接上文一文教你从Linux内核角度探秘JDK NIO文件读写本质(上)
10. JDK NIO 对普通文件的写入
        FileChannel fileChannel = new RandomAccessFile(new File("file-read-write.txt"), "rw").getChannel();
        ByteBuffer  heapByteBuffer = ByteBuffer.allocate(4096);
        fileChannel.write(heapByteBuffer);
在对文件进行读写之前,我们需要首先利用 RandomAccessFile 在内核中打开指定的文件 file-read-write.txt ,并获取到它的文件描述符 fd = 5000。
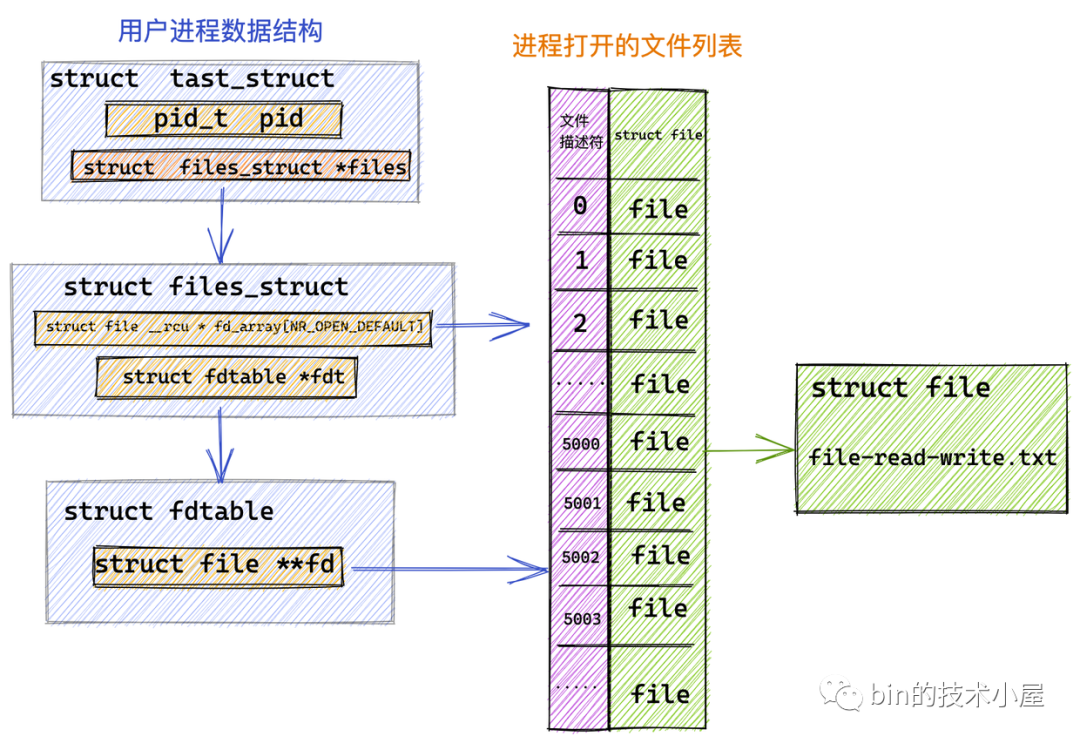
image.png
本例 heapByteBuffer 中存放着需要写入文件的内容,随后来到 FileChannelImpl 实现类调用 IOUtil 触发底层系统调用 write 来写入文件。
public class FileChannelImpl extends FileChannel {
  // 前边介绍打开的文件描述符 5000
  private final FileDescriptor fd;
  // NIO中用它来触发 native read 和 write 的系统调用
  private final FileDispatcher nd;
  // 读写文件时加锁,前边介绍 FileChannel 的读写方法均是线程安全的
  private final Object positionLock = new Object();

    public int write(ByteBuffer src) throws IOException {
        ensureOpen();
        if (!writable)
            throw new NonWritableChannelException();
        synchronized (positionLock) {
            //写入的字节数
            int n = 0;
            try {
                ......省略......
                if (!isOpen())
                    return 0;
                do {
                    n = IOUtil.write(fd, src, -1, nd);
                } while ((n == IOStatus.INTERRUPTED) && isOpen());
                // 返回写入的字节数
                return IOStatus.normalize(n);
            } finally {
                  ......省略......
            }
        }
    }

}
NIO 中的所有 IO 操作全部封装在 IOUtil 类中,而 NIO 中的 SocketChannel 以及这里介绍的 FileChannel 底层依赖的系统调用可能不同,这里会通过 NativeDispatcher 对具体 Channel 操作实现分发,调用具体的系统调用。对于 FileChannel 来说 NativeDispatcher 的实现类为 FileDispatcher。对于 SocketChannel 来说 NativeDispatcher 的实现类为 SocketDispatcher。
public class IOUtil {

    static int write(FileDescriptor fd, ByteBuffer src, long position,
                     NativeDispatcher nd)
        throws IOException
    {
        // 标记传递进来的 heapByteBuffer 的 position 位置用于后续恢复
        int pos = src.position();
        // 获取 heapByteBuffer 的 limit 用于计算 写入字节数
        int lim = src.limit();
        assert (pos <= lim);
        // 写入的字节数
        int rem = (pos <= lim ? lim - pos : 0);
        // 创建临时的 DirectByteBuffer,用于通过系统调用 write 写入数据到内核
        ByteBuffer bb = Util.getTemporaryDirectBuffer(rem);
        try {
            // 将 heapByteBuffer 中的内容拷贝到临时 DirectByteBuffer 中
            bb.put(src);
            // DirectByteBuffer 切换为读模式,用于后续发送数据
            bb.flip();
            // 恢复 heapByteBuffer 中的 position
            src.position(pos);

            int n = writeFromNativeBuffer(fd, bb, position, nd);
            if (n > 0) {
                // 此时 heapByteBuffer 中的内容已经发送完毕,更新它的 postion + n
                // 这里表达的语义是从 heapByteBuffer 中读取了 n 个字节并发送成功
                src.position(pos + n);
            }
            // 返回发送成功的字节数
            return n;
        } finally {
            // 释放临时创建的 DirectByteBuffer
            Util.offerFirstTemporaryDirectBuffer(bb);
        }
    }

   private static int writeFromNativeBuffer(FileDescriptor fd, ByteBuffer bb,
                                             long position, NativeDispatcher nd)
        throws IOException
    {
        int pos = bb.position();
        int lim = bb.limit();
        assert (pos <= lim);
        // 要发送的字节数
        int rem = (pos <= lim ? lim - pos : 0);

        int written = 0;
        if (rem == 0)
            return 0;
        if (position != -1) {
             ........省略.......
        } else {
            written = nd.write(fd, ((DirectBuffer)bb).address() + pos, rem);
        }
        if (written > 0)
            // 发送完毕之后更新 DirectByteBuffer 的position
            bb.position(pos + written);
        // 返回写入的字节数
        return written;
    }
}
在 IOUtil 中首先创建一个临时的 DirectByteBuffer,然后将本例中 HeapByteBuffer 中的数据全部拷贝到这个临时的 DirectByteBuffer 中。这个 DirectByteBuffer 就是我们在 IO 系统调用中经常提到的用户空间缓冲区。
随后在 writeFromNativeBuffer 方法中通过 FileDispatcher 触发 JNI 层的 native 方法执行底层系统调用 write 。
class FileDispatcherImpl extends FileDispatcher {

   int write(FileDescriptor fd, long address, int len) throws IOException {
        return write0(fd, address, len);
    }

  static native int write0(FileDescriptor fd, long address, int len)
        throws IOException;
}
NIO 中关于文件 IO 相关的系统调用全部封装在 JNI 层中的 FileDispatcherImpl.c 文件中。里边定义了各种 IO 相关的系统调用的 native 方法。
// FileDispatcherImpl.c 文件
JNIEXPORT jint JNICALL
Java_sun_nio_ch_FileDispatcherImpl_write0(JNIEnv *env, jclass clazz,
                              jobject fdo, jlong address, jint len)
{
    jint fd = fdval(env, fdo);
    void *buf = (void *)jlong_to_ptr(address);
    // 发起 write 系统调用进入内核
    return convertReturnVal(env, write(fd, buf, len), JNI_FALSE);
}
系统调用 write 在内核中的定义如下所示:
SYSCALL_DEFINE3(write, unsigned int, fd, const char __user *, buf,
    size_t, count)
{
  struct fd f = fdget_pos(fd);
         ......
  loff_t pos = file_pos_read(f.file);
  ret = vfs_write(f.file, buf, count, &pos);
         ......
}
现在我们就从用户空间的 JDK NIO 这一层逐步来到了内核空间的边界处 --- OS 系统调用 write 这里,马上就要进入内核了。
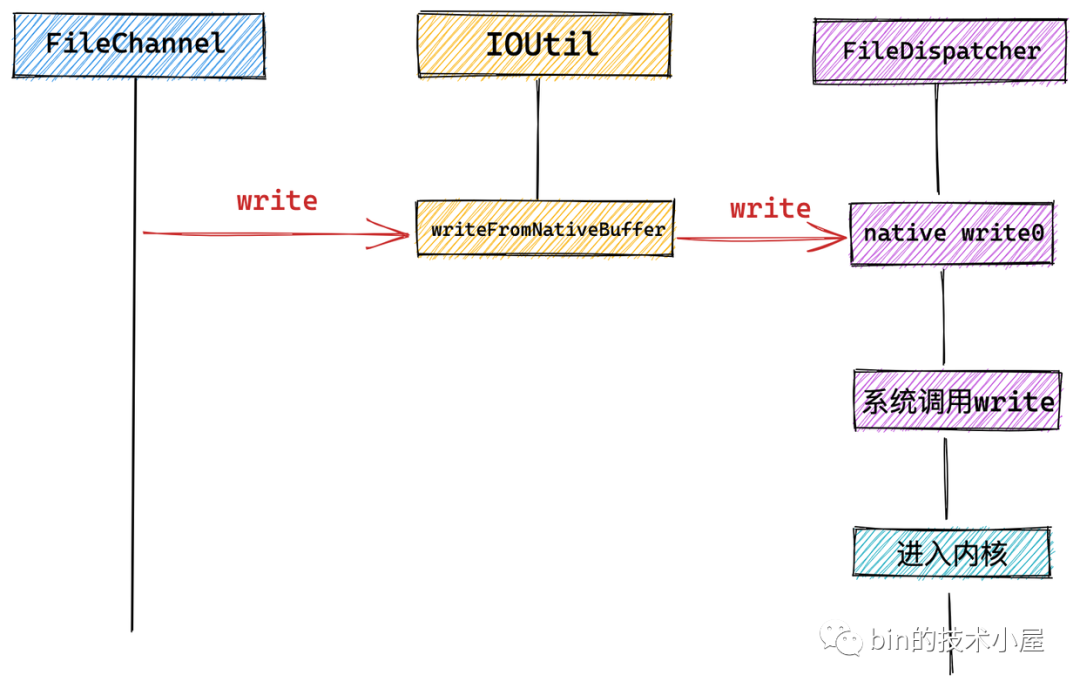
image.png
这一次我们来看一下当系统调用 write 发起之后,用户进程在内核态具体做了哪些事情?
资料直通车:Linux内核源码技术学习路线+视频教程内核源码
学习直通车:Linux内核源码内存调优文件系统进程管理设备驱动/网络协议栈
11. 从内核角度探秘文件写入本质
现在让我们再次进入内核,来看一下内核中具体是如何处理文件写入操作的,这个过程会比文件读取要复杂很多,大家需要有点耐心~~
再次强调一下,本文所举示例中用到的 HeapByteBuffer 只是为了与上篇文章 《一步一图带你深入剖析 JDK NIO ByteBuffer 在不同字节序下的设计与实现》介绍的内容做出呼应,并不是最佳实践。笔者会在后续的文章中一步一步为大家展开这块内容的最佳实践。
11.1 Buffered IO
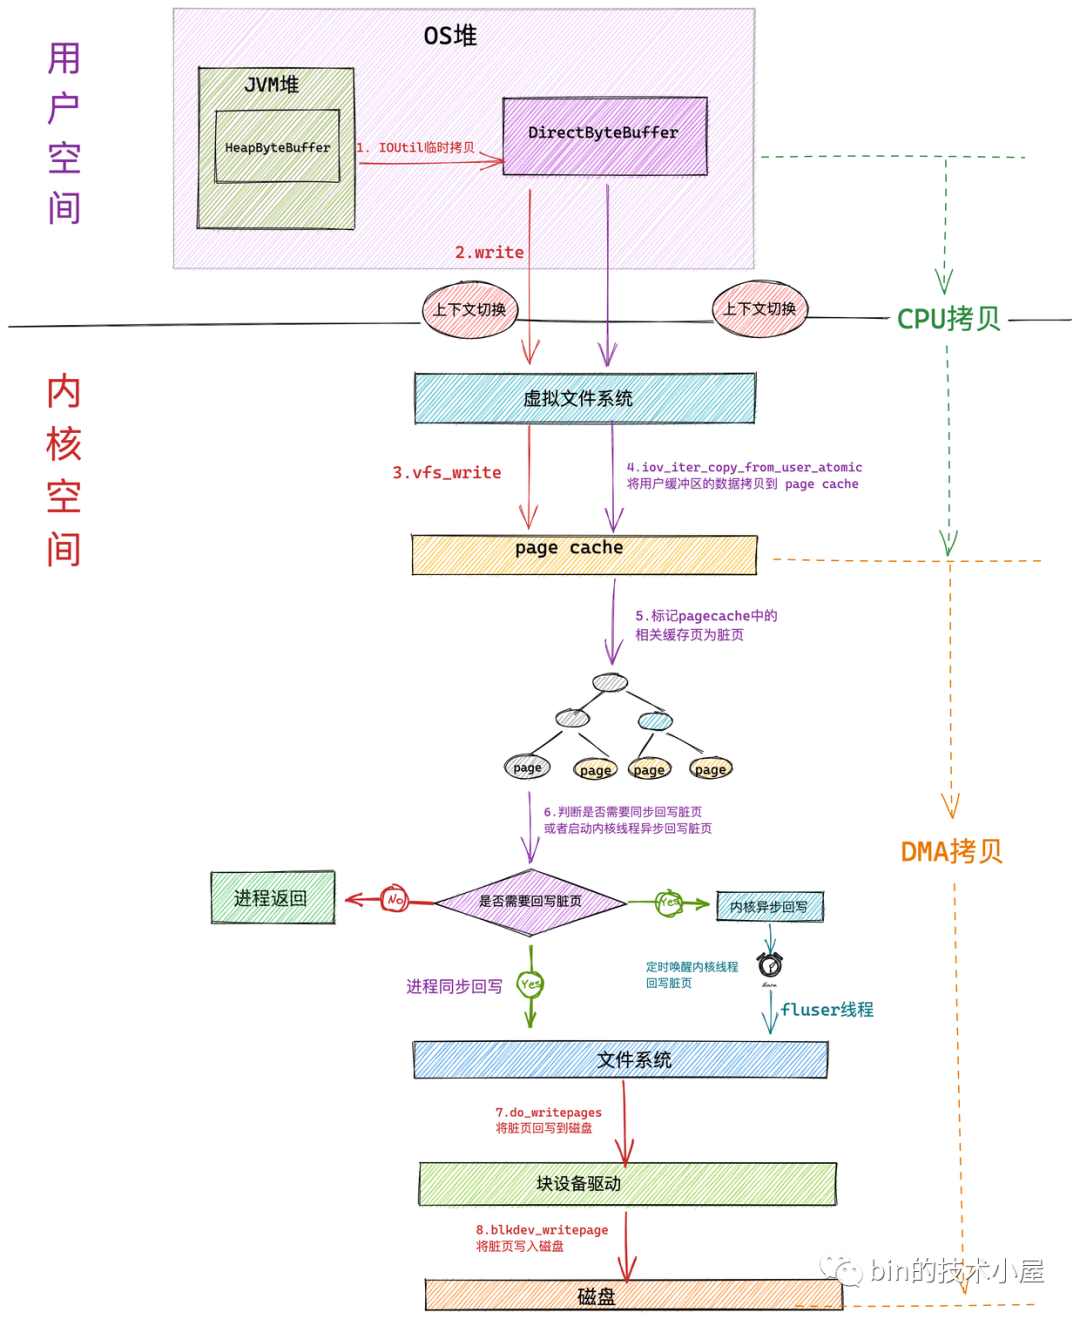
image.png
使用 JDK NIO 中的 HeapByteBuffer 在对文件进行写入的过程,主要分为如下几个核心步骤:
-
首先会在用户空间的 JDK 层将位于 JVM 堆中的 HeapByteBuffer 中的待写入数据拷贝到位于 OS 堆中的 DirectByteBuffer 中。这里发生第一次拷贝
-
随后 NIO 会在用户态通过系统调用 write 发起文件写入的请求,此时发生第一次上下文切换。
-
随后用户进程进入内核态,在虚拟文件系统层调用 vfs_write 触发对 page cache 写入的操作。相关操作封装在 generic_perform_write 函数中。这个后面笔者会细讲,这里我们只关注核心总体流程。
-
内核调用 iov_iter_copy_from_user_atomic 函数将用户空间缓冲区 DirectByteBuffer 中的待写入数据拷贝到 page cache 中。发生第二次拷贝动作,这里的操作就是我们常说的 CPU 拷贝。
-
当待写入数据拷贝到 page cache 中时,内核会将对应的文件页标记为脏页。
脏页表示内存中的数据要比磁盘中对应文件数据要新。
-
此时内核会根据一定的阈值判断是否要对 page cache 中的脏页进行回写,如果不需要同步回写,进程直接返回。文件写入操作完成。这里发生第二次上下文切换
从这里我们看到在对文件进行写入时,内核只会将数据写入到 page cache 中。整个写入过程就完成了,并不会写到磁盘中。
-
脏页回写又会根据脏页数量在内存中的占比分为:进程同步回写和内核异步回写。当脏页太多了,进程自己都看不下去的时候,会同步回写内存中的脏页,直到回写完毕才会返回。在回写的过程中会发生第三次拷贝,通过DMA 将 page cache 中的脏页写入到磁盘中。
所谓内核异步回写就是内核会定时唤醒一个 flusher 线程,定时将内存中的脏页回写到磁盘中。这部分的内容笔者会在后续的章节中详细讲解。
在 NIO 使用 HeapByteBuffer 在对文件进行写入的过程中,一般只会发生两次拷贝动作和两次上下文切换,因为内核将数据拷贝到 page cache 中后,文件写入过程就结束了。如果脏页在内存中的占比太高了,达到了进程同步回写的阈值,那么就会发生第三次 DMA 拷贝,将脏页数据回写到磁盘文件中。
如果进程需要同步回写脏页数据时,在本例中是要发生三次拷贝动作。但一般情况下,在本例中只会发生两次,没有第三次的 DMA 拷贝。
11.2 Direct IO
在 JDK 10 中我们可以通过如下的方式采用 Direct IO 模式打开文件:
FileChannel fc = FileChannel.open(p, StandardOpenOption.WRITE,
             ExtendedOpenOption.DIRECT)
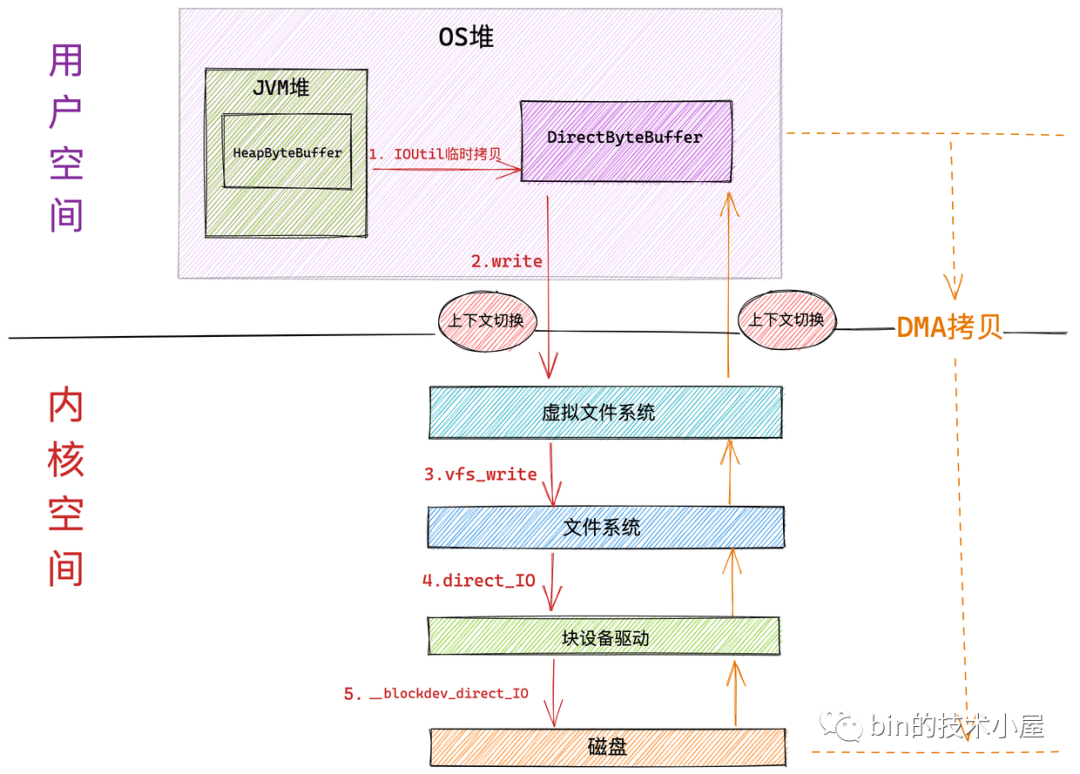
image.png
在 Direct IO 模式下的文件写入操作最明显的特点就是绕过 page cache 直接通过 DMA 拷贝将用户空间缓冲区 DirectByteBuffer 中的待写入数据写入到磁盘中。
-
同样发生两次上下文切换、
-
在本例中只会发生两次数据拷贝,第一次是将 JVM 堆中的 HeapByteBuffer 中的待写入数据拷贝到位于 OS 堆中的 DirectByteBuffer 中。第二次则是 DMA 拷贝,将用户空间缓冲区 DirectByteBuffer 中的待写入数据写入到磁盘中。
12. Talk is cheap ! show you the code
下面是系统调用 write 在内核中的完整定义:
SYSCALL_DEFINE3(write, unsigned int, fd, const char __user *, buf,
    size_t, count)
{
  // 根据文件描述符获取文件对应的 struct file 结构
  struct fd f = fdget_pos(fd);
         ......
  // 获取当前文件的写入位置 offset
  loff_t pos = file_pos_read(f.file);
  // 进入虚拟文件系统层,执行具体的文件写入操作
  ret = vfs_write(f.file, buf, count, &pos);
         ......
}
这里和文件读取的流程基本一样,也是通过 vfs_write 进入虚拟文件系统层。
ssize_t __vfs_write(struct file *file, const char __user *p, size_t count,
        loff_t *pos)
{
  if (file->f_op->write)
    return file->f_op->write(file, p, count, pos);
  else if (file->f_op->write_iter)
    return new_sync_write(file, p, count, pos);
  else
    return -EINVAL;
}
在虚拟文件系统层,通过 struct file 中定义的函数指针 file_operations 在具体的文件系统中执行相应的文件 IO 操作。我们还是以 ext4 文件系统为例。
struct file {
    const struct file_operations  *f_op;
}
在 ext4 文件系统中 .write_iter 函数指针指向的是 ext4_file_write_iter 函数执行具体的文件写入操作。
const struct file_operations ext4_file_operations = {

      ......省略........

      .read_iter  = ext4_file_read_iter,
      .write_iter  = ext4_file_write_iter,

      ......省略.........
}
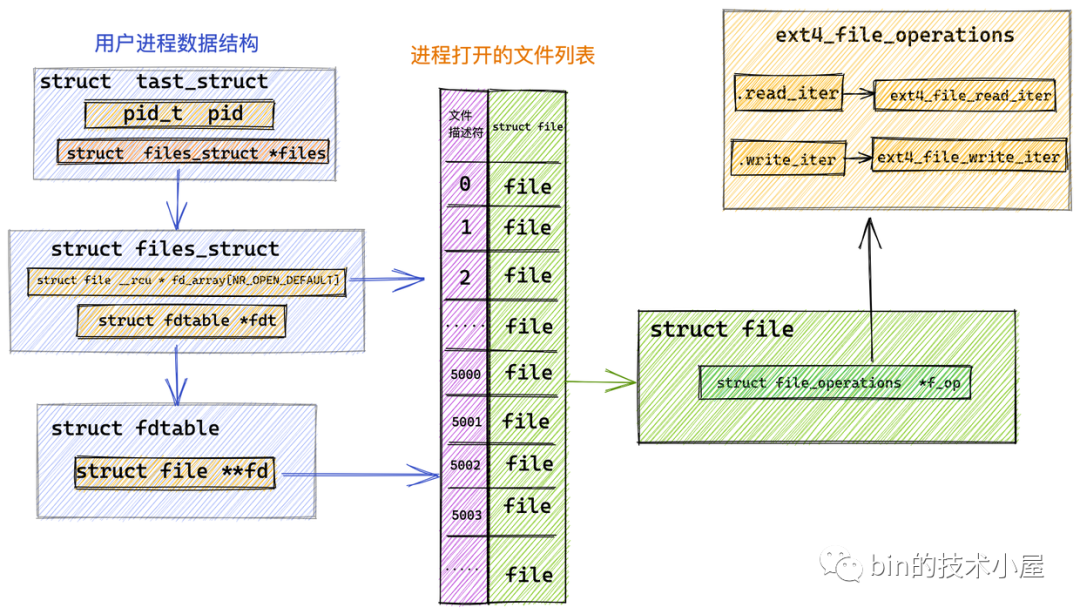
image.png
由于 ext4_file_operations 中只定义了 .write_iter 函数指针,所以在 __vfs_write 函数中流程进入 else if {......} 分支来到 new_sync_write 函数中:
static ssize_t new_sync_write(struct file *filp, const char __user *buf, size_t len, loff_t *ppos)
{
    // 将 DirectByteBuffer 以及要写入的字节数封装进 iovec 结构体中
 struct iovec iov = { .iov_base = (void __user *)buf, .iov_len = len };
    // 用来封装文件 IO 相关操作的状态和进度信息:
 struct kiocb kiocb;
    // 用来封装用用户缓存区 DirectByteBuffer 的相关的信息
 struct iov_iter iter;
 ssize_t ret;
    // 利用文件 struct file 初始化 kiocb 结构体
 init_sync_kiocb(&kiocb, filp);
    // 设置文件写入偏移位置
 kiocb.ki_pos = (ppos ? *ppos : 0);
 iov_iter_init(&iter, WRITE, &iov, 1, len);
    // 调用 ext4_file_write_iter
 ret = call_write_iter(filp, &kiocb, &iter);
 BUG_ON(ret == -EIOCBQUEUED);
 if (ret > 0 && ppos)
  *ppos = kiocb.ki_pos;
 return ret;
}
在文件读取的相关章节中,我们介绍了用于封装传递进来的用户空间缓冲区 DirectByteBuffer 相关信息的 struct iovec 结构体,也介绍了用于封装文件 IO 相关操作的状态和进度信息的 struct kiocb 结构体,这里笔者不在赘述。
不过在这里笔者还是想强调的一下,内核中一般会使用 struct iov_iter 结构体对 struct iovec 进行包装,iov_iter 中包含多个 iovec。
struct iov_iter {
        ......省略.....
 const struct iovec *iov;
}
这是为了兼容 readv() ,writev() 等系统调用,它允许用户使用多个缓存区去读取文件中的数据或者从多个缓冲区中写入数据到文件中。
-
JDK NIO Channel 支持的 Scatter 操作底层原理就是 readv 系统调用。
-
JDK NIO Channel 支持的 Gather 操作底层原理就是 writev 系统调用。
       FileChannel fileChannel = new RandomAccessFile(new File("file-read-write.txt"), "rw").getChannel();

       ByteBuffer  heapByteBuffer1 = ByteBuffer.allocate(4096);
       ByteBuffer  heapByteBuffer2 = ByteBuffer.allocate(4096);

       ByteBuffer[] gather = { heapByteBuffer1, heapByteBuffer2 };

       fileChannel.write(gather);
最终在 call_write_iter 中触发 ext4_file_write_iter 的调用,从虚拟文件系统层进入到具体文件系统 ext4 中。
static inline ssize_t call_write_iter(struct file *file, struct kiocb *kio,
          struct iov_iter *iter)
{
 return file->f_op->write_iter(kio, iter);
}
static ssize_t
ext4_file_write_iter(struct kiocb *iocb, struct iov_iter *from)
{
        ..........省略..........
 ret = __generic_file_write_iter(iocb, from);
 return ret;
}
我们看到在文件系统 ext4 中调用的是 __generic_file_write_iter 方法。内核针对文件写入的所有逻辑都封装在这里。
ssize_t __generic_file_write_iter(struct kiocb *iocb, struct iov_iter *from)
{
 struct file *file = iocb->ki_filp;
 struct address_space * mapping = file->f_mapping;
 struct inode  *inode = mapping->host;
 ssize_t  written = 0;
 ssize_t  err;
 ssize_t  status;

        ........省略基本校验逻辑和更新文件原数据逻辑........

 if (iocb->ki_flags & IOCB_DIRECT) {
  loff_t pos, endbyte;
        // Direct IO
  written = generic_file_direct_write(iocb, from);
         .......省略......
 } else {
        // Buffered IO
  written = generic_perform_write(file, from, iocb->ki_pos);
  if (likely(written > 0))
   iocb->ki_pos += written;
 }
           .......省略......
    // 返回写入文件的字节数 或者 错误
    return written ? written : err;
}
这里和我们在介绍文件读取时候提到的 generic_file_read_iter 函数中的逻辑是一样的。都会处理 Direct IO 和 Buffered IO 的场景。
这里对于 Direct IO 的处理都是一样的,在 generic_file_direct_write 中也是会调用 address_space 中的 address_space_operations 定义的 .direct_IO 函数指针来绕过 page cache 直接写入磁盘。
struct address_space {
    const struct address_space_operations *a_ops;
}
written = mapping->a_ops->direct_IO(iocb, from);

image.png
在 ext4 文件系统中实现 Direct IO 的函数是 ext4_direct_IO,这里直接会调用到块设备驱动层,通过 do_blockdev_direct_IO 直接将用户空间缓冲区 DirectByteBuffer 中的内容写入磁盘中。do_blockdev_direct_IO 函数会等到所有的 Direct IO 写入到磁盘之后才会返回。
static const struct address_space_operations ext4_aops = {
  .direct_IO  = ext4_direct_IO,
};
Direct IO 是由 DMA 直接从用户空间缓冲区 DirectByteBuffer 中拷贝到磁盘中。
下面我们主要介绍下 Buffered IO 的写入逻辑 generic_perform_write 方法。
12.1 Buffered IO

image.png
ssize_t generic_perform_write(struct file *file,
    struct iov_iter *i, loff_t pos)
{
    // 获取 page cache。数据将会被写入到这里
 struct address_space *mapping = file->f_mapping;
    // 获取 page cache 相关的操作函数
 const struct address_space_operations *a_ops = mapping->a_ops;
 long status = 0;
 ssize_t written = 0;
 unsigned int flags = 0;

 do {
        // 用于引用要写入的文件页
  struct page *page;
        // 要写入的文件页在 page cache 中的 index
  unsigned long offset; /* Offset into pagecache page */
  unsigned long bytes; /* Bytes to write to page */
  size_t copied;  /* Bytes copied from user */

  offset = (pos & (PAGE_SIZE - 1));
  bytes = min_t(unsigned long, PAGE_SIZE - offset,
      iov_iter_count(i));

again:
        // 检查用户空间缓冲区 DirectByteBuffer 地址是否有效
  if (unlikely(iov_iter_fault_in_readable(i, bytes))) {
   status = -EFAULT;
   break;
  }
        // 从 page cache 中获取要写入的文件页并准备记录文件元数据日志工作
  status = a_ops->write_begin(file, mapping, pos, bytes, flags,
      &page, &fsdata);
        // 将用户空间缓冲区 DirectByteBuffer 中的数据拷贝到 page cache 中的文件页中
  copied = iov_iter_copy_from_user_atomic(page, i, offset, bytes);
  flush_dcache_page(page);
       // 将写入的文件页标记为脏页并完成文件元数据日志的写入
  status = a_ops->write_end(file, mapping, pos, bytes, copied,
      page, fsdata);
        // 更新文件 ppos
  pos += copied;
  written += copied;
        // 判断是否需要回写脏页
  balance_dirty_pages_ratelimited(mapping);
 } while (iov_iter_count(i));
    // 返回写入字节数
 return written ? written : status;
}
由于本文中笔者是以 ext4 文件系统为例来介绍文件的读写流程,本小节中介绍的文件写入流程涉及到与文件系统相关的两个操作:write_begin,write_end。这两个函数在不同的文件系统中都有不同的实现,在不同的文件系统中,写入每一个文件页都需要调用一次 write_begin,write_end 这两个方法。
static const struct address_space_operations ext4_aops = {
          ......省略.......
  .write_begin    = ext4_write_begin,
  .write_end    = ext4_write_end,
         ......省略.......
}
下图为本文中涉及文件读写的所有内核数据结构图:
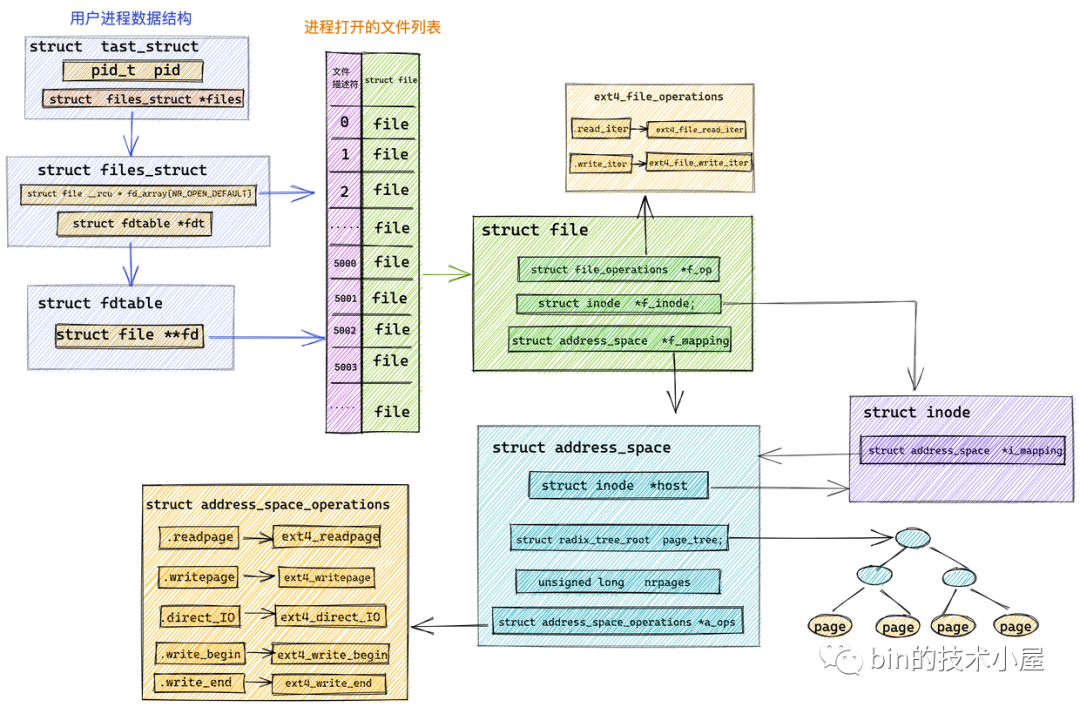
image.png
经过前边介绍文件读取的章节我们知道在读取文件的时候都是先从 page cache 中读取,如果 page cache 正好缓存了文件页就直接返回。如果没有在进行磁盘 IO。
文件的写入过程也是一样,内核会将用户缓冲区 DirectByteBuffer 中的待写数据先拷贝到 page cache 中,写完就直接返回。后续内核会根据一定的规则把这些文件页回写到磁盘中。
从这个过程我们可以看出,内核将数据先是写入 page cache 中但是不会立刻写入磁盘中,如果突然断电或者系统崩溃就可能导致文件系统处于不一致的状态。
为了解决这种场景,于是 linux 内核引入了 ext3 , ext4 等日志文件系统。而日志文件系统比非日志文件系统在磁盘中多了一块 Journal 区域,Journal 区域就是存放管理文件元数据和文件数据操作日志的磁盘区域。
-
文件元数据的日志用于恢复文件系统的一致性。
-
文件数据的日志用于防止系统故障造成的文件内容损坏,
ext3 , ext4 等日志文件系统分为三种模式,我们可以在挂载的时候选择不同的模式。
-
日志模式(Journal 模式):这种模式在将数据写入文件系统前,必须等待元数据和数据的日志已经落盘才能发挥作用。这样性能比较差,但是最安全。
-
顺序模式(Order 模式):在 Order 模式不会记录数据的日志,只会记录元数据的日志,但是在写元数据的日志前,必须先确保数据已经落盘。这样可以减少文件内容损坏的机会,这种模式是对性能的一种折中,是默认模式。
-
回写模式(WriteBack 模式):WriteBack 模式 和 Order 模式一样它们都不会记录数据的日志,只会记录元数据的日志,不同的是在 WriteBack 模式下不会保证数据比元数据先落盘。这个性能最好,但是最不安全。
而 write_begin,write_end 正是对文件系统中相关日志的操作,在 ext4 文件系统中对应的是 ext4_write_begin,ext4_write_end。下面我们就来看一下在 Buffered IO 模式下对于 ext4 文件系统中的文件写入的核心步骤。
12.2 ext4_write_begin
static int ext4_write_begin(struct file *file, struct address_space *mapping,
       loff_t pos, unsigned len, unsigned flags,
       struct page **pagep, void **fsdata)
{
 struct inode *inode = mapping->host;
 struct page *page;
 pgoff_t index;

        ...........省略.......

retry_grab:
    // 从 page cache 中查找要写入文件页
 page = grab_cache_page_write_begin(mapping, index, flags);
 if (!page)
  return -ENOMEM;
 unlock_page(page);

retry_journal:
    // 相关日志的准备工作
 handle = ext4_journal_start(inode, EXT4_HT_WRITE_PAGE, needed_blocks);

         ...........省略.......
在写入文件数据之前,内核在 ext4_write_begin 方法中调用 ext4_journal_start 方法做一些相关日志的准备工作。
还有一个重要的事情是在 grab_cache_page_write_begin 方法中从 page cache 中根据 index 查找要写入数据的文件缓存页。
struct page *grab_cache_page_write_begin(struct address_space *mapping,
          pgoff_t index, unsigned flags)
{
  struct page *page;
  int fgp_flags = FGP_LOCK|FGP_WRITE|FGP_CREAT;
  // 在 page cache 中查找写入数据的缓存页
  page = pagecache_get_page(mapping, index, fgp_flags,
      mapping_gfp_mask(mapping));
  if (page)
    wait_for_stable_page(page);
  return page;
}
通过 pagecache_get_page 在 page cache 中查找要写入数据的缓存页。如果缓存页不在 page cache 中,内核则会首先会在物理内存中分配一个内存页,然后将新分配的内存页加入到 page cache 中。
相关的查找过程笔者已经在 《8. page cache 中查找缓存页》小节中详细介绍过了,这里不在赘述。
12.3 iov_iter_copy_from_user_atomic
这里就是写入过程的关键所在,图中描述的 CPU 拷贝是将用户空间缓存区 DirectByteBuffer 中的待写入数据拷贝到内核里的 page cache 中,这个过程就发生在这里。
size_t iov_iter_copy_from_user_atomic(struct page *page,
    struct iov_iter *i, unsigned long offset, size_t bytes)
{
  // 将缓存页临时映射到内核虚拟地址空间的高端地址上
  char *kaddr = kmap_atomic(page),
  *p = kaddr + offset;
  // 将用户缓存区 DirectByteBuffer 中的待写入数据拷贝到文件缓存页中
  iterate_all_kinds(i, bytes, v,
    copyin((p += v.iov_len) - v.iov_len, v.iov_base, v.iov_len),
    memcpy_from_page((p += v.bv_len) - v.bv_len, v.bv_page,
         v.bv_offset, v.bv_len),
    memcpy((p += v.iov_len) - v.iov_len, v.iov_base, v.iov_len)
  )
  // 解除内核虚拟地址空间与缓存页之间的临时映射,这里映射只是为了拷贝数据用
  kunmap_atomic(kaddr);
  return bytes;
}
但是这里不能直接进行拷贝,因为此时从 page cache 中取出的缓存页 page 是物理地址,而在内核中是不能够直接操作物理地址的,只能操作虚拟地址。
那怎么办呢?所以就需要调用 kmap_atomic 将缓存页临时映射到内核空间的一段虚拟地址上,然后将用户空间缓存区 DirectByteBuffer 中的待写入数据通过这段映射的虚拟地址拷贝到 page cache 中的相应缓存页中。这时文件的写入操作就已经完成了。
从这里我们看出,内核对于文件的写入只是将数据写入到 page cache 中就完事了并没有真正地写入磁盘。
由于是临时映射,所以在拷贝完成之后,调用 kunmap_atomic 将这段映射再解除掉。
12.4 ext4_write_end
static int ext4_write_end(struct file *file,
     struct address_space *mapping,
     loff_t pos, unsigned len, unsigned copied,
     struct page *page, void *fsdata)
{
     handle_t *handle = ext4_journal_current_handle();
     struct inode *inode = mapping->host;

        ......省略.......
        // 将写入的缓存页在 page cache 中标记为脏页
        copied = block_write_end(file, mapping, pos, len, copied, page, fsdata);

        ......省略.......
        // 完成相关日志的写入
        ret2 = ext4_journal_stop(handle);

        ......省略.......
}
在这里会对文件的写入流程做一些收尾的工作,比如在 block_write_end 方法中会调用 mark_buffer_dirty 将写入的缓存页在 page cache 中标记为脏页。后续内核会根据一定的规则将 page cache 中的这些脏页回写进磁盘中。
具体的标记过程笔者已经在《7.1 radix_tree 的标记》小节中详细介绍过了,这里不在赘述。
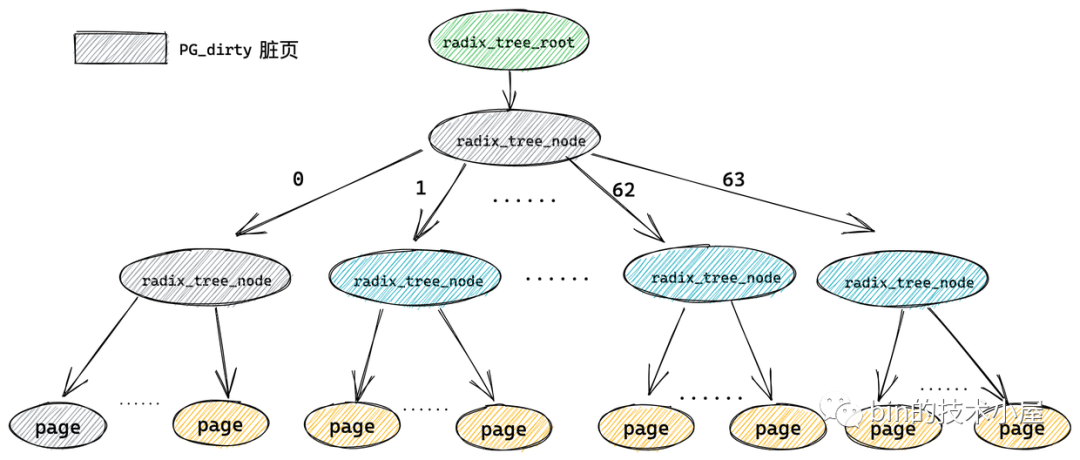
image.png
另一个核心的步骤就是调用 ext4_journal_stop 完成相关日志的写入。这里日志也只是会先写到缓存里,不会直接落盘。
12.5 balance_dirty_pages_ratelimited
当进程将待写数据写入 page cache 中之后,相应的缓存页就变为了脏页,我们需要找一个时机将这些脏页回写到磁盘中。防止断电导致数据丢失。
本小节我们主要聚焦于脏页回写的主体流程,相应细节部分以及内核对脏页的回写时机我们放在下一小节中在详细为大家介绍。
void balance_dirty_pages_ratelimited(struct address_space *mapping)
{
  struct inode *inode = mapping->host;
  struct backing_dev_info *bdi = inode_to_bdi(inode);
  struct bdi_writeback *wb = NULL;
  int ratelimit;
    ......省略......
  if (unlikely(current->nr_dirtied >= ratelimit))
    balance_dirty_pages(mapping, wb, current->nr_dirtied);
   ......省略......
}
在 balance_dirty_pages_ratelimited 会判断如果脏页数量在内存中达到了一定的规模 ratelimit 就会触发 balance_dirty_pages 回写脏页逻辑。
static void balance_dirty_pages(struct address_space *mapping,
                struct bdi_writeback *wb,
                unsigned long pages_dirtied)
{
    .......根据内核异步回写阈值判断是否需要唤醒 flusher 线程异步回写脏页...

    if (nr_reclaimable > gdtc->bg_thresh)
        wb_start_background_writeback(wb);
}
如果达到了脏页回写的条件,那么内核就会唤醒 flusher 线程去将这些脏页异步回写到磁盘中。
void wb_start_background_writeback(struct bdi_writeback *wb)
{
  /*
   * We just wake up the flusher thread. It will perform background
   * writeback as soon as there is no other work to do.
   */
  wb_wakeup(wb);
}
13. 内核回写脏页的触发时机
经过前边对文件写入过程的介绍我们看到,用户进程在对文件进行写操作的时候只是将待写入数据从用户空间的缓冲区 DirectByteBuffer 写入到内核中的 page cache 中就结束了。后面内核会对脏页进行延时写入到磁盘中。
当 page cache 中的缓存页比磁盘中对应的文件页的数据要新时,就称这些缓存页为脏页。
延时写入的好处就是进程可以多次频繁的对文件进行写入但都是写入到 page cache 中不会有任何磁盘 IO 发生。随后内核可以将进程的这些多次写入操作转换为一次磁盘 IO ,将这些写入的脏页一次性刷新回磁盘中,这样就把多次磁盘 IO 转换为一次磁盘 IO 极大地提升文件 IO 的性能。
那么内核在什么情况下才会去触发 page cache 中的脏页回写呢?
-
内核在初始化的时候,会创建一个 timer 定时器去定时唤醒内核 flusher 线程回写脏页。
-
当内存中脏页的数量太多了达到了一定的比例,就会主动唤醒内核中的 flusher 线程去回写脏页。
-
脏页在内存中停留的时间太久了,等到 flusher 线程下一次被唤醒的时候就会回写这些驻留太久的脏页。
-
用户进程可以通过 sync() 回写内存中的所有脏页和 fsync() 回写指定文件的所有脏页,这些是进程主动发起脏页回写请求。
-
在内存比较紧张的情况下,需要回收物理页或者将物理页中的内容 swap 到磁盘上时,如果发现通过页面置换算法置换出来的页是脏页,那么就会触发回写。
现在我们了解了内核回写脏页的一个大概时机,这里大家可能会问了:
-
内核通过 timer 定时唤醒 flush 线程回写脏页,那么到底间隔多久唤醒呢?
-
内存中的脏页数量太多会触发回写,那么这里的太多指的具体是多少呢?
-
脏页在内存中驻留太久也会触发回写,那么这里的太久指的到底是多久呢?
其实这三个问题中涉及到的具体数值,内核都提供了参数供我们来配置。这些参数的配置文件存在于 proc/sys/vm 目录下:
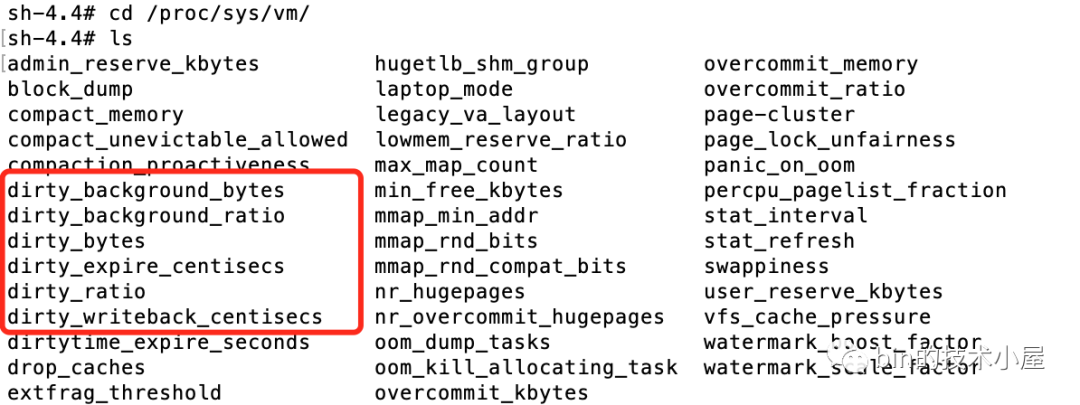
image.png
下面笔者就为大家介绍下内核回写脏页涉及到的这 6 个参数,并解答上面我们提出的这三个问题。
13.1 内核中的定时器间隔多久唤醒 flusher 线程
内核中通过 dirty_writeback_centisecs 参数来配置唤醒 flusher 线程的间隔时间。

image.png
该参数可以通过修改 /proc/sys/vm/dirty_writeback_centisecs 文件来配置参数,我们也可以通过 sysctl 命令或者通过修改 /etc/sysctl.conf 配置文件来对这些参数进行修改。
这里我们先主要关注这些内核参数的含义以及源码实现,文章后面笔者有一个专门的章节来介绍这些内核参数各种不同的配置方式。
dirty_writeback_centisecs 内核参数的默认值为 500。单位为 0.01 s。也就是说内核会每隔 5s 唤醒一次 flusher 线程来执行相关脏页的回写。该参数在内核源码中对应的变量名为 dirty_writeback_interval。
笔者这里在列举一个生活中的例子来解释下这个 dirty_writeback_interval 的作用。
假设大家的工作都非常繁忙,于是大家就到家政公司请了专门的保洁阿姨(内核 flusher 回写线程)来帮助我们打扫房间卫生(回写脏页)。你和保洁阿姨约定每周(dirty_writeback_interval)来你房间(内存)打扫一次卫生(回写脏页),保洁阿姨会固定每周日按时来到你房间打扫。记住这个例子,我们后面还会用到~~~
13.2 内核中如何使用 dirty_writeback_interval 来控制 flusher 唤醒频率
在磁盘中数据是以块的形式存储于扇区中的,前边在介绍文件读写的章节中,读写流程的最后都会从文件系统层到块设备驱动层,由块设备驱动程序将数据写入对应的磁盘块中存储。
内存中的文件页对应于磁盘中的一个数据块,而这块磁盘就是我们常说的块设备。而每个块设备在内核中对应一个 backing_dev_info 结构用于存储相关信息。其中最重要的信息是 workqueue_struct *bdi_wq 用于缓存块设备上所有的回写脏页异步任务的队列。
/* bdi_wq serves all asynchronous writeback tasks */
struct workqueue_struct *bdi_wq;

static int __init default_bdi_init(void)
{
 int err;
    // 创建 bdi_wq 队列
 bdi_wq = alloc_workqueue("writeback", WQ_MEM_RECLAIM | WQ_FREEZABLE |
           WQ_UNBOUND | WQ_SYSFS, 0);
 if (!bdi_wq)
  return -ENOMEM;
    // 初始化 backing_dev_info
 err = bdi_init(&noop_backing_dev_info);

 return err;
}
在系统启动的时候,内核会调用 default_bdi_init 来创建 bdi_wq 队列和初始化 backing_dev_info。
static int bdi_init(struct backing_dev_info *bdi)
{
 int ret;

 bdi->dev = NULL;
    // 初始化 backing_dev_info 相关信息
 kref_init(&bdi->refcnt);
 bdi->min_ratio = 0;
 bdi->max_ratio = 100;
 bdi->max_prop_frac = FPROP_FRAC_BASE;
 INIT_LIST_HEAD(&bdi->bdi_list);
 INIT_LIST_HEAD(&bdi->wb_list);
 init_waitqueue_head(&bdi->wb_waitq);
    // 这里会设置 flusher 线程的定时器 timer
 ret = cgwb_bdi_init(bdi);
 return ret;
}
在 bdi_init 中初始化 backing_dev_info 结构的相关信息,并在 cgwb_bdi_init 中调用 wb_init 初始化回写脏页任务 bdi_writeback *wb,并创建一个 timer 用于定时启动 flusher 线程。
static int wb_init(struct bdi_writeback *wb, struct backing_dev_info *bdi,
       int blkcg_id, gfp_t gfp)
{
  ......... 初始化 bdi_writeback 结构该结构表示回写脏页任务相关信息.....

  // 创建 timer 定时执行 flusher 线程
  INIT_DELAYED_WORK(&wb->dwork, wb_workfn);

   ......
}


#define __INIT_DELAYED_WORK(_work, _func, _tflags)      \
  do {                \
    INIT_WORK(&(_work)->work, (_func));      \
    __setup_timer(&(_work)->timer, delayed_work_timer_fn,  \
            (unsigned long)(_work),      \
bdi_writeback 有个成员变量 struct delayed_work dwork,bdi_writeback 就是把 delayed_work 结构挂到 bdi_wq 队列上的。
而 wb_workfn 函数则是 flusher 线程要执行的回写核心逻辑,全部封装在 wb_workfn 函数中。
/*
 * Handle writeback of dirty data for the device backed by this bdi. Also
 * reschedules periodically and does kupdated style flushing.
 */
void wb_workfn(struct work_struct *work)
{
 struct bdi_writeback *wb = container_of(to_delayed_work(work),
      struct bdi_writeback, dwork);
 long pages_written;

 set_worker_desc("flush-%s", bdi_dev_name(wb->bdi));
 current->flags |= PF_SWAPWRITE;

        .......在循环中不断的回写脏页..........

     // 如果 work-list 中还有回写脏页的任务,则立即唤醒flush线程
 if (!list_empty(&wb->work_list))
  wb_wakeup(wb);
     // 如果回写任务已经被全部执行完毕,但是内存中还有脏页,则延时唤醒
 else if (wb_has_dirty_io(wb) && dirty_writeback_interval)
  wb_wakeup_delayed(wb);

 current->flags &= ~PF_SWAPWRITE;
}
在 wb_workfn 中会不断的循环执行 work_list 中的脏页回写任务。当这些回写任务执行完毕之后调用 wb_wakeup_delayed 延时唤醒 flusher线程。大家注意到这里的 dirty_writeback_interval 配置项终于出现了,后续会根据 dirty_writeback_interval 计算下次唤醒 flusher 线程的时机。
void wb_wakeup_delayed(struct bdi_writeback *wb)
{
 unsigned long timeout;

 // 使用 dirty_writeback_interval 配置设置下次唤醒时间
 timeout = msecs_to_jiffies(dirty_writeback_interval * 10);
 spin_lock_bh(&wb->work_lock);
 if (test_bit(WB_registered, &wb->state))
  queue_delayed_work(bdi_wq, &wb->dwork, timeout);
 spin_unlock_bh(&wb->work_lock);
}
13.3 脏页数量多到什么程度会主动唤醒 flusher 线程
这一节的内容中涉及到四个内核参数分别是:
drity_background_ratio :当脏页数量在系统的可用内存 available 中占用的比例达到 drity_background_ratio 的配置值时,内核就会调用 wakeup_flusher_threads 来唤醒 flusher 线程异步回写脏页。默认值为:10。表示如果 page cache 中的脏页数量达到系统可用内存的 10% 的话,就主动唤醒 flusher 线程去回写脏页到磁盘。

image.png
系统的可用内存 = 空闲内存 + 可回收内存。可以通过 free 命令的 available 项查看。

image.png
dirty_background_bytes :如果 page cache 中脏页占用的内存用量绝对值达到指定的 dirty_background_bytes。内核就会调用 wakeup_flusher_threads 来唤醒 flusher 线程异步回写脏页。默认为:0。

image.png
dirty_background_bytes 的优先级大于 drity_background_ratio 的优先级。
dirty_ratio :dirty_background_* 相关的内核配置参数均是内核通过唤醒 flusher 线程来异步回写脏页。下面要介绍的 dirty_* 配置参数,均是由用户进程同步回写脏页。表示内存中的脏页太多了,用户进程自己都看不下去了,不用等内核 flusher 线程唤醒,用户进程自己主动去回写脏页到磁盘中。当脏页占用系统可用内存的比例达到 dirty_ratio 配置的值时,用户进程同步回写脏页。默认值为:20 。

image.png
dirty_bytes :如果 page cache 中脏页占用的内存用量绝对值达到指定的 dirty_bytes。用户进程同步回写脏页。默认值为:0。
*_bytes 相关配置参数的优先级要大于 *_ratio 相关配置参数。

image.png
我们继续使用上小节中保洁阿姨的例子说明:
之前你们已经约定好了,保洁阿姨会每周日固定(dirty_writeback_centisecs)来到你的房间打扫卫生(脏页),但是你周三回家的时候,发现屋子里太脏了,实在是脏到一定程度了(drity_background_ratio ,dirty_background_bytes),你实在是看不去了,这时你就不会等这周日(dirty_writeback_centisecs)保洁阿姨过来才打扫,你会直接给阿姨打电话让阿姨周三就来打扫一下(内核主动唤醒 flusher 线程异步回写脏页)。
还有一种更极端的情况就是,你的房间已经脏到很夸张的程度了(dirty_ratio ,dirty_byte)连你自己都忍不了了,于是你都不用等保洁阿姨了(内核 flusher 回写线程),你自己就乖乖的开始打扫房间卫生了。这就是用户进程同步回写脏页。
13.4 内核如何主动唤醒 flusher 线程
通过 《12.5 balance_dirty_pages_ratelimited》小节的介绍,我们知道在 generic_perform_write 函数的最后一步会调用 balance_dirty_pages_ratelimited 来判断是否要触发脏页回写。
void balance_dirty_pages_ratelimited(struct address_space *mapping)
{
        ................省略............

 if (unlikely(current->nr_dirtied >= ratelimit))
  balance_dirty_pages(mapping, wb, current->nr_dirtied);

 wb_put(wb);
}
这里会触发 balance_dirty_pages 函数进行脏页回写。
static void balance_dirty_pages(struct address_space *mapping,
    struct bdi_writeback *wb,
    unsigned long pages_dirtied)
{
        ..................省略.............

 for (;;) {
        // 获取系统可用内存
  gdtc->avail = global_dirtyable_memory();
        // 根据 *_ratio 或者 *_bytes 相关内核配置计算脏页回写触发的阈值
  domain_dirty_limits(gdtc);
                .............省略..........
     }

        .............省略..........
在 balance_dirty_pages 中首先通过 global_dirtyable_memory() 获取系统当前可用内存。在 domain_dirty_limits 函数中根据前边我们介绍的 *_ratio 或者 *_bytes 相关内核配置计算脏页回写触发的阈值。
static void domain_dirty_limits(struct dirty_throttle_control *dtc)
{
    // 获取可用内存
 const unsigned long available_memory = dtc->avail;
    // 封装触发脏页回写相关阈值信息
 struct dirty_throttle_control *gdtc = mdtc_gdtc(dtc);
    // 这里就是内核参数 dirty_bytes 指定的值
 unsigned long bytes = vm_dirty_bytes;
    // 内核参数 dirty_background_bytes 指定的值
 unsigned long bg_bytes = dirty_background_bytes;
    // 将内核参数 dirty_ratio 指定的值转换为以 页 为单位
 unsigned long ratio = (vm_dirty_ratio * PAGE_SIZE) / 100;
     // 将内核参数 dirty_background_ratio 指定的值转换为以 页 为单位
 unsigned long bg_ratio = (dirty_background_ratio * PAGE_SIZE) / 100;
     // 进程同步回写 dirty_* 相关阈值
 unsigned long thresh;
     // 内核异步回写 direty_background_* 相关阈值
 unsigned long bg_thresh;
 struct task_struct *tsk;

 if (gdtc) {
        // 系统可用内存
  unsigned long global_avail = gdtc->avail;
        // 这里可以看出 bytes 相关配置的优先级大于 ratio 相关配置的优先级
  if (bytes)
            // 将 bytes 相关的配置转换为以页为单位的内存占用比例ratio
   ratio = min(DIV_ROUND_UP(bytes, global_avail),
        PAGE_SIZE);
        // 设置 dirty_backgound_* 相关阈值
  if (bg_bytes)
   bg_ratio = min(DIV_ROUND_UP(bg_bytes, global_avail),
           PAGE_SIZE);
  bytes = bg_bytes = 0;
 }

    // 这里可以看出 bytes 相关配置的优先级大于 ratio 相关配置的优先级
 if (bytes)
        // 将 bytes 相关的配置转换为以页为单位的内存占用比例ratio
  thresh = DIV_ROUND_UP(bytes, PAGE_SIZE);
 else
  thresh = (ratio * available_memory) / PAGE_SIZE;
    // 设置 dirty_background_* 相关阈值
 if (bg_bytes)
         // 将 dirty_background_bytes 相关的配置转换为以页为单位的内存占用比例ratio
  bg_thresh = DIV_ROUND_UP(bg_bytes, PAGE_SIZE);
 else
  bg_thresh = (bg_ratio * available_memory) / PAGE_SIZE;

    // 保证异步回写 backgound 的相关阈值要比同步回写的阈值要低
 if (bg_thresh >= thresh)
  bg_thresh = thresh / 2;

 dtc->thresh = thresh;
 dtc->bg_thresh = bg_thresh;

        ..........省略..........
}
domain_dirty_limits 函数会分别计算用户进程同步回写脏页的相关阈值 thresh 以及内核异步回写脏页的相关阈值 bg_thresh。逻辑比较好懂,笔者将每一步的注释已经为大家标注出来了。这里只列出几个关键核心点:
-
从源码中的 if (bytes) {....} else {.....} 分支以及 if (bg_bytes) {....} else {.....} 我们可以看出内核配置 *_bytes 相关的优先级会高于 *_ratio 相关配置的优先级。
-
*_bytes 相关配置我们只会指定脏页占用内存的 bytes 阈值,但在内核实现中会将其转换为 页 为单位。(每页 4K 大小)。
-
内核中对于脏页回写阈值的判断是通过 ratio 比例来进行判断的。
-
内核异步回写的阈值要小于进程同步回写的阈值,如果超过,那么内核异步回写的阈值将会被设置为进程通过回写的一半。
static void balance_dirty_pages(struct address_space *mapping,
    struct bdi_writeback *wb,
    unsigned long pages_dirtied)
{
        ..................省略.............

 for (;;) {
        // 获取系统可用内存
  gdtc->avail = global_dirtyable_memory();
        // 根据 *_ratio 或者 *_bytes 相关内核配置计算 脏页回写触发的阈值
  domain_dirty_limits(gdtc);
                .............省略..........
     }

    // 根据进程同步回写阈值判断是否需要进程直接同步回写脏页
    if (writeback_in_progress(wb))
  return
    // 根据内核异步回写阈值判断是否需要唤醒flusher异步回写脏页
 if (nr_reclaimable > gdtc->bg_thresh)
  wb_start_background_writeback(wb);
如果是异步回写,内核则唤醒 flusher 线程开始异步回写脏页,直到脏页数量低于阈值或者全部回写到磁盘。
void wb_start_background_writeback(struct bdi_writeback *wb)
{
 /*
  * We just wake up the flusher thread. It will perform background
  * writeback as soon as there is no other work to do.
  */
 trace_writeback_wake_background(wb);
 wb_wakeup(wb);
}
13.5 脏页到底在内存中能驻留多久
内核为了避免 page cache 中的脏页在内存中长久的停留,所以会给脏页在内存中的驻留时间设置一定的期限,这个期限可由前边提到的 dirty_expire_centisecs 内核参数配置。默认为:3000。单位为:0.01 s。

image.png
也就是说在默认配置下,脏页在内存中的驻留时间为 30 s。超过 30 s 之后,flusher 线程将会在下次被唤醒的时候将这些脏页回写到磁盘中。
这些过期的脏页最终会在 flusher 线程下一次被唤醒时候被 flusher 线程回写到磁盘中。而前边我们也多次提到过 flusher 线程执行逻辑全部封装在 wb_workfn 函数中。接下来的调用链为 wb_workfn->wb_do_writeback->wb_writeback。在 wb_writeback 中会判断根据 dirty_expire_interval 判断哪些是过期的脏页。
/*
 * Explicit flushing or periodic writeback of "old" data.
 *
 * Define "old": the first time one of an inode's pages is dirtied, we mark the
 * dirtying-time in the inode's address_space.  So this periodic writeback code
 * just walks the superblock inode list, writing back any inodes which are
 * older than a specific point in time.
 *
 * Try to run once per dirty_writeback_interval.  But if a writeback event
 * takes longer than a dirty_writeback_interval interval, then leave a
 * one-second gap.
 *
 * older_than_this takes precedence over nr_to_write.  So we'll only write back
 * all dirty pages if they are all attached to "old" mappings.
 */
static long wb_writeback(struct bdi_writeback *wb,
    struct wb_writeback_work *work)
{
        ........省略.......
 work->older_than_this = &oldest_jif;
 for (;;) {
                ........省略.......
  if (work->for_kupdate) {
   oldest_jif = jiffies -
    msecs_to_jiffies(dirty_expire_interval * 10);
  } else if (work->for_background)
   oldest_jif = jiffies;
        }
         ........省略.......
}
13.6 脏页回写参数的相关配置方式
前面的几个小节笔者结合内核源码实现为大家介绍了影响内核回写脏页时机的六个参数。
内核越频繁的触发脏页回写,数据的安全性就越高,但是同时系统性能会消耗很大。所以我们在日常工作中需要结合数据的安全性和 IO 性能综合考虑这六个内核参数的配置。
本小节笔者就为大家介绍一下配置这些内核参数的方式,前面的小节中也提到过,内核提供的这些参数存在于 proc/sys/vm 目录下。

image.png
比如我们直接将要配置的具体数值写入对应的配置文件中:
echo "value" > /proc/sys/vm/dirty_background_ratio
我们还可以使用 sysctl 来对这些内核参数进行配置:
sysctl -w variable=value
sysctl 命令中定义的这些变量 variable 全部定义在内核 kernel/sysctl.c 源文件中。
-
其中 .procname 定义的就是 sysctl 命令中指定的配置变量名字。
-
.data 定义的是内核源码中引用的变量名字。这在前边我们介绍内核代码的时候介绍过了。比如配置参数 dirty_writeback_centisecs 在内核源码中的变量名为 dirty_writeback_interval , dirty_ratio 在内核中的变量名为 vm_dirty_ratio。
static struct ctl_table vm_table[] = {

        ........省略........

 {
  .procname = "dirty_background_ratio",
  .data  = &dirty_background_ratio,
  .maxlen  = sizeof(dirty_background_ratio),
  .mode  = 0644,
  .proc_handler = dirty_background_ratio_handler,
  .extra1  = SYSCTL_ZERO,
  .extra2  = SYSCTL_ONE_HUNDRED,
 },
 {
  .procname = "dirty_background_bytes",
  .data  = &dirty_background_bytes,
  .maxlen  = sizeof(dirty_background_bytes),
  .mode  = 0644,
  .proc_handler = dirty_background_bytes_handler,
  .extra1  = SYSCTL_LONG_ONE,
 },
 {
  .procname = "dirty_ratio",
  .data  = &vm_dirty_ratio,
  .maxlen  = sizeof(vm_dirty_ratio),
  .mode  = 0644,
  .proc_handler = dirty_ratio_handler,
  .extra1  = SYSCTL_ZERO,
  .extra2  = SYSCTL_ONE_HUNDRED,
 },
 {
  .procname = "dirty_bytes",
  .data  = &vm_dirty_bytes,
  .maxlen  = sizeof(vm_dirty_bytes),
  .mode  = 0644,
  .proc_handler = dirty_bytes_handler,
  .extra1  = (void *)&dirty_bytes_min,
 },
 {
  .procname = "dirty_writeback_centisecs",
  .data  = &dirty_writeback_interval,
  .maxlen  = sizeof(dirty_writeback_interval),
  .mode  = 0644,
  .proc_handler = dirty_writeback_centisecs_handler,
 },
 {
  .procname = "dirty_expire_centisecs",
  .data  = &dirty_expire_interval,
  .maxlen  = sizeof(dirty_expire_interval),
  .mode  = 0644,
  .proc_handler = proc_dointvec_minmax,
  .extra1  = SYSCTL_ZERO,
 }

       ........省略........
}
而前边介绍的这两种配置方式全部是临时的,我们可以通过编辑 /etc/sysctl.conf 文件来永久的修改内核相关的配置。
我们也可以在目录
/etc/sysctl.d/下创建自定义的配置文件。
vi /etc/sysctl.conf
在 /etc/sysctl.conf 文件中直接以 variable = value 的形式添加到文件的末尾。

image.png
最后调用 sysctl -p /etc/sysctl.conf 使 /etc/sysctl.conf 配置文件中新添加的那些配置生效。
总结
本文笔者带大家从 Linux 内核的角度详细解析了 JDK NIO 文件读写在 Buffered IO 以及 Direct IO 这两种模式下的内核源码实现,探秘了文件读写的本质。并对比了 Buffered IO 和 Direct IO 的不同之处以及各自的适用场景。
在这个过程中又详细地介绍了与 Buffered IO 密切相关的文件页高速缓存 page cache 在内核中的实现以及相关操作。
最后我们详细介绍了影响文件 IO 的两个关键步骤:文件预读和脏页回写的详细内核源码实现,以及内核中影响脏页回写时机的 6 个关键内核配置参数相关的实现及应用。
-
dirty_background_bytes
-
dirty_background_ratio
-
dirty_bytes
-
dirty_ratio
-
dirty_expire_centisecs
-
dirty_writeback_centisecs
以及关于内核参数的三种配置方式:
-
通过直接修改
proc/sys/vm目录下的相关参数配置文件。 -
使用 sysctl 命令来对相关参数进行修改。
-
通过编辑
/etc/sysctl.conf文件来永久的修改内核相关配置。

![[附源码]JAVA毕业设计昆明市人民医院血库管理系统(系统+LW)](https://img-blog.csdnimg.cn/6c812114fa074e019d762bb7696aff57.png)



![[附源码]Python计算机毕业设计Django求职招聘网站](https://img-blog.csdnimg.cn/5f94600f2a9c4126957d264f8088c982.png)


![[每周一更]-(第23期):Docker 逻辑图及常用命令汇总](https://img-blog.csdnimg.cn/cfca07a8703b4fddb9bc8e6618c2d7dd.png#pic_center)


