目录
一、源码
1、为什么要分析源码
2、看源码的方法
二、Nacos服务注册与发现源码剖析
1、Nacos核心功能点
2、Nacos服务端/客户端原理
2.1、nacos-example
2.2、Nacos-Client测试类
3、项目中实例客户端注册
一、源码
1、为什么要分析源码
1. 提升技术功底:学习源码里面的优秀的设计思想,比如一些问题的解决问题思路,还有一些优秀的设计模式,提升自己的技术功底。
2. 深度掌握框架:源码看多了,对于一个新技术或者框架的掌握速度会有大幅度提升,看下框架的演示Demo就基本上知道了底层实现原理,学习框架的速度会非常快。
3. 快速定位问题:遇到问题,特别是框架源码的Bug问题,能够快速定位,这就是多看源码所带来的的好处和优势。
4. 提高面试成功率:面试一线互联网大厂,一般都会问题到框架源码级别的实现,如果掌握了源码,会大大提升面试成功几率和薪资待遇。
5. 参与开源社区:参与到开源项目的研发,结识更多大牛,对于自己以后的提升好处多多。
2、看源码的方法
1. 先使用:先看官方网站提供的文档,快速掌握框架的基本使用
2. 关注核心功能:在使用的过程中关注框架的核心功能,然后来观察这些核心功能的代码
3. 总结归纳:总结源码中的一些核心点,同时最好能够跟着源码来做出核心流程图,这样就可以把源码中的核心亮点找出并且标记,后续就可能会借鉴到实际工作项目中,同时要善于用Debug,来观看源码的执行过程,观察一些关键变量的值的变化。当我们把框架的所有功能点的源码都分析完成后,回到主流程在梳理一遍,最后在自己脑袋中形成一个闭环,这样源码的核心内容和主流程就基本上理解了。
二、Nacos服务注册与发现源码剖析
1、Nacos核心功能点
服务注册:Nacos Client会通过发送REST请求的方式向Nacos Server注册自己的服务,提供自身的元数据,比如ip地址、端口等信息。Nacos Server接收到注册请求后,就会把这些元数据信息存储在一个双层的内存Map中。
服务心跳:在服务注册后,Nacos Client会维护一个定时心跳来持续通知Nacos Server,说明服务一直处于可用状态,防止被剔除。默认5s发送一次心跳。
服务健康检查:Nacos Server会开启一个定时任务用来检查注册服务实例的健康情况,对于超过15s没有收到客户端心跳的实例会将它的healthy属性置为false(客户端服务发现时不会发现),如果某个实例超过30秒没有收到心跳,直接剔除该实例(被剔除的实例如果恢复发送心跳则会重新注册)
服务发现:服务消费者(Nacos Client)在调用服务提供者的服务时,会发送一个REST请求给Nacos Server,获取上面注册的服务清单,并且缓存在Nacos Client本地,同时会在Nacos Client本地开启一个定时任务定时拉取服务端最新的注册表信息更新到本地缓存
服务同步:Nacos Server集群之间会互相同步服务实例,用来保证服务信息的一致性。
2、Nacos服务端/客户端原理


Nacos源码下载
Nacos源码地址
设置单机运行
-Dnacos.standalone=true -Dnacos.home=C:\\nacos

启动完访问:http://localhost:8848/nacos
2.1、nacos-example
NamingExample
public class NamingExample {

    public static void main(String[] args) throws NacosException, InterruptedException {

        Properties properties = new Properties();
        properties.setProperty("serverAddr", System.getProperty("serverAddr", "localhost"));
        properties.setProperty("namespace", System.getProperty("namespace", "public"));

        NamingService naming = NamingFactory.createNamingService(properties);

        naming.registerInstance("nacos.test.3", "11.11.11.11", 8888, "TEST1");

        System.out.println("instances after register: " + naming.getAllInstances("nacos.test.3"));

        Executor executor = new ThreadPoolExecutor(1, 1, 0L, TimeUnit.MILLISECONDS, new LinkedBlockingQueue<Runnable>(),
                runnable -> {
                    Thread thread = new Thread(runnable);
                    thread.setName("test-thread");
                    return thread;
                });

        naming.subscribe("nacos.test.3", new AbstractEventListener() {

            //EventListener onEvent is sync to handle, If process too low in onEvent, maybe block other onEvent callback.
            //So you can override getExecutor() to async handle event.
            @Override
            public Executor getExecutor() {
                return executor;
            }

            @Override
            public void onEvent(Event event) {
                System.out.println("serviceName: " + ((NamingEvent) event).getServiceName());
                System.out.println("instances from event: " + ((NamingEvent) event).getInstances());
            }
        });

        naming.deregisterInstance("nacos.test.3", "11.11.11.11", 8888, "TEST1");

        Thread.sleep(1000);

        System.out.println("instances after deregister: " + naming.getAllInstances("nacos.test.3"));

        Thread.sleep(1000);
    }
}
可以从这开始分析
2.2、Nacos-Client测试类
NacosNamingServiceTest
public class NacosNamingServiceTest {

    @Rule
    public ExpectedException expectedException = ExpectedException.none();

    private NacosNamingService client;

    private NamingClientProxy proxy;

    private InstancesChangeNotifier changeNotifier;

    @Before
    public void before() throws NoSuchFieldException, NacosException, IllegalAccessException {
        Properties prop = new Properties();
        prop.setProperty("serverAddr", "localhost");
        prop.put(PropertyKeyConst.NAMESPACE, "test");
        client = new NacosNamingService(prop);
        // inject proxy
        proxy = mock(NamingHttpClientProxy.class);
        Field serverProxyField = NacosNamingService.class.getDeclaredField("clientProxy");
        serverProxyField.setAccessible(true);
        serverProxyField.set(client, proxy);
        // inject notifier
        changeNotifier = mock(InstancesChangeNotifier.class);
        Field changeNotifierField = NacosNamingService.class.getDeclaredField("changeNotifier");
        changeNotifierField.setAccessible(true);
        changeNotifierField.set(client, changeNotifier);
    }

    @Test
    public void testRegisterInstance1() throws NacosException {
        //given
        String serviceName = "service1";
        String ip = "1.1.1.1";
        int port = 10000;
        //when
        client.registerInstance(serviceName, ip, port);
        //then
        verify(proxy, times(1))
                .registerService(eq(serviceName), eq(Constants.DEFAULT_GROUP), argThat(
                        instance -> instance.getIp().equals(ip) && instance.getPort() == port
                                && Math.abs(instance.getWeight() - 1.0) < 0.01f && instance.getClusterName()
                                .equals(Constants.DEFAULT_CLUSTER_NAME)));
    }
.....
实例信息
注册实例信息用Instance对象承载,注册的实例信息又分两部分:实例基础信息和元数据。
- instanceId:实例的唯一ID;
- ip:实例IP,提供给消费者进行通信的地址;
- port: 端口,提供给消费者访问的端口;
- weight:权重,当前实例的权限,浮点类型(默认1.0D);
- healthy:健康状况,默认true;
- enabled:实例是否准备好接收请求,默认true;
- ephemeral:实例是否为瞬时的,默认为true;
- clusterName:实例所属的集群名称;
- serviceName:实例的服务信息;
Instance类包含了实例的基础信息之外,还包含了用于**存储元数据的metadata**(描述数据的数据),类型为HashMap,从当前这个Demo中我们可以得知存放了两个数据:
- netType:顾名思义,网络类型,这里的值为external,也就是外网的意思;
- version:版本,Nacos的版本,这里是2.0这个大版本。
除了Demo中这些“自定义”的信息,在Instance类中还定义了一些默认信息,这些信息通过get方法提供:
@JsonInclude(Include.NON_NULL)
public class Instance implements Serializable {
    /**
     * unique id of this instance.
     */
    private String instanceId;

    /**
     * instance ip.
     */
    private String ip;

    /**
     * instance port.
     */
    private int port;

    /**
     * instance weight.
     */
    private double weight = 1.0D;

    /**
     * instance health status.
     */
    private boolean healthy = true;

    /**
     * If instance is enabled to accept request.
     */
    private boolean enabled = true;

    /**
     * If instance is ephemeral.
     *
     * @since 1.0.0
     */
    private boolean ephemeral = true;

    /**
     * cluster information of instance.
     */
    private String clusterName;

    /**
     * Service information of instance.
     */
    private String serviceName;
....
    public long getInstanceHeartBeatInterval() {
        return getMetaDataByKeyWithDefault(PreservedMetadataKeys.HEART_BEAT_INTERVAL,
                Constants.DEFAULT_HEART_BEAT_INTERVAL);
    }

    public long getInstanceHeartBeatTimeOut() {
        return getMetaDataByKeyWithDefault(PreservedMetadataKeys.HEART_BEAT_TIMEOUT,
                Constants.DEFAULT_HEART_BEAT_TIMEOUT);
    }

    public long getIpDeleteTimeout() {
        return getMetaDataByKeyWithDefault(PreservedMetadataKeys.IP_DELETE_TIMEOUT,
                Constants.DEFAULT_IP_DELETE_TIMEOUT);
    }

    public String getInstanceIdGenerator() {
        return getMetaDataByKeyWithDefault(PreservedMetadataKeys.INSTANCE_ID_GENERATOR,
                Constants.DEFAULT_INSTANCE_ID_GENERATOR);
    }
...
}
上面的get方法在需要元数据默认值时会被用到:
- preserved.heart.beat.interval:心跳间隙的key,默认为5s,也就是默认5秒进行一次心跳;
- preserved.heart.beat.timeout:心跳超时的key,默认为15s,也就是默认15秒收不到心跳,实例将会标记为不健康;
- preserved.ip.delete.timeout:实例IP被删除的key,默认为30s,也就是30秒收不到心跳,实例将会被移除;
- preserved.instance.id.generator:实例ID生成器key,默认为simple;
这些都是Nacos默认提供的值,也就是当前实例注册时会告诉Nacos Server说:我的心跳间隙、心跳超时等对应的值是多少,你按照这个值来判断我这个实例是否健康。
有了这些信息,我们基本是已经知道注册实例时需要传递什么参数,需要配置什么参数了。
NamingService接口
NamingService接口是Nacos命名服务对外提供的一个统一接口,看对应的源码就可以发现,它提供了大量实例相关的接口方法:
//服务实例注册
  void registerInstance(...) throws NacosException;
//服务实例注销
  void deregisterInstance(...) throws NacosException;
//获取服务实例列表
  List<Instance> getAllInstances(...) throws NacosException;
//查询健康服务实例
  List<Instance> selectInstances(...) throws NacosException;
//查询集群中健康的服务实例
 List<Instance> selectInstances(....List<String> clusters....)throws NacosException;
//使用负载均衡策略选择一个健康的服务实例
  Instance selectOneHealthyInstance(...) throws NacosException;
//订阅服务事件
  void subscribe(...) throws NacosException;
//取消订阅服务事件
  void unsubscribe(...) throws NacosException;
//获取所有(或指定)服务名称
  ListView<String> getServicesOfServer(...) throws NacosException;
//获取所有订阅的服务
   List<ServiceInfo> getSubscribeServices() throws NacosException;
//获取Nacos服务的状态
  String getServerStatus();
//主动关闭服务
void shutDown() throws NacosException;
在这些方法中提供了大量的重载方法,应用于不同场景和不同类型实例或服务的筛选,所以我们只需要在不同的情况下使用不同的方法即可。
NamingService的实例化是通过NamingFactory类和上面的Nacos服务信息,从代码中可以看出这里采用了反射机制来实例化NamingService,具体的实现类为NacosNamingService:
public class NamingFactory {

    /**
     * Create a new naming service.
     *
     * @param serverList server list
     * @return new naming service
     * @throws NacosException nacos exception
     */
    public static NamingService createNamingService(String serverList) throws NacosException {
        try {
            Class<?> driverImplClass = Class.forName("com.alibaba.nacos.client.naming.NacosNamingService");
            Constructor constructor = driverImplClass.getConstructor(String.class);
            return (NamingService) constructor.newInstance(serverList);
        } catch (Throwable e) {
            throw new NacosException(NacosException.CLIENT_INVALID_PARAM, e);
        }
    }

    /**
     * Create a new naming service.
     *
     * @param properties naming service properties
     * @return new naming service
     * @throws NacosException nacos exception
     */
    public static NamingService createNamingService(Properties properties) throws NacosException {
        try {
            Class<?> driverImplClass = Class.forName("com.alibaba.nacos.client.naming.NacosNamingService");
            Constructor constructor = driverImplClass.getConstructor(Properties.class);
            return (NamingService) constructor.newInstance(properties);
        } catch (Throwable e) {
            throw new NacosException(NacosException.CLIENT_INVALID_PARAM, e);
        }
    }
}
NamingExample代码中使用了NamingService的registerInstance方法来进行服务实例的注册,该方法接收参数,服务名称,ip,port和实例对象。这个方法的最大作用是设置了当前实例的分组信息。我们知道,在Nacos中,通过Namespace、group、Service、Cluster等一层层的将实例进行环境的隔离。在这里设置了默认的分组为“DEFAULT_GROUP”。
public class NacosNamingService implements NamingService {
....
    @Override
    public void registerInstance(String serviceName, String ip, int port, String clusterName) throws NacosException {
        registerInstance(serviceName, Constants.DEFAULT_GROUP, ip, port, clusterName);
    }

    @Override
    public void registerInstance(String serviceName, String groupName, String ip, int port, String clusterName)
            throws NacosException {
        Instance instance = new Instance();
        instance.setIp(ip);
        instance.setPort(port);
        instance.setWeight(1.0);
        instance.setClusterName(clusterName);
        registerInstance(serviceName, groupName, instance);
    }
...
紧接着调用的registerInstance方法如下,这个方法实现了两个功能:
第一,检查心跳时间设置的对不对(心跳默认为5秒)
第二,通过NamingClientProxy这个代理来执行服务注册操作
    @Override
    public void registerInstance(String serviceName, String groupName, Instance instance) throws NacosException {
        NamingUtils.checkInstanceIsLegal(instance);//检查心跳
        clientProxy.registerService(serviceName, groupName, instance);//通过代理执行服务注册操作
    }
通过clientProxy我们发现NamingClientProxy这个代理接口的具体实现是有NamingClientProxyDelegate来完成的,这个可以从NacosNamingService构造方法中来看出。
    public NacosNamingService(Properties properties) throws NacosException {
        init(properties);
    }
初始化在init方法中
    private void init(Properties properties) throws NacosException {
        final NacosClientProperties nacosClientProperties = NacosClientProperties.PROTOTYPE.derive(properties);

        ValidatorUtils.checkInitParam(nacosClientProperties);
        this.namespace = InitUtils.initNamespaceForNaming(nacosClientProperties);
        InitUtils.initSerialization();
        InitUtils.initWebRootContext(nacosClientProperties);
        initLogName(nacosClientProperties);

        this.notifierEventScope = UUID.randomUUID().toString();
        this.changeNotifier = new InstancesChangeNotifier(this.notifierEventScope);
        NotifyCenter.registerToPublisher(InstancesChangeEvent.class, 16384);
        NotifyCenter.registerSubscriber(changeNotifier);
        this.serviceInfoHolder = new ServiceInfoHolder(namespace, this.notifierEventScope, nacosClientProperties);
        //在这里进行了初始化,并看出使用的是NamingClientProxyDelegate来完成的
        this.clientProxy = new NamingClientProxyDelegate(this.namespace, serviceInfoHolder, nacosClientProperties, changeNotifier);
    }
根据上方的分析和源码的阅读,我们可以发现NamingClientProxy调用registerService实际上调用的就是NamingClientProxyDelegate的对应方法:
    @Override
    public void registerService(String serviceName, String groupName, Instance instance) throws NacosException {
        getExecuteClientProxy(instance).registerService(serviceName, groupName, instance);
    }
真正调用注册服务的并不是代理实现类,而是根据当前实例是否为瞬时对象,来选择对应的客户端代理来进行请求的:
如果当前实例为瞬时对象,则采用gRPC协议(NamingGrpcClientProxy)进行请求,否则采用http协议(NamingHttpClientProxy)进行请求。默认为瞬时对象,也就是说,2.0版本中默认采用了gRPC协议进行与Nacos服务进行交互。
    private NamingClientProxy getExecuteClientProxy(Instance instance) {
        return instance.isEphemeral() ? grpcClientProxy : httpClientProxy;
    }
关于gRPC协议(NamingGrpcClientProxy),我们主要关注一下registerService方法实现,这里其实做了两件事情
1. 缓存当前注册的实例信息用于恢复,缓存的数据结构为ConcurrentMap<String, Instance>,key为“serviceName@@groupName”,value就是前面封装的实例信息。
2. 另外一件事就是封装了参数,基于gRPC进行服务的调用和结果的处理。
    @Override
    public void registerService(String serviceName, String groupName, Instance instance) throws NacosException {
        NAMING_LOGGER.info("[REGISTER-SERVICE] {} registering service {} with instance {}", namespaceId, serviceName,
                instance);
        redoService.cacheInstanceForRedo(serviceName, groupName, instance);//缓存数据
        doRegisterService(serviceName, groupName, instance);//基于gRPC进行服务的调用
    }
3、项目中实例客户端注册
实际上我们在真实的生产环境中,我们要让某一个服务注册到Nacos中,我们首先要引入一个依赖:
<dependency>
    <groupId>com.alibaba.cloud</groupId>
    <artifactId>spring-cloud-starter-alibaba-nacos-discovery</artifactId>
</dependency>
在引入这个依赖以后,我们要找到SpringBoot自动装配文件META-INF/spring.factories文件

org.springframework.boot.autoconfigure.EnableAutoConfiguration=\
  com.alibaba.cloud.nacos.discovery.NacosDiscoveryAutoConfiguration,\
  com.alibaba.cloud.nacos.ribbon.RibbonNacosAutoConfiguration,\
  com.alibaba.cloud.nacos.endpoint.NacosDiscoveryEndpointAutoConfiguration,\
  com.alibaba.cloud.nacos.registry.NacosServiceRegistryAutoConfiguration,\
  com.alibaba.cloud.nacos.discovery.NacosDiscoveryClientConfiguration,\
  com.alibaba.cloud.nacos.discovery.reactive.NacosReactiveDiscoveryClientConfiguration,\
  com.alibaba.cloud.nacos.discovery.configclient.NacosConfigServerAutoConfiguration,\
  com.alibaba.cloud.nacos.NacosServiceAutoConfiguration
org.springframework.cloud.bootstrap.BootstrapConfiguration=\
  com.alibaba.cloud.nacos.discovery.configclient.NacosDiscoveryClientConfigServiceBootstrapConfiguration
然后再通过SpingBoot的自动装配(首先找到)来加载EnableAutoConfiguration对应的类,然后这里我们就能看见很多Nacos相关的内容,那我们怎么能知道这个服务在注册的时候具体走的时候哪一个,其实一般这种文件我们都会找“Auto”关键子的文件来进行查看,然后我们现在要了解的是客户端的注册,所以我们要找“NacosServiceRegistryAutoConfiguration”。
@Configuration(
    proxyBeanMethods = false
)
@EnableConfigurationProperties
@ConditionalOnNacosDiscoveryEnabled
@ConditionalOnProperty(
    value = {"spring.cloud.service-registry.auto-registration.enabled"},
    matchIfMissing = true
)
@AutoConfigureAfter({AutoServiceRegistrationConfiguration.class, AutoServiceRegistrationAutoConfiguration.class, NacosDiscoveryAutoConfiguration.class})
public class NacosServiceRegistryAutoConfiguration {
    public NacosServiceRegistryAutoConfiguration() {
    }

    @Bean
    public NacosServiceRegistry nacosServiceRegistry(NacosDiscoveryProperties nacosDiscoveryProperties) {
        return new NacosServiceRegistry(nacosDiscoveryProperties);
    }

    @Bean
    @ConditionalOnBean({AutoServiceRegistrationProperties.class})
    public NacosRegistration nacosRegistration(ObjectProvider<List<NacosRegistrationCustomizer>> registrationCustomizers, NacosDiscoveryProperties nacosDiscoveryProperties, ApplicationContext context) {
        return new NacosRegistration((List)registrationCustomizers.getIfAvailable(), nacosDiscoveryProperties, context);
    }

    @Bean
    @ConditionalOnBean({AutoServiceRegistrationProperties.class})
    public NacosAutoServiceRegistration nacosAutoServiceRegistration(NacosServiceRegistry registry, AutoServiceRegistrationProperties autoServiceRegistrationProperties, NacosRegistration registration) {
        return new NacosAutoServiceRegistration(registry, autoServiceRegistrationProperties, registration);
    }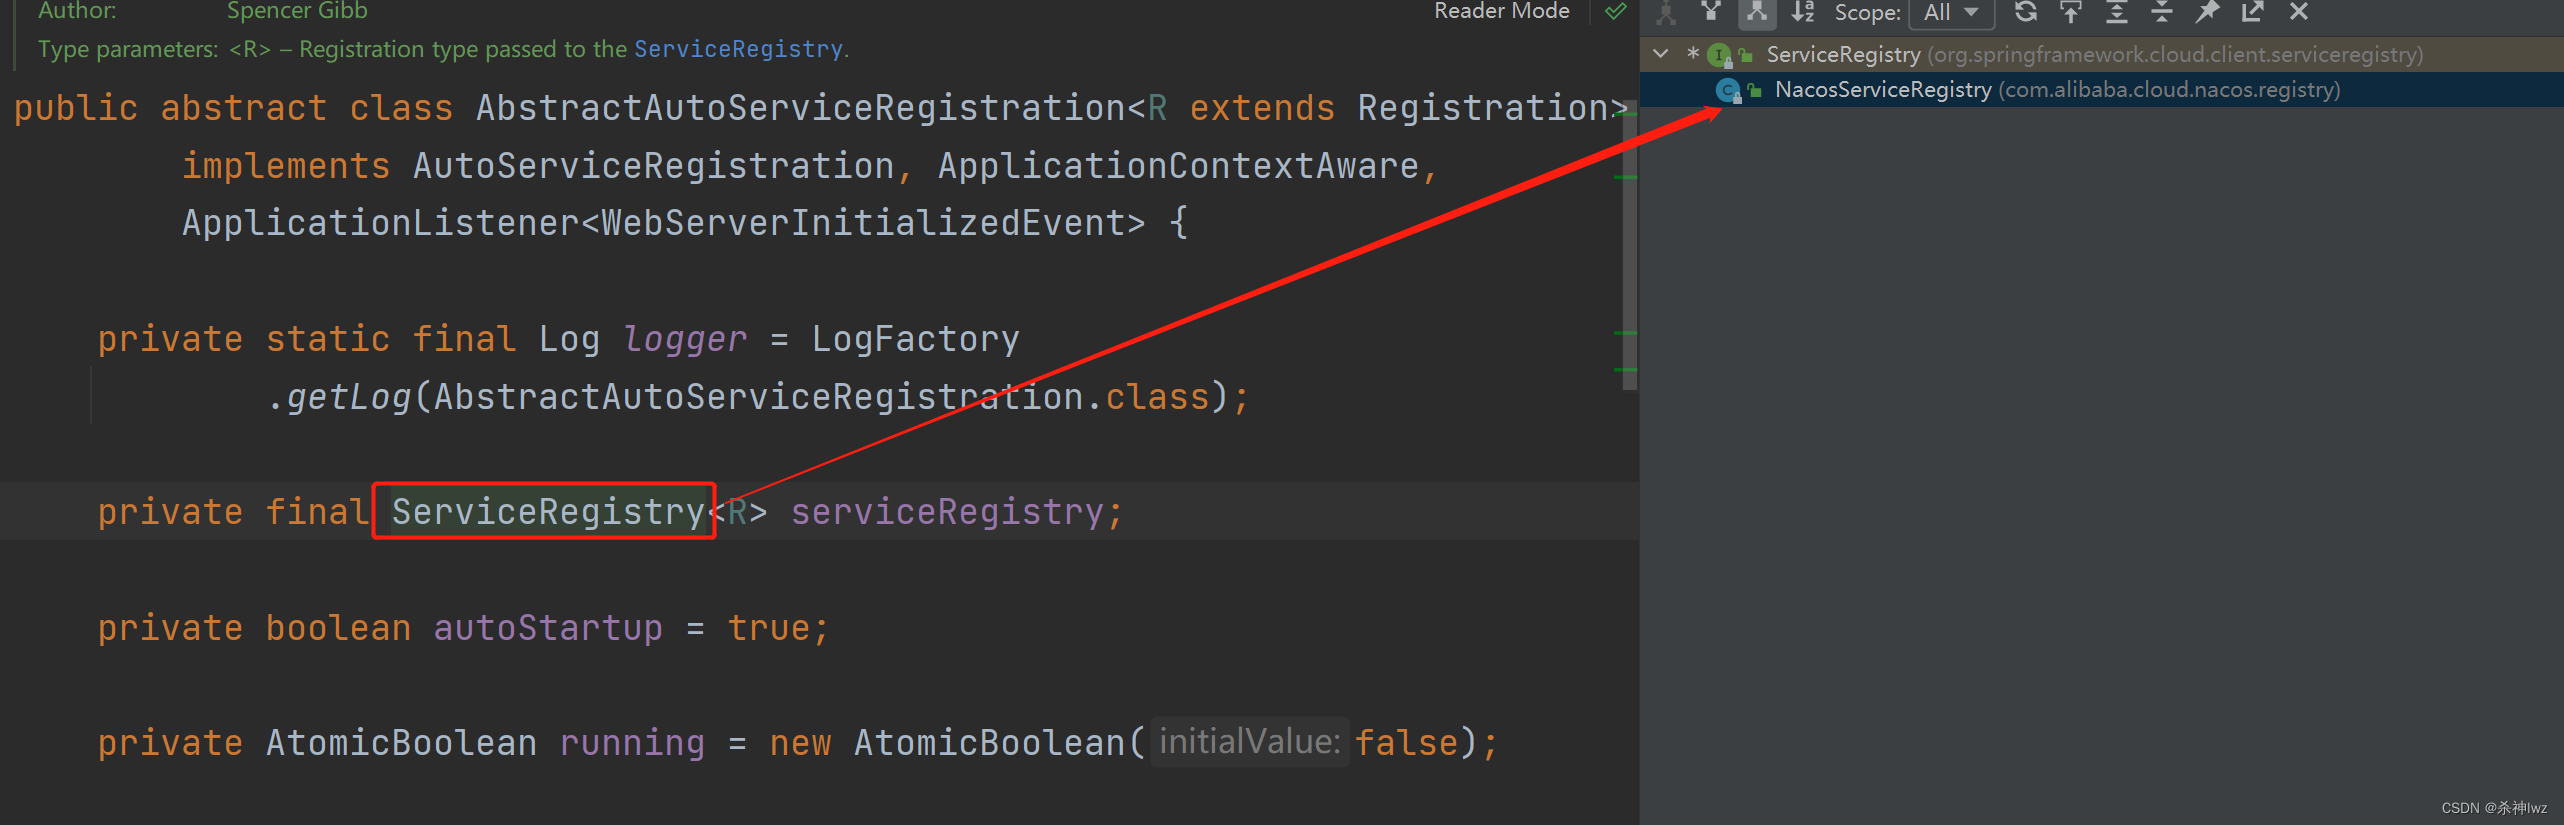
}NacosAutoServiceRegistration继承了AbstractAutoServiceRegistration而这个类型实现了ApplicationListener接口,所以我们由此得出一般实现ApplicationListener接口的类型都会实现一个方法"onApplicationEvent",这个方法会在项目启动的时候触发

public class NacosAutoServiceRegistration extends AbstractAutoServiceRegistration<Registration> {
    private static final Logger log = LoggerFactory.getLogger(NacosAutoServiceRegistration.class);
    private NacosRegistration registration;

    public NacosAutoServiceRegistration(ServiceRegistry<Registration> serviceRegistry, AutoServiceRegistrationProperties autoServiceRegistrationProperties, NacosRegistration registration) {
        super(serviceRegistry, autoServiceRegistrationProperties);//-->enter
        this.registration = registration;
    }
....
public void onApplicationEvent(WebServerInitializedEvent event) {
this.bind(event);//-->
}
/** @deprecated */
@Deprecated
public void bind(WebServerInitializedEvent event) {
ApplicationContext context = event.getApplicationContext();
if (!(context instanceof ConfigurableWebServerApplicationContext) || !"management".equals(((ConfigurableWebServerApplicationContext)context).getServerNamespace())) {
this.port.compareAndSet(0, event.getWebServer().getPort());
this.start();//-->
}
}
//然后在start()方法中调用register()方法来注册服务
public void start() {
if (!this.isEnabled()) {
if (logger.isDebugEnabled()) {
logger.debug("Discovery Lifecycle disabled. Not starting");
}
} else {
if (!this.running.get()) {
this.context.publishEvent(new InstancePreRegisteredEvent(this, this.getRegistration()));
this.register();//-->
if (this.shouldRegisterManagement()) {
this.registerManagement();
}
this.context.publishEvent(new InstanceRegisteredEvent(this, this.getConfiguration()));
this.running.compareAndSet(false, true);
}
}
}分析到这里,我们已经知道了真实服务注册的入口和具体调用那个方法来注册,那我们再来分析一下register这个方法
    protected void register() {
        this.serviceRegistry.register(this.getRegistration());
    }
但是这里要注意serviceRegistry实际上是一个接口,所以我们来看一下它的具体实现类NacosServiceRegistry:
public class NacosServiceRegistry implements ServiceRegistry<Registration> {
...
    public void register(Registration registration) {
        if (StringUtils.isEmpty(registration.getServiceId())) {
            log.warn("No service to register for nacos client...");
        } else {
            NamingService namingService = this.namingService();
            String serviceId = registration.getServiceId();
            String group = this.nacosDiscoveryProperties.getGroup();
            //构建instance实例
            Instance instance = this.getNacosInstanceFromRegistration(registration);

            try {
                //向服务端注册此服务
                namingService.registerInstance(serviceId, group, instance);
                log.info("nacos registry, {} {} {}:{} register finished", new Object[]{group, serviceId, instance.getIp(), instance.getPort()});
            } catch (Exception var7) {
                log.error("nacos registry, {} register failed...{},", new Object[]{serviceId, registration.toString(), var7});
                ReflectionUtils.rethrowRuntimeException(var7);
            }

        }
    }
...
其实到这里大家应该已经明白Nacos客户端的服务注册过程了,但是其实再给大家补充一点,就是其实注册本身就是访问了Nacos提供的一个接口,我们可以在官网上看到
nacos API 注册实例
跟到这里和上面源码部分能衔接上了。可打断点Debug跟踪。
Spring Cloud Alibaba - Nacos
干我们这行,啥时候懈怠,就意味着长进的停止,长进的停止就意味着被淘汰,只能往前冲,直到凤凰涅槃的一天!