1. 前言
PSMNet的核心思想是通过金字塔结构来捕捉不同尺度的特征信息,从而提高视差估计的精度。其亮点在于:(1)使用了金字塔形的卷积神经(SPP module)网络来提取不同尺度的特征信息;(2)使用了cost volume来捕捉不同视角之间的匹配信息;(3)引入了多分辨率的3D CNN,用于处理cost volume以进行深度估计。

2.环境配置
PSMNet源工程的GitHub链接如下:
https://github.com/JiaRenChang/PSMNet![]() https://github.com/JiaRenChang/PSMNet下载上述工程,获得PSMNet-master工程文件夹。
https://github.com/JiaRenChang/PSMNet下载上述工程,获得PSMNet-master工程文件夹。
作者也给出了在Kitti数据集上训练获得的.tar模型:
https://drive.google.com/file/d/1pHWjmhKMG4ffCrpcsp_MTXMJXhgl3kF9/view![]() https://drive.google.com/file/d/1pHWjmhKMG4ffCrpcsp_MTXMJXhgl3kF9/view
https://drive.google.com/file/d/1pHWjmhKMG4ffCrpcsp_MTXMJXhgl3kF9/view
上述预训练模型名称为pretrained_model_KITTI2015.tar,文件大小21MB。
笔者的训练环境Ubuntu20.04+Pytorch1.6,硬件为RTX2080Ti(22G显存)。
GPU驱动配置请参考:《环境感知算法——1.简介与GPU驱动、CUDA和cudnn配置》![]() https://blog.csdn.net/wenquantongxin/article/details/130858818
https://blog.csdn.net/wenquantongxin/article/details/130858818
1)创建PSMNet虚拟环境
conda create -n PSMNet python=3.7
conda activate PSMNet
conda install pytorch==1.6.0 torchvision==0.7.0 -c pytorch
conda install scikit-image
pip install opencv-python
2)准备数据集
数据集需要整理为两个文件夹data_scene_flow、data_scene_flow_calib。以使⽤KITTI stereo 2015数据集为例, 从官⽹下载Stereo 2015数据集中的stereo 2015/flow 2015/scene flow 2015 data set (2 GB)和calibration files (1 MB)。
The KITTI Vision Benchmark Suite![]() https://www.cvlibs.net/datasets/kitti/eval_scene_flow.php?benchmark=stereo或通过以下云盘链接下载:
https://www.cvlibs.net/datasets/kitti/eval_scene_flow.php?benchmark=stereo或通过以下云盘链接下载:
https://pan.baidu.com/s/1p3oyglhMvVv0rTE-x-C9ig?pwd=yao1![]() https://pan.baidu.com/s/1p3oyglhMvVv0rTE-x-C9ig?pwd=yao1
https://pan.baidu.com/s/1p3oyglhMvVv0rTE-x-C9ig?pwd=yao1
3)可视化预训练模型在KITTI testing集上的结果
为了避免出现以下错误:
TypeError: unsupported operand type(s) for //: 'str' and 'int'需要将models/stackhourglass.py的第55行改为
self.maxdisp = int(maxdisp)使用以下代码对于预训练模型在Kitti 2015数据集上进行测试评估。
cd .../PSMNet-master
    python submission.py --maxdisp 192 \
    --model stackhourglass \
    --KITTI 2015 \
    --datapath .../data_scene_flow/testing/ \
    --loadmodel .../pretrained_model/pretrained_model_KITTI2015.tar
请根据实际修改其中的testing数据集的路径和预训练数据集的路径。运行上述代码,会在PSMNet-master文件夹内生成(大量)识别后的伪彩色深度图。

3. 训练PSMNet
首先需要依次修改以下代码:
a)为了避免出现以下TabError错误:
TabError: inconsistent use of tabs and spaces in indentation需要调整finetune.py对应第158行及以下的缩进:
def main():
    max_acc=0
    max_epo=0
    start_full_time = time.time()

    for epoch in range(1, args.epochs+1):
        total_train_loss = 0
        total_test_loss = 0
        adjust_learning_rate(optimizer,epoch)

               ## training ##
        for batch_idx, (imgL_crop, imgR_crop, disp_crop_L) in enumerate(TrainImgLoader):
            start_time = time.time()

            loss = train(imgL_crop,imgR_crop, disp_crop_L)
            print('Iter %d training loss = %.3f , time = %.2f' %(batch_idx, loss, time.time() - start_time))
            total_train_loss += loss
        print('epoch %d total training loss = %.3f' %(epoch, total_train_loss/len(TrainImgLoader)))

               ## Test ##

        for batch_idx, (imgL, imgR, disp_L) in enumerate(TestImgLoader):
            test_loss = test(imgL,imgR, disp_L)
            print('Iter %d 3-px error in val = %.3f' %(batch_idx, test_loss*100))
            total_test_loss += test_loss


        print('epoch %d total 3-px error in val = %.3f' %(epoch, total_test_loss/len(TestImgLoader)*100))
        if total_test_loss/len(TestImgLoader)*100 > max_acc:
            max_acc = total_test_loss/len(TestImgLoader)*100
        max_epo = epoch
        print('MAX epoch %d total test error = %.3f' %(max_epo, max_acc))

	   #SAVE
        savefilename = args.savemodel+'finetune_'+str(epoch)+'.tar'
        torch.save({
		    'epoch': epoch,
		    'state_dict': model.state_dict(),
		    'train_loss': total_train_loss/len(TrainImgLoader),
		    'test_loss': total_test_loss/len(TestImgLoader)*100,
		}, savefilename)

        print('full finetune time = %.2f HR' %((time.time() - start_full_time)/3600))
    print(max_epo)
    print(max_acc)
b)为了避免出现以下ModuleNotFoundError错误:
ModuleNotFoundError: No module named 'preprocess'需要更改dataloader/KITTILoader.py第9行代码为
from . import preprocessc)为了避免出现以下RuntimeError错误:
RuntimeError: CUDA out of memory. 需要修改finetune.py中的batch_size大小,视GPU显存而定(Tips:训练batch_size取2时,GPU所需显存约为7GB)。
#对于Line59修改
batch_size= 2, shuffle= True, num_workers= 8, drop_last=False)
#对于Line63修改
batch_size= 2, shuffle= False, num_workers= 4, drop_last=False)
d)为了避免出现以下IndexError错误:
IndexError: invalid index of a 0-dim tensor. Use `tensor.item()` in Python or `tensor.item<T>()` in C++ to convert a 0-dim tensor to a number需要修改finetune.py 第114行:
return loss.item()e)为了避免在训练中(一般发生在epoch 1结束后)出现如下错误:
IndexError: index xxx is out of bounds for dimension 1 with size 1修改finetune.py 第131行:
disp_true[index[0][:], index[1][:], index[2][:]] = np.abs(true_disp[index[0][:], index[1][:], index[2][:]]-pred_disp[index[0][:], 0, index[1][:], index[2][:]])f)训练之前应预先在PSMNet-master文件夹下新建trained文件夹,否则会出现如下错误:
[Errno 2] No such file or directory: './trained/finetune_1.tar'完成上述代码修改,可使用以下代码finetune网络:
cd .../PSMNet-master
python finetune.py --maxdisp 192 \
    --model stackhourglass \
    --datatype 2015 \
    --datapath .../data_scene_flow/training/ \
    --epochs 300 \
    --loadmodel .../pretrained_model/pretrained_model_KITTI2015.tar \
    --savemodel ./trained
4. 对于训练获得的PSMNet神经网络进行评估
使用以下代码进行评估:
cd .../PSMNet-master
python submission.py --maxdisp 192 \
    --model stackhourglass \
    --KITTI 2015 \
    --datapath .../data_scene_flow/testing/ \
    --loadmodel .../PSMNet-master/trained/finetune_300.tar
请对应修改datapath目录。代码所示的finetune_300.tar为训练300epochs后保存的神经网络。评估同样会在PSMNet-master文件夹内生成大量伪彩色深度图。
可以通过以下代码进行(美观化)上色:
# coding=utf-8
import cv2
import numpy as np

# 读取视差图
disparity_map = cv2.imread('000107_10.png', cv2.IMREAD_UNCHANGED)

# 将视差图转换为深度图
depth_map = np.zeros(disparity_map.shape, dtype=np.float32)
invalid_mask = disparity_map == 0
valid_mask = np.logical_not(invalid_mask)
depth_map[valid_mask] = 1.0 / (disparity_map[valid_mask].astype(np.float32) / 255.0)

# 将深度图转换为彩色深度图
depth_map_normalized = cv2.normalize(depth_map, None, 0, 1, cv2.NORM_MINMAX)
depth_map_colored = cv2.applyColorMap(np.uint8(depth_map_normalized * 255), cv2.COLORMAP_JET)

# 显示彩色深度图
cv2.imshow('Colored Depth Map', depth_map_colored)
cv2.waitKey(0)
可以获得更直观的效果。
部分识别结果如下:
a)testing的第156号图片,街景两侧多个车辆均有效识别,体积、位置、形状正确。


b)testing的第174号图片,行人有效识别但左侧的建筑边界由于纹理特征不明显,没有合理地估计出深度。
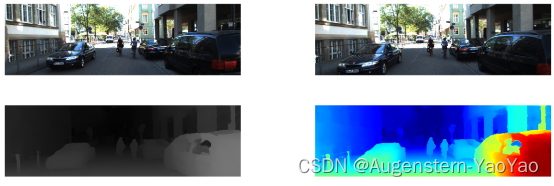
c)testing的第132号图片,右下角镜头边缘由于镜头畸变、近景左右相机拍摄部分不全等原因,出现了预测小范围失真的情况,但整体来讲预测精度较好。

d)testing的第186号图片。


5. 总结
PSMNet的训练过程需要大量的时间和计算资源,网络结构比较复杂,且需要在多个尺度上进行处理;模型对于纹理较少的区域或者低对比度的区域的深度估计结果不够准确,容易出现误匹配现象。
可以考虑进一步优化网络结构,减少网络参数和计算量,提高训练和推理效率;引入更多的先验知识,在训练时可以通过数据增强的方式加入不同光照条件下的图像数据,从而提高模型对光照变化的适应性。
