1. STM32F105RBT6 系统时钟树
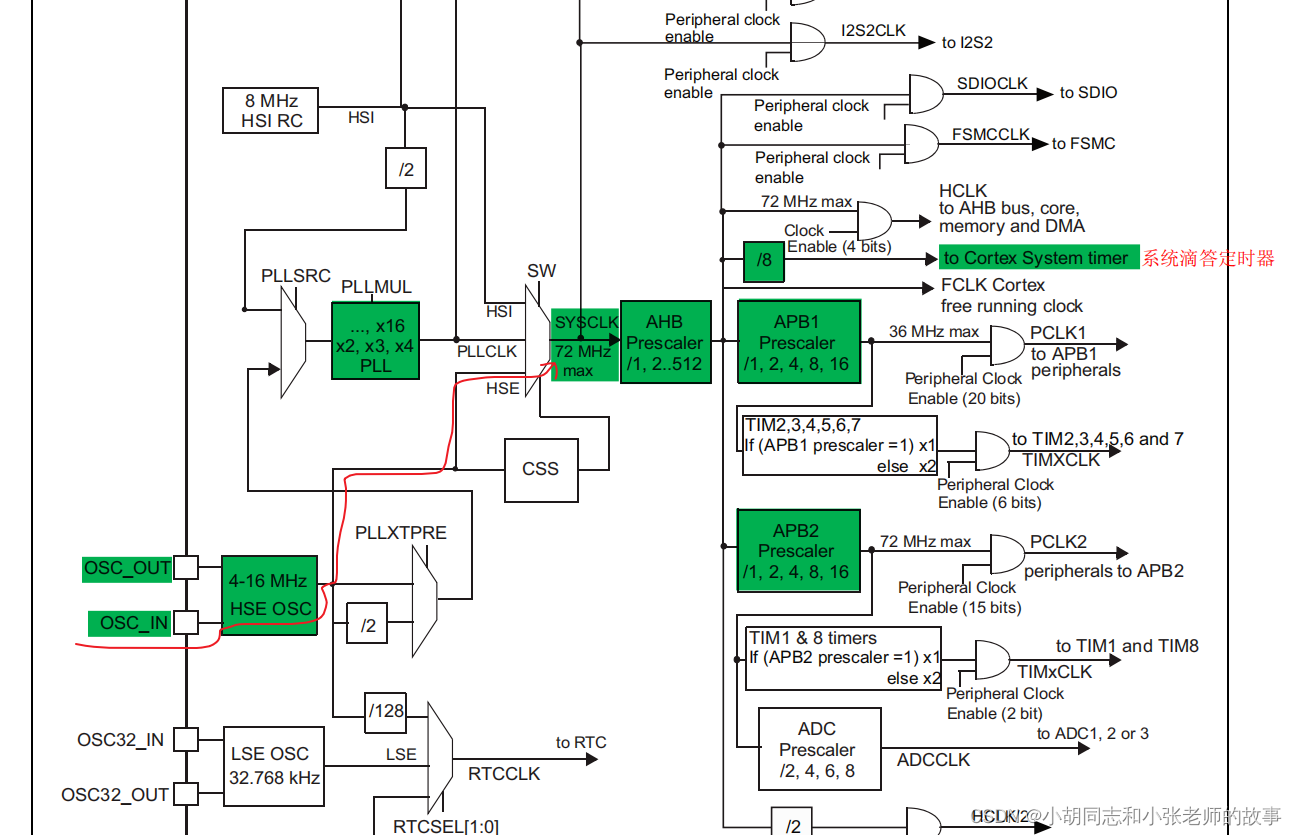
2. 使用外部时钟给系统提供时钟HSE,外接一个8Mhz的晶振
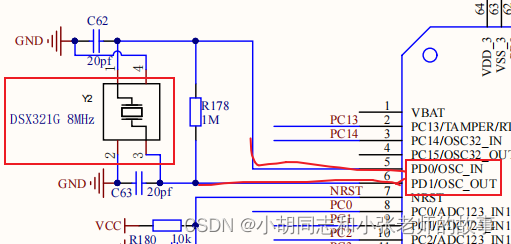
3. 系统在启动的时候就会调用系统初始化函数,配置RCC 时钟系统,在调用main函数之前调用SystemInit函数
startup_stm32f10x_hd.s
; Reset handler
Reset_Handler   PROC
                EXPORT  Reset_Handler             [WEAK]
                IMPORT  __main
                IMPORT  SystemInit    ; 上电复位,在main函数之前调用系统初始化函数
                LDR     R0, =SystemInit
                BLX     R0
                LDR     R0, =__main
                BX      R0
                ENDP
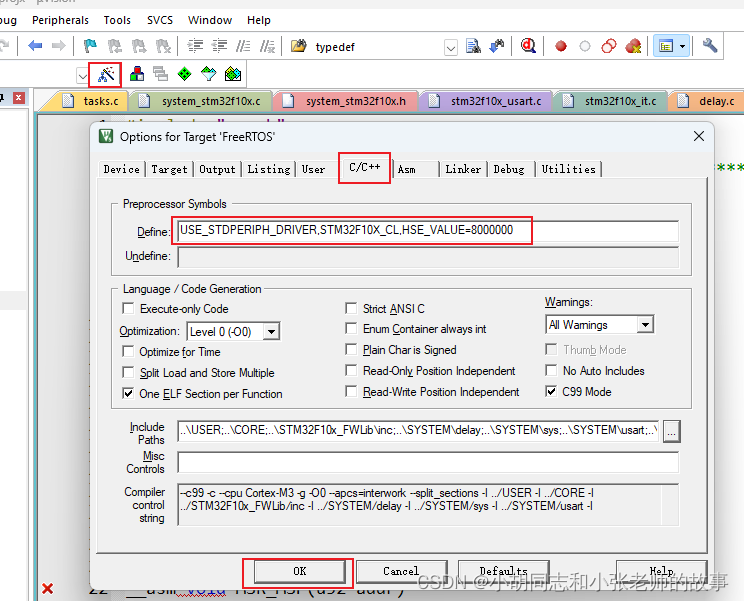
4. keil 宏定义 USE_STDPERIPH_DRIVER,STM32F10X_CL,HSE_VALUE=8000000
中间用逗号隔开 STM32F10X_CL 这里可以不用定义,因为选芯片stm32f105rbt6 的时候默认已经定义了,HSE_VALUE=8000000 这个也可以不用定义,因为后面代码里面会再定义一次
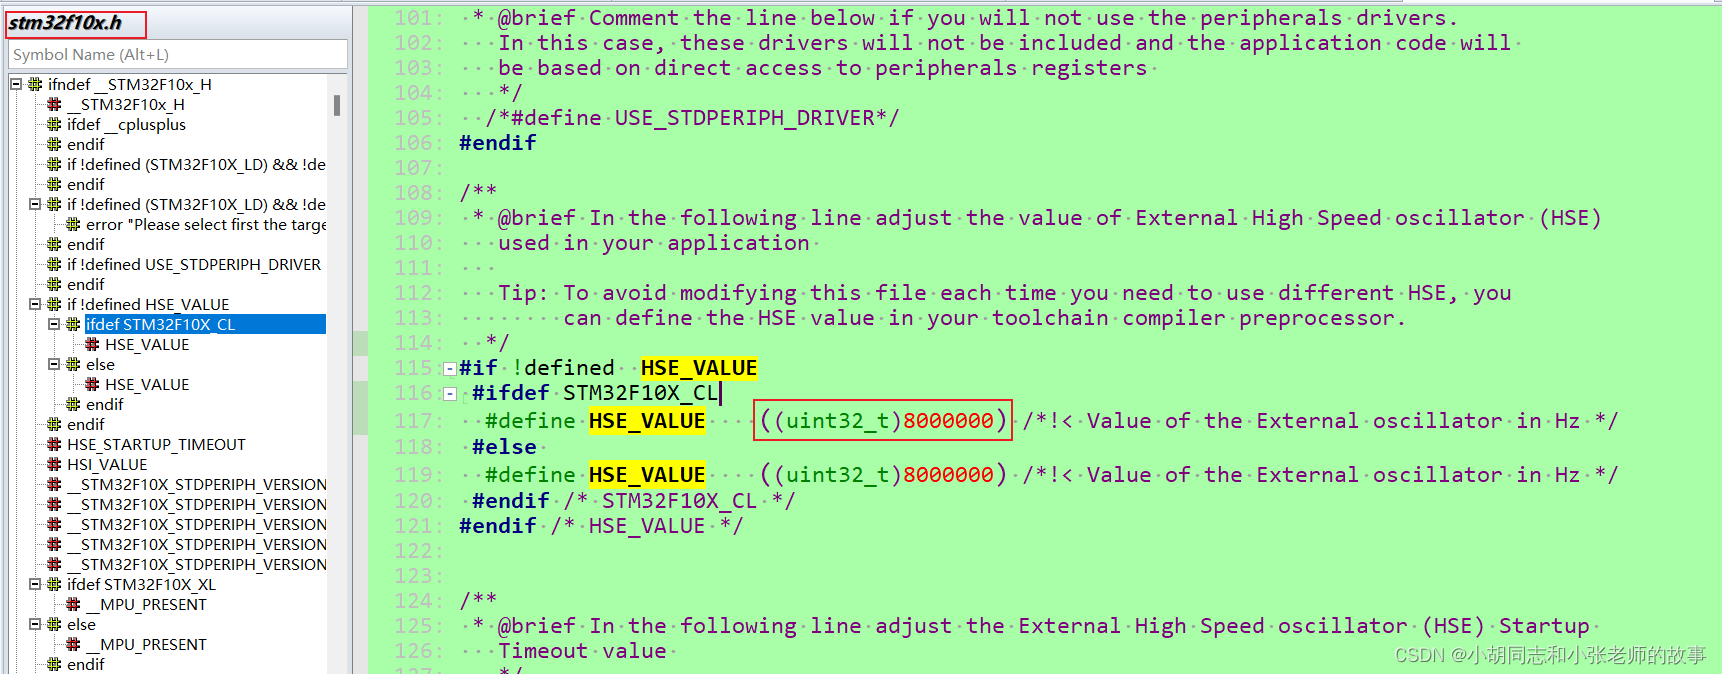
5. 设置宏 HSE_VALUE 的值,STM32F105RBT6 默认是接的25Mhz的晶振,这里需要改成8Mhz
stm32f10x.h
/**
 * @brief In the following line adjust the value of External High Speed oscillator (HSE)
   used in your application

   Tip: To avoid modifying this file each time you need to use different HSE, you
        can define the HSE value in your toolchain compiler preprocessor.
  */
#if !defined  HSE_VALUE
 #ifdef STM32F10X_CL
  #define HSE_VALUE    ((uint32_t)8000000) /*!< Value of the External oscillator in Hz */
 #else
  #define HSE_VALUE    ((uint32_t)8000000) /*!< Value of the External oscillator in Hz */
 #endif /* STM32F10X_CL */
#endif /* HSE_VALUE */
6. STM32F105RBT6 系统时钟配置模块图,用CubeMX 打开的图
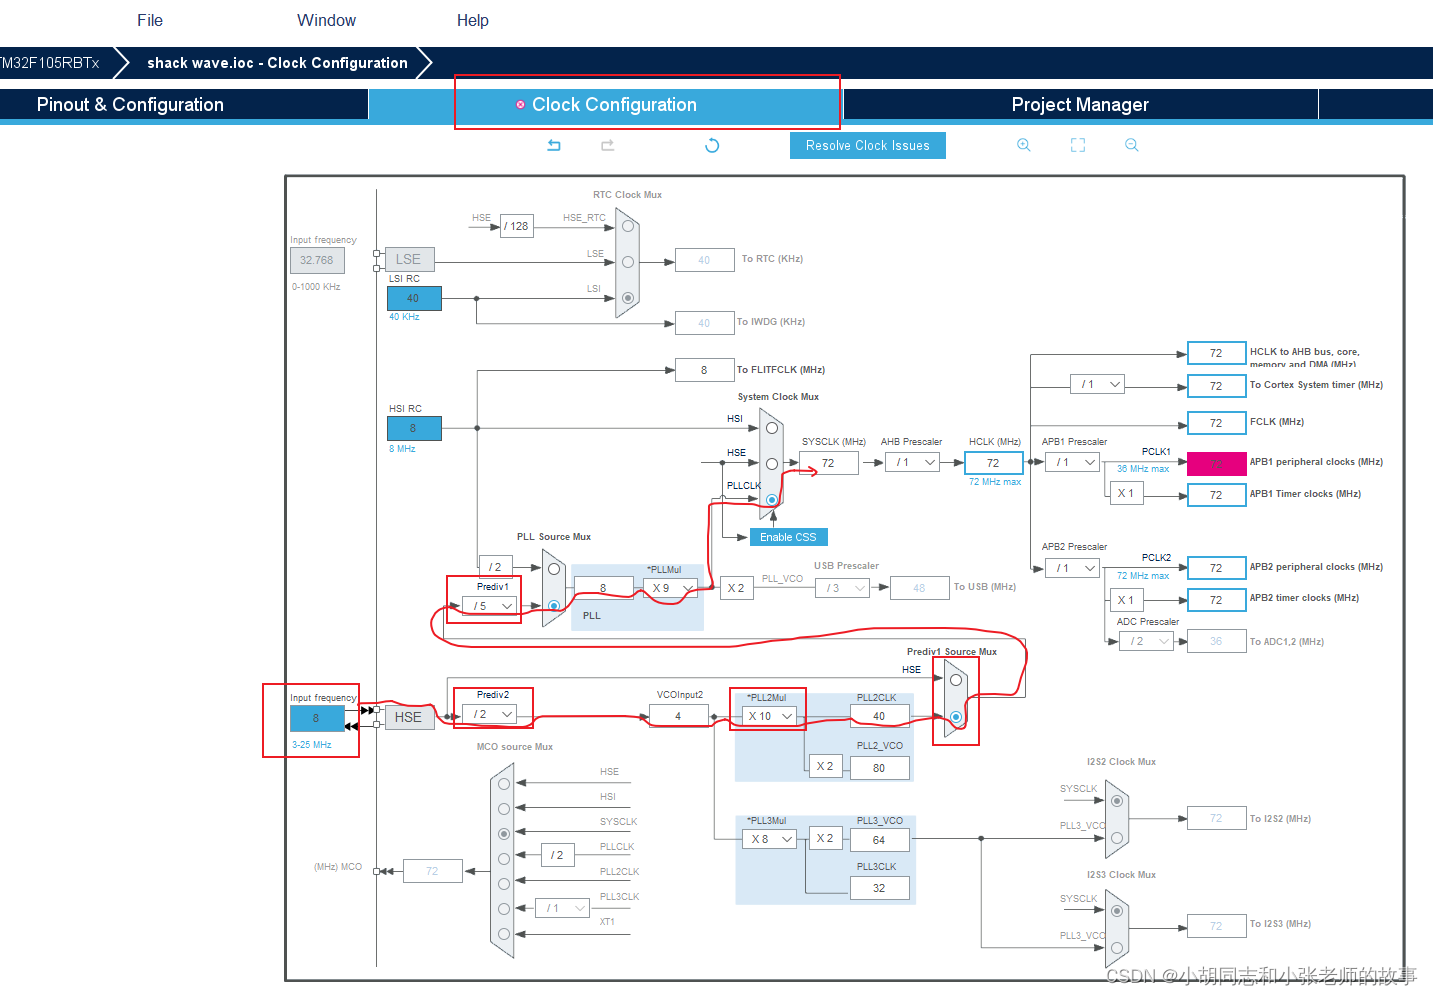
7. HSE 时钟配置
system_stm32f10x.c
/**
  * @brief  Sets System clock frequency to 72MHz and configure HCLK, PCLK2
  *          and PCLK1 prescalers.
  * @note   This function should be used only after reset.
  * @param  None
  * @retval None
  */
static void SetSysClockTo72(void)
{
  __IO uint32_t StartUpCounter = 0, HSEStatus = 0;

  /* SYSCLK, HCLK, PCLK2 and PCLK1 configuration ---------------------------*/
  /* Enable HSE */
  RCC->CR |= ((uint32_t)RCC_CR_HSEON);

  /* Wait till HSE is ready and if Time out is reached exit */
  do
  {
    HSEStatus = RCC->CR & RCC_CR_HSERDY;
    StartUpCounter++;
  } while((HSEStatus == 0) && (StartUpCounter != HSE_STARTUP_TIMEOUT));

  if ((RCC->CR & RCC_CR_HSERDY) != RESET)
  {
    HSEStatus = (uint32_t)0x01;
  }
  else
  {
    HSEStatus = (uint32_t)0x00;
  }

  if (HSEStatus == (uint32_t)0x01)
  {
    /* Enable Prefetch Buffer */
    FLASH->ACR |= FLASH_ACR_PRFTBE;

    /* Flash 2 wait state */
    FLASH->ACR &= (uint32_t)((uint32_t)~FLASH_ACR_LATENCY);
    FLASH->ACR |= (uint32_t)FLASH_ACR_LATENCY_2;


    /* HCLK = SYSCLK */
    RCC->CFGR |= (uint32_t)RCC_CFGR_HPRE_DIV1;

    /* PCLK2 = HCLK */
    RCC->CFGR |= (uint32_t)RCC_CFGR_PPRE2_DIV1;

    /* PCLK1 = HCLK */
    RCC->CFGR |= (uint32_t)RCC_CFGR_PPRE1_DIV2;

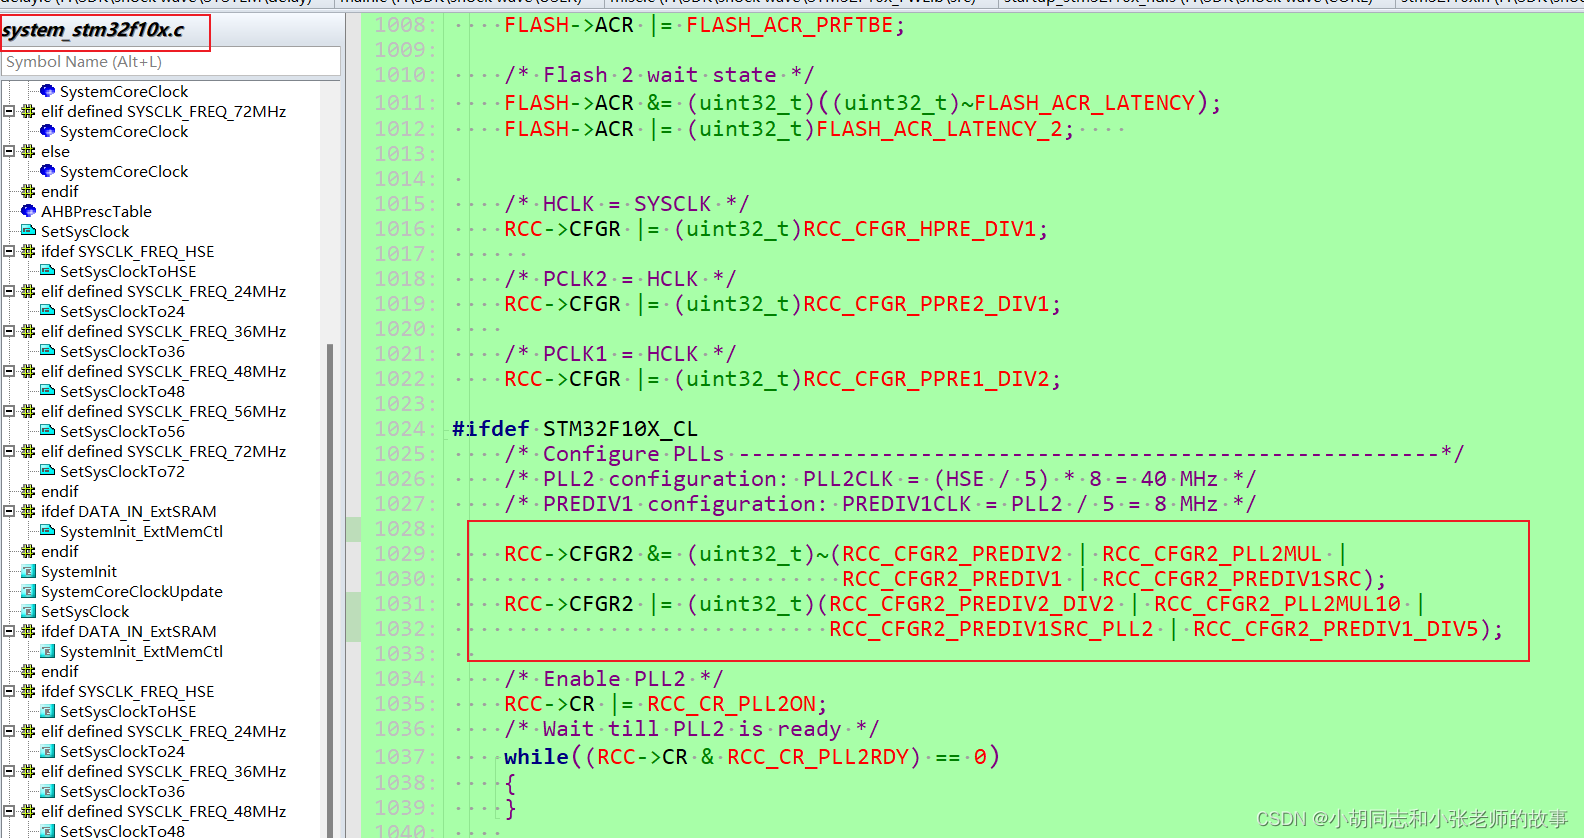
#ifdef STM32F10X_CL
    /* Configure PLLs ------------------------------------------------------*/
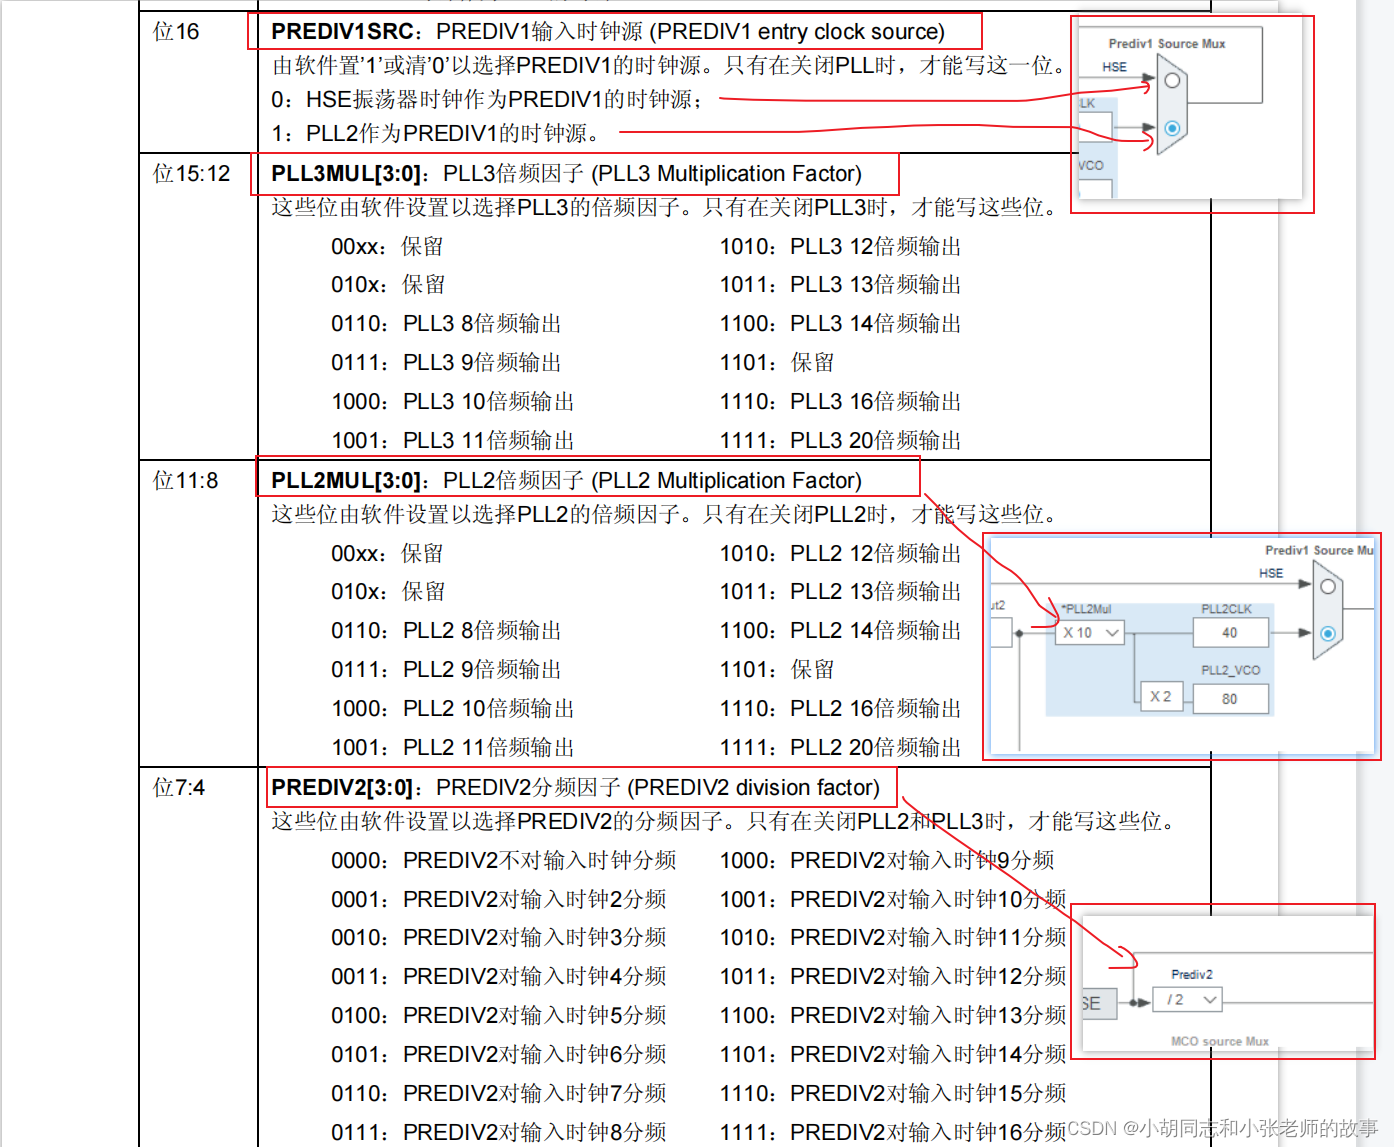
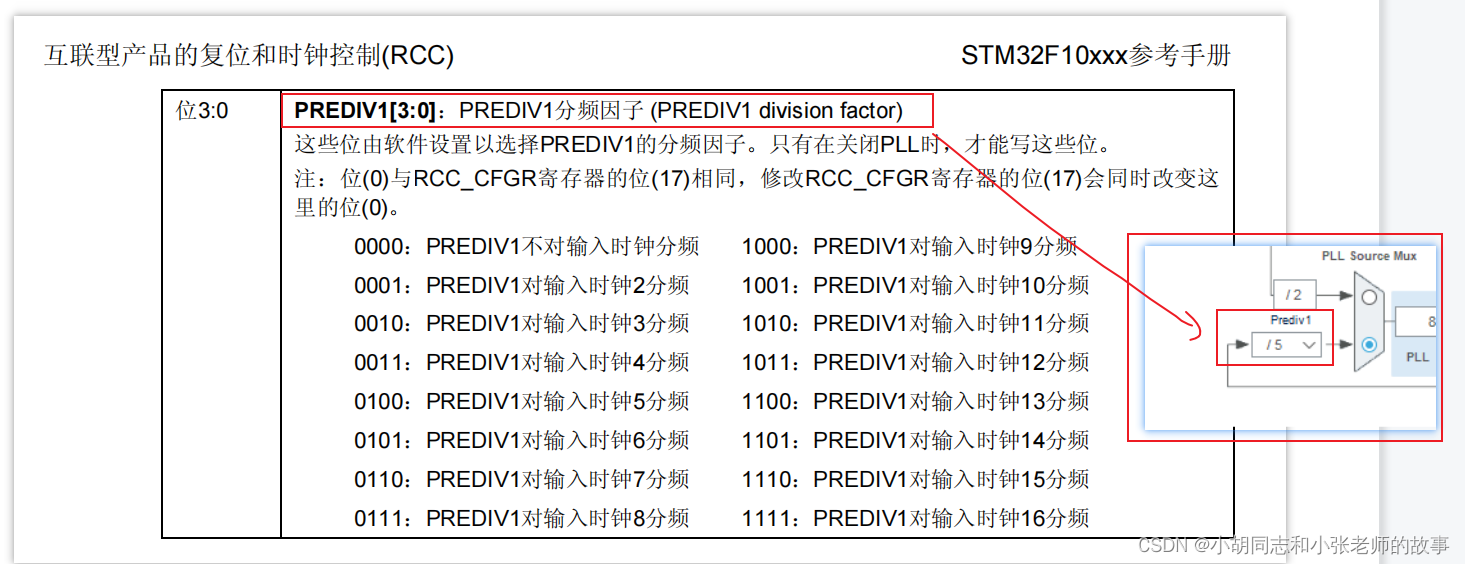
    /* PLL2 configuration: PLL2CLK = (HSE / 5) * 8 = 40 MHz */
    /* PREDIV1 configuration: PREDIV1CLK = PLL2 / 5 = 8 MHz */

    RCC->CFGR2 &= (uint32_t)~(RCC_CFGR2_PREDIV2 | RCC_CFGR2_PLL2MUL |
                              RCC_CFGR2_PREDIV1 | RCC_CFGR2_PREDIV1SRC);
    RCC->CFGR2 |= (uint32_t)(RCC_CFGR2_PREDIV2_DIV2 | RCC_CFGR2_PLL2MUL10 |
                             RCC_CFGR2_PREDIV1SRC_PLL2 | RCC_CFGR2_PREDIV1_DIV5);

    /* Enable PLL2 */
    RCC->CR |= RCC_CR_PLL2ON;
    /* Wait till PLL2 is ready */
    while((RCC->CR & RCC_CR_PLL2RDY) == 0)
    {
    }


    /* PLL configuration: PLLCLK = PREDIV1 * 9 = 72 MHz */
    RCC->CFGR &= (uint32_t)~(RCC_CFGR_PLLXTPRE | RCC_CFGR_PLLSRC | RCC_CFGR_PLLMULL);
    RCC->CFGR |= (uint32_t)(RCC_CFGR_PLLXTPRE_PREDIV1 | RCC_CFGR_PLLSRC_PREDIV1 |
                            RCC_CFGR_PLLMULL9);
#else
    /*  PLL configuration: PLLCLK = HSE * 9 = 72 MHz */
    RCC->CFGR &= (uint32_t)((uint32_t)~(RCC_CFGR_PLLSRC | RCC_CFGR_PLLXTPRE |
                                        RCC_CFGR_PLLMULL));
    RCC->CFGR |= (uint32_t)(RCC_CFGR_PLLSRC_HSE | RCC_CFGR_PLLMULL9);
#endif /* STM32F10X_CL */

    /* Enable PLL */
    RCC->CR |= RCC_CR_PLLON;

    /* Wait till PLL is ready */
    while((RCC->CR & RCC_CR_PLLRDY) == 0)
    {
    }

    /* Select PLL as system clock source */
    RCC->CFGR &= (uint32_t)((uint32_t)~(RCC_CFGR_SW));
    RCC->CFGR |= (uint32_t)RCC_CFGR_SW_PLL;

    /* Wait till PLL is used as system clock source */
    while ((RCC->CFGR & (uint32_t)RCC_CFGR_SWS) != (uint32_t)0x08)
    {
    }
  }
  else
  { /* If HSE fails to start-up, the application will have wrong clock
         configuration. User can add here some code to deal with this error */
  }
}
8. 代码与图的对应关系
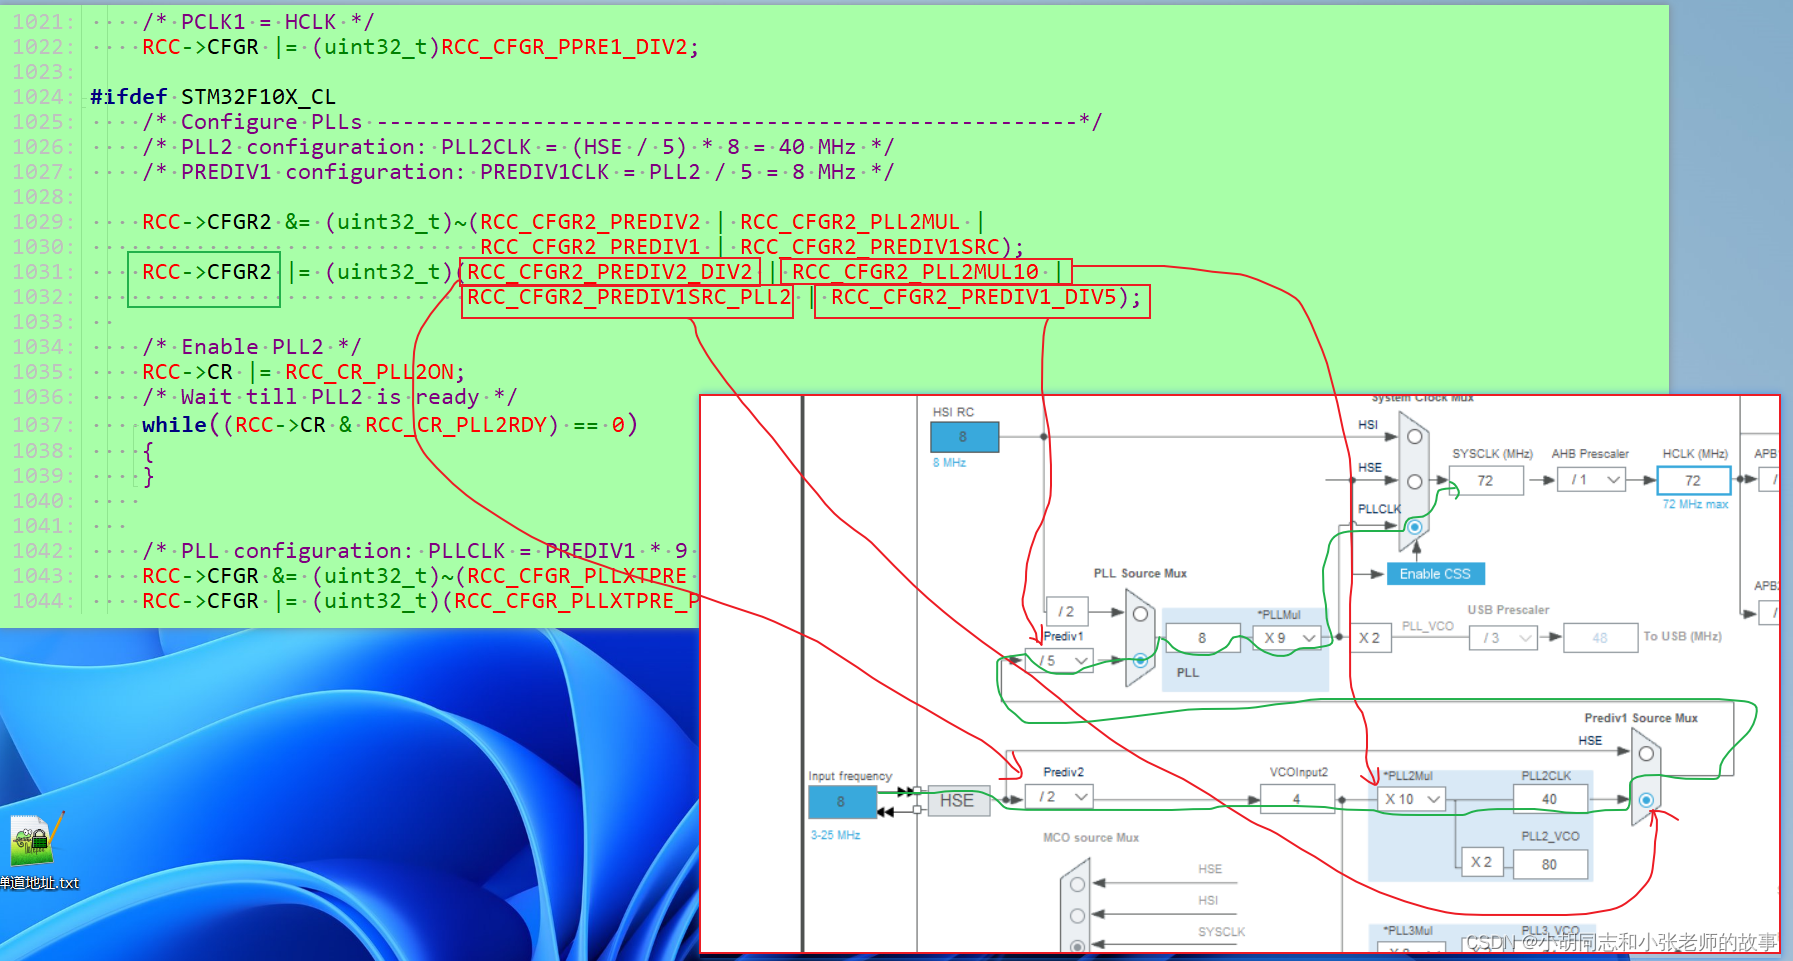
不同型号的芯片,一般只有这几个参数不同,只需要设置RCC的这几个寄存器就可以配置不同的系统时钟频率,可自由组合,想要多少自己配置
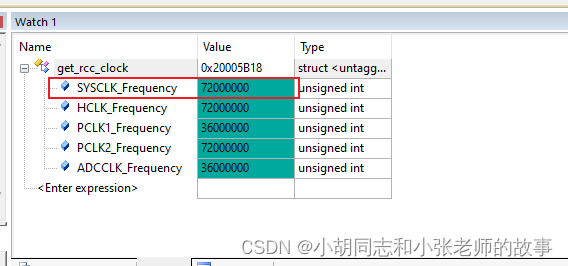
9. 配置好之后在keil里面仿真验证一下
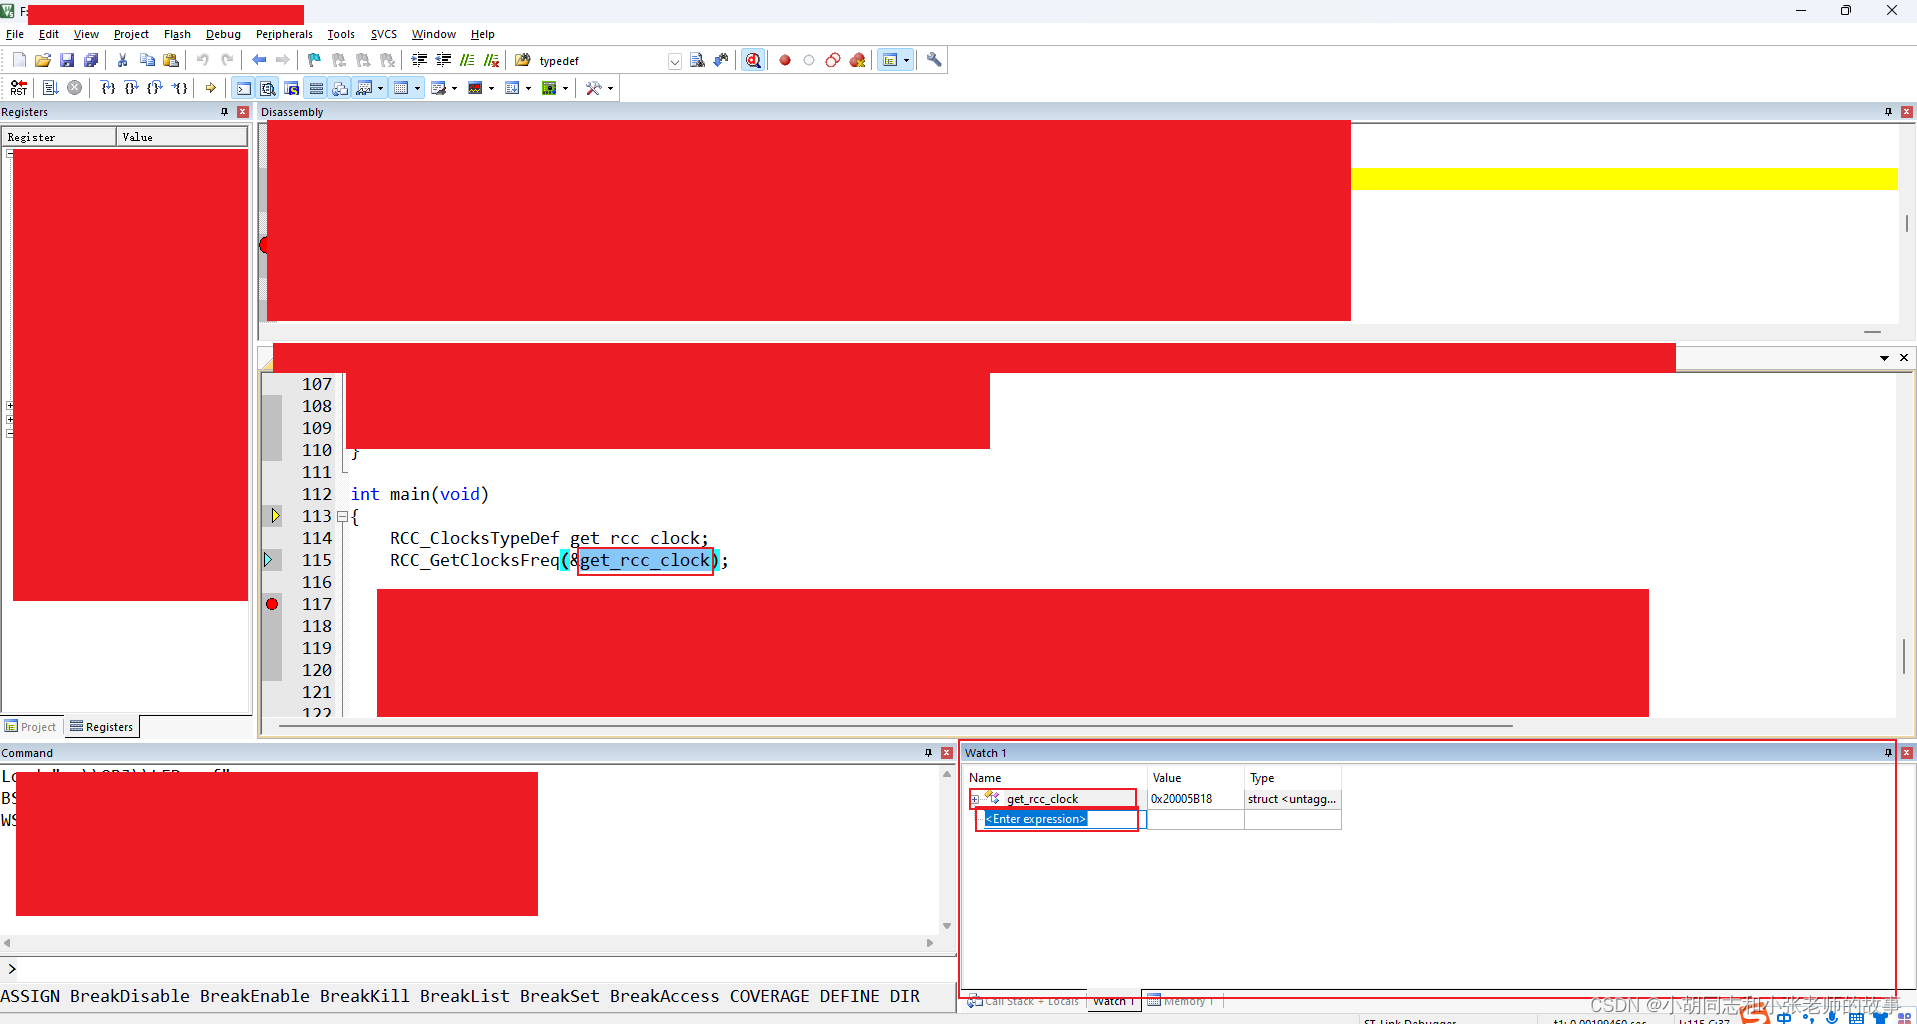
9.1 加两行调试代码,打一个断点,编译
     RCC_ClocksTypeDef get_rcc_clock;
    RCC_GetClocksFreq(&get_rcc_clock);

9.2 连接开发板,点击debug
 ###
###
9.3 打开watch 窗口
点击view->Watch Window->Watch1

9.4 在watch 窗口查看变量的值,输入 get_rcc_clock
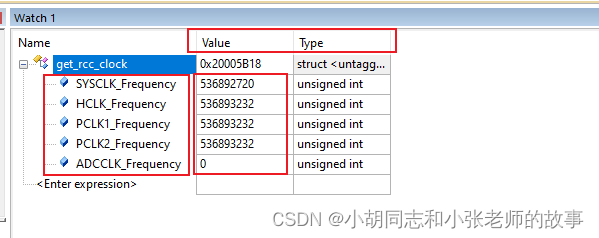
9.5 变量值
9.6 全速运行

9.7 再看变量值,然后自己慢慢玩吧
10. 寄存器介绍


![[QT_055]设置QT源码调试(qtc+vs/mingw+msvc)](https://img-blog.csdnimg.cn/b3aeb7e64d864400a8262f4ec00db104.png)


