Seata 分布式事务-应用实例
需求分析/图解
- 需求:完成下订单功能,由三个微服务模块协同完成, 涉及到多数据库, 多张表
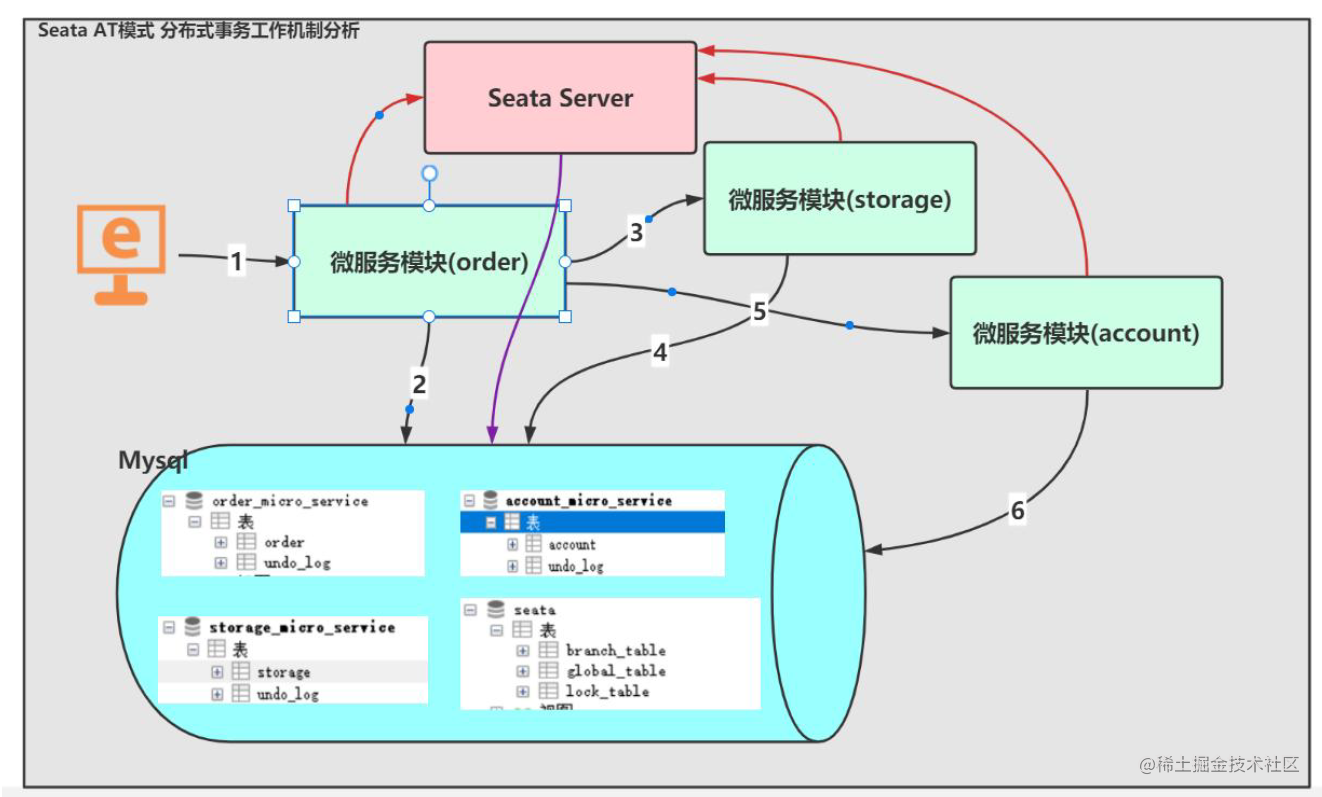
分析 黑色线是执行顺序线 红色线是想Seata Server注册 最后紫色线是决定是否提交和回滚
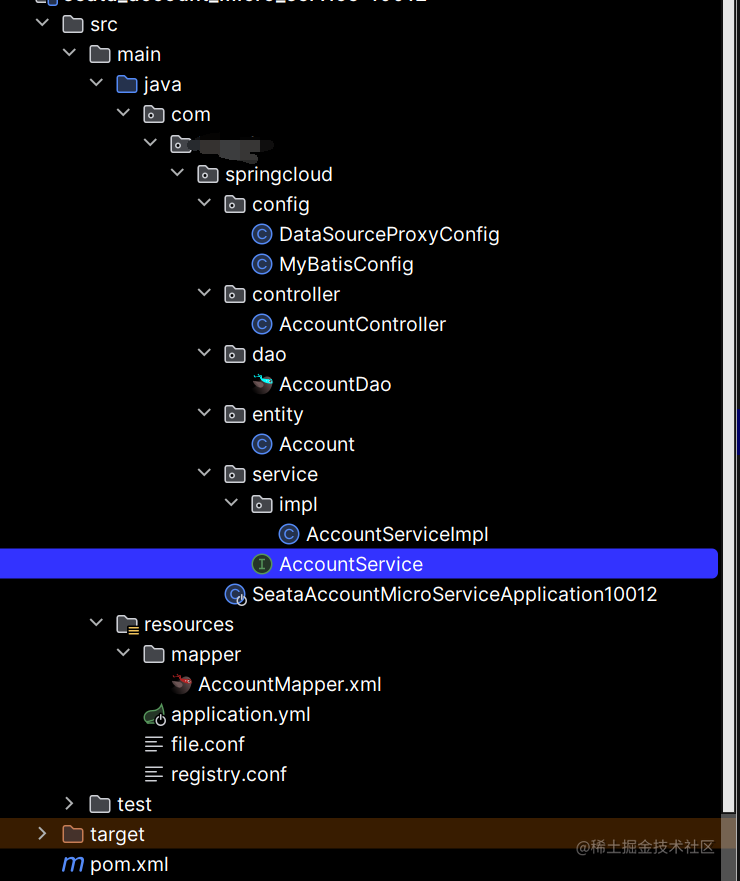
项目目录
主题包结构都是一样的但是类名字每个项目是不一样的这里列举的10012端口微服务的
创建数据库和表
-- 订单微服务的数据库
CREATE DATABASE order_micro_service
USE order_micro_service

CREATE TABLE `order`(
id BIGINT NOT NULL AUTO_INCREMENT PRIMARY KEY,
user_id BIGINT DEFAULT NULL ,
product_id BIGINT DEFAULT NULL ,
nums INT DEFAULT NULL ,
money INT DEFAULT NULL,
`status` INT DEFAULT NULL COMMENT '0:创建中; 1:已完结'
);
SELECT * FROM `order`

-- 库存微服务的数据库`storage``order`
CREATE DATABASE storage_micro_service
USE storage_micro_service

CREATE TABLE `storage`(
id BIGINT NOT NULL AUTO_INCREMENT PRIMARY KEY,
product_id BIGINT DEFAULT NULL ,
amount INT DEFAULT NULL COMMENT '库存量'
);

-- 初始化库存表
INSERT INTO `storage` VALUES(NULL, 1, 10);
SELECT * FROM `storage`

-- 账号微服务的数据库
CREATE DATABASE account_micro_service
USE account_micro_service

CREATE TABLE `account`(
id BIGINT NOT NULL AUTO_INCREMENT PRIMARY KEY ,
user_id BIGINT DEFAULT NULL ,
money INT DEFAULT NULL COMMENT '账户金额'
);

-- 初始化账户表
INSERT INTO `account` VALUES(NULL, 666, 10000);
分别为3 库创建对应的回滚日志表, 说明回滚日志表在seata 的\conf\db_undo_log.sql
use order_micro_service
CREATE TABLE `undo_log` (
`id` bigint(20) NOT NULL AUTO_INCREMENT,
`branch_id` bigint(20) NOT NULL,
`xid` varchar(100) NOT NULL,
`context` varchar(128) NOT NULL,
`rollback_info` longblob NOT NULL,
`log_status` int(11) NOT NULL,
`log_created` datetime NOT NULL,
`log_modified` datetime NOT NULL,
`ext` varchar(100) DEFAULT NULL,
PRIMARY KEY (`id`),
UNIQUE KEY `ux_undo_log` (`xid`,`branch_id`)
) ENGINE=InnoDB AUTO_INCREMENT=1 DEFAULT CHARSET=utf8;

use storage_micro_service
CREATE TABLE `undo_log` (
`id` bigint(20) NOT NULL AUTO_INCREMENT,
`branch_id` bigint(20) NOT NULL,
`xid` varchar(100) NOT NULL,
`context` varchar(128) NOT NULL,
`rollback_info` longblob NOT NULL,
`log_status` int(11) NOT NULL,
`log_created` datetime NOT NULL,
`log_modified` datetime NOT NULL,
`ext` varchar(100) DEFAULT NULL,
PRIMARY KEY (`id`),
UNIQUE KEY `ux_undo_log` (`xid`,`branch_id`)
) ENGINE=InnoDB AUTO_INCREMENT=1 DEFAULT CHARSET=utf8;

use account_micro_service
CREATE TABLE `undo_log` (
`id` bigint(20) NOT NULL AUTO_INCREMENT,
`branch_id` bigint(20) NOT NULL,
`xid` varchar(100) NOT NULL,
`context` varchar(128) NOT NULL,
`rollback_info` longblob NOT NULL,
`log_status` int(11) NOT NULL,
`log_created` datetime NOT NULL,
`log_modified` datetime NOT NULL,
`ext` varchar(100) DEFAULT NULL,
PRIMARY KEY (`id`),
UNIQUE KEY `ux_undo_log` (`xid`,`branch_id`)
) ENGINE=InnoDB AUTO_INCREMENT=1 DEFAULT CHARSET=utf8;
开发seata_storage_micro_service-10010 微服务
参考以前的方式,创建seata_storage_micro_service-10010 微服务模块
修改pom.xml
添加相关的jar 依赖
    <!--引入相关的依赖-->
    <dependencies>
        <!--引入opefeign starter 即场景启动器 因为要和其他微服务通信-->
        <dependency>
            <groupId>org.springframework.cloud</groupId>
            <artifactId>spring-cloud-starter-openfeign</artifactId>
        </dependency>

        <!--引入 seata starter -->
        <dependency>
            <groupId>com.alibaba.cloud</groupId>
            <artifactId>spring-cloud-starter-alibaba-seata</artifactId>
            <exclusions>
                <!--排除自带的seata-all, 引入自己的版本, 否则会出现冲突-->
                <exclusion>
                    <groupId>io.seata</groupId>
                    <artifactId>seata-all</artifactId>
                </exclusion>
            </exclusions>
        </dependency>
        <!--引入指定版本的seata-all-->
        <dependency>
            <groupId>io.seata</groupId>
            <artifactId>seata-all</artifactId>
            <version>0.9.0</version>
        </dependency>
        <!--引入nacos-starter nacos的场景启动器starter -->
        <dependency>
            <groupId>com.alibaba.cloud</groupId>
            <artifactId>spring-cloud-alibaba-nacos-discovery</artifactId>
        </dependency>

        <!--引入web-starter 说明我们使用版本仲裁(从父项目继承了版本)
        -->
        <dependency>
            <groupId>org.springframework.boot</groupId>
            <artifactId>spring-boot-starter-web</artifactId>
        </dependency>


        <dependency>
            <groupId>org.springframework.boot</groupId>
            <artifactId>spring-boot-starter-actuator</artifactId>
        </dependency>

        <!--引入mybatis-starter 整合到springboot-->
        <dependency>
            <groupId>org.mybatis.spring.boot</groupId>
            <artifactId>mybatis-spring-boot-starter</artifactId>
        </dependency>

        <!--引入druid-starter-->
        <dependency>
            <groupId>com.alibaba</groupId>
            <artifactId>druid-spring-boot-starter</artifactId>
            <!--这里需要我们指定版本, 因为父项目没有-->
            <version>1.1.17</version>
        </dependency>

        <!--引入mysql依赖,使用版本仲裁-->
        <dependency>
            <groupId>mysql</groupId>
            <artifactId>mysql-connector-java</artifactId>
        </dependency>

        <!--spring-boot-start-jdbc引入-->
        <dependency>
            <groupId>org.springframework.boot</groupId>
            <artifactId>spring-boot-starter-jdbc</artifactId>
        </dependency>

        <!--lombok-->
        <dependency>
            <groupId>org.projectlombok</groupId>
            <artifactId>lombok</artifactId>
            <optional>true</optional>
        </dependency>

        <!--引入test-starter-->
        <dependency>
            <groupId>org.springframework.boot</groupId>
            <artifactId>spring-boot-starter-test</artifactId>
        </dependency>
        <!--引入公共模块-->
        <dependency>
            <groupId>com.wyxedu.springcloud</groupId>
            <artifactId>e_commerce_center-common-api</artifactId>
            <version>${project.version}</version>
        </dependency>
    </dependencies>
创建application.yml
进行相关的配置
server:
  port: 10010
spring:
  application:
    name: seata-storage-micro-service
  cloud:
    alibaba:
      seata:
        #指定事务组名,需要和seata-server中的对应 /conf/file.conf
        tx-service-group: wyx_order_tx_group
    nacos:
      discovery:
        server-addr: localhost:8848 #指定nacos server地址
  datasource:
    driver-class-name: com.mysql.jdbc.Driver
         #注意数据库要改对应的数据库
    url: jdbc:mysql://localhost:3306/storage_micro_service
    username: root
    password: 自己的密码
#配置seata日志输出
logging:
  level:
    io:
      seata: info

mybatis:
  mapperLocations: classpath:mapper/*.xml
创建conf文件
resources目录下
-
创建file.conf, 进行相关的配置, 说明:该文件从seata 的\conf\file.conf 拷贝,进行修改即可 注意因为我们前面已经修改了所以这里可以不需要修改之际拷贝即可
-
创建registry.conf, 进行相关的配置, 说明:该文件从seata 的\conf\registry.conf 拷贝,进行修改即可 注意因为我们前面已经修改了所以这里可以不需要修改之际拷贝即可
创建/entity/Storage
/entity/Storage.java
/**
 * Storage 实体类对应 storage表
 */
@Data
@AllArgsConstructor
@NoArgsConstructor
public class Storage {
    private Long id;
    private Long productId;
    private Integer amount;
}
创建StorageDao
/dao/StorageDao.java接口
@Mapper
public interface StorageDao {
    //扣减库存信息
    void reduce(@Param("productId") Long productId, @Param("nums") Integer nums);
}
注意这里使用; @Param注解指定一下为好 防止不识别
创建StorageMapper
resources/mapper/StorageMapper.xml
<?xml version="1.0" encoding="UTF-8" ?>
<!DOCTYPE mapper PUBLIC "-//mybatis.org//DTD Mapper 3.0//EN" "http://mybatis.org/dtd/mybatis-3-mapper.dtd" >

<mapper namespace="com.wyxedu.springcloud.dao.StorageDao">

    <resultMap id="BaseResultMap" type="com.springcloud.entity.Storage">
        <id column="id" property="id" jdbcType="BIGINT"/>
        <result column="product_id" property="productId" jdbcType="BIGINT"/>
        <result column="amount" property="amount" jdbcType="INTEGER"/>
    </resultMap>
    <!-- 减少库存 -->
    <update id="reduce">
        UPDATE
            storage
        SET
            amount = amount - #{nums}
        WHERE
            product_id = #{productId}
    </update>

</mapper>
创建StorageService
service/StorageService.java接口
public interface StorageService {
    // 扣减库存
    void reduce(Long productId, Integer nums);
}
创建StorageServiceImpl
service/impl/StorageServiceImpl.java
@Slf4j
@Service
public class StorageServiceImpl implements StorageService {

    @Resource
    private StorageDao storageDao;

    @Override
    public void reduce(Long productId, Integer nums) {
        log.info("==========seata_storage_micro_service-10010 扣减库存 start==========");
        storageDao.reduce(productId, nums);
        log.info("==========seata_storage_micro_service-10010 扣减库存 end==========");

    }
}
创建StorageController
controller/StorageController.java
@RestController
public class StorageController {

    @Resource
    private StorageService storageService;

    //扣减库存
    @PostMapping("/storage/reduce")
    public Result reduce(@RequestParam("productId") Long productId,@RequestParam("nums") Integer nums) {
        storageService.reduce(productId, nums);
        return Result.success("扣减库存成功ok", null);
    }

}
创建MyBatisConfig
config/MyBatisConfig
/**
 * 常规配置 Mybatis 和 dao关联
 */
@Configuration
@MapperScan({"com.springcloud.dao"})
public class MyBatisConfig {
}
创建DataSourceProxyConfig
config/DataSourceProxyConfig常规配置(拿来使用即可)
注意DataSourceProxy 是引入的 io.seata.rm.datasource不要引入错了
/**
 * 说明
 * 1. 这里很重要: 配置数据源的代理是seata 也就是使用seata代理数据源
 * 2. DataSourceProxy 是引入的 io.seata.rm.datasource
 */
@Configuration
public class DataSourceProxyConfig {

    @Value("${mybatis.mapperLocations}")
    private String mapperLocations;

    //配置druidDataSource
    @Bean
    @ConfigurationProperties(prefix = "spring.datasource")
    public DataSource druidDataSource() {
        return new DruidDataSource();
    }

    //配置DataSourceProxy- 使用seata代理数据源
    @Bean
    public DataSourceProxy dataSourceProxy(DataSource dataSource) {
        return new DataSourceProxy(dataSource);
    }

    //配置SqlSessionFactory-常规写法
    @Bean
    public SqlSessionFactory sqlSessionFactoryBean(DataSourceProxy dataSourceProxy)
            throws Exception {
        SqlSessionFactoryBean sqlSessionFactoryBean =
                new SqlSessionFactoryBean();
        sqlSessionFactoryBean.setDataSource(dataSourceProxy);
        sqlSessionFactoryBean.setMapperLocations
                (new PathMatchingResourcePatternResolver().getResources(mapperLocations));
        sqlSessionFactoryBean.setTransactionFactory
                (new SpringManagedTransactionFactory());
        return sqlSessionFactoryBean.getObject();
    }

}
创建主启动类
SeataStorageMicroServiceApplication10010.java
//注意: 需要取消数据源的自动配置
//而是使用seata 代理数据源, DataSourceProxy
@SpringBootApplication(exclude = DataSourceAutoConfiguration.class)
@EnableDiscoveryClient
@EnableFeignClients
public class SeataStorageMicroServiceApplication10010 {
    public static void main(String[] args) {
        SpringApplication.run
                (SeataStorageMicroServiceApplication10010.class,args);
    }
}
测试seata_storage_micro_service-10010 微服务
-
启动Nacos Server 8848
-
双击Seata 的\bin\seata-server.bat , 启动Seata Server
-
启动seata_storage_micro_service-10010
-
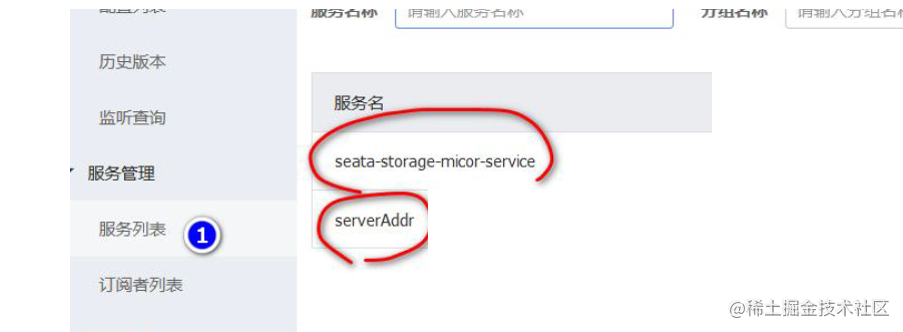
登录Nacos Server , 查看10010 微服务是否注册成功
4. 1. 登录Nacos Server, 查看10010 是否注册成功
开发seata_account_micro_service-10012 微服务
-
参考以前的方式,创建seata_account_micro_service-10012 微服务模块
-
修改pom.xml, 添加相关的jar 依赖 和1010端口微服务一模一样
创建application.yml
进行相关的配置
server:
  port: 10012
spring:
  application:
    name: seata-account-micro-service
  cloud:
    alibaba:
      seata:
        #指定事务组名,需要和seata-server中的对应 /conf/file.conf
        tx-service-group: wyxedu_order_tx_group
    nacos:
      discovery:
        server-addr: localhost:8848 #指定nacos server地址
  datasource:
    driver-class-name: com.mysql.jdbc.Driver
         #注意数据库要改对应的数据库
    url: jdbc:mysql://localhost:3306/account_micro_service
    username: root
    password: 自己的密码
#配置seata日志输出
logging:
  level:
    io:
      seata: info

mybatis:
  mapperLocations: classpath:mapper/*.xml
创建conf文件
resources目录下
-
创建file.conf, 进行相关的配置, 说明:该文件从seata 的\conf\file.conf 拷贝,进行修改即可 注意因为我们前面已经修改了所以这里可以不需要修改之际拷贝即可
-
创建registry.conf, 进行相关的配置, 说明:该文件从seata 的\conf\registry.conf 拷贝,进行修改即可 注意因为我们前面已经修改了所以这里可以不需要修改之际拷贝即可
创建Account
com/springcloud/entity/Account.java
@Data
@AllArgsConstructor
@NoArgsConstructor
public class Account {
    private Long id;
    private Long userId;
    private Integer money;

}
创建AccountDao
com/springcloud/dao/AccountDao.java接口
@Mapper
public interface AccountDao {
    void reduce(@Param("userId") Long userId, @Param("money") Integer money);
}
创建AccountMapper
resources/mapper/AccountMapper.xml
<?xml version="1.0" encoding="UTF-8" ?>
<!DOCTYPE mapper PUBLIC "-//mybatis.org//DTD Mapper 3.0//EN" "http://mybatis.org/dtd/mybatis-3-mapper.dtd" >

<!--提醒-一定对应-->
<mapper namespace="com.wyx.springcloud.dao.AccountDao">

    <resultMap id="BaseResultMap" type="com.wyxedu.springcloud.entity.Account">
        <id column="id" property="id" jdbcType="BIGINT"/>
        <result column="user_id" property="userId" jdbcType="BIGINT"/>
        <result column="money" property="money" jdbcType="INTEGER"/>

    </resultMap>

    <!-- 扣减金额用户account表的money -->
    <update id="reduce">
        UPDATE account
        SET
          money = money - #{money}
        WHERE
          user_id = #{userId};
    </update>

</mapper>
创建AccountService
com/springcloud/service/AccountService.java接口
public interface AccountService {
    //扣减用户的money
    void reduce(Long userId, Integer money);
}
AccountServiceImpl
com/springcloud/service/impl/AccountServiceImpl.java
@Service
@Slf4j
public class AccountServiceImpl implements AccountService {

    @Resource
    AccountDao accountDao;

    @Override
    public void reduce(Long userId, Integer money) {
        log.info("========seata_account_micro_service-10012 扣减账户余额 start ======");
        accountDao.reduce(userId, money);
        log.info("========seata_account_micro_service-10012 扣减账户余额 end ======");
    }
}
创建AccountController
com/springcloud/controller/AccountController.java
@RestController
public class AccountController {
    @Resource
    AccountService accountService;

    /**
     * 扣减账户余额
     */
    @PostMapping("/account/reduce")
    public Result reduce(@RequestParam("userId") Long userId, @RequestParam("money") Integer money){

        accountService.reduce(userId,money);
        return Result.success("200", "扣减账户余额OK");
    }
}
创建MyBatisConfig
//常规配置 Mybatis 和 dao关联
@Configuration
@MapperScan({"com.wyxedu.springcloud.dao"})
public class MyBatisConfig {
}
创建DataSourceProxyConfig
config/DataSourceProxyConfig常规配置(拿来使用即可)
注意DataSourceProxy 是引入的 io.seata.rm.datasource不要引入错了
/**
 * 说明
 * 1. 这里很重要: 配置数据源的代理是seata 也就是使用seata代理数据源
 * 2. DataSourceProxy 是引入的 io.seata.rm.datasource
 */
@Configuration
public class DataSourceProxyConfig {

    @Value("${mybatis.mapperLocations}")
    private String mapperLocations;

    //配置druidDataSource
    @Bean
    @ConfigurationProperties(prefix = "spring.datasource")
    public DataSource druidDataSource() {
        return new DruidDataSource();
    }

    //配置DataSourceProxy- 使用seata代理数据源
    @Bean
    public DataSourceProxy dataSourceProxy(DataSource dataSource) {
        return new DataSourceProxy(dataSource);
    }

    //配置SqlSessionFactory-常规写法
    @Bean
    public SqlSessionFactory sqlSessionFactoryBean(DataSourceProxy dataSourceProxy)
            throws Exception {
        SqlSessionFactoryBean sqlSessionFactoryBean =
                new SqlSessionFactoryBean();
        sqlSessionFactoryBean.setDataSource(dataSourceProxy);
        sqlSessionFactoryBean.setMapperLocations
                (new PathMatchingResourcePatternResolver().getResources(mapperLocations));
        sqlSessionFactoryBean.setTransactionFactory
                (new SpringManagedTransactionFactory());
        return sqlSessionFactoryBean.getObject();
    }

}
创建主启动类
springcloud/SeataAccountMicroServiceApplication10012
@SpringBootApplication(exclude = DataSourceAutoConfiguration.class)
@EnableFeignClients
@EnableDiscoveryClient
public class SeataAccountMicroServiceApplication10012 {
    public static void main(String[] args) {
        SpringApplication.run
                (SeataAccountMicroServiceApplication10012.class,args);
    }
}
测试seata_storage_micro_service-10012 微服务
-
启动Nacos Server 8848
-
双击Seata 的\bin\seata-server.bat , 启动Seata Server
-
启动seata_storage_micro_service-10012
-
登录Nacos Server , 查看10010 微服务是否注册成功
4. 1. 登录Nacos Server, 查看10012 是否注册成功

开发seata-order-micro-service-10008 微服务
- 参考以前的方式,创建seata-order-micro-service-10008 微服务模块
修改pom.xml
添加相关的jar 依赖
和10012 微服务一模一样
创建application.yml
进行相关的配置
server:
  port: 10008
spring:
  application:
    name: seata-order-micro-service
  cloud:
    alibaba:
      seata:
        #指定事务组名,需要和seata-server中的对应 /conf/file.conf
        tx-service-group: wyxedu_order_tx_group
    nacos:
      discovery:
        server-addr: localhost:8848 #指定nacos server地址
  datasource:
    driver-class-name: com.mysql.jdbc.Driver
    #注意数据库要改对应的数据库
    url: jdbc:mysql://localhost:3306/order_micro_service
    username: root
    password: 自己的密码
#配置seata日志输出
logging:
  level:
    io:
      seata: info

mybatis:
  mapperLocations: classpath:mapper/*.xml
创建conf文件
resources目录下
-
创建file.conf, 进行相关的配置, 说明:该文件从seata 的\conf\file.conf 拷贝,进行修改即可 注意因为我们前面已经修改了所以这里可以不需要修改之际拷贝即可
-
创建registry.conf, 进行相关的配置, 说明:该文件从seata 的\conf\registry.conf 拷贝,进行修改即可 注意因为我们前面已经修改了所以这里可以不需要修改之际拷贝即可
创建Order
com/springcloud/entity/Order.java
@Data
@AllArgsConstructor
@NoArgsConstructor
public class Order {
    private Long id;
    private Long userId;
    private Long productId;
    private Integer nums;
    private Integer money;
    private Integer status;

}
创建OrderDao
com/springcloud/dao/OrderDao.java接口
@Mapper
public interface OrderDao {
    //新建订单
    void save(Order order);
    //修改订单状态
    void update(@Param("userId") Long userId, @Param("status") Integer status);

}
创建OrderMapper
resources/mapper/OrderMapper.xml
<?xml version="1.0" encoding="UTF-8" ?>
<!DOCTYPE mapper PUBLIC "-//mybatis.org//DTD Mapper 3.0//EN" "http://mybatis.org/dtd/mybatis-3-mapper.dtd" >

<mapper namespace="com.wyx.springcloud.dao.OrderDao">

    <resultMap id="BaseResultMap" type="com.wyxedu.springcloud.entity.Order">
        <id column="id" property="id" jdbcType="BIGINT"/>
        <result column="user_id" property="userId" jdbcType="BIGINT"/>
        <result column="product_id" property="productId" jdbcType="BIGINT"/>
        <result column="nums" property="nums" jdbcType="INTEGER"/>
        <result column="money" property="money" jdbcType="INTEGER"/>
        <result column="status" property="status" jdbcType="INTEGER"/>
    </resultMap>
    <!--配置实现save方法 添加订单 -->
    <insert id="save">
        insert into `order` (id,user_id,product_id,nums,money,status)
        values (null,#{userId},#{productId},#{nums},#{money},0);
    </insert>

    <!--配置实现update- 修改订单状态 这里写的比较简单,实际工作中根据业务需求编写即可-->
    <update id="update">
        update `order` set status = 1
        where user_id=#{userId} and status = #{status};
    </update>
</mapper>
创建OrderService
com/springcloud/service/OrderService.java接口
public interface OrderService {
    void save(Order order);
}
创建AccountService
创建com/springcloud/service/AccountService.java接口
@FeignClient(value = "seata-account-micro-service")
public interface AccountService {

    /**
     * 解读
     * 1. 远程调用方式是 post
     * 2. 远程调用的url 为 http://seata_account_micro_service/account/reduce
     * 3. seata_account_micro_service是nacos注册中心服务名
     * 4. openfeign是通过接口方式调用服务
     */
    /**
     * 扣减账户余额
     */
    @PostMapping("/account/reduce")
    public Result reduce(@RequestParam("userId") Long userId,@RequestParam("money") Integer money);
}
创建StorageService
创建com/springcloud/service/StorageService.java接口
@FeignClient(value = "seata-storage-micro-service")
public interface StorageService {

    /**
     * 解读
     * 1. 远程调用方式是 post
     * 2. 远程调用的url 为 http://seata_storage_micro_service/storage/reduce
     * 3. seata_storage_micro_service是nacos注册中心服务名
     * 4. openfeign是通过接口方式调用服务
     */
    //扣减库存
    @PostMapping("/storage/reduce")
    public Result reduce(@RequestParam("productId") Long productId,@RequestParam("nums") Integer nums);
}
创建OrderServiceImpl
com/springcloud/service/impl/OrderServiceImpl.java
@Service
@Slf4j
public class OrderServiceImpl implements OrderService {
    @Resource
    private OrderDao orderDao;
    @Resource
    private StorageService storageService;
    @Resource
    private AccountService accountService;
    /**
     * 创建订单->调用库存服务扣减库存->
     * 调用账户服务扣减账户余额->修改订单状态
     */
    @Override
    public void save(Order order) {
        log.info("=========开始新建订单start ==========");
        //新建订单
        orderDao.save(order);
        System.out.println("order=" + order);
        log.info("=========减库存start ==========");
        storageService.reduce(order.getProductId(), order.getNums());
        log.info("=========减库存end ==========");
        log.info("=========减账户金额start ==========");
        accountService.reduce(order.getUserId(), order.getMoney());
        log.info("=========减账户金额end ==========");
        log.info("=========修改订单状态start ==========");
        orderDao.update(order.getUserId(), 0);
        log.info("=========修改订单状态end ==========");
        log.info("=========下订单end==========");
    }
}
创建OrderController
com/springcloud/controller/OrderController.java
@RestController
public class OrderController {

    @Resource
    private OrderService orderService;

    /**
     * 提醒
     * 1. 我们的前端如果是以json格式来发送添加信息Order, 那么我们需要使用@RequestBody
     *     才能将数据封装到对应的bean, 同时保证http的请求头的 content-type是对应
     * 2. 如果前端是以表单形式提交了,则不需要使用@RequestBody, 才会进行对象参数封装, 同时保证
     *      http的请求头的 content-type是对应
     */
    @GetMapping("/order/save")
    public Result save(Order order) {
        orderService.save(order);
        return Result.success("订单创建成功", null);
    }
}
创建MyBatisConfig
//常规配置 Mybatis 和 dao关联
@Configuration
@MapperScan({"com.wyxedu.springcloud.dao"})
public class MyBatisConfig {
}
创建DataSourceProxyConfig
config/DataSourceProxyConfig常规配置(拿来使用即可)
注意DataSourceProxy 是引入的 io.seata.rm.datasource不要引入错了
/**
 * 说明
 * 1. 这里很重要: 配置数据源的代理是seata 也就是使用seata代理数据源
 * 2. DataSourceProxy 是引入的 io.seata.rm.datasource
 */
@Configuration
public class DataSourceProxyConfig {

    @Value("${mybatis.mapperLocations}")
    private String mapperLocations;

    //配置druidDataSource
    @Bean
    @ConfigurationProperties(prefix = "spring.datasource")
    public DataSource druidDataSource() {
        return new DruidDataSource();
    }

    //配置DataSourceProxy- 使用seata代理数据源
    @Bean
    public DataSourceProxy dataSourceProxy(DataSource dataSource) {
        return new DataSourceProxy(dataSource);
    }

    //配置SqlSessionFactory-常规写法
    @Bean
    public SqlSessionFactory sqlSessionFactoryBean(DataSourceProxy dataSourceProxy)
            throws Exception {
        SqlSessionFactoryBean sqlSessionFactoryBean =
                new SqlSessionFactoryBean();
        sqlSessionFactoryBean.setDataSource(dataSourceProxy);
        sqlSessionFactoryBean.setMapperLocations
                (new PathMatchingResourcePatternResolver().getResources(mapperLocations));
        sqlSessionFactoryBean.setTransactionFactory
                (new SpringManagedTransactionFactory());
        return sqlSessionFactoryBean.getObject();
    }

}
创建主启动类
springcloud/SeataAccountMicroServiceApplication10008
@SpringBootApplication(exclude = DataSourceAutoConfiguration.class)
@EnableDiscoveryClient
@EnableFeignClients
public class SeataOrderMicroServiceApplication10008 {
    public static void main(String[] args) {
        SpringApplication.run
                (SeataOrderMicroServiceApplication10008.class,args);
    }
}
测试seata_storage_micro_service-10008 微服务
- 启动Nacos Server 8848
- 双击Seata 的\bin\seata-server.bat , 启动Seata Server
- 启动seata_storage_micro_service-10008
- 登录Nacos Server , 查看10010 微服务是否注册成功
4. 1. 登录Nacos Server, 查看10008 是否注册成功

集成测试(1) 三个微服务协同完成-正常下单
-
启动Nacos Server 8848
-
双击Seata 的\bin\seata-server.bat , 启动Seata Server
-
启动seata-order-micro-service-10010 /10012/10008 三个微服务
-
浏览器: http://localhost:10008/order/save?userId=666&productId=1&nums=1&money=100
1. -
查看数据库/表的情况是否正常, 结论:如果没有异常出现,正常下单,数据库三张表数据一致性是OK 的

注意事项和细节
- MySQL 出现too many connections(1040)错误
解决方法在my.ini 设置
max\_connections=1000
- 如果出现: service id not legal hostname报错Service id not legal hostname 的原因是服务名称不能带有下划线,可以使用中划线,springcloud 无法识别下划线,把下划线改成中划线就好
集成测试(2) 三个微服务协同完成-模拟异常
- 启动Nacos Server 8848
- 双击Seata 的\bin\seata-server.bat , 启动Seata Server
- 启动seata-order-micro-service-10010 /10012/10008 三个微服务
- 浏览器: http://localhost:10008/order/save?userId=666&productId=1&nums=1&money=100
修改seata_account_micro_service-10012 的com/springcloud/controller/AccountController.java, 模拟异常出现
@RestController
public class AccountController {
    @Resource
    AccountService accountService;

    /**
     * 扣减账户余额
     */
    @PostMapping("/account/reduce")
    public Result reduce(@RequestParam("userId") Long userId, @RequestParam("money") Integer money){

       // 模拟异常,超时
        //openfeign 接口调用默认超时时间为1s
        try {
           TimeUnit.SECONDS.sleep(12);
        } catch (InterruptedException e) {
           e.printStackTrace();
        }
        accountService.reduce(userId,money);
        return Result.success("200", "扣减账户余额OK");
    }
}
- 浏览器:http://localhost:10008/order/save?userId=666&productId=1&nums=1&money=100

- 查看数据库/表的情况是否正常, 结论:这时数据库/表,出现数据不一致现象, 订单是未支付,但是库存减少了,账号钱也扣了(提示: 等休眠时间完成后,再查看account 表,会看到数据不一致.)
集成测试(3)使用@GlobalTransactional
三个微服务协同完成-使用@GlobalTransactional完成分布式事务控制(出现异常,也能保证数据一致性)
-
启动Nacos Server 8848
-
双击Seata 的\bin\seata-server.bat , 启动Seata Server
-
启动seata-order-micro-service-10010 /10012/10008 三个微服务
-
浏览器: http://localhost:10008/order/save?userId=666&productId=1&nums=1&money=100
-
修改seata_account_micro_service-10012 的com/springcloud/controller/AccountController.java, 模拟异常出现
@RestController
public class AccountController {
    @Resource
    AccountService accountService;
    /**
     * 扣减账户余额
     */
    @PostMapping("/account/reduce")
    public Result result(@RequestParam("userId") Long userId, @RequestParam("money")
    Integer money){
    //模拟异常, 超时,或者int i = 9 / 0;
    //openfeign 接口调用默认超时时间为1s
    //说明1. 也可以使用其它方式模拟异常, 但在Debug 看Seata 分布式事务机制不方便, 不好看效果, 所以这里我们使用超时异常
    //说明2. 因为是超时异常, 所以在Debug 分析Seata 机制时, 可能会发现某张表被锁几条记录, 因为seata 会做最终一致性操作(即尝试再提交上次超时的事务).
        try {
            TimeUnit.SECONDS.sleep(12);
        } catch (InterruptedException e) {
            e.printStackTrace();
        }
        accountService.reduce(userId,money);
        return Result.success("200", "扣减账户余额OK");
    }
}
- 修改seata-order-micro-service-10008 的com/springcloud/service/impl/OrderServiceImpl.java
@Service
@Slf4j
public class OrderServiceImpl implements OrderService {

    @Resource
    private OrderDao orderDao;

    @Resource
    private StorageService storageService;

    @Resource
    private AccountService accountService;

    @Override
    /**
     * 解读
     * 1. @GlobalTransactional : 分布式全局事务控制  io.seata.spring.annotation包
     * 2. name = "wyxedu-save-order" 名称,程序员自己指定,保证唯一即可
     * 3. rollbackFor = Exception.class 指定发送什么异常就回滚, 这里我们指定的是Exception.class
     *    即 只要发生了异常就回滚
     */
    @GlobalTransactional(name = "wyxedu-save-order", rollbackFor = Exception.class)
    public void save(Order order) {

        //后面我们如果需要打印日志
        log.info("====创建订单 start=====");

        log.info("====本地生成订单 start===");
        orderDao.save(order);//调用本地方法生成订单order
        log.info("====本地生成订单 end===");

        log.info("====扣减库存 start===");
        //远程调用storage微服务扣减库存
        storageService.reduce(order.getProductId(), order.getNums());
        log.info("====扣减库存 end===");

        log.info("====扣减用户余额 start===");
        //远程调用account微服务扣减用户money
        accountService.reduce(order.getUserId(), order.getMoney());
        log.info("====扣减用户余额 end===");

        log.info("====本地修改订单状态 start===");
        //调用本地方法修改订单状态0->1
        orderDao.update(order.getUserId(), 0);
        log.info("====本地修改订单状态 end===");

        log.info("====创建订单 end=====");
    }
}
- 重启seata-order-micro-service-10008
浏览器:http://localhost:10008/order/save?userId=666&productId=1&nums=1&money=100

在数据库就可以看到数据回滚了为什么可以呢我们下面详细说
注意事项和细节
如果数据库/表使用到关键字,需要使用反引号
举例说明:
比如mapper/OrderMapper.xml , 这里的order 就要使用``, 否则会报错
<insert id="save">
    insert into `order` (id,user_id,product_id,nums,money,status)
    values (null,#{userId},#{productId},#{nums},#{money},0);
</insert>
<update id="update">
    update `order` set status = 1
    where user_id=#{userId} and status = #{status};
</update>
openfeign 在远程调用api 接口时, 默认超时时间为1s





![[强网杯 2019]随便注 1【SQL注入】解析过程](https://img-blog.csdnimg.cn/1a25f83b23634ddc93b182dd6e0bde6d.png)

