最近在做App内皮肤切换功能,想了很久方案,写了个皮肤更换工具类,适配N+皮肤种类。
话不多说,直接捋一下我的设计思路,因为我的App默认为黑色主题,因此在做其他皮肤主题时,我的图片命名方式是直接添加后缀。
比如默认主题(黑色)的图片名成为menu。白色主题就叫menu_white 科技主题叫menu_tech,我用的是Mac电脑,设计师做好图后直接批量命名。操作方式如下
白色主题的图片是设计师给我的,命名跟默认主题是一致,则只需要全选图片或者selecter或者shape 右键选择重命名,选择以添加文本方式如图


这样所有白色主图的图片都有个white后缀,其他主题也可按照此类方法操作
再结合工具类方法,代码如下
    public static int getResourceId(int drawableId){
        String name = SLCApplication.getAppContext().getResources().getString(drawableId);
//        上面转换出来路径为: res/drawable-xhdpi-v4/user_vip.png
//        Log.e(TAG, "getResourceId: name===="+name );
        //得到user_vip.png这个图片名称的字符串
        name = name.substring(name.lastIndexOf("/")+1);
//        Log.e(TAG, "getResourceId: nam0="+name );
        //user_vip.png替换成user_vip_white并去掉.png的后缀
        int themeType = (int)SpUtils.get(SLCApplication.getAppContext(), SkinActivity.THEME_TYPE_KEY,1);
//        Log.e(TAG, "getResourceId: themeType="+themeType );
        if (themeType == 0){
            name = name.replace(name.substring(name.lastIndexOf(".")), "_white");
        }else if (themeType == 2){
            name = name.replace(name.substring(name.lastIndexOf(".")), "_tech");
        }else if (themeType == 3){
            name = name.replace(name.substring(name.lastIndexOf(".")), "_retro");
        }else {
            name = name.replace(name.substring(name.lastIndexOf(".")), "");
        }
//        Log.e(TAG, "getResourceId: name="+name );
        int ids = SLCApplication.getAppContext().getResources().getIdentifier(name,"drawable",SLCApplication.getAppContext().getPackageName());
        if (ids == 0){
            return drawableId;
        }
        return ids;
    }

    public static int getColor(Context context, int colorResId) {
        TypedValue typedValue = new TypedValue();
        TypedArray typedArray = context.obtainStyledAttributes(typedValue.data, new int[] {colorResId});
        int color = typedArray.getColor(0, 0);
        typedArray.recycle();
        return color;
    }
getResourceId方法是通过图片Id 返回对应主题的Id ,getColor则是设置成为什么颜色。
设置字体方法调用如下:
text_title.setTextColor(ColorAPI.getColor(this, R.attr.whiteColor));
设置图片方法调用如下:
menuImage.setImageDrawable(getDrawable(ColorAPI.getResourceId(R.drawable.menu_selector)));
布局调用如下:
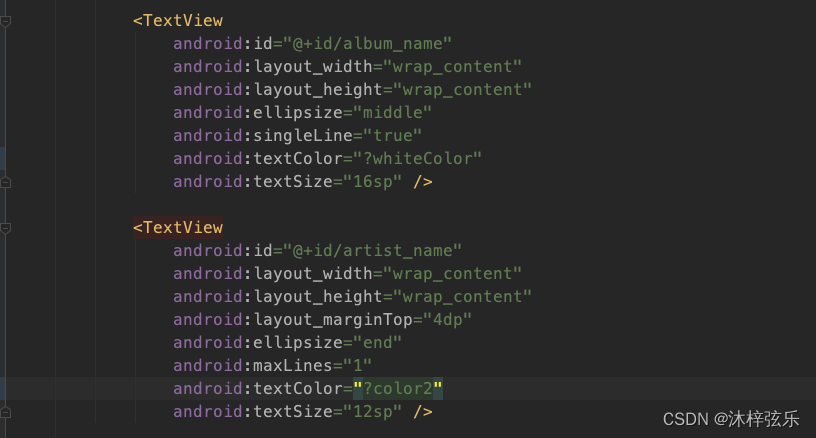
这样的写法是由于我们设置了多主题,可以去自动适配 主题写法如下
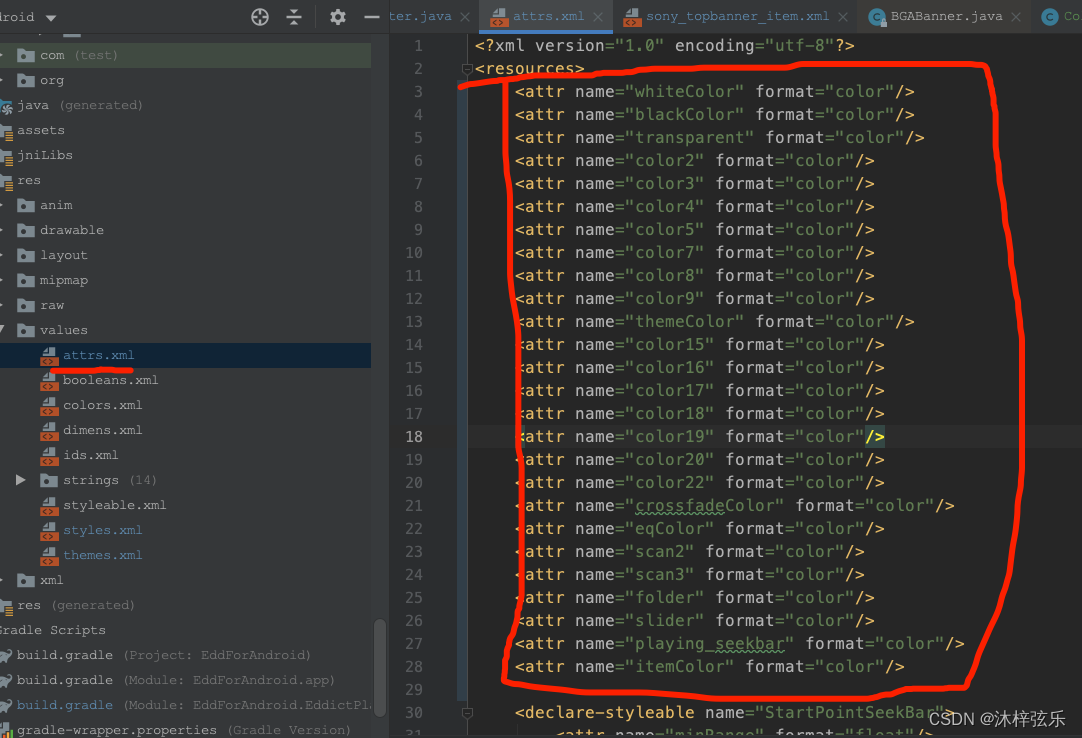
在res-->values包中的attrs.xml中的添加颜色属性 如下图
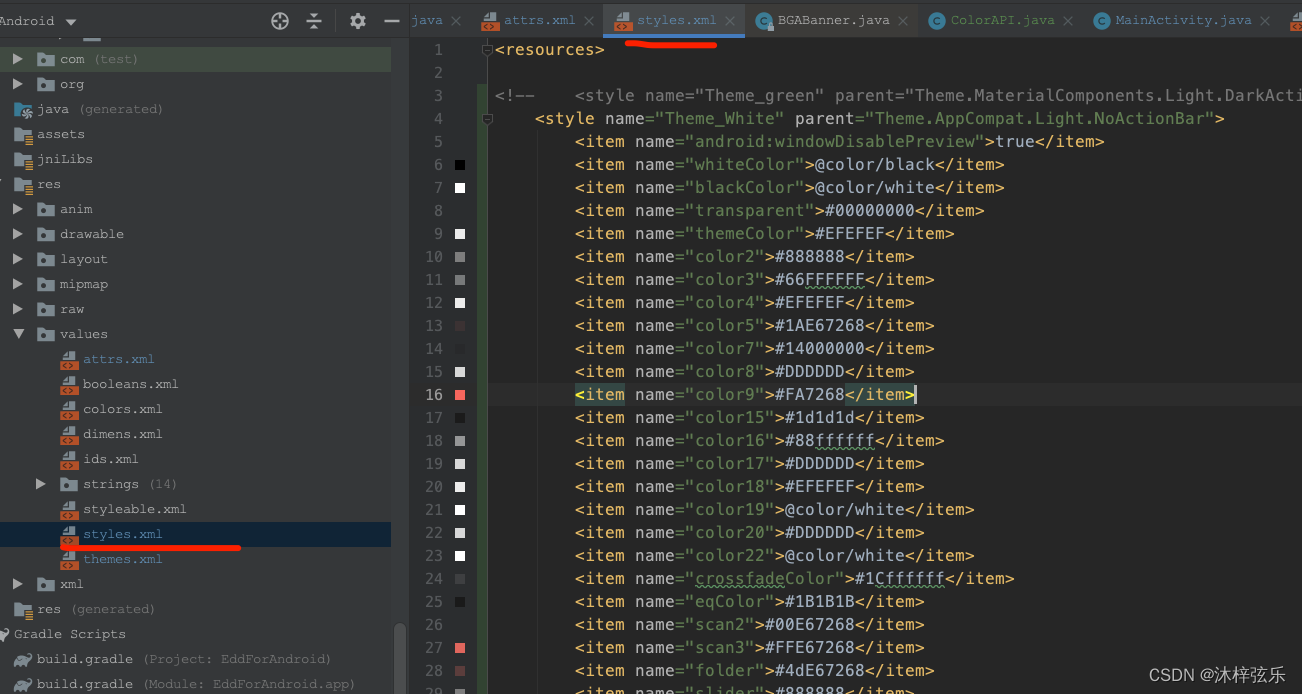
在res-->values包中的styles.xml中的设置主题并设置颜色属性的值如下图
由于我的整个项目的Activity都是继承与自Base ,则只需要在Base的OnCreate方法setContentView函数之前设置好主题,则可以进行自动适配
如图


工具类中还有几个适配主题的其他方法 ,我整理了下 ,整个类的源码如下
/**
 * ColorAPI
 * Create by lxy on 5/6/23 4:54 PM
 * Copyright © 2022 lxy. All rights reserved.
 **/
public class ColorAPI {

    private static final String TAG = "ColorAPI";

    public static int getResourceId(int drawableId){
        String name = SLCApplication.getAppContext().getResources().getString(drawableId);
//        上面转换出来路径为: res/drawable-xhdpi-v4/user_vip.png
//        Log.e(TAG, "getResourceId: name===="+name );
        //得到user_vip.png这个图片名称的字符串
        name = name.substring(name.lastIndexOf("/")+1);
//        Log.e(TAG, "getResourceId: nam0="+name );
        //user_vip.png替换成user_vip_white并去掉.png的后缀
        int themeType = (int)SpUtils.get(SLCApplication.getAppContext(), SkinActivity.THEME_TYPE_KEY,1);
//        Log.e(TAG, "getResourceId: themeType="+themeType );
        if (themeType == 0){
            name = name.replace(name.substring(name.lastIndexOf(".")), "_white");
        }else if (themeType == 2){
            name = name.replace(name.substring(name.lastIndexOf(".")), "_tech");
        }else if (themeType == 3){
            name = name.replace(name.substring(name.lastIndexOf(".")), "_retro");
        }else {
            name = name.replace(name.substring(name.lastIndexOf(".")), "");
        }
//        Log.e(TAG, "getResourceId: name="+name );
        int ids = SLCApplication.getAppContext().getResources().getIdentifier(name,"drawable",SLCApplication.getAppContext().getPackageName());
        if (ids == 0){
            return drawableId;
        }
        return ids;
    }

    public static int getColor(Context context, int colorResId) {
        TypedValue typedValue = new TypedValue();
        TypedArray typedArray = context.obtainStyledAttributes(typedValue.data, new int[] {colorResId});
        int color = typedArray.getColor(0, 0);
        typedArray.recycle();
        return color;
    }

    public  @interface FrameType {
        int BOTTOM = 0; //底部按钮
        int BOTTOM_LEFT_RIGHT = 1;//底部左右两边按钮
        int FRAME_TWO = 2; //弹出框2行
        int FRAME_THREE = 3;//弹出框3行
    }
    public static void setDrawable(Context context, int type, View textView) {
        //type 0:底部框  1:弹出框底部(取消、确定)
        int themeType = (int) SpUtils.get(context, SkinActivity.THEME_TYPE_KEY,1);
        if (themeType !=2 && themeType !=3)return;
        if (textView.getClass().equals(TextView.class) || textView.getClass().equals(Button.class)){
            ((TextView) textView).setTextColor(getColor(context, R.attr.whiteColor));
        }
        if (themeType == 2){
            if (type == FrameType.BOTTOM)
                 textView.setBackground(context.getDrawable(R.drawable.btn_bottom_frame_tech));
            else if (type == FrameType.BOTTOM_LEFT_RIGHT)
                textView.setBackground(context.getDrawable(R.drawable.btn_frame_tech));
            else if (type == FrameType.FRAME_TWO)
                textView.setBackground(context.getDrawable(R.drawable.tip_frame_tech));
            else if (type == FrameType.FRAME_THREE)
                textView.setBackground(context.getDrawable(R.drawable.new_create_frame_tech));
        }else if (themeType == 3){
            if (type == FrameType.BOTTOM)
                textView.setBackground(context.getDrawable(R.drawable.btn_bottom_frame_retro));
            else if (type == FrameType.BOTTOM_LEFT_RIGHT)
                textView.setBackground(context.getDrawable(R.drawable.btn_frame_retro));
            else if (type == FrameType.FRAME_TWO)
                textView.setBackground(context.getDrawable(R.drawable.tip_frame_retro));
            else if (type == FrameType.FRAME_THREE)
                textView.setBackground(context.getDrawable(R.drawable.new_create_frame_retro));
        }
    }

    public static void setDialogParam(Context context, AlertDialog builder) {
        WindowManager.LayoutParams lp = builder.getWindow().getAttributes();
        lp.gravity = Gravity.CENTER;
        lp.width =  context.getResources().getDisplayMetrics().widthPixels-Util.dip2px(context, 50);
        lp.height = WindowManager.LayoutParams.WRAP_CONTENT;
        builder.getWindow().setAttributes(lp);
    }
}
文章分享给大家不容易,转载请注明出处!
