目录
- 前言
- 节点声明
- 链表的初始化
- 尾插
- 打印链表
- 头插
- 尾删
- 头删
- 查找节点
- 指定位置插入
- 指定位置删除
- 链表销毁
前言
之前讲过单链表的实现,在实现的过程中,我们会发现每次删除或者在前面插入节点的时候,都要提前保存上一个节点的地址。这样做十分麻烦,所以就有了单链表的升级,双链表。今天就来实现一个带头双向循环的双链表。
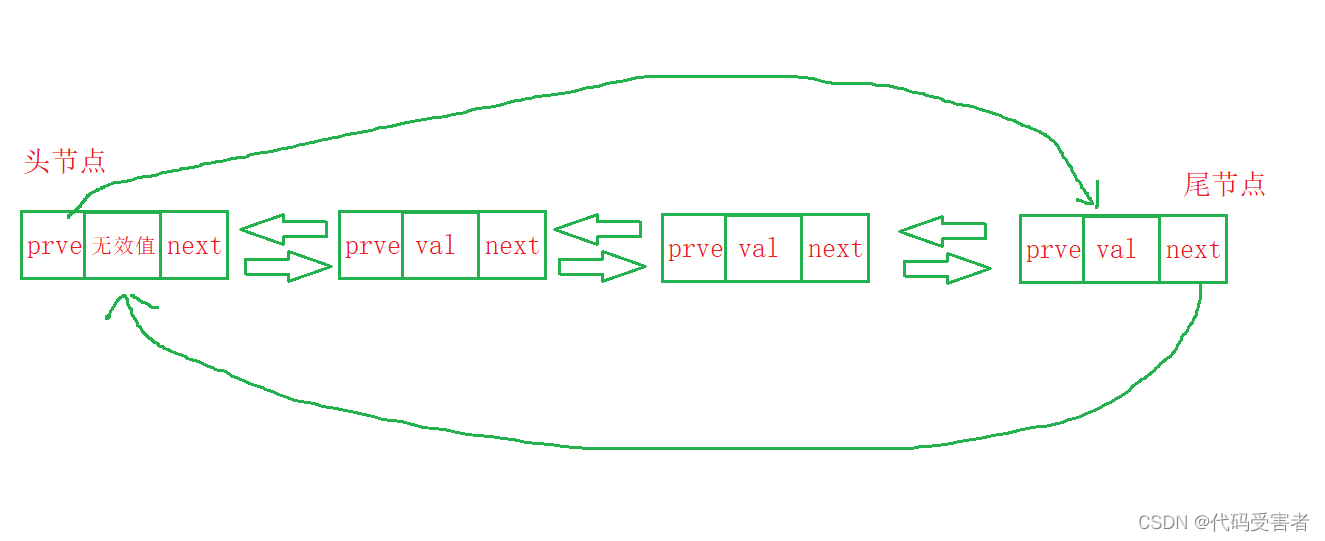
带头: 指有一个哨兵位的头节点,头节点不拿来存放有效值
双向: 代表是个双向链表,一个指针存放前一个节点地址,一个地址存放后一个节点地址。
循环: 最后一个节点的下一个节点是头节点。
节点声明
刚刚提到过,双向链表是有2个指针的,一个指针指向前一个节点,一个指针指向后一个节点,还有一个来存放数据。
//存放的类型
typedef int ListValType;

//节点结构体声明
typedef struct ListNode
{
	ListValType val;
	struct ListNode* prve;
	struct ListNode* next;
}LSNode;
链表的初始化
因为我们是带哨兵头的链表,所以链表需要初始化。
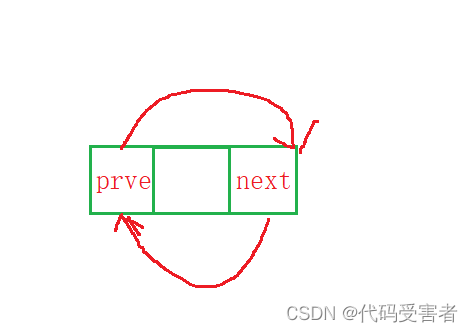
初始化我们只需要开辟一个头节点,但这个节点我们不存放有效值。
而因为是循环链表,所以最后一个节点要指向第一个节点,只有一个节点时,自己指向自己。
初始化代码
//链表初始化
LSNode* ListInto()
{
	//创建一个节点
	LSNode* newNode = (LSNode*)malloc(sizeof(LSNode));
	//指向自己
	newNode->next = newNode;
	newNode->prve = newNode;

	return newNode;
}

调试后发现它的next和prve指针都指向自己,说明初始化完成了。
尾插
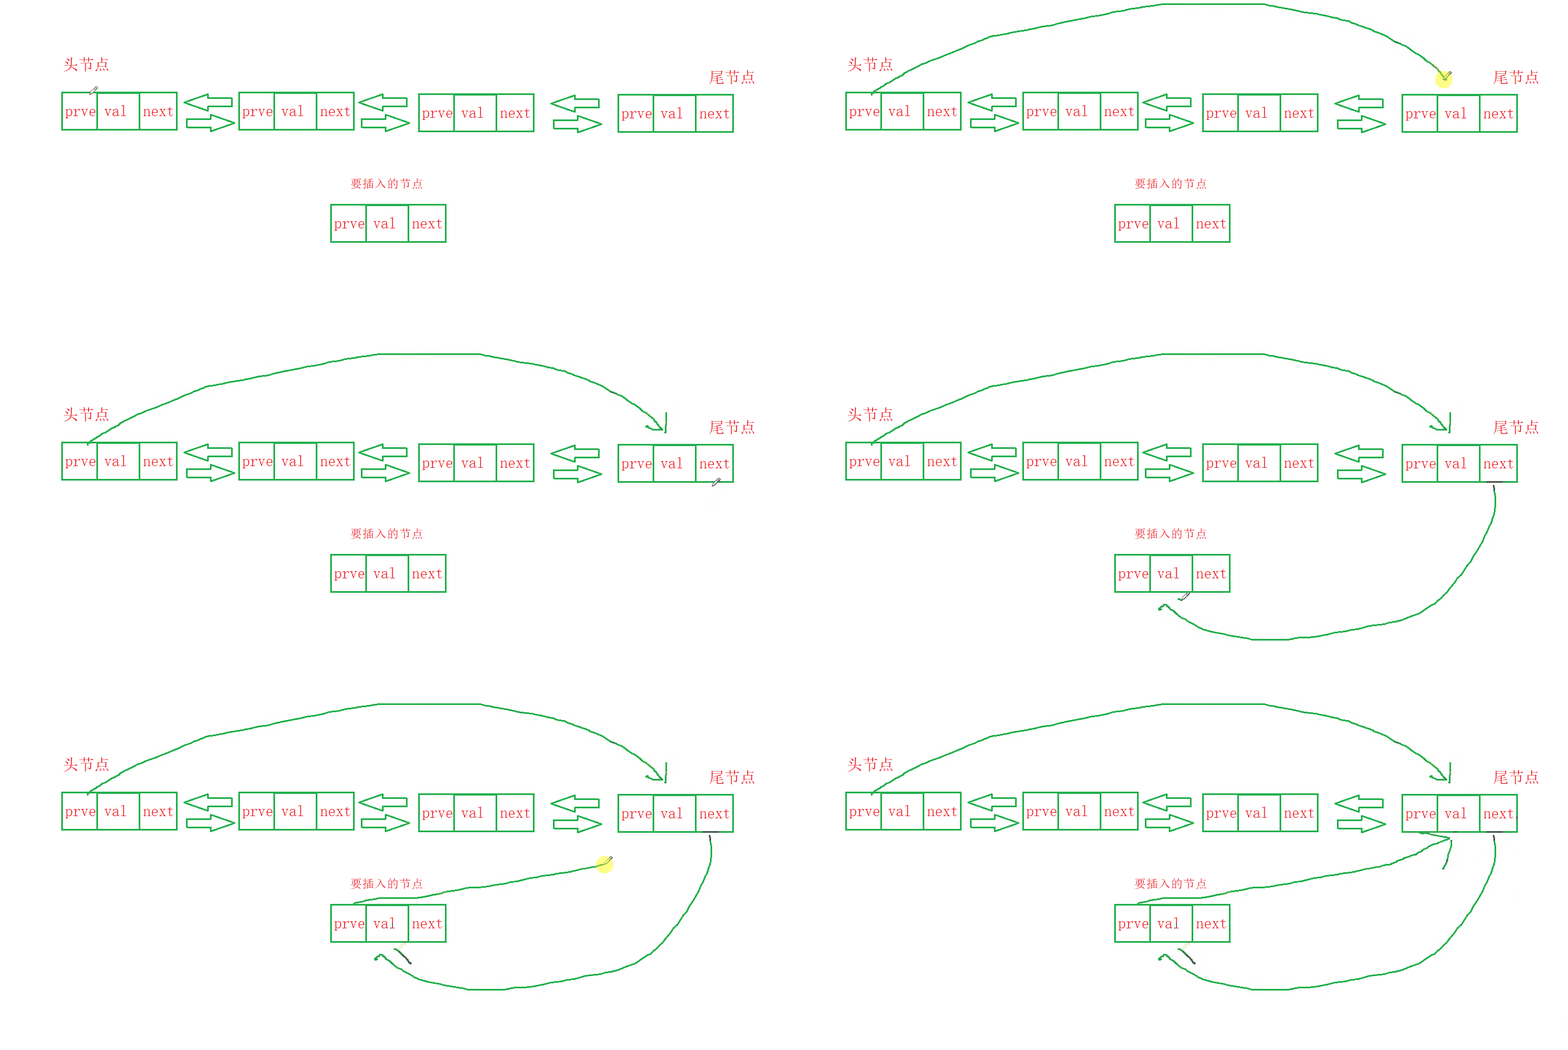
那么我们就可以写个尾部插入来玩玩,我们都知道头节点的前一个地址是指向最后一个地址的。所以就可以直接找到尾节点进行插入。
//创建节点
LSNode* CreateListNode(ListValType x)
{
	LSNode* newNode = (LSNode*)malloc(sizeof(LSNode));
	if (newNode == NULL)
	{
		//空间开辟失败,不玩了
		exit(-1);
	}
	newNode->val = x;
	return newNode;
}

//尾插
void ListPushBack(LSNode* phead, ListValType x)
{
	//断言,phead不能为空
	assert(phead);

	//创建一个新节点
	LSNode* newNode = CreateListNodeC(x);
	//记录头节点的前一个节点,也就是尾节点
	LSNode* tail = phead->prve;
	//尾节点指向 新节点
	tail->next = newNode;
	//新节点前节点指向尾节点
	newNode->prve = tail;
	//后节点指向头节点
	newNode->next = phead;
	//头节点前节点指向新节点
	phead->prve = newNode;

}
然后调试发现链表已经连起来了

打印链表
为了方便测试,我们对链表进行打印一下,但这次打印和之前不同,因为之前是打印到最后一个节点为NULL停止,但循环链表不存在NULL节点,所以当我们再次走到头节点的时候停止打印。
//打印链表
void ListPrint(LSNode* phead)
{
	assert(phead);
	//头节点存放的是无效值,所以从头节点下一个位置开始打印
	LSNode* cru = phead->next;
	//cru == phead时说明链表走了一圈了
	while (cru != phead)
	{
		printf("%d->", cru->val);
		cru = cru->next;
	}
	printf(".....\n");
}
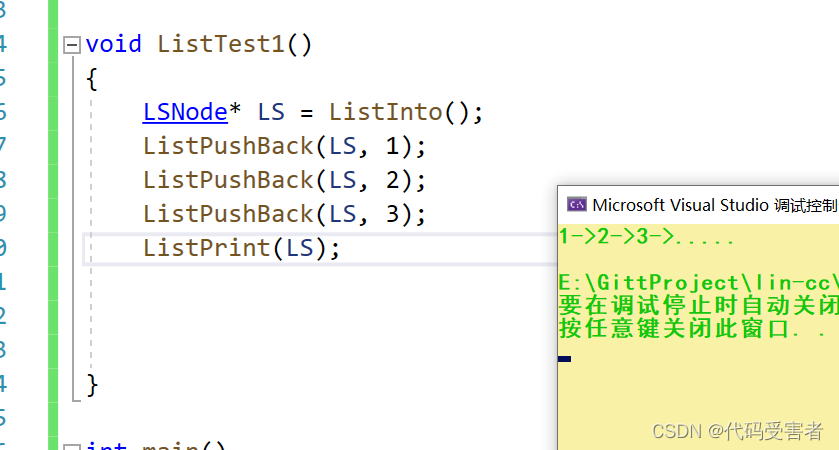
因为是循环链表,所以不可能打印完,我们打印一圈就可以了。
头插
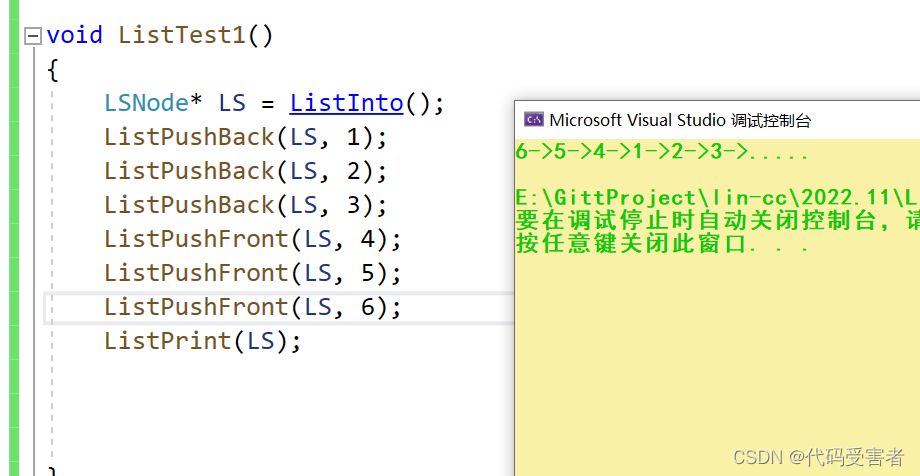
头插也很简单,因为头节点存放的不是有效值,我们只需要记录头节点的下一个节点,然后让它的 prve节点指向新节点,让新节点next节点指向它,头节点的next指向新节点,新节点的prve节点指向头节点。
语言表达有点绕,看图。

代码
//头插
void ListPushFront(LSNode* phead, ListValType x)
{
	//断言,phead不能为空
	assert(phead);

	//创建一个新节点
	LSNode* newNode = CreateListNode(x);
	//保存头节点的下一个节点
	LSNode* Next = phead->next;
	//next前节点指向新节点
	Next->prve = newNode;
	//新节点next指向Next
	newNode->next = Next;
	//头节点next指向新节点
	phead->next = newNode;
	//新节点前节点指向头节点
	newNode->prve = phead;
}
尾删
尾删和尾插差不多,不过需要最后一个节点的前一个节点,然后让它指向头节点,随后释放最后一个节点。

但是我们需要注意一个问题,当尾节点等于头节点时,那么说明链表没有节点了,哨兵头节点是不能删除的,所以这时我们需要判断或者断言一下都行。
//尾删
void ListPopBack(LSNode* phead)
{
	//phead不能为空
	assert(phead);
	//尾节点不能头节点一样
	assert(phead != phead->prve);

	//尾节点
	LSNode* tail = phead->prve;
	//尾节点的前一个节点
	LSNode* prvetail = tail->prve;
	//释放尾节点
	free(tail);
	//prvetail 连接 头节点
	prvetail->next = phead;
	phead->prve = prvetail;

}
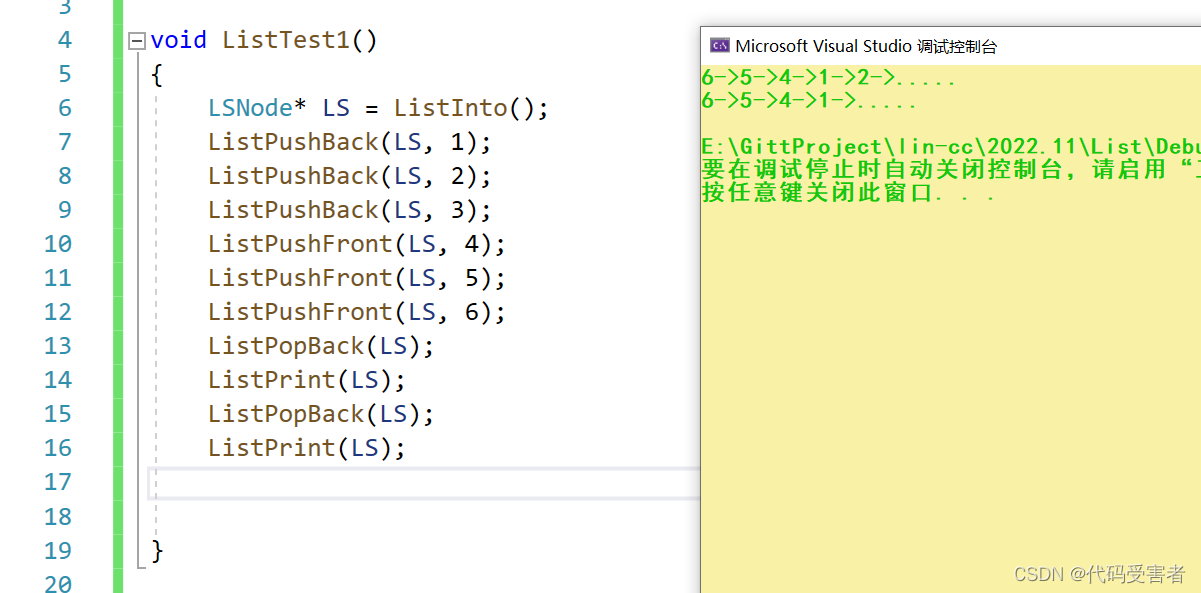
然后我们发现后面的3和2都被删掉了
头删
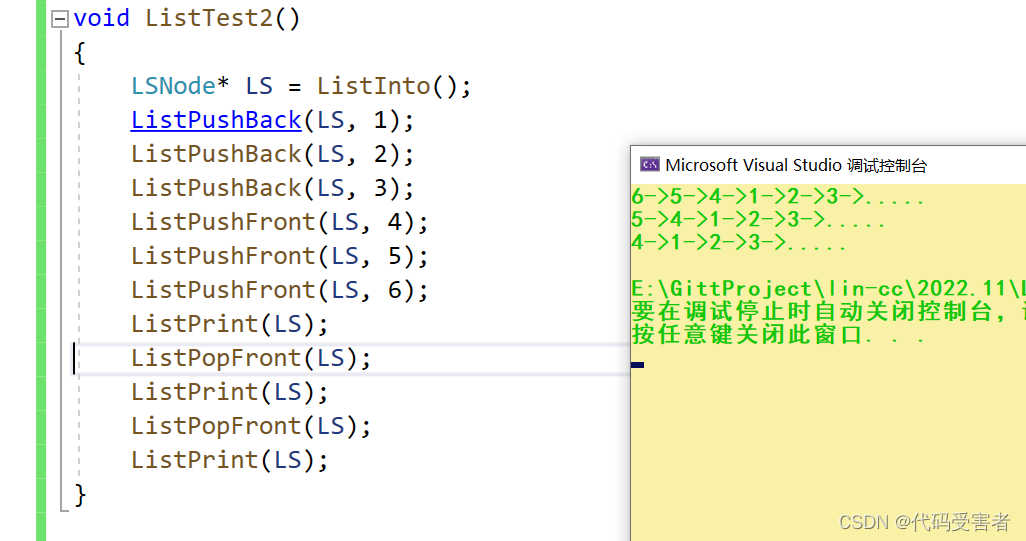
头删我们只需要记录头节点的下一个节点的下一个节点,因为等等头节点要和这个节点连接,然后释放掉头节点的下一个节点即可。

当然,头删和尾删一样,当链表只剩下头节点时,那就不能再删除了。
//头删
void ListPopFront(LSNode* phead)
{
	assert(phead);
	assert(phead != phead->prve);

	//头节点的下一个节点
	LSNode* headNext = phead->next;
	//下下个节点
	LSNode* nextnext = headNext->next;
	//连接头节点和 nextnext
	nextnext->prve = phead;
	phead->next = nextnext;

	//释放headNext
	free(headNext);
	headNext = NULL;
}
代码执行结果
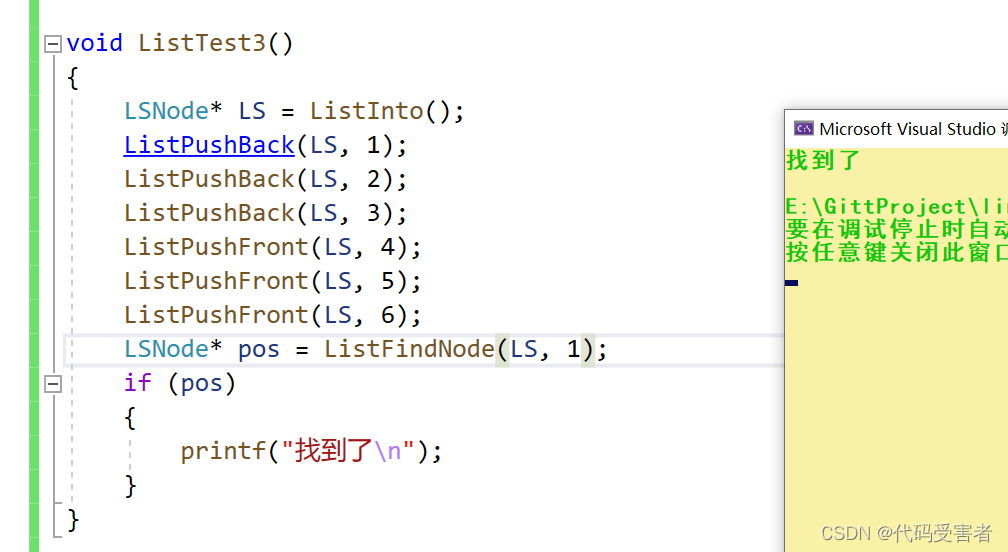
查找节点
这个就很简单了,思路和打印差不多,遍历一遍找,没找到返回空指针。
//查找
LSNode* ListFindNode(LSNode* phead, ListValType x)
{
	assert(phead);
	//头节点存放的是无效值,所以从头节点下一个位置开始查找
	LSNode* cru = phead->next;
	//cru == phead时说明链表走了一圈了
	while (cru != phead)
	{
		if (cru->val == x)
			return cru;

		cru = cru->next;
	}
	return NULL;
}
指定位置插入
指定位置插入和头插尾插没有太大区别,如果前插,保存pos位置的前一个节点,如果后插,保存后一个节点,然后连接。
这里我们演示前插。
//指定插入
void ListInsert(LSNode* phead, LSNode* pos, ListValType x)
{
	//pos和phead不能为空
	assert(pos && phead);

	//创建节点
	LSNode* newNode = CreateListNode(x);

	//保存pos的前一个节点
	LSNode* posprve = pos->prve;
	//然后连接起来
	posprve->next = newNode;
	newNode->prve = posprve;
	newNode->next = pos;
	pos->prve = newNode;

}
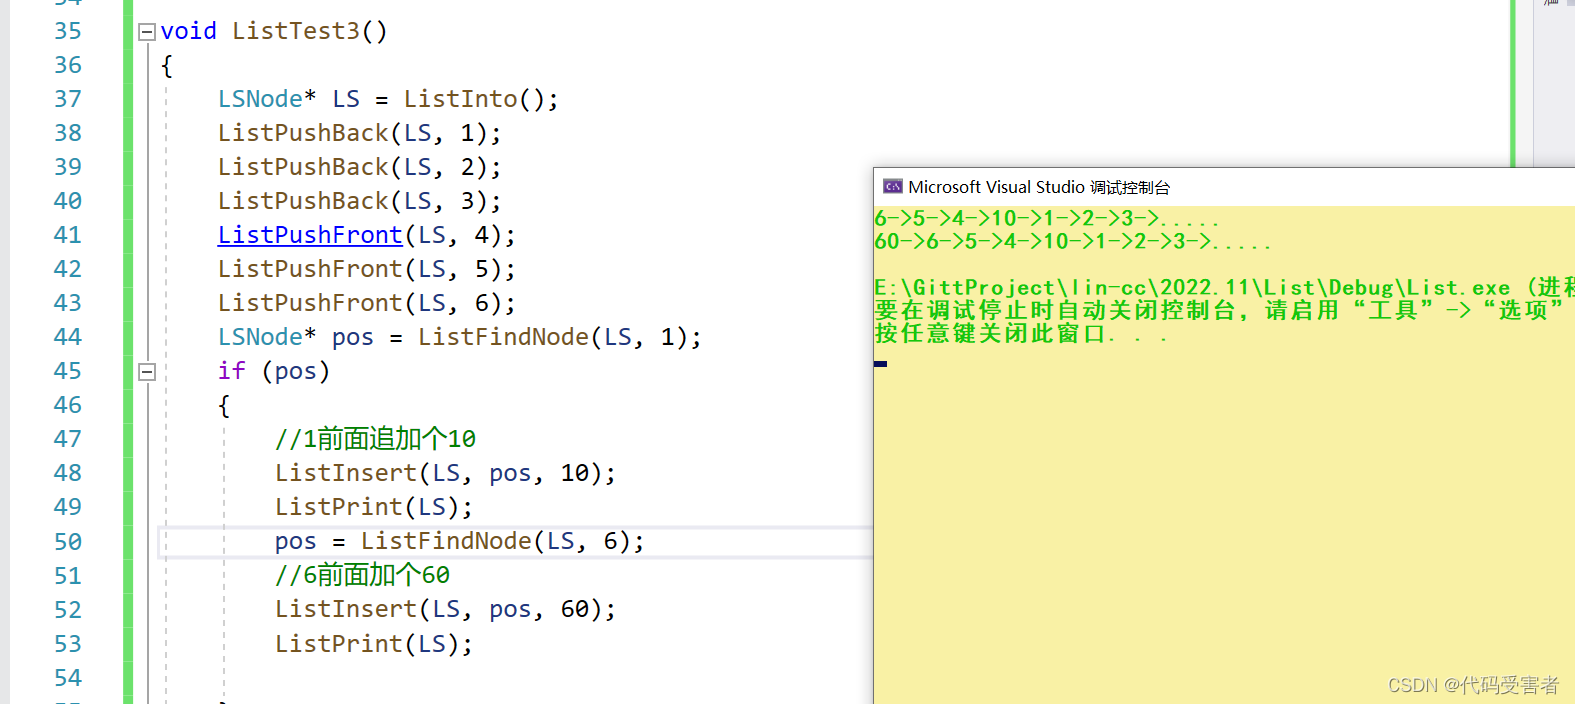
我们发现这个函数也可以完成头插和尾插,所以说前面的头插和尾插可以直接复用这个函数。
头插更新
//头插
void ListPushFront(LSNode* phead, ListValType x)
{
	/*
	//断言,phead不能为空
	assert(phead);

	//创建一个新节点
	LSNode* newNode = CreateListNode(x);
	//保存头节点的下一个节点
	LSNode* Next = phead->next;
	//next前节点指向新节点
	Next->prve = newNode;
	//新节点next指向Next
	newNode->next = Next;
	//头节点next指向新节点
	phead->next = newNode;
	//新节点前节点指向头节点
	newNode->prve = phead;
	*/
	ListInsert(phead,phead->next,x);
}
尾插更新
//尾插
void ListPushBack(LSNode* phead, ListValType x)
{
	/*
	//断言,phead不能为空
	assert(phead);

	//创建一个新节点
	LSNode* newNode = CreateListNode(x);
	//记录头节点的前一个节点,也就是尾节点
	LSNode* tail = phead->prve;
	//尾节点指向 新节点
	tail->next = newNode;
	//新节点前节点指向尾节点
	newNode->prve = tail;
	//后节点指向头节点
	newNode->next = phead;
	//头节点前节点指向新节点
	phead->prve = newNode;
	*/
	ListInsert(phead, phead->prve, x);

}
指定位置删除
前删的话我们首先保存pos的前一个节点和后一个节点,然后两个节点连接,释放pos即可,也可以先释放,没有顺序要求。

//指定删除
void ListEase(LSNode* phead, LSNode* pos)
{
	//pos和phead不能为空
	assert(pos && phead);

	//保存pos前后节点
	LSNode* posprve = pos->prve;
	LSNode* posnext = pos->next;

	//前后节点连接
	posprve->next = posnext;
	posnext->prve = posprve;

	//释放pos空间
	free(pos);
	pos = NULL;
}
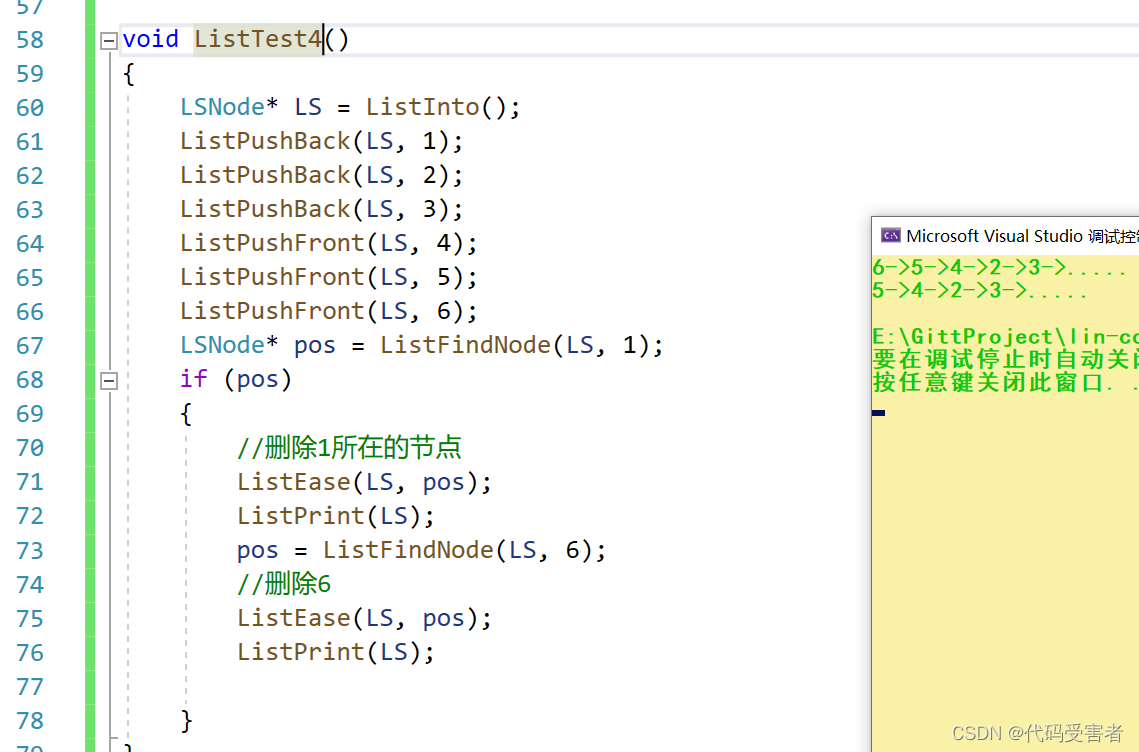
我们发现它同样可以完成 头删和尾删,所以头删和尾删我们可以直接复用这个函数。
头删更新
//头删
void ListPopFront(LSNode* phead)
{
	/*
	assert(phead);
	assert(phead != phead->prve);

	//头节点的下一个节点
	LSNode* headNext = phead->next;
	//下下个节点
	LSNode* nextnext = headNext->next;
	//连接头节点和 nextnext
	nextnext->prve = phead;
	phead->next = nextnext;

	//释放headNext
	free(headNext);
	headNext = NULL;
	*/
	ListEase(phead, phead->next);
}
尾删更新
void ListPopBack(LSNode* phead)
{
	/*
	//phead不能为空
	assert(phead);
	//尾节点不能头节点一样
	assert(phead != phead->prve);

	//尾节点
	LSNode* tail = phead->prve;
	//尾节点的前一个节点
	LSNode* prvetail = tail->prve;
	//释放尾节点
	free(tail);
	//prvetail 连接 头节点
	prvetail->next = phead;
	phead->prve = prvetail;
	*/

	ListEase(phead, phead->prve);
}
链表销毁
销毁是连头也一起销毁的,所以先保存后一个或前一个地址,然后释放当前地址,然后迭代一个个销毁,直到最后遇到头节点后销毁头节点并结停止迭代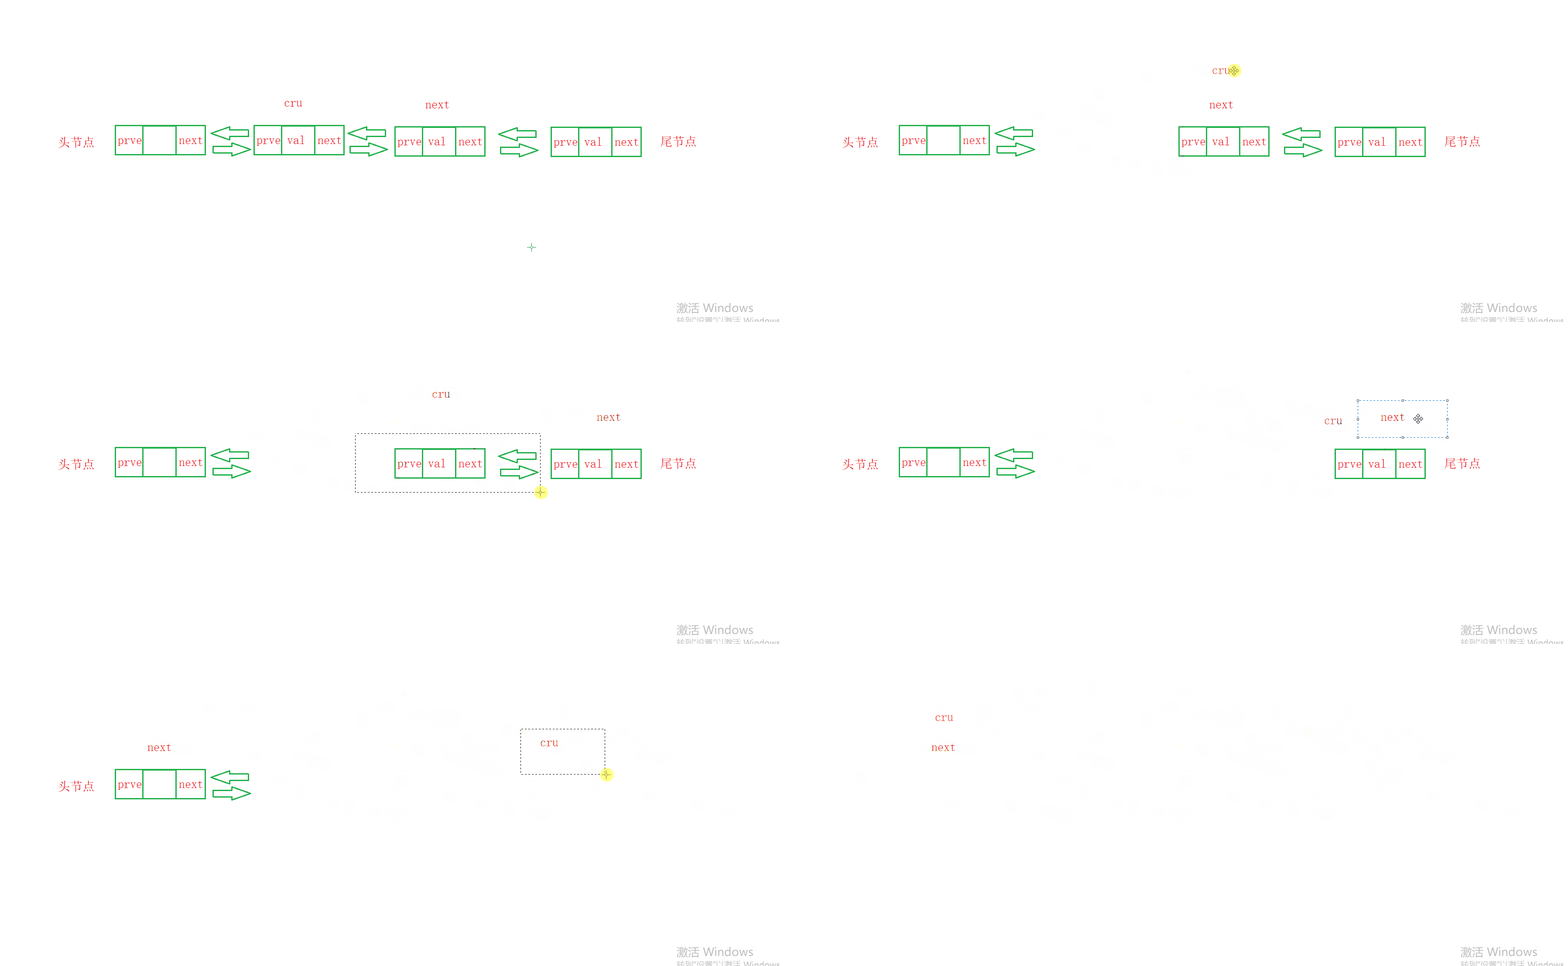
//销毁链表,因为会改变原来的phead节点,所以需要传二级指针
void ListDestroy(LSNode** pphead)
{
	assert(*pphead);

	LSNode* cru = (*pphead)->next;
	while (1)
	{
		//保存后一个节点
		LSNode* next = cru->next;
		//释放cru
		free(cru);
		//迭代
		cru = next;
		//如果cru 和头节点相等,说明头节点后面的都删完了
		if (cru == *pphead)
		{
			//释放头节点空间
			free(*pphead);
			//指针置空
			*pphead = NULL;
			//跳出循环
			break;
		}
	}
}
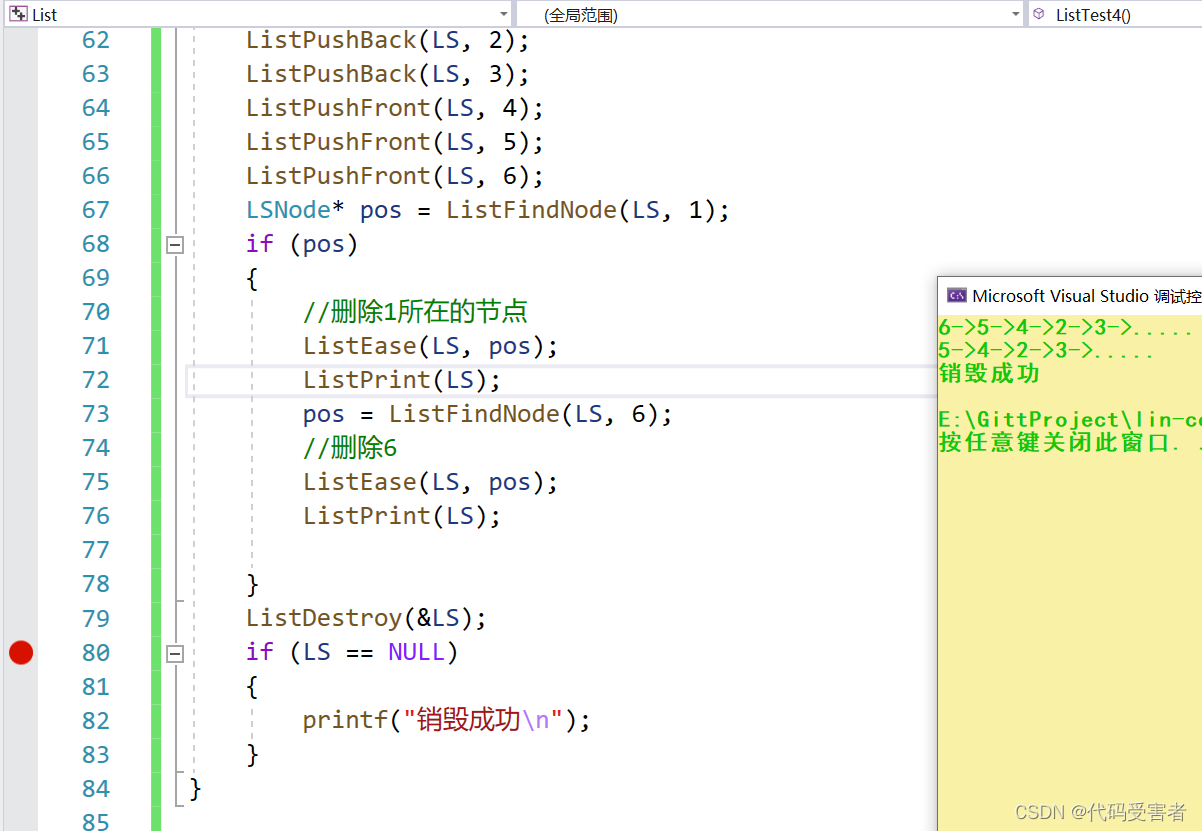
我们在调试看看是否真的销毁成功了。
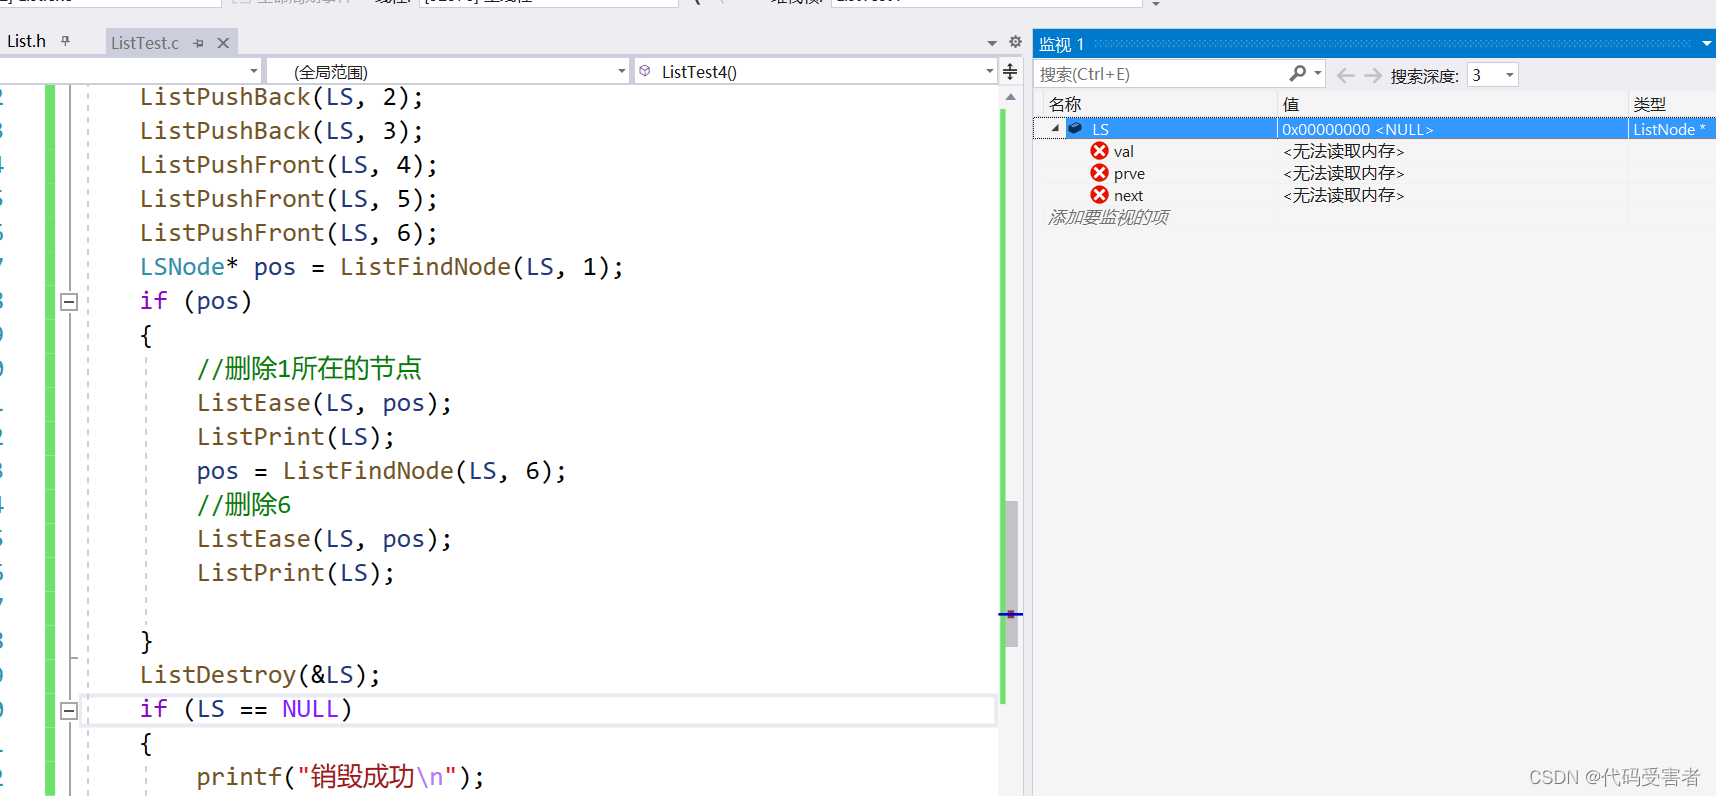
这样我们的带头双向循环链表已经简单实现完了。代码已上传至git,点此获取
这里还有单链表的实现,有兴趣的大佬也可以看看

