本文目录
- 1、测试环境
- 1、eBPF字节码的源代码实现
- 3、用户态应用程度实现简介
- 4、编译与运行
- 5、运行状态验证
通过文章XDP入门–之hello world 我们知道,可以通过iproute2的ip工具向网卡去加载和卸载eBPF程序的字节码。但这个使用起来不太方便。而且在需要网卡恢复正常工作时,还需要输入相应的命令去手动卸载eBPF程序的字节码。
更为通用和可行的做法是创建一个常规的用户态程序做为让用户运行使用的管理控制程序。
- 当用户态程序启动时,自动去加载eBPF程序的字节码到网卡
- 当用户态程序退出时,自动去卸载eBPF程序的字节码,让相应网卡恢复正常工作模式
- 当用户态程序运行时,用于对eBPF程序的字节码的运行做出配置与控制
所以本文章就介绍如上所述的自动加载和卸载的代码实现。
1、测试环境
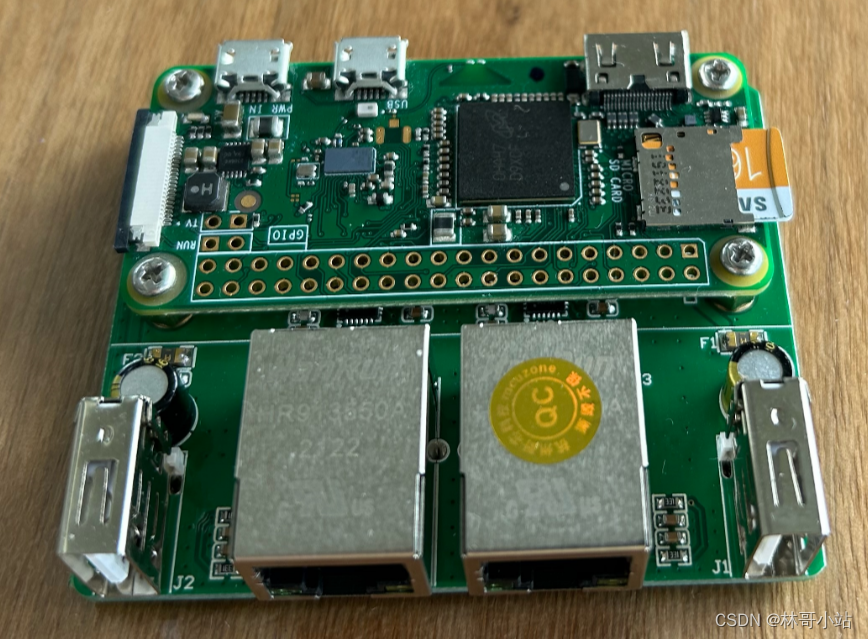
硬件:基于树莓派Zero w + 带二个以太网卡的扩展底板----图中的RPi
网络:如下图所示
                                                     +- RPi -------+          +- old pc1----+
                                                     |         Eth0+----------+ Eth0        |
                 +- Router ----+                     |  DHCP server|          | 10.0.0.10   |
                 | Firewall    |                     |   10.0.0.1  |          |             |
(Internet)---WAN-+ DHCP server +-WLAN AP-+-)))   (((-+ WLAN        |          +-------------+
                 | 192.168.3.1 |                     |             |
                 +-------------+                     |             |          +- old pc2----+
                                                     |         Eth1+----------+ Eth0        |
                                                     |             |          | 10.0.0.4    |
                                                     +-------------+          |             |
                                                                              +-------------+
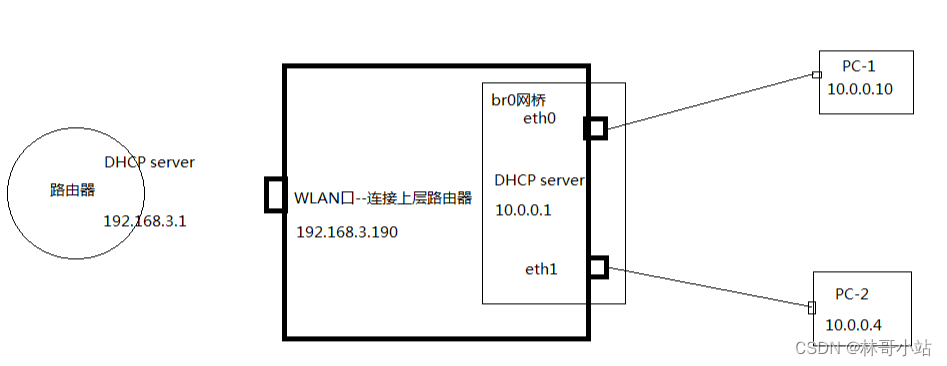
1、eBPF字节码的源代码实现
这个字节码实现的功能:每进来一个报文就检测是不是IPV4的报文,如果是,则打印本报文的源IP地址和目标IP地址
#include <stdio.h>
#include <linux/bpf.h>
#include <net/ethernet.h>
#include <linux/if_vlan.h>
#include <netinet/in.h>
#include <linux/ip.h>
#include <bpf/bpf_helpers.h>

#ifndef __section
# define __section(NAME)                  \
   __attribute__((section(NAME), used))
#endif

__section("prog")
int xdp_ip_filter(struct xdp_md *ctx)
{
    void *end = (void *)(long)ctx->data_end;
    void *data = (void *)(long)ctx->data;
    int ip_src;
    int ip_dst;
    long int offset;
    short int eth_type;

    char info_fmt1[] = "Dst Addr: %pi4";
    char info_fmt2[] = "Src Addr: %pi4";
    char info_fmt3[] ="-----------------";

    struct ethhdr *eth = data;
    offset = sizeof(*eth);

    if (data + offset > end) {
    return XDP_ABORTED;
    }
    eth_type = eth->h_proto;

    /* 只处理 IPv4 地址*/
    if (eth_type == ntohs(ETH_P_IPV6)) {
        return XDP_PASS;
    }

    struct iphdr *iph = data + offset;
    offset += sizeof(struct iphdr);
    /*  在读取之前,确保你要读取的子节在数据包的长度范围内  */
    if (iph + 1 > end) {
        return XDP_ABORTED;
    }
    ip_src = iph->saddr;
    ip_dst = iph->daddr;

    bpf_trace_printk(info_fmt3, sizeof(info_fmt3));
    bpf_trace_printk(info_fmt2, sizeof(info_fmt2), &ip_src);
    bpf_trace_printk(info_fmt1, sizeof(info_fmt1), &ip_dst);

    return XDP_PASS;
}

char __license[] __section("license") = "GPL";
3、用户态应用程度实现简介
注意,
- 因为实验测试用的树梅派只有二个以太网卡,所以代码里就写死二个网卡了。
- 这个用户态程序不会自动退出,只能以ctrl+c的方式强制退出
- 编程运行环境为32位linux,所以如果你的环境是64位的,char, short, int, long, long long的长度需要进行调整
#include <stdio.h>
#include <signal.h>
#include <sys/socket.h>
#include <net/if.h>
#include <bpf/bpf.h>
#include <linux/bpf.h>
#include <linux/rtnetlink.h>
#include "/usr/src/linux-6.1/tools/testing/selftests/bpf/bpf_util.h"

int flags = XDP_FLAGS_UPDATE_IF_NOEXIST;
static int *ifindex_list;

// 退出时自动卸载eBPF字节码的函数
static void uninstall_exit(int sig)
{
        int i = 0;
        for (i = 0; i < 2; i++) {
                bpf_set_link_xdp_fd(ifindex_list[i], -1, 0);
        }
        exit(0);
}
// 以下是用户态程序入口
int main(int argc, char *argv[])
{
        int i;
        char filename[64];
        struct bpf_object *obj;
        struct bpf_prog_load_attr prog_load_attr = {
                .prog_type      = BPF_PROG_TYPE_XDP,
        };
        int prog_fd;

        // 以下bridge.o依赖于你编译出来的.o文件名,做修改,.o要和当前代码编译出来的可执行程序放在同一个目录下
        snprintf(filename, sizeof(filename), "bridge.o");
        prog_load_attr.file = filename;

        // 从文件中载入eBPF字节码
        if (bpf_prog_load_xattr(&prog_load_attr, &obj, &prog_fd)) {
                return 1;
        }

        ifindex_list = (int *)calloc(2, sizeof(int *));

        //注意,运行时,需要输入二个网卡的ifname, 就是eth0 eth1这种,依赖于系统不一样,可能名字会不同,下面的代码会把ifname转换在ifindex。
        ifindex_list[0] = if_nametoindex(argv[1]);
        ifindex_list[1] = if_nametoindex(argv[2]);

        for (i = 0; i < 2; i++) {
                // 将eBPF字节码安装到指定的网卡
                if (bpf_set_link_xdp_fd(ifindex_list[i], prog_fd, flags) < 0) {
                        printf("install xdp fd failed\n");
                        return 1;
                }
        }
        //设置程序退出时,自动卸载eBPF字节码的函数
        signal(SIGINT, uninstall_exit);

        // 进入运行循环,什么都不做,只打印一个working...
        while(1){
            i++;
            sleep(1);
            printf("working...%d\r\n", i);
        }

}
4、编译与运行
将用户态程序存成文件main.c, 将eBPF程序存成bridge.c, 分别用以下命令进行编译
gcc main.c -lbpf
sudo clang -O2 -Wall -target bpf -c bridge.c -o bridge.o
会在当前目录下生成a.out和bridge.o二个文件
然后用以下命令运行:
sudo ./a.out eth0 eth1
5、运行状态验证
- 用户态程序已经正常运行(这里有个告警打印,不影响功能,忽略则可)
meihualing@raspberrypi:~/userloadprint $ sudo ./a.out eth0 eth1
libbpf: elf: skipping unrecognized data section(4) .rodata.str1.1
working...3
working...4
working...5
working...6
working...7
working...8
working...9
working...10
working...11
working...12
working...13
working...14
working...15
working...16
working...17
working...18
working...19
working...20
working...21
working...22
working...23
working...24
working...25
working...26
working...27
2,然后eBPF字节码运行的输出如下(如需要详细的原理,可参见XDP入门–BPF程序如何打印log, printf log,打印日志)
因为eth0,eth1接着的电脑后台程序在和互联网交互,所以不需要任何东西就可以看到字节码的打印输出,你的linux特别干净,没有后台运行的东西,则可以从10.0.0.4 ping 10.0.0.10后,得到类似下方的输出。
sudo cat /sys/kernel/debug/tracing/trace_pipe
  kworker/u3:0-60      [000] d.s..  7613.615253: bpf_trace_printk: -----------------
    kworker/u3:0-60      [000] d.s..  7613.615287: bpf_trace_printk: Src Addr: 010.000.000.004
    kworker/u3:0-60      [000] d.s..  7613.615299: bpf_trace_printk: Dst Addr: 115.223.009.115
    kworker/u3:0-60      [000] d.s..  7613.615756: bpf_trace_printk: -----------------
    kworker/u3:0-60      [000] d.s..  7613.615784: bpf_trace_printk: Src Addr: 010.000.000.004
    kworker/u3:0-60      [000] d.s..  7613.615795: bpf_trace_printk: Dst Addr: 115.223.009.115
    kworker/u3:0-60      [000] d.s..  7613.617634: bpf_trace_printk: -----------------
    kworker/u3:0-60      [000] d.s..  7613.617668: bpf_trace_printk: Src Addr: 010.000.000.004
    kworker/u3:0-60      [000] d.s..  7613.617679: bpf_trace_printk: Dst Addr: 115.223.009.115
            sshd-1291    [000] d.s..  7613.620971: bpf_trace_printk: -----------------
            sshd-1291    [000] d.s..  7613.621009: bpf_trace_printk: Src Addr: 010.000.000.004
            sshd-1291    [000] d.s..  7613.621022: bpf_trace_printk: Dst Addr: 192.168.003.190
          <idle>-0       [000] d.s..  7613.628747: bpf_trace_printk: -----------------
          <idle>-0       [000] d.s..  7613.628785: bpf_trace_printk: Src Addr: 010.000.000.004
          <idle>-0       [000] d.s..  7613.628797: bpf_trace_printk: Dst Addr: 192.168.003.190
          <idle>-0       [000] d.s..  7613.839358: bpf_trace_printk: -----------------
          <idle>-0       [000] d.s..  7613.839397: bpf_trace_printk: Src Addr: 010.000.000.004
          <idle>-0       [000] d.s..  7613.839409: bpf_trace_printk: Dst Addr: 192.168.003.190
          <idle>-0       [000] d.s..  7613.849433: bpf_trace_printk: -----------------
          <idle>-0       [000] d.s..  7613.849473: bpf_trace_printk: Src Addr: 010.000.000.004
          <idle>-0       [000] d.s..  7613.849484: bpf_trace_printk: Dst Addr: 192.168.003.190


