启动没有在AndroidManifest中声明的插件Activity
在前一篇文章中,我们已经可以在宿主中启动一个插件中的Activity了,但该Activity 必须在宿主的AndroidManifest文件中声明,否则会抛出ActivityNotFound异常。
我们需要做的是欺上瞒下的做法,也就是在AMS的startActivity方法中借助在宿主App的AndroidManifest.xml文件中声明的StubActivity,来临时替换掉真正要启动的插件Activity,然后在ActivityThread的Handler的事件中把StubActivity再换回插件Activity。
public class AMSHookHelper {
    public static final String EXTRA_TARGET_INTENT = "extra_target_intent";

    /**
     * Hook AMS
     * 主要完成的操作是  "把真正要启动的Activity临时替换为在AndroidManifest.xml中声明的替身Activity",进而骗过AMS
     */
    public static void hookAMS() throws ClassNotFoundException,
            NoSuchMethodException, InvocationTargetException,
            IllegalAccessException, NoSuchFieldException {

        // 获取AMN的gDefault对象实例
        Object singletonObject = null;
        if(Build.VERSION.SDK_INT >= Build.VERSION_CODES.P){
            singletonObject = RefInvoke.getStaticFieldObject("android.app.ActivityTaskManager","IActivityTaskManagerSingleton");
        }else if(Build.VERSION.SDK_INT >= Build.VERSION_CODES.O){
            singletonObject = RefInvoke.getStaticFieldObject("android.app.ActivityTaskManager","IActivityManagerSingleton");
        }else{
            // 获取AMN的gDefault单例,gDefault是final静态的
            singletonObject = RefInvoke.getStaticFieldObject("android.app.ActivityManagerNative","gDefault");
        }

        // singletonObject 是一个 android.util.Singleton<T>对象; 我们取出这个单例里面的mInstance字段
        Object mInstance = RefInvoke.getFieldObject("android.util.Singleton", singletonObject, "mInstance");

        // 创建一个这个对象的代理对象MockClass1, 然后替换这个字段, 让我们的代理对象帮忙干活
        Class<?> activityManagerInterface;
        if(Build.VERSION.SDK_INT >= Build.VERSION_CODES.P){
            activityManagerInterface = Class.forName("android.app.IActivityTaskManager");
        }else {
            activityManagerInterface = Class.forName("android.app.IActivityManager");
        }

        Object proxy = Proxy.newProxyInstance(
                Thread.currentThread().getContextClassLoader(),
                new Class[]{ activityManagerInterface },
                new AMSProxy(mInstance));

        RefInvoke.setFieldObject("android.util.Singleton", singletonObject, "mInstance",proxy);
    }

    /**
     * 由于之前我们用替身欺骗了AMS; 现在我们要换回我们真正需要启动的Activity
     * 不然就真的启动替身了, 狸猫换太子...
     * 到最终要启动Activity的时候,会交给ActivityThread 的一个内部类叫做 H 来完成
     * H 会完成这个消息转发; 最终调用它的callback
     */
    public static void hookActivityThread() throws Exception {

        // 先获取到当前的ActivityThread对象
        Object currentActivityThread = RefInvoke.getStaticFieldObject("android.app.ActivityThread", "sCurrentActivityThread");

        // 由于ActivityThread一个进程只有一个,我们获取这个对象的mH
        Handler mH = (Handler) RefInvoke.getFieldObject(currentActivityThread, "mH");

        //把Handler的mCallback字段,替换为new MockClass2(mH)
        RefInvoke.setFieldObject(Handler.class,
                mH, "mCallback", new HandlerProxy(mH));
    }
}
AMSProxy类如下:
class AMSProxy implements InvocationHandler {

    private static final String TAG = "MockClass1";
	private static final String stubPackage = "jianqiang.com.hostapp";

    Object mBase;

    public AMSProxy(Object base) {
        mBase = base;
    }

    @Override
    public Object invoke(Object proxy, Method method, Object[] args) throws Throwable {

        Log.e(TAG, method.getName());

        if ("startActivity".equals(method.getName())) {
            // 只拦截这个方法
            // 替换参数, 任你所为;甚至替换原始Activity启动别的Activity偷梁换柱

            // 找到参数里面的第一个Intent 对象
            Intent raw;
            int index = 0;

            for (int i = 0; i < args.length; i++) {
                if (args[i] instanceof Intent) {
                    index = i;
                    break;
                }
            }
            raw = (Intent) args[index];

            Intent newIntent = new Intent();

            // 这里我们把启动的Activity临时替换为 StubActivity
            ComponentName componentName = new ComponentName(stubPackage, StubActivity.class.getName());
            newIntent.setComponent(componentName);

            // 把我们原始要启动的TargetActivity先存起来
            newIntent.putExtra(AMSHookHelper.EXTRA_TARGET_INTENT, raw);

            // 替换掉Intent, 达到欺骗AMS的目的
            args[index] = newIntent;

            Log.d(TAG, "hook success");
            return method.invoke(mBase, args);
        }

        return method.invoke(mBase, args);
    }
}
HandlerProxy类如下:
class HandlerProxy implements Handler.Callback {

    Handler mBase;

    public HandlerProxy(Handler base) {
        mBase = base;
    }

    @Override
    public boolean handleMessage(Message msg) {

        switch (msg.what) {
            // ActivityThread里面 "LAUNCH_ACTIVITY" 这个字段的值是100
            // 本来使用反射的方式获取最好, 这里为了简便直接使用硬编码
            case 100:   //for API 28以下
                handleLaunchActivity(msg);
                break;
            case 159: // //for API 28以上
                handleActivity(msg);
                break;
        }

        mBase.handleMessage(msg);
        return true;
    }

   private void handleActivity(Message msg) {
        // 这里简单起见,直接取出TargetActivity;
        Object obj = msg.obj; // ClientTransaction对象

        List<Object> mActivityCallbacks = (List<Object>) RefInvoke.getFieldObject(obj, "mActivityCallbacks");
        if(mActivityCallbacks.size() > 0) {
            String className = "android.app.servertransaction.LaunchActivityItem";
            if(mActivityCallbacks.get(0).getClass().getCanonicalName().equals(className)) {
                // 找到LaunchActivityItem
                Object object = mActivityCallbacks.get(0);
                // 找到传递过来的intent
                Intent intent = (Intent) RefInvoke.getFieldObject(object, "mIntent");
                Intent target = intent.getParcelableExtra(AMSHookHelper.EXTRA_TARGET_INTENT);
                intent.setComponent(target.getComponent());
            }
        }
    }

    private void handleLaunchActivity(Message msg) {
        // 取出TargetActivity
        Object obj = msg.obj; // ActivityClientRecord

        // 把替身恢复成真身,拿到 ActivityClientRecord 中的intent
        Intent raw = (Intent) RefInvoke.getFieldObject(obj,"intent");
        Intent target = raw.getParcelableExtra(AMSHookHelper.EXTRA_TARGET_INTENT);
        raw.setComponent(target.getComponent());
    }

}
这样就可以正常启动一个没有在AndroidManifest.xml中声明的Activity了。
启动没有在AndroidManifest中声明的插件Service
ActivityThread最终是通过Instrumentation启动一个Activity的。而ActivityThread启动Service并不借助于Instrumentation,而是直接把Service反射出来就启动了。Instrumentation只给Activity提供服务
startService的解决方案
1. 在宿主App中声明几个占位Service,数量和插件中的Service相同
<?xml version="1.0" encoding="utf-8"?>
<manifest xmlns:android="http://schemas.android.com/apk/res/android"
    package="jianqiang.com.hostapp">
	...
    <application
        android:name=".MyApplication"
        android:allowBackup="true"
        android:icon="@mipmap/ic_launcher"
        android:label="@string/app_name"
        android:theme="@style/AppTheme">

        <activity android:name=".MainActivity"
            android:exported="true">
            <intent-filter>
                <action android:name="android.intent.action.MAIN" />

                <category android:name="android.intent.category.LAUNCHER" />
            </intent-filter>
        </activity>
			...

        <service android:name="jianqiang.com.hostapp.StubService1"/>
        <service android:name="jianqiang.com.hostapp.StubService2"/>
    </application>

</manifest>
2. 在插件的Assets目录中创建一个plugin_config.json配置文件,让宿主的占位Service和插件中的Service一一对应
{
  "plugins": [
    {
      "PluginService": "jianqiang.com.plugin1.MyService1",
      "StubService": "jianqiang.com.hostapp.StubService1"
    },
    {
      "PluginService": "jianqiang.com.plugin1.MyService2",
      "StubService": "jianqiang.com.hostapp.StubService2"
    }
  ]
}
定义一个方法来解析配置文件:
 /**
     * 读取zip文件中某个文件为字符串,参看自Zeus的PluginUtil
     * @param zipFile     压缩文件
     * @param fileNameReg 需要获取的文件名
     * @return 获取的字符串
     */
    public static String readZipFileString(String zipFile,String fileNameReg){
        final int BUF_SIZE = 8192;

        String result = null;
        byte[] buffer = new byte[BUF_SIZE];
        InputStream in = null;
        ZipInputStream zipIn = null;
        ByteArrayOutputStream bos = null;
        try {
            File file = new File(zipFile);
            if (!file.exists()) return null;
            in = new FileInputStream(file);
            zipIn = new ZipInputStream(in);
            ZipEntry entry;
            while (null != (entry = zipIn.getNextEntry())) {
                String zipName = entry.getName();
                if (zipName.equals(fileNameReg)) {
                    int bytes;
                    int count = 0;
                    bos = new ByteArrayOutputStream();

                    while ((bytes = zipIn.read(buffer, 0, BUF_SIZE)) != -1) {
                        bos.write(buffer, 0, bytes);
                        count += bytes;
                    }
                    if (count > 0) {
                        result = bos.toString();
                        break;
                    }
                }
            }
        } catch (Exception e) {
            e.printStackTrace();
        } finally {
            try {
                closeSilently(in);
                closeSilently(zipIn);
                closeSilently(bos);
            } catch (Exception e2) {
                e2.printStackTrace();
            }
        }
        return result;
    }
3. 把插件和宿主的dex合并
/**
 * 由于应用程序使用的ClassLoader为PathClassLoader
 * 最终继承自 BaseDexClassLoader
 * 查看源码得知,这个BaseDexClassLoader加载代码根据一个叫做
 * dexElements的数组进行, 因此我们把包含代码的dex文件插入这个数组
 * 系统的classLoader就能帮助我们找到这个类
 *
 * 这个类用来进行对于BaseDexClassLoader的Hook
 * 类名太长, 不要吐槽.
 * @author weishu
 * @date 16/3/28
 */
public final class BaseDexClassLoaderHookHelper {

    public static void patchClassLoader(ClassLoader cl, File apkFile, File optDexFile)
            throws IllegalAccessException, NoSuchMethodException, IOException, InvocationTargetException, InstantiationException, NoSuchFieldException {
        // 获取 BaseDexClassLoader : pathList
        Object pathListObj = RefInvoke.getFieldObject(DexClassLoader.class.getSuperclass(), cl, "pathList");

        // 获取 PathList: Element[] dexElements
        Object[] dexElements = (Object[]) RefInvoke.getFieldObject(pathListObj, "dexElements");

        // Element 类型
        Class<?> elementClass = dexElements.getClass().getComponentType();

        // 创建一个数组, 用来替换原始的数组
        Object[] newElements = (Object[]) Array.newInstance(elementClass, dexElements.length + 1);

        // 构造插件Element(File file, boolean isDirectory, File zip, DexFile dexFile) 这个构造函数
        Class[] p1 = {File.class, boolean.class, File.class, DexFile.class};
        Object[] v1 = {apkFile, false, apkFile, DexFile.loadDex(apkFile.getCanonicalPath(), optDexFile.getAbsolutePath(), 0)};
        Object o = RefInvoke.createObject(elementClass, p1, v1);

        Object[] toAddElementArray = new Object[] { o };
        // 把原始的elements复制进去
        System.arraycopy(dexElements, 0, newElements, 0, dexElements.length);
        // 插件的那个element复制进去
        System.arraycopy(toAddElementArray, 0, newElements, dexElements.length, toAddElementArray.length);

        // 替换
        RefInvoke.setFieldObject(pathListObj, "dexElements", newElements);
    }
}
4. 采用“欺上瞒下”的方法
public class AMSHookHelperForService {
    public static final String EXTRA_TARGET_INTENT = "extra_target_intent";

    /**
     * Hook AMS
     * 主要完成的操作是  "把真正要启动的Activity临时替换为在AndroidManifest.xml中声明的替身Activity",进而骗过AMS
     */
    public static void hookAMS() throws ClassNotFoundException,
            NoSuchMethodException, InvocationTargetException,
            IllegalAccessException, NoSuchFieldException {

        // 获取AMN的gDefault对象实例
        Object singletonObject = null;
        if(Build.VERSION.SDK_INT >= Build.VERSION_CODES.O){
            singletonObject = RefInvoke.getStaticFieldObject("android.app.ActivityManager","IActivityManagerSingleton");
        }else{
            // 获取AMN的gDefault单例,gDefault是final静态的
            singletonObject = RefInvoke.getStaticFieldObject("android.app.ActivityManagerNative","gDefault");
        }

        // singletonObject 是一个 android.util.Singleton<T>对象; 我们取出这个单例里面的mInstance字段
        Object mInstance = RefInvoke.getFieldObject("android.util.Singleton", singletonObject, "mInstance");

        // 创建一个这个对象的代理对象MockClass1, 然后替换这个字段, 让我们的代理对象帮忙干活
        Class<?> activityManagerInterface;
        activityManagerInterface = Class.forName("android.app.IActivityManager");

        Object proxy = Proxy.newProxyInstance(
                Thread.currentThread().getContextClassLoader(),
                new Class[]{ activityManagerInterface },
                new AMSProxy(mInstance));

        RefInvoke.setFieldObject("android.util.Singleton", singletonObject, "mInstance",proxy);
    }

    /**
     * 由于之前我们用替身欺骗了AMS; 现在我们要换回我们真正需要启动的Activity
     * 不然就真的启动替身了, 狸猫换太子...
     * 到最终要启动Activity的时候,会交给ActivityThread 的一个内部类叫做 H 来完成
     * H 会完成这个消息转发; 最终调用它的callback
     */
    public static void hookActivityThread() throws Exception {

        // 先获取到当前的ActivityThread对象
        Object currentActivityThread = RefInvoke.getStaticFieldObject("android.app.ActivityThread", "sCurrentActivityThread");

        // 由于ActivityThread一个进程只有一个,我们获取这个对象的mH
        Handler mH = (Handler) RefInvoke.getFieldObject(currentActivityThread, "mH");

        //把Handler的mCallback字段,替换为new HandlerProxy(mH)
        RefInvoke.setFieldObject(Handler.class,
                mH, "mCallback", new HandlerProxy(mH));
    }
}
和Activity不同的是,startService被委托给了ActivityManagerService的startService方法:
在AMSProxy文件中添加startService 和 stopService 的捕获:
public class AMSProxy implements InvocationHandler {
    private static final String TAG = "AMSProxy";
    private static final String stubPackage = "jianqiang.com.hostapp";

    Object mBase;

    public AMSProxy(Object mBase) {
        this.mBase = mBase;
    }

    @Override
    public Object invoke(Object proxy, Method method, Object[] args) throws Throwable {
        Log.e(TAG, method.getName());

        if ("startActivity".equals(method.getName())) {
            // 只拦截这个方法
            // 替换参数, 任你所为;甚至替换原始Activity启动别的Activity偷梁换柱

            // 找到参数里面的第一个Intent 对象
            Intent raw;
            int index = 0;

            for (int i = 0; i < args.length; i++) {
                if (args[i] instanceof Intent) {
                    index = i;
                    break;
                }
            }
            raw = (Intent) args[index];

            Intent newIntent = new Intent();

            // 替身Activity的包名, 也就是我们自己的包名
            String stubPackage = "jianqiang.com.hostapp";

            // 这里我们把启动的Activity临时替换为 StubActivity
            ComponentName componentName = new ComponentName(stubPackage, StubActivity.class.getName());
            newIntent.setComponent(componentName);

            // 把我们原始要启动的TargetActivity先存起来
            newIntent.putExtra(AMSHookHelper.EXTRA_TARGET_INTENT, raw);

            // 替换掉Intent, 达到欺骗AMS的目的
            args[index] = newIntent;

            Log.d(TAG, "hook success");
            return method.invoke(mBase, args);
        }else if("startService".equals(method.getName())){
            // hook startService

            // 找到参数里面的第一个Intent 对象
            int index = 0;
            for (int i = 0; i < args.length; i++) {
                if (args[i] instanceof Intent) {
                    index = i;
                    break;
                }
            }
            // 拿到启动Service时的Intent
            Intent rawIntent = (Intent) args[index];
            // jianqiang.com.plugin1.MyService1
            String rawServiceName = rawIntent.getComponent().getClassName();
            // 拿到插件Service对应的Service  jianqiang.com.hostapp.StubService1
            String stubServiceName = MyApplication.pluginServices.get(rawServiceName);
            // replace Plugin Service of StubService
            ComponentName componentName = new ComponentName(stubPackage, stubServiceName);
            Intent newIntent = new Intent();
            newIntent.setComponent(componentName);
            // Replace Intent, cheat AMS
            args[index] = newIntent;

            Log.d(TAG, "hook success");
            return method.invoke(mBase, args);
        }else if("stopService".equals(method.getName())){
            // 找到参数里面的第一个Intent 对象
            int index = 0;
            for (int i = 0; i < args.length; i++) {
                if (args[i] instanceof Intent) {
                    index = i;
                    break;
                }
            }

            //get StubService form UPFApplication.pluginServices
            Intent rawIntent = (Intent) args[index];
            String rawServiceName = rawIntent.getComponent().getClassName();
            String stubServiceName = MyApplication.pluginServices.get(rawServiceName);
            // replace Plugin Service of StubService
            ComponentName componentName = new ComponentName(stubPackage, stubServiceName);
            Intent newIntent = new Intent();
            newIntent.setComponent(componentName);

            // Replace Intent, cheat AMS
            args[index] = newIntent;

            Log.d(TAG, "hook success");
            return method.invoke(mBase, args);
        }
        return method.invoke(mBase, args);
    }
}
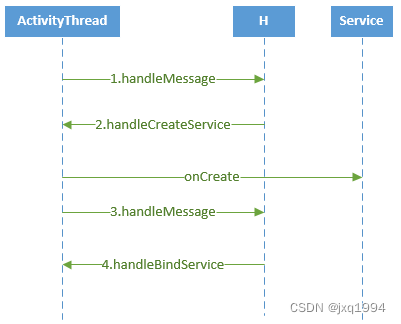
AMS被欺骗后,它原本会通知APP启动StubService,而我们要Hook掉ActivityThread的mH对象的mCallback对象,仍然截获它的handleMessage方法,只不过这次截取的是CREATE_SERVICE(value=114)分支,这个分支执行ActivityThread中的handleCreateService方法。我们看源码的实现:
public void handleMessage(Message msg) {
    switch (msg.what) {
       ...

        case CREATE_SERVICE:
            if (Trace.isTagEnabled(Trace.TRACE_TAG_ACTIVITY_MANAGER)) {
                Trace.traceBegin(Trace.TRACE_TAG_ACTIVITY_MANAGER,
                        ("serviceCreate: " + String.valueOf(msg.obj)));
            }
            handleCreateService((CreateServiceData)msg.obj);
            Trace.traceEnd(Trace.TRACE_TAG_ACTIVITY_MANAGER);
            break;

        ...
    }
}
private void handleCreateService(CreateServiceData data) {
	LoadedApk packageInfo = getPackageInfoNoCheck(
            data.info.applicationInfo, data.compatInfo);
    Service service = null;
    try {
        //创建service的context
        ContextImpl context = ContextImpl.createAppContext(this, packageInfo);
        //创建Application
        Application app = packageInfo.makeApplication(false, mInstrumentation);
        //获取类加载器
        java.lang.ClassLoader cl = packageInfo.getClassLoader();
        //加载service实例
        service = packageInfo.getAppFactory()
                .instantiateService(cl, data.info.name, data.intent);
                ...
                //初始化service
        service.attach(context, this, data.info.name, data.token, app,
                ActivityManager.getService());
        //调用service的onCreate方法
        service.onCreate();
     } catch (Exception e) {
        if (!mInstrumentation.onException(service, e)) {
            throw new RuntimeException(
                "Unable to create service " + data.info.name
                + ": " + e.toString(), e);
        }
    }
}
在handleCreateService 方法中,可以通过CreateServiceData来获取要启动的Service的信息。只需要将data.info.name 的值Hook为插件Service即可。
public class HandlerProxy implements Handler.Callback {
    Handler mBase;

    public HandlerProxy(Handler mBase) {
        this.mBase = mBase;
    }

    @Override
    public boolean handleMessage(@NonNull Message msg) {
        switch (msg.what){
            case 100: // //for API 28以下
                handleLaunchActivity(msg);
                break;
            case 159: // //for API 28以上
                handleActivity(msg);
                break;
            case 114: // CREATE_SERVICE
                handleCreateService(msg);
                break;
        }
        mBase.handleMessage(msg);
        return true;
    }

    private void handleCreateService(Message msg) {
        Object obj = msg.obj;
        ServiceInfo serviceInfo = (ServiceInfo) RefInvoke.getFieldObject(obj, "info");

        String realServiceName = null;

        for (String key : MyApplication.pluginServices.keySet()) {
            String value = MyApplication.pluginServices.get(key);
            if(value.equals(serviceInfo.name)) {
                realServiceName = key;
                break;
            }
        }

        if(TextUtils.isEmpty(realServiceName)){
            // 只有在plugin_config中注册的才不会为空
            return;
        }

        serviceInfo.name = realServiceName;
    }

    private void handleActivity(Message msg) {
        // 这里简单起见,直接取出TargetActivity;
        Object obj = msg.obj; // ClientTransaction对象

        List<Object> mActivityCallbacks = (List<Object>) RefInvoke.getFieldObject(obj, "mActivityCallbacks");
        if(mActivityCallbacks.size() > 0) {
            String className = "android.app.servertransaction.LaunchActivityItem";
            if(mActivityCallbacks.get(0).getClass().getCanonicalName().equals(className)) {
                // 找到LaunchActivityItem
                Object object = mActivityCallbacks.get(0);
                // 找到传递过来的intent
                Intent intent = (Intent) RefInvoke.getFieldObject(object, "mIntent");
                Intent target = intent.getParcelableExtra(AMSHookHelper.EXTRA_TARGET_INTENT);
                intent.setComponent(target.getComponent());
            }
        }
    }

    private void handleLaunchActivity(Message msg) {
        // 取出TargetActivity
        Object obj = msg.obj; // ActivityClientRecord

        // 把替身恢复成真身,拿到 ActivityClientRecord 中的intent
        Intent raw = (Intent) RefInvoke.getFieldObject(obj,"intent");
        Intent target = raw.getParcelableExtra(AMSHookHelper.EXTRA_TARGET_INTENT);
        raw.setComponent(target.getComponent());
    }
}
如此就完成了支持startService。
在宿主中调用
 public void startUnRegisterService1InPlugin1(View view) {
        try {

            Intent intent = new Intent();
            intent.setComponent(
                    new ComponentName("jianqiang.com.plugin1",
                            "jianqiang.com.plugin1.MyService1"));
            startService(intent);
        } catch (Exception e) {
            e.printStackTrace();
        }
    }

    public void stopUnRegisterService1InPlugin1(View view) {
        try {
            Intent intent = new Intent();
            intent.setComponent(
                    new ComponentName("jianqiang.com.plugin1",
                            "jianqiang.com.plugin1.MyService1"));
            stopService(intent);
        } catch (Exception e) {
            e.printStackTrace();
        }
    }
bindService的解决方案
只需要在AMSProxy中增加一个分支,在bindService时欺骗AMS就行了:
else if("bindIsolatedService".equals(method.getName())){
            // 找到参数里面的第一个Intent 对象
            int index = 0;
            for (int i = 0; i < args.length; i++) {
                if (args[i] instanceof Intent) {
                    index = i;
                    break;
                }
            }

            Intent rawIntent = (Intent) args[index];
            String rawServiceName = rawIntent.getComponent().getClassName();
            String stubServiceName = MyApplication.pluginServices.get(rawServiceName);


            // replace Plugin Service of StubService
            ComponentName componentName = new ComponentName(stubPackage, stubServiceName);
            Intent newIntent = new Intent();
            newIntent.setComponent(componentName);

            // Replace Intent, cheat AMS
            args[index] = newIntent;

            Log.d(TAG, "hook success");
            return method.invoke(mBase, args);
        }
接下来就可以在宿主中调用:
public void bindUnRegisterService1InPlugin1(View view) {
        try {

            Intent intent = new Intent();
            intent.setComponent(
                    new ComponentName("jianqiang.com.plugin1",
                            "jianqiang.com.plugin1.MyService2"));
            bindService(intent, serviceConnection, Service.BIND_AUTO_CREATE);
        } catch (Exception e) {
            e.printStackTrace();
        }
    }

    ServiceConnection serviceConnection = new ServiceConnection() {
        @Override
        public void onServiceConnected(ComponentName name, IBinder service) {
            Log.i("TAG","onServiceConnected   " + name);
        }

        @Override
        public void onServiceDisconnected(ComponentName name) {
            Log.i("TAG","onServiceConnected   " + name);
        }
    };
    public void unbindUnRegisterService1InPlugin1(View view) {
        try {
            if(null != serviceConnection){
                unbindService(serviceConnection);
            }
        } catch (Exception e) {
            e.printStackTrace();
        }
    }
问1:为什么不在unbind的时候欺骗AMS?
因为unbind语法是unbindService(conn),AMS会根据conn来找到对应的Service,所以我们不需要把MyService2替换为StubService2
问2:为什么在MockClass2中不需要吧StubService2切换回MyService2?
因为bindService是先走handleCreateService再走handleBindService方法。在handleCreateService方法中已经将StubService2切换回MyService2了,所以后面不需要切换了。
源码







![我的创作纪念日---[需要更开阔的视野!]](https://img-blog.csdnimg.cn/38625f307b724378a51557d73f2be7f7.png#pic_center)


