Tomcat/Nginx配置https协议证书
- 前言
- Tomcat配置https协议证书-阿里云
- 方式一 pfx
- 配置证书
- 重启即可
- 方式二 jks
- pfx生成jks
- 配置证书
- 重启即可
- Nginx配置https协议证书-阿里云
- 实现方式
- 重启即可
- 其他
- Tomcat相关配置例子如下
- nginx配置相关例子如下
前言
阿里云官网:https://account.aliyun.com/login/login.htm
前往阿里云控制台下载域名证

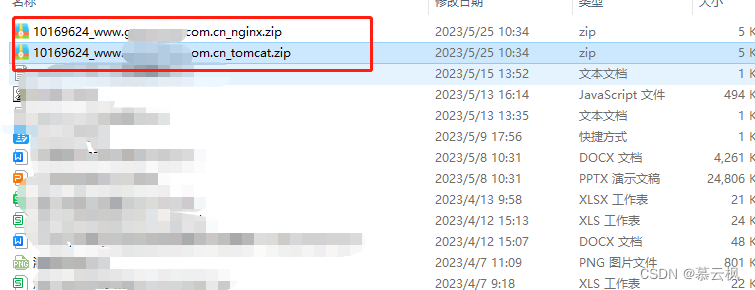
证书分为两个
Tomcat配置https协议证书-阿里云
其中_tomcat.zip就是我们需要用到的,里面包括.pfx文件和密钥
证书文件pfx目录存放于:D:/Tomcat8.0/cert/www.*****.com.cn.pfx
证书文件jks 目录存放于:D:/Tomcat8.0/cert/www.*****.com.cn.jks
修改相同配置文件:D:/Tomcat8.0/conf/server.xml
文件前缀我在使用的时候已去除,方便替换,如:10169624_www.****.com.cn
去除了10169624_
方式一 pfx
参考网址:https://blog.csdn.net/weixin_43246026/article/details/125804546
配置证书
将解压后的pfx文件复制到这个目录下

然后修改conf/server.xml文件
<Connector port="443" protocol="org.apache.coyote.http11.Http11Protocol" SSLEnabled="true"
		maxThreads="150" scheme="https" secure="true"
		keystoreFile="cert/www.*****.com.cn.pfx"
		keystorePass="12345678"
		clientAuth="false" sslProtocol="TLS" />
keystoreFile:就是我们pfx文件的路径
keystorePass:则是密钥
重启即可
方式二 jks
参考网址:https://www.ab62.cn/article/22429.html
pfx生成jks
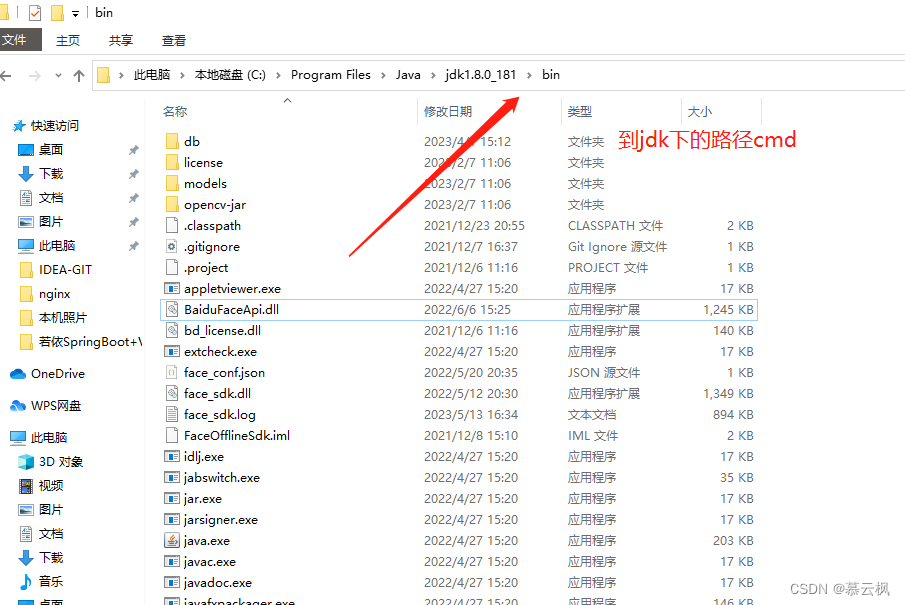
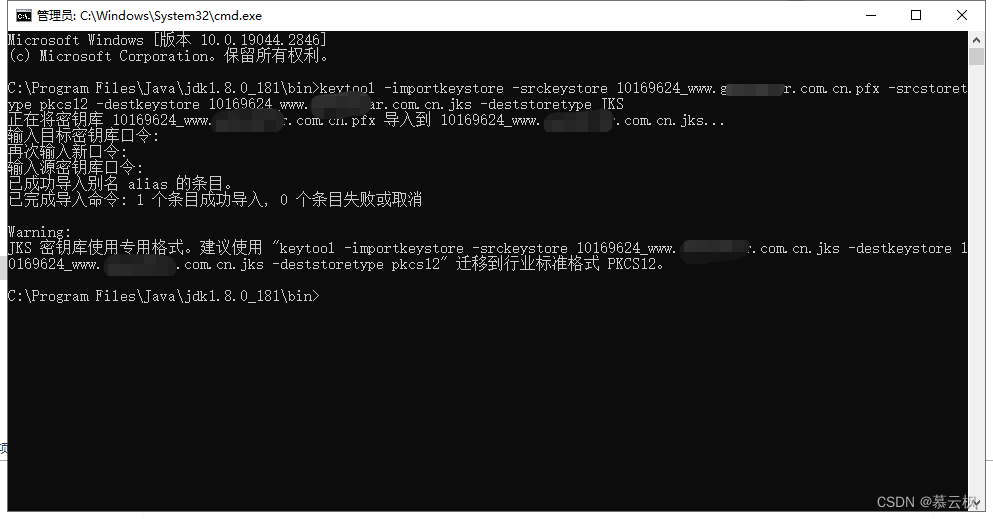
使用JDK生成,我们需要到本地jdk路径bin下,然后将解压的pfx文件复制到这里,并cmd打开这个目录的窗口
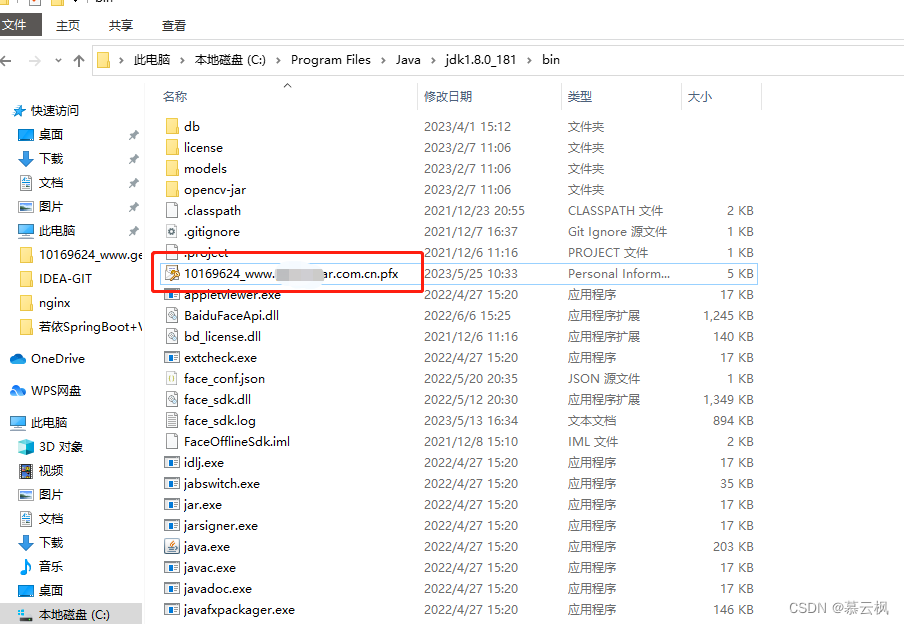
然后将如下命令执行,记得要把pfx名称改成自己的
注:需要输入三次密钥,我们到解压的文件中将pfx-password.txt内的密码复制,然后粘贴上去即可,粘贴后直接回车,密码不会显示出来的,看起来就是空格,三次粘贴回车即可生成jks
命令:
keytool -importkeystore -srckeystore 10169624_www.****.com.cn.pfx -srcstoretype pkcs12 -destkeystore 10169624_www.****.com.cn.jks -deststoretype JKS
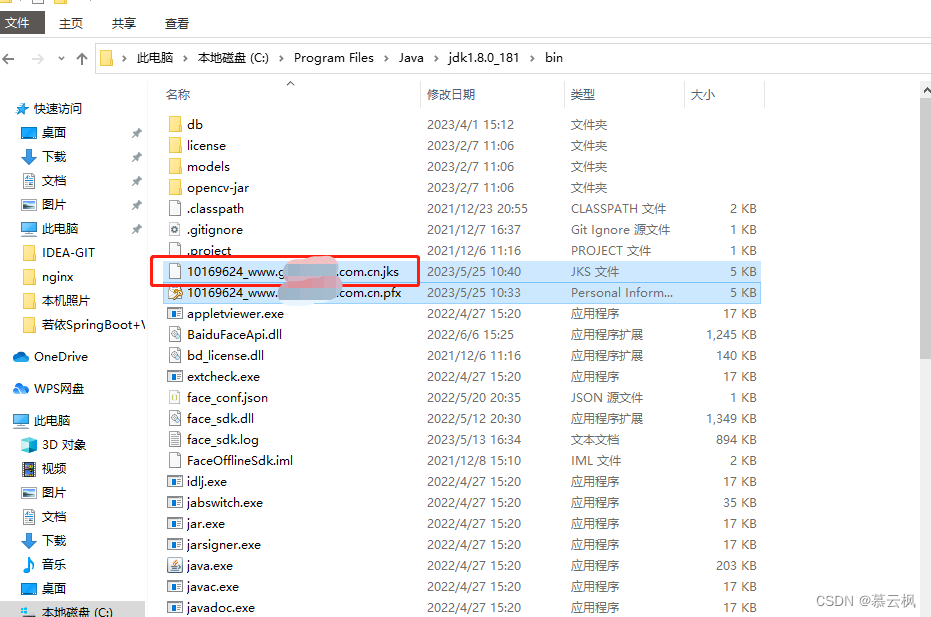
生成后的文件,生成后的jks文件我们需要复制到Tomcat目录下,
如:D:/Tomcat8.0/cert/www.*****.com.cn.jks
配置证书
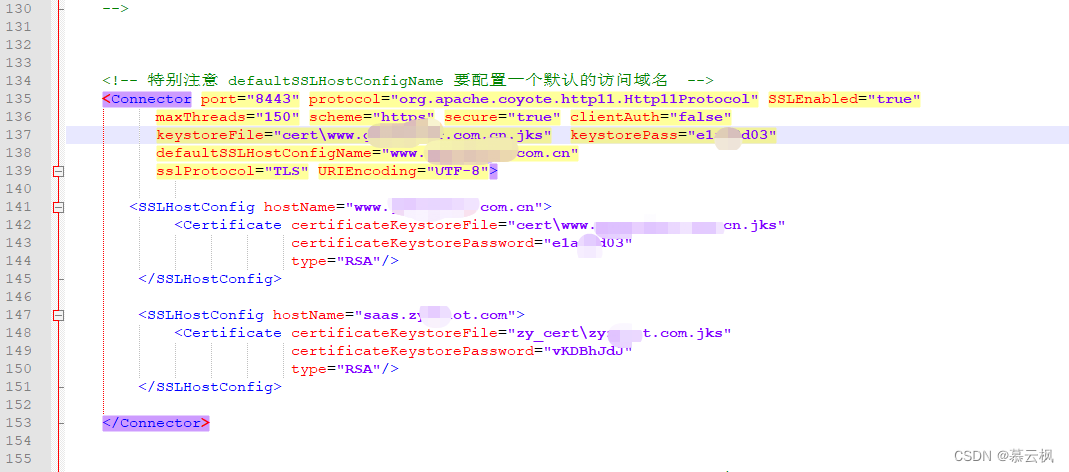
生成jks后,我们需要修改tomcat的conf/server.xml文件,此处的配置方式为多域名配置,
其中Connector标签行配置的域名是默认域名,内的SSLHostConfig标签则是用来配置多域名的;
我们操作第一个www.开头的,将文件jks文件路径填充,并将keystorePass的密钥填充。
重启即可
Nginx配置https协议证书-阿里云
其中_nginx.zip就是我们需要用到的,里面包括.key和.pem文件
文件前缀我在使用的时候已去除,方便替换,如:10169624_www.****.com.cn
去除了10169624_
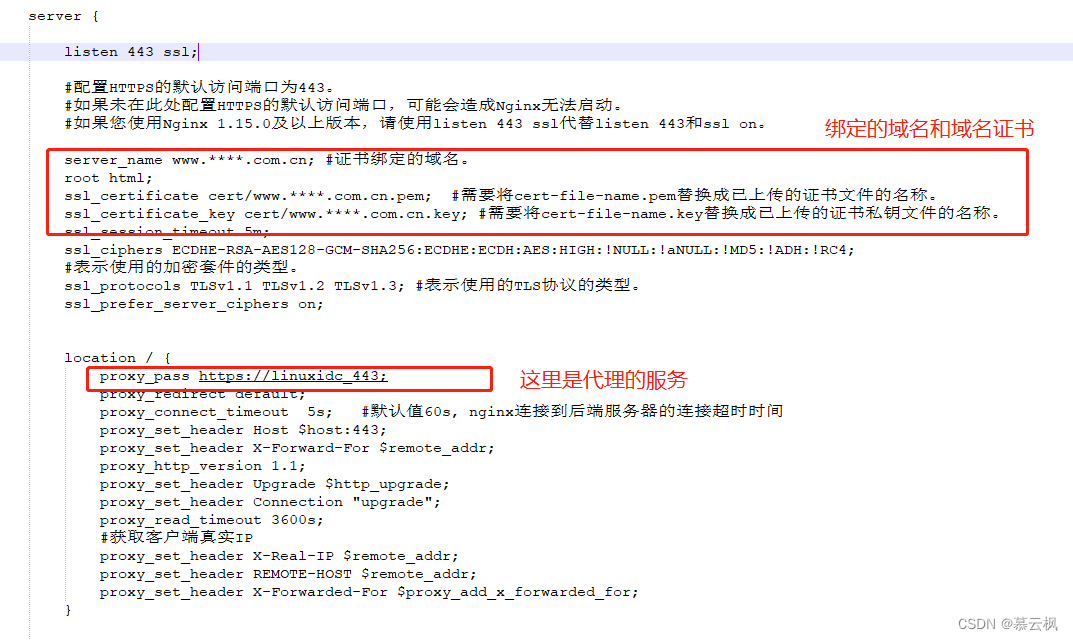
实现方式
证书文件目录存放于:
F:\nginx\conf\cert\www.*****.com.cn.key
F:\nginx\conf\cert\www.*****.com.cn.pem
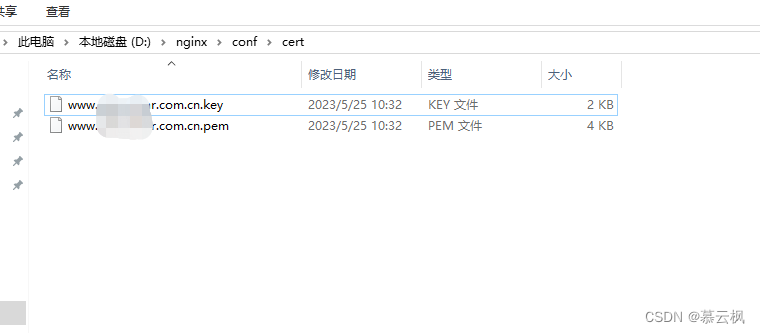
修改配置文件:F:\nginx\conf\nginx.conf
重启即可
其他
请复制下拉耐心查看,实际用的并不多,只是注释的也被我捞上来了而已
Tomcat相关配置例子如下
(其中 zy_cert\zy***.com.jks 是另一个域名的证书,此处并未相关,只是例子,需注意)
<?xml version="1.0" encoding="UTF-8"?>
<!--
Licensed to the Apache Software Foundation (ASF) under one or more
contributor license agreements. See the NOTICE file distributed with
this work for additional information regarding copyright ownership.
The ASF licenses this file to You under the Apache License, Version 2.0
(the "License"); you may not use this file except in compliance with
the License. You may obtain a copy of the License at
http://www.apache.org/licenses/LICENSE-2.0
Unless required by applicable law or agreed to in writing, software
distributed under the License is distributed on an "AS IS" BASIS,
WITHOUT WARRANTIES OR CONDITIONS OF ANY KIND, either express or implied.
See the License for the specific language governing permissions and
limitations under the License.
-->
<!-- Note: A "Server" is not itself a "Container", so you may not
define subcomponents such as "Valves" at this level.
Documentation at /docs/config/server.html
-->
<Server port="8018" shutdown="SHUTDOWN">
<Listener className="org.apache.catalina.startup.VersionLoggerListener" />
<!-- Security listener. Documentation at /docs/config/listeners.html
<Listener className="org.apache.catalina.security.SecurityListener" />
-->
<!--APR library loader. Documentation at /docs/apr.html -->
<Listener className="org.apache.catalina.core.AprLifecycleListener" SSLEngine="on" />
<!-- Prevent memory leaks due to use of particular java/javax APIs-->
<Listener className="org.apache.catalina.core.JreMemoryLeakPreventionListener" />
<Listener className="org.apache.catalina.mbeans.GlobalResourcesLifecycleListener" />
<Listener className="org.apache.catalina.core.ThreadLocalLeakPreventionListener" />
<!-- Global JNDI resources
Documentation at /docs/jndi-resources-howto.html
-->
<GlobalNamingResources>
<!-- Editable user database that can also be used by
UserDatabaseRealm to authenticate users
-->
<Resource name="UserDatabase" auth="Container"
type="org.apache.catalina.UserDatabase"
description="User database that can be updated and saved"
factory="org.apache.catalina.users.MemoryUserDatabaseFactory"
pathname="conf/tomcat-users.xml" />
</GlobalNamingResources>
<!-- A "Service" is a collection of one or more "Connectors" that share
a single "Container" Note: A "Service" is not itself a "Container",
so you may not define subcomponents such as "Valves" at this level.
Documentation at /docs/config/service.html
-->
<Service name="Catalina">
<!--The connectors can use a shared executor, you can define one or more named thread pools-->
<!--
<Executor name="tomcatThreadPool" namePrefix="catalina-exec-"
maxThreads="150" minSpareThreads="4"/>
-->
<Executor name="tomcatThreadPool"
namePrefix="HTTP-8081-exec-"
prestartminSpareThreads="true"
maxThreads="5000"
maxQueueSize="100"
minSpareThreads="50"
maxIdleTime="10000"
/>
<!-- A "Connector" represents an endpoint by which requests are received
and responses are returned. Documentation at :
Java HTTP Connector: /docs/config/http.html
Java AJP Connector: /docs/config/ajp.html
APR (HTTP/AJP) Connector: /docs/apr.html
Define a non-SSL/TLS HTTP/1.1 Connector on port 8080
-->
<Connector port="8081" protocol="HTTP/1.1"
connectionTimeout="8000"
URIEncoding="UTF-8" maxHttpHeaderSize="8192"
relaxedQueryChars="{,},[,],\,^" executor="tomcatThreadPool"
redirectPort="443" />
<!-- A "Connector" using the shared thread pool-->
<!--
<Connector executor="tomcatThreadPool"
port="8080" protocol="HTTP/1.1"
connectionTimeout="8000"
redirectPort="8443" />
-->
<!-- Define a SSL/TLS HTTP/1.1 Connector on port 8443
This connector uses the NIO implementation. The default
SSLImplementation will depend on the presence of the APR/native
library and the useOpenSSL attribute of the
AprLifecycleListener.
Either JSSE or OpenSSL style configuration may be used regardless of
the SSLImplementation selected. JSSE style configuration is used below.
-->
<!--
<Connector port="8443" protocol="org.apache.coyote.http11.Http11NioProtocol"
maxThreads="150" SSLEnabled="true">
<SSLHostConfig>
<Certificate certificateKeystoreFile="conf/localhost-rsa.jks"
type="RSA" />
</SSLHostConfig>
</Connector>
-->
<!-- Define a SSL/TLS HTTP/1.1 Connector on port 8443 with HTTP/2
This connector uses the APR/native implementation which always uses
OpenSSL for TLS.
Either JSSE or OpenSSL style configuration may be used. OpenSSL style
configuration is used below.
-->
<!--
<Connector port="443" protocol="org.apache.coyote.http11.Http11NioProtocol"
maxThreads="150" SSLEnabled="true" scheme="https" secure="true"
clientAuth="false" sslProtocol="TLS"
URIEncoding="UTF-8" maxHttpHeaderSize="8192" maxSwallowSize="-1" maxPostSize="20971520"
relaxedQueryChars="{,},[,],\,^"
keystoreFile="bin\5984483_www.****.com.cn.pfx"
keystorePass="123456" />-->
<!--
<Connector port="8443" protocol="org.apache.coyote.http11.Http11AprProtocol"
maxThreads="150" SSLEnabled="true" >
<UpgradeProtocol className="org.apache.coyote.http2.Http2Protocol" />
<SSLHostConfig>
<Certificate certificateKeyFile="conf/localhost-rsa-key.pem"
certificateFile="conf/localhost-rsa-cert.pem"
certificateChainFile="conf/localhost-rsa-chain.pem"
type="RSA" />
</SSLHostConfig>
</Connector>
-->
<!-- 特别注意 defaultSSLHostConfigName 要配置一个默认的访问域名 -->
<Connector port="8443" protocol="org.apache.coyote.http11.Http11Protocol" SSLEnabled="true"
maxThreads="150" scheme="https" secure="true" clientAuth="false"
keystoreFile="cert\www.****.com.cn.jks" keystorePass="123456"
defaultSSLHostConfigName="www.****.com.cn"
sslProtocol="TLS" URIEncoding="UTF-8">
<SSLHostConfig hostName="www.****.com.cn">
<Certificate certificateKeystoreFile="cert\www.****.com.cn.jks"
certificateKeystorePassword="123456"
type="RSA"/>
</SSLHostConfig>
<SSLHostConfig hostName="saas.zy***.com">
<Certificate certificateKeystoreFile="zy_cert\zy***.com.jks"
certificateKeystorePassword="123456"
type="RSA"/>
</SSLHostConfig>
</Connector>
<!-- Define an AJP 1.3 Connector on port 8009
<Connector port="8009" protocol="AJP/1.3" redirectPort="8443" />-->
<!-- An Engine represents the entry point (within Catalina) that processes
every request. The Engine implementation for Tomcat stand alone
analyzes the HTTP headers included with the request, and passes them
on to the appropriate Host (virtual host).
Documentation at /docs/config/engine.html -->
<!-- You should set jvmRoute to support load-balancing via AJP ie :
<Engine name="Catalina" defaultHost="localhost" jvmRoute="jvm1">
-->
<Engine name="Catalina" defaultHost="www.****.com.cn">
<Valve className="org.apache.catalina.valves.RemoteIpValve"
remoteIpHeader="X-Forwarded-For"
protocolHeader="X-Forwarded-Proto"
protocolHeaderHttpsValue="https"/>
<!--For clustering, please take a look at documentation at:
/docs/cluster-howto.html (simple how to)
/docs/config/cluster.html (reference documentation) -->
<!--
<Cluster className="org.apache.catalina.ha.tcp.SimpleTcpCluster"/>
-->
<!-- Use the LockOutRealm to prevent attempts to guess user passwords
via a brute-force attack -->
<Realm className="org.apache.catalina.realm.LockOutRealm">
<!-- This Realm uses the UserDatabase configured in the global JNDI
resources under the key "UserDatabase". Any edits
that are performed against this UserDatabase are immediately
available for use by the Realm. -->
<Realm className="org.apache.catalina.realm.UserDatabaseRealm"
resourceName="UserDatabase"/>
</Realm>
<Host name="www.****.com.cn" appBase="webapps"
unpackWARs="true" autoDeploy="true">
<Alias>www.****.com.cn</Alias>
<Alias>saas.zy***.com</Alias>
<!-- SingleSignOn valve, share authentication between web applications
Documentation at: /docs/config/valve.html -->
<!--
<Valve className="org.apache.catalina.authenticator.SingleSignOn" />
-->
<!-- Access log processes all example.
Documentation at: /docs/config/valve.html
Note: The pattern used is equivalent to using pattern="common" -->
<Valve className="org.apache.catalina.valves.AccessLogValve" directory="logs"
prefix="localhost_access_log" suffix=".txt"
pattern="%h %l %u %t "%r" %s %b" />
</Host>
</Engine>
</Service>
</Server>
nginx配置相关例子如下
(其中 nginx/cloudRoot 是项目静态文件目录)
#user  nobody;
worker_processes  8;#设置与CUP核数一致

#错误日志存放目录
#error_log  logs/error.log;
#error_log  logs/error.log  notice;
#error_log  logs/error.log  info;

#pid        logs/nginx.pid;


events {
    worker_connections  65535;#单个后台worker process进程的最大并发链接数
}

stream {
    upstream bitbucket-ssh {
        server localhost:27017; #MongoDB 服务
    }
}

http {
    include       mime.types;#文件扩展名与类型映射表
    default_type  application/octet-stream;#默认文件类型

    #log_format  main  '$remote_addr - $remote_user [$time_local] "$request" '
    #                  '$status $body_bytes_sent "$http_referer" '
    #                  '"$http_user_agent" "$http_x_forwarded_for"';

    #access_log  logs/access.log  main;
    add_header Access-Control-Allow-Origin *;
    add_header Access-Control-Allow-Headers X-Requested-With;
    add_header Access-Control-Allow-Methods GET,POST,OPTIONS;
    client_max_body_size   1024m;
    sendfile        on;
    #tcp_nopush     on;
    tcp_nopush on; #防止网络阻塞
    tcp_nodelay on; #防止网络阻塞
    keepalive_timeout  60;#连接超时时间,单位是秒
    #keepalive_timeout  5;

    #开启gzip压缩功能
    gzip  on;
    #upstream表示负载服务器池,定义名字为backend_server的服务器池


#项目 - http
    upstream linuxidc{#服务器集群名字
        ip_hash;
        server localhost:8081 weight=2 max_fails=3 fail_timeout=60s; #服务器配置   weight是权重的意思,权重越大,分配的概率越大。
		server localhost:8082 weight=2 max_fails=3 fail_timeout=60s; #服务器配置   weight是权重的意思,权重越大,分配的概率越大。
    }

#项目 - https
    upstream linuxidc_443{#服务器集群名字
        ip_hash;
        server localhost:8443 weight=2 max_fails=3 fail_timeout=60s; #服务器配置   weight是权重的意思,权重越大,分配的概率越大。
		server localhost:8444 weight=2 max_fails=3 fail_timeout=60s; #服务器配置   weight是权重的意思,权重越大,分配的概率越大。
    }


#----
    map $http_upgrade $connection_upgrade {
        default upgrade;
        '' close;
    }
#-----

    server {
        listen       80;
        server_name  172.18.93.221;
        #charset koi8-r;
        #access_log  logs/host.access.log  main;

        location / {
            proxy_pass http://linuxidc;
            proxy_redirect default;
            proxy_connect_timeout  5s;   #默认值60s, nginx连接到后端服务器的连接超时时间
            proxy_set_header Host $host:80;
            proxy_set_header X-Forward-For $remote_addr;
            proxy_http_version 1.1;
            proxy_set_header Upgrade $http_upgrade;
            proxy_set_header Connection "upgrade";
            proxy_read_timeout 3600s;
			#获取客户端真实IP
			proxy_set_header X-Real-IP $remote_addr;
			proxy_set_header REMOTE-HOST $remote_addr;
			proxy_set_header X-Forwarded-For $proxy_add_x_forwarded_for;
        }

        #配置静态文件
        location ~ .*\.(gif|jpg|jpeg|png|bmp|swf|css|js|apk|zip|exe|doc|pdf|xlsx|jade|xls|txt|mp4|json|so|mp3)$ {
              root /nginx/cloudRoot/;add_header Cache-Control no-store;
            expires 24h;
             add_header Access-Control-Allow-Crigin http://www.joy.com;  # 允许跨域访问的域名
             add_header Access-Control-Allow-Methods GET,POST,PUT,DELETE,OPTIONS; # 配置请求方式
        }


        error_page 400 401 402 403 404 405 408 410 412 413 414 415 500 501 502 503 504 506 /404.html;
        location = /50x.html {
            root   html;
        }
        location = /404.html {
            root   html;
        }
        location = /403.html {
            root   html;
        }
    }

    server {

        listen 443 ssl;

        #配置HTTPS的默认访问端口为443。
        #如果未在此处配置HTTPS的默认访问端口,可能会造成Nginx无法启动。
        #如果您使用Nginx 1.15.0及以上版本,请使用listen 443 ssl代替listen 443和ssl on。

        server_name www.****.com.cn; #证书绑定的域名。
        root html;
        ssl_certificate cert/www.****.com.cn.pem;  #需要将cert-file-name.pem替换成已上传的证书文件的名称。
        ssl_certificate_key cert/www.****.com.cn.key; #需要将cert-file-name.key替换成已上传的证书私钥文件的名称。
        ssl_session_timeout 5m;
        ssl_ciphers ECDHE-RSA-AES128-GCM-SHA256:ECDHE:ECDH:AES:HIGH:!NULL:!aNULL:!MD5:!ADH:!RC4;
        #表示使用的加密套件的类型。
        ssl_protocols TLSv1.1 TLSv1.2 TLSv1.3; #表示使用的TLS协议的类型。
        ssl_prefer_server_ciphers on;


        location / {
            proxy_pass https://linuxidc_443;
            proxy_redirect default;
            proxy_connect_timeout  5s;   #默认值60s, nginx连接到后端服务器的连接超时时间
            proxy_set_header Host $host:443;
            proxy_set_header X-Forward-For $remote_addr;
            proxy_http_version 1.1;
            proxy_set_header Upgrade $http_upgrade;
            proxy_set_header Connection "upgrade";
            proxy_read_timeout 3600s;
			#获取客户端真实IP
			proxy_set_header X-Real-IP $remote_addr;
			proxy_set_header REMOTE-HOST $remote_addr;
			proxy_set_header X-Forwarded-For $proxy_add_x_forwarded_for;
        }


        #配置静态文件
        location ~ .*\.(gif|jpg|jpeg|png|bmp|swf|css|js|apk|zip|exe|doc|pdf|xlsx|jade|xls|txt|mp4|json|so|mp3)$ {
              root /nginx/cloudRoot/;add_header Cache-Control no-store;
            #expires 24h;
             #add_header Access-Control-Allow-Crigin http://www.joy.com;  # 允许跨域访问的域名
             #add_header Access-Control-Allow-Methods GET,POST,PUT,DELETE,OPTIONS; # 配置请求方式
        }


        error_page 400 401 402 403 404 405 408 410 412 413 414 415 500 501 502 503 504 506 /404.html;
        location = /50x.html {
            root   html;
        }
        location = /404.html {
            root   html;
        }
        location = /403.html {
            root   html;
        }
    }


}
