FileOutputStream写数据的3种方式
void write(int b)
//一次写一个字节的数据
void write(byte[] b)
//一次写一个字节数组数据
void write(byte[] b, int off,int len)
//一次写一个字节数组的部分数据
参数一:数组;参数二:起始索引 0;参数三:个数
换行:
windows:“\r\n”
linux:“\n”
mac:“\r”
细节:
在windows操作系统当中,java对回车换行进行了优化.
虽然完整的是\r\n,但我们只写其中一个\r或者\n
建议:
不要省略要写全
续写:
如果想要续写,打开续写开关即可
开关位置:创建对象的第二个参数
默认false:表示关闭续写,此时创建对象会清空文件
FileInputStream
操作本地文件的字节输入流,可以把本地文件中的数据读取到程序中来
实现步骤:
创建对象
读取数据
释放资源
FileInputStream书写细节
1创建字节输入流对象
细节1:如果文件不存在,就直接报错
2读取数据
细节1:一次读一个字节,读出来的是数据在ASCII上对应的数字
细节2:读到末尾了,read方法返回-1
3释放资源
细节:每次使用完流后要释放资源
练习:
 public static void main(String[] args) throws IOException {
        /*练习:
        * 文件拷贝
        * 注意:
        * 文件不宜太大*/
        FileInputStream fis = new FileInputStream("C:\\musictest\\G.E.M. 邓紫棋 - 多远都要在一起.mp3");
        FileOutputStream fos = new FileOutputStream("myio\\copy.mp3");
        //拷贝
        int b;
        while( (b = fis.read()) != -1){
            fos.write(b);
        }
        //3.释放资源
        fos.close();
        fis.close();
    }
public int read()
//一次读一个字节
public int read(byte[] buffer)
//一次读一个字节组数据
拷贝升级
public static void main(String[] args) throws IOException {
        /*练习:
        * 文件拷贝
        * 注意:
        * 文件不宜太大*/
        long start=  System .currentTimeMillis();
        FileInputStream fis = new FileInputStream("C:\\musictest\\G.E.M. 邓紫棋 - 多远都要在一起.mp3");
        FileOutputStream fos = new FileOutputStream("coppy.mp3");
        //拷贝
        int len;
        byte[] bytes = new byte[1024*1024*5];
        while ((len=fis.read(bytes)) != -1){
            fos.write(bytes,0,len);

        }
        //3.释放资源
        fos.close();
        fis.close();
        long end = System.currentTimeMillis();
        System.out.println(end - start);
    }
try…catch…finally处理异常
字符集详解:
ASCII编码规则:前面补0,补齐8位
ASCii解码规则:直接转成十进制
核心1:GBK中,一个英文字母一个字节,二进制第一位是0
核心2:GBK中,一个中文汉字两个字节,二进制第一位是1
字符集详解Unicode
Java中编码和解码的实现
编码方法:
public byte[] getBytes()
//使用默认方法编码
public byte[] getBytes(String charsetName)
//使用指定方式进行编码
解码方法:
String(byte[] bytes)
//使用默认方式编码
String(byte[] bytes, String charsetName)
//使用指定方式解码
FileReader
创建字符输入对象
public FileREader(File file)
//创建字符输入流关联本地文件
public FileReader(String pathname)
//创建字符输入流关联本地文件
读取数据:
public int read()
//读取数据,读到末尾返回-1
public int read(char[] buffer)
//读取多个数据,读到末尾返回-1
read()细节
1.read():默认是一个字节一个字节读取,如果遇到中文会一次读取多个
2.在读取之后,方法的底层会进行解码并转成十进制
FileWrite构造方法
public FileWriter(File file)
//创建字符输出流关联本地文件
public FileWriter(String pathname)
//创建字符输出流关联本地文件
public FileWriter(File file, boolean append)
//创建字符输出流关联本地文件,续写
public FileWriter(String pathname, boolean appeand)
//创建字符输出流关联本地文件,续写
flush刷新:刷新之后可再文件中继续输出数据
字符缓冲流
1.缓冲流分类
字节缓冲输入流:BufferedinputStream
字节缓冲输出流:BufferedOutputStream
字符缓冲输入流:BufferedReader
字符缓冲输出流:BufferedWrite
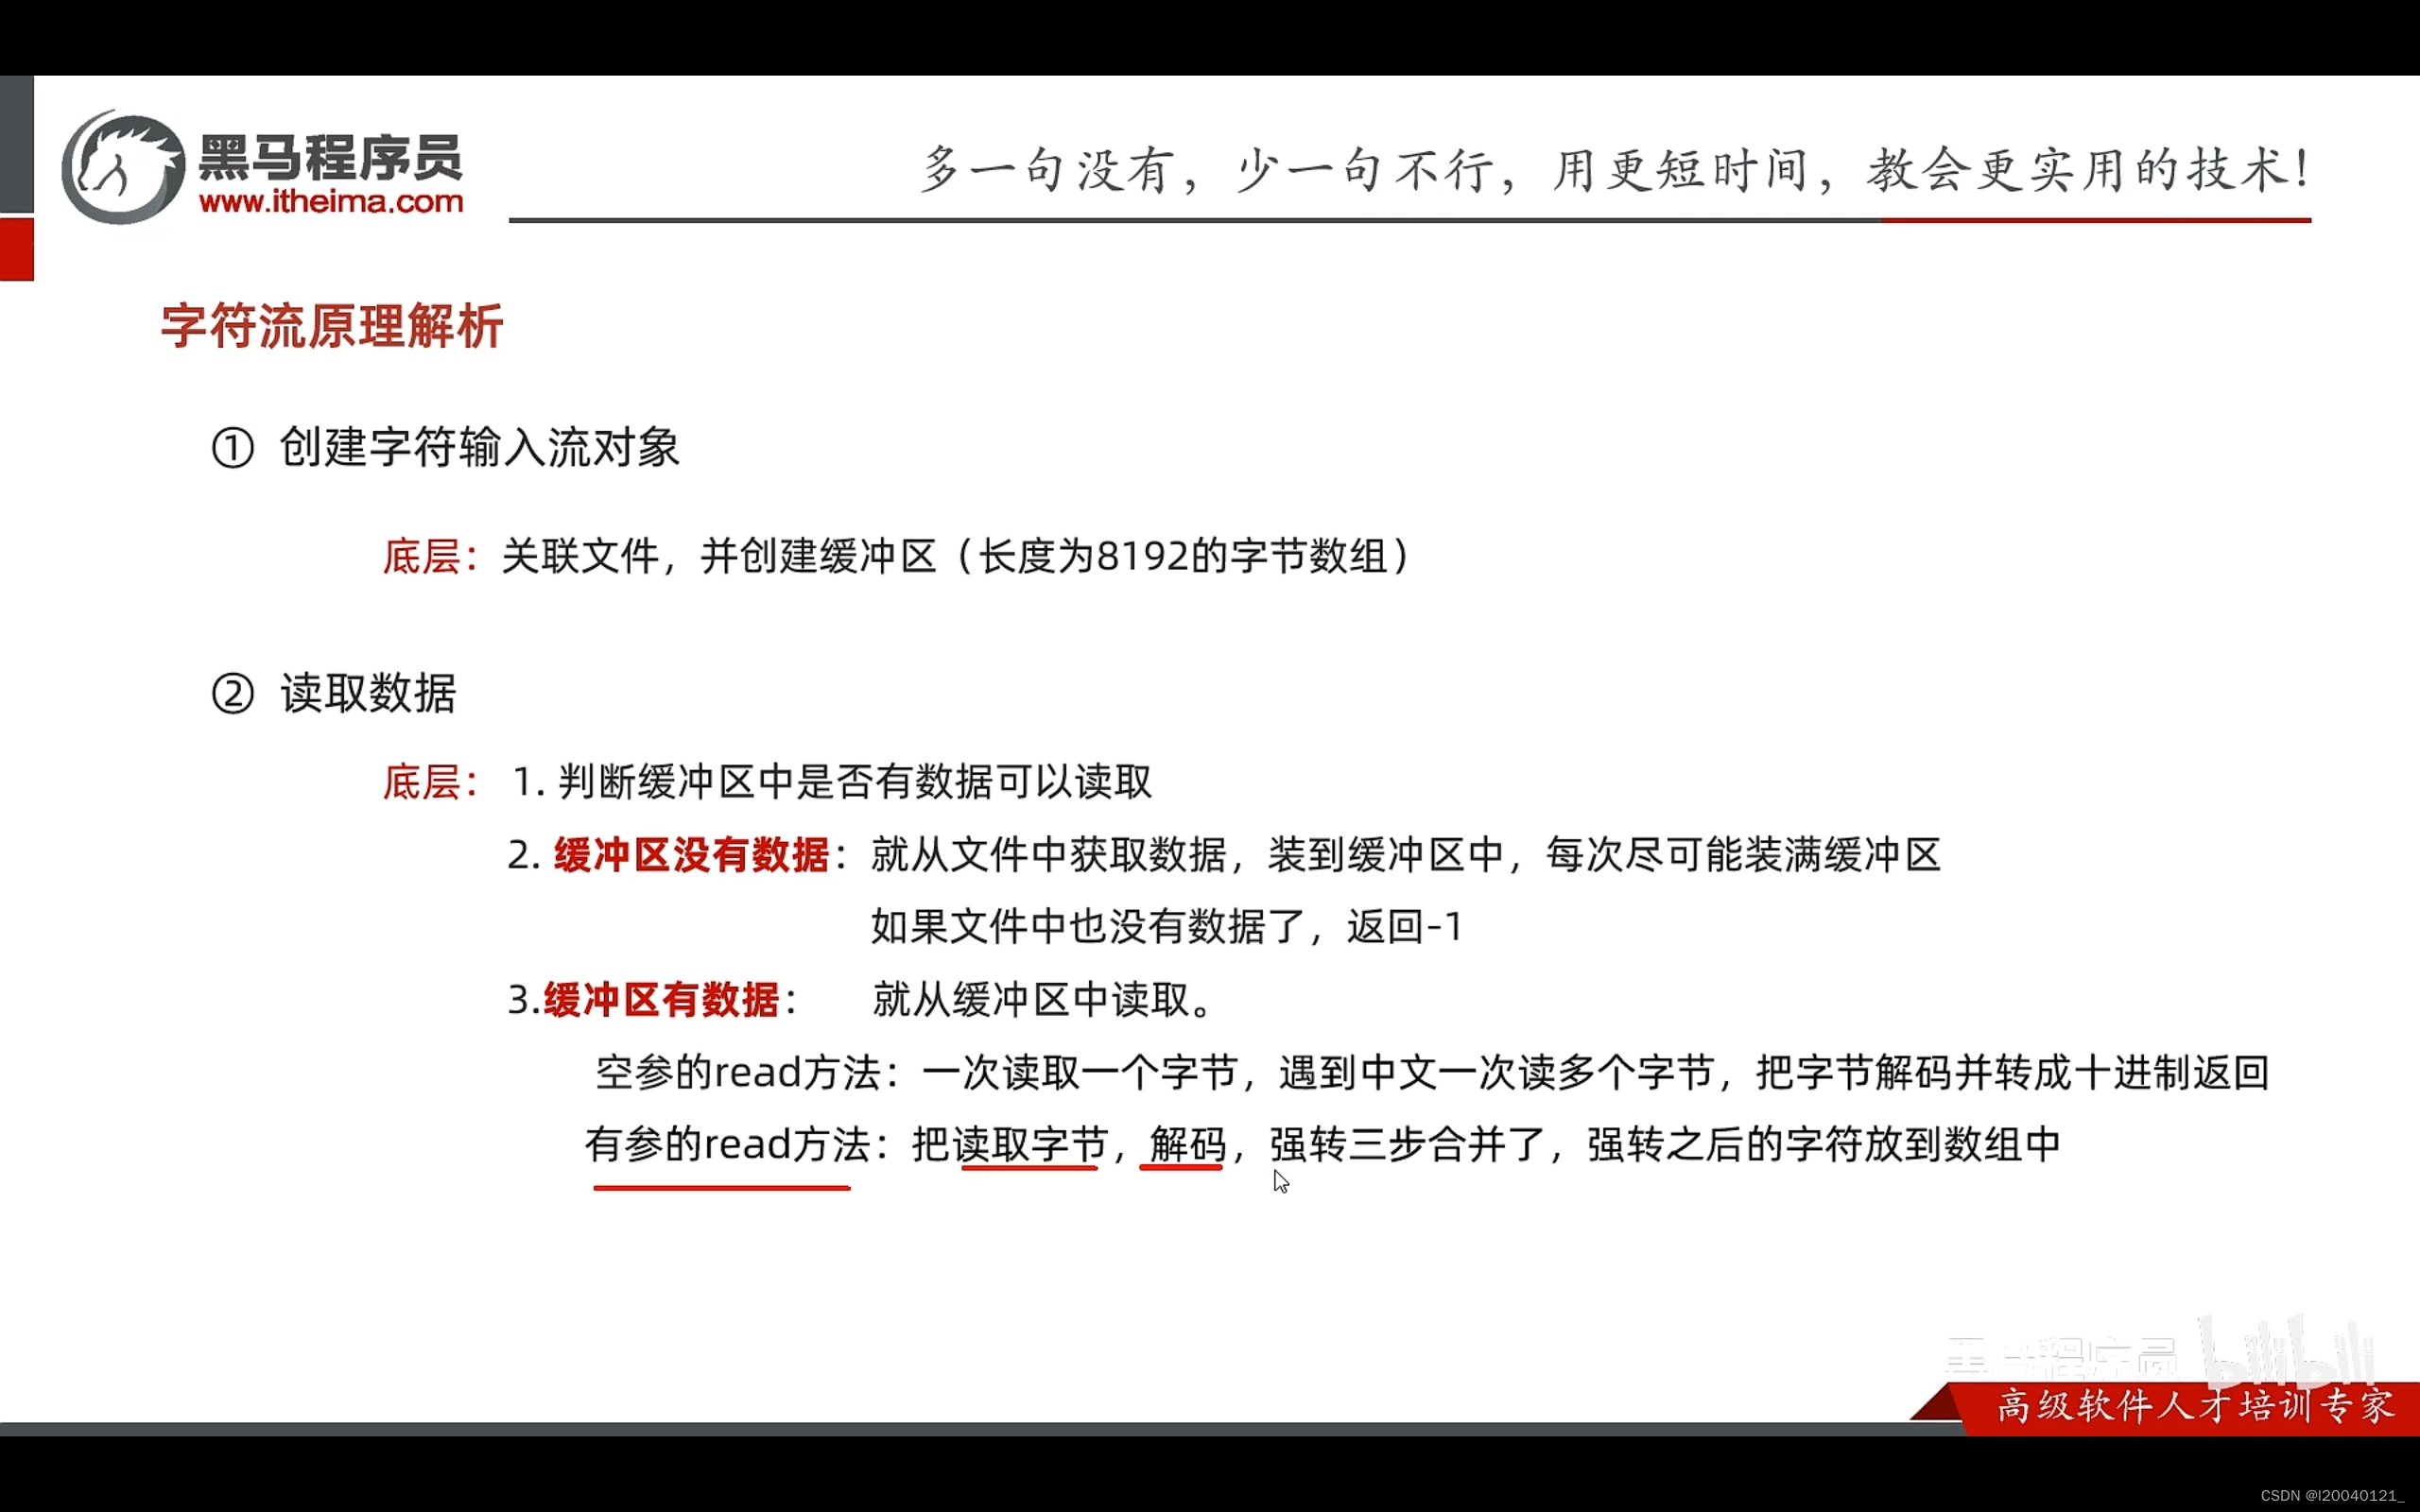
2.缓冲流为什么提高性能
缓冲流自带长度为8192的缓冲区
可以显著提高字节流读写性
对于字符流提升不明显
3.字符缓冲流两个特有方法
字符缓冲输入流BufferedReader:readLine()
字符缓冲输出流BufferedWriter:newline()
转换流
作用:是字符流与字节流之间的桥梁
package myconvertStream;

import java.io.*;
import java.nio.charset.Charset;

public class convertStreamdemo1 {
    public static void main(String[] args) throws IOException {
        /*C:\aaa\gbkfile.txt*/
        /*//创建对象
        InputStreamReader isr = new InputStreamReader(new FileInputStream("gbkfile.txt"),"GBK");
        //2.读取数据
        int ch;
        while ((ch = isr.read()) != -1){
            System.out.println((char) ch);
        }
        //3.释放资源
        isr.close();*/
        FileReader fr = new FileReader("gbkfile.txt", Charset.forName("GBK"));
        //2.读取数据
        int ch;
        while ((ch = fr.read()) != -1){
            System.out.println((char) ch);
        }
        //3.释放资源
        fr.close();
    }
}
利用字节流读取文件中的数据,每次读一整行,而且不能出现乱码
public class convertStreamdemo2 {
    public static void main(String[] args) throws IOException {
        BufferedReader bfr = new BufferedReader( new InputStreamReader(new FileInputStream("a.txt")));
        String line;
        while ((line = bfr.readLine()) != null){
            System.out.println(line);
        }
        bfr.close();

    }
}
序列化流
可以吧Java中的对象写到本地文件中
序列化流/反序列化流的细节汇总
- 使用序列化流将对象写到文件时,需要javabean类实现Serializable接口,否则,会出现NoSerializableException异常.
- 序列化流写到文件中数据不能修改,一旦修改就再也无法读回来了
- 序列化对象后,修改了javabean类,再次反序列化,会不会哟有问题
会出问题:会抛出InvalidClassException异常
解决方案:给javabean类添加serialVersionUID(序列号,版本号)
如果一个对象中的某个成员变量的值不想被序列化,又该如何实现?
解决方案:给成员变量加transient关键字修饰,该关键字标记的成员变量不参与序列化过程
public printStream(OutputStream/File/String)
//关键字节输出流/文件/文件路径
public PrintStream(String fileName, Charset charset)
//指定字符编码
public PrintStream(OutputStream out, blooean autoFlush)
//自动刷新
public PrintStream(OutputStream out, boolean autoFlush, String encoding)

字符打印流

解压缩流
package myzipStream;

import java.io.*;
import java.util.zip.ZipEntry;
import java.util.zip.ZipInputStream;
import java.util.zip.ZipOutputStream;

public class zipStreamdemo1 {
    public static void main(String[] args) throws IOException {
        File src = new File("C:\\aaa\\ddd.zip");
        File dest = new File("C:aaa");
        unzip(src,dest);
    }

    public static void unzip(File src,File dest) throws IOException {
        ZipInputStream zip  = new ZipInputStream(new FileInputStream(src));
        ZipEntry entry;
       while ((entry = zip.getNextEntry()) != null){
           System.out.println(entry);
           if (entry.isDirectory()){
               //文件夹
               File file = new File(dest,entry.toString());
               file.mkdirs();

           }else {
               //文件
               FileOutputStream fos = new FileOutputStream(new File(dest,entry.toString()));
               int b;
               while ((b = zip.read()) != -1){
                   fos.write(b);
               }
               fos.close();
               zip.closeEntry();
           }
       }
       zip.close();
    }
}
压缩流
package myzipStream;

import java.io.File;
import java.io.FileInputStream;
import java.io.FileOutputStream;
import java.io.IOException;
import java.util.zip.ZipEntry;
import java.util.zip.ZipOutputStream;

public class zipStreamDemo2 {
    public static void main(String[] args) {
        File src = new File("C:\\aaa\\a.txt");
        File dest = new File("C:\\");
    }

    public static void tozip(File src,File dest) throws IOException {
        ZipOutputStream zos = new ZipOutputStream(new FileOutputStream(new File(dest,"a.zop")));
        ZipEntry entry = new ZipEntry("a.txt");
        zos.putNextEntry(entry);
        FileInputStream fis  = new FileInputStream(src);
        int b;
        while ((b = fis.read()) != -1){
            zos.write(b);
        }
        zos.closeEntry();
        zos.close();
    }
}
Commons-io
步骤:
1.在项目中创建一个文件夹:lib
2.在jar包复制粘贴到lib文件夹
3.右键点击jar包,选择Add as Library->点击ok
4.在类中导包使用
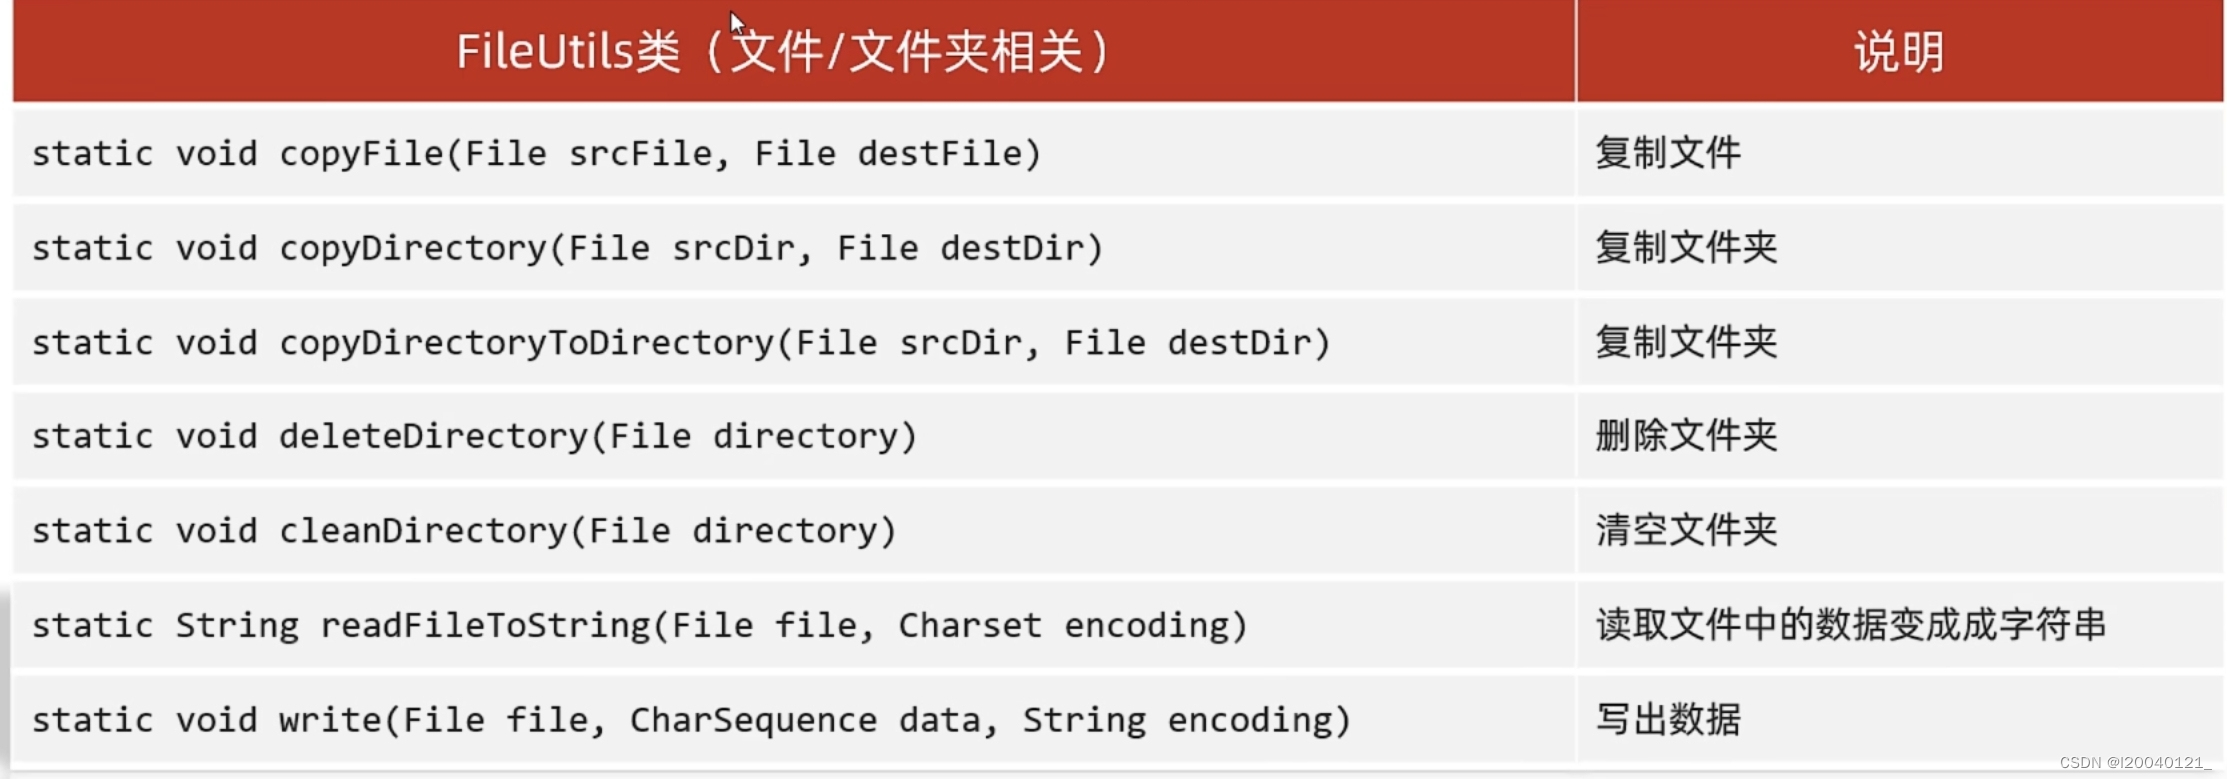
常见方法

Hutool
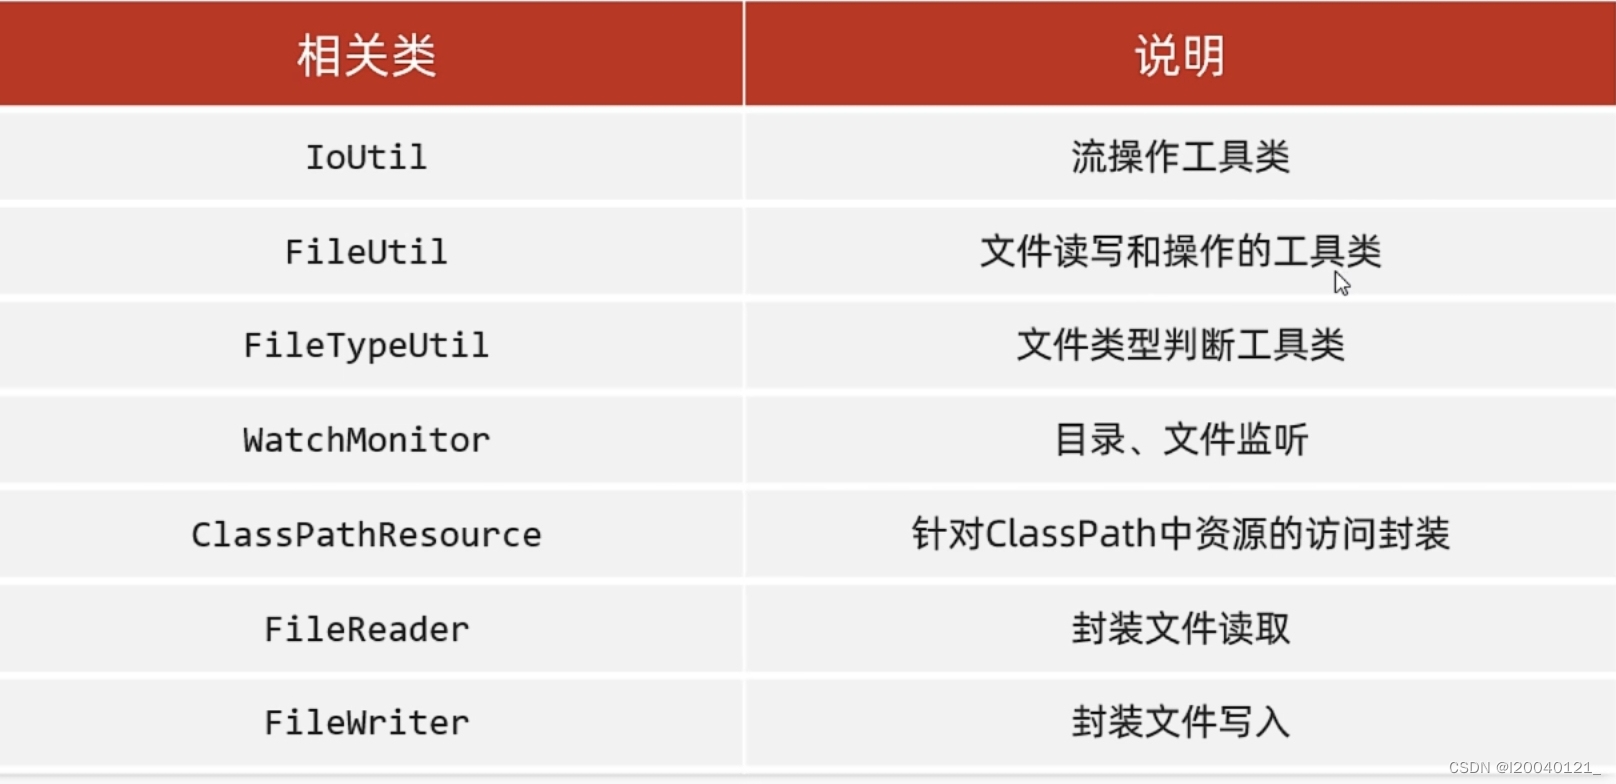
IO综合练习
package myiotest;

import java.io.IOException;
import java.io.InputStreamReader;
import java.net.URL;
import java.net.URLConnection;
import java.sql.Array;
import java.util.ArrayList;
import java.util.regex.Matcher;
import java.util.regex.Pattern;

public class test {
    public static void main(String[] args) throws IOException {
        /*https://hanyu.baidu.com/shici/detail?pid=0b2f26d4c0ddb3ee693fdb1137ee1b0d&from=kg0
        * http://www.haoming8.cn/baobao/10881.html
        * http://www.haoming8.cn/baobao/7641.html*/
        String familyNamenet = "https://hanyu.baidu.com/shici/detail?pid=0b2f26d4c0ddb3ee693fdb1137ee1b0d&from=kg0";
        String boyNamenet = "http://www.haoming8.cn/baobao/10881.html";
        String girlNamenet = "http://www.haoming8.cn/baobao/7641.html";
        String familyNamestr = webCrawler(familyNamenet);
        String boyNAmestr = webCrawler(boyNamenet);
        String girlNamestr = webCrawler(girlNamenet);
      //通过正则表达式获取需要数据
        ArrayList<String> familyNameTempList = getDate(familyNamestr,"(.{4})(,|。)",1);
    }

    private static ArrayList<String> getDate(String str, String regex,int index) {
        //1.创建集合存储数据
        ArrayList<String> list = new ArrayList<>();
        //2,按照正则表达式的规则,获取数据
        Pattern pattern = Pattern.compile(regex);
        //3.按照pattern的规则,到str中获取数据
        Matcher matcher = pattern.matcher(str);
        while (matcher.find()){
            String group = matcher.group();
            System.out.println(group);
        }
        return list;
    }

    public static String webCrawler(String net) throws IOException {
        //1.定义stringbuilder拼接爬取到的数据
        StringBuilder sb = new StringBuilder();
        //2.创建一个URL
        URL url = new URL(net);
        //3.连接网址
        URLConnection conn = url.openConnection();
        //4.读取数据
        InputStreamReader isr = new InputStreamReader(conn.getInputStream());
        int ch;
        while ((ch = isr.read()) !=-1){
            sb.append((char)ch);
        }
        //5.释放资源
        isr.close();
        //6.把读取到的数据返回
        return sb.toString();
    }
}
多线程
1.什么是多线程
有了多线程,我们可以让程序同时做很多事情
2.多线程的作用
提高效率
3.多线程的应用场景
只要你想让多个事情同时运行就需要用到多线程
并发和并行
并发:在同一时刻,有多个指令在单个CPU上交替执行
并行:在同一时刻,有多个指令在多个CPU上执行
继承Thread类
package myThread;

public class threaddemo1 {
    public static void main(String[] args) {
        /*
        * 多线程第一种启动方式
        * 1.自己定义一个类继承Thread
        * 2.重写run方法
        * 3.创建子类对象,并启动线程*/
        MyThread t1 = new MyThread();
        t1.start();

    }
}
package myThread;

public class MyThread extends Thread{
    @Override
    public void run() {
        for (int i = 0; i <100 ; i++) {
            System.out.println("helloword");
        }
    }
}
实现Runnable接口的方式进行实现
package myThread;

public class Threaddemo2 {
    public static void main(String[] args) {
        //1.自己定义一个类实现Runnable接口
        //2.重写run方法
        //3.创建自己的类对象
        //创建一个Thread类对象,并开启线程
        //创建myrun对象
        myRun run = new myRun();
        itsrun r = new itsrun();

        //创建多线程对象
        Thread t1 = new Thread(run);
        Thread t2 = new Thread(r);
        //给线程设置名字
        t1.setName("线程一");
        t2.setName("线程二");
        //开启线程
        t1.start();
        t2.start();
    }
}
package myThread;

public class myRun implements Runnable{
    @Override
    public void run() {
        for (int i = 0; i < 100; i++) {
            Thread t = Thread.currentThread();
            System.out.println(t.getName()+ "hello word");
        }
    }
}
利用Callable接口和Future接口方式实现
package myThread;

import java.util.concurrent.ExecutionException;
import java.util.concurrent.FutureTask;

public class Threaddemo3 {
    public static void main(String[] args) throws ExecutionException, InterruptedException {
        /*多线程第三种实现方式
        * 1.创建一个类MyCallable实现Callable接口
        * 2.重写call(是具有返回值的,表示多线程运行结果)
        * 3.创建Mycallable对象(表示多线程要执行的任务)
        * 4.创建futureTask对象(作用管理多线程运行的结果)
        * 5.创建Thread类的对象,并启动(表示线程)*/
        //创建MYCable对象(表示多线程要执行的任务)
        MyCallable mc = new MyCallable();
        //创建futureTask对象(作用管理多线程运行结果)
        FutureTask<Integer> ft  = new FutureTask<>(mc);
        Thread t1 = new Thread(ft);
        t1 .start();
        Integer result = ft.get();
        System.out.println(result);
    }
}
package myThread;

import java.util.concurrent.Callable;

public class MyCallable implements Callable<Integer> {
    @Override
    public Integer call() throws Exception {

            //求1-100之间的和
            int sum = 0;
            for (int i = 0; i < 100; i++) {
                sum = sum +i;

        }
        return sum;
    }
}

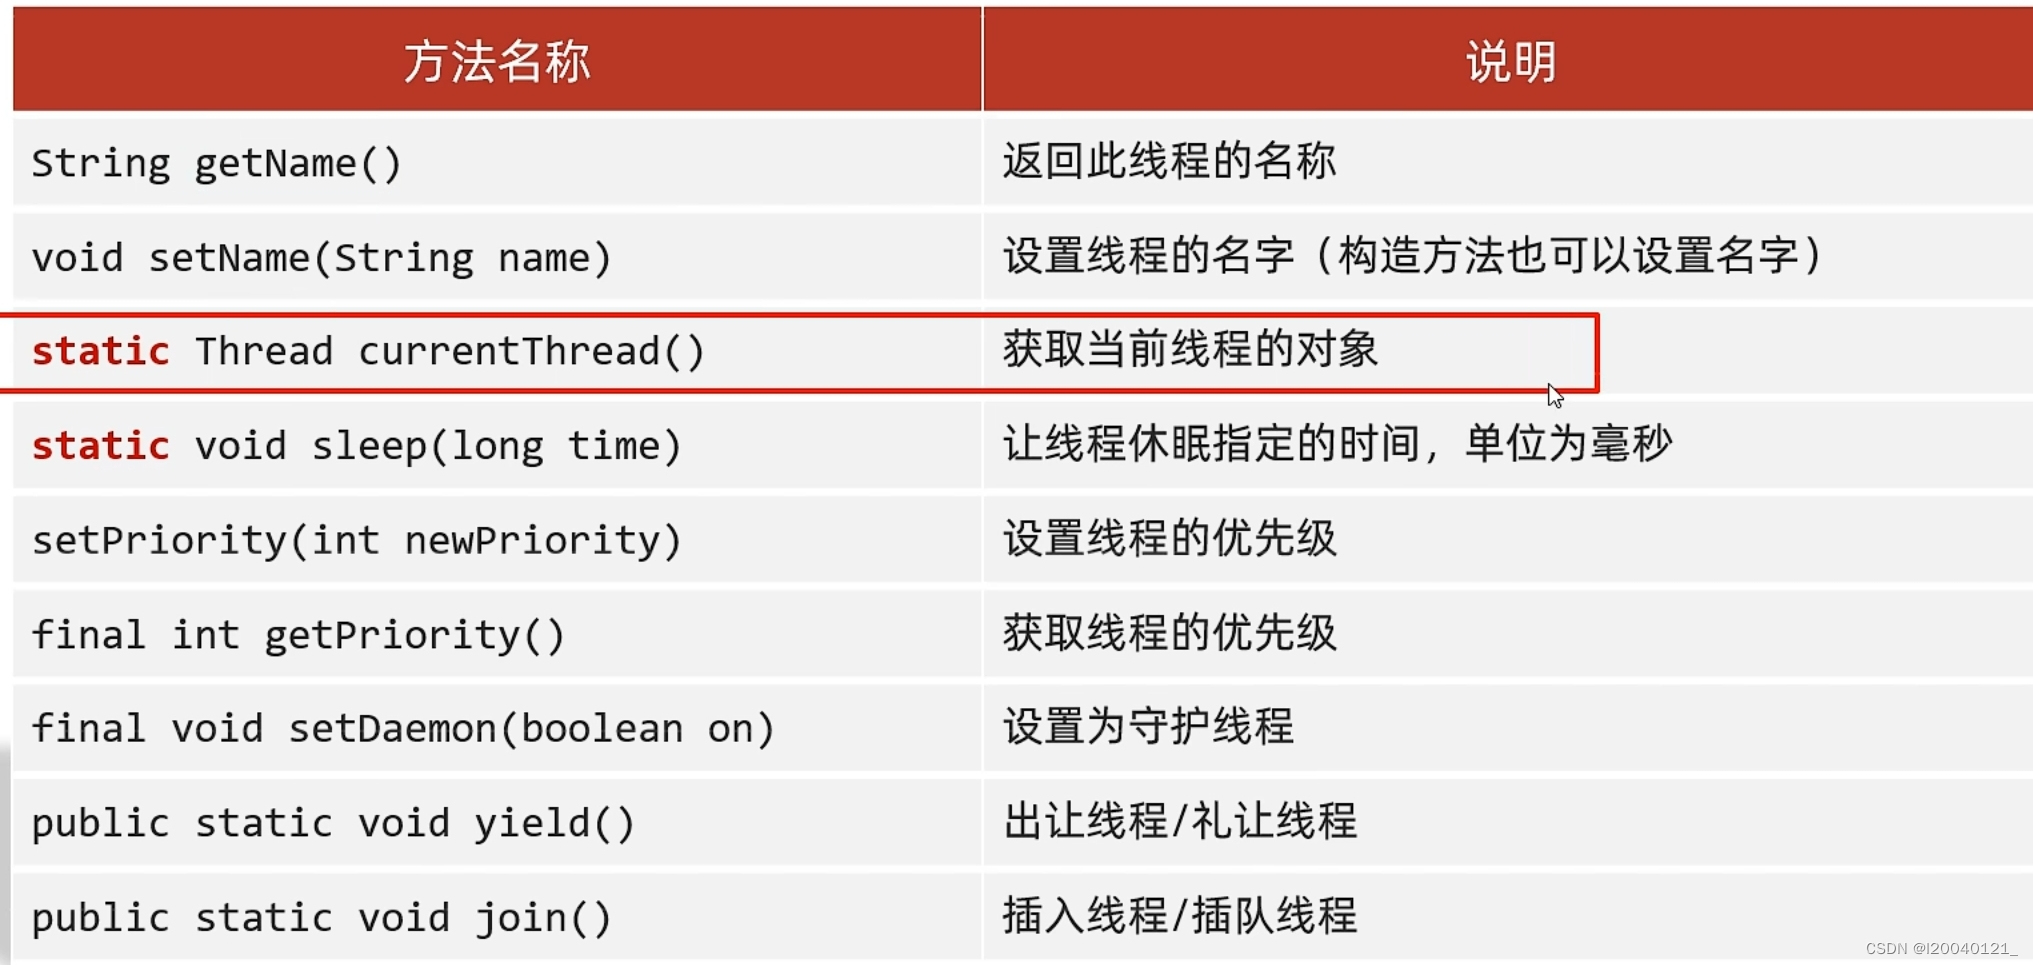
常见的成员方法
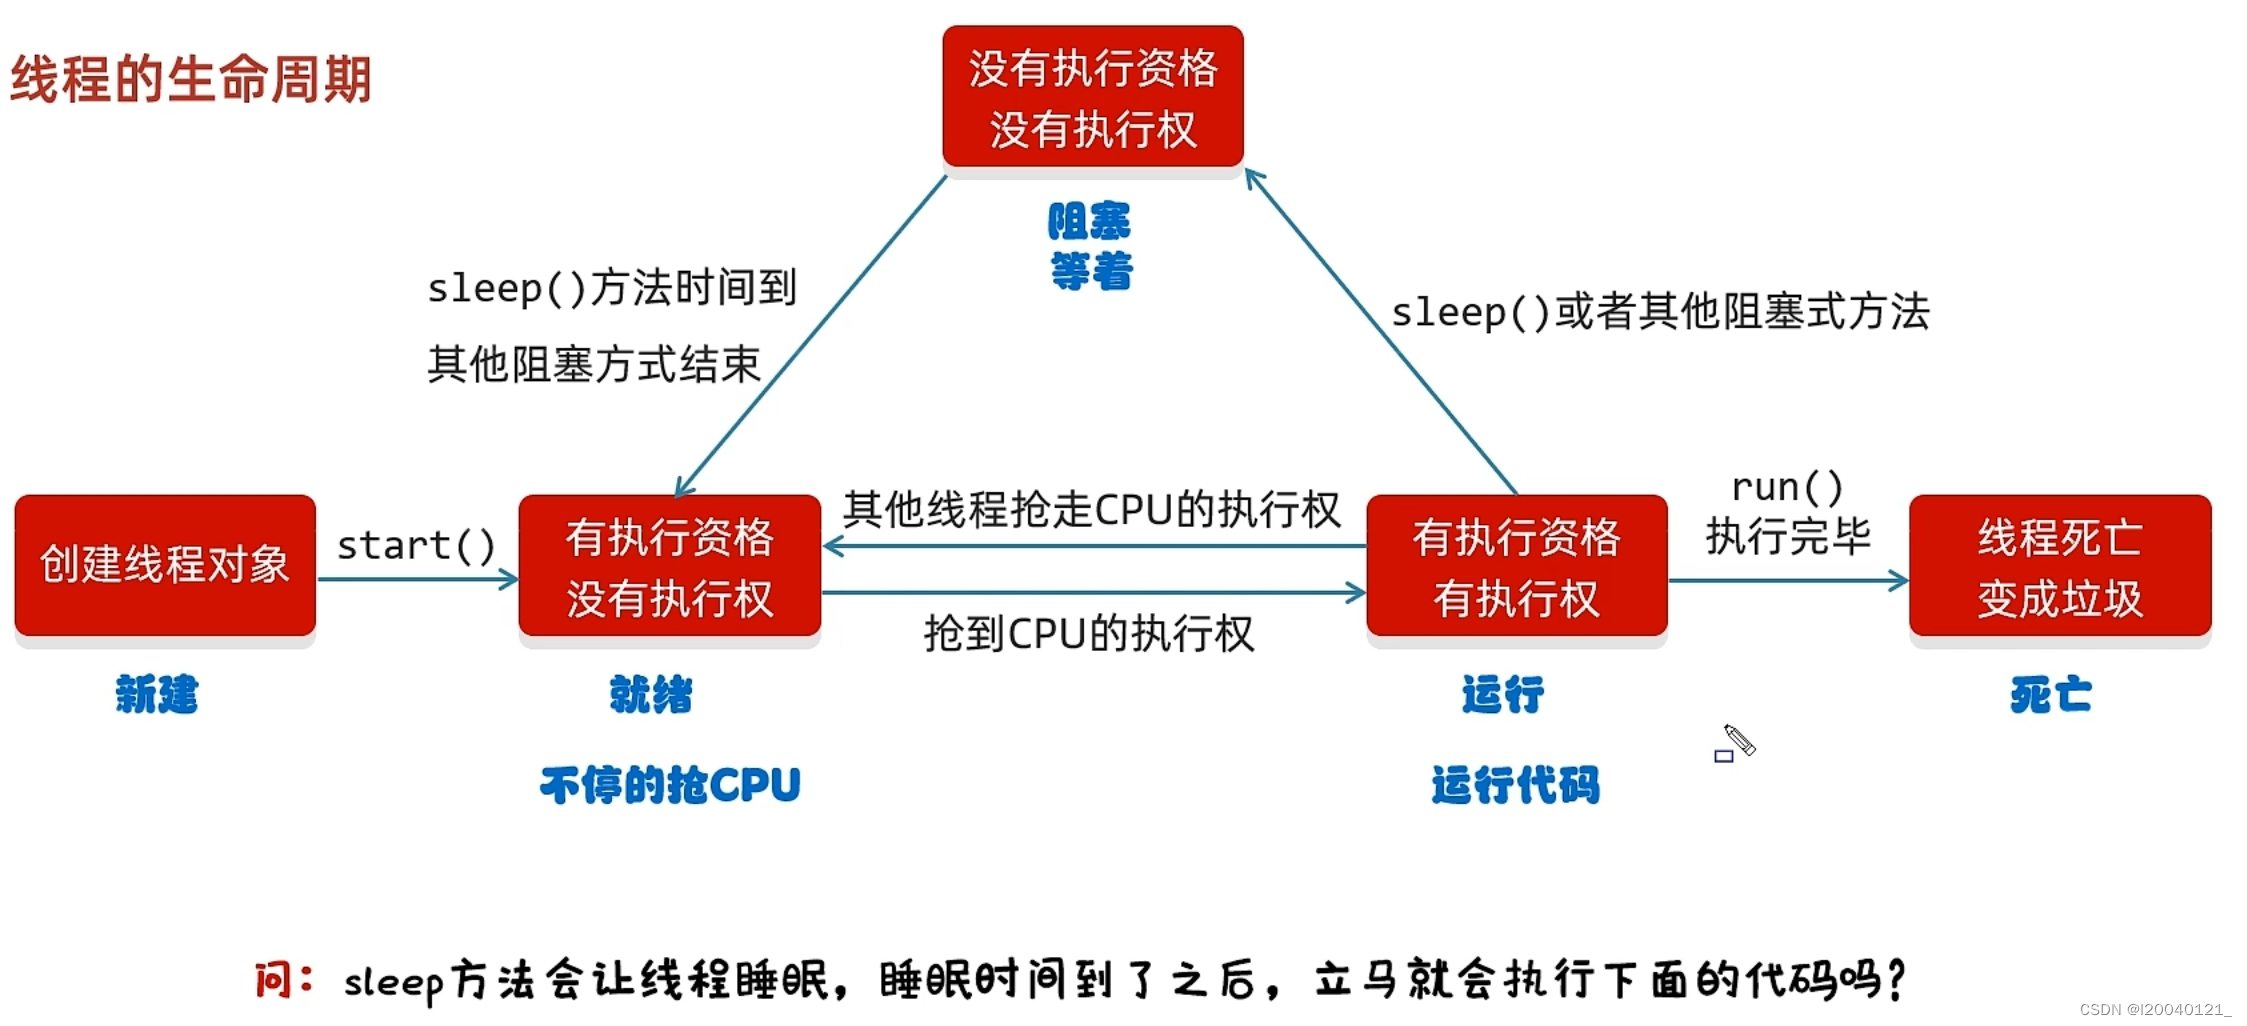
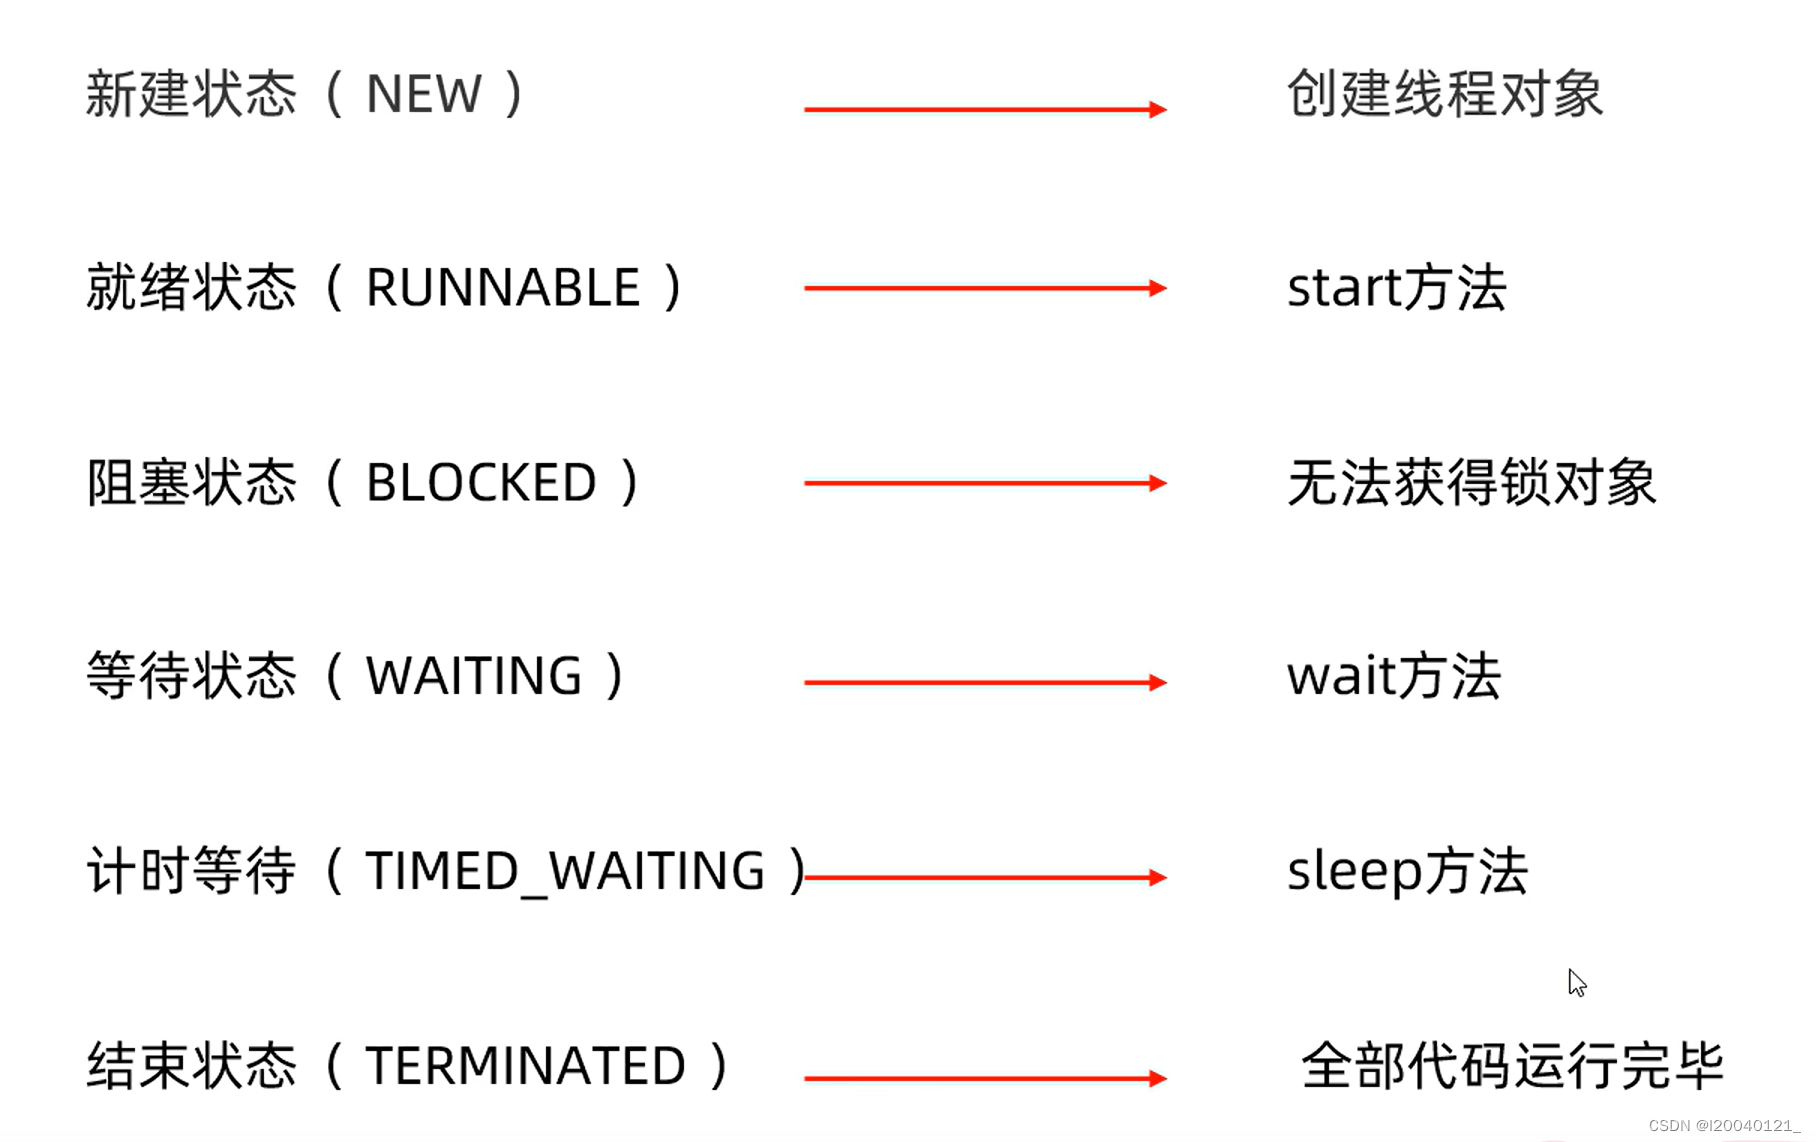
线程的生命周期
同步代码块
把操作共享数据的代码锁起来
synchronized(){
操作共享数据的代码
}
特点一:锁默认打开,有一个线程进去了,锁自动关闭
特点二:里面代码全部执行完毕,线程出来,锁自动打开
同步方法
就是把synchronized关键字加到方法上
格式:修饰符synchronized 返回值类型 方法名(方法参数){......}
特点一:同步方法是锁在方法里所有代码
特点二:锁对象不能自己指定 非静态:this
静态:当前类的字节码文件对象
Lock锁 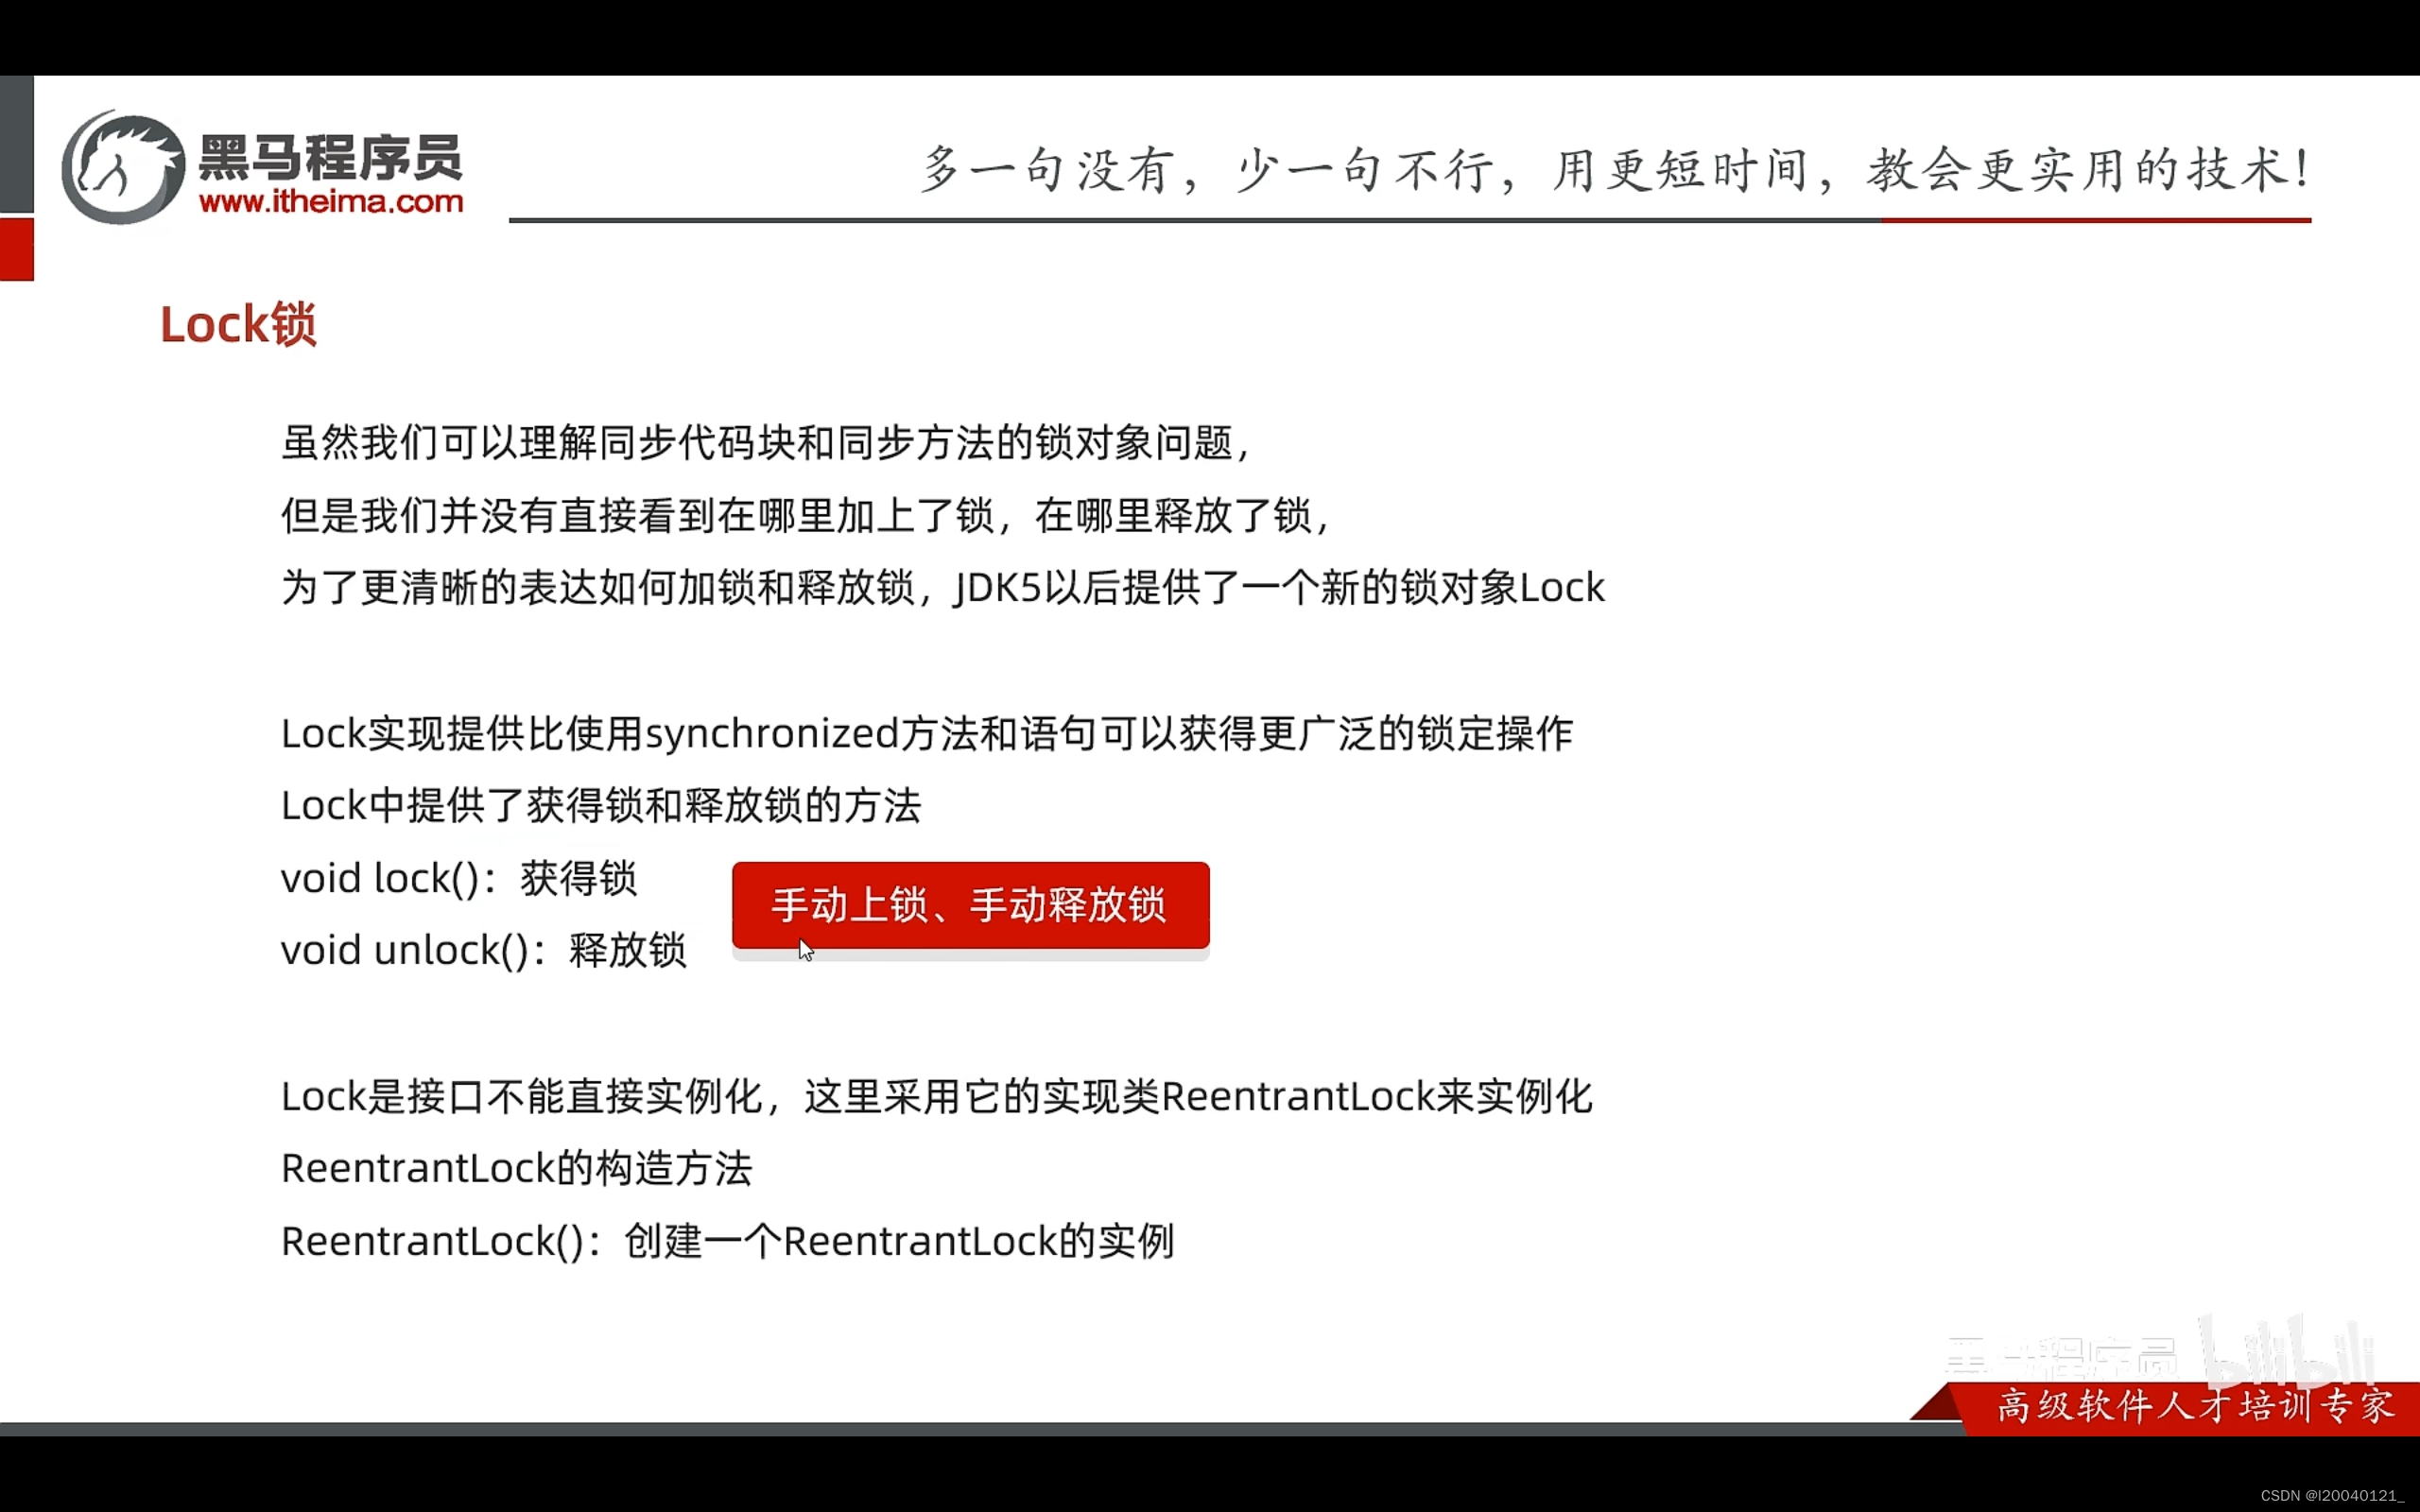
等待唤醒 
练习:厨师与吃货
package Waitandnotify;

public class Threaddemo1 {
    public static void main(String[] args) {
        //创建线程的对象
        Cook c = new Cook();
        Foodie f = new Foodie();
        //给线程设置名字
        c.setName("厨师");
        f.setName("吃货");
        //开启线程
        c.start();
        f.start();
    }


}
package Waitandnotify;

import java.util.Set;

public class Foodie extends Thread{
    @Override
    public void run() {
        while (true){
            synchronized (Desk.lock){
                if (Desk.count == 0){
                    break;
                }else {
                    //先判断桌子上是否有面条
                    if (Desk.foodflag == 0){
                        //如果没有就等待
                        try {
                            Desk.lock.wait();//让当前线程与锁进行绑定
                        } catch (InterruptedException e) {
                            throw new RuntimeException(e);
                        }

                    }else {
                        //把吃的总数-1
                        Desk.count--;
                        //如果有就开吃
                        System.out.println("吃货在吃面条,还能再吃" + Desk.count+ "碗");
                        //吃完之后唤醒厨师继续做
                        Desk.lock.notify();

                        //修改桌子的状态
                        Desk.foodflag = 0;
                    }


                }
            }
        }

    }
}
package Waitandnotify;

public class Desk {
    /*
    * 作用控制生产者消费者执行
    * */
    public static int foodflag = 0;
    //总个数
    public static int count = 10;
    public static Object lock = new Object();
}
package Waitandnotify;

import java.util.concurrent.locks.Lock;

public class Cook extends Thread{
    @Override
    public void run() {
        while (true){
            synchronized (Desk.lock){
                if (Desk.count == 0){
                    break;
                }else {
                    //判断桌子是否有实物
                    if (Desk.foodflag == 1){
                        //如果有就等待
                        try {
                            Desk.lock.wait();
                        } catch (InterruptedException e) {
                            throw new RuntimeException(e);
                        }
                    }else {
                        //如果没有就制作实物
                        System.out.println("厨师正在制作食物");
                        //修改桌子上食物状态
                        Desk.foodflag = 1;
                        //叫醒等待的消费者开吃
                        Desk.lock.notifyAll();
                    }
                }
            }
        }
    }
}
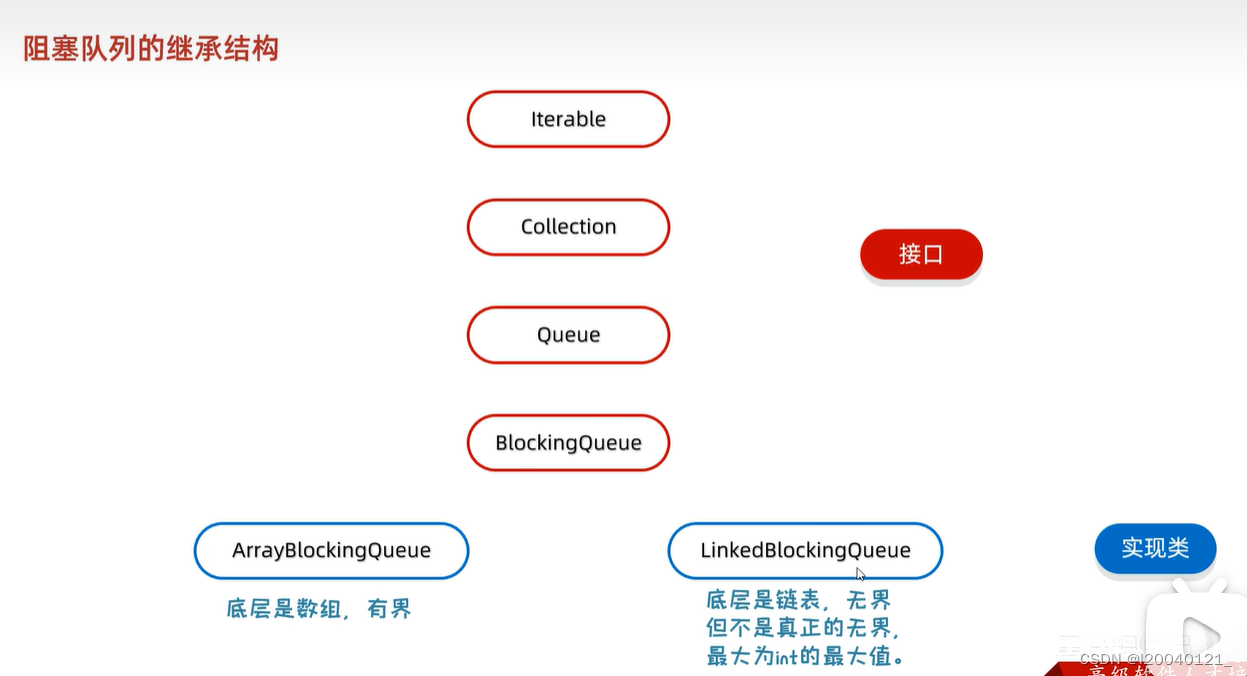
阻塞队列继承结构
线程的状态
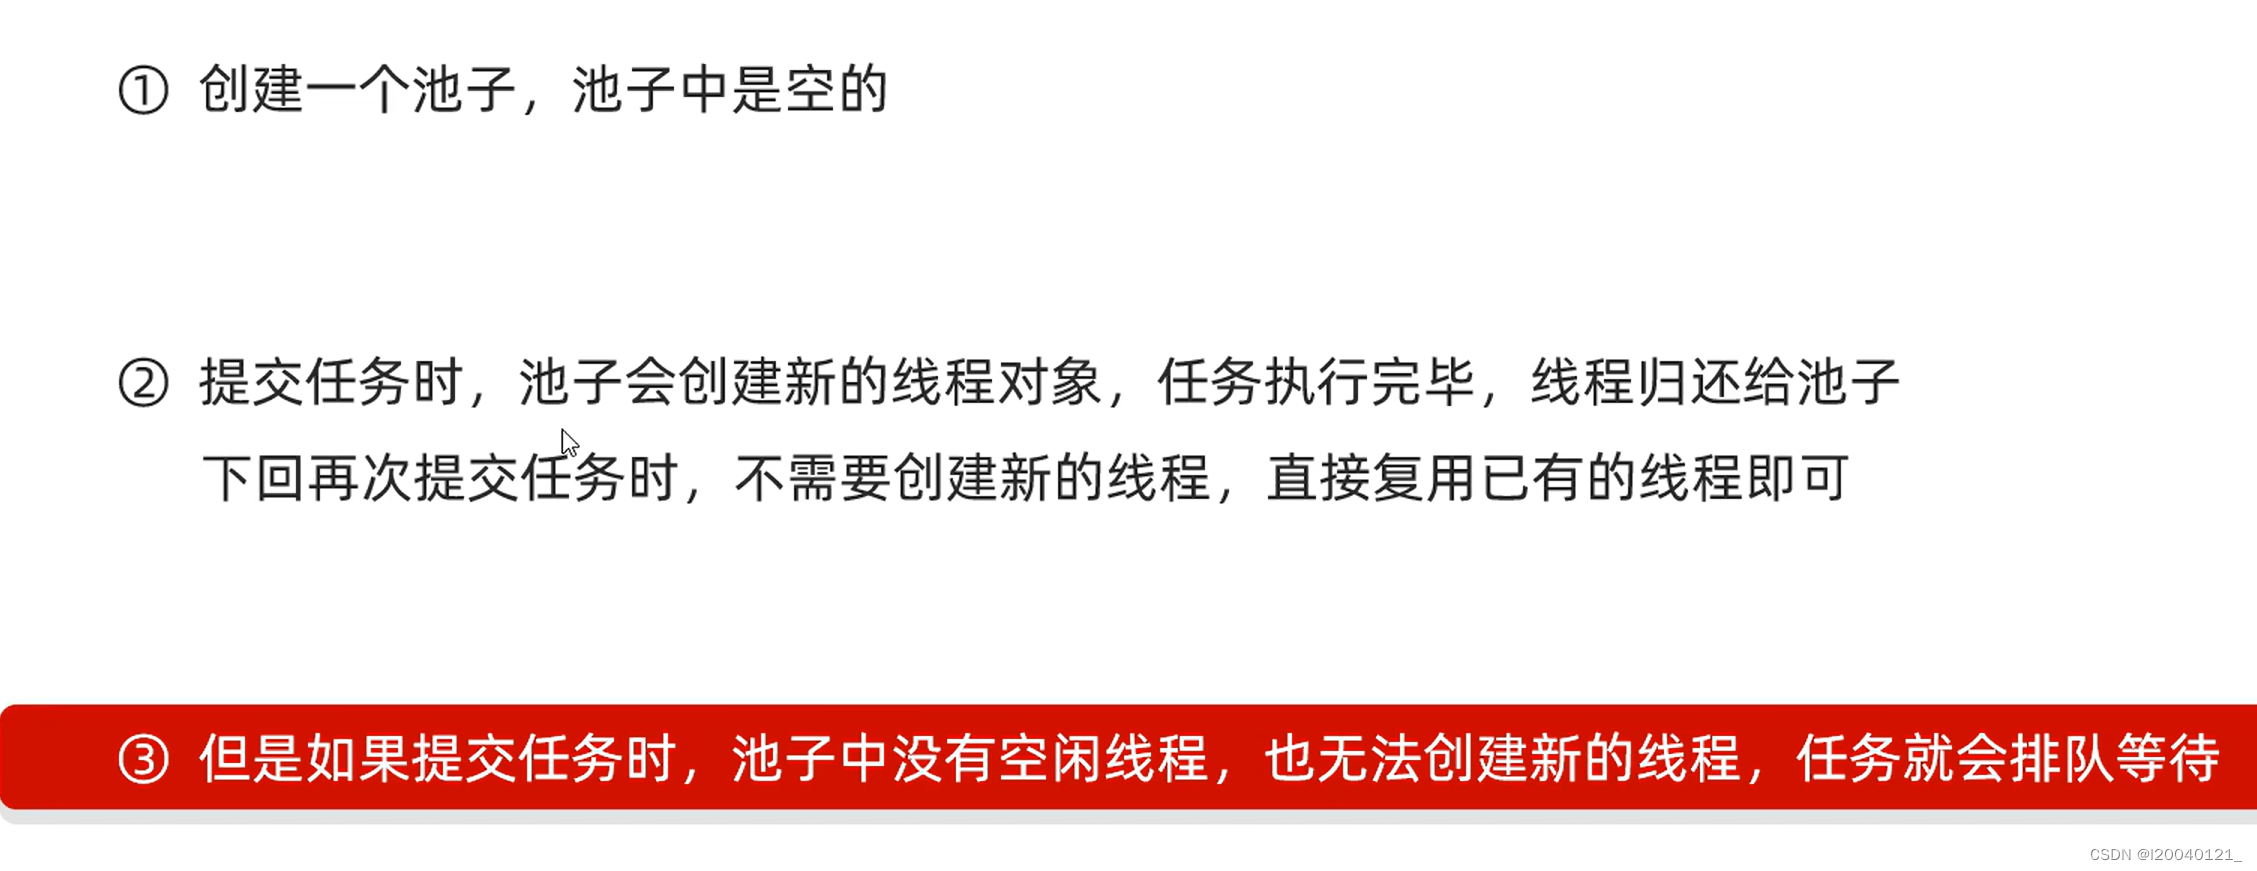
线程池

核心原理
网络编程
在网络通讯协议下,不同计算机上运行的程序,进行的数据传输
网络编程三要素
IP:设备在网络中的地址,是唯一标识
端口号:应用程序在设备中唯一标识
协议:数据在网络中传输的规则,常见协议有UDP,TCP,http,https,ftp
UDP三种通信方式
1.单播
以前的代码都是单播
2.组播
组播地址:224.0.0.0~239.225.225.225
其中224.0.0.0~224.0.0.225为预留组播地址
3.广播
广播地址:255.255.255.255
反射
反射允许对封装类的字段,方法和构造函数的信息进行编程访问
