1.概述
Elasticsearch 是一个流行的开源搜索引擎,用于存储、搜索和分析数据。下面是 Elasticsearch 7.x 版本的基本操作(CRUD):
1、创建索引:
PUT /index_name
{
  "settings": {
    "number_of_shards": 1,
    "number_of_replicas": 0
  }
}
2、查看索引:
GET /index_name
3、删除索引:
DELETE /index_name
4、创建文档:
POST /index_name/_doc
{
  "field1": "value1",
  "field2": "value2"
}
5、获取文档:
GET /index_name/_doc/doc_id
6、更新文档:
POST /index_name/_doc/doc_id/_update
{
  "doc": {
    "field1": "new_value1"
  }
}
7、删除文档:
DELETE /index_name/_doc/doc_id
这些操作可以通过 Elasticsearch 的 REST API 进行。注意,这只是 Elasticsearch 的基本操作之一,还有许多其他操作,如搜索、聚合、分析等。要深入了解 Elasticsearch 的使用,请查看 Elasticsearch 官方文档。
2.Elasticsearch CRUD 详细示例讲解
1)添加文档
1、指定文档ID
PUT blog/_doc/1
{
  "title":"1、VMware Workstation虚拟机软件安装图解",
  "author":"chengyuqiang",
  "content":"1、VMware Workstation虚拟机软件安装图解...",
  "url":"http://x.co/6nc81"
}
Elasticsearch服务会返回一个JSON格式的响应。
{
  "_index" : "blog",
  "_type" : "_doc",
  "_id" : "1",
  "_version" : 1,
  "result" : "created",
  "_shards" : {
    "total" : 2,
    "successful" : 1,
    "failed" : 0
  },
  "_seq_no" : 0,
  "_primary_term" : 2
}
响应结果说明:
- _index:文档所在的索引名
- _type:文档所在的类型名
- _id:文档ID
- _version:文档的版本
- result:created已经创建
- _shards: _shards表示索引操作的复制过程的信息。
- total:指示应在其上执行索引操作的分片副本(主分片和副本分片)的数量。
- successful:表示索引操作成功的分片副本数。
- failed:在副本分片上索引操作失败的情况下包含复制相关错误。
2、不指定文档ID
添加文档时可以不指定文档id,则文档id是自动生成的字符串。注意,需要使用POST方法,而不是PUT方法。
POST blog/_doc
{
  "title":"2、Linux服务器安装图解",
  "author":"chengyuqiang",
  "content":"2、Linux服务器安装图解解...",
  "url":"http://x.co/6nc82"
}
输出:
{
  "_index" : "blog",
  "_type" : "_doc",
  "_id" : "5P2-O2gBNSQY7o-KMw2P",
  "_version" : 1,
  "result" : "created",
  "_shards" : {
    "total" : 2,
    "successful" : 1,
    "failed" : 0
  },
  "_seq_no" : 1,
  "_primary_term" : 1
}
2)获取文档
1、通过文档id获取指定的文档
GET blog/_doc/1
输出:
{
  "_index" : "blog",
  "_type" : "_doc",
  "_id" : "1",
  "_version" : 1,
  "found" : true,
  "_source" : {
    "title" : "1、VMware Workstation虚拟机软件安装图解",
    "author" : "chengyuqiang",
    "content" : "1、VMware Workstation虚拟机软件安装图解...",
    "url" : "http://x.co/6nc81"
  }
}
响应结果说明:
- found值为true,表明查询到该文档
- _source字段是文档的内容
2、文档不存在的情况
GET blog/_doc/2
输出:
{
  "_index" : "blog",
  "_type" : "_doc",
  "_id" : "2",
  "found" : false
}
found字段值为false表明查询的文档不存在。
3、判定文档是否存在
HEAD blog/_doc/1
输出:
200 - OK
3)更新文档
1、更改id为1的文档,删除了author,修改content字段。
PUT blog/_doc/1
{
  "title":"1、VMware Workstation虚拟机软件安装图解",
  "content":"下载得到VMware-workstation-full-15.0.2-10952284.exe可执行文件...",
  "url":"http://x.co/6nc81"
}
输出:
{
  "_index" : "blog",
  "_type" : "_doc",
  "_id" : "1",
  "_version" : 2,
  "result" : "updated",
  "_shards" : {
    "total" : 2,
    "successful" : 1,
    "failed" : 0
  },
  "_seq_no" : 1,
  "_primary_term" : 1
}
_version更新为2
查看该文档
GET blog/_doc/1
输出:
{
  "_index" : "blog",
  "_type" : "_doc",
  "_id" : "1",
  "_version" : 2,
  "found" : true,
  "_source" : {
    "title" : "1、VMware Workstation虚拟机软件安装图解",
    "content" : "下载得到VMware-workstation-full-15.0.2-10952284.exe可执行文件...",
    "url" : "http://x.co/6nc81"
  }
}
2、添加文档时,防止覆盖已存在的文档,可以通过_create加以限制
PUT blog/_doc/1/_create
{
  "title":"1、VMware Workstation虚拟机软件安装图解",
  "content":"下载得到VMware-workstation-full-15.0.2-10952284.exe可执行文件...",
  "url":"http://x.co/6nc81"
}
该文档已经存在,添加失败。
{
  "error": {
    "root_cause": [
      {
        "type": "version_conflict_engine_exception",
        "reason": "[_doc][1]: version conflict, document already exists (current version [2])",
        "index_uuid": "GqC2fSqPS06GRfTLmh1TLg",
        "shard": "1",
        "index": "blog"
      }
    ],
    "type": "version_conflict_engine_exception",
    "reason": "[_doc][1]: version conflict, document already exists (current version [2])",
    "index_uuid": "GqC2fSqPS06GRfTLmh1TLg",
    "shard": "1",
    "index": "blog"
  },
  "status": 409
}
3、更新文档的字段
通过脚本更新制定字段,其中ctx是脚本语言中的一个执行对象,先获取_source,再修改content字段
POST blog/_doc/1/_update
{
  "script": {
    "source": "ctx._source.content=\"从官网下载VMware-workstation,双击可执行文件进行安装...\""
  }
}
响应结果如下:
{
  "_index" : "blog",
  "_type" : "_doc",
  "_id" : "1",
  "_version" : 3,
  "result" : "updated",
  "_shards" : {
    "total" : 2,
    "successful" : 1,
    "failed" : 0
  },
  "_seq_no" : 2,
  "_primary_term" : 1
}
再次获取文档 GET blog/_doc/1,响应结果如下
{
  "_index" : "blog",
  "_type" : "_doc",
  "_id" : "1",
  "_version" : 3,
  "found" : true,
  "_source" : {
    "title" : "1、VMware Workstation虚拟机软件安装图解",
    "content" : "从官网下载VMware-workstation,双击可执行文件进行安装...",
    "url" : "http://x.co/6nc81"
  }
}
4、添加字段
POST blog/_doc/1/_update
{
  "script": {
    "source": "ctx._source.author=\"chengyuqiang\""
  }
}
再次获取文档 GET blog/_doc/1,响应结果如下:
{
  "_index" : "blog",
  "_type" : "_doc",
  "_id" : "1",
  "_version" : 4,
  "found" : true,
  "_source" : {
    "title" : "1、VMware Workstation虚拟机软件安装图解",
    "content" : "从官网下载VMware-workstation,双击可执行文件进行安装...",
    "url" : "http://x.co/6nc81",
    "author" : "chengyuqiang"
  }
}
5、删除字段
POST blog/_doc/1/_update
{
  "script": {
    "source": "ctx._source.remove(\"url\")"
  }
}
再次获取文档 GET blog/_doc/1,响应结果如下:
{
  "_index" : "blog",
  "_type" : "_doc",
  "_id" : "1",
  "_version" : 5,
  "found" : true,
  "_source" : {
    "title" : "1、VMware Workstation虚拟机软件安装图解",
    "content" : "从官网下载VMware-workstation,双击可执行文件进行安装...",
    "author" : "chengyuqiang"
  }
}
4)删除文档
DELETE blog/_doc/1
输出:
{
  "_index" : "blog",
  "_type" : "_doc",
  "_id" : "1",
  "_version" : 6,
  "result" : "deleted",
  "_shards" : {
    "total" : 2,
    "successful" : 1,
    "failed" : 0
  },
  "_seq_no" : 6,
  "_primary_term" : 1
}
再次判定该文档是否存在,执行 HEAD blog/_doc/1,响应结果 404 - Not Found
5)批量操作
如果文档数量非常庞大,商业运维中都是海量数据,一个一个操作文档显然不合实际。幸运的是ElasticSearch提供了文档的批量操作机制。我们已经知道mget允许一次性检索多个文档,ElasticSearch提供了Bulk API,可以执行批量索引、批量删除、批量更新等操作,也就是说Bulk API允许使用在单个步骤中进行多次 create 、 index 、 update 或 delete 请求。
bulk 与其他的请求体格式稍有不同,bulk请求格式如下:
{ action: { metadata }}\n
{ request body        }\n
{ action: { metadata }}\n
{ request body        }\n
...
这种格式类似一个有效的单行 JSON 文档 流 ,它通过换行符(\n)连接到一起。注意两个要点:
- 每行一定要以换行符(\n)结尾, 包括最后一行 。这些换行符被用作一个标记,可以有效分隔行。
- 这些行不能包含未转义的换行符,因为他们将会对解析造成干扰。这意味着这个 JSON 不 能使用 pretty 参数打印。
- action/metadata 行指定 哪一个文档 做 什么操作 。metadata 应该 指定被索引、创建、更新或者删除的文档的
_index 、 _type 和 _id 。 - request body 行由文档的 _source 本身组成–文档包含的字段和值。它是 index 和 create 操作所必需的。
1、批量导入
POST /_bulk
{ "create": { "_index": "blog", "_type": "_doc", "_id": "1" }}
{ "title": "1、VMware Workstation虚拟机软件安装图解" ,"author":"chengyuqiang","content":"官网下载VMware-workstation,双击可执行文件进行安装" , "url":"http://x.co/6nc81" }
{ "create": { "_index": "blog", "_type": "_doc", "_id": "2" }}
{ "title":  "2、Linux服务器安装图解" ,"author":  "chengyuqiang" ,"content": "VMware模拟Linux服务器安装图解" , "url": "http://x.co/6nc82" }
{ "create": { "_index": "blog", "_type": "_doc", "_id": "3" }}
{ "title":  "3、Xshell 6 个人版安装与远程操作连接服务器" , "author": "chengyuqiang" ,"content": "Xshell 6 个人版安装与远程操作连接服务器..." , "url": "http://x.co/6nc84" }
这个 Elasticsearch 响应包含 items 数组, 这个数组的内容是以请求的顺序列出来的每个请求的结果。
{
  "took" : 132,
  "errors" : false,
  "items" : [
    {
      "create" : {
        "_index" : "blog",
        "_type" : "_doc",
        "_id" : "1",
        "_version" : 7,
        "result" : "created",
        "_shards" : {
          "total" : 2,
          "successful" : 1,
          "failed" : 0
        },
        "_seq_no" : 7,
        "_primary_term" : 1,
        "status" : 201
      }
    },
    {
      "create" : {
        "_index" : "blog",
        "_type" : "_doc",
        "_id" : "2",
        "_version" : 1,
        "result" : "created",
        "_shards" : {
          "total" : 2,
          "successful" : 1,
          "failed" : 0
        },
        "_seq_no" : 8,
        "_primary_term" : 1,
        "status" : 201
      }
    },
    {
      "create" : {
        "_index" : "blog",
        "_type" : "_doc",
        "_id" : "3",
        "_version" : 1,
        "result" : "created",
        "_shards" : {
          "total" : 2,
          "successful" : 1,
          "failed" : 0
        },
        "_seq_no" : 0,
        "_primary_term" : 1,
        "status" : 201
      }
    }
  ]
}
2、批量操作,包括删除、更新、新增
POST /_bulk
{ "delete": { "_index": "blog", "_type": "_doc", "_id": "1" }}
{ "update": { "_index": "blog", "_type": "_doc", "_id": "3", "retry_on_conflict" : 3} }
{ "doc" : {"title" : "Xshell教程"} }
{ "index": { "_index": "blog", "_type": "_doc", "_id": "4" }}
{ "title": "4、CentOS 7.x基本设置" ,"author":"chengyuqiang","content":"CentOS 7.x基本设置","url":"http://x.co/6nc85" }
{ "create": { "_index": "blog", "_type": "_doc", "_id": "5" }}
{ "title": "5、图解Linux下JDK安装与环境变量配置","author":"chengyuqiang" ,"content": "图解JDK安装配置" , "url": "http://x.co/6nc86" }
在7.0版本中,retry_on_conflict 参数取代了之前的_retry_on_conflict
{
  "took" : 125,
  "errors" : false,
  "items" : [
    {
      "delete" : {
        "_index" : "blog",
        "_type" : "_doc",
        "_id" : "1",
        "_version" : 2,
        "result" : "deleted",
        "_shards" : {
          "total" : 2,
          "successful" : 1,
          "failed" : 0
        },
        "_seq_no" : 3,
        "_primary_term" : 1,
        "status" : 200
      }
    },
    {
      "update" : {
        "_index" : "blog",
        "_type" : "_doc",
        "_id" : "3",
        "_version" : 2,
        "result" : "updated",
        "_shards" : {
          "total" : 2,
          "successful" : 1,
          "failed" : 0
        },
        "_seq_no" : 4,
        "_primary_term" : 1,
        "status" : 200
      }
    },
    {
      "index" : {
        "_index" : "blog",
        "_type" : "_doc",
        "_id" : "4",
        "_version" : 1,
        "result" : "created",
        "_shards" : {
          "total" : 2,
          "successful" : 1,
          "failed" : 0
        },
        "_seq_no" : 1,
        "_primary_term" : 1,
        "status" : 201
      }
    },
    {
      "create" : {
        "_index" : "blog",
        "_type" : "_doc",
        "_id" : "5",
        "_version" : 1,
        "result" : "created",
        "_shards" : {
          "total" : 2,
          "successful" : 1,
          "failed" : 0
        },
        "_seq_no" : 5,
        "_primary_term" : 1,
        "status" : 201
      }
    }
  ]
}
6)批量获取
GET blog/_doc/_mget
{
    "ids" : ["1", "2","3"]
}
id为1的文档已经删除,所以没有搜索到
{
  "docs" : [
    {
      "_index" : "blog",
      "_type" : "_doc",
      "_id" : "1",
      "found" : false
    },
    {
      "_index" : "blog",
      "_type" : "_doc",
      "_id" : "2",
      "_version" : 1,
      "found" : true,
      "_source" : {
        "title" : "2、Linux服务器安装图解",
        "author" : "chengyuqiang",
        "content" : "VMware模拟Linux服务器安装图解",
        "url" : "http://x.co/6nc82"
      }
    },
    {
      "_index" : "blog",
      "_type" : "_doc",
      "_id" : "3",
      "_version" : 2,
      "found" : true,
      "_source" : {
        "title" : "Xshell教程",
        "author" : "chengyuqiang",
        "content" : "Xshell 6 个人版安装与远程操作连接服务器...",
        "url" : "http://x.co/6nc84"
      }
    }
  ]
}
7)简单搜索
这里介绍一下简单的文档搜索操作,后面章节会详细介绍。
1、词项查询, 也称 term 查询
【示例一】
GET blog/_search
{
  "query": {
    "term": {
      "title": "centos"
    }
  }
}
输出:
{
  "took" : 1,
  "timed_out" : false,
  "_shards" : {
    "total" : 2,
    "successful" : 2,
    "skipped" : 0,
    "failed" : 0
  },
  "hits" : {
    "total" : {
      "value" : 1,
      "relation" : "eq"
    },
    "max_score" : 0.71023846,
    "hits" : [
      {
        "_index" : "blog",
        "_type" : "_doc",
        "_id" : "4",
        "_score" : 0.71023846,
        "_source" : {
          "title" : "4、CentOS 7.x基本设置",
          "author" : "chengyuqiang",
          "content" : "CentOS 7.x基本设置",
          "url" : "http://x.co/6nc85"
        }
      }
    ]
  }
}
【示例二】
GET blog/_search
{
  "query": {
    "term": {
      "title": "远程"
    }
  }
}
输出:
{
  "took" : 0,
  "timed_out" : false,
  "_shards" : {
    "total" : 2,
    "successful" : 2,
    "skipped" : 0,
    "failed" : 0
  },
  "hits" : {
    "total" : {
      "value" : 0,
      "relation" : "eq"
    },
    "max_score" : null,
    "hits" : [ ]
  }
}
【示例三】
GET blog/_search
{
  "query": {
    "term": {
      "title": "程"
    }
  }
}
输出:
{
  "took" : 2,
  "timed_out" : false,
  "_shards" : {
    "total" : 2,
    "successful" : 2,
    "skipped" : 0,
    "failed" : 0
  },
  "hits" : {
    "total" : {
      "value" : 1,
      "relation" : "eq"
    },
    "max_score" : 1.3486402,
    "hits" : [
      {
        "_index" : "blog",
        "_type" : "_doc",
        "_id" : "3",
        "_score" : 1.3486402,
        "_source" : {
          "title" : "Xshell教程",
          "author" : "chengyuqiang",
          "content" : "Xshell 6 个人版安装与远程操作连接服务器...",
          "url" : "http://x.co/6nc84"
        }
      }
    ]
  }
}
2、匹配查询,也称match查询
与term精确查询不同,对于match查询,只要被查询字段中存在任何一个词项被匹配,就会搜索到该文档。
GET blog/_search
{
  "query": {
    "match": {
      "title": {
        "query": "远程"
      }
    }
  }
}
输出:
{
  "took" : 9,
  "timed_out" : false,
  "_shards" : {
    "total" : 2,
    "successful" : 2,
    "skipped" : 0,
    "failed" : 0
  },
  "hits" : {
    "total" : {
      "value" : 1,
      "relation" : "eq"
    },
    "max_score" : 1.3486402,
    "hits" : [
      {
        "_index" : "blog",
        "_type" : "_doc",
        "_id" : "3",
        "_score" : 1.3486402,
        "_source" : {
          "title" : "Xshell教程",
          "author" : "chengyuqiang",
          "content" : "Xshell 6 个人版安装与远程操作连接服务器...",
          "url" : "http://x.co/6nc84"
        }
      }
    ]
  }
}
8)路由机制
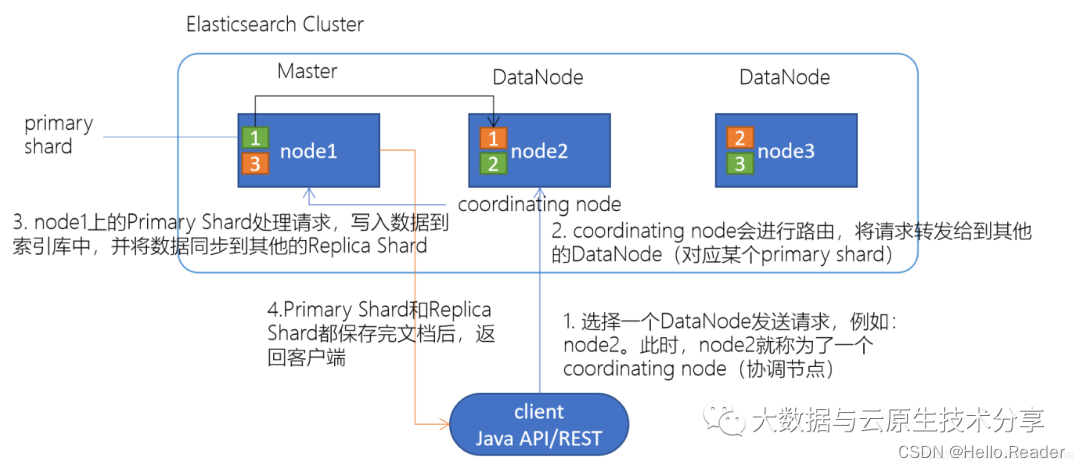
当你索引(动词,对该文档建立倒排索引)一个文档,它被存储到master节点上的一个主分片上。
Elasticsearch是如何知道文档属于哪个分片的呢?当你创建一个新文档,它是如何知道是应该存储在分片1还是分片2上的呢?
解答这个问题,我们需要了解Elasticsearch的路由机制。
简单地说,Elasticsearch将具有相关Hash值的文档存放到同一个主分片中,分片位置计算算法如下:
shard = hash(routing) % number_of_primary_shards
算法说明:
- routing值是一个字符串,它默认是文档_id,也可以自定义。这个routing字符串通过哈希函数生成一个数字,然后除以主切片的数量得到一个余数(remainder),余数的范围是[0
, number_of_primary_shards-1],这个数字就是特定文档所在的分片。 - 之前我们介绍过,创建索引时需要指定主分片数量,该不能修改。这是因为如果主分片的数量在未来改变了,所有先前的路由值就失效了,文档也就永远找不到了。
- 该算法基本可以保证所有文档在所有分片上平均分布,不会导致数据分布不均(数据倾斜)的情况。
- 默认情况下,routing值是文档的_id。我们创建文档时可以指定id的值;如果不指定id时,Elasticsearch将随机生成文档的_id值。这将导致在查询文档时,Elasticsearch不能确定文档的位置,需要将请求广播到所有的分片节点上。
假设我们有一个10个分片的索引。当一个请求在集群上执行时基本过程如下:
- 这个搜索的请求会被发送到一个节点。
- 接收到这个请求的节点,将这个查询广播到这个索引的每个分片上(可能是主分片,也可能是复制分片)。
- 每个分片执行这个搜索查询并返回结果。
- 结果在通道节点上合并、排序并返回给用户。
了解Elasticsearch的路由机制后,我们可以在创建某一类文档时指定文档的路由值,这样ElasticSearch就知道在处理这一类文档时,如何定位到正确的分片。比如,把某一特定类型的书籍存储到特定的分片上去,这样在搜索这一类书籍的时候就可以避免搜索其它的分片,也就避免了多个分片搜索结果的合并。路由机制向 Elasticsearch提供一种信息来决定哪些分片用于存储和查询。同一个路由值将映射到同一个分片。这基本上就是在说:“通过使用用户提供的路由值,就可以做到定向存储,定向搜索。
所有的文档API(GET、INDEX、DELETE、BULK、UPDATE、MGET)都接收一个routing参数,它用来自定义文档到分片的映射。添加routing参数形式与URL参数形式相同url?参数名=参数值。
PUT blog/_doc/1?routing=haron
{
  "title":"1、VMware安装",
  "author":"hadron",
  "content":"VMware Workstation虚拟机软件安装图解...",
  "url":"http://x.co/6nc81"
}
输出:
{
  "_index" : "blog",
  "_type" : "_doc",
  "_id" : "1",
  "_version" : 1,
  "result" : "created",
  "_shards" : {
    "total" : 2,
    "successful" : 1,
    "failed" : 0
  },
  "_seq_no" : 12,
  "_primary_term" : 1
}
查询
GET blog/_doc/1?routing=hardon
输出:
{
  "_index" : "blog",
  "_type" : "_doc",
  "_id" : "1",
  "_version" : 1,
  "_routing" : "hardon",
  "found" : true,
  "_source" : {
    "title" : "1、VMware安装",
    "author" : "hadron",
    "content" : "VMware Workstation虚拟机软件安装图解...",
    "url" : "http://x.co/6nc81"
  }
}
【注意】自定义routing值可以造成数据分布不均的情况。例如用户hadron的文档非常多,有数十万个,而其他大多数用户的文档只有数个到数十个,这样将导致hadron所在的分片较大。
9)版本控制
参考文档:
- https://www.elastic.co/guide/en/elasticsearch/guide/2.x/version-control.html
- https://www.elastic.co/guide/en/elasticsearch/guide/2.x/optimistic-concurrency-control.html
- https://elasticsearch.cn/book/elasticsearch_definitive_guide_2.x/version-control.html
- https://elasticsearch.cn/book/elasticsearch_definitive_guide_2.x/optimistic-concurrency-control.html
【示例一】不带版本
PUT website
{
    "settings" : {
        "index" : {
            "number_of_shards" : 1,
            "number_of_replicas" : 1
        }
    }
}
PUT /website/_doc/1/_create
{
  "title": "My first blog entry",
  "text":  "Just trying this out..."
}
查看
GET website/_doc/1
输出:
{
  "_index" : "website",
  "_type" : "_doc",
  "_id" : "1",
  "_version" : 1,
  "found" : true,
  "_source" : {
    "title" : "My first blog entry",
    "text" : "Just trying this out..."
  }
}
【示例二】指定版本
PUT website/_doc/1?version=1
{
  "title": "My first blog entry",
  "text":  "Starting to get the hang of this..."
}
输出:
{
  "_index" : "website",
  "_type" : "_doc",
  "_id" : "1",
  "_version" : 2,
  "result" : "updated",
  "_shards" : {
    "total" : 2,
    "successful" : 1,
    "failed" : 0
  },
  "_seq_no" : 1,
  "_primary_term" : 1
}
例如,要创建一个新的具有外部版本号 5 的博客文章,我们可以按以下方法进行:
PUT /website/_doc/2?version=5&version_type=external
{
  "title": "My first external blog entry",
  "text":  "Starting to get the hang of this..."
}
在响应中,我们能看到当前的 _version 版本号是 5 :
{
  "_index" : "website",
  "_type" : "_doc",
  "_id" : "2",
  "_version" : 5,
  "result" : "created",
  "_shards" : {
    "total" : 2,
    "successful" : 1,
    "failed" : 0
  },
  "_seq_no" : 2,
  "_primary_term" : 1
}
现在我们更新这个文档,指定一个新的 version 号是 10 :
PUT /website/_doc/2?version=10&version_type=external
{
  "title": "My first external blog entry",
  "text":  "This is a piece of cake..."
}
请求成功并将当前 _version 设为 10 :
{
  "_index" : "website",
  "_type" : "_doc",
  "_id" : "2",
  "_version" : 10,
  "result" : "updated",
  "_shards" : {
    "total" : 2,
    "successful" : 1,
    "failed" : 0
  },
  "_seq_no" : 3,
  "_primary_term" : 1
}
如果你要重新运行此请求时,它将会失败,并返回像我们之前看到的同样的冲突错误, 因为指定的外部版本号不大于 Elasticsearch 的当前版本号。
{
  "error": {
    "root_cause": [
      {
        "type": "version_conflict_engine_exception",
        "reason": "[_doc][2]: version conflict, current version [10] is higher or equal to the one provided [10]",
        "index_uuid": "5616aEUkQ7yvQIYUDyLudg",
        "shard": "0",
        "index": "website"
      }
    ],
    "type": "version_conflict_engine_exception",
    "reason": "[_doc][2]: version conflict, current version [10] is higher or equal to the one provided [10]",
    "index_uuid": "5616aEUkQ7yvQIYUDyLudg",
    "shard": "0",
    "index": "website"
  },
  "status": 409
}
10)refresh
1、立即刷新,文档可见
这些将创建一个文档并立即刷新索引,使其可见:
DELETE test
PUT test/_doc/1?refresh
{"message": "测试文档1"}
PUT test/_doc/2?refresh=true
{"message": "测试文档2"}
2、不刷新
这些将创建一个文档而不做任何使搜索可见的内容:
PUT test/_doc/3
{"message": "测试文档3"}
PUT test/_doc/4?refresh=false
{"message": "测试文档4"}
3、等待刷新可见
PUT test/_doc/5?refresh=wait_for
{"message": "测试文档5"}
Elasticsearch 常见的操作就先到这里了


