模块一:k8s集群部署与安全配置
目录
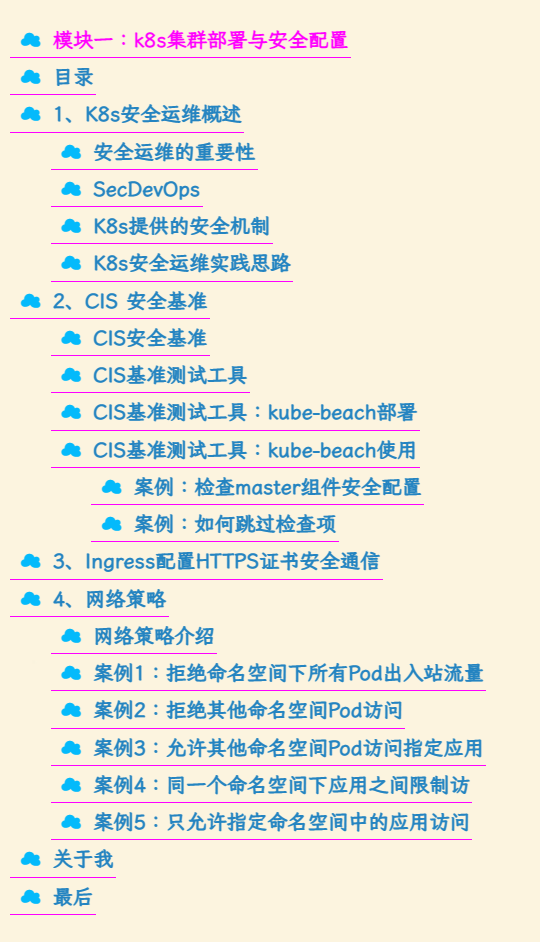
1、K8s安全运维概述
[外链图片转存失败,源站可能有防盗链机制,建议将图片保存下来直接上传(img-PST6trat-1684674016197)(https://bucket-hg.oss-cn-shanghai.aliyuncs.com/img/1665822875941-73d822c8-7bdd-481c-acc1-df97b70c45c0.png)]
安全运维的重要性
[外链图片转存失败,源站可能有防盗链机制,建议将图片保存下来直接上传(img-AZ0QJTng-1684674016197)(https://bucket-hg.oss-cn-shanghai.aliyuncs.com/img/1665822893494-0682b840-75cf-4f21-9922-9b5dbc18f4a5.png)]
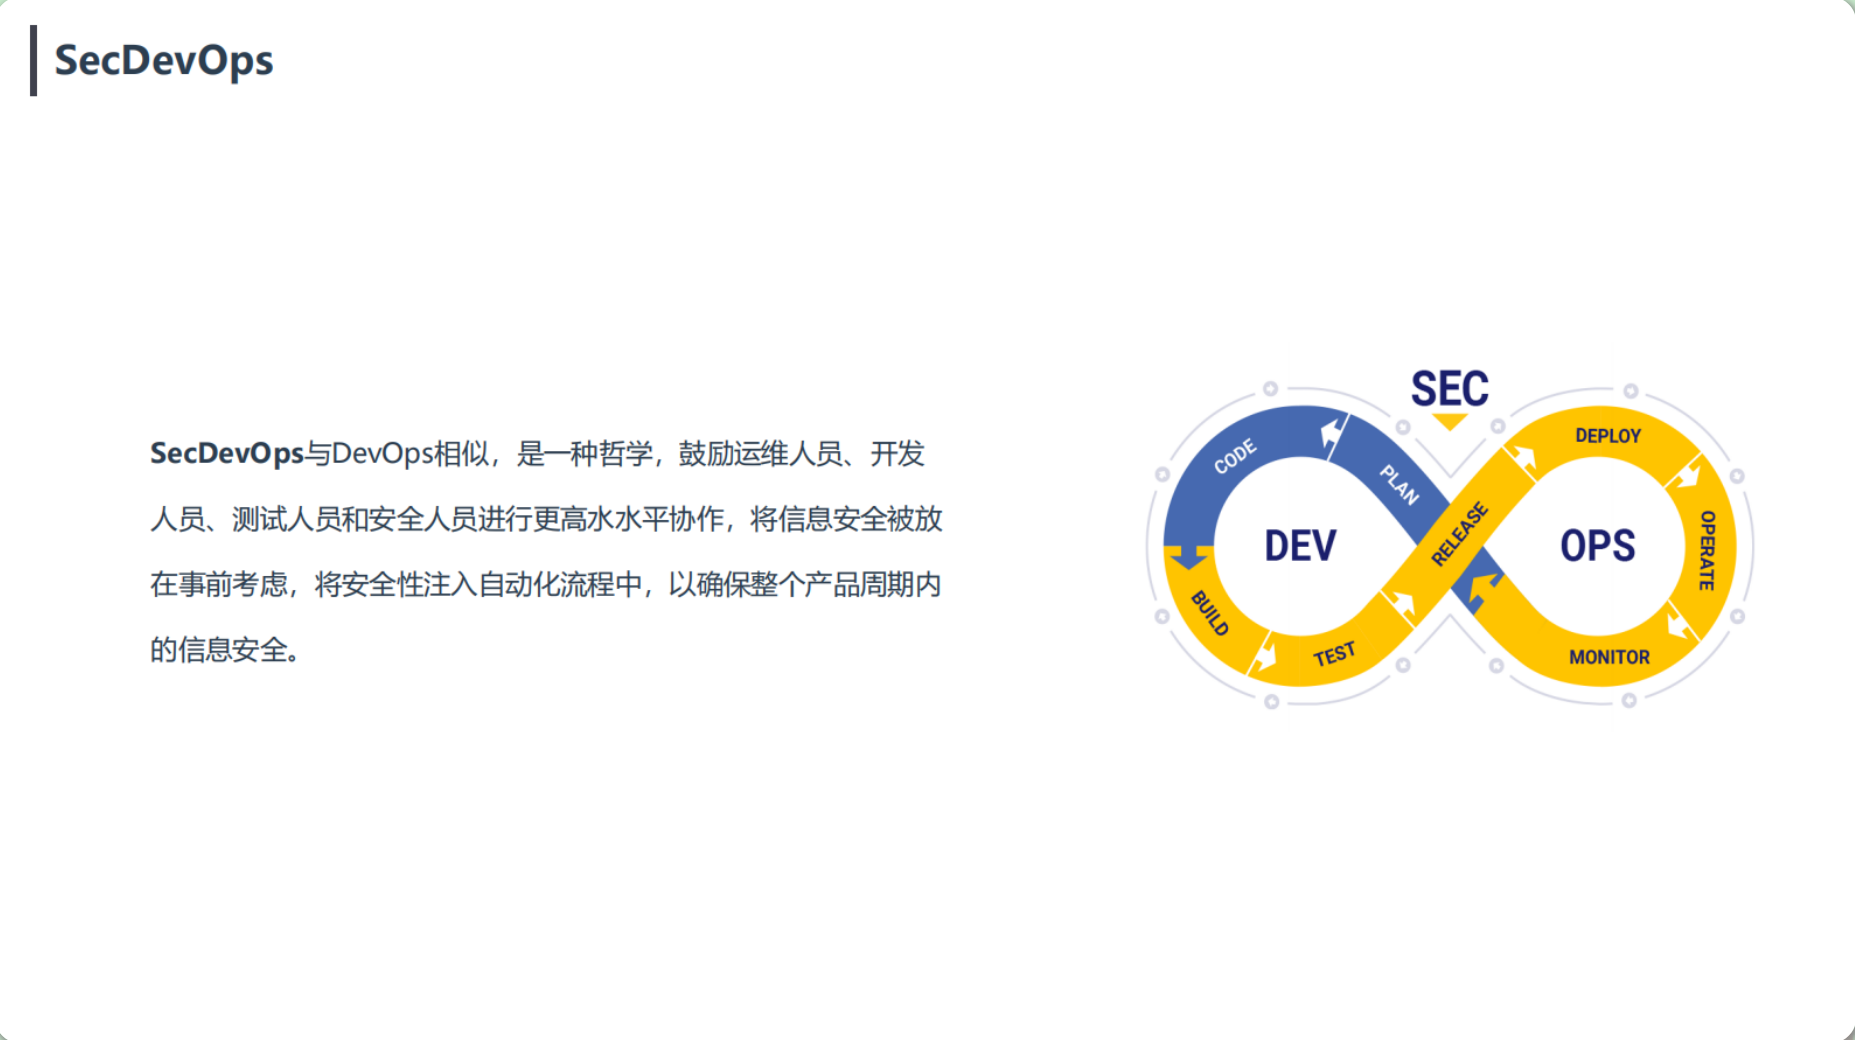
SecDevOps
K8s提供的安全机制
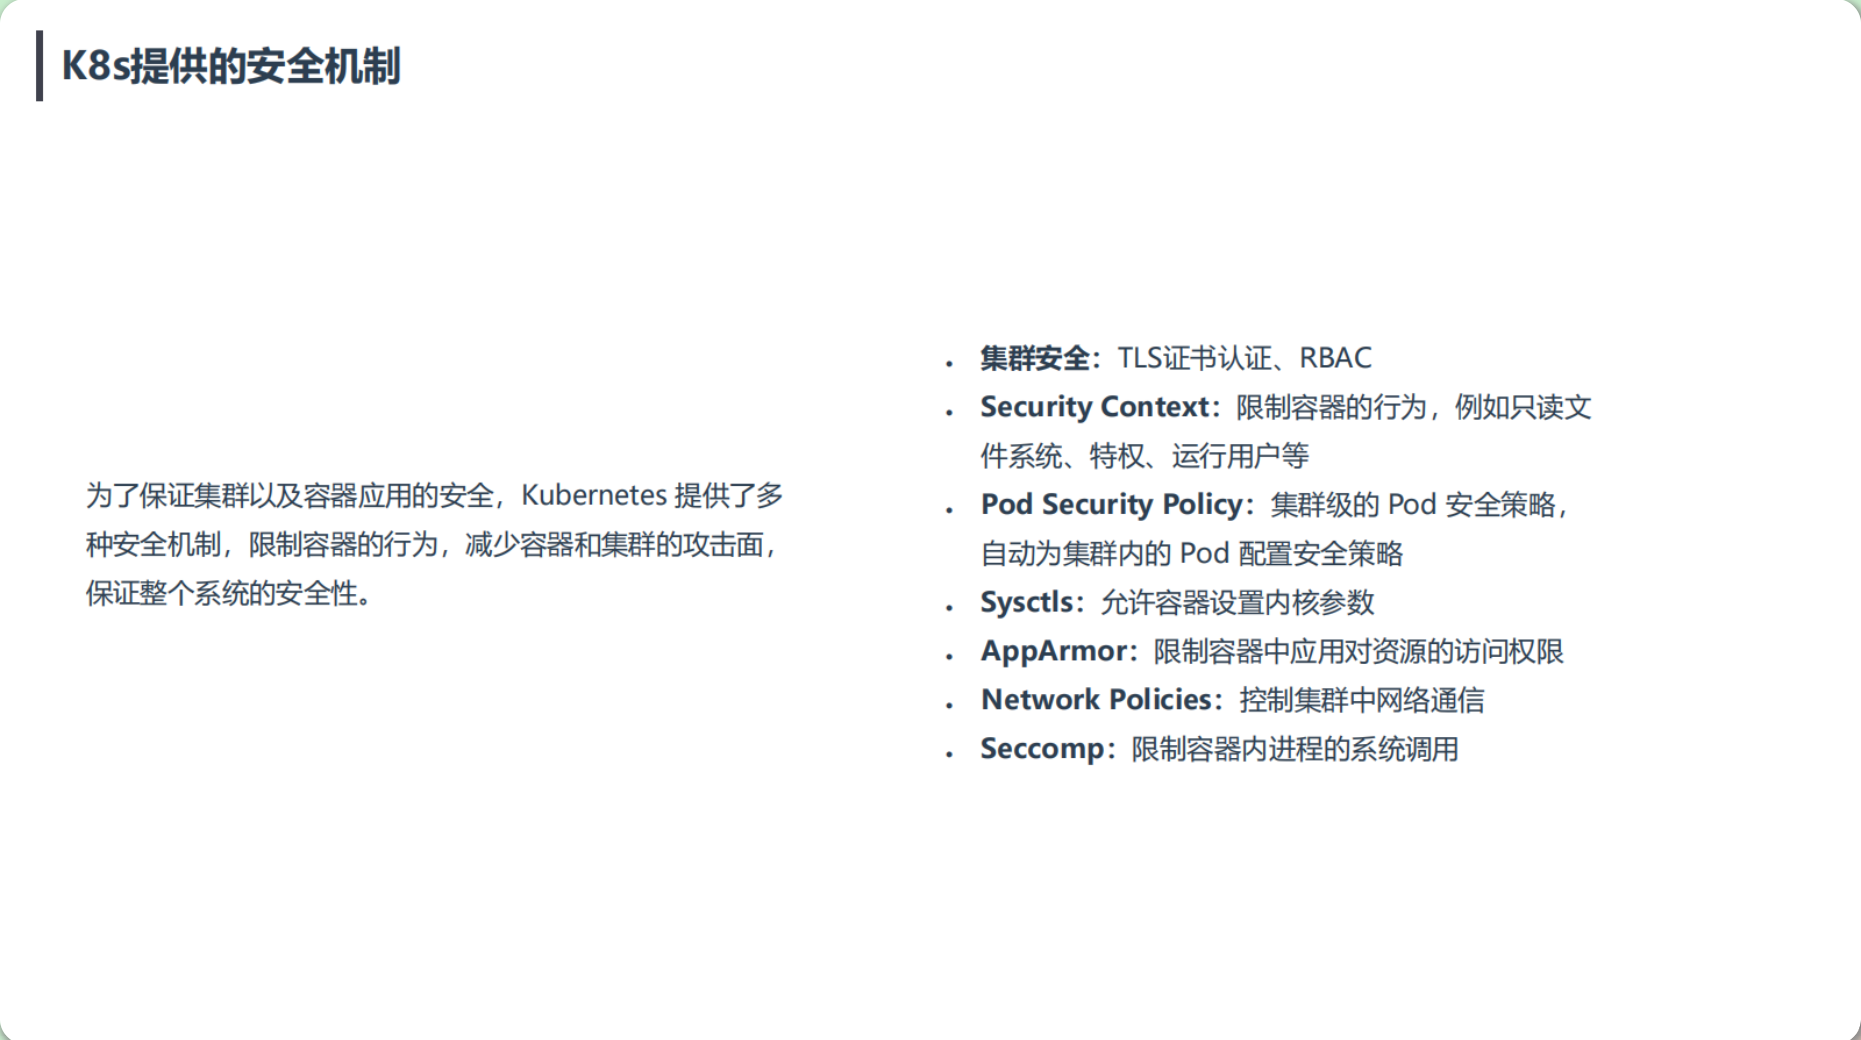
- 集群安全:TLS证书认证(https证书)、RBAC
- Security Context:限制容器的行为,例如只读文件系统、特权、运行用户等
- Pod Security Policy:集群级的 Pod 安全策略,自动为集群内的 Pod 配置安全策略
- Sysctls:允许容器设置内核参数(不建议这么干,可能影响宿主机稳定性)
- AppArmor:限制容器中应用对资源的访问权限
- Network Policies:控制集群中网络通信
- Seccomp:限制容器内进程的系统调用
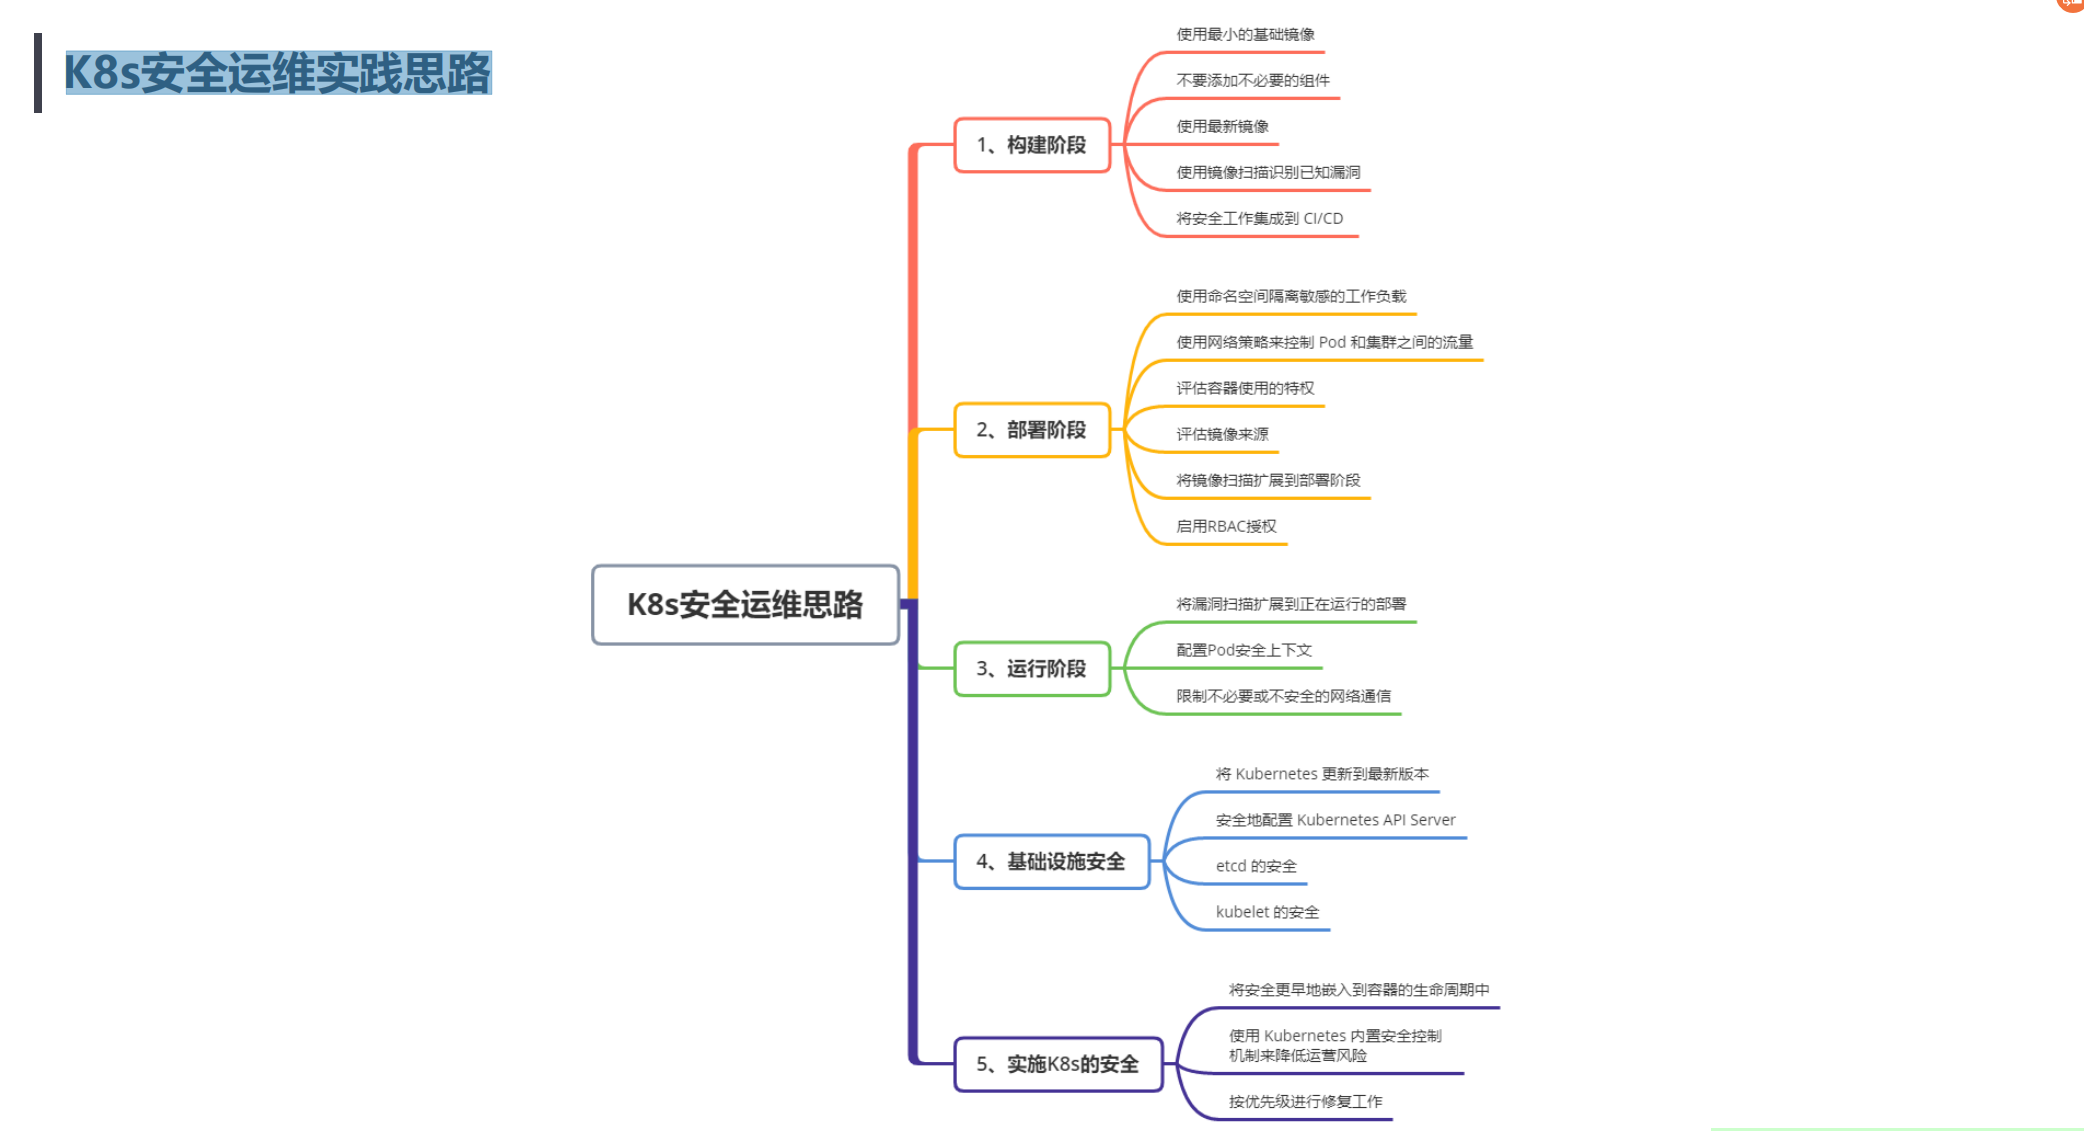
K8s安全运维实践思路
2、CIS 安全基准
• CIS安全基准介绍
• K8s安全基准工具 kube-bench
CIS安全基准
互联网安全中心(CIS,Center for Internet Security),是一个非盈利组织,致力为互联网提供免费的安全防御解决方案。
官网:https://www.cisecurity.org/
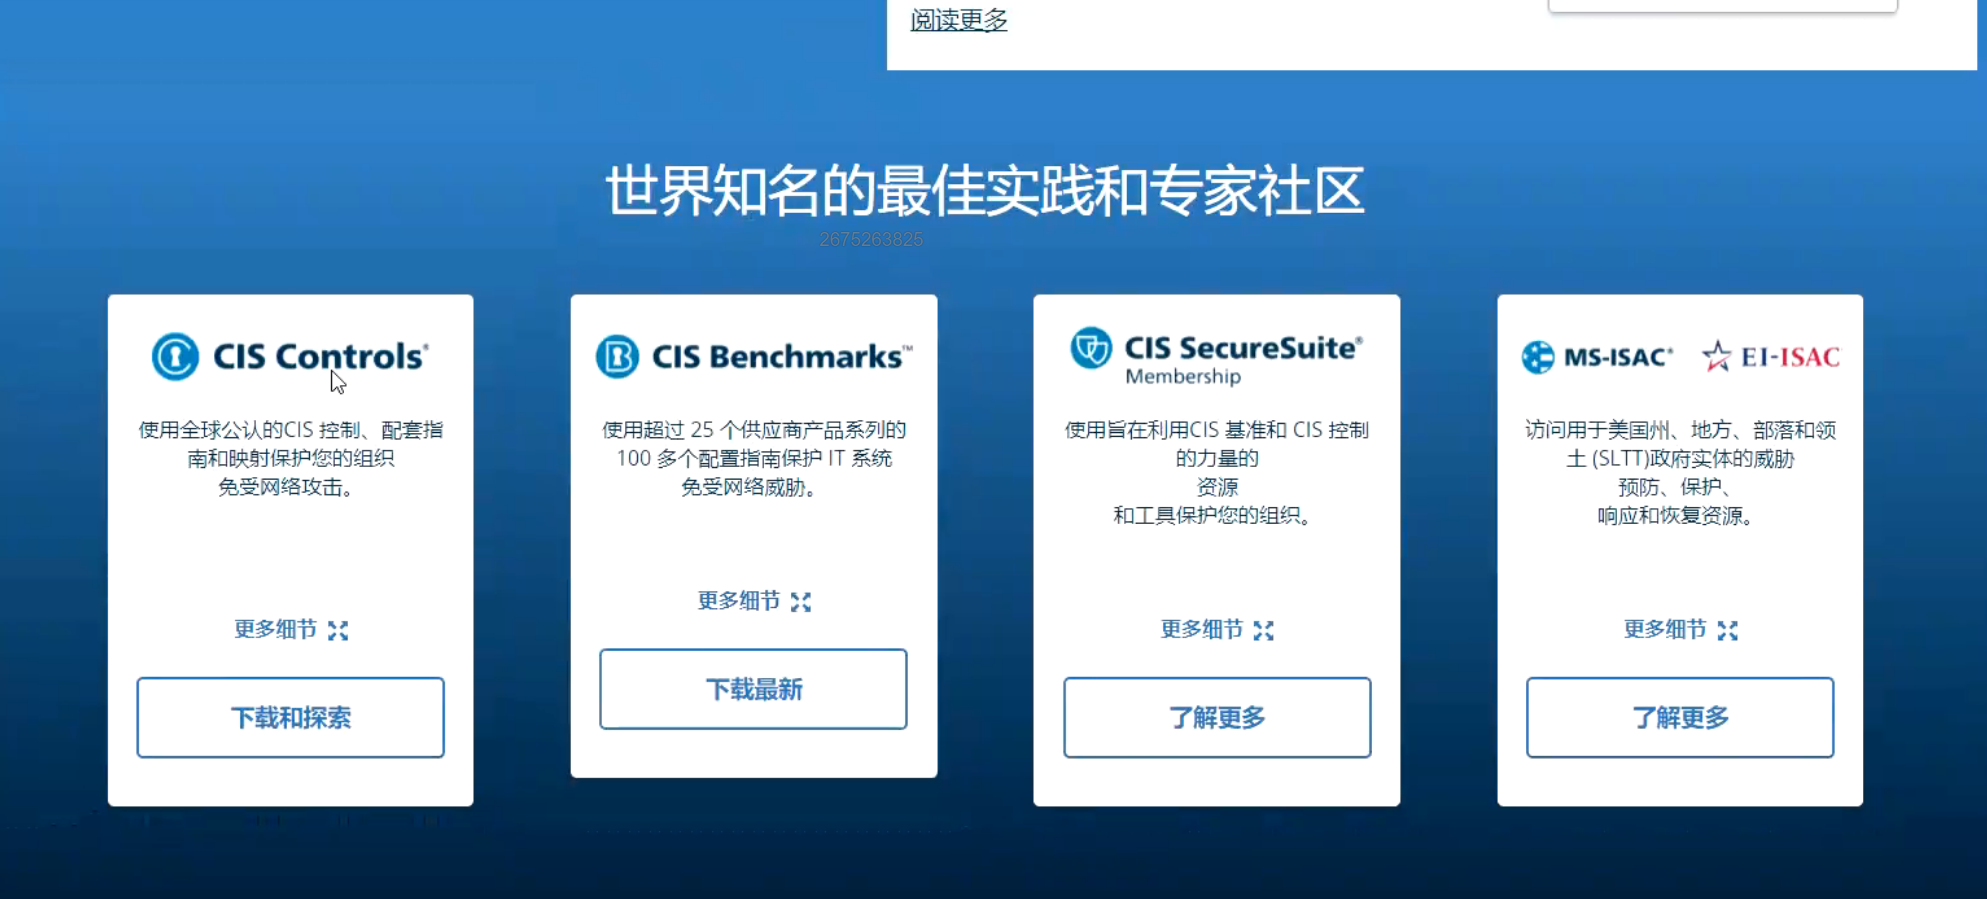

Kubernetes CIS基准:https://www.cisecurity.org/benchmark/kubernetes/
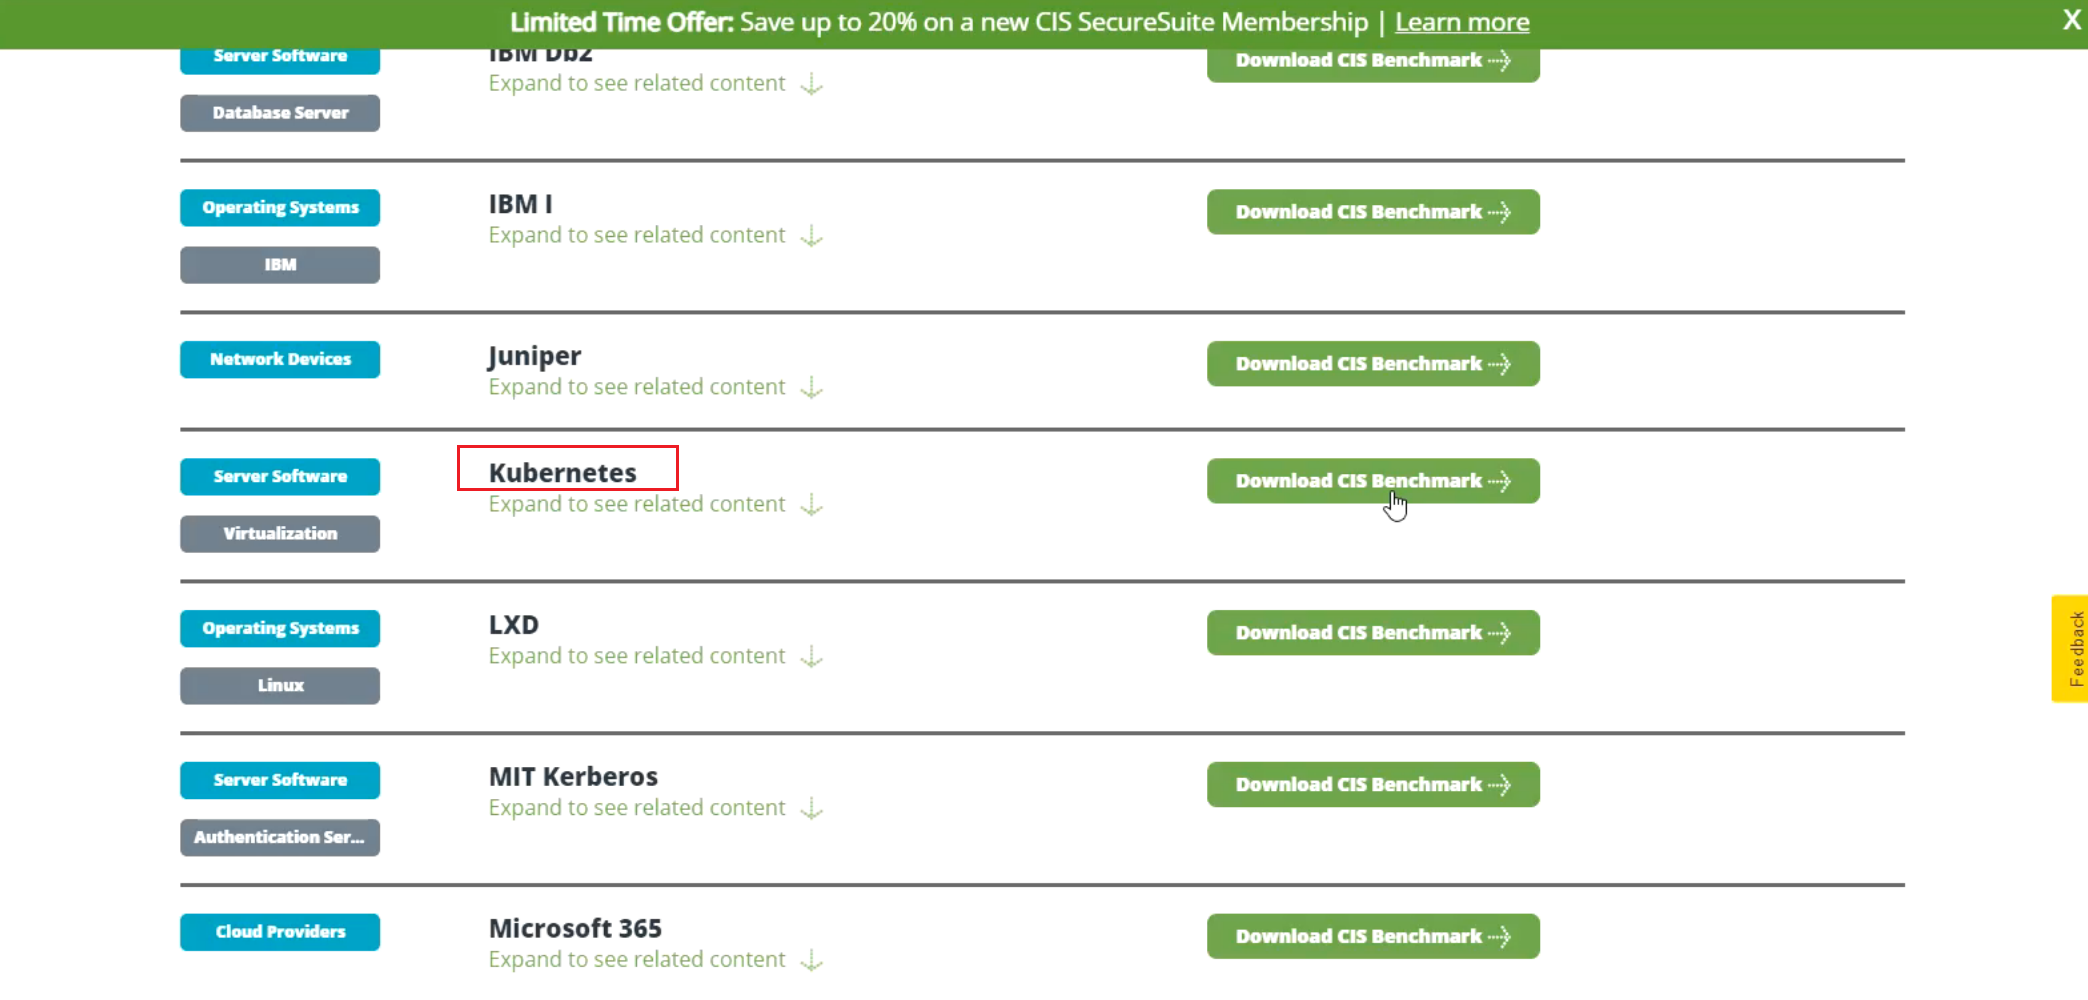
已经下载好的pdf如下:
📌 附件:《CIS_Kubernetes_Benchmark_v1.6.0.pdf》
CIS_Kubernetes_Benchmark_v1.6.0.pdf
下载时需要提供一个邮箱:

CIS基准测试工具
下载pdf后,根据里面的基准来检查K8s集群配置,但内容量太大,一般会采用相关工具来完成这项工作。
Kube-bench是容器安全厂商Aquq推出的工具,以CIS K8s基准作为基础,来检查K8s是否安全部署。
主要查找不安全的配置参数、敏感的文件权限、不安全的帐户或公开端口等等。
项目地址:https://github.com/aquasecurity/kube-bench
kube-bench是用go去写的。
CIS基准测试工具:kube-beach部署
💘 实战:CIS基准测试工具:kube-beach部署(测试成功)-2022.11.13(成功测试)
- 实验环境
1、win10,vmwrokstation虚机;
2、k8s集群:3台centos7.6 1810虚机,2个master节点,1个node节点
   k8s version:v1.20
   CONTAINER-RUNTIME:docker://20.10.7
- 实验软件
kube-bench_0.6.3_linux_amd64.tar.gz
链接:https://pan.baidu.com/s/1Ja2AwjQDs6rzheihN41EpQ?pwd=n2uq
提取码:n2uq

部署过程如下:
1、下载二进制包
https://github.com/aquasecurity/kube-bench/releases
2、解压使用
[root@k8s-master1 ~]#ll -h  kube-bench_0.6.3_linux_amd64.tar.gz
-rw-r--r-- 1 root root 7.7M Jun 13  2021 kube-bench_0.6.3_linux_amd64.tar.gz

[root@k8s-master1 ~]#tar zxf kube-bench_0.6.3_linux_amd64.tar.gz
[root@k8s-master1 ~]#mkdir /etc/kube-bench # 创建默认配置文件路径
[root@k8s-master1 ~]#mv cfg /etc/kube-bench/cfg
[root@k8s-master1 ~]#mv kube-bench /usr/bin/
3、测试
[root@k8s-master1 ~]#kube-bench --help
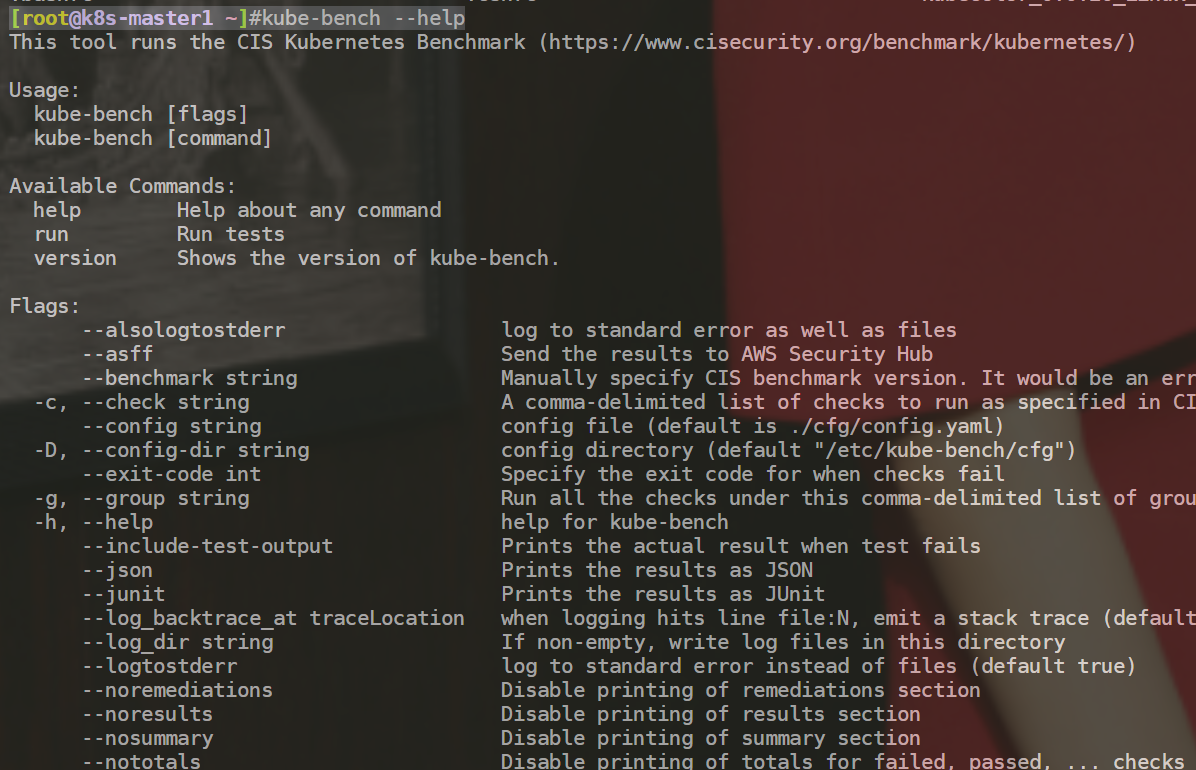
部署完成。😘
CIS基准测试工具:kube-beach使用
使用kube-bench run进行测试,该指令有以下常用参数:
常用参数:
• -s, --targets 指定要基础测试的目标,这个目标需要匹配cfg/中的文件名称,已有目标:master, controlplane, node, etcd, policies
• --version:指定k8s版本,如果未指定会自动检测
• --benchmark:手动指定CIS基准版本,不能与–version一起使用
[外链图片转存失败,源站可能有防盗链机制,建议将图片保存下来直接上传(img-7J6snW3Y-1684674016202)(https://bucket-hg.oss-cn-shanghai.aliyuncs.com/img/1668995190718-43a1d0f2-758e-4e1f-91d3-a8bf97843dc4.png)]
ls /etc/kube-bench/cfg/

目前通常使用的是:1.6.0版本。
ls /etc/kube-bench/cfg/cis-1.6/

案例:检查master组件安全配置
kube-bench run --targets=master
执行后会逐个检查安全配置并输出修复方案及汇总信息输出:
[PASS]:测试通过
[FAIL]:测试未通过,重点关注,在测试结果会给出修复建议
[WARN]:警告,可做了解
[INFO]:信息
🍀 测试过程:
[root@k8s-master1 ~]#kube-bench run --targets=master
CIS基准测试:
[外链图片转存失败,源站可能有防盗链机制,建议将图片保存下来直接上传(img-6m0Wq8iQ-1684674016203)(https://bucket-hg.oss-cn-shanghai.aliyuncs.com/img/1668996513966-ab937794-d39a-4dc6-a55b-35adb3341bd9.png)]
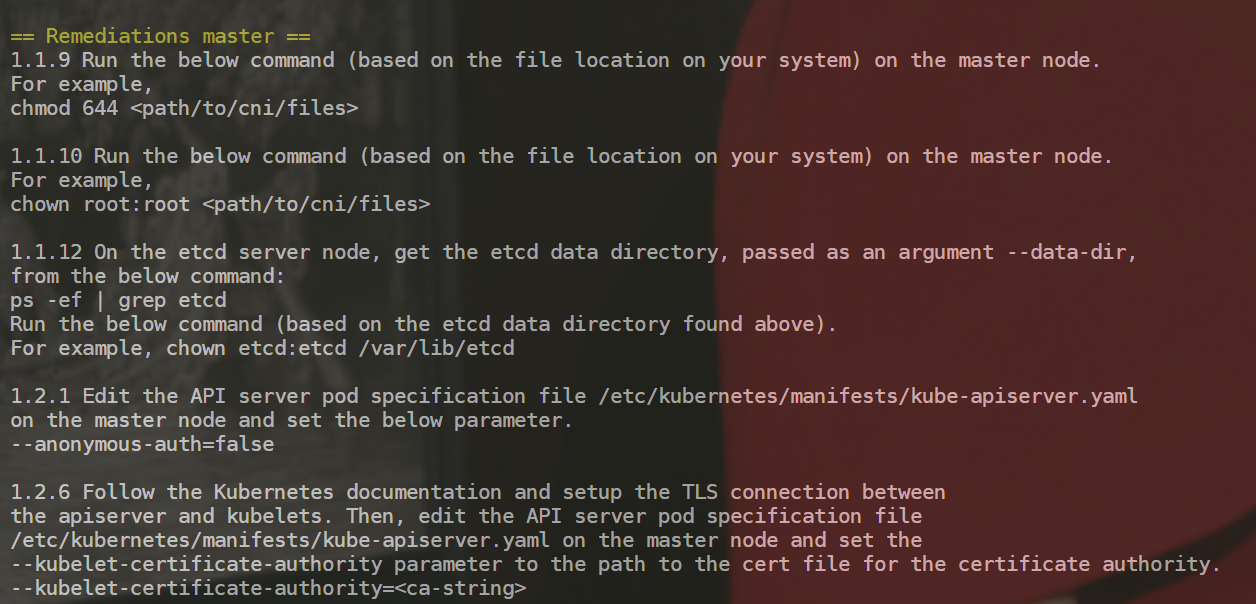
修复建议:
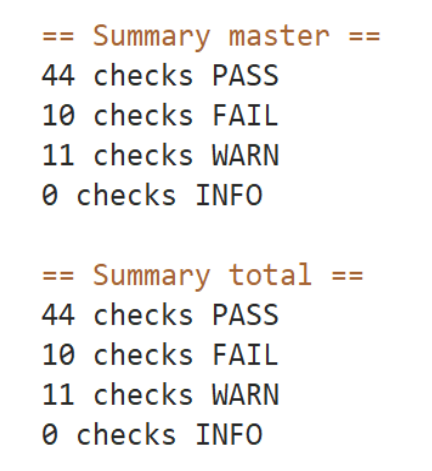
汇总信息:
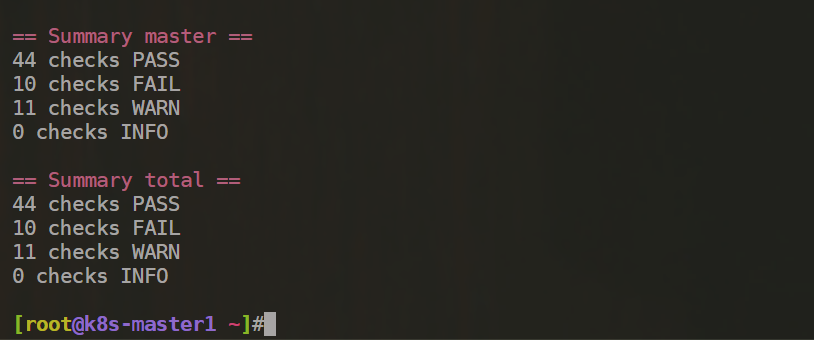
注意:这个检查项就是按这个CIS_Kubernetes_Benchmark_v1.6.0.pdf上来做的配置。

🍀 找出FAILED的配置项:
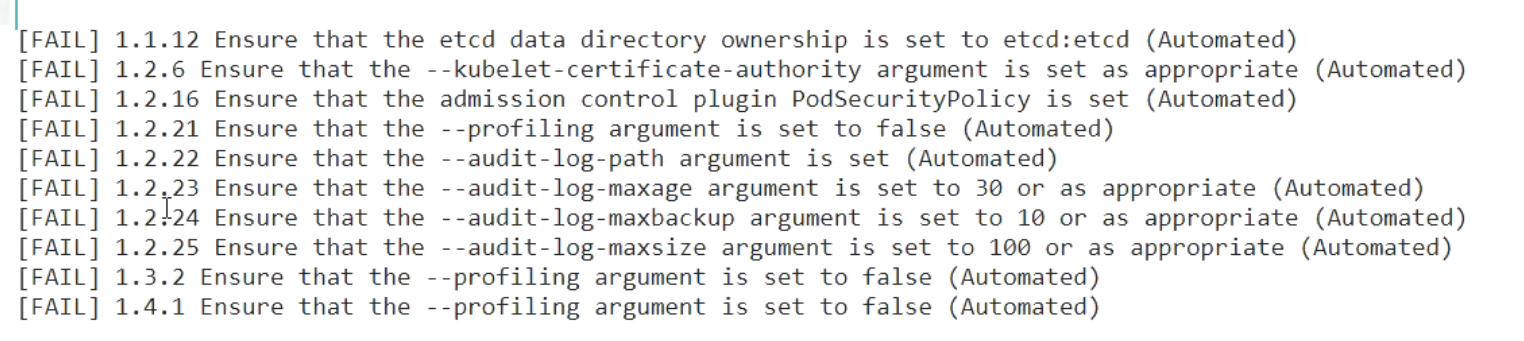
[FAIL]  1.1.12 Ensure that the etcd data directory ownership is set to etcd:etcd (Automated)
[FAIL]  1.2.6 Ensure that the --kubelet-certificate-authority argument is set as appropriate (Automated) #不太熟,忽略掉。
[FAIL]  1.2.16 Ensure that the admission control plugin PodSecurityPolicy is set (Automated) #后面会单独讲解。
[FAIL]  1.2.21 Ensure that the --profiling argument is set to false (Automated) #pprod 性能分析程序,go语言。默认是打开的。

#审计日志
[FAIL]  1.2.22 Ensure that the --audit-log-path argument is set (Automated)
[FAIL]  1.2.23 Ensure that the --audit-log-maxage argument is set to 30 or as appropriate (Automated)
[FAIL]  1.2.24 Ensure that the --audit-log-maxbackup argument is set to 10 or as appropriate (Automated)
[FAIL]  1.2.25 Ensure that the --audit-log-maxsize argument is set to 100 or as appropriate (Automated)

[FAIL]  1.3.2 Ensure that the --profiling argument is set to false (Automated)
[FAIL]  1.4.1 Ensure that the --profiling argument is set to false (Automated)
- 检查项
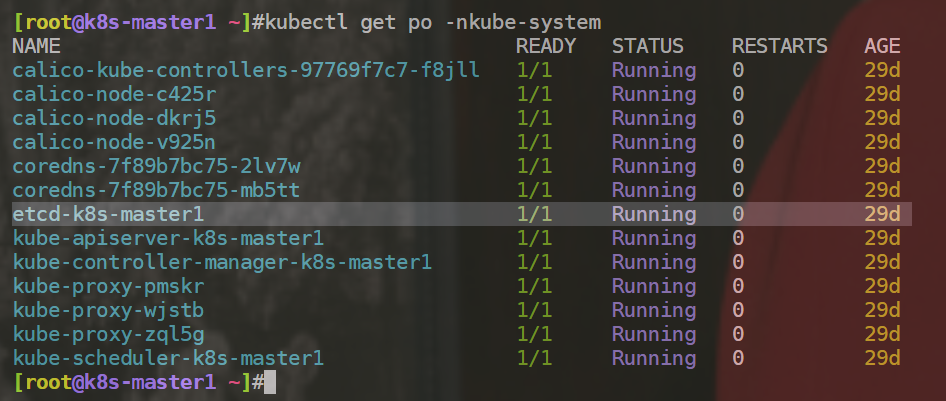
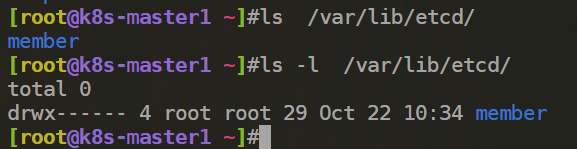
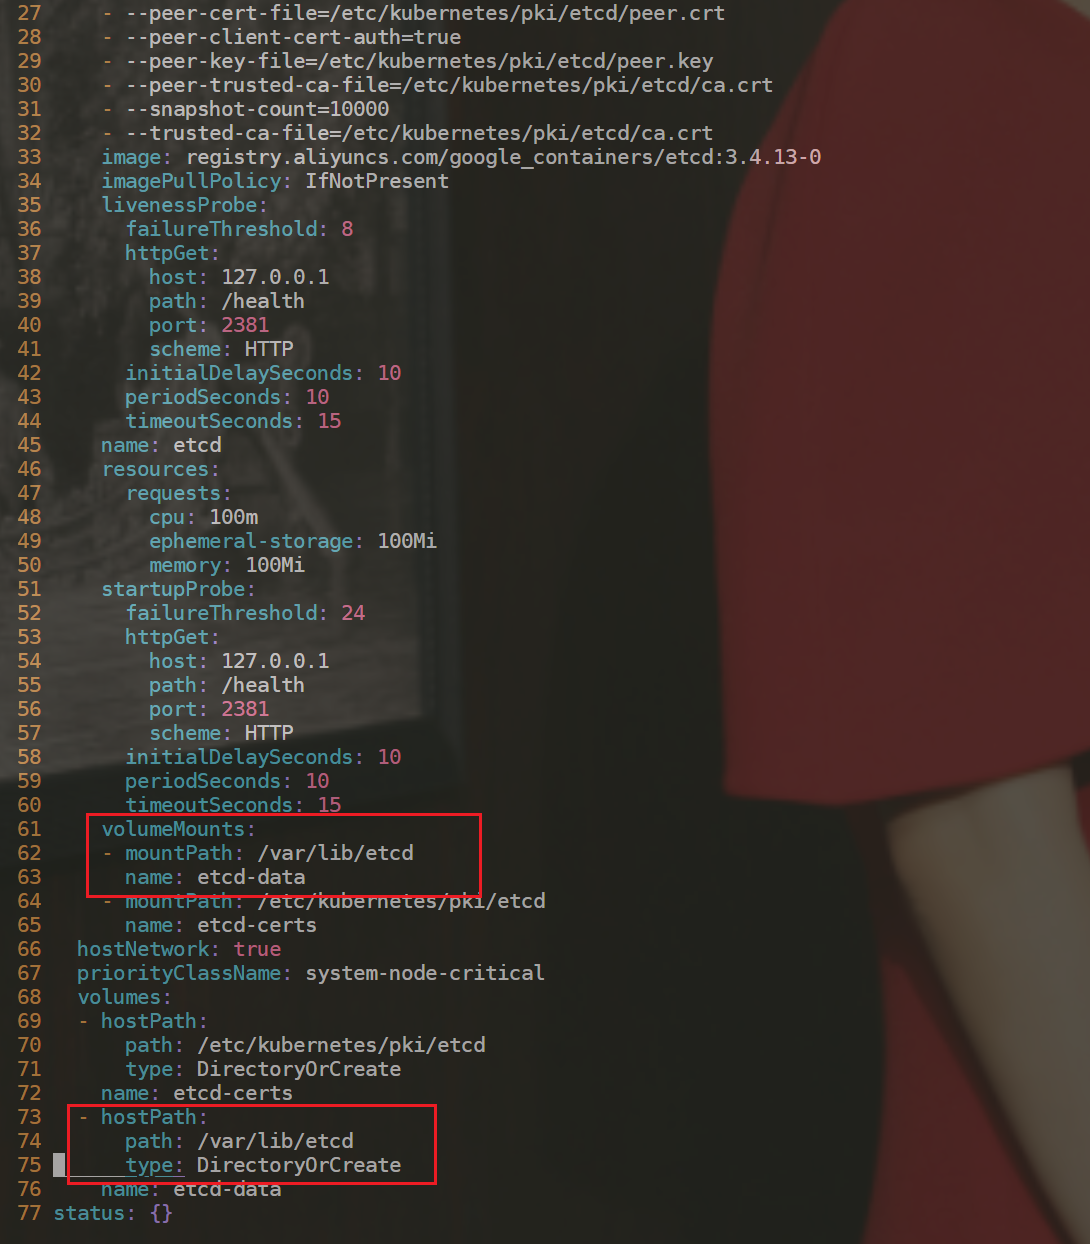
因为当前k8s环境的etcd是通过静态pod启动起来的,因此这个检查项可忽略。
[FAIL] 1.1.12 Ensure that the etcd data directory ownership is set to etcd:etcd (Automated)

- 进一步测试
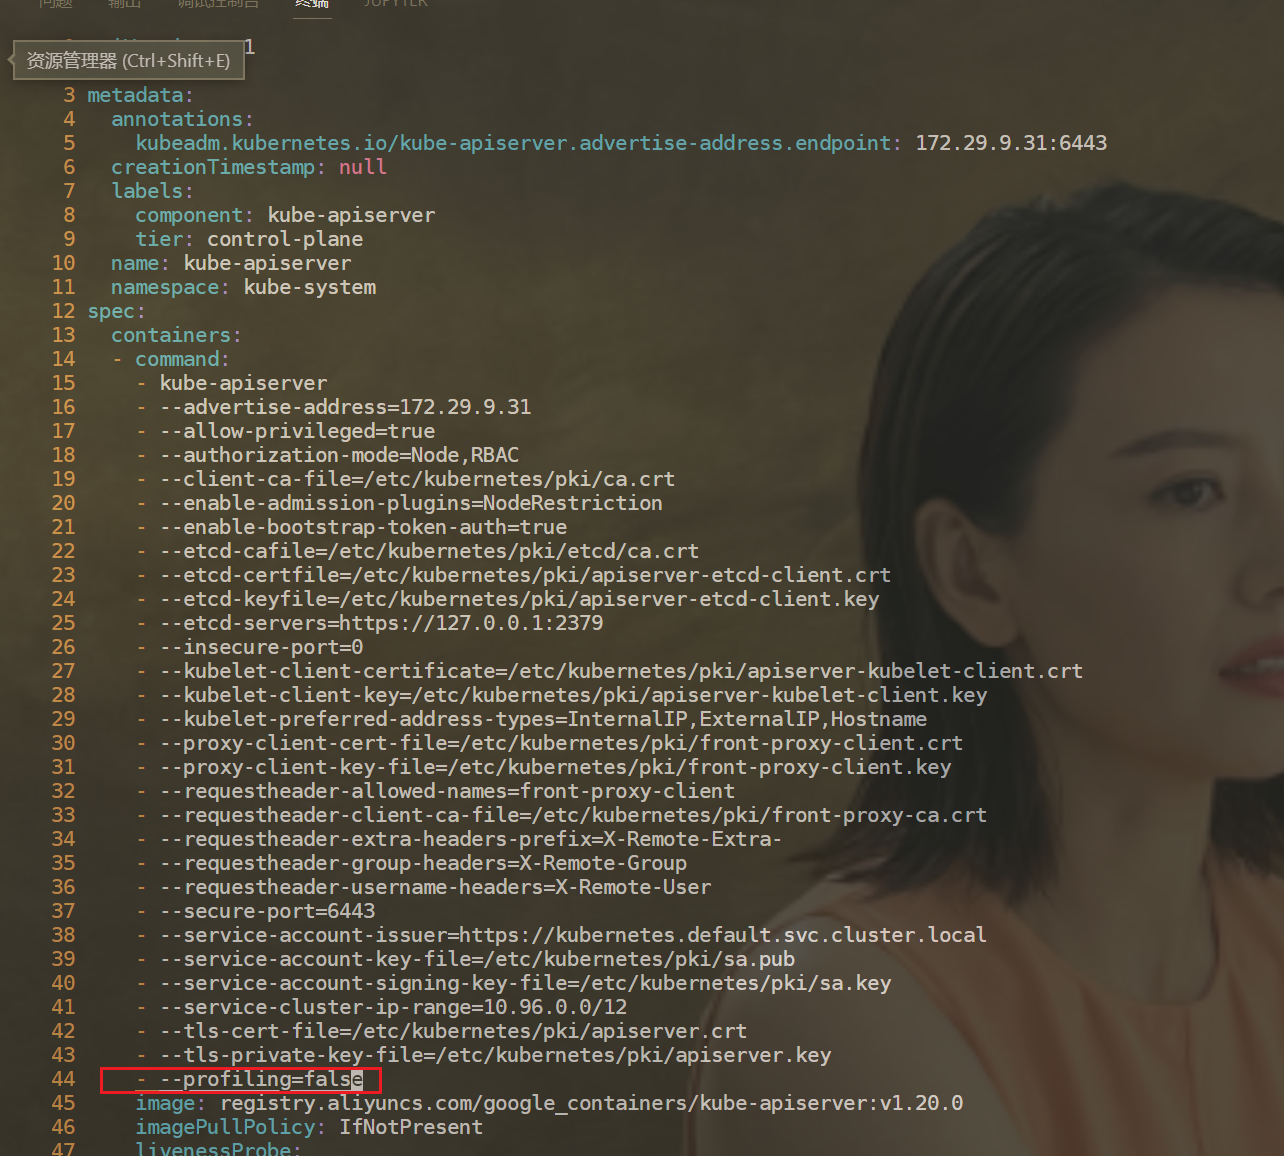
[FAIL]  1.2.21 Ensure that the --profiling argument is set to false (Automated) #pprod 性能分析程序,go语言。默认是打开的。

#建议配置如下
1.2.21 Edit the API server pod specification file /etc/kubernetes/manifests/kube-apiserver.yaml
on the master node and set the below parameter.
--profiling=false
开始配置:
[root@k8s-master1 ~]#vim /etc/kubernetes/manifests/kube-apiserver.yaml
配置完/etc/kubernetes/manifests/kube-apiserver.yaml配置文件后,可以看到kube-apiserver-k8s-master1pod发生了重启,此时kubelet也是活动的。(这里是不用重启kublet服务的)
[外链图片转存失败,源站可能有防盗链机制,建议将图片保存下来直接上传(img-lEllhzGa-1684674016205)(https://bucket-hg.oss-cn-shanghai.aliyuncs.com/img/1669160169865-5c76df48-9edc-4de8-aeb6-140bd4401726.png)]
[外链图片转存失败,源站可能有防盗链机制,建议将图片保存下来直接上传(img-ePvuPn1k-1684674016205)(https://bucket-hg.oss-cn-shanghai.aliyuncs.com/img/1669160181668-9ed3c76d-a5e3-4e00-b453-4fffd6d7b0df.png)]
此时,我们再次运行下kube-bench run --targets=master命令,观察现象:
可以看到,原来的1.2.21选项此时的检查结果为PASS了,符合预期。
[外链图片转存失败,源站可能有防盗链机制,建议将图片保存下来直接上传(img-6ft2WzIY-1684674016206)(https://bucket-hg.oss-cn-shanghai.aliyuncs.com/img/1669160397840-e8705025-c241-40a7-8457-ec4f581359a7.png)]
配置完成。😘
例如:检查node组件安全配置
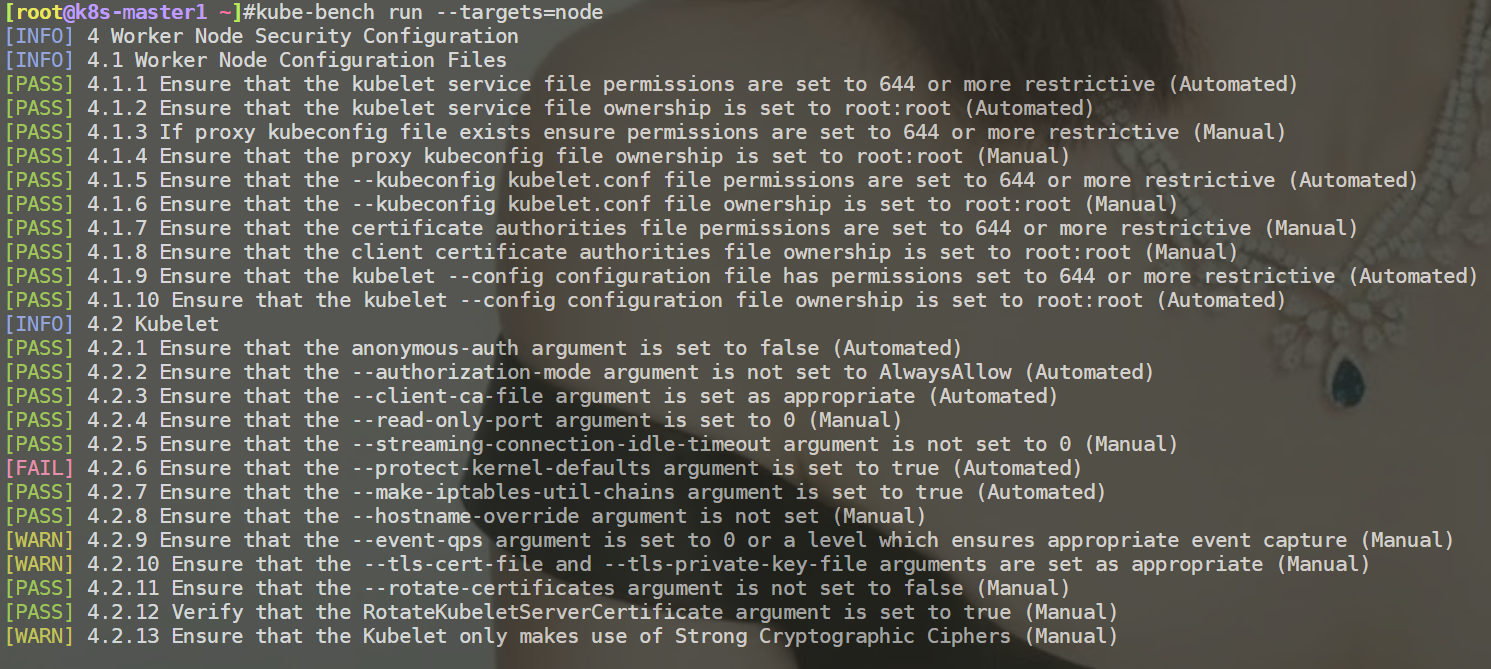
检查node时,会重点检查这个kubelet。
[root@k8s-master1 ~]#kube-bench run --targets=node
[INFO] 4 Worker Node Security Configuration
[INFO] 4.1 Worker Node Configuration Files
[PASS] 4.1.1 Ensure that the kubelet service file permissions are set to 644 or more restrictive (Automated)
[PASS] 4.1.2 Ensure that the kubelet service file ownership is set to root:root (Automated)
[PASS] 4.1.3 If proxy kubeconfig file exists ensure permissions are set to 644 or more restrictive (Manual)
[PASS] 4.1.4 Ensure that the proxy kubeconfig file ownership is set to root:root (Manual)
[PASS] 4.1.5 Ensure that the --kubeconfig kubelet.conf file permissions are set to 644 or more restrictive (Automated)
[PASS] 4.1.6 Ensure that the --kubeconfig kubelet.conf file ownership is set to root:root (Manual)
[PASS] 4.1.7 Ensure that the certificate authorities file permissions are set to 644 or more restrictive (Manual)
[PASS] 4.1.8 Ensure that the client certificate authorities file ownership is set to root:root (Manual)
[PASS] 4.1.9 Ensure that the kubelet --config configuration file has permissions set to 644 or more restrictive (Automated)
[PASS] 4.1.10 Ensure that the kubelet --config configuration file ownership is set to root:root (Automated)
[INFO] 4.2 Kubelet
[PASS] 4.2.1 Ensure that the anonymous-auth argument is set to false (Automated)
[PASS] 4.2.2 Ensure that the --authorization-mode argument is not set to AlwaysAllow (Automated)
[PASS] 4.2.3 Ensure that the --client-ca-file argument is set as appropriate (Automated)
[PASS] 4.2.4 Ensure that the --read-only-port argument is set to 0 (Manual)
[PASS] 4.2.5 Ensure that the --streaming-connection-idle-timeout argument is not set to 0 (Manual)
[FAIL] 4.2.6 Ensure that the --protect-kernel-defaults argument is set to true (Automated)
[PASS] 4.2.7 Ensure that the --make-iptables-util-chains argument is set to true (Automated)
[PASS] 4.2.8 Ensure that the --hostname-override argument is not set (Manual)
[WARN] 4.2.9 Ensure that the --event-qps argument is set to 0 or a level which ensures appropriate event capture (Manual)
[WARN] 4.2.10 Ensure that the --tls-cert-file and --tls-private-key-file arguments are set as appropriate (Manual)
[PASS] 4.2.11 Ensure that the --rotate-certificates argument is not set to false (Manual)
[PASS] 4.2.12 Verify that the RotateKubeletServerCertificate argument is set to true (Manual)
[WARN] 4.2.13 Ensure that the Kubelet only makes use of Strong Cryptographic Ciphers (Manual)

== Remediations node ==
4.2.6 If using a Kubelet config file, edit the file to set protectKernelDefaults: true.
If using command line arguments, edit the kubelet service file
/lib/systemd/system/kubelet.service on each worker node and
set the below parameter in KUBELET_SYSTEM_PODS_ARGS variable.
--protect-kernel-defaults=true
Based on your system, restart the kubelet service. For example:
systemctl daemon-reload
systemctl restart kubelet.service

4.2.9 If using a Kubelet config file, edit the file to set eventRecordQPS: to an appropriate level.
If using command line arguments, edit the kubelet service file
/lib/systemd/system/kubelet.service on each worker node and
set the below parameter in KUBELET_SYSTEM_PODS_ARGS variable.
Based on your system, restart the kubelet service. For example:
systemctl daemon-reload
systemctl restart kubelet.service

4.2.10 If using a Kubelet config file, edit the file to set tlsCertFile to the location
of the certificate file to use to identify this Kubelet, and tlsPrivateKeyFile
to the location of the corresponding private key file.
If using command line arguments, edit the kubelet service file
/lib/systemd/system/kubelet.service on each worker node and
set the below parameters in KUBELET_CERTIFICATE_ARGS variable.
--tls-cert-file=<path/to/tls-certificate-file>
--tls-private-key-file=<path/to/tls-key-file>
Based on your system, restart the kubelet service. For example:
systemctl daemon-reload
systemctl restart kubelet.service

4.2.13 If using a Kubelet config file, edit the file to set TLSCipherSuites: to
TLS_ECDHE_ECDSA_WITH_AES_128_GCM_SHA256,TLS_ECDHE_RSA_WITH_AES_128_GCM_SHA256,TLS_ECDHE_ECDSA_WITH_CHACHA20_POLY1305,TLS_ECDHE_RSA_WITH_AES_256_GCM_SHA384,TLS_ECDHE_RSA_WITH_CHACHA20_POLY1305,TLS_ECDHE_ECDSA_WITH_AES_256_GCM_SHA384,TLS_RSA_WITH_AES_256_GCM_SHA384,TLS_RSA_WITH_AES_128_GCM_SHA256
or to a subset of these values.
If using executable arguments, edit the kubelet service file
/lib/systemd/system/kubelet.service on each worker node and
set the --tls-cipher-suites parameter as follows, or to a subset of these values.
--tls-cipher-suites=TLS_ECDHE_ECDSA_WITH_AES_128_GCM_SHA256,TLS_ECDHE_RSA_WITH_AES_128_GCM_SHA256,TLS_ECDHE_ECDSA_WITH_CHACHA20_POLY1305,TLS_ECDHE_RSA_WITH_AES_256_GCM_SHA384,TLS_ECDHE_RSA_WITH_CHACHA20_POLY1305,TLS_ECDHE_ECDSA_WITH_AES_256_GCM_SHA384,TLS_RSA_WITH_AES_256_GCM_SHA384,TLS_RSA_WITH_AES_128_GCM_SHA256
Based on your system, restart the kubelet service. For example:
systemctl daemon-reload
systemctl restart kubelet.service


== Summary node ==
19 checks PASS
1 checks FAIL
3 checks WARN
0 checks INFO

== Summary total ==
19 checks PASS
1 checks FAIL
3 checks WARN
0 checks INFO

[root@k8s-master1 ~]#
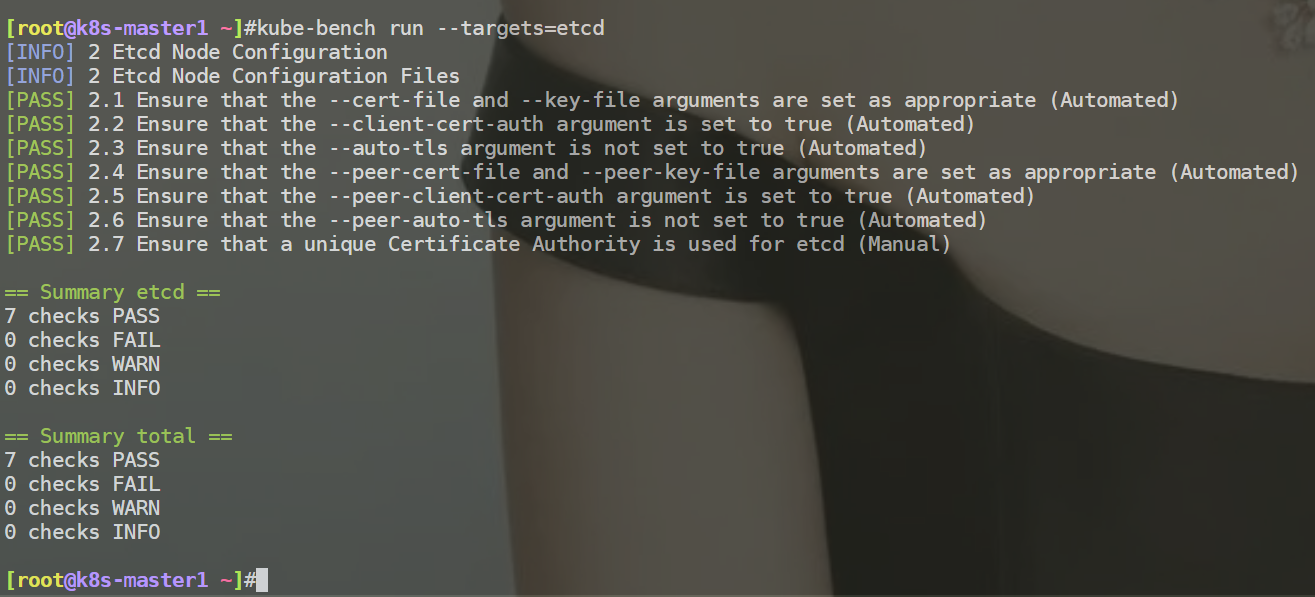
例如:检查etcd组件安全配置
案例:如何跳过检查项
测试项目配置文件:/etc/kube-bench/cfg/cis-1.6/
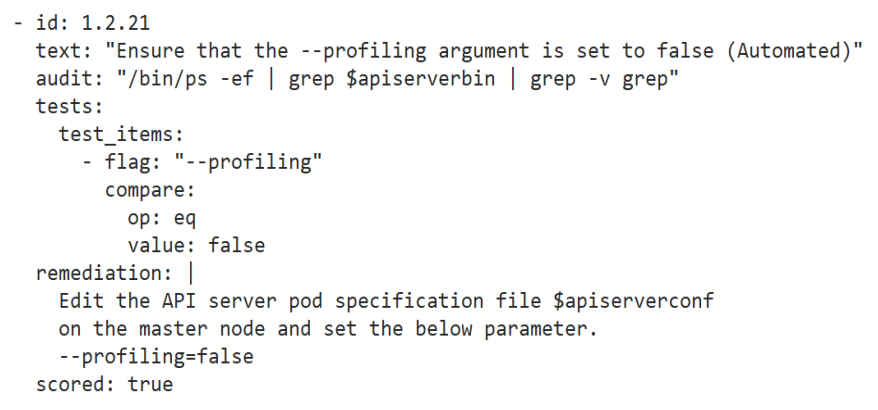
• id:编号

• text:提示的文本
• audit:
• tests:测试项目
• remediation:修复方案
• scored:如果为true,kube-bench无法正常测试,则会生成FAIL,如果为false,无法正常测试,则会
生成WARN。#如果设置为false,则会生成WARN。
• type:如果为manual则会生成WARN,如果为skip,则会生成INFO
案例测试:
[root@k8s-master1 ~]#vim /etc/kube-bench/cfg/cis-1.6/master.yaml
[外链图片转存失败,源站可能有防盗链机制,建议将图片保存下来直接上传(img-kU45GJnF-1684674016207)(https://bucket-hg.oss-cn-shanghai.aliyuncs.com/img/1669426521536-b1f02a55-7e2c-4f3c-b775-12167086036f.png)]
kube-bench run --targets=mster的检测未通过项。
[FAIL]  1.1.12 Ensure that the etcd data directory ownership is set to etcd:etcd (Automated)
[FAIL]  1.2.6 Ensure that the --kubelet-certificate-authority argument is set as appropriate (Automated) #不太熟,忽略掉。
[FAIL]  1.2.16 Ensure that the admission control plugin PodSecurityPolicy is set (Automated) #后面会单独讲解。
[FAIL]  1.2.21 Ensure that the --profiling argument is set to false (Automated) #pprod 性能分析程序,go语言。默认是打开的。

#审计日志
[FAIL]  1.2.22 Ensure that the --audit-log-path argument is set (Automated)
[FAIL]  1.2.23 Ensure that the --audit-log-maxage argument is set to 30 or as appropriate (Automated)
[FAIL]  1.2.24 Ensure that the --audit-log-maxbackup argument is set to 10 or as appropriate (Automated)
[FAIL]  1.2.25 Ensure that the --audit-log-maxsize argument is set to 100 or as appropriate (Automated)

[FAIL]  1.3.2 Ensure that the --profiling argument is set to false (Automated)
[FAIL]  1.4.1 Ensure that the --profiling argument is set to false (Automated)
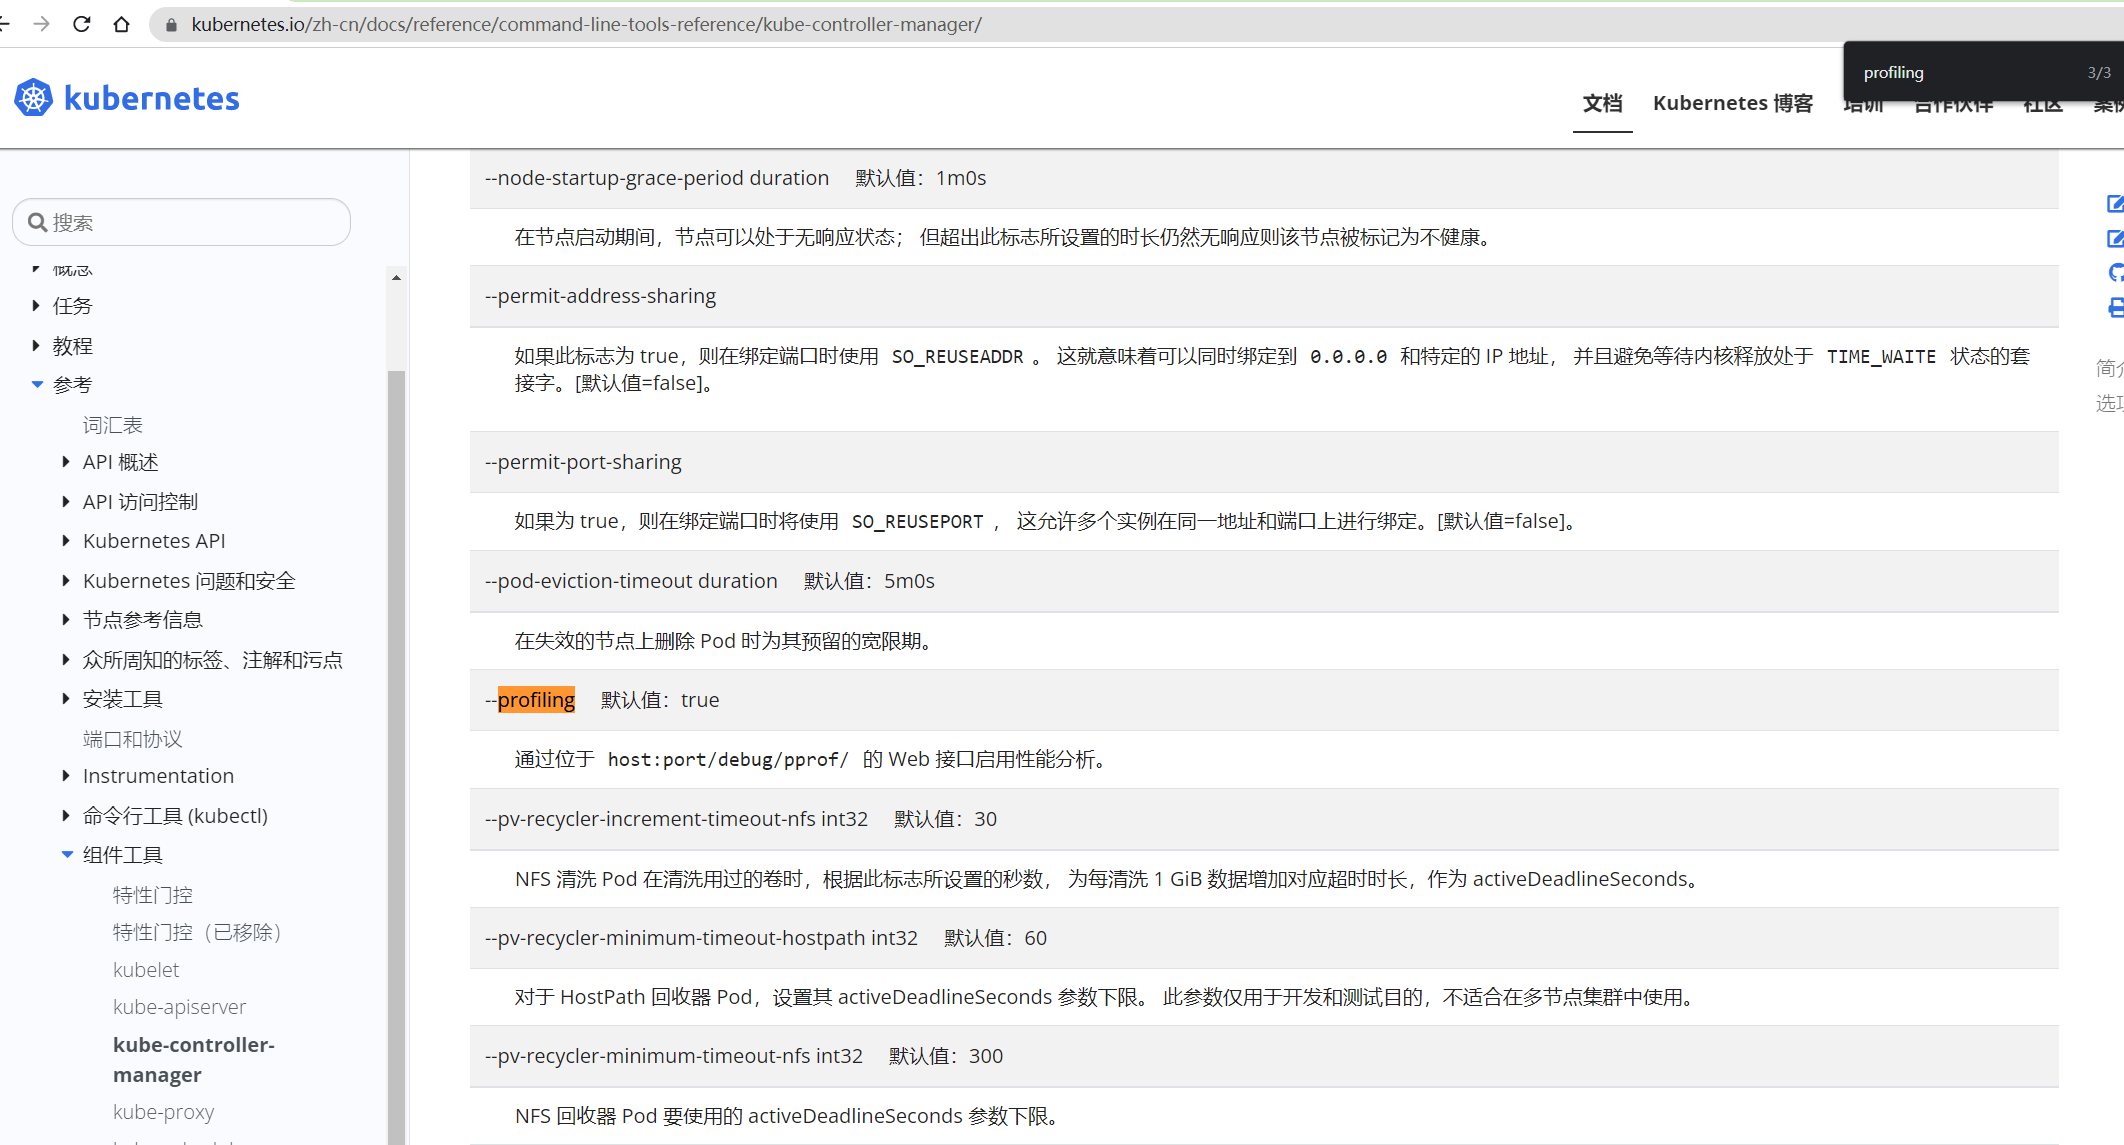
我们可以看一下官网:
kube-controller-manager和kube-apiserver的这个profiling功能还没弃用,但是kube-scheduler的这个profiling功能已经被弃用了;
但是这个kube-bench这个脚本的检测程序还在,说明kube-bench并没有及时地区更新;
 [外链图片转存失败,源站可能有防盗链机制,建议将图片保存下来直接上传(img-ZMsHaTzl-1684674016208)(https://bucket-hg.oss-cn-shanghai.aliyuncs.com/img/1669426860102-b26518ce-6f36-43a8-a35d-0d53fa3c4f60.png)]
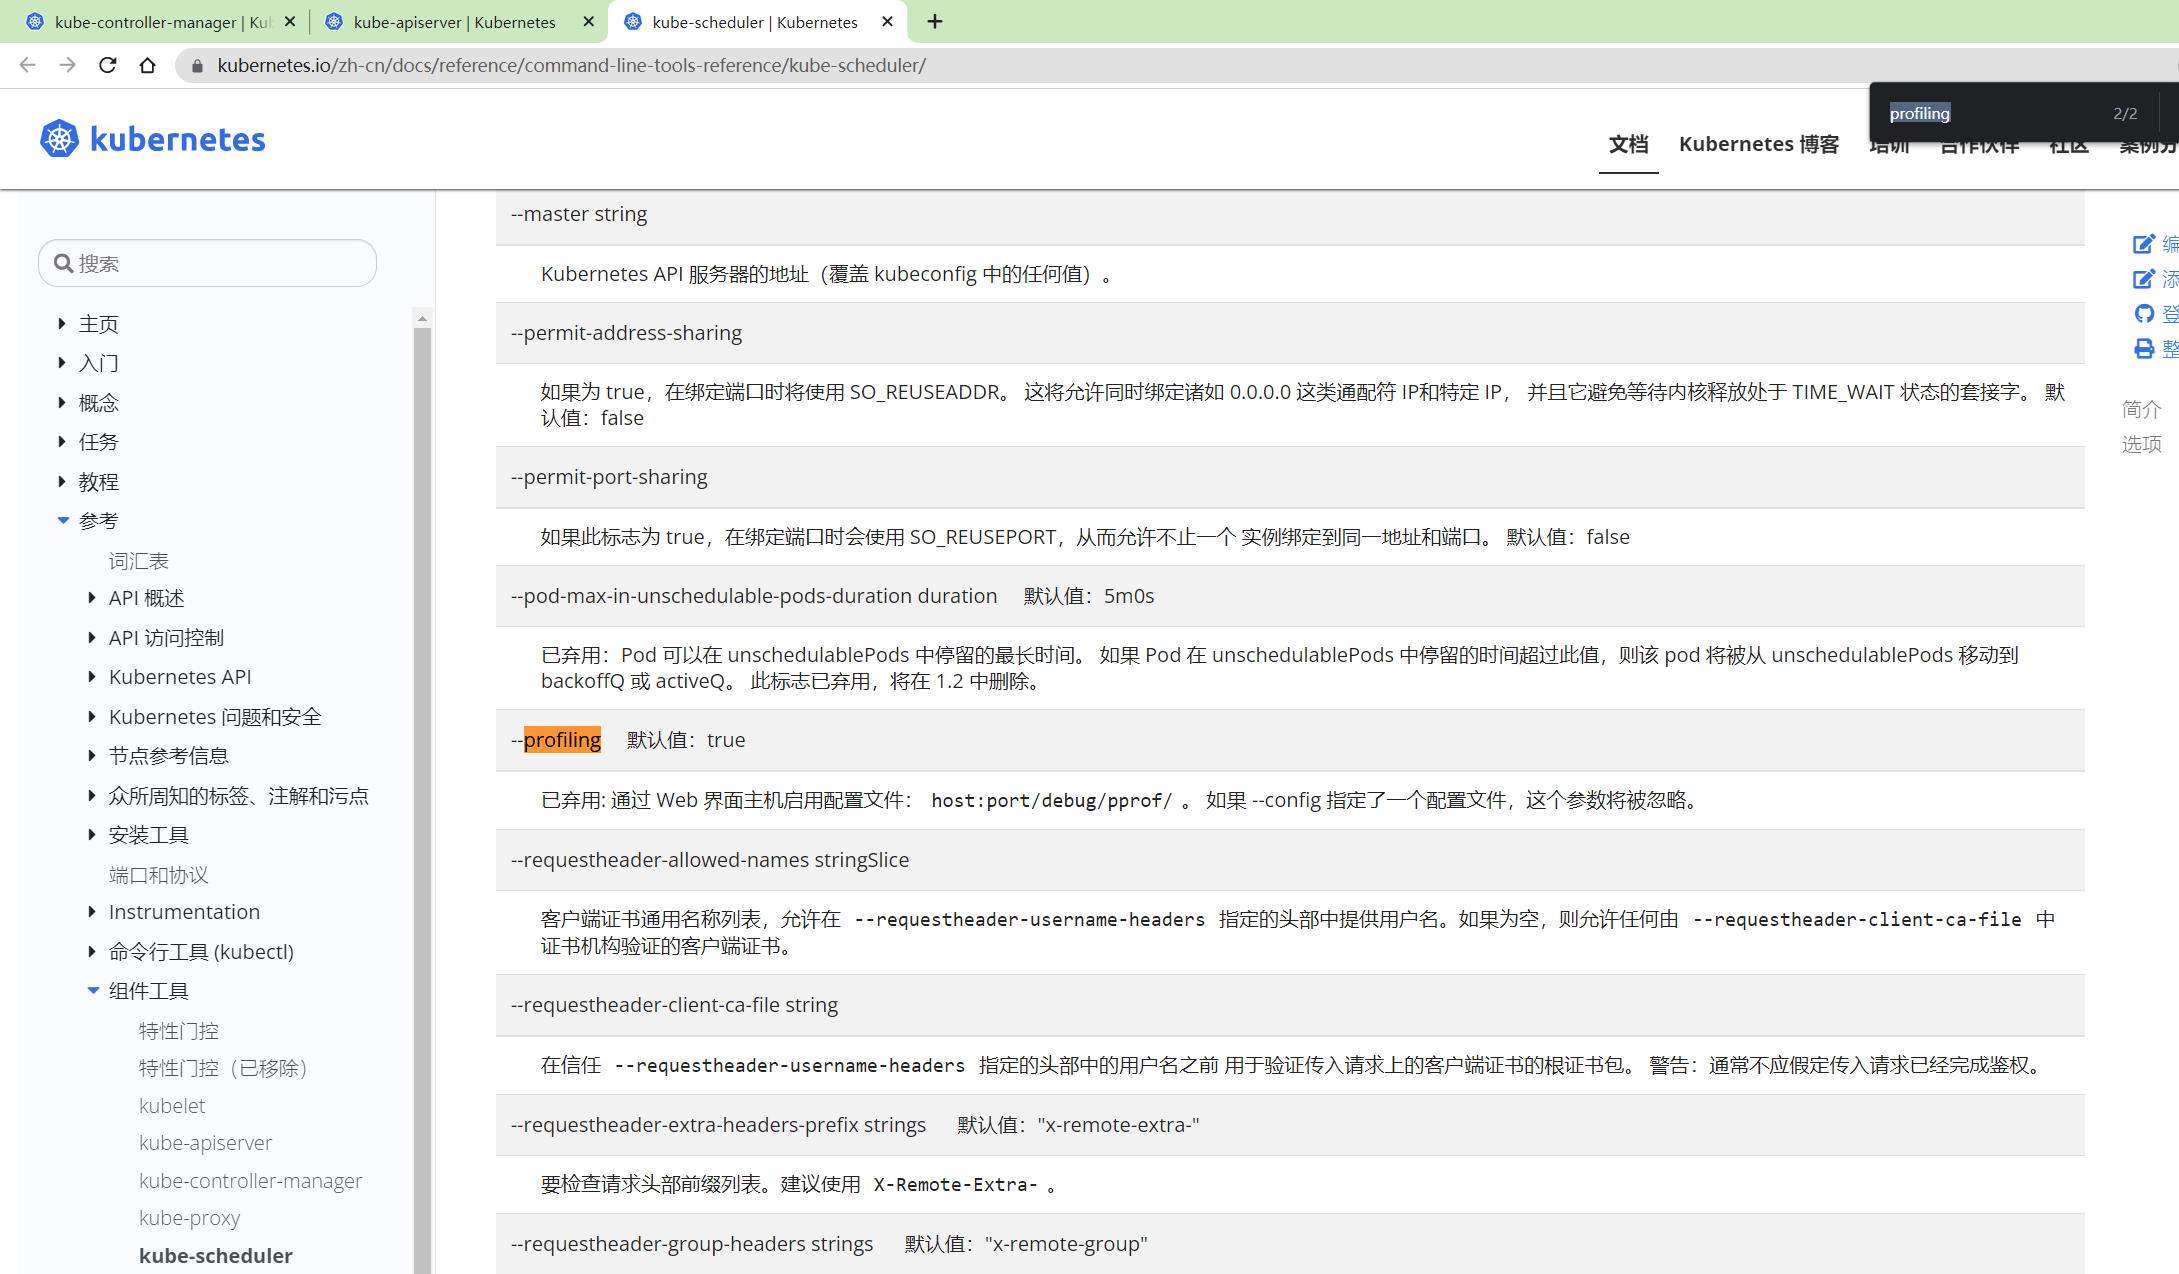
此时,想要把kube-scheduler组件的profiling检查项给忽略掉,该怎么办呢?
因此需要用到如下选项:type:如果为manual则会生成WARN,如果为skip,则会生成INFO
[root@k8s-master1 ~]#vim /etc/kube-bench/cfg/cis-1.6/master.yaml
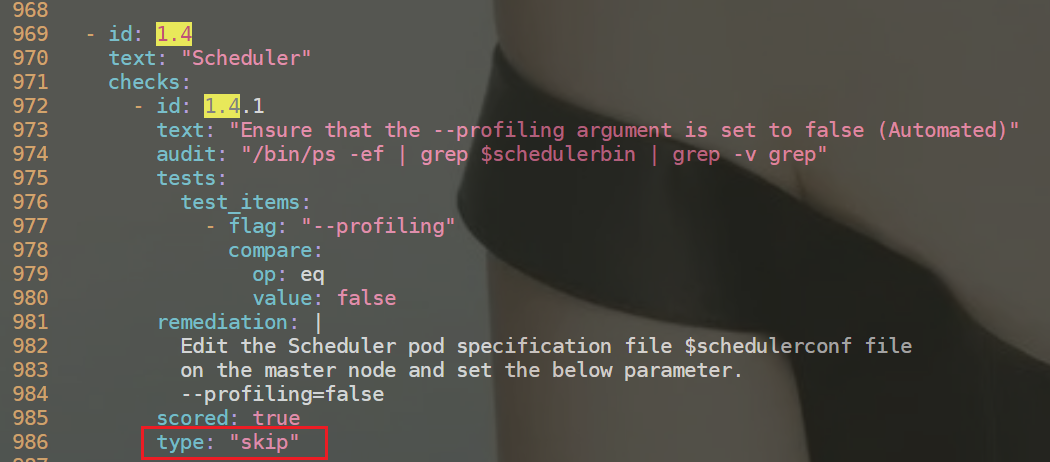
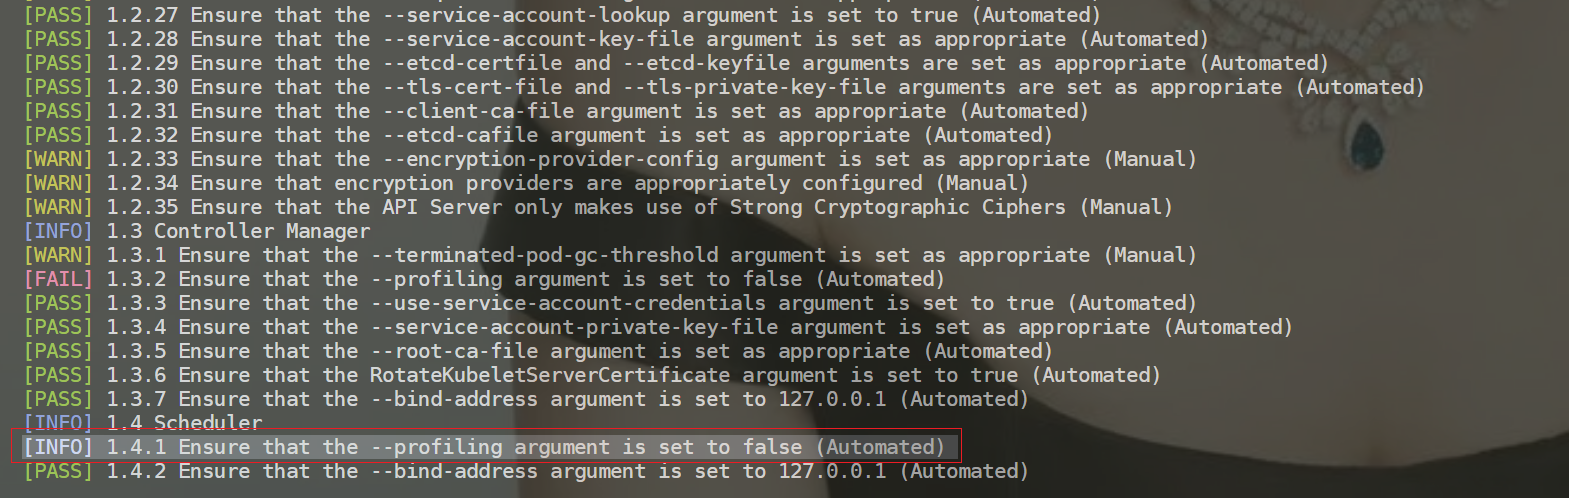
再次执行kube-bench run --targets=master,可以看到1.4.1检查项此时为INFO了;
测试结束。😘
注意事项
[FAIL]  1.1.12 Ensure that the etcd data directory ownership is set to etcd:etcd (Automated)
[FAIL]  1.2.6 Ensure that the --kubelet-certificate-authority argument is set as appropriate (Automated) #不太熟,忽略掉。
[FAIL]  1.2.16 Ensure that the admission control plugin PodSecurityPolicy is set (Automated) #后面会单独讲解。PodSecurityPolicy这个本来就是个独立的功能,可用可不用;
[FAIL]  1.2.21 Ensure that the --profiling argument is set to false (Automated) #pprod 性能分析程序,go语言。默认是打开的。

#审计日志
[FAIL]  1.2.22 Ensure that the --audit-log-path argument is set (Automated)
[FAIL]  1.2.23 Ensure that the --audit-log-maxage argument is set to 30 or as appropriate (Automated)
[FAIL]  1.2.24 Ensure that the --audit-log-maxbackup argument is set to 10 or as appropriate (Automated)
[FAIL]  1.2.25 Ensure that the --audit-log-maxsize argument is set to 100 or as appropriate (Automated)

[FAIL]  1.3.2 Ensure that the --profiling argument is set to false (Automated)
[FAIL]  1.4.1 Ensure that the --profiling argument is set to false (Automated)
-
一般在master上是可以检查node的;(当然直接在node节点安装kube-bench跑程序也是可以的)
-
例如有3个master节点,只需要在1个master节点执行检查项就行,然后在all master节点配置相同的加固箱就好;(同样,node加固项也是需要做相同的操作)
-
可以以json格式输出的:
kube-bench run --help,--json Prints the results as JSON。
3、Ingress配置HTTPS证书安全通信
(见其它章节)
4、网络策略
网络策略介绍
默认情况下,Kubernetes 集群网络没任何网络限制,Pod 可以与任何其他Pod通信,在某些场景下就需要进行网络控制,减少网络攻击面,提高安全性,这就会用到网络策略。
网络策略(Network Policy):是一个K8s资源,用于限制Pod出入流量,提供Pod级别和Namespace级别网络访问控制。
默认情况,k8集群里,Pod和Pod,Node和Pod之间都是可以随意通信的。
网络策略的应用场景:
- 应用程序间的访问控制,例如项目A不能访问项目B的Pod
- 开发环境命名空间不能访问测试环境命名空间Pod
- 当Pod暴露到外部时,需要做Pod白名单
- 多租户网络环境隔离
网络策略:yaml文件示例
apiVersion: networking.k8s.io/v1
kind: NetworkPolicy
metadata:
  name: test-network-policy
  namespace: default
spec:
  podSelector:
    matchLabels:
      role: db
  policyTypes:
  - Ingress
  - Egress
  ingress:
  - from:
    - ipBlock:
        cidr: 172.17.0.0/16
        except:
        - 172.17.1.0/24
    - namespaceSelector:
        matchLabels:
          project: myproject
    - podSelector:
        matchLabels:
          role: frontend
    ports:
    - protocol: TCP
      port: 6379
  egress:
  - to:
    - ipBlock:
        cidr: 10.0.0.0/24
    ports:
    - protocol: TCP
      port: 5978
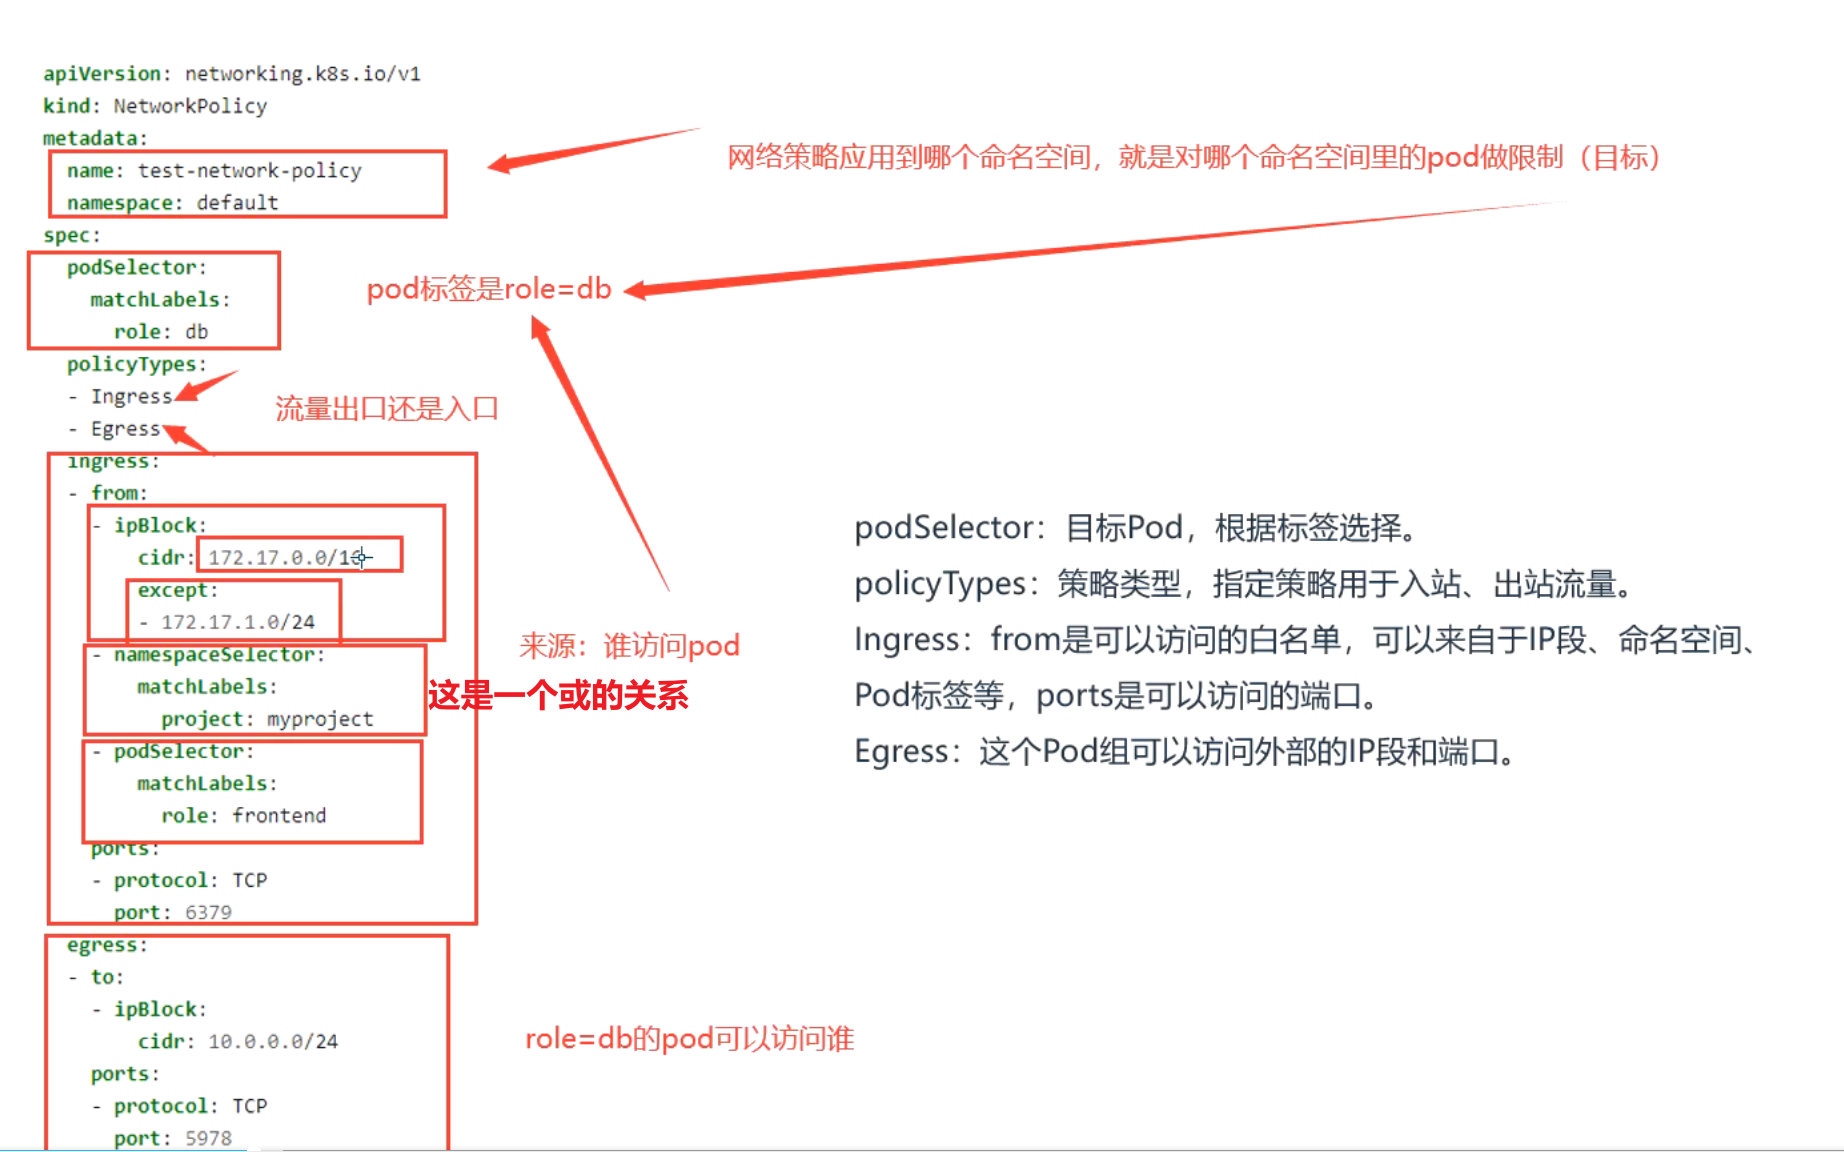
podSelector:目标Pod,根据标签选择。
policyTypes:策略类型,指定策略用于入站、出站流量。
Ingress:from是可以访问的白名单,可以来自于IP段、命名空间、Pod标签等,ports是可以访问的端口。
Egress:这个Pod组可以访问外部的IP段和端口。
注意:
{} 代表包括所有
不写ingress或者egress代表默认行为,拒绝所有。
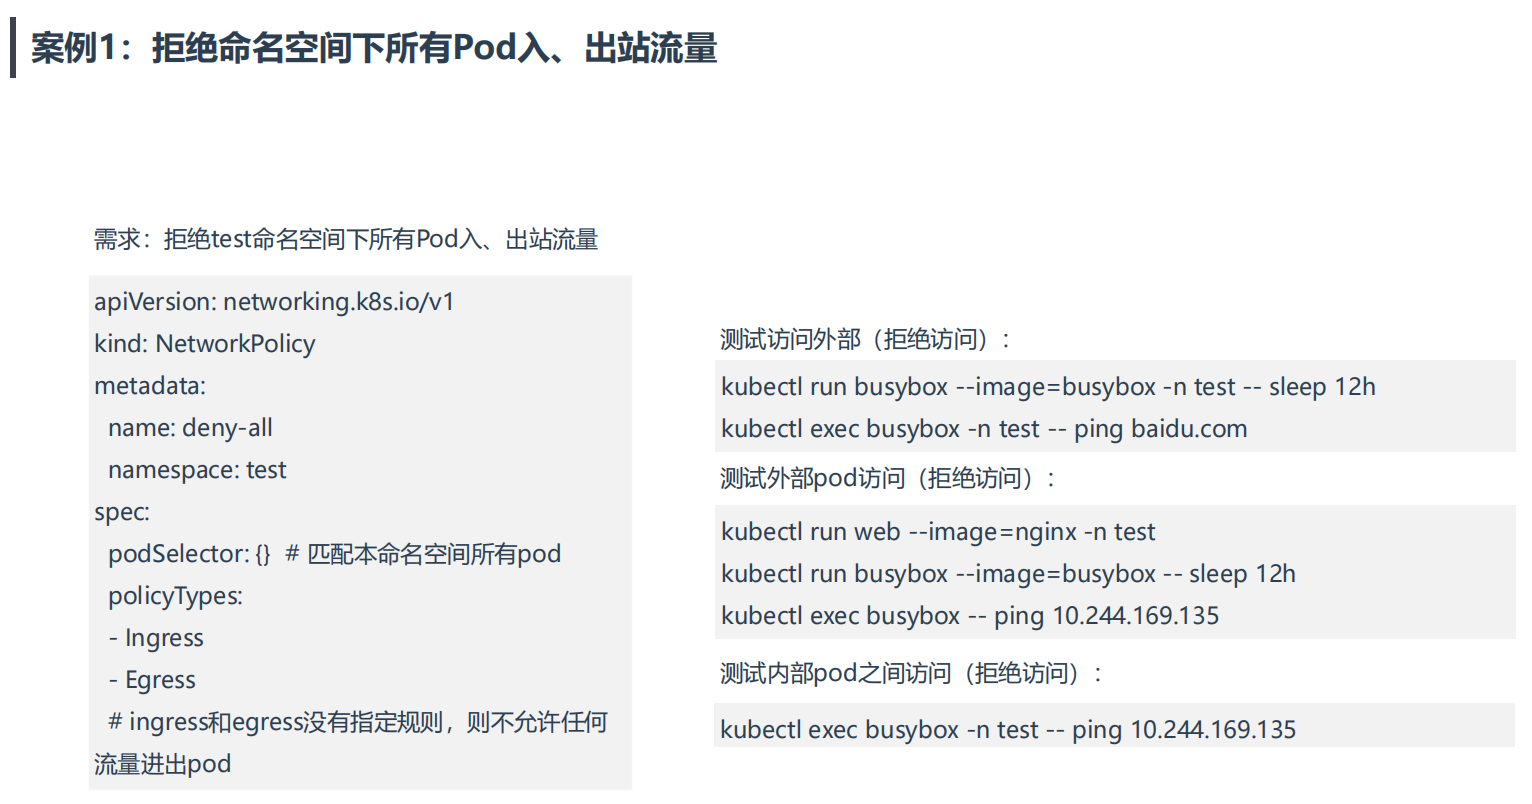
案例1:拒绝命名空间下所有Pod出入站流量
💘 案例:拒绝命名空间下所有Pod出入站流量-2023.1.6(测试成功)
次策略实际过程中不会用到。
- 实验环境
实验环境:
1、win10,vmwrokstation虚机;
2、k8s集群:3台centos7.6 1810虚机,1个master节点,2个node节点
   k8s version:v1.22.2
   containerd://1.5.5
- 实验软件
无。
1、创建测试命名空间和相应pod
(1)创建测试命名空间test
[root@k8s-master1 ~]#kubectl create ns test
namespace/test created

(2)创建相应pod
#在test命名空间下创建2个pod
[root@k8s-master1 ~]#kubectl run busybox-test --image=busybox -n test -- sleep 12h
pod/busybox-test created
[root@k8s-master1 ~]#kubectl run web-test --image=nginx -n test
pod/web-test created
[root@k8s-master1 ~]#kubectl get po -owide -ntest
NAME           READY   STATUS    RESTARTS   AGE   IP               NODE        NOMINATED NODE   READINESS GATES
busybox-test   1/1     Running   0          13s   10.244.36.74     k8s-node1   <none>           <none>
web-test       1/1     Running   0          8s    10.244.169.138   k8s-node2   <none>           <none>

#在default命名空间下创建1个pod
[root@k8s-master1 ~]#kubectl run busybox-default --image=busybox  -- sleep 12h
pod/busybox-default created
[root@k8s-master1 ~]#kubectl get po -owide
NAME              READY   STATUS    RESTARTS   AGE   IP               NODE        NOMINATED NODE   READINESS GATES
busybox-default   1/1     Running   0          5s    10.244.169.140   k8s-node2   <none>           <none>
2、测试k8s默认网络策略
(1)同命名空间下pod是可以互相访问的
[root@k8s-master1 ~]#kubectl exec -it busybox-test -ntest -- sh
/ #
/ # ping 10.244.169.138
PING 10.244.169.138 (10.244.169.138): 56 data bytes
64 bytes from 10.244.169.138: seq=0 ttl=62 time=0.601 ms
64 bytes from 10.244.169.138: seq=1 ttl=62 time=0.393 ms
^C
--- 10.244.169.138 ping statistics ---
2 packets transmitted, 2 packets received, 0% packet loss
round-trip min/avg/max = 0.393/0.497/0.601 ms

(2)不同命名空间下pod是可以互相访问的
[root@k8s-master1 ~]#kubectl exec -it busybox-test -ntest -- sh
/ #
/ # ping 10.244.169.140
PING 10.244.169.140 (10.244.169.140): 56 data bytes
64 bytes from 10.244.169.140: seq=0 ttl=62 time=0.657 ms
^C
--- 10.244.169.140 ping statistics ---
1 packets transmitted, 1 packets received, 0% packet loss
round-trip min/avg/max = 0.657/0.657/0.657 ms

(3)node是可以访问pod地址的
[root@k8s-master1 ~]#ping 10.244.36.74
PING 10.244.36.74 (10.244.36.74) 56(84) bytes of data.
64 bytes from 10.244.36.74: icmp_seq=1 ttl=63 time=0.485 ms
64 bytes from 10.244.36.74: icmp_seq=2 ttl=63 time=0.440 ms
^C
--- 10.244.36.74 ping statistics ---
2 packets transmitted, 2 received, 0% packet loss, time 1000ms
rtt min/avg/max/mdev = 0.440/0.462/0.485/0.031 ms
3、为test命名空间配置网络策略
#deny-all.yaml
apiVersion: networking.k8s.io/v1
kind: NetworkPolicy
metadata:
  name: deny-all
  namespace: test
spec:
  podSelector: {} # 匹配本命名空间所有pod
  policyTypes:
  - Ingress
  - Egress
  # ingress和egress没有指定规则,则不允许任何流量进出pod
部署:
[root@k8s-master1 ~]#kubectl apply -f deny-all.yaml
networkpolicy.networking.k8s.io/deny-all created
[root@k8s-master1 ~]#kubectl get networkpolicy -ntest
NAME       POD-SELECTOR   AGE
deny-all   <none>         21s
4、测试
(1)测试访问外部(拒绝访问):
[root@k8s-master1 ~]#kubectl exec -it busybox-test -n test -- sh
/ #
/ # ping 10.244.169.140
PING 10.244.169.140 (10.244.169.140): 56 data bytes
^C
--- 10.244.169.140 ping statistics ---
4 packets transmitted, 0 packets received, 100% packet loss


(2)测试外部pod访问(拒绝访问):
[root@k8s-master1 ~]#kubectl exec -it busybox-default -- sh
/ #
/ # ping 10.244.36.74
PING 10.244.36.74 (10.244.36.74): 56 data bytes
^C
--- 10.244.36.74 ping statistics ---
4 packets transmitted, 0 packets received, 100% packet loss
/ #


(3)测试内部pod之间访问(拒绝访问):
[root@k8s-master1 ~]#kubectl exec -it busybox-test -n test -- sh
/ #
/ # ping 10.244.169.138
PING 10.244.169.138 (10.244.169.138): 56 data bytes
^C
--- 10.244.169.138 ping statistics ---
4 packets transmitted, 0 packets received, 100% packet loss
/ #
测试结束。😘
案例2:拒绝其他命名空间Pod访问
💘 案例2:拒绝其他命名空间Pod访问-2023.1.6(测试成功)
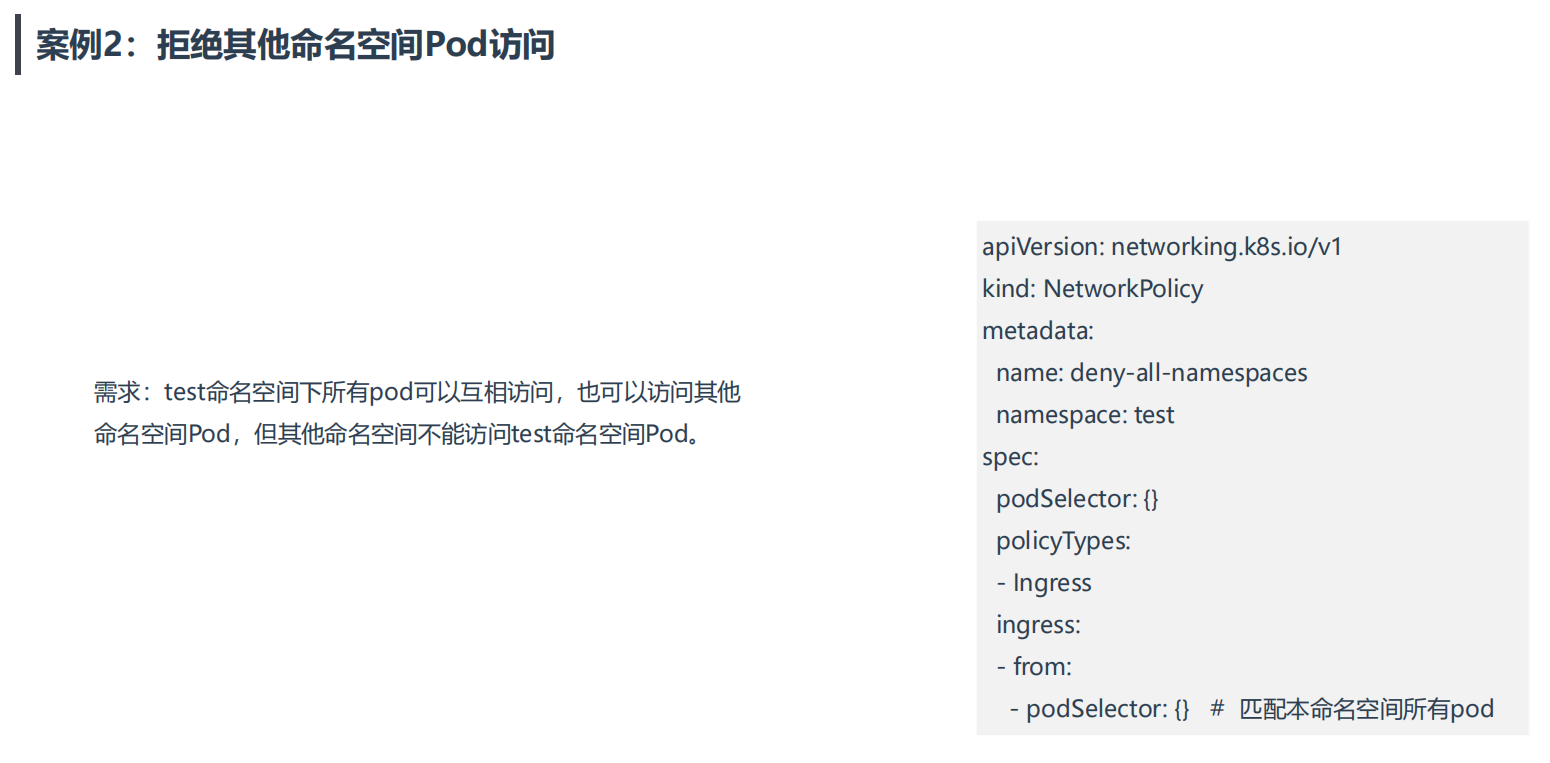
案例2:拒绝其他命名空间Pod访问
需求:test命名空间下所有pod可以互相访问,也可以访问其他命
名空间Pod,但其他命名空间不能访问test命名空间Pod。

apiVersion: networking.k8s.io/v1
kind: NetworkPolicy
metadata:
  name: deny-all-namespaces
  namespace: test
spec:
  podSelector: {} # 未配置,匹配本命名空间所有pod
  policyTypes:
  - Ingress
  ingress:
  - from:
    - podSelector: {} # 未配置,匹配本命名空间所有pod

#说明
一般情况,我们配置的ingress规则会多些,而出规则egress很少去配置的;
- 实验环境
实验环境:
1、win10,vmwrokstation虚机;
2、k8s集群:3台centos7.6 1810虚机,1个master节点,2个node节点
   k8s version:v1.20.0
   docker://20.10.7
- 实验软件
无。
准备测试环境:
- 先创建下test命名空间:
[root@k8s-master ~]#kubectl create ns test
namespace/test created
- 再创建2个pod:
[root@k8s-master np]#kubectl run web --image=nginx -n test
pod/web created
[root@k8s-master ~]#kubectl run busybox --image=busybox -n test -- sleep 24h
pod/busybox created

#查看
[root@k8s-master ~]#kubectl get pod -n test
NAME                  READY   STATUS    RESTARTS   AGE
busybox               1/1     Running   0          9s
web-96d5df5c8-7r6w6   1/1     Running   0          3m11s
[root@k8s-master ~]#kubectl get pod -n test -o wide
NAME      READY   STATUS    RESTARTS   AGE     IP               NODE        NOMINATED NODE   READINESS GATES
busybox   1/1     Running   0          21h     10.244.169.148   k8s-node2   <none>           <none>
web       1/1     Running   0          7h26m   10.244.169.151   k8s-node2   <none>           <none>

#默认情况下,`Kubernetes 集群网络没任何网络限制,Pod 可以与任何其他 Pod 通信`
[root@k8s-master ~]#kubectl exec busybox -n test -- ping 10.244.169.151
PING 10.244.169.151 (10.244.169.151): 56 data bytes
64 bytes from 10.244.169.151: seq=0 ttl=63 time=0.283 ms
64 bytes from 10.244.169.151: seq=1 ttl=63 time=0.126 ms
^C
[root@k8s-master ~]#
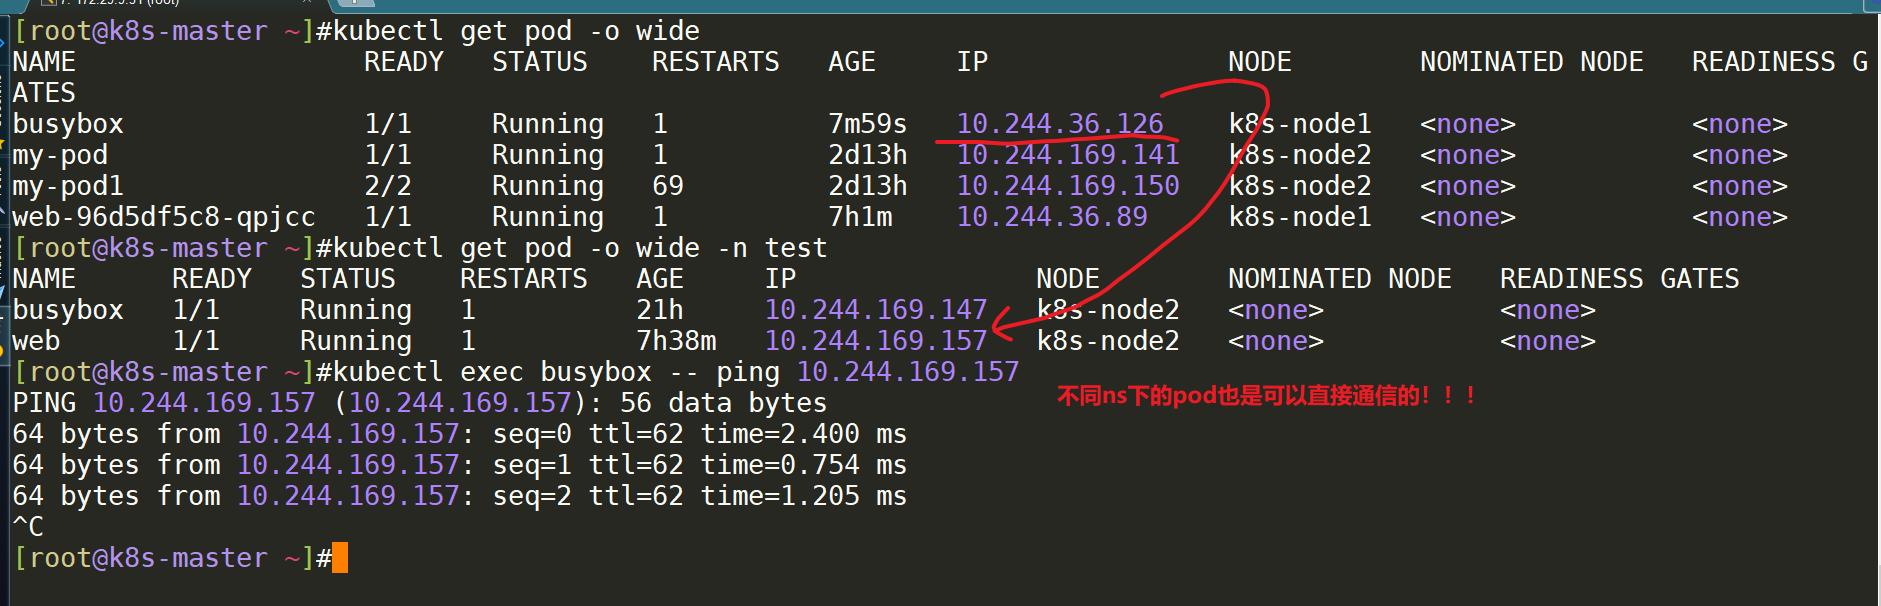
- 我们再次在默认命名空间下创建一个pod,并测试不同命名空间下的pod是否可以进行通信:=>是可以通信的。
[root@k8s-master ~]#kubectl run busybox --image=busybox -- sleep 24h

[root@k8s-master ~]#kubectl get pod -o wide
[root@k8s-master ~]#kubectl get pod -o wide -n test
[root@k8s-master ~]#kubectl exec busybox -- ping 10.244.169.157
现在进行按题目需求进行限制:
拒绝其他命名空间Pod访问
需求:test命名空间下所有pod可以互相访问,也可以访问其他命名空间Pod,但其他命名空间不能访问test命名空间Pod。
- 创建np目录:
[root@k8s-master ~]#mkdir np
[root@k8s-master ~]#cd np/
[root@k8s-master np]#vim deny-all-namespaces.yaml #配置yaml,这就是所谓的白名单
apiVersion: networking.k8s.io/v1
kind: NetworkPolicy
metadata:
  name: deny-all-namespaces
  namespace: test
spec:
  podSelector: {} # 未配置,匹配本命名空间所有pod
  policyTypes:
  - Ingress
  ingress:
  - from:
    - podSelector: {} # 未配置,匹配本命名空间所有pod
- apply并测试效果:=>完全符合预期效果。
 #apply下
 [root@k8s-master np]#kubectl apply -f deny-all-namespaces.yaml
networkpolicy.networking.k8s.io/deny-all-namespaces created

#验证效果
[root@k8s-master np]#kubectl exec busybox -- ping 10.244.169.157 #做了网络策略限制后,从默认命名空间下不能ping通test命名空间下的web pod了。
^C

#但在test下ping不同命名空间下的pod是依然可以访问的
[root@k8s-master np]#kubectl exec busybox -n test -- ping 10.244.169.157
PING 10.244.169.157 (10.244.169.157): 56 data bytes
64 bytes from 10.244.169.157: seq=0 ttl=63 time=0.245 ms
64 bytes from 10.244.169.157: seq=1 ttl=63 time=0.307 ms
^C

#test命名空间下也是可以直接访问外网的;
[root@k8s-master np]#kubectl exec busybox -n test -- ping www.baidu.com
PING www.baidu.com (180.101.49.11): 56 data bytes
64 bytes from 180.101.49.11: seq=0 ttl=127 time=12.591 ms
64 bytes from 180.101.49.11: seq=1 ttl=127 time=9.736 ms
^C
[root@k8s-master np]#

#至此,案例2测试成功!
测试结束。😘
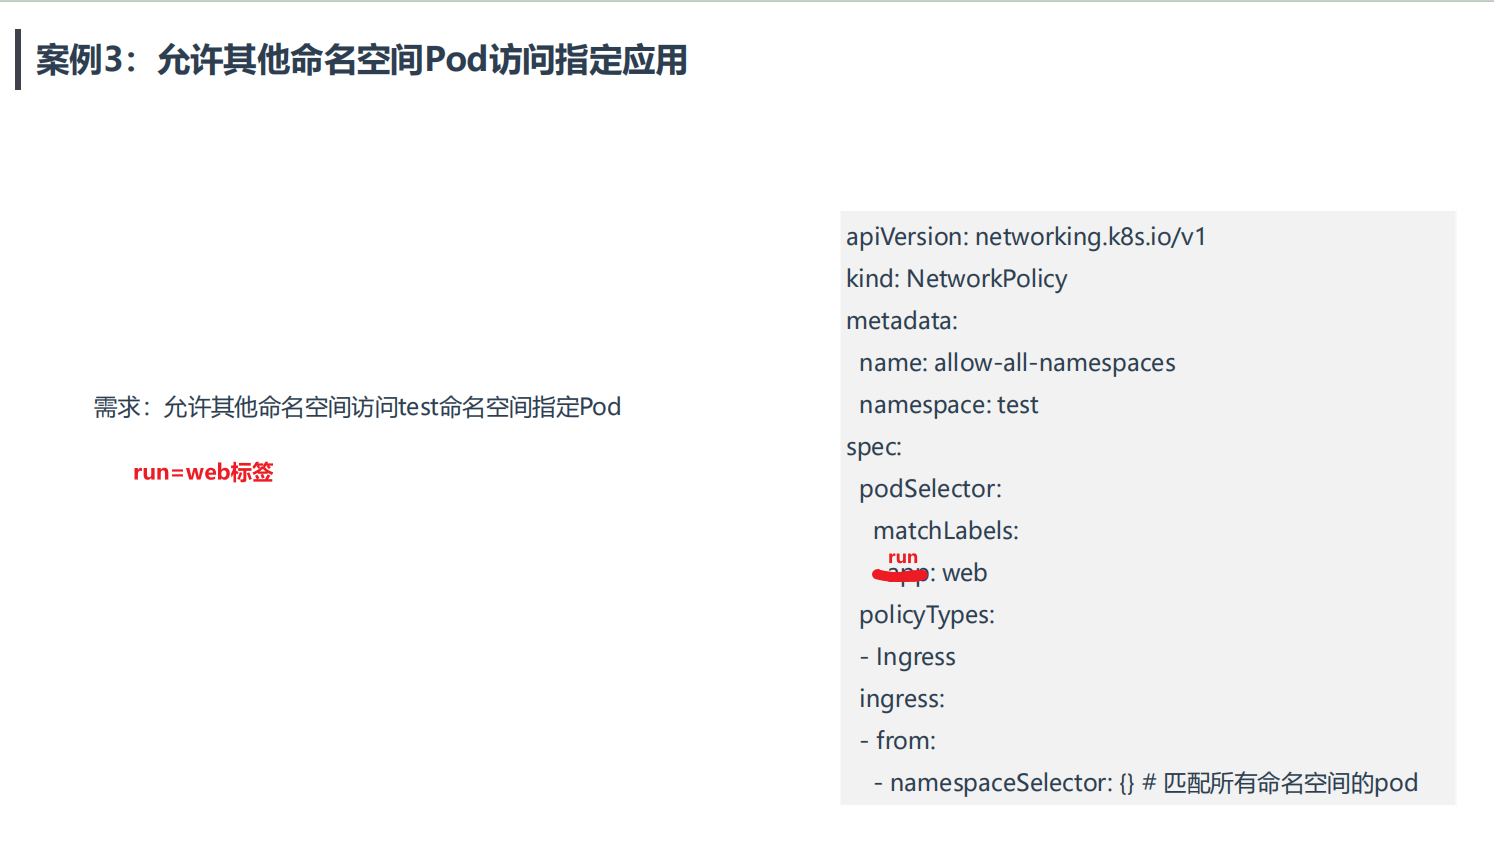
案例3:允许其他命名空间Pod访问指定应用
💘 案例3:允许其他命名空间Pod访问指定应用-2023.5.21(测试成功)
- 实验环境
实验环境:
1、win10,vmwrokstation虚机;
2、k8s集群:3台centos7.6 1810虚机,1个master节点,2个node节点
   k8s version:v1.20.0
   docker://20.10.7
- 实验软件
无。
- 先创建下test命名空间:
[root@k8s-master ~]#kubectl create ns test
namespace/test created
- 创建网络策略
[root@k8s-master1 ~]#mkdir np
[root@k8s-master1 ~]#cd np
[root@k8s-master1 np]#vim allow-all-namespace.yaml
apiVersion: networking.k8s.io/v1
kind: NetworkPolicy
metadata:
  name: allow-all-namespaces
  namespace: test
spec:
  podSelector:
    matchLabels:
      run: web
  policyTypes:
  - Ingress
  ingress:
  - from:
    - namespaceSelector: {} # 匹配所有命名空间的pod
- 部署
[root@k8s-master1 np]#kubectl  apply -f allow-all-namespace.yaml
networkpolicy.networking.k8s.io/allow-all-namespaces created
[root@k8s-master1 np]#kubectl get networkpolicy -ntest
NAME                   POD-SELECTOR   AGE
allow-all-namespaces   app=web        32s
- 创建测试pod
kubectl run busybox --image=busybox -n test -- sleep 12h
kubectl run web --image=nginx -n test

kubectl run busybox --image=busybox - sleep 12h
kubectl run web --image=nginx

[root@k8s-master1 ~]#kubectl  get po -owide
NAME      READY   STATUS    RESTARTS   AGE     IP               NODE        NOMINATED NODE   READINESS GATES
busybox   1/1     Running   0          84s     10.244.169.155   k8s-node2   <none>           <none>
web       1/1     Running   0          2m50s   10.244.36.90     k8s-node1   <none>           <none>
[root@k8s-master1 np]#kubectl  get po -owide -ntest --show-labels
NAME      READY   STATUS    RESTARTS   AGE     IP               NODE        NOMINATED NODE   READINESS GATES   LABELS
busybox   1/1     Running   0          6m23s   10.244.169.153   k8s-node2   <none>           <none>            run=busybox
web       1/1     Running   0          6m23s   10.244.36.89     k8s-node1   <none>           <none>            run=web
- 在default命名空间下ping测test命名空间下的2个pod,观察效果
[root@k8s-master1 np]#kubectl  exec -it busybox -- sh
/ # ping 10.244.169.153 #ping测buxybox
PING 10.244.169.153 (10.244.169.153): 56 data bytes
64 bytes from 10.244.169.153: seq=0 ttl=63 time=0.168 ms
^C
--- 10.244.169.153 ping statistics ---
1 packets transmitted, 1 packets received, 0% packet loss
round-trip min/avg/max = 0.168/0.168/0.168 ms
/ # ping 10.244.36.89  #ping测web
PING 10.244.36.89 (10.244.36.89): 56 data bytes
64 bytes from 10.244.36.89: seq=0 ttl=62 time=0.504 ms
64 bytes from 10.244.36.89: seq=1 ttl=62 time=0.448 ms
^C
--- 10.244.36.89 ping statistics ---
2 packets transmitted, 2 packets received, 0% packet loss
round-trip min/avg/max = 0.448/0.476/0.504 ms
/ #
- 问题来了:不是已经配置了策略了吗?怎么还能ping通test命名空间下的buxybox pod呢?
这是因为这个策略实际上是没有意义的,因为k8s默认的策略就是各个命名空间下的pod是可以互访的。
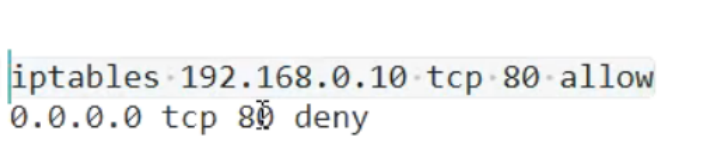
网路策略是由网络组件控制的,网络组件是由iptable完成的,iptables是从上到下匹配的。
因此,可以看到,在default命名空间下都是可以ping通test命名空间下2个pod的。
但是,该如何解决呢?
此时就需要配合案例1的网络策略进行使用。
把案例1的网络策略当做一个安全基础,然后在此基础上做白名单限制。
[root@k8s-master1 np]#vim deny-all.yaml
#deny-all.yaml
apiVersion: networking.k8s.io/v1
kind: NetworkPolicy
metadata:
  name: deny-all
  namespace: test
spec:
  podSelector: {} # 匹配本命名空间所有pod
  policyTypes:
  - Ingress
  - Egress
  # ingress和egress没有指定规则,则不允许任何流量进出pod


#部署
#注意:此时需要先删除刚才创建的那条策略,然后先部署deny-all.yaml,再部署allow-all-namespace.yaml
kubectl delete -f  allow-all-namespace.yaml
[root@k8s-master1 np]#kubectl apply -f deny-all.yaml
networkpolicy.networking.k8s.io/deny-all created
[root@k8s-master1 np]#kubectl apply -f allow-all-namespace.yaml
networkpolicy.networking.k8s.io/allow-all-namespaces created
- 再次测试
[root@k8s-master1 np]#kubectl  exec -it busybox -- sh
/ # ping 10.244.36.89 #ping测web
PING 10.244.36.89 (10.244.36.89): 56 data bytes
64 bytes from 10.244.36.89: seq=0 ttl=62 time=0.470 ms
^C
--- 10.244.36.89 ping statistics ---
1 packets transmitted, 1 packets received, 0% packet loss
round-trip min/avg/max = 0.470/0.470/0.470 ms
/ # ping 10.244.169.153 #ping测buxybox
PING 10.244.169.153 (10.244.169.153): 56 data bytes
^C
--- 10.244.169.153 ping statistics ---
3 packets transmitted, 0 packets received, 100% packet loss
/ #
测试结束。😘
案例4:同一个命名空间下应用之间限制访
💘 案例4:同一个命名空间下应用之间限制访-2023.5.21(测试成功)
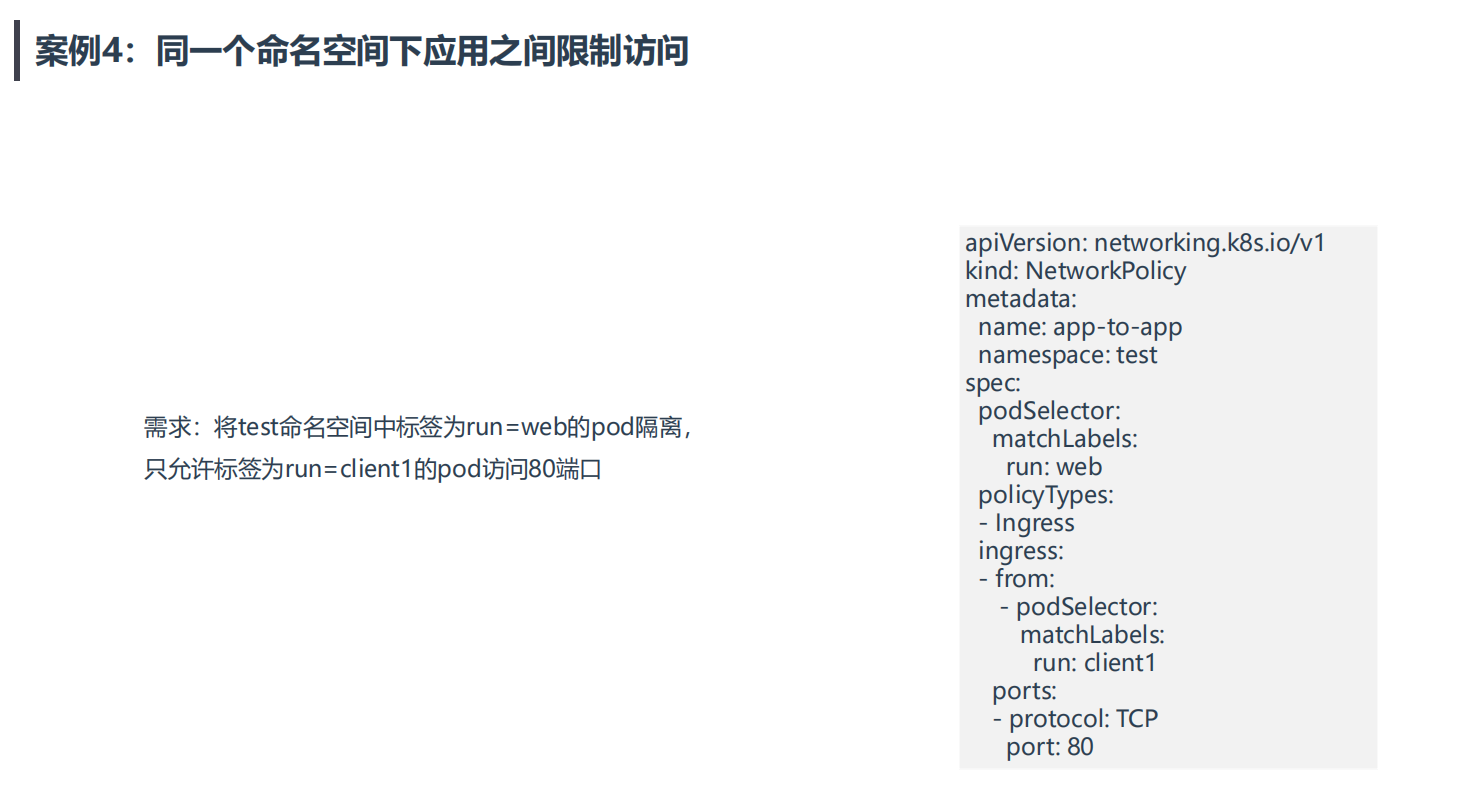
案例4:同一个命名空间下应用之间限制访问

需求:将test命名空间携带run=web标签的Pod隔离,只允许test
命名空间携带run=client1标签的Pod访问80端口。

apiVersion: networking.k8s.io/v1
kind: NetworkPolicy
metadata:
  name: app-to-app
  namespace: test
spec:
  podSelector:
    matchLabels:
      run: web
  policyTypes:
  - Ingress
  ingress:
  - from:
    - podSelector:
        matchLabels:
          run: client1
    ports:
    - protocol: TCP
      port: 80
- 实验环境
实验环境:
1、win10,vmwrokstation虚机;
2、k8s集群:3台centos7.6 1810虚机,1个master节点,2个node节点
   k8s version:v1.20.0
   docker://20.10.7
- 实验软件
无。
- 我们这边做测试时,先把上面的网络策略规则给删除掉:
[root@k8s-master1 np]#kubectl delete -f .
networkpolicy.networking.k8s.io "allow-all-namespaces" deleted
networkpolicy.networking.k8s.io "deny-all" deleted
- 创建2个test命名空间下的不同label的测试pod:
[root@k8s-master np]#kubectl get pod -n test --show-labels
NAME      READY   STATUS    RESTARTS   AGE   LABELS
busybox   1/1     Running   1          22h   run=busybox
web       1/1     Running   1          8h    run=web

[root@k8s-master np]#kubectl run  client1 -l run=client1 --image=busybox -n test -- sleep 12h
pod/client1 created
[root@k8s-master np]#kubectl run  client2 -l run=client2 --image=busybox -n test -- sleep 12h
pod/client2 created

[root@k8s-master np]#kubectl get pod -n test --show-labels
NAME      READY   STATUS    RESTARTS   AGE   LABELS
busybox   1/1     Running   1          22h   run=busybox
client1   1/1     Running   0          33s   run=client1
client2   1/1     Running   0          20s   run=client2
web       1/1     Running   1          8h    run=web
[root@k8s-master np]#
- 配置前测试:默认同一个命名空间下的pod都是可以直接访问的:

- 现在开始配置网络策略:
[root@k8s-master np]#vim app-to-app.yaml
apiVersion: networking.k8s.io/v1
kind: NetworkPolicy
metadata:
  name: app-to-app
  namespace: test
spec:
  podSelector:
    matchLabels:
      run: web
  policyTypes:
  - Ingress
  ingress:
  - from:
    - podSelector:
        matchLabels:
          run: client1
    ports:
    - protocol: TCP
      port: 80

[root@k8s-master np]#kubectl apply -f app-to-app.yaml
networkpolicy.networking.k8s.io/app-to-app created

- 测试失效效果:=>符合预期。

至此,案例4实验完成。😘
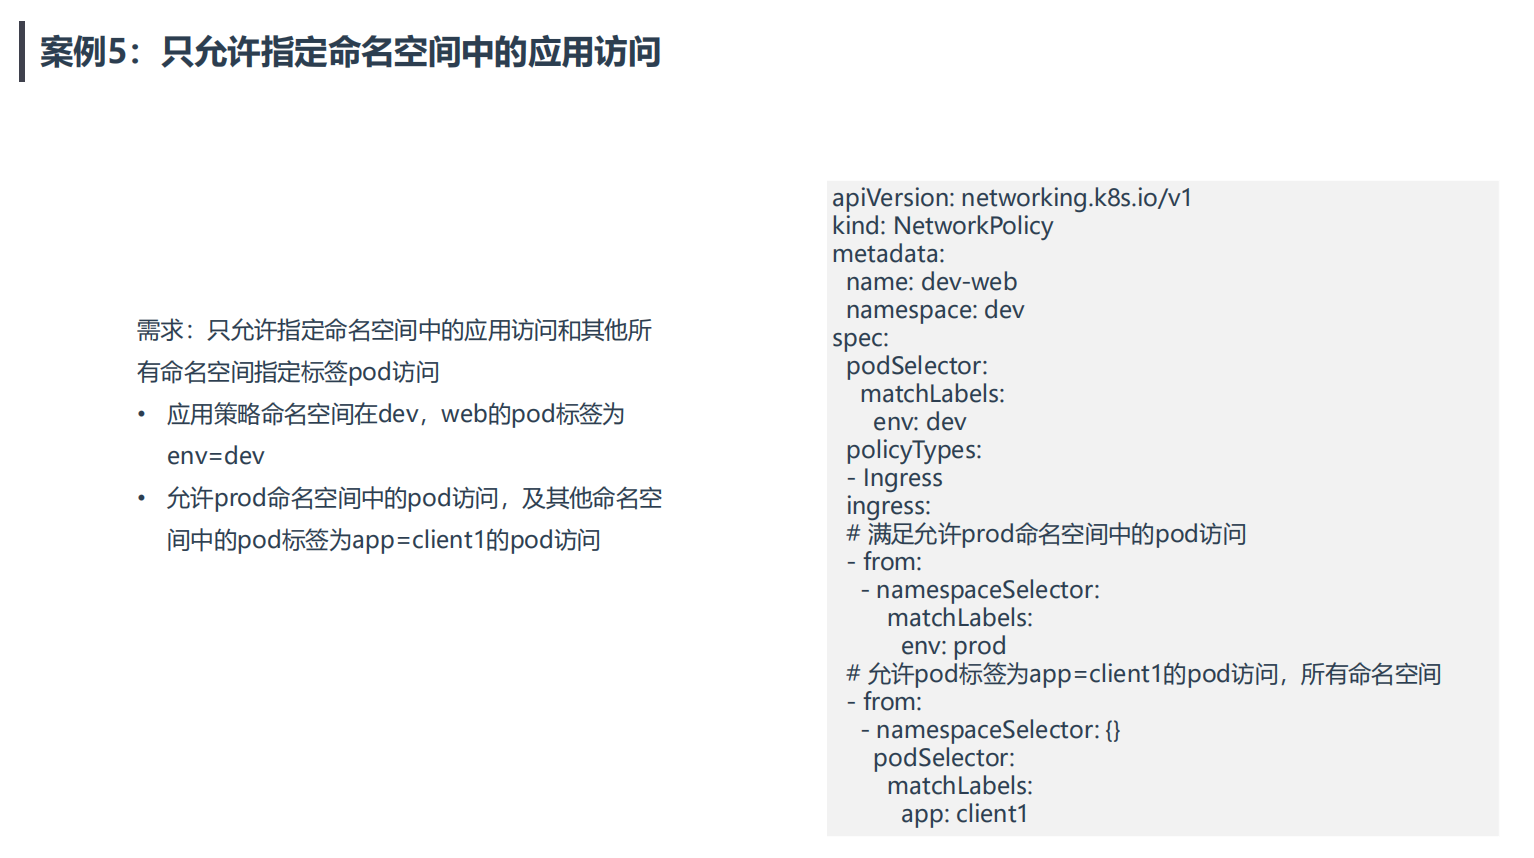
案例5:只允许指定命名空间中的应用访问
💘 案例5:只允许指定命名空间中的应用访问-2023.5.21(测试成功)
- 实验环境
实验环境:
1、win10,vmwrokstation虚机;
2、k8s集群:3台centos7.6 1810虚机,1个master节点,2个node节点
   k8s version:v1.20.0
   docker://20.10.7
- 实验软件
无。
根据题目需求进行测试
- 创建ns dev与标签为
env=dev的pod
[root@k8s-master1 np]#kubectl create ns dev
namespace/dev created

[root@k8s-master1 np]#kubectl run web --image=nginx -l env=dev -n dev
pod/web created
[root@k8s-master1 np]#kubectl get po -ndev --show-labels -owide
NAME   READY   STATUS    RESTARTS   AGE   IP               NODE        NOMINATED NODE   READINESS GATES   LABELS
web    1/1     Running   0          30s   10.244.169.156   k8s-node2   <none>           <none>            env=dev
- 创建ns prod及网络策略.yaml
#创建ns prod并打上标签
[root@k8s-master1 np]#kubectl create ns prod
namespace/prod created
[root@k8s-master1 np]#kubectl label ns prod env=prod
namespace/prod labeled
[root@k8s-master1 np]#kubectl get ns prod --show-labels
NAME   STATUS   AGE   LABELS
prod   Active   30s   env=prod

#创建网络策略.yaml
[root@k8s-master1 np]#vim test.yaml
apiVersion: networking.k8s.io/v1
kind: NetworkPolicy
metadata:
  name: dev-web
  namespace: dev
spec:
  podSelector:
    matchLabels:
      env: dev
  policyTypes:
  - Ingress
  ingress:
  # 满足允许prod命名空间中的pod访问
  - from:
    - namespaceSelector:
        matchLabels:
          env: prod
  # 允许pod标签为app=client1的pod访问,所有命名空间
  - from:
    - namespaceSelector: {}
      podSelector:
        matchLabels:
          app: client1

#部署
[root@k8s-master1 np]#kubectl apply -f test.yaml
networkpolicy.networking.k8s.io/dev-web created
- 测试
#创建测试pod
kubectl run busybox --image=busybox  -n prod -- sleep 12h #预期:会访问成功
kubectl run busybox --image=busybox  -- sleep 12h #预期:会访问失败
kubectl run busybox2 --image=busybox -l app=client1  -- sleep 12h #预期:会访问成功

#ping测试
kubectl run busybox --image=busybox  -n prod-- sleep 12h #预期:会访问成功
kubectl run busybox --image=busybox  -- sleep 12h #预期:会访问失败
kubectl run busybox2 --image=busybox -l app=client1  -- sleep 12h #预期:会访问成功

#测试效果(以下均符合预期效果)
[root@k8s-master1 np]#kubectl exec busybox -nprod -- ping 10.244.169.156
PING 10.244.169.156 (10.244.169.156): 56 data bytes
64 bytes from 10.244.169.156: seq=0 ttl=63 time=0.161 ms
^C
[root@k8s-master1 np]#kubectl exec -it  busybox -- ping 10.244.169.156
PING 10.244.169.156 (10.244.169.156): 56 data bytes
^C
--- 10.244.169.156 ping statistics ---
2 packets transmitted, 0 packets received, 100% packet loss
command terminated with exit code 1
[root@k8s-master1 np]#kubectl exec -it  busybox2 -- ping 10.244.169.156
PING 10.244.169.156 (10.244.169.156): 56 data bytes
64 bytes from 10.244.169.156: seq=0 ttl=62 time=0.951 ms
64 bytes from 10.244.169.156: seq=1 ttl=62 time=0.600 ms
^C
--- 10.244.169.156 ping statistics ---
2 packets transmitted, 2 packets received, 0% packet loss
round-trip min/avg/max = 0.600/0.775/0.951 ms
测试结束。😘
关于我
我的博客主旨:
- 排版美观,语言精炼;
- 文档即手册,步骤明细,拒绝埋坑,提供源码;
- 本人实战文档都是亲测成功的,各位小伙伴在实际操作过程中如有什么疑问,可随时联系本人帮您解决问题,让我们一起进步!
🍀 微信二维码
x2675263825 (舍得), qq:2675263825。

🍀 微信公众号
《云原生架构师实战》

🍀 语雀
https://www.yuque.com/xyy-onlyone
🍀 csdn
https://blog.csdn.net/weixin_39246554?spm=1010.2135.3001.5421

🍀 知乎
https://www.zhihu.com/people/foryouone
最后
好了,关于本次就到这里了,感谢大家阅读,最后祝大家生活快乐,每天都过的有意义哦,我们下期见!