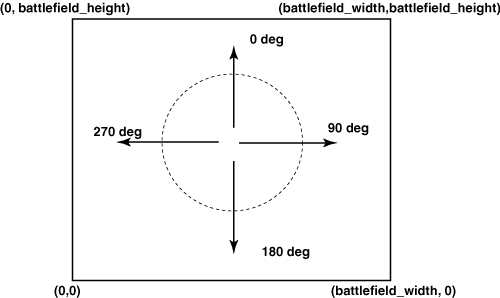
基础知识
1. heading 角度系
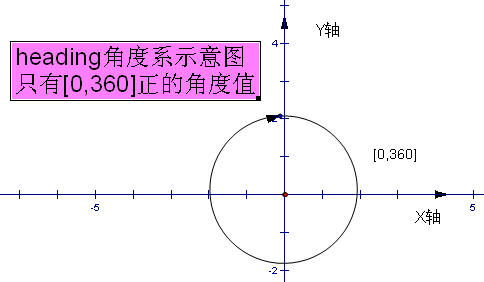
如图所示,所谓heading角,即从Y轴出发,然后顺时针绕回Y轴的这么个角度区间,取值范围: [0,360]
2. bearing角度系
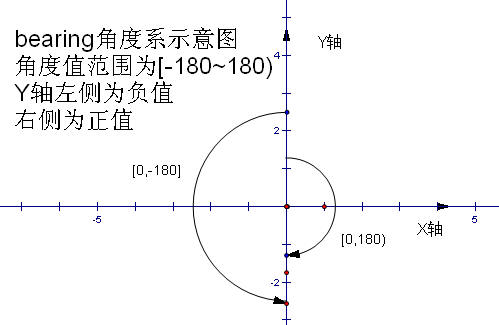
所谓bearing 角,即从Y轴顺、逆时针出发,绕半圈回到Y轴所形成的两个角度区间,取值范围:顺时针[0,180) ;逆时针[0,-180]
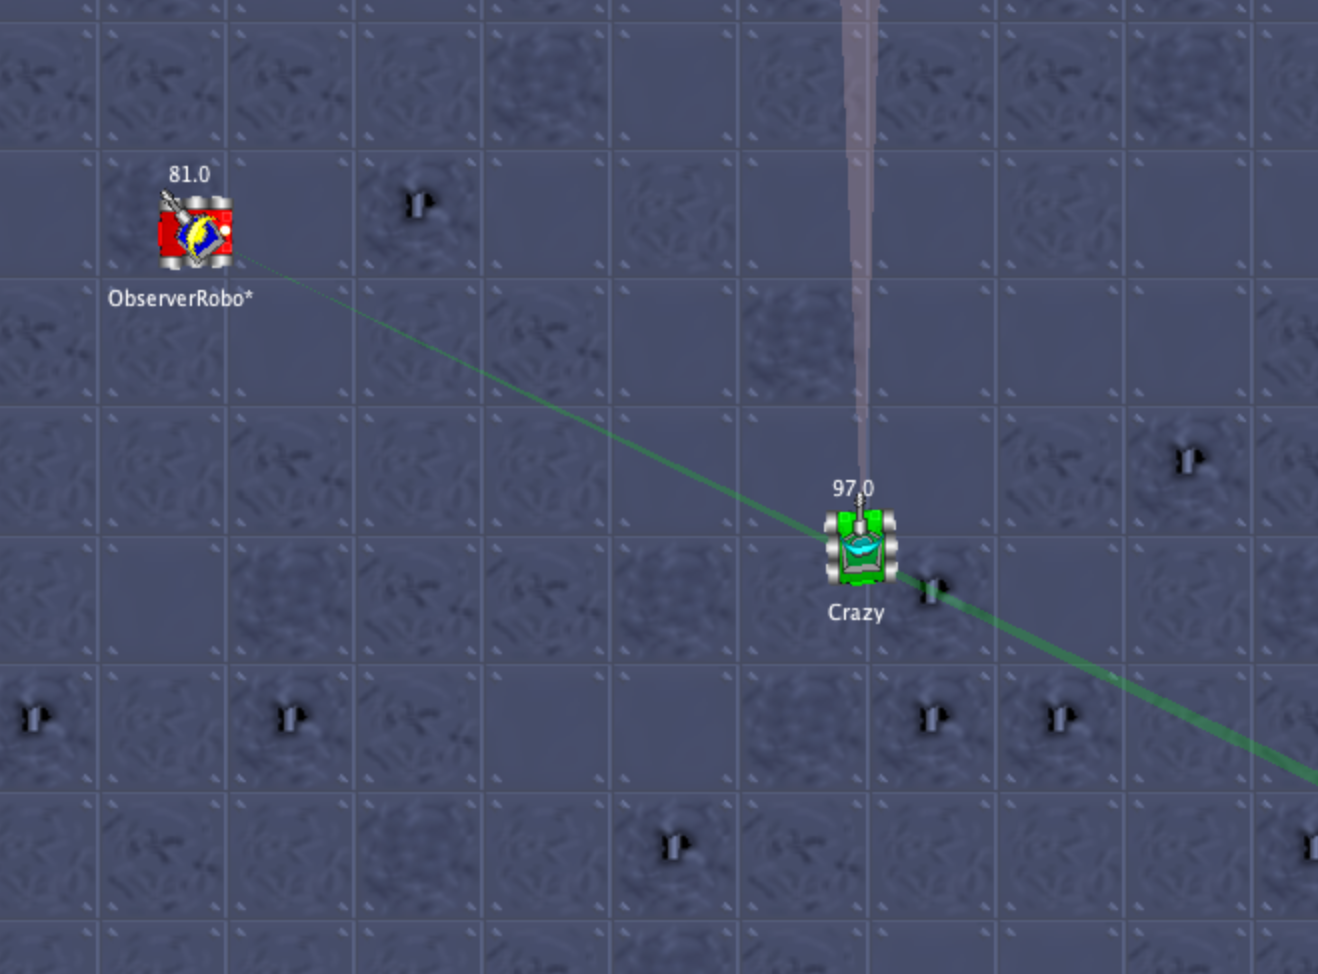
实例分析
说明:
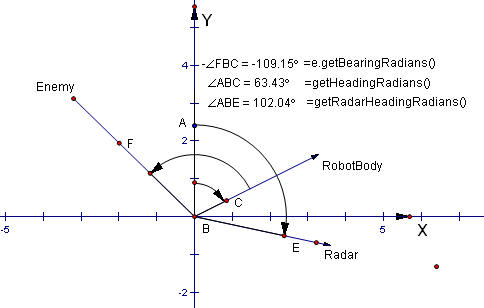
e.getBearingRadians(),如图中的∠FBC所示
是敌机(Enemy)与自己车头方向(你使用setAhead(正值)前进的方向即为车头方向,如BC箭头所示)所成的角,因为是以BC为Y轴的bearing角,所以这个角在这个例子中是个负值。
getHeadingRadians(),如图中∠ABC所示
是以自己的车头方向与屏幕垂直正上方为Y轴所成的heaing角。
absBearing=robocode.util.Utils.normalRelativeAngle(e.getBearingRadians()+getHeadingRadians());
所以absBearing角即为∠FBA,即自己与敌机的连线,与Y轴所成的bearing角,取值范围为[-180,180)。
相应的代码
 public void onScannedRobot(ScannedRobotEvent e) {

       //注意 这里的计算都以弧度为单位
       double absBearing=0d;
       //雷达转动角度
       double radarTurnAngle=0d;
       //得到绝对角度差
absBearing=robocode.util.Utils.normalRelativeAngle(e.getBearingRadians()+getHeadingRadians());

       //根据absBearing角算出Radar要调整的角度
       radarTurnAngle=Math.sin(absBearing - getRadarHeadingRadians());
       //转动雷达,注意是向右
       setTurnRadarRightRadians(radarTurnAngle);
    }
雷达锁定
我们要写这样一个代码,它将让敌人逃不出我们的眼睛。雷达锁定是一个高效战斗机器人的基础,因为robot只有执行onScannedRobot方法,我们才能够获取敌人的信息,而onScannedRobot方法只有在我们的雷达扫描到敌人之后才会被调用,当然,调用的过程是自动的。

雷达的扫描实际上是一条线,当扫描线扫描到目标时,触发onScannedRobot事件,更新当前数据,包括direction。当程序执行到onScannedRobot内的代码时,雷达扫描线的角度getRadarHeadingRadians()已经和direction有所偏离。为了锁定目标,我们可以把雷达往反方向扫描。因为雷达旋转很快,而且getRadarHeadingRadians()和direction的偏移量不大,机器人是有一定大小的。于是扫描线在目标身上来回扫动,实现了雷达锁定。
public void onScannedRobot(ScannedRobotEvent e) {
     enemy.update(e,this);
     doubleOffset = rectify( enemy.direction-getRadarHeadingRadians() );
     setTurnRadarRightRadians( Offset * 1.5);

}
这是我们的onScannedRobot方法,enemy.updata(e,this);是调用我们的enemy对象里面的方法,更新敌人信息,当然,忘了一点,在这之前,我们需要生成一个enemy对象,具体方法为:
Enemy enemy = new Enemy();
这里我们还要解释一下rectify方法,它的作用是对角度进行修正,因为direction减去我们雷达的朝向,有可能会大于180度或者小于-180度,比如当大于180度时,我们所需要转动的角度并不需要那么大,只需方向转一个角度就可以了。这个rectify方法很简单,当在后面应用很多。它的代码为:
	public double rectify(double angle)
	{
		System.out.println("angle:"+angle);
		if (angle < -Math.PI)
			angle += 2 * Math.PI;
		if (angle > Math.PI)
			angle -= 2 * Math.PI;
		return angle;
	}
在代码中,enemy.direction -getRadarHeadingRadians()是雷达所要旋转的偏移量。假设之前雷达顺时针扫描,那么enemy.direction略小于getRadarHeadingRadians(),为负。经rectify()方法修正后即为需要转动的值。然后用setTurnRadarRightRadians旋转雷达,旋转度数为偏移的1.5倍,因为RadarOffset为负,故反方向扫描,保证无论目标
如何移动,扫描线始终在目标身上。上面的1.5可以改成2,3等数。当你在Options中打开了Visible Scan Arcs选项后,就可以看到绿色的扇形,倍数为1.5的时候,类似一条线,而倍数为2,3的时候就可以看到像是一个扇形。
另外我们还要说一下另外两段代码:
setAdjustGunForRobotTurn( true );
setAdjustRadarForGunTurn( true );
它们的作用是使雷达、大炮、车身运动独立,具体参考API手册。
到这里我们雷达扫描的代码就完成了,运行试试我们的“观察者号”吧!!
完整代码
package com;

import java.awt.Color;
import robocode.AdvancedRobot;
import robocode.ScannedRobotEvent;

public class ObserverRobot extends AdvancedRobot {

	Enemy enemy = new Enemy();
	public static double PI = Math.PI;

	public void run() {
		setAdjustGunForRobotTurn(true);
		setAdjustRadarForGunTurn(true);
		this.setColors(Color.red, Color.blue, Color.yellow, Color.black, Color.green);

		while (true) {
			if (enemy.name == null) {
				setTurnRadarRightRadians(2 * PI);
				execute();
			}
			else {
				execute();
			}
		}
	}

	public void onScannedRobot(ScannedRobotEvent e)
	{
		enemy.update(e, this);
		double Offset = rectify(enemy.direction - getRadarHeadingRadians());
		setTurnRadarRightRadians(Offset * 1.5);
	}

	// 角度修正方法,重要

	public double rectify(double angle)
	{
		if (angle < -Math.PI)
			angle += 2 * Math.PI;
		if (angle > Math.PI)
			angle -= 2 * Math.PI;

		return angle;

	}

	public class Enemy {

		public double x, y;
		public String name = null;
		public double headingRadian = 0.0D;
		public double bearingRadian = 0.0D;
		public double distance = 1000D;
		public double direction = 0.0D;
		public double velocity = 0.0D;
		public double prevHeadingRadian = 0.0D;
		public double energy = 100.0D;

		public void update(ScannedRobotEvent e, AdvancedRobot me) {
			name = e.getName();
			headingRadian = e.getHeadingRadians();
			bearingRadian = e.getBearingRadians();
			this.energy = e.getEnergy();
			this.velocity = e.getVelocity();
			this.distance = e.getDistance();
			direction = bearingRadian + me.getHeadingRadians();

			x = me.getX() + Math.sin(direction) * distance;
			y = me.getY() + Math.cos(direction) * distance;

		}

	}

}
敌方坦克坐标预测
完整代码
...
AdvancedRobot类中相应的API解读
1. getHeadingRadians
public double getHeadingRadians()
Returns the direction that the robot's body is facing, in radians. The value returned will be between 0 and 2 * PI (is excluded).
Note that the heading in Robocode is like a compass, where 0 means North, PI / 2 means East, PI means South, and 3 * PI / 2 means West.
Overrides:
getHeadingRadians in class _AdvancedRadiansRobot
Returns:
the direction that the robot's body is facing, in radians.
疑问
I want to fire a bullet every turn, but I can't. Why?
Every time you fire, the gun generates some heat. You must wait till it is cool again to fire. If you give a fire order when your gun is hot, it will do nothing. The heat generated by a shot is 1 + (firepower / 5). The gun cools down at a default rate of 0.1 per turn (note that you can change this parameter when you run the battle, but nobody usually does). It means you can fire a 3.0 power bullet every 16 ticks.
See Rules.getGunHeat() and Robot.getGunCoolingRate().
What is the difference between the setXXX() (e.g. setFire()) and the XXX() (e.g. fire()) methods?
Basically, the setXXX() methods just notify Robocode to take some action at the end of the turn. The XXX()-type methods end the turn when you call them, and they block your robot's thread until the command finishes. Unless you have a good reason, you should almost always use the setXXX() version when writing AdvancedRobots.
What is the difference between a set method like setAhead() and ahead() without the set-prefix?
The difference between a method like ahead(), and the method setAhead() is that set-methods are only available with the AdvancedRobot. The difference is that you can call multiple setters like e.g. setAhead(), setTurnGunLeft(), and setFire() in the same turn. These set commands will first take effect, i.e. execute, when you call the execute() method explicitly in a turn. Methods that are not setters like e.g. ahead(), turnGunLeft(), and fire() will execute independently and take one to many turns to complete, as one command will need to execute and complete before the next command is being executed. Setters are called in the same turn when execute() is called. So the method ahead() is actually the same as setAhead() + execute(), and in that order. The set methods can be seen as "fire and forget" methods that are executed immediately, whereas the methods like ahead() must first complete its movement, turning, firing etc. before the next command is being run. Hence those commands need to wait for the other commands to complete first before the method itself will be executed.
How fast can I turn my gun?
The gun turns at 20 degrees per tick.
See Rules.GUN_TURN_RATE.
How fast can I turn my radar?
It turns 45 degrees per tick.
See Rules.RADAR_TURN_RATE.
What are ticks, turns, and frames?
A tick refers to one unit, which is also called a turn in Robocode. During one turn, you may perform one action as a Robot, or multiple (independent) actions as an AdvancedRobot. A frame is a unit of drawing to the Robocode client interface. If you are processing turns slowly, you will get one frame per tick / turn. However, if you up the turns per second beyond your computer's ability to render the frames, you will miss some frames of animation. This won't affect the robots' behavior, unless you foolishly added code in your onPaint(Graphics2D) method that alters your bots behavior. In that case, your bot will behave differently depending on whether or not the Paint button has been enabled, and if the framerate can keep up with the turnrate.
参考资料
Robowiki
Robocode教程7——雷达锁定_dawnsun001的博客-CSDN博客Robocode中一个高效雷达的学习记录_lihe758的博客-CSDN博客_雷达 heading angle
https://github.com/robo-code/robocode/blob/master/robocode.api/src/main/java/robocode/AdvancedRobot.java
![[附源码]计算机毕业设计智能衣橱APPSpringboot程序](https://img-blog.csdnimg.cn/ad2b69392166403f942c7f58ddb8bea9.png)