文章目录
- 卷积核的维度
- 2D卷积
- 单通道
- 多通道
- 代码
- example
- 2d卷积操作后变化
- 3D卷积
- 单通道
- 多通道
- 代码
在项目中用到了conv3但是对其背后的原理还有一些模糊的地方,conv2d与多通道的conv2d的区别在哪里?conv3d的思想理论是什么?对此进行探究和记录…
首先要明确多通道的2d卷积和3d卷积是不一样的,3d是可以在通道中移动的,2d不可以
卷积核的维度
卷积核的维度指的的进行滑窗操作的维度,而滑窗操作不在channel维度上进行,不管有几个channel,它们都共享同一个滑窗位置(虽然2D多channel卷积的时候每个channel上的卷积核权重是独立的,但滑窗位置是共享的)。所以在讨论卷积核维度的时候,是不把channel维加进去的。
2D conv的卷积核就是 ( c , k h , k w ) (c, k_h, k_w) (c,kh,kw),因此,对于RGB图像做2D卷积,卷积核可以是conv2D(3,3) 而不该是conv3D(3,3,3);
3D conv的卷积核就是 ( c , k d , k h , k w ) (c, k_d, k_h, k_w) (c,kd,kh,kw),其中k_d就是多出来的第三维,根据具体应用,在视频中就是时间维,在CT图像中就是层数维.
2D卷积
单通道
首先了解什么是卷积核,卷积核(filter)是由一组参数构成的张量,卷积核相当于权值,图像相当于输入量,卷积的操作就是根据卷积核对这些输入量进行加权求和。我们通常用卷积来提取图像的特征。
直观理解如下:下图使用的是 3x3卷积核(height x width,简写
H
×
W
H \times W
H×W )的卷积,padding为1(周围的虚线部分,卷积时为了使卷积后的图像大小与原来一致,会对原图像进行填充),两个维度上的strides均为1(滑动步长,这里体现为每次滑动几个小方格)。
![[外链图片转存失败,源站可能有防盗链机制,建议将图片保存下来直接上传(img-3RueSX6s-1684241254644)(null)]](https://img-blog.csdnimg.cn/e840329e1e5d460e912214d28d65c10b.png)
针对单通道,输入图像的channel为1,即输入大小为
(
1
,
h
e
i
g
h
t
,
w
e
i
g
h
t
)
(1, height, weight)
(1,height,weight),卷积核尺寸为
(
1
,
k
h
,
k
w
)
(1, k_h, k_w)
(1,kh,kw),卷积核在输入图像上的的空间维度(即(height, width)两维)上进行进行滑窗操作,每次滑窗和
(
k
h
,
k
w
)
(k_h, k_w)
(kh,kw) 窗口内的values进行卷积操作(现在都用相关操作取代),得到输出图像中的一个value。
上图是通道数为1的2维图像的卷积操作,静态表示为:
![[外链图片转存失败,源站可能有防盗链机制,建议将图片保存下来直接上传(img-P5WnZPSx-1684241254668)(null)]](https://img-blog.csdnimg.cn/1cfeb6a77e3d4905bad32e2e06ebc519.png)
多通道
了解了单通道图像的卷积之后,再来看多通道图像的卷积,我们知道灰度图像只有一个通道,而 RGB 图像有R、G、B三个通道。
多通道图像的一次卷积要对所有通道上同一位置的元素做加权和,因此卷积核的shape变成了
H
×
W
×
c
h
a
n
n
e
l
s
H \times W \times channels
H×W×channels,没有错卷积核变成了3维,但这不是3维卷积,因为我们区分几维卷积看的是卷积核可以在几个维度上的滑动,卷积核是不能在 channels上滑动的,因为上面提到每次卷积都要关联所有通道上同一位置上的元素。
3通道的卷积表示如下:是对每个通道进行2d卷积操作然后把最后的值相加的到右侧的小方块。
![[外链图片转存失败,源站可能有防盗链机制,建议将图片保存下来直接上传(img-BsfaZIGY-1684241254677)(null)]](https://img-blog.csdnimg.cn/75e8f7d0d9ba470dab486fd5b42fab07.png)
上图将3个通道分开表示,卷积核也分开表示,filter1、filter2、filter3均为二维卷积核,堆叠在一起便形成了
H
×
W
×
3
H \times W \times 3
H×W×3 的卷积核,同样的我们将3个通道也堆叠在一起;
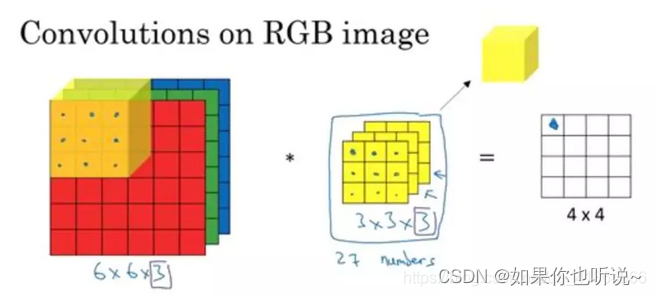
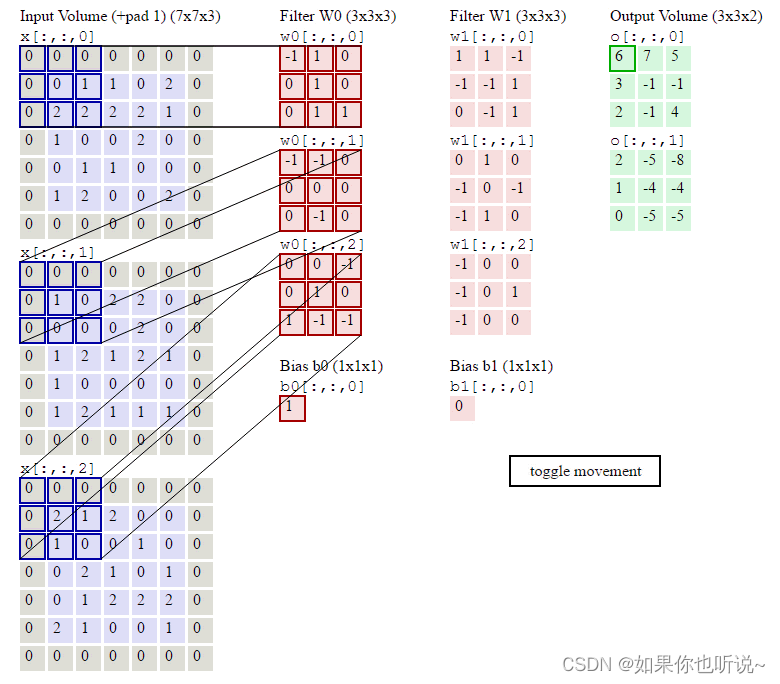
针对多通道,假定输入图像的channel为c,即输入大小为 ( c , h e i g h t , w e i g h t ) (c, height, weight) (c,height,weight),卷积核尺寸为 ( c , k h , k w ) (c, k_h, k_w) (c,kh,kw), 卷积核在输入图像的空间维度即 ( h e i g h t , w i d t h ) (height, width) (height,width)两维上进行滑窗操作(在channel这一维度没有滑动只有相加),每次滑窗与c个channels上的$ (k_h, k_w)$ 窗口内的所有的values进行相关操作,得到输出图像中的一个value(多通道的信息被完全压缩了)
于是形成了下面的3维表示图:
得到多个Feature Map就需要多个卷积核,下面这个例子是有2个卷积核:
代码
torch.nn.Conv2d(in_channels, out_channels, kernel_size, stride=1, padding=0, dilation=1, groups=1, bias=True, padding_mode='zeros', device=None, dtype=None)
- in_channels (int) – Number of channels in the input image
- out_channels (int) – Number of channels produced by the convolution
- kernel_size (int or tuple) – Size of the convolving kernel
- stride (int or tuple, optional) – Stride of the convolution. Default: 1
- padding (int, tuple or str, optional) – Padding added to all four sides of the input. Default: 0
- padding_mode (string*,* optional) –
'zeros','reflect','replicate'or'circular'. Default:'zeros' - dilation (int or tuple, optional) – Spacing between kernel elements. Default: 1
- groups (int, optional) – Number of blocked connections from input channels to output channels. Default: 1
- bias (bool, optional) – If
True, adds a learnable bias to the output. Default:True
Applies a 2D convolution over an input signal composed of several input planes.
In the simplest case, the output value of the layer with input size ( N , C in , H , W ) (N, C_{\text{in}}, H, W) (N,Cin,H,W)and output ( N , C out , H out , W out ) (N, C_{\text{out}}, H_{\text{out}}, W_{\text{out}}) (N,Cout,Hout,Wout) can be precisely described as:
out ( N i , C out j ) = bias ( C out j ) + ∑ k = 0 C in − 1 weight ( C out j , k ) ⋆ input ( N i , k ) \text{out}(N_i, C_{\text{out}_j}) = \text{bias}(C_{\text{out}_j}) + \sum_{k = 0}^{C_{\text{in}} - 1} \text{weight}(C_{\text{out}_j}, k) \star \text{input}(N_i, k) out(Ni,Coutj)=bias(Coutj)+k=0∑Cin−1weight(Coutj,k)⋆input(Ni,k)
where ⋆ is the valid 2D cross-correlation operator, NN is a batch size, CC denotes a number of channels, HH is a height of input planes in pixels, and WW is width in pixels.
This module supports TensorFloat32.
-
stridecontrols the stride for the cross-correlation, a single number or a tuple. -
paddingcontrols the amount of padding applied to the input. It can be either a string {‘valid’, ‘same’} or a tuple of ints giving the amount of implicit padding applied on both sides. -
dilationcontrols the spacing between the kernel points; also known as the à trous algorithm. It is harder to describe, but this link has a nice visualization of whatdilationdoes. -
groupscontrols the connections between inputs and outputs.in_channelsandout_channelsmust both be divisible bygroups. For example,- At groups=1, all inputs are convolved to all outputs.
- At groups=2, the operation becomes equivalent to having two conv layers side by side, each seeing half the input channels and producing half the output channels, and both subsequently concatenated.
- At groups=
in_channels, each input channel is convolved with its own set of filters (of size out_channels in_channels \frac{\text{out\_channels}}{\text{in\_channels}} in_channelsout_channels ).
The parameters kernel_size, stride, padding, dilation can either be:
- a single
int– in which case the same value is used for the height and width dimension- a
tupleof two ints – in which case, the first int is used for the height dimension, and the second int for the width dimension
example
# With square kernels and equal stride
m = nn.Conv2d(16, 33, 3, stride=2)
# non-square kernels and unequal stride and with padding
m = nn.Conv2d(16, 33, (3, 5), stride=(2, 1), padding=(4, 2))
# non-square kernels and unequal stride and with padding and dilation
m = nn.Conv2d(16, 33, (3, 5), stride=(2, 1), padding=(4, 2), dilation=(3, 1))
input = torch.randn(20, 16, 50, 100)
output = m(input)
2d卷积操作后变化
![[外链图片转存失败,源站可能有防盗链机制,建议将图片保存下来直接上传(img-0tZN2Ywf-1684241254698)(null)]](https://img-blog.csdnimg.cn/b88ba2a5030b4d6d8af84e6d27b4e31a.png)
3D卷积
单通道
用类似的方法我们先分析单通道图像的3D卷积,3D卷积的对象是三维图像,因此卷积核变成了$depth \times height \times width
简写为
简写为
简写为D \times H \times W $。单通道的3D卷积动态图如下:

针对单通道,与2D卷积不同之处在于,输入图像多了一个 depth 维度,故输入大小为 ( 1 , d e p t h , h e i g h t , w i d t h ) (1, depth, height, width) (1,depth,height,width),卷积核也多了一个 k d k_d kd维度,因此卷积核在输入3D图像的空间维度 ( d e p t h , h e i g h t , w i d t h ) (depth,height,width) (depth,height,width)上均进行滑窗操作,每次滑窗与 ( k d , k h , k w ) (k_d, k_h, k_w) (kd,kh,kw)窗口内的values进行相关操作,得到输出3D图像中的一个value,最终输出一个3D的特征图。
这里的3D不是通道导致的,而是深度(多层切片,多帧视频),因此,虽然输入和卷积核和输出都是3D的,但都可以是单通道的。
将上述静态表示成:
![[外链图片转存失败,源站可能有防盗链机制,建议将图片保存下来直接上传(img-0fxgLRVX-1684241253990)(null)]](https://img-blog.csdnimg.cn/6c9dfc6c416449b2baf0c01563ddbe3e.png)
多通道
![[外链图片转存失败,源站可能有防盗链机制,建议将图片保存下来直接上传(img-t0ZSzCLW-1684241254628)(null)]](https://img-blog.csdnimg.cn/f7fe9d6d532347c6b53ab60408698465.png)
然后将filter1、filter2、filter3堆叠在一起形成一个4维卷积核 D × H × W × 3 D \times H \times W \times 3 D×H×W×3,同理将各通道堆叠在一起就形成了多通道的3D卷积输入图像。
针对多通道,比如c个通道,输入大小为
(
c
,
d
e
p
t
h
,
h
e
i
g
h
t
,
w
i
d
t
h
)
(c, depth, height, width)
(c,depth,height,width),与2D多通道卷积的操作类似,对于每次滑窗,卷积核同时与c个channels上的
(
k
d
,
k
h
,
k
w
)
(k_d, k_h, k_w)
(kd,kh,kw) 窗口内的所有values进行相关操作,得到输出3D图像中的一个value。
由于3D卷积中的卷积核是3D的,因此在每个channel下使用的是同样的参数,权重共享。不同于2D多通道下的卷积核,后者在每一个channel使用的权重是一样的,不同的通道权重可能不一样。
代码
torch.nn.Conv3d(in_channels, out_channels, kernel_size, stride=1, padding=0, dilation=1, groups=1, bias=True, padding_mode='zeros', device=None, dtype=None)
- in_channels (int) – Number of channels in the input image
- out_channels (int) – Number of channels produced by the convolution
- kernel_size (int or tuple) – Size of the convolving kernel
- stride (int or tuple, optional) – Stride of the convolution. Default: 1
- padding (int, tuple or str, optional) – Padding added to all six sides of the input. Default: 0
- padding_mode (string*,* optional) –
'zeros','reflect','replicate'or'circular'. Default:'zeros' - dilation (int or tuple, optional) – Spacing between kernel elements. Default: 1
- groups (int, optional) – Number of blocked connections from input channels to output channels. Default: 1
- bias (bool, optional) – If
True, adds a learnable bias to the output. Default:True
和2D卷积函数基本上是一样的,只是维度和内部的工作机制不太一样。
Applies a 3D convolution over an input signal composed of several input planes.
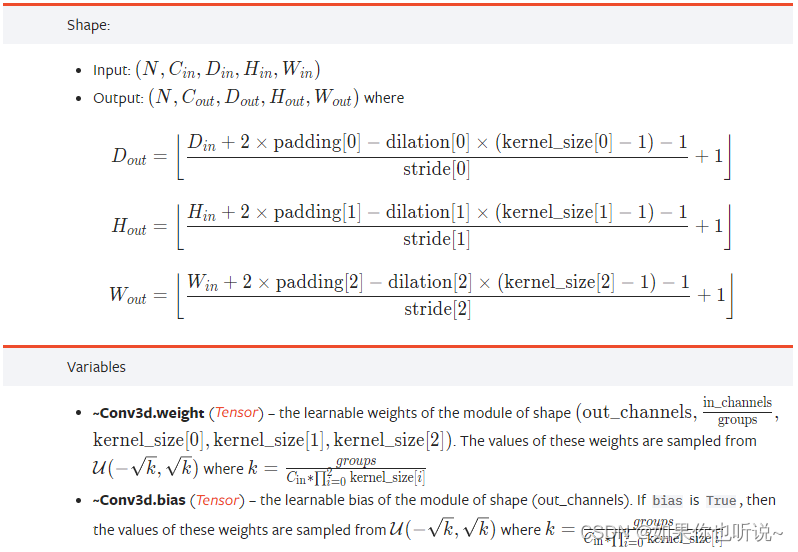
In the simplest case, the output value of the layer with input size$ (N, C_{in}, D, H, W)$ and output ( N , C o u t , D o u t , H o u t , W o u t ) (N, C_{out}, D_{out}, H_{out}, W_{out}) (N,Cout,Dout,Hout,Wout) can be precisely described as:
o u t ( N i , C o u t j ) = b i a s ( C o u t j ) + ∑ k = 0 C i n − 1 w e i g h t ( C o u t j , k ) ⋆ i n p u t ( N i , k ) out(N_i, C_{out_j}) = bias(C_{out_j}) + \sum_{k = 0}^{C_{in} - 1} weight(C_{out_j}, k) \star input(N_i, k) out(Ni,Coutj)=bias(Coutj)+k=0∑Cin−1weight(Coutj,k)⋆input(Ni,k)
where ⋆ is the valid 3D cross-correlation operator
This module supports TensorFloat32.
-
stridecontrols the stride for the cross-correlation. -
paddingcontrols the amount of padding applied to the input. It can be either a string {‘valid’, ‘same’} or a tuple of ints giving the amount of implicit padding applied on both sides. -
dilationcontrols the spacing between the kernel points; also known as the à trous algorithm. It is harder to describe, but this link has a nice visualization of whatdilationdoes. -
groupscontrols the connections between inputs and outputs.in_channelsandout_channelsmust both be divisible bygroups. For example,- At groups=1, all inputs are convolved to all outputs.
- At groups=2, the operation becomes equivalent to having two conv layers side by side, each seeing half the input channels and producing half the output channels, and both subsequently concatenated.
- At groups=
in_channels, each input channel is convolved with its own set of filters (of size out_channels in_channels \frac{\text{out\_channels}}{\text{in\_channels}} in_channelsout_channels).
The parameters kernel_size, stride, padding, dilation can either be:
- a single
int– in which case the same value is used for the depth, height and width dimension- a
tupleof three ints – in which case, the first int is used for the depth dimension, the second int for the height dimension and the third int for the width dimension
