前言
不知道小伙伴们是否注意到,用AS创建一个默认的新项目后,MainActivity已经有了很大的不同,最大的区别就是新增加了两个Fragment,同时我们注意到这两个Fragment之间跳转的时候并没有使用之前FragmentTransaction这种形式,而是使用了NavController和NavHostFragment,这就是新一代导航管理————Navigation。
项目中依赖Navigation:
implementation 'androidx.navigation:navigation-fragment-ktx:2.3.5'
implementation 'androidx.navigation:navigation-ui-ktx:2.3.5'
使用Navigation
先来看看如果使用Navigation
创建导航视图
新建一个Android Resource File,类型选择Navigation即可,输入名称后我们就创建了一个导航视图。
添加页面
在导航试图中,我们可以通过添加activity/fragment等标签手动添加页面,也支持在Design页面中通过界面添加,如下:
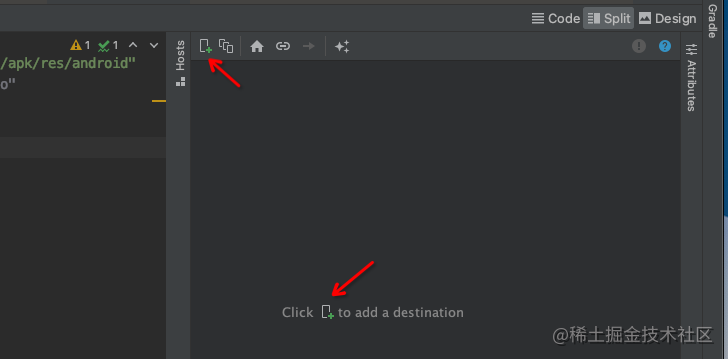
注意:这样添加后手动修改一下label。如果我们将Navigation与ToolBar连接,会在标题栏这个label。
示例中添加了两个页面,添加后代码如下:
<?xml version="1.0" encoding="utf-8"?>
<navigation xmlns:android="http://schemas.android.com/apk/res/android"
    xmlns:app="http://schemas.android.com/apk/res-auto"
    xmlns:tools="http://schemas.android.com/tools">

    <fragment
        android:id="@+id/FirstFragment"
        android:name="com.xxx.xxx.FirstFragment"
        android:label="@string/first_fragment_label"
        tools:layout="@layout/fragment_first">
    </fragment>
    <fragment
        android:id="@+id/SecondFragment"
        android:name="com.xxx.xxx.SecondFragment"
        android:label="@string/second_fragment_label"
        tools:layout="@layout/fragment_second">
    </fragment>
</navigation>
除了添加Fragment和Activity,Google还提供了一个占位符placeholder,添加加完代码如下:
<fragment android:id="@+id/placeholder" />
用于暂时占位以便后面可以替换为Fragment和Activity
添加导航
添加完页面后,我们还需要添加页面之间的导航,可以手动添加action标签,当然也可以通过拖拽来实现,如下:
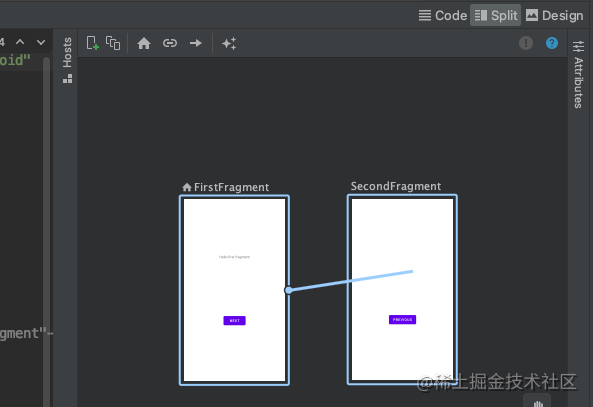
这样我们就添加了一个从FirstFragment导航到SecondFragment的动作,我们再添加一个逆向的动作,最终的代码如下:
<?xml version="1.0" encoding="utf-8"?>
<navigation xmlns:android="http://schemas.android.com/apk/res/android"
    xmlns:app="http://schemas.android.com/apk/res-auto"
    xmlns:tools="http://schemas.android.com/tools">

    <fragment
        android:id="@+id/FirstFragment"
        android:name="com.xxx.xxx.FirstFragment"
        android:label="@string/first_fragment_label"
        tools:layout="@layout/fragment_first">

        <action
            android:id="@+id/action_FirstFragment_to_SecondFragment"
            app:destination="@id/SecondFragment" />
    </fragment>
    <fragment
        android:id="@+id/SecondFragment"
        android:name="com.xxx.xxx.SecondFragment"
        android:label="@string/second_fragment_label"
        tools:layout="@layout/fragment_second">

        <action
            android:id="@+id/action_SecondFragment_to_FirstFragment"
            app:destination="@id/FirstFragment" />
    </fragment>
</navigation>
注意占位符placeholder同样支持添加导航。
这样就实现了两个页面间的导航,最后还需要为这个navigation设置id和默认页面startDestination,如下:
<navigation xmlns:android="http://schemas.android.com/apk/res/android"
    xmlns:app="http://schemas.android.com/apk/res-auto"
    xmlns:tools="http://schemas.android.com/tools"
    android:id="@+id/nav_graph"
    app:startDestination="@id/FirstFragment">
这样导航视图就创建完成了。可以看到Google力图通过可视化工具来简化开发工作,这对我们开发者来说非常有用,可以省去大量编写同质化代码的时间。
添加导航宿主
下一步我们需要向Activity中添加导航宿主,导航宿主是一个空页面,必须实现NavHost接口,我们使用Navigation提供的默认NavHost————NavHostFragment即可。如下:
<fragment
    android:id="@+id/nav_host_fragment_content_main"
    android:name="androidx.navigation.fragment.NavHostFragment"
    android:layout_width="0dp"
    android:layout_height="0dp"
    app:defaultNavHost="true"
    app:layout_constraintBottom_toBottomOf="parent"
    app:layout_constraintLeft_toLeftOf="parent"
    app:layout_constraintRight_toRightOf="parent"
    app:layout_constraintTop_toTopOf="parent"
    app:navGraph="@navigation/nav_graph" />
在Activity的视图中添加一个fragment标签,
- android:name设置为实现类,即NavHostFragment;
- app:navGraph设置为刚才新建的导航视图。
注意app:defaultNavHost=“true”,设置为true后表示将这个NavHostFragment设置为默认导航宿主,这样就会拦截系统的返回按钮事件。同一布局中如果有多个导航宿主(比如双窗口)则必须制定一个为默认的导航宿主。
这时候我们运行应用,就可以发现Activity中已经可以展示FirstFragment了。
实现导航
我们还需要为两个fragment添加按钮,是其点击跳转到另外一个页面,代码如下:
binding.buttonFirst.setOnClickListener {
    findNavController().navigate(R.id.action_FirstFragment_to_SecondFragment)
}
示例中是FirstFragment中的一个按钮,点击时执行了id为action_FirstFragment_to_SecondFragment的动作,这个是我们之前在导航视图中配置好的,会导航到SecondFragment。
注意首先通过 findNavController() 来获取一个NavController对象,然后调用它的navigate函数即可,当然这个函数有多种重载,比如可以传递参数,如下:
public void navigate(@IdRes int resId, @Nullable Bundle args) {
这里不一一列举了,大家自行查看源码即可。
可以看到使用Navigation代码精简了很多,只需要一行代码执行一个函数即可。
原理解析
我们重点来看看 findNavController() ,它是一个扩展函数,如下:
fun Fragment.findNavController(): NavController =
        NavHostFragment.findNavController(this)
实际上是NavHostFragment的一个静态函数findNavController:
@NonNull
public static NavController findNavController(@NonNull Fragment fragment) {
    ...
    View view = fragment.getView();
    if (view != null) {
        return Navigation.findNavController(view);
    }

    // For DialogFragments, look at the dialog's decor view
    Dialog dialog = fragment instanceof DialogFragment
            ? ((DialogFragment) fragment).getDialog()
            : null;
    if (dialog != null && dialog.getWindow() != null) {
        return Navigation.findNavController(dialog.getWindow().getDecorView());
    }

    throw new IllegalStateException("Fragment " + fragment
            + " does not have a NavController set");
}
通过源码可以看到最终是执行了Navigation的 findNavController 函数,它的代码如下:
@NonNull
public static NavController findNavController(@NonNull View view) {
    NavController navController = findViewNavController(view);
    ...
    return navController;
}
这里是通过 findViewNavController 函数来获取NavController的,它的代码如下:
@Nullable
private static NavController findViewNavController(@NonNull View view) {
    while (view != null) {
        NavController controller = getViewNavController(view);
        if (controller != null) {
            return controller;
        }
        ViewParent parent = view.getParent();
        view = parent instanceof View ? (View) parent : null;
    }
    return null;
}
这里可以看到通过view来获取NavController,如果没有则向上层查找(父view)直到找到或到根结点。 getViewNavController 代码如下:
@Nullable
private static NavController getViewNavController(@NonNull View view) {
    Object tag = view.getTag(R.id.nav_controller_view_tag);
    NavController controller = null;
    if (tag instanceof WeakReference) {
        controller = ((WeakReference<NavController>) tag).get();
    } else if (tag instanceof NavController) {
        controller = (NavController) tag;
    }
    return controller;
}
看到这里获取view中key为 R.id.nav_controller_view_tag 的tag,这个tag就是NavController,那么这个tag又从哪来的?
NavHostFragment
其实就是上面我们提到导航宿主————NavHostFragment,在他的 onViewCreated 中可以看到如下代码:
@Override
public void onViewCreated(@NonNull View view, @Nullable Bundle savedInstanceState) {
    super.onViewCreated(view, savedInstanceState);
    if (!(view instanceof ViewGroup)) {
        throw new IllegalStateException("created host view " + view + " is not a ViewGroup");
    }
    Navigation.setViewNavController(view, mNavController);
    // When added programmatically, we need to set the NavController on the parent - i.e.,
    // the View that has the ID matching this NavHostFragment.
    if (view.getParent() != null) {
        mViewParent = (View) view.getParent();
        if (mViewParent.getId() == getId()) {
            Navigation.setViewNavController(mViewParent, mNavController);
        }
    }
}
这里的 mNavController 是在NavHostFragment的 onCreate 中创建出来的,是一个NavHostController对象,它继承NavController,所以就是NavController。
可以看到 onViewCreated 中调用了Navigation的 setViewNavController 函数,它的代码如下:
public static void setViewNavController(@NonNull View view,
        @Nullable NavController controller) {
    view.setTag(R.id.nav_controller_view_tag, controller);
}
这样就将NavController加入tag中了,通过 findNavController() 就可以得到这个NavController来执行导航了。
注意在 onViewCreated 中不仅为Fragment的View添加了tag,同时还为其父View也添加了,这样做的目的是在Activity中也可以获取到NavController,这点下面就会遇到。
支持ToolBar
Google提供了Navigation与ToolBar连接的功能,代码如下:
val navController = findNavController(R.id.nav_host_fragment_content_main)
appBarConfiguration = AppBarConfiguration(navController.graph)
setupActionBarWithNavController(navController, appBarConfiguration)
上面我们提到,如果Navigation与ToolBar连接,标题栏会自动显示在导航视图中设定好的label。
注意这里的 findNavController 是Activity的扩展函数,它最终一样会调用Navigation的对应函数,所以与Fragment的流程是一样的。而上面我们提到了,在NavHostFragment中给上层View也设置了tag,所以在这里才能获取到NavController。
除了这个,我们还可以发现当在切换页面的时候,标题栏的返回按钮也会自动显示和隐藏。当导航到第二个页面SecondFragment,返回按钮显示;当回退到首页时,返回按钮隐藏。
但是此时返回按钮点击无效,因为我们还需要重写一个函数:
override fun onSupportNavigateUp(): Boolean {
    val navController = findNavController(R.id.nav_host_fragment_content_main)
    return navController.navigateUp(appBarConfiguration)
            || super.onSupportNavigateUp()
}
这样当点击标题栏的返回按钮时,会执行NavController的 navigateUp 函数,就会退回到上一页面。
总结
可以看出通过Google推出的这个Navigation,可以让开发者更加优雅管理导航,同时也简化了这部分的开发工作,可视化功能可以让开发者更直观的进行管理。除此之外,Google还提供了Safe Args Gradle插件,该插件可以生成简单的对象和构建器类,这些类支持在目的地之间进行类型安全的导航和参数传递。关于这个大家可以参考官方文档即可。
更多JetPack文章:
【Jetpack】ActivityResult介绍及原理分析
Android Jetpack:利用Palette进行图片取色


