Apollo与SpringBoot整合原理深度剖析
- Spring环境上下文模块
- @Value注解如何完成属性注入
- application.yml等配置文件加载时机
- 监听环境上下文prepared事件
- Loader加载配置文件
- Apollo与SpringBoot整合原理
- @Value注解的热更新原理
Spring环境上下文模块
- Spring Envionment设计如下:
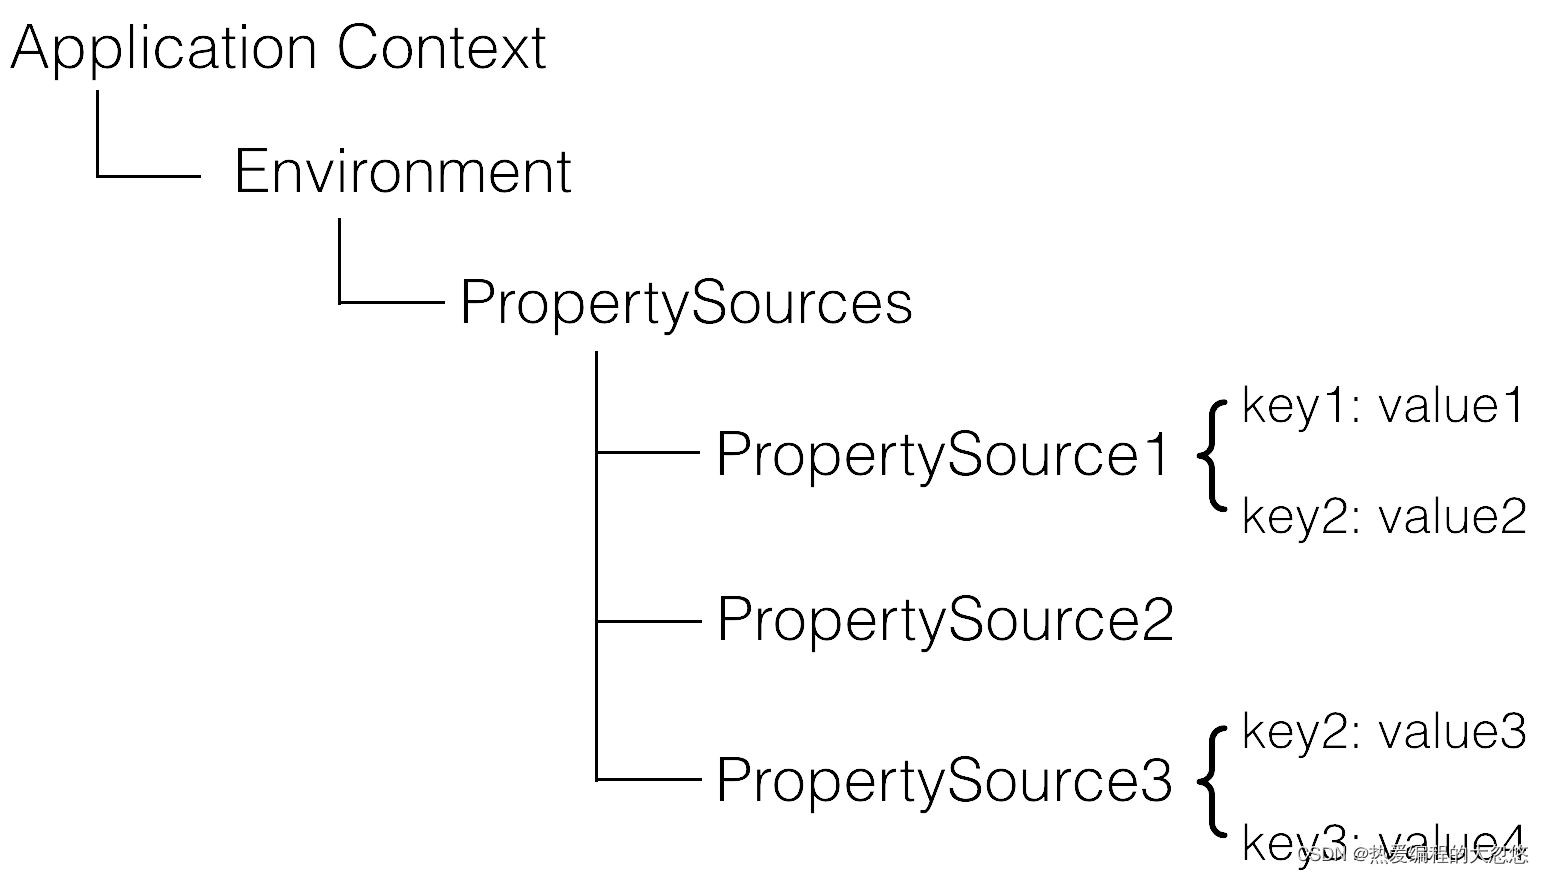
- 需要注意的是,PropertySource之间是有优先级顺序的,如果有一个Key在多个property source中都存在,那么在前面的property source优先。
public abstract class AbstractEnvironment implements ConfigurableEnvironment {
    //Spring中并不是直接用一个List<PropertySource>管理多个属性源,而是用一个MutablePropertySources进行管理
	private final MutablePropertySources propertySources = new MutablePropertySources(this.logger);
	...
}
//MutablePropertySources中本质还是使用一个List集合进行管理---组合模式的体现
public class MutablePropertySources implements PropertySources {
	//一个写时复制集合,考虑到了线程安全性,同时兼顾了性能,因为对于PropertySource而言,读大于写,一般属性源在Spring应用程序启动完毕后,基本就确定不动了
	private final List<PropertySource<?>> propertySourceList = new CopyOnWriteArrayList<>();
    ...
}
- Spring中的Environment模块组织结构如下所示:
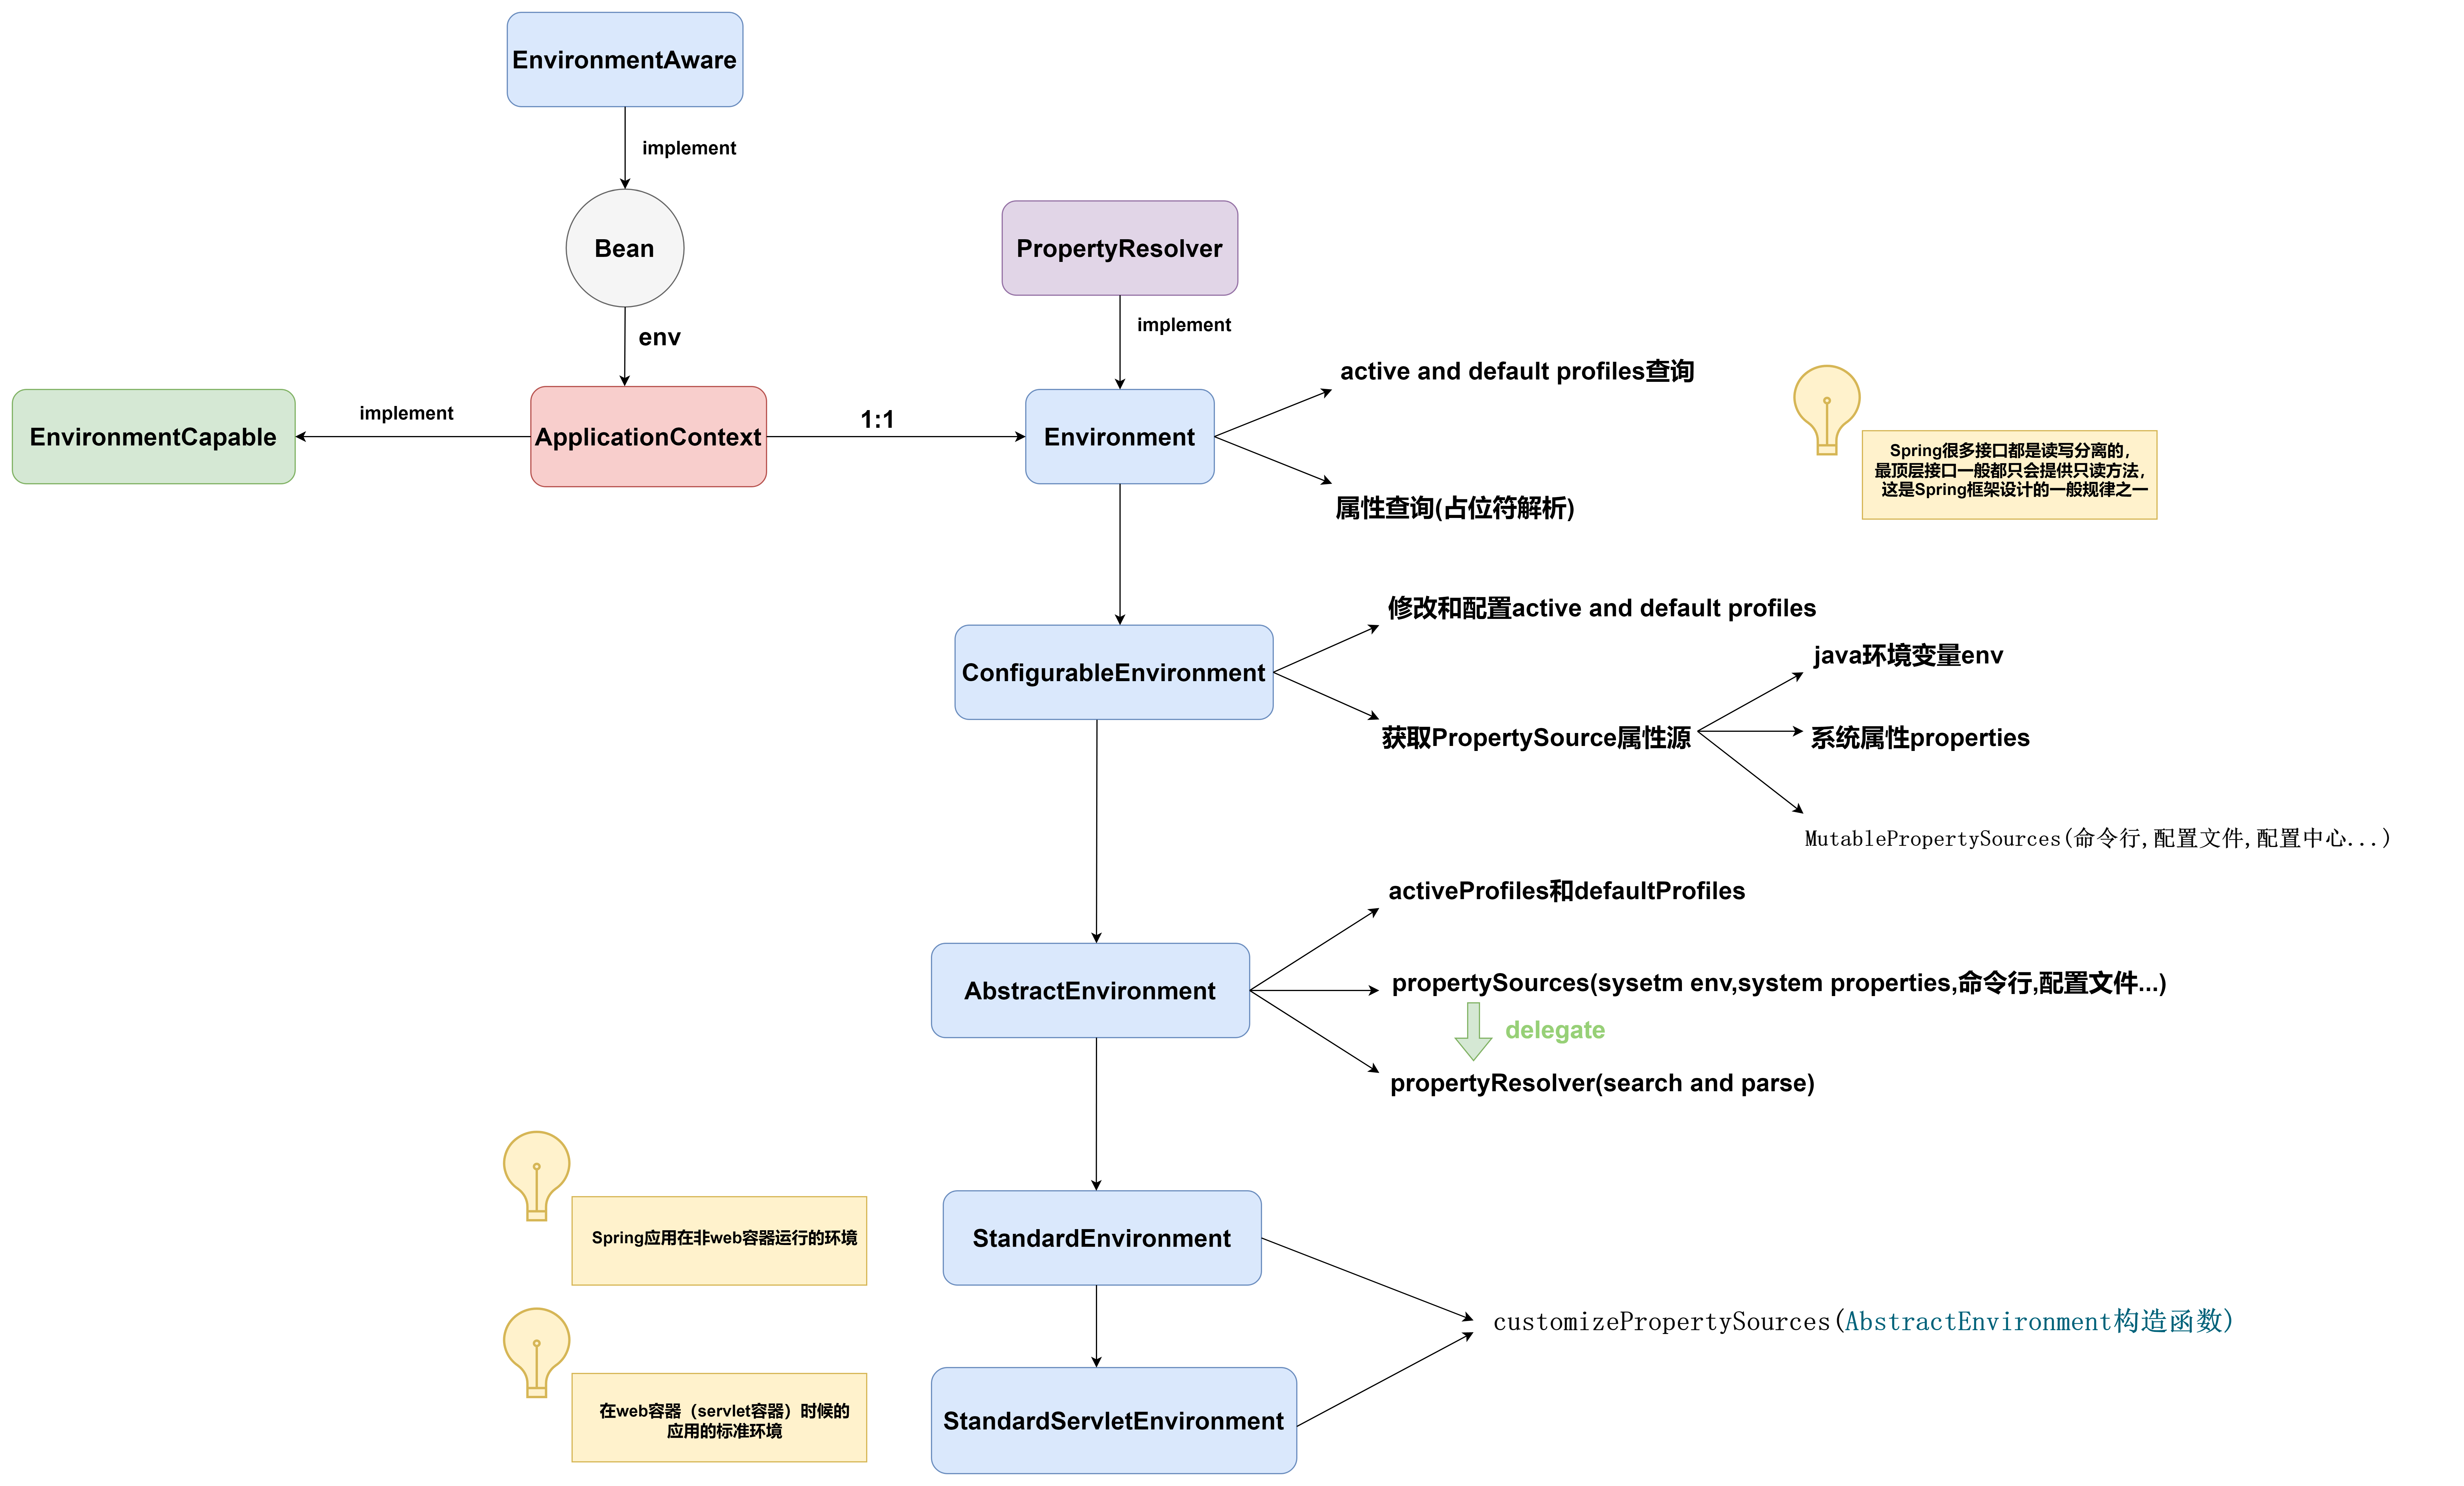
- ApplicationContext继承EnvironmentCapable接口,表明具备管理和对外暴露环境上下文对象的能力
- 普通的Spring Bean可以通过继承EnvironmentAware,在依赖注入阶段,从容器中获取并注入环境上下文实例对象
- PropertyResolver接口对外暴露获取解析过后的属性的相关方法 --> 只负责解析
${}占位符 , 不负责解析EL表达式#{}占位符 - Environment接口继承了PropertyResolver接口,从而具备了获取解析过后的属性的能力,并且自身对外暴露获取激活配置文件和默认配置文件方法
这里Environment根据配置文件中设置的spring.active.active属性来管理当前激活的Profile(配置文件)
- ConfigurableEnvironment接口主要对外暴露修改激活的Profile和默认Profile的方法,同时还对外暴露出MutablePropertySources属性源,SystemProperties属性源和SystemEnvironment属性源,用户获取后可以进行修改
Spring很多接口都是读写分离的,最顶层接口一般都只会提供只读方法,Configurablexxx接口中提供写方法,这是Spring框架设计的一般规律之一
- AbstractEnvironment对顶层读写接口功能进行具体落地实现,同时也作为抽象基础类将属性源管理和profile管理全部实现,但是具体是标准环境上下文,Web环境上下文还是响应式Web环境上下文,给出不同实现类区分即可
public abstract class AbstractEnvironment implements ConfigurableEnvironment {
    //管理激活配置文件的容器
	private final Set<String> activeProfiles = new LinkedHashSet<>();
   //管理默认配置文件的容器
	private final Set<String> defaultProfiles = new LinkedHashSet<>(getReservedDefaultProfiles());
    //MutablePropertySources负责管理多个属性源---组合模式体现
	private final MutablePropertySources propertySources = new MutablePropertySources(this.logger);
    //负责${}占位符属性解析
	private final ConfigurablePropertyResolver propertyResolver =
			new PropertySourcesPropertyResolver(this.propertySources);

    public AbstractEnvironment() {
        //留给子类扩展其他属性源的钩子方法
		customizePropertySources(this.propertySources);
	}
    ...
}
- Environment返回的是解析后的属性,因此所有的getProperty的系列方法,实际都是由propertyResolver负责完成。
- propertyResolver负责search and parse
- search是根据key遍历属性源集合找到第一个存在该key的propertySource并返回value
- parse是对找到的value进行${}占位符解析,最终返回的是parse过后的value
- StandardEnvironment代表标准环境上下文,可以在非Web和Web环境下使用
public class StandardEnvironment extends AbstractEnvironment {
	public static final String SYSTEM_ENVIRONMENT_PROPERTY_SOURCE_NAME = "systemEnvironment";
	public static final String SYSTEM_PROPERTIES_PROPERTY_SOURCE_NAME = "systemProperties";
    //StandardEnvironment只干了一件事,通过钩子接口customizePropertySources向属性源集合添加系统属性源和系统上下文属性源
	@Override
	protected void customizePropertySources(MutablePropertySources propertySources) {
		propertySources.addLast(
				new PropertiesPropertySource(SYSTEM_PROPERTIES_PROPERTY_SOURCE_NAME, getSystemProperties()));
		propertySources.addLast(
				new SystemEnvironmentPropertySource(SYSTEM_ENVIRONMENT_PROPERTY_SOURCE_NAME, getSystemEnvironment()));
	}
}
Java环境变量(Env)和系统属性(Property)区别介绍
- StandardServletEnvironment代表Servlet作为Web容器环境下的上下文
public class StandardServletEnvironment extends StandardEnvironment implements ConfigurableWebEnvironment {
	public static final String SERVLET_CONTEXT_PROPERTY_SOURCE_NAME = "servletContextInitParams";
	public static final String SERVLET_CONFIG_PROPERTY_SOURCE_NAME = "servletConfigInitParams";
	public static final String JNDI_PROPERTY_SOURCE_NAME = "jndiProperties";
    //StandardServletEnvironment同样是通过钩子接口,向属性源集合中添加上面三个属性源
	@Override
	protected void customizePropertySources(MutablePropertySources propertySources) {
	    //此处的Stub意思为桩,表示模拟属性源--在initPropertySources方法中会对Stub属性源进行实际替换操作
	    //之所以这里采用Stud模拟属性源,因为环境上下文模块初始化早于Servlet容器初始化和启动
		propertySources.addLast(new StubPropertySource(SERVLET_CONFIG_PROPERTY_SOURCE_NAME));
		propertySources.addLast(new StubPropertySource(SERVLET_CONTEXT_PROPERTY_SOURCE_NAME));
		if (JndiLocatorDelegate.isDefaultJndiEnvironmentAvailable()) {
			propertySources.addLast(new JndiPropertySource(JNDI_PROPERTY_SOURCE_NAME));
		}
		//调用父类钩子方法,添加系统属性源和系统上下文属性源
		super.customizePropertySources(propertySources);
	}

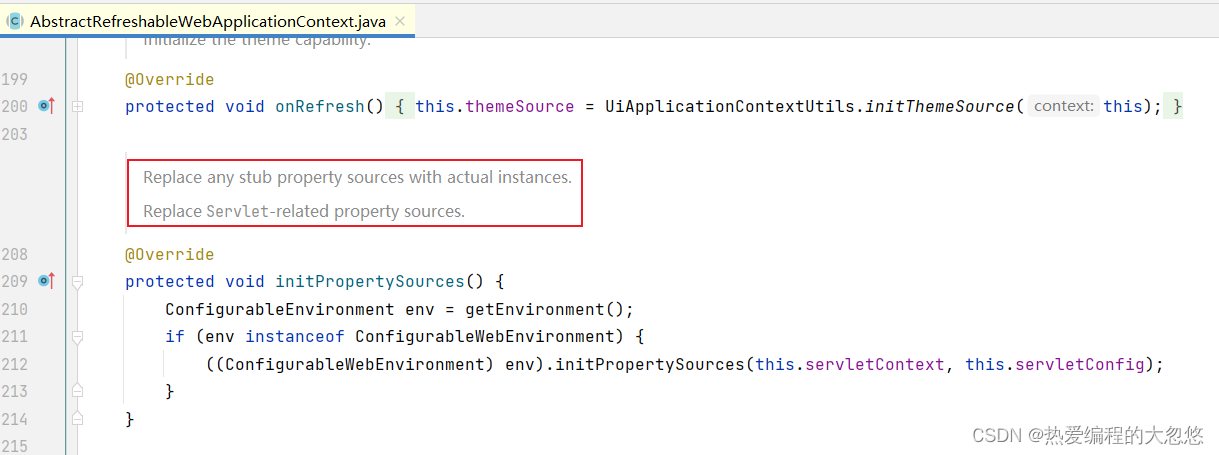
    //initPropertySources方法来源于ConfigurableWebEnvironment接口,当Servlet容器启动时,调用此方法完成上面两个stub属性源的替换
    //initPropertySources回调接口何时被调用,大家可以追踪一下SpringBoot环境下Servlet容器初始化过程
	@Override
	public void initPropertySources(@Nullable ServletContext servletContext, @Nullable ServletConfig servletConfig){
		WebApplicationContextUtils.initServletPropertySources(getPropertySources(), servletContext, servletConfig);
	}
}
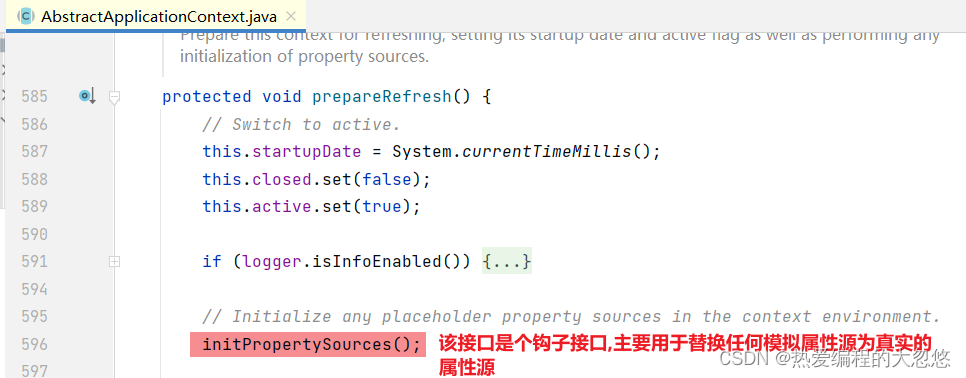
- initServletPropertySources方法完成模拟属性源替换工作
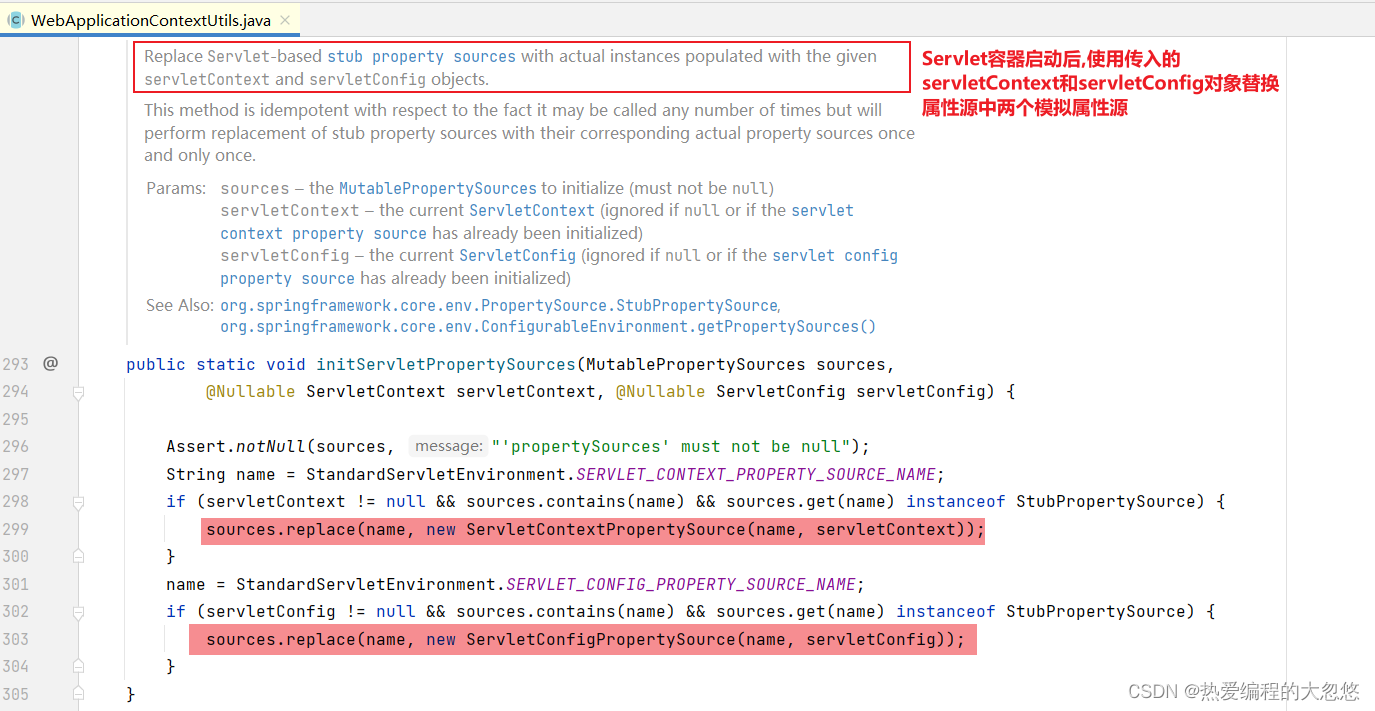
- initPropertySources调用链
@Value注解如何完成属性注入
- 回顾一下Bean的生命周期
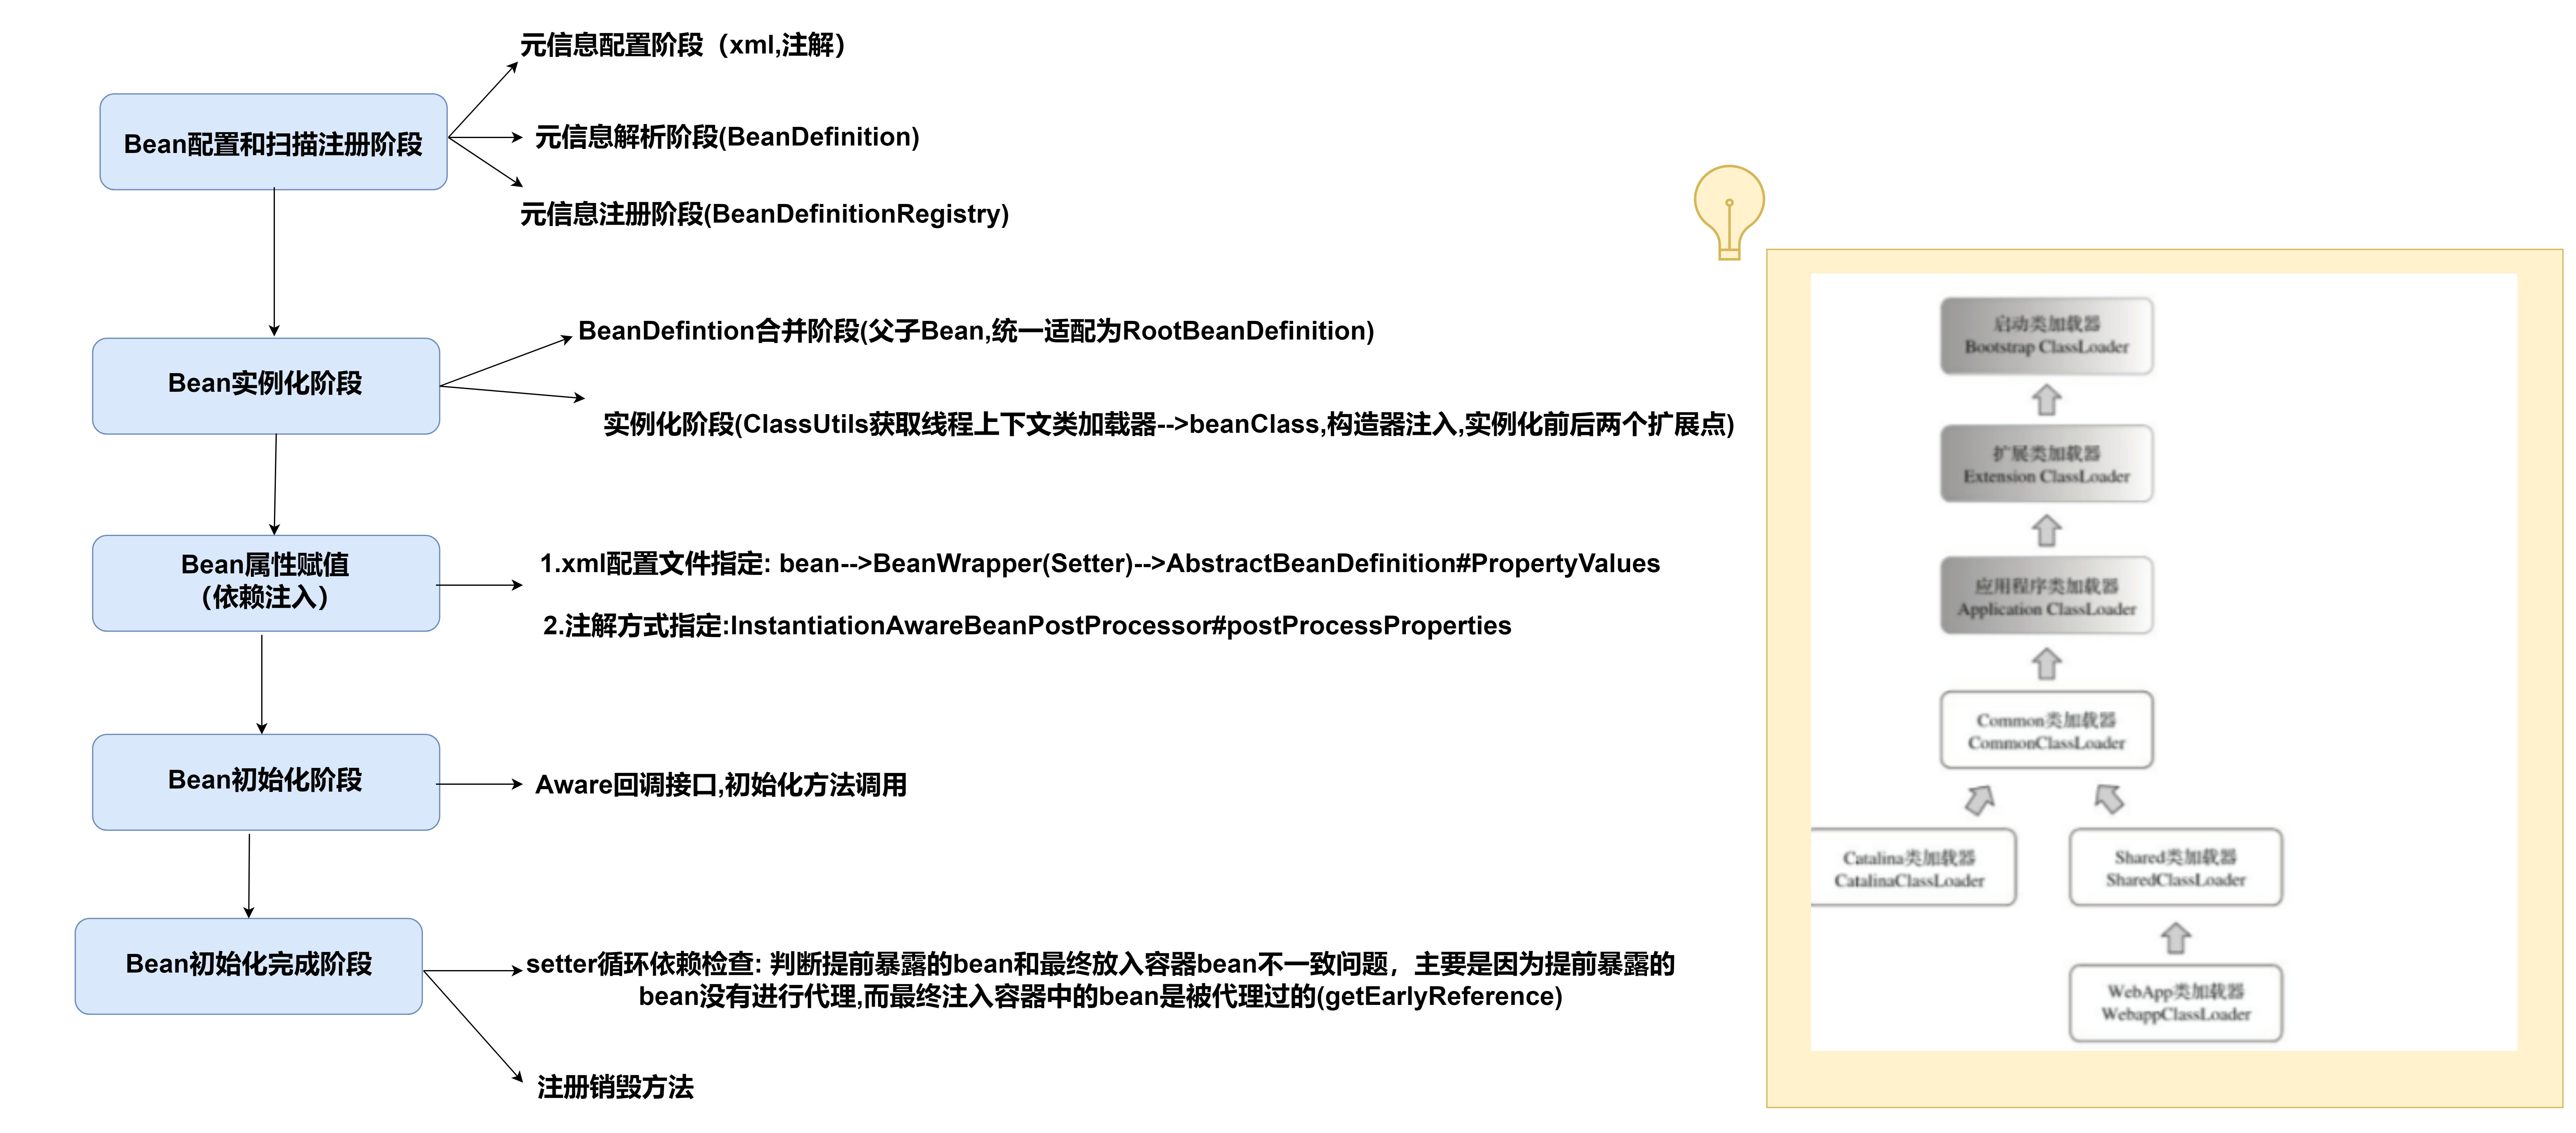
- 依赖注入阶段是如何完成属性注入的呢 ?
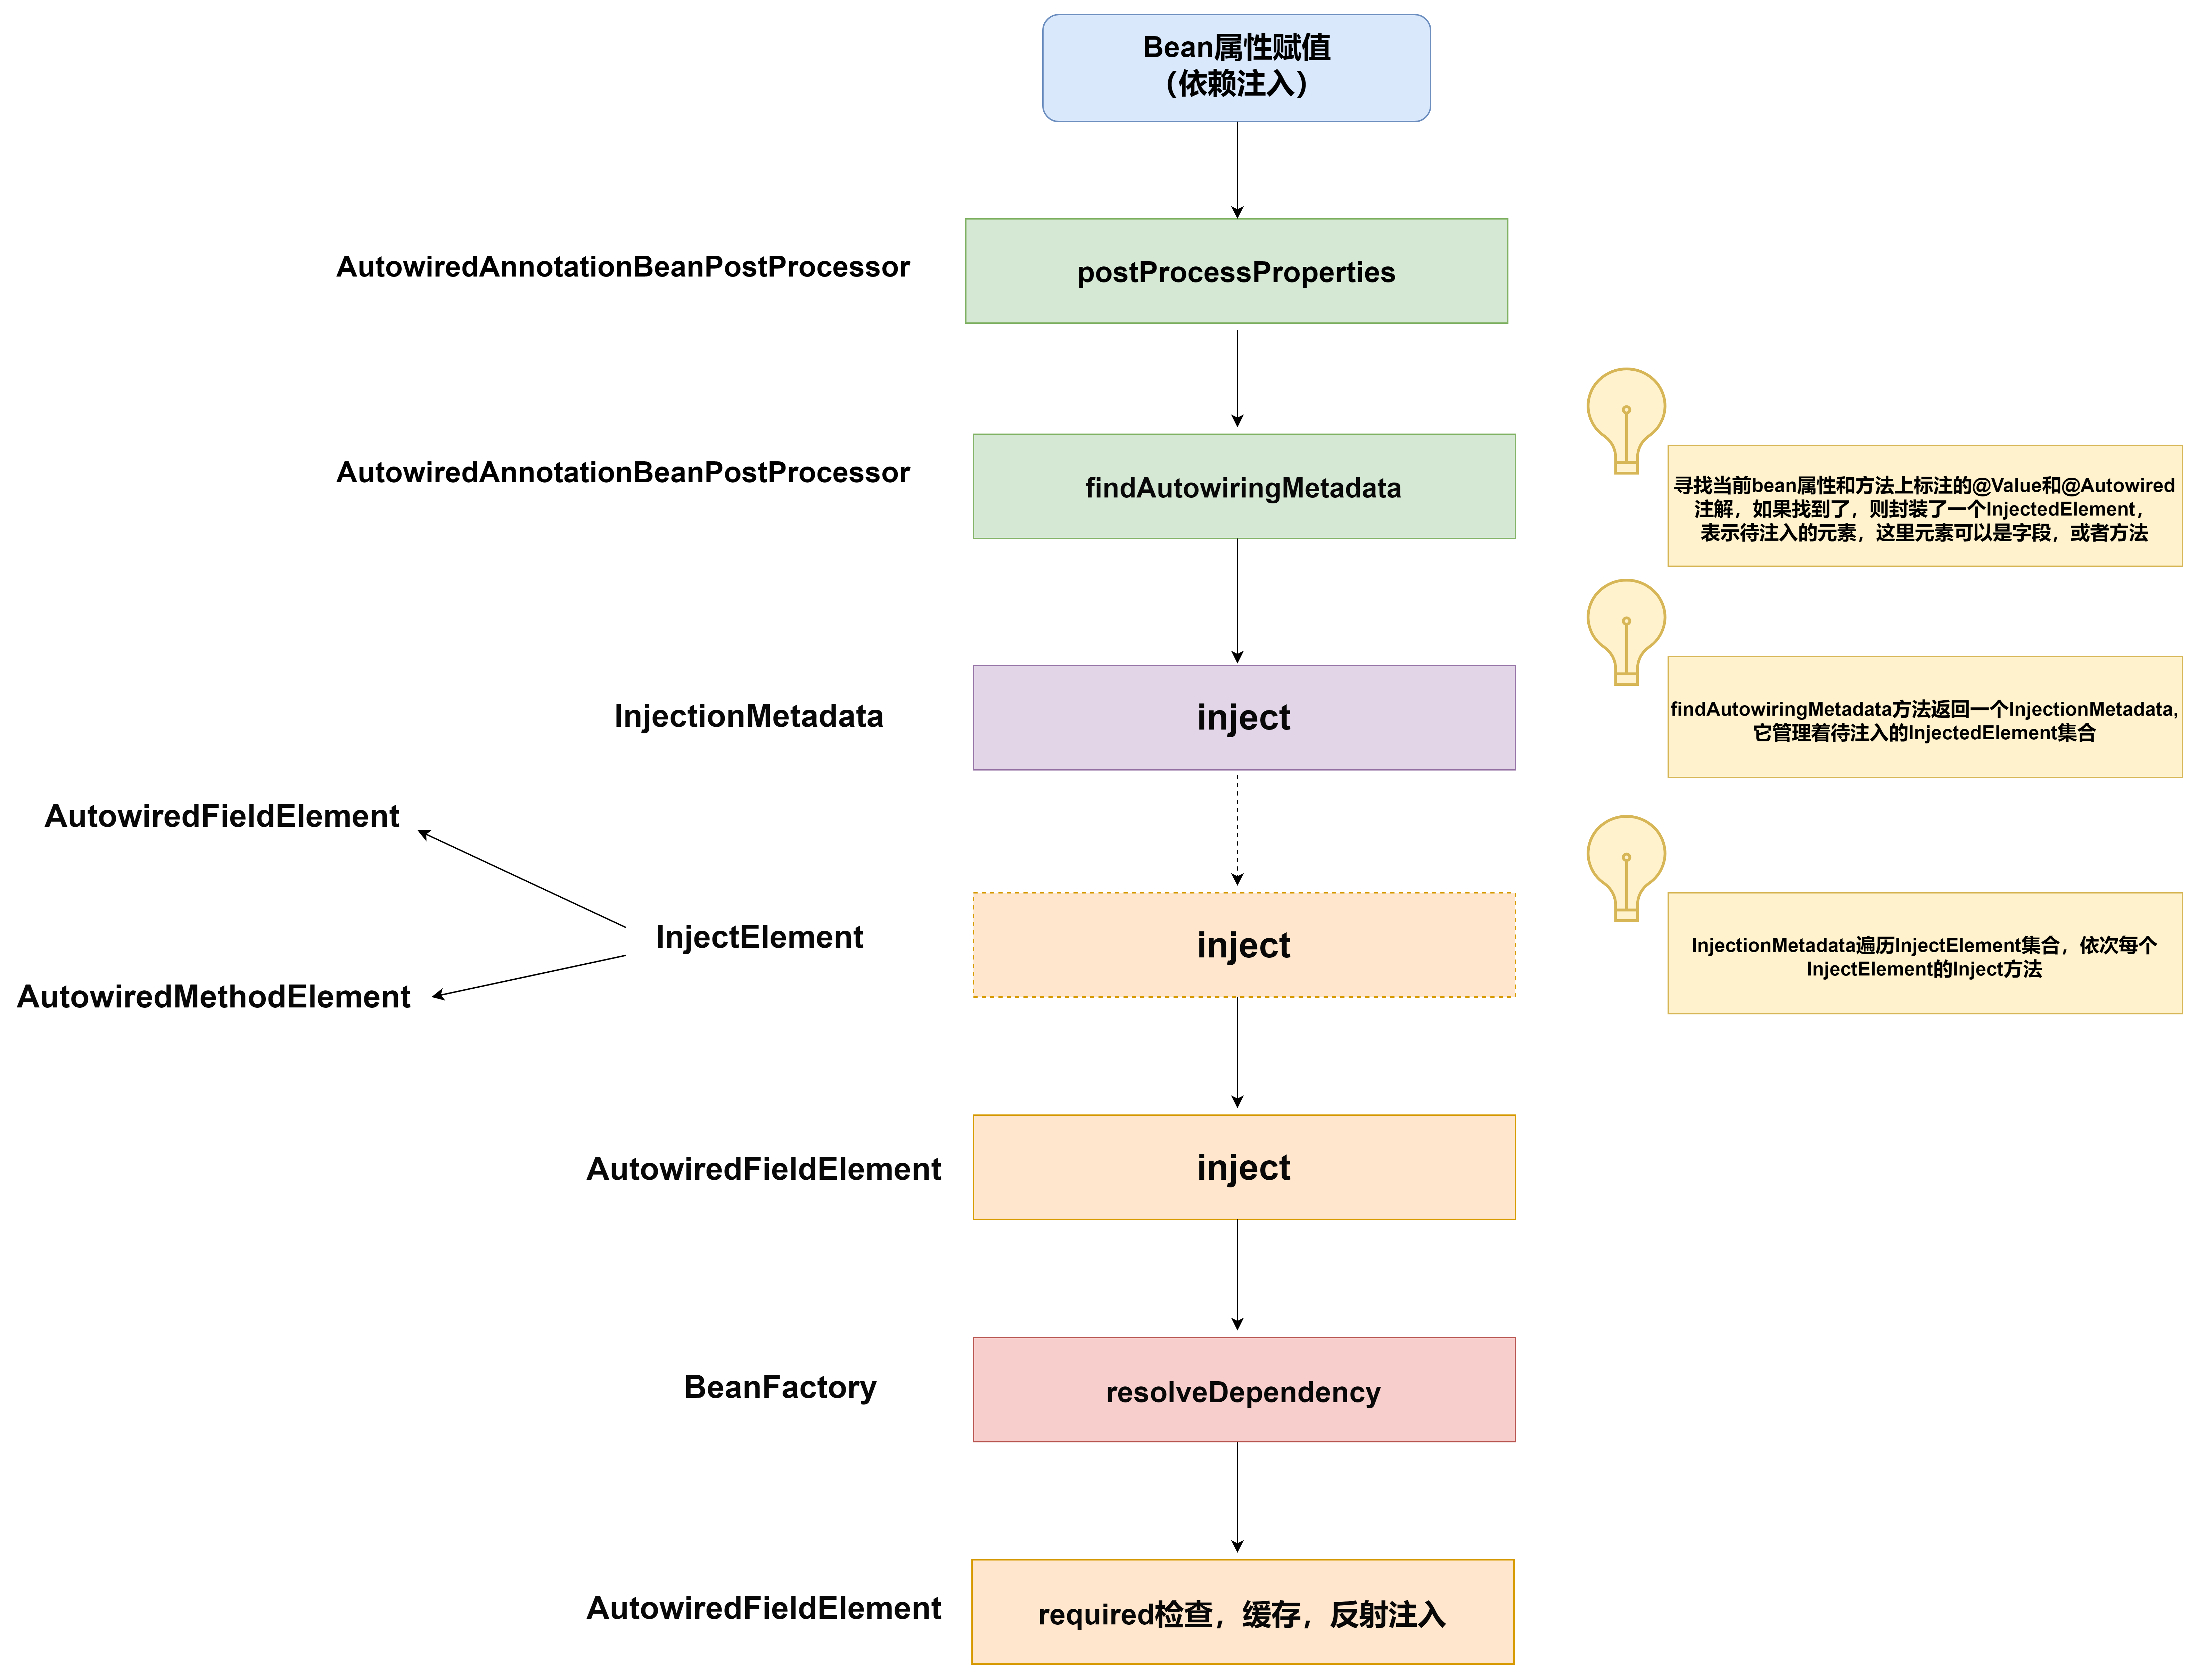
- AutowiredAnnotationBeanPostProcessor的postProcessPropertyValues方法负责处理由注解形式指定的依赖注入点集合
需要依赖注入的点指定方式在Spring中有两种方式,一种是配置文件方式,一种是注解形式。
- 配置文件方式指定的依赖注入点集合在populateBean方法中,由BeanWrapper利用setter方法完成依赖注入
- 注解方式指定的依赖注入点集合在populateBean方法中,由SmartInstantiationAwareBeanPostProcessor的postProcessPropertyValues方法进行处理,默认通过反射方式完成依赖注入
- 如果配置文件和注解指定的依赖注入点集合中存在重叠的注入点,虽然注解指定的依赖注入点先被处理,但是postProcessPropertyValues方法中会判断当前注入点是否已经在配置文件中指定,如果指定了,那么跳过处理。
public class AutowiredAnnotationBeanPostProcessor extends InstantiationAwareBeanPostProcessorAdapter
		implements MergedBeanDefinitionPostProcessor, PriorityOrdered, BeanFactoryAware {
	private final Set<Class<? extends Annotation>> autowiredAnnotationTypes = new LinkedHashSet<>(4);
	private String requiredParameterName = "required";
	private boolean requiredParameterValue = true;
	private ConfigurableListableBeanFactory beanFactory;
	private final Map<String, InjectionMetadata> injectionMetadataCache = new ConcurrentHashMap<>(256);

	public AutowiredAnnotationBeanPostProcessor() {
	    //当前Bean后置处理器负责处理Autowired,Value,Inject注解
		this.autowiredAnnotationTypes.add(Autowired.class);
		this.autowiredAnnotationTypes.add(Value.class);
		try {
			this.autowiredAnnotationTypes.add((Class<? extends Annotation>)
					ClassUtils.forName("javax.inject.Inject", AutowiredAnnotationBeanPostProcessor.class.getClassLoader()));
			logger.info("JSR-330 'javax.inject.Inject' annotation found and supported for autowiring");
		}
		catch (ClassNotFoundException ex) {
		}
	}

    //处理注解指定的依赖注入
	@Override
	public PropertyValues postProcessPropertyValues(
			PropertyValues pvs, PropertyDescriptor[] pds, Object bean, String beanName) throws BeanCreationException{
        //寻找当前bean属性和方法上所有标注了相关注解的地方,如果找到了,则封装为一个InjectedElement对象实例
        //表示待注入元素,这里待注入元素可以是字段,或者方法
        //InjectionMetadata内部管理从当前bean上找到的所有InjectedElement
		InjectionMetadata metadata = findAutowiringMetadata(beanName, bean.getClass(), pvs);
		try {
		    //进行注解标注的依赖注入---遍历InjectionMetadata内部管理的InjectedElement集合
		    //依次调用每个InjectedElement的inject方法
			metadata.inject(bean, beanName, pvs);
		}
		...
		//
		return pvs;
	}
    ...

	private InjectionMetadata findAutowiringMetadata(String beanName, Class<?> clazz, @Nullable PropertyValues pvs){
		// InjectionMetadata会被缓存起来--key为beanName
		String cacheKey = (StringUtils.hasLength(beanName) ? beanName : clazz.getName());
		InjectionMetadata metadata = this.injectionMetadataCache.get(cacheKey);
		//双重锁机制,确保单例
		if (InjectionMetadata.needsRefresh(metadata, clazz)) {
			synchronized (this.injectionMetadataCache) {
				metadata = this.injectionMetadataCache.get(cacheKey);
				if (InjectionMetadata.needsRefresh(metadata, clazz)) {
					if (metadata != null) {
						metadata.clear(pvs);
					}
					//为当前bean构建InjectionMetadata
					metadata = buildAutowiringMetadata(clazz);
					this.injectionMetadataCache.put(cacheKey, metadata);
				}
			}
		}
		return metadata;
	}

	private InjectionMetadata buildAutowiringMetadata(final Class<?> clazz) {
		List<InjectionMetadata.InjectedElement> elements = new ArrayList<>();
		Class<?> targetClass = clazz;
		do {
			final List<InjectionMetadata.InjectedElement> currElements = new ArrayList<>();
			//遍历当前类上所有属性,寻找到存在相关注解的属性
			ReflectionUtils.doWithLocalFields(targetClass, field -> {
				AnnotationAttributes ann = findAutowiredAnnotation(field);
				//排除静态属性的注入
				if (ann != null) {
					if (Modifier.isStatic(field.getModifiers())) {
						if (logger.isWarnEnabled()) {
							logger.warn("Autowired annotation is not supported on static fields: " + field);
						}
						return;
					}
					//从注解中取出required属性--表明是否必须注入成功
					boolean required = determineRequiredStatus(ann);
					//封装为AutowiredFieldElement后返回
					currElements.add(new AutowiredFieldElement(field, required));
				}
			});
            //遍历当前bean所有方法,寻找存在相关注解的方法,并且方法不是静态的,封装为AutowiredMethodElement后返回
			ReflectionUtils.doWithLocalMethods(targetClass, method -> {
				...
				AnnotationAttributes ann = findAutowiredAnnotation(bridgedMethod);
				if (ann != null && method.equals(ClassUtils.getMostSpecificMethod(method, clazz))) {
					if (Modifier.isStatic(method.getModifiers())) {
						...
						return;
					}
					...
					boolean required = determineRequiredStatus(ann);
					PropertyDescriptor pd = BeanUtils.findPropertyForMethod(bridgedMethod, clazz);
					currElements.add(new AutowiredMethodElement(method, required, pd));
				}
			});
			elements.addAll(0, currElements);
			//注入依赖注入一并处理当前父类上标注的相关依赖注入点
			targetClass = targetClass.getSuperclass();
		}
		while (targetClass != null && targetClass != Object.class);
        //创建一个InjectionMetadata返回,InjectionMetadata管理当前bean中所有依赖注入点
		return new InjectionMetadata(clazz, elements);
	}
}
- InjectionMetadata的inject方法负责完成实际的基于注解搜集到依赖注入点的依赖注入
	public void inject(Object target, @Nullable String beanName, @Nullable PropertyValues pvs) throws Throwable {
		    ...
		    //遍历所有InjectedElement,调用其inject方法完成依赖注入
			for (InjectedElement element : elementsToIterate) {
				...
				element.inject(target, beanName, pvs);
			}
		}
	}
依赖注入点InjectedElement分为两种实现类: AutowiredFieldElement和AutowiredMethodElement,此处只看AutowiredMethodElement的inject方法实现
- AutowiredMethodElement的inject方法进行方法级别的依赖注入之前,会调用checkPropertySkipping方法检查是否和配置文件中指定的依赖注入点重叠,如果是,则跳过处理。
	private class AutowiredFieldElement extends InjectionMetadata.InjectedElement {

		private final boolean required;

		private volatile boolean cached = false;

		@Nullable
		private volatile Object cachedFieldValue;
        ...
		@Override
		protected void inject(Object bean, @Nullable String beanName, @Nullable PropertyValues pvs) throws Throwable {
			Field field = (Field) this.member;
			Object value;
			 ...
            //构建依赖描述符
		    DependencyDescriptor desc = new DependencyDescriptor(field, this.required);
			  ...
             //类型转换器
		     TypeConverter typeConverter = beanFactory.getTypeConverter();
             //调用beanFactory的resolveDependency方法,根据依赖描述符完成依赖查找
			 value = beanFactory.resolveDependency(desc, beanName, autowiredBeanNames, typeConverter);
				...
            //反射注入
			if (value != null) {
				ReflectionUtils.makeAccessible(field);
				field.set(bean, value);
			}
		}
	}
- resolveDependency作为依赖查找核心,怎么查找的?
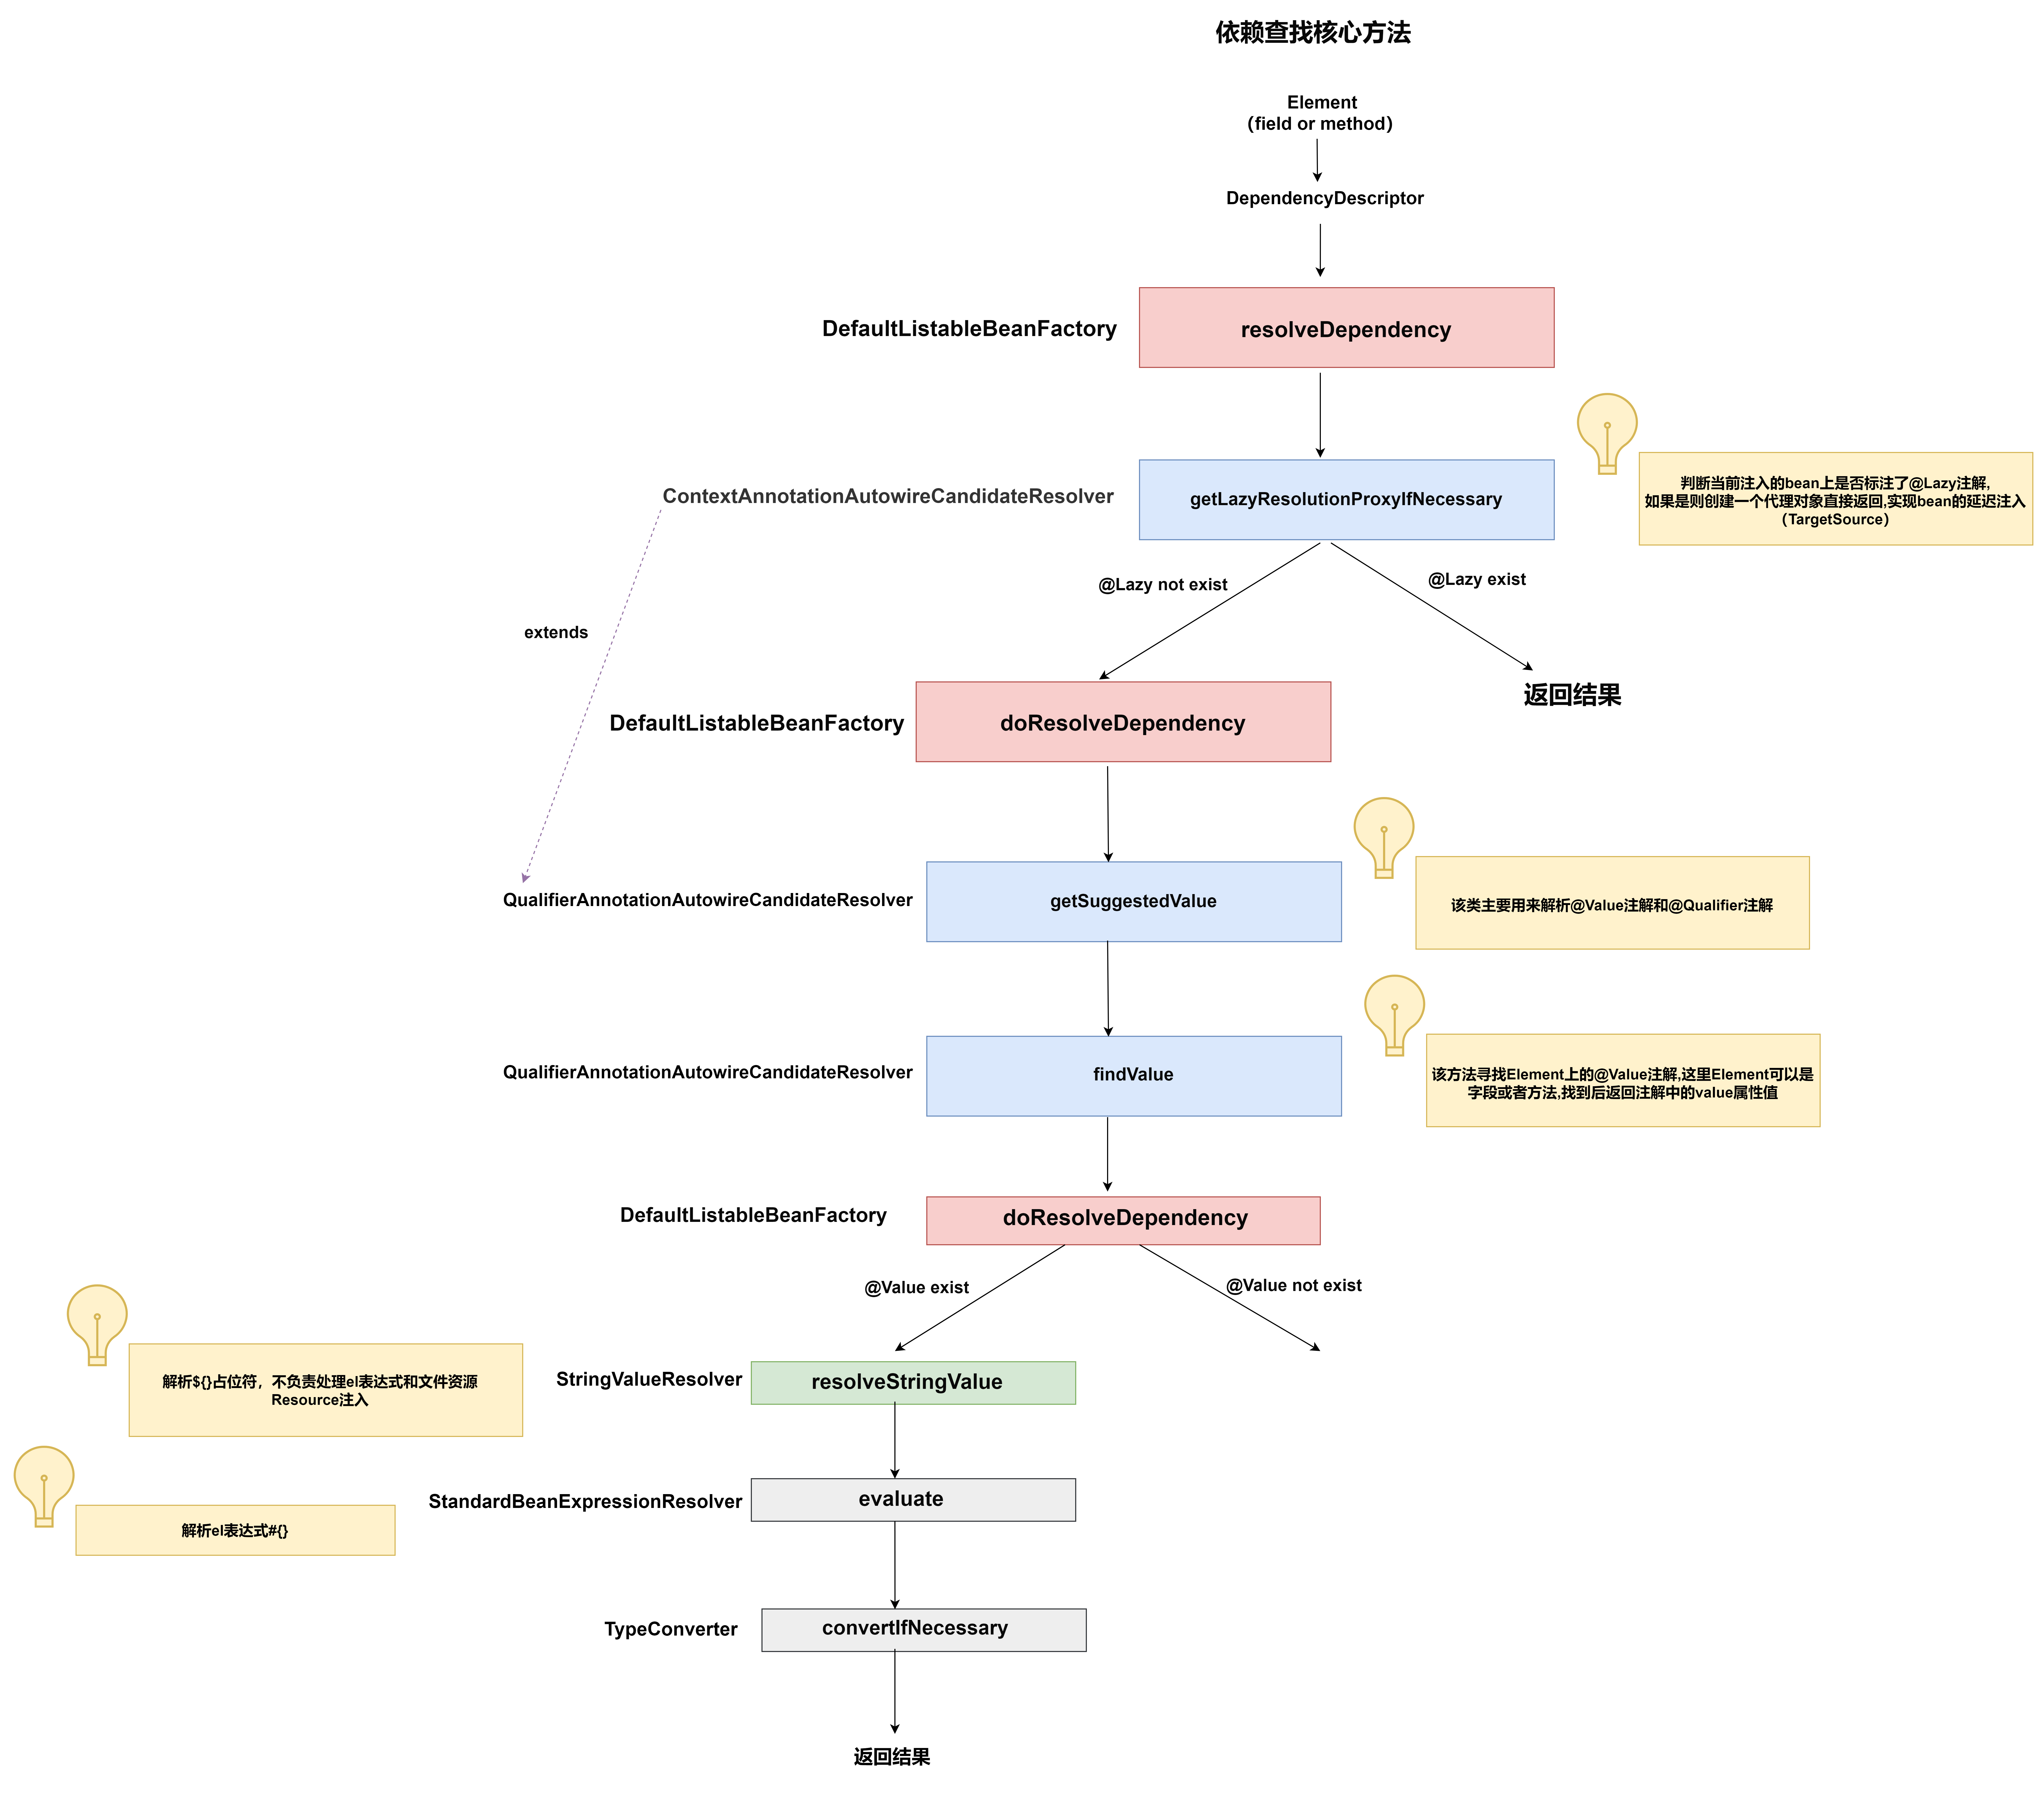
- DefaultListableBeanFactory的resolveDependency方法作为IOC容器进行依赖查找的核心方法
	public Object resolveDependency(DependencyDescriptor descriptor, @Nullable String requestingBeanName,
			@Nullable Set<String> autowiredBeanNames, @Nullable TypeConverter typeConverter) throws BeansException {
        //初始化方法参数名解析器
		descriptor.initParameterNameDiscovery(getParameterNameDiscoverer());
		...
		//如果当前依赖注入点上存在@Lazy注解,则创建一个代理对象返回,为的是实现依赖延迟注入---这块逻辑很简单,不展开,自己看源码
		Object result = getAutowireCandidateResolver().getLazyResolutionProxyIfNecessary(descriptor, requestingBeanName);
	     //正常情况下进入依赖查找逻辑
	    if (result == null) {
				result = doResolveDependency(descriptor, requestingBeanName, autowiredBeanNames, typeConverter);
		 }
		return result;
	}
}
- doResolveDependency方法中真正负责依赖查找工作,依赖查找要么根据value注解中的属性值进行解析,把解析后的结果作为依赖查找结果返回。要么就是@Autowired属性注入–> 也就是我们平常认为的依赖查找应该干的事情。
	public Object doResolveDependency(DependencyDescriptor descriptor, @Nullable String beanName,
			@Nullable Set<String> autowiredBeanNames, @Nullable TypeConverter typeConverter) throws BeansException {

		InjectionPoint previousInjectionPoint = ConstructorResolver.setCurrentInjectionPoint(descriptor);
		try {
		    //描述符解析过了,直接返回--相当于缓存
			Object shortcut = descriptor.resolveShortcut(this);
			if (shortcut != null) {
				return shortcut;
			}
            //获取要查找的bean类型---当然这里可能是bean类型(@Autowired注解),也可能需要查找的是String字符串(@Value注解)
			Class<?> type = descriptor.getDependencyType();
			//当前依赖注入点上是否存在@Value注解--如果存在返回注解中value属性值,否则返回null
			Object value = getAutowireCandidateResolver().getSuggestedValue(descriptor);
			//如果value不为null,说明当前依赖查找需要解析value注解中的value属性值,然后返回作为依赖查找结果
			if (value != null) {
				if (value instanceof String) {
				     //解析${}占位符
					String strVal = resolveEmbeddedValue((String) value);
					BeanDefinition bd = (beanName != null && containsBean(beanName) ? getMergedBeanDefinition(beanName) : null);
					//解析EL表达式
					value = evaluateBeanDefinitionString(strVal, bd);
				}
				//获取类型转换器
				TypeConverter converter = (typeConverter != null ? typeConverter : getTypeConverter());
				//@Value注解可以标注在Resource资源对象上,因为value字符串经过${}占位符解析和EL表达式解析后
				//可能得到的是一个资源路径或者url字符串表示形式,可以使用类型转换器将字符串形式表示的资源路径转换为
				//实际的资源类型对象
				return (descriptor.getField() != null ?
						converter.convertIfNecessary(value, type, descriptor.getField()) :
						converter.convertIfNecessary(value, type, descriptor.getMethodParameter()));
			}
			//下面是@Autowired等注解的依赖查找过程,非本文重点,这里不进行讲解
            ...
		}
		finally {
			ConstructorResolver.setCurrentInjectionPoint(previousInjectionPoint);
		}
	}
EL表达式的解析部分本文也不展开讲解
- resolveEmbeddedValue方法解析${}占位符
	public String resolveEmbeddedValue(@Nullable String value) {
		if (value == null) {
			return null;
		}
		String result = value;
		for (StringValueResolver resolver : this.embeddedValueResolvers) {
			result = resolver.resolveStringValue(result);
			if (result == null) {
				return null;
			}
		}
		return result;
	}
AbstractBeanFactory的embeddedValueResolvers集合中StringValueResolver 的注册时机是什么呢?
- StringValueResolver的注册时机(有两处,另一处---->PropertyResourceConfigurer#processProperties–>PropertyResourceConfigurer#postProcessBeanFactory)
public abstract class AbstractApplicationContext extends DefaultResourceLoader implements ConfigurableApplicationContext, DisposableBean {

	protected void finishBeanFactoryInitialization(ConfigurableListableBeanFactory beanFactory) {
		...
		// 若没有指定EmbeddedValueResolver
		if (!beanFactory.hasEmbeddedValueResolver()) {
		    //创建一个匿名内部类的实现,核心交给环境上下文对象完成
			beanFactory.addEmbeddedValueResolver(new StringValueResolver() {
				@Override
				public String resolveStringValue(String strVal) {
					return getEnvironment().resolvePlaceholders(strVal);
				}
			});
		}
		...
	}
}
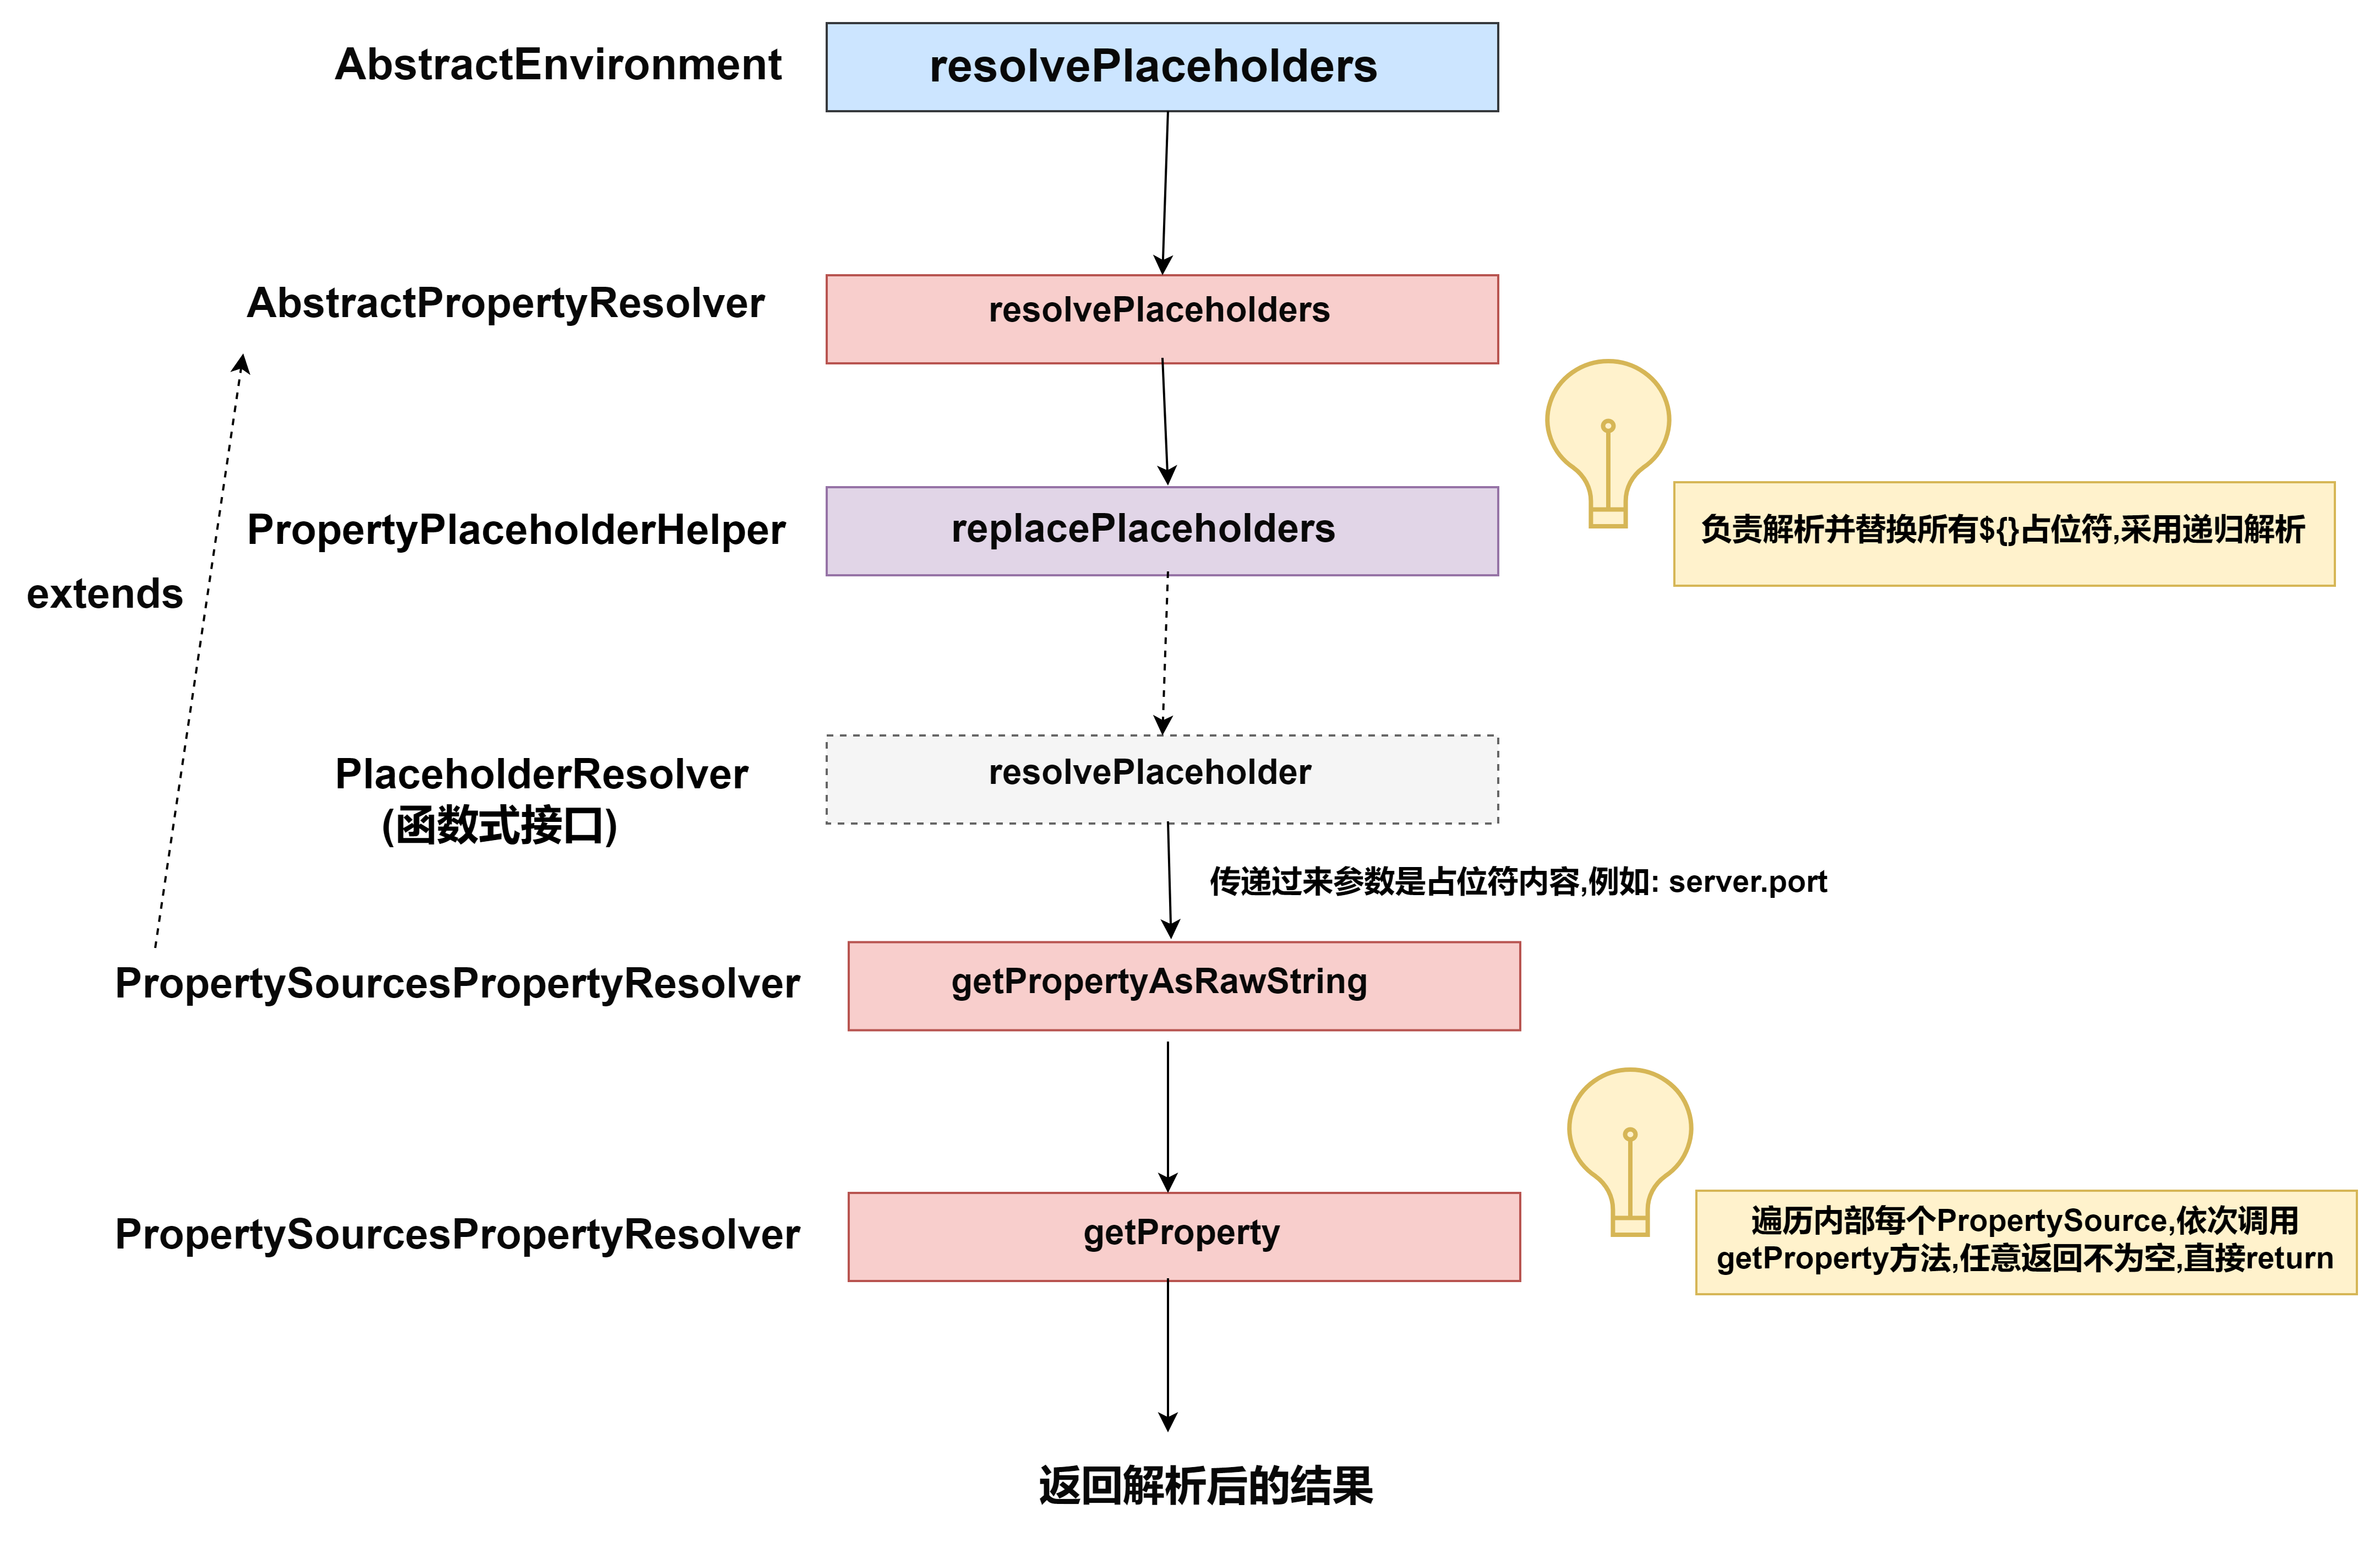
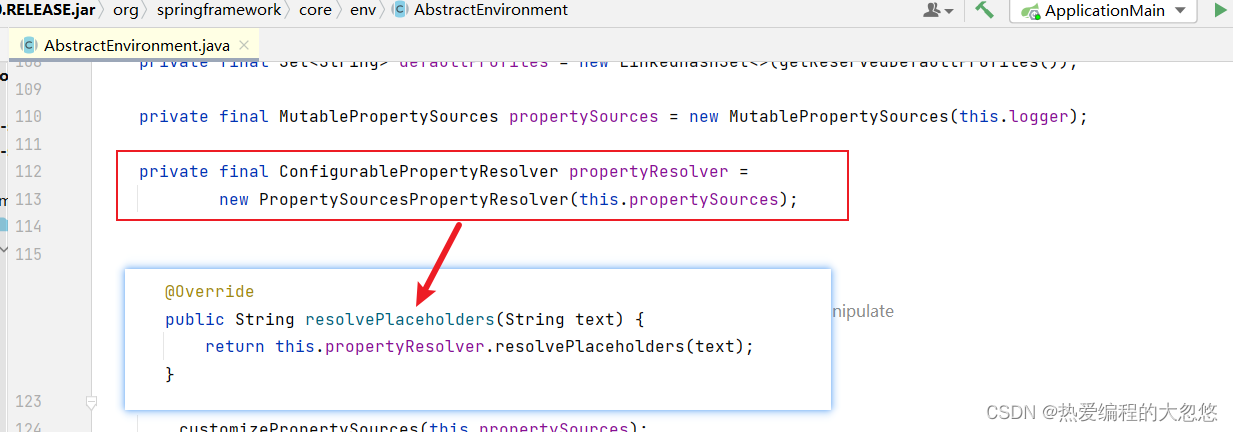
- AbstractEnvironment的resolvePlaceholders方法实现最终是交给PropertySourcesPropertyResolver完成的
- AbstractPropertyResolver抽象类中给出resolvePlaceholders方法实现
	@Override
	public String resolvePlaceholders(String text) {
	    //这里的strict表示是否忽略无法被解析的${}占位符,如果不忽略,则会抛出异常
		if (this.nonStrictHelper == null) {
			this.nonStrictHelper = createPlaceholderHelper(true);
		}
		// 真正进行占位符解析
		return doResolvePlaceholders(text, this.nonStrictHelper);
	}

	private String doResolvePlaceholders(String text, PropertyPlaceholderHelper helper) {
		//借助PropertyPlaceholderHelper完成占位符解析
		return helper.replacePlaceholders(text, this::getPropertyAsRawString);
	}

    //子类实现根据PropertyPlaceholderHelper取出${server.port}占位符中的server.port
    //去属性源集合中根据取出的server.port作为key,进行查找
	protected abstract String getPropertyAsRawString(String key);
- 占位符核心解析逻辑在PropertyPlaceholderHelper的parseStringValue方法中
    //传入的是value注解中的value属性值,如: ${server.port}
    public String replacePlaceholders(String value, PlaceholderResolver placeholderResolver) {
		Assert.notNull(value, "'value' must not be null");
		return parseStringValue(value, placeholderResolver, new HashSet<>());
	}

	protected String parseStringValue(
			String value, PlaceholderResolver placeholderResolver, Set<String> visitedPlaceholders) {
		StringBuilder result = new StringBuilder(value);
		//定位 ${ 出现的位置
		int startIndex = value.indexOf(this.placeholderPrefix);
		while (startIndex != -1) {
		    //定位 } 出现的位置
			int endIndex = findPlaceholderEndIndex(result, startIndex);
			if (endIndex != -1) {
			    //截取${server.post}占位符之间的值--> server.port
				String placeholder = result.substring(startIndex + this.placeholderPrefix.length(), endIndex);
				//拿到传入的占位符解析器
				String originalPlaceholder = placeholder;
				...
				// 递归解析${}占位符,因为可能会存在${${config.key}.value}的情况
				placeholder = parseStringValue(placeholder, placeholderResolver, visitedPlaceholders);
				// 调用传入的占位符解析器的resolvePlaceholder方法解析占位符
				String propVal = placeholderResolver.resolvePlaceholder(placeholder);
				//valueSeparator默认为":",表示默认值
				//如果val值为null,那么尝试查找默认值
				if (propVal == null && this.valueSeparator != null) {
				   //如: ${server.port:8079}---如果存在默认值设置,那么将默认值作为结果
					int separatorIndex = placeholder.indexOf(this.valueSeparator);
					if (separatorIndex != -1) {
						String actualPlaceholder = placeholder.substring(0, separatorIndex);
						String defaultValue = placeholder.substring(separatorIndex + this.valueSeparator.length());
						propVal = placeholderResolver.resolvePlaceholder(actualPlaceholder);
						if (propVal == null) {
							propVal = defaultValue;
						}
					}
				}
				//如果解析结果不为null
				if (propVal != null) {
					//考虑到根据${dhy.name}中的dhy.name查找属性源得到的值可能是${xpy.name}这种形式
					//因此需要继续递归解析
					propVal = parseStringValue(propVal, placeholderResolver, visitedPlaceholders);
					result.replace(startIndex, endIndex + this.placeholderSuffix.length(), propVal);
					...
					startIndex = result.indexOf(this.placeholderPrefix, startIndex + propVal.length());
				}
				else if (this.ignoreUnresolvablePlaceholders) {
					// Proceed with unprocessed value.
					startIndex = result.indexOf(this.placeholderPrefix, endIndex + this.placeholderSuffix.length());
				}
				//ignoreUnresolvablePlaceholders为false的情况下,抛出解析失败异常
				else {
					throw new IllegalArgumentException("Could not resolve placeholder '" +
							placeholder + "'" + " in value \"" + value + "\"");
				}
				visitedPlaceholders.remove(originalPlaceholder);
			}
			else {
				startIndex = -1;
			}
		}
		return result.toString();
	}
- PropertySourcesPlaceholdersResolver提供的resolvePlaceholder方法,根据PropertyPlaceholderHelper取出${server.port}占位符中的server.port,去属性源集合中根据取出的server.port作为key,进行查找
	protected String resolvePlaceholder(String placeholder) {
		if (this.sources != null) {
		   //挨个遍历每个属性源,哪个先找到,就直接返回---这里引出了配置优先级问题
			for (PropertySource<?> source : this.sources) {
				Object value = source.getProperty(placeholder);
				if (value != null) {
					return String.valueOf(value);
				}
			}
		}
		return null;
	}
application.yml等配置文件加载时机
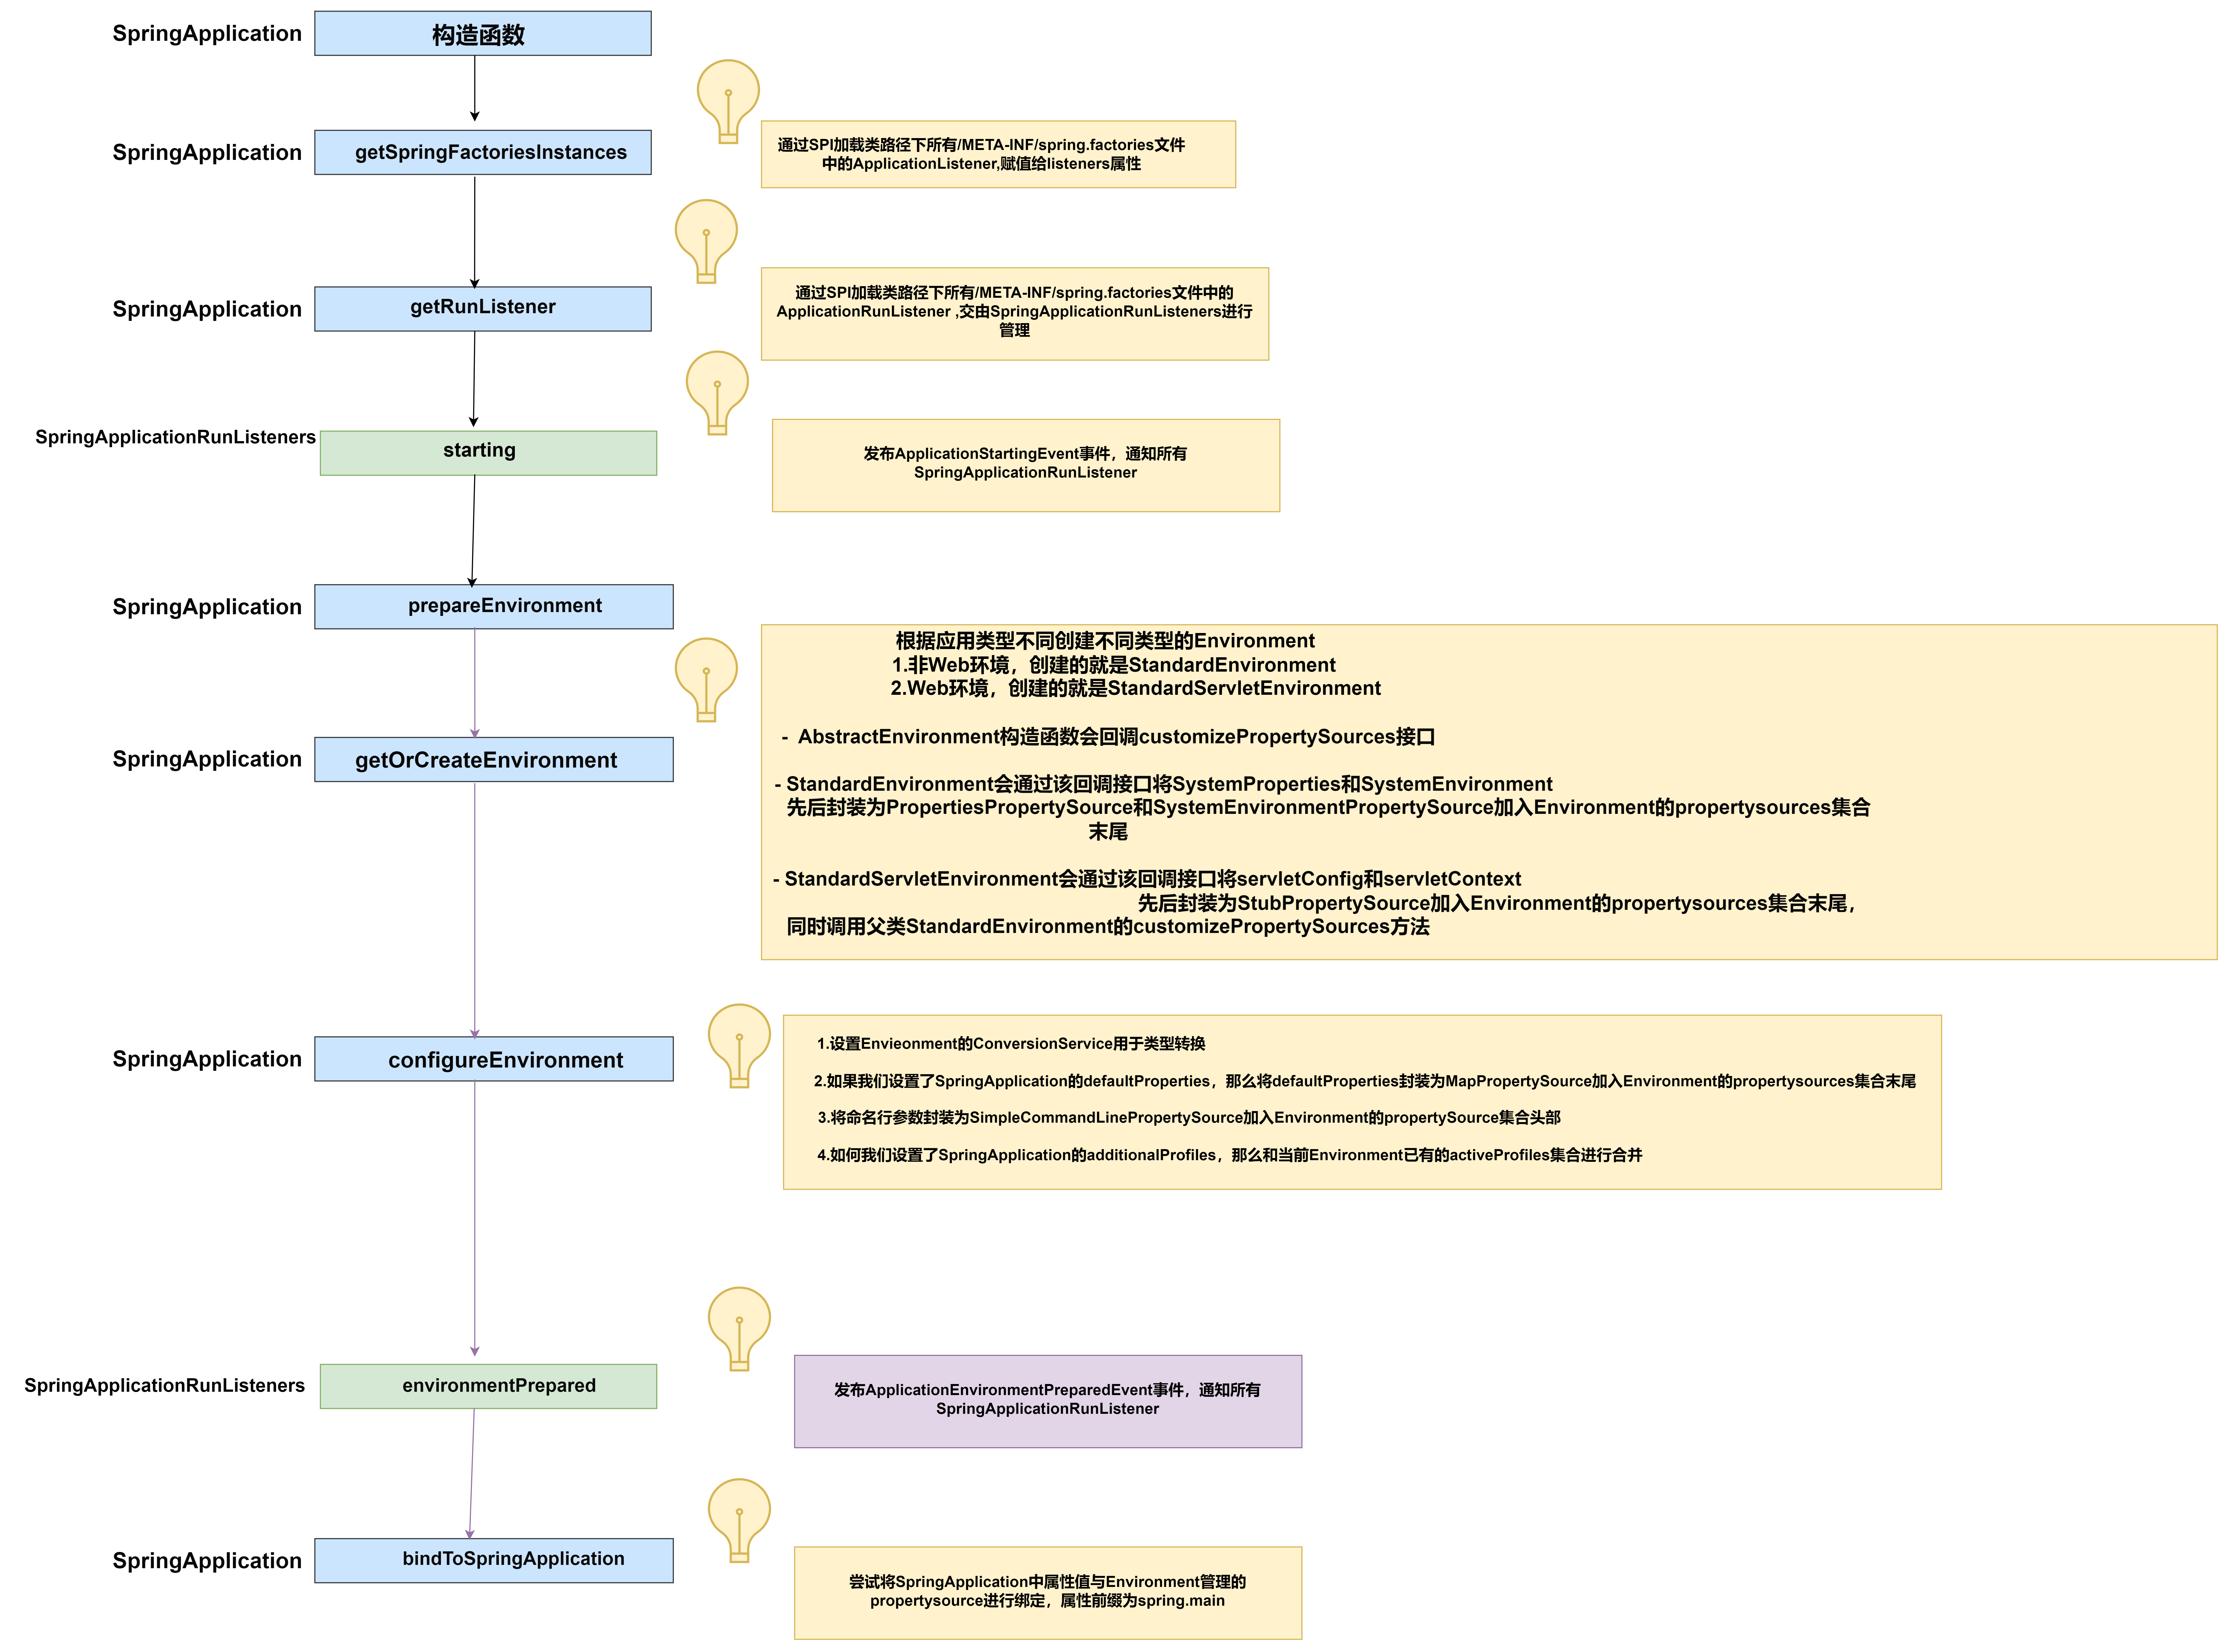
- SpringApplication的构造函数中通过SPI完成ApplicationContextInitializer和ApplicationListener实现类的加载
	public SpringApplication(ResourceLoader resourceLoader, Class<?>... primarySources) {
		this.resourceLoader = resourceLoader;
		Assert.notNull(primarySources, "PrimarySources must not be null");
		this.primarySources = new LinkedHashSet<>(Arrays.asList(primarySources));
		this.webApplicationType = WebApplicationType.deduceFromClasspath();
		setInitializers((Collection) getSpringFactoriesInstances(ApplicationContextInitializer.class));
		setListeners((Collection) getSpringFactoriesInstances(ApplicationListener.class));
		this.mainApplicationClass = deduceMainApplicationClass();
	}
- 这里重点关注通过SPI加载得到的,专门负责加载配置文件的监听器
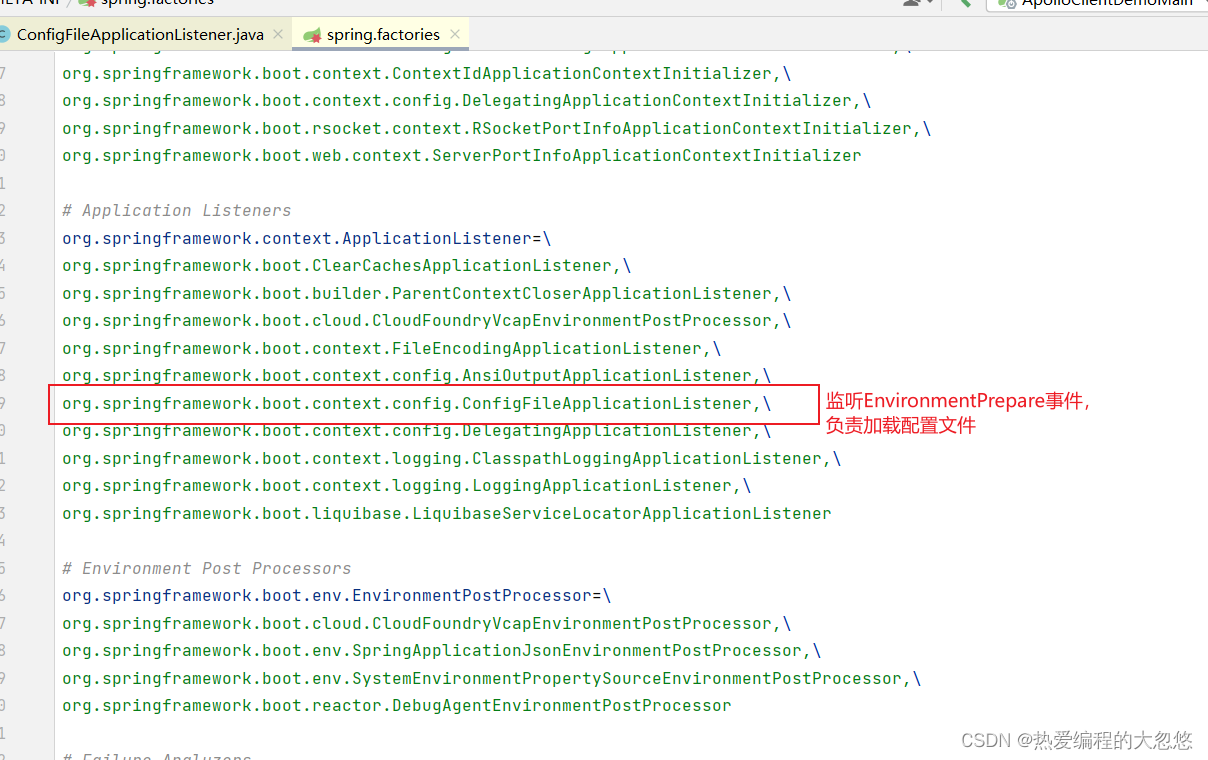
- SpringApplication的Run方法启动SpringBoot应用程序—这里只关注和配置文件加载相关的监听器部分
	public ConfigurableApplicationContext run(String... args) {
		..
		ConfigurableApplicationContext context = null;
		...
		//SPI加载SpringApplicationRunListener实现类,然后交给SpringApplicationRunListeners管理---组合模式
		SpringApplicationRunListeners listeners = getRunListeners(args);
		...
		return context;
	}

- 默认情况下,可以通过SPI机制获取到: 负责发布SpringBoot应用程序生命周期事件的监听器

	public EventPublishingRunListener(SpringApplication application, String[] args) {
		this.application = application;
		this.args = args;
        //事件派发器
		this.initialMulticaster = new SimpleApplicationEventMulticaster();
		//从SpringApplication拿到通过SPI加载得到的ApplicationListener集合
        for (ApplicationListener<?> listener : application.getListeners()) {
			this.initialMulticaster.addApplicationListener(listener);
		}
	}
SpringApplicationRunListeners,EventPublishingRunListener和ApplicationListener三者关系如下:

我们继续回到SpringBoot run启动方法中来;
	public ConfigurableApplicationContext run(String... args) {
		..
		ConfigurableApplicationContext context = null;
		...
		//SPI加载SpringApplicationRunListener实现类,然后交给SpringApplicationRunListeners管理---组合模式
		SpringApplicationRunListeners listeners = getRunListeners(args);
		//发布SpringBoot应用程序启动事件
		listeners.starting();
		try {
		    //封装命令行参数
			ApplicationArguments applicationArguments = new DefaultApplicationArguments(args);
			//环境上下文准备--配置类加载的地方
			ConfigurableEnvironment environment = prepareEnvironment(listeners, applicationArguments);
			...
			context = createApplicationContext();
			...
			//这里我们需要关注一点: 此处会调用经过SPI加载得到的ApplicationContextInitializer的initialize方法
			prepareContext(context, environment, listeners, applicationArguments, printedBanner);
			refreshContext(context);
			afterRefresh(context, applicationArguments);
			...
			listeners.started(context);
			callRunners(context, applicationArguments);
		}
		...
		listeners.running(context);
		return context;
	}
	private ConfigurableEnvironment prepareEnvironment(SpringApplicationRunListeners listeners,
			ApplicationArguments applicationArguments) {
		ConfigurableEnvironment environment = getOrCreateEnvironment();
		//主要干的事情: 封装命令行参数为propertySource,加入环境上下文管理的属性源集合中
		configureEnvironment(environment, applicationArguments.getSourceArgs());
		//发布环境上下文准备好的事件
		listeners.environmentPrepared(environment);
		bindToSpringApplication(environment);
		...
		ConfigurationPropertySources.attach(environment);
		return environment;
	}

    //根据当前应用程序类型的不同,创建不同的环境上下文实现类
	private ConfigurableEnvironment getOrCreateEnvironment() {
		if (this.environment != null) {
			return this.environment;
		}
		switch (this.webApplicationType) {
		case SERVLET:
			return new StandardServletEnvironment();
		case REACTIVE:
			return new StandardReactiveWebEnvironment();
		default:
			return new StandardEnvironment();
		}
	}

	protected void configureEnvironment(ConfigurableEnvironment environment, String[] args) {
	    //封装命令行参数为propertySource,加入环境上下文管理的属性源集合中
		configurePropertySources(environment, args);
		// 从已有的属性源集合中更新激活profile的配置
		configureProfiles(environment, args);
	}
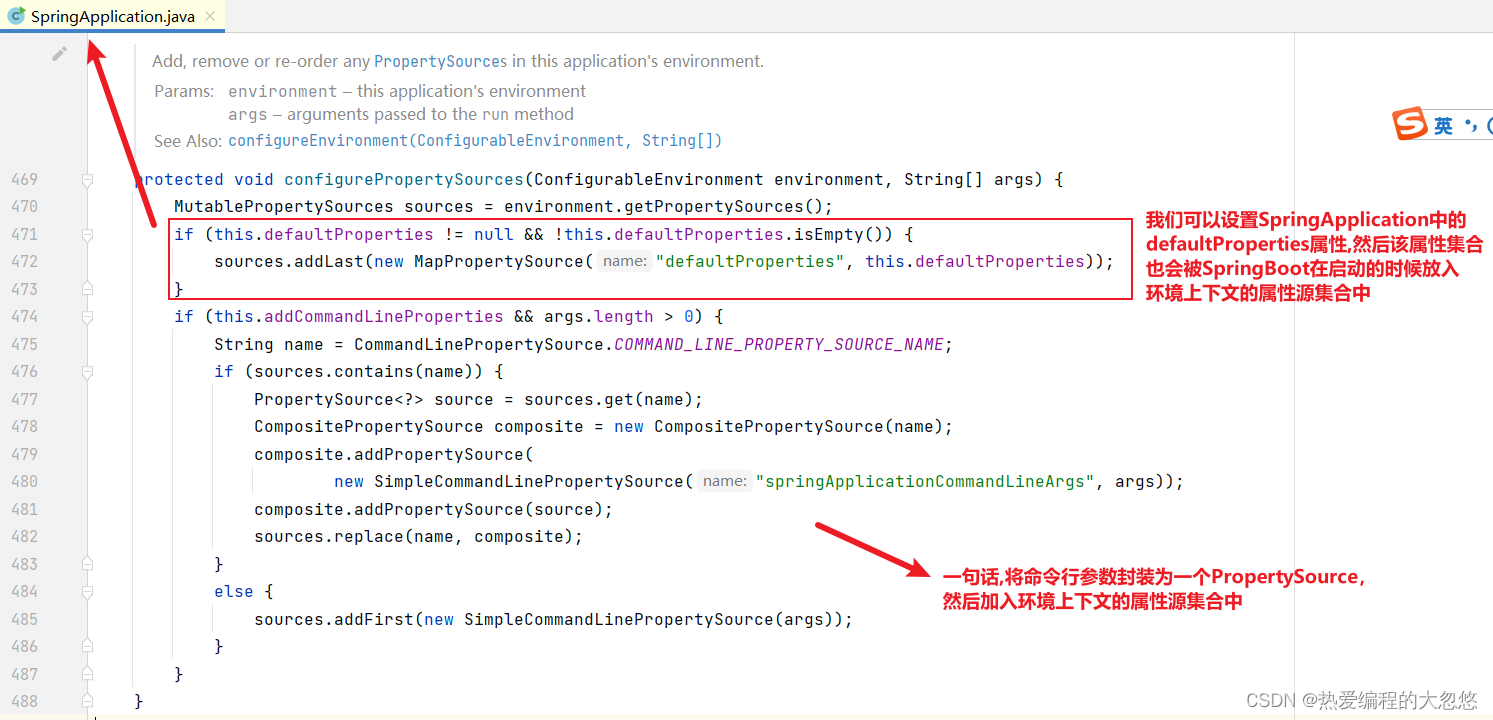
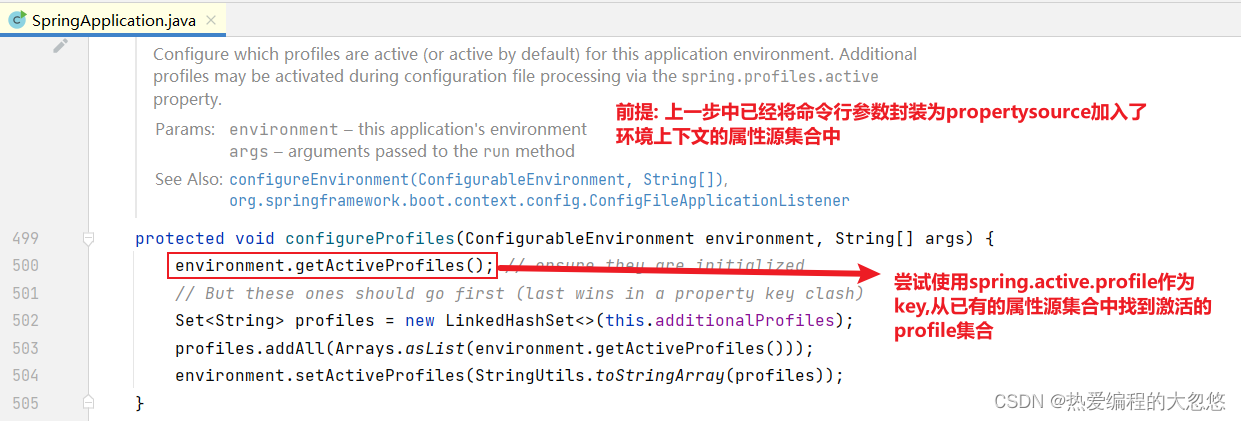
监听环境上下文prepared事件
- ConfigFileApplicationListener是如何加载配置文件的呢?
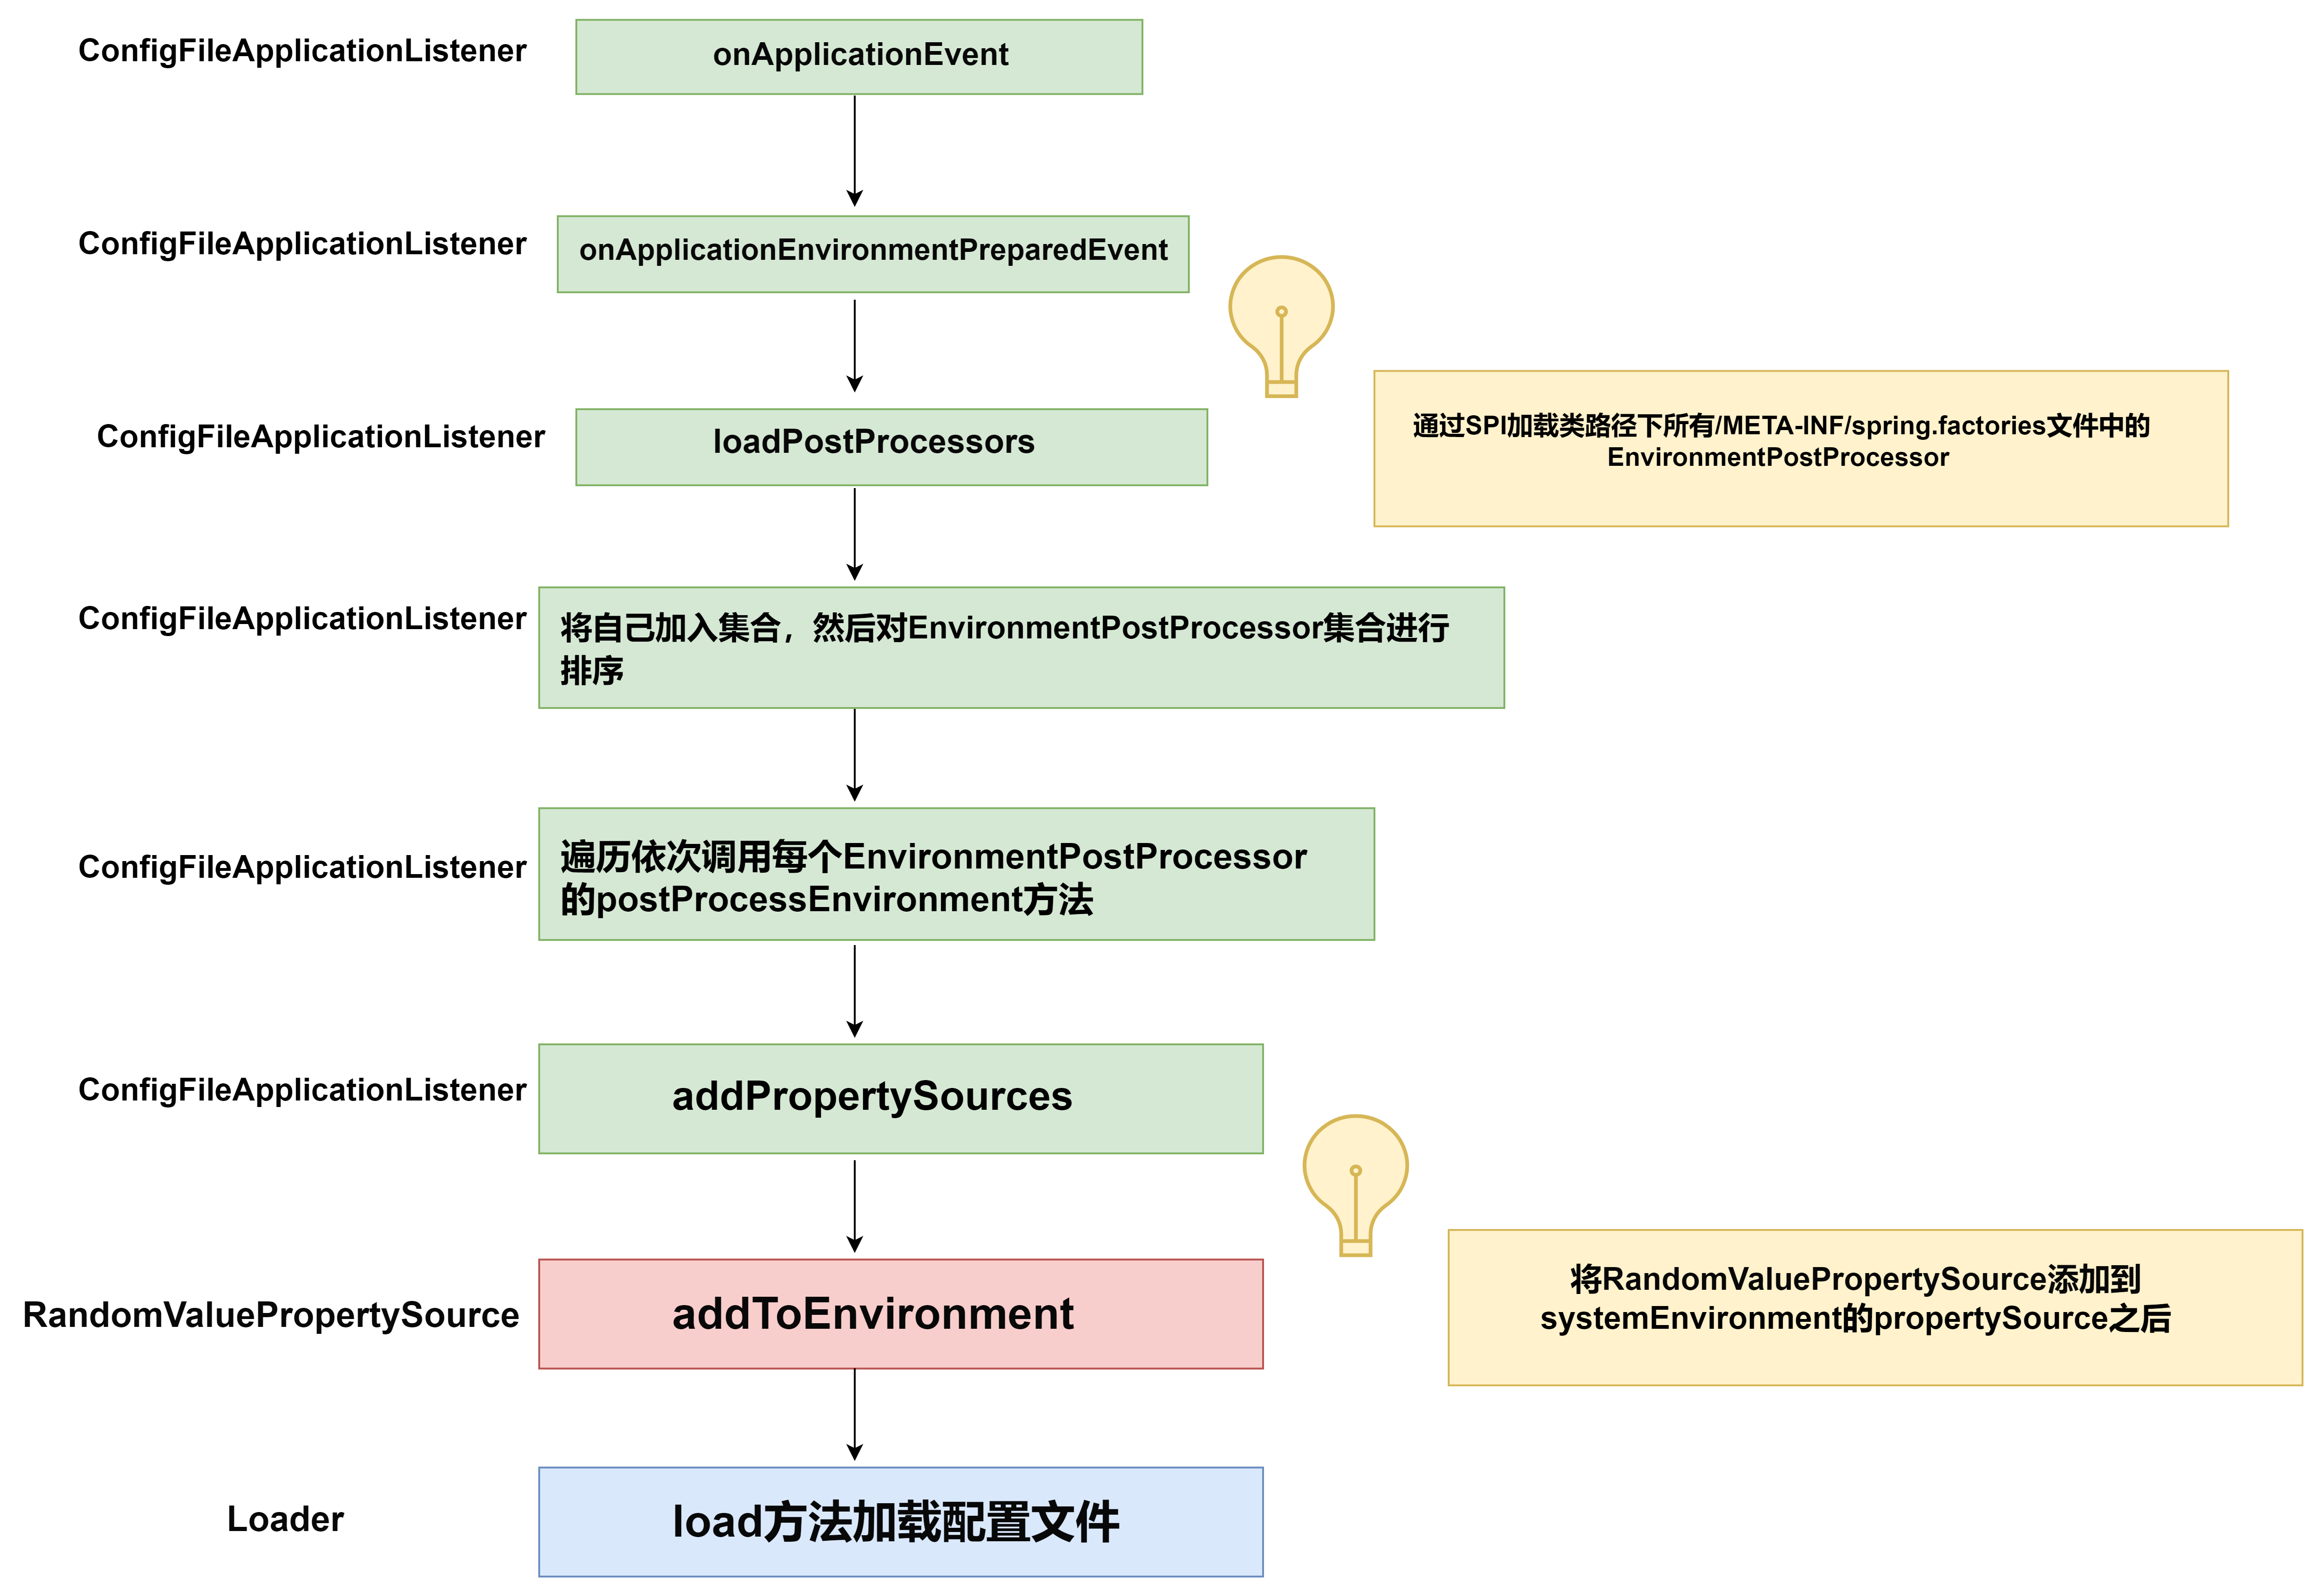
- ConfigFileApplicationListener的onApplicationEvent方法如下
	@Override
	public void onApplicationEvent(ApplicationEvent event) {
	     //重点关注监听应用程序环境上下文准备好的这个事件处理逻辑
		if (event instanceof ApplicationEnvironmentPreparedEvent) {
			onApplicationEnvironmentPreparedEvent((ApplicationEnvironmentPreparedEvent) event);
		}
		//一句话: 将SpringApplication中的defaultProperties对应的propertysource移动到属性源集合末尾
		//即: 具有最低优先级 --- 上面一开始添加过
		if (event instanceof ApplicationPreparedEvent) {
			onApplicationPreparedEvent(event);
		}
	}

	private void onApplicationEnvironmentPreparedEvent(ApplicationEnvironmentPreparedEvent event) {
	    //SPI机制加载所有EnvironmentPostProcessor
		List<EnvironmentPostProcessor> postProcessors = loadPostProcessors();
		//ConfigFileApplicationListener自己本身也是一个EnvironmentPostProcessor
		postProcessors.add(this);
		AnnotationAwareOrderComparator.sort(postProcessors);
		for (EnvironmentPostProcessor postProcessor : postProcessors) {
			postProcessor.postProcessEnvironment(event.getEnvironment(), event.getSpringApplication());
		}
	}
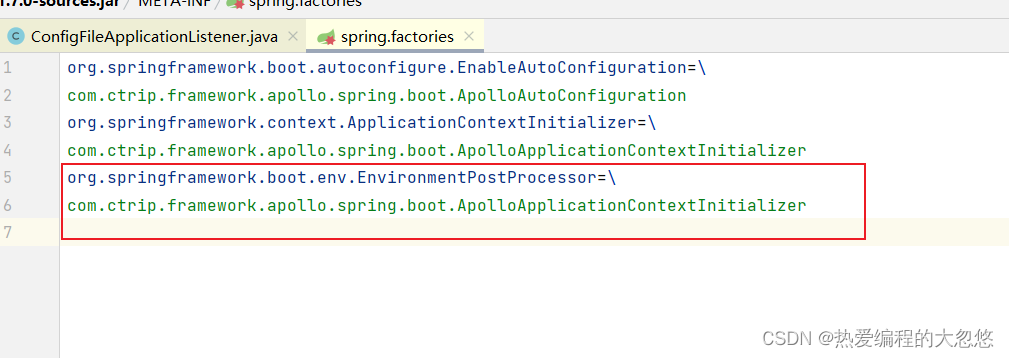
- Apollo在这里也添加了一个自定义的EnvironmentPostProcessor
- ConfigFileApplicationListener的postProcessEnvironment方法会调用addPropertySources方法
	@Override
	public void postProcessEnvironment(ConfigurableEnvironment environment, SpringApplication application) {
		addPropertySources(environment, application.getResourceLoader());
	}
    //addPropertySources方法中,会首先向环境上下中添加一个随机数属性源
	protected void addPropertySources(ConfigurableEnvironment environment, ResourceLoader resourceLoader) {
		RandomValuePropertySource.addToEnvironment(environment);
		//创建一个Loader,调用其load方法,完成配置文件的加载
		new Loader(environment, resourceLoader).load();
	}
Loader加载配置文件
- Loader如何完成配置文件的加载,以及如何封装配置文件为PropertySource,然后加载到Environment的PropertySources集合中呢?
		Loader(ConfigurableEnvironment environment, ResourceLoader resourceLoader) {
			this.environment = environment;
			//search and parse==> environment内部的propertySources集合的delegate
            this.placeholdersResolver = new PropertySourcesPlaceholdersResolver(this.environment);
            //加载配置的资源加载器
			this.resourceLoader = (resourceLoader != null) ? resourceLoader : new DefaultResourceLoader(null);
            //通过SPI机制加载PropertySourceLoader
			this.propertySourceLoaders = SpringFactoriesLoader.loadFactories(PropertySourceLoader.class,
					getClass().getClassLoader());
		}
- 默认提供的两个实现如下 – 分别负责加载.yml,.yaml和.properties结尾的配置文件
org.springframework.boot.env.PropertySourceLoader=\
org.springframework.boot.env.PropertiesPropertySourceLoader,\
org.springframework.boot.env.YamlPropertySourceLoader
- load方法源码如下
		void load() {
			FilteredPropertySource.apply(this.environment, DEFAULT_PROPERTIES, LOAD_FILTERED_PROPERTY,
					(defaultProperties) -> {
						this.profiles = new LinkedList<>();
						this.processedProfiles = new LinkedList<>();
						this.activatedProfiles = false;
						this.loaded = new LinkedHashMap<>();
                        //初始化profiles--从已有的propertySource集合中解析得到激活的profile
						initializeProfiles();
						while (!this.profiles.isEmpty()) {
							Profile profile = this.profiles.poll();
                            //如果当前Profile是默认的,那么加入Environment的ActiveProfile集合
							if (isDefaultProfile(profile)) {
								addProfileToEnvironment(profile.getName());
							}
                           //加载配置文件,并通过getNegativeProfileFilter过滤进行过滤
                           //过滤规则:
                           //1.如果传入的profile为null,那么过滤掉document的profiles不为空
                           //2.如果传入的profile不为null,那么过滤掉document的profile不等于传入的profile的
							load(profile, this::getPositiveProfileFilter,
                                    //将配置文件加载完毕后,回调此方法,用于将配置文件对应的PropertySource和Profile关系记录到loaded集合中
									addToLoaded(MutablePropertySources::addLast, false));
							//标记当前profile处理完毕
                            this.processedProfiles.add(profile);
						}
                        //加载配置文件,并通过getNegativeProfileFilter过滤进行过滤
                        //过滤规则: 1.如果传入的profile为null,那么过滤掉document的profiles不为空
                        //2.如果传入的profile不为null,那么过滤掉document的profile不等于传入的profile的
						load(null, this::getNegativeProfileFilter, addToLoaded(MutablePropertySources::addFirst, true));
                        //将Loaded集合中记录的propertySource加入environment的propertySources集合中去
						addLoadedPropertySources();
                        //向environment中添加通过解析配置文件得到的activeProfiles
						applyActiveProfiles(defaultProperties);
					});
		}
- initializeProfiles负责尝试从已有的propertySource集合中解析得到激活的profile
		private void initializeProfiles() {
			// The default profile for these purposes is represented as null. We add it
			// first so that it is processed first and has lowest priority.
			this.profiles.add(null);
			Binder binder = Binder.get(this.environment);
            //获取spring.profiles.active和spring.profiles.include
			Set<Profile> activatedViaProperty = getProfiles(binder, ACTIVE_PROFILES_PROPERTY);
			Set<Profile> includedViaProperty = getProfiles(binder, INCLUDE_PROFILES_PROPERTY);
            //获取Environment中已经存在的profile的,过滤掉了和上面两个重复的profile
			List<Profile> otherActiveProfiles = getOtherActiveProfiles(activatedViaProperty, includedViaProperty);
            //合并三个集合
			this.profiles.addAll(otherActiveProfiles);
			// Any pre-existing active profiles set via property sources (e.g.
			// System properties) take precedence over those added in config files.
			this.profiles.addAll(includedViaProperty);
			addActiveProfiles(activatedViaProperty);
            //如果我们没有通过命令行或者系统参数的形式配置spring.profiles.active
            //那么添加defaultProflie到profiles集合中
			if (this.profiles.size() == 1) { // only has null profile
				for (String defaultProfileName : this.environment.getDefaultProfiles()) {
					Profile defaultProfile = new Profile(defaultProfileName, true);
					this.profiles.add(defaultProfile);
				}
			}
		}

- 核心load方法
		private void load(Profile profile, DocumentFilterFactory filterFactory, DocumentConsumer consumer) {
			//默认springboot会去这几个路径下寻找配置文件
            //classpath:/,classpath:/config/,file:./,file:./config/*/,file:./config/
            getSearchLocations()
                .forEach((location) -> {
                //getSearchNames获取配置文件的前缀名,默认只有一个,为application
				boolean isDirectory = location.endsWith("/");
				Set<String> names = isDirectory ? getSearchNames() : NO_SEARCH_NAMES;
				names.forEach((name) ->
                              //location目录路径有了,配置文件名有了,还差个后缀名
                              //load方法拼接上后缀,然后去定位配置文件
                              load(location, name, profile, filterFactory, consumer));
			});
		}
- load重载方法
 //location目录路径有了,配置文件名有了,还差个后缀名
//load方法拼接上后缀,然后去定位配置文件
private void load(String location, String name, Profile profile, DocumentFilterFactory filterFactory,
				DocumentConsumer consumer) {
			...
			Set<String> processed = new HashSet<>();
            //默认情况下能够处理.properties后缀,.yml后缀或者是.yaml后缀
			for (PropertySourceLoader loader : this.propertySourceLoaders) {
				for (String fileExtension : loader.getFileExtensions()) {
					if (processed.add(fileExtension)) {
                        //配置文件完整路径=目录名+文件名+后缀名
						loadForFileExtension(loader, location + name, "." + fileExtension, profile, filterFactory,
								consumer);
					}
				}
			}
		}
- loadForFileExtension定位加载配置文件
		private void loadForFileExtension(PropertySourceLoader loader, String prefix, String fileExtension,
				Profile profile, DocumentFilterFactory filterFactory, DocumentConsumer consumer) {
            //DocumentFilterFactory负责进行过滤
			DocumentFilter defaultFilter = filterFactory.getDocumentFilter(null);
			DocumentFilter profileFilter = filterFactory.getDocumentFilter(profile);
            //如果说profile不为null,那么还会尝试根据:目录名+文件名+"-"+profile+后缀去定位配置文件
			if (profile != null) {
				String profileSpecificFile = prefix + "-" + profile + fileExtension;
				load(loader, profileSpecificFile, profile, defaultFilter, consumer);
				load(loader, profileSpecificFile, profile, profileFilter, consumer);
				// Try profile specific sections in files we've already processed
				for (Profile processedProfile : this.processedProfiles) {
					if (processedProfile != null) {
						String previouslyLoaded = prefix + "-" + processedProfile + fileExtension;
						load(loader, previouslyLoaded, profile, profileFilter, consumer);
					}
				}
			}
			//根据 目录名+文件名+后缀去定位配置文件
			load(loader, prefix + fileExtension, profile, profileFilter, consumer);
		}
- 真正加载配置文件的地方
		private void load(PropertySourceLoader loader, String location, Profile profile, DocumentFilter filter,
				DocumentConsumer consumer) {
            //利用resourceLoader加载配置文件
			Resource[] resources = getResources(location);
			for (Resource resource : resources) {
				try {
                    //如果配置文件不存在则continue--省略配置文件不存在或者不符合要求的几种情况判断
                    ...
                    //配置文件存在--name作为propertySource的名字
					String name = "applicationConfig: [" + getLocationName(location, resource) + "]";
                    //加载配置文件信息
					List<Document> documents = loadDocuments(loader, name, resource);
					//如果集合为空,则continue
                    ...
                    // DocumentFilter进行过滤
					List<Document> loaded = new ArrayList<>();
					for (Document document : documents) {
						if (filter.match(document)) {
                            //如果配置文件中指定了spring.profiles.active则进行记录
							addActiveProfiles(document.getActiveProfiles());
                            //如果配置文件中指定了spring.profiles.include则进行记录
							addIncludedProfiles(document.getIncludeProfiles());
							loaded.add(document);
						}
					}
					Collections.reverse(loaded);
					if (!loaded.isEmpty()) {
                        //调用回调接口,进行propertySource合并处理
                        //加入ConfigFileApplicationListener的Map<Profile, MutablePropertySources> loaded
                        //集合中
						loaded.forEach((document) -> consumer.accept(profile, document));
						...
					}
				}
				...
			}
		}
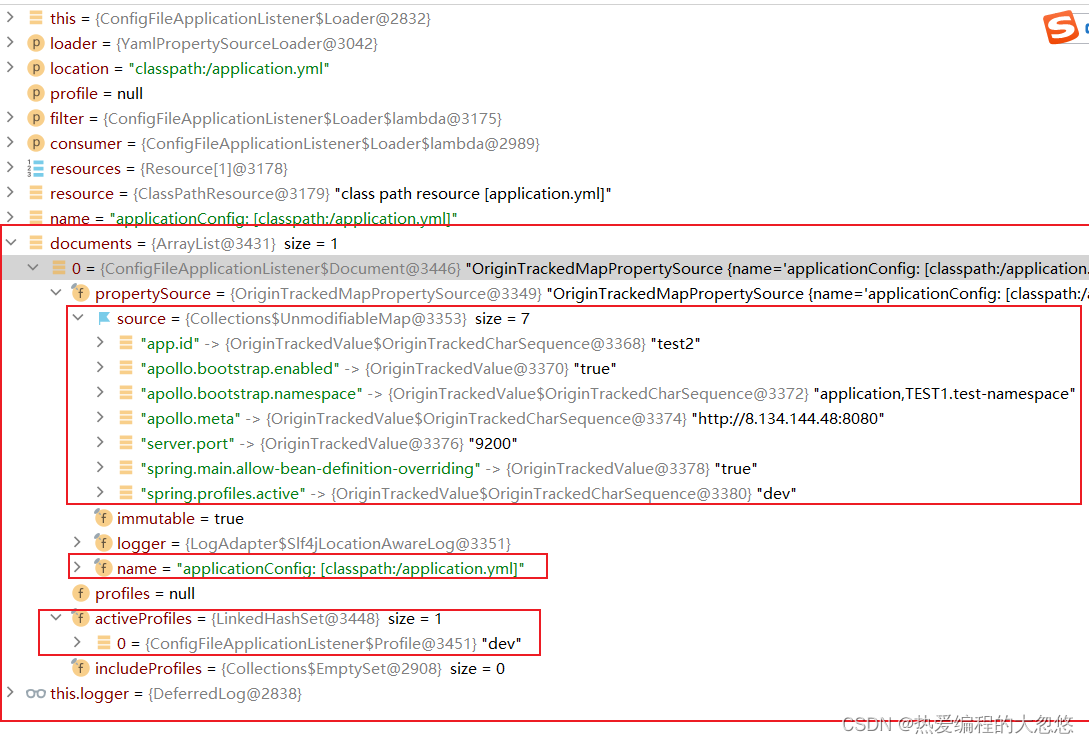

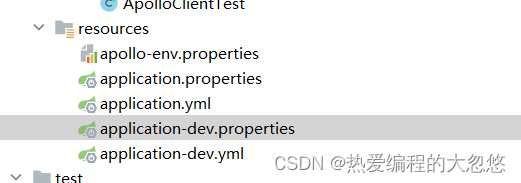
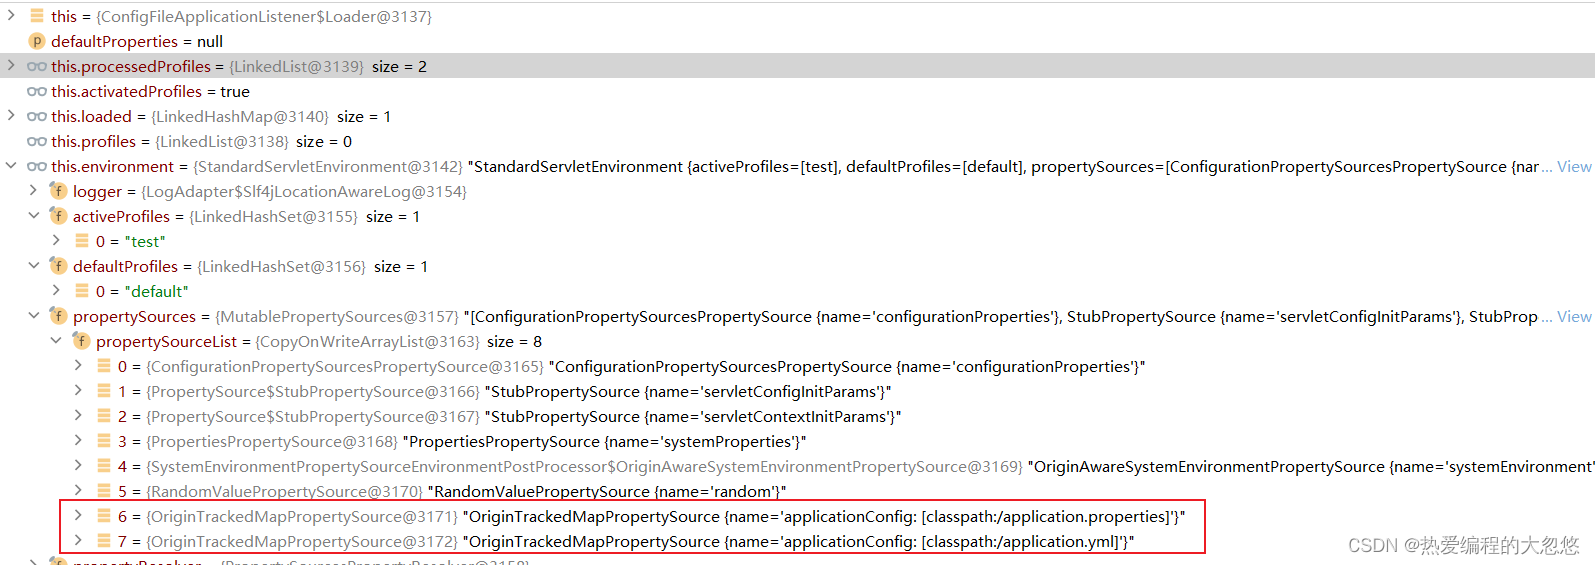
- 配置文件加载完毕后的效果
Apollo与SpringBoot整合原理
Apollo和Spring/Spring Boot集成的手段:在应用启动阶段,Apollo从远端获取配置,然后组装成PropertySource并插入到第一个即可,如下图所示:
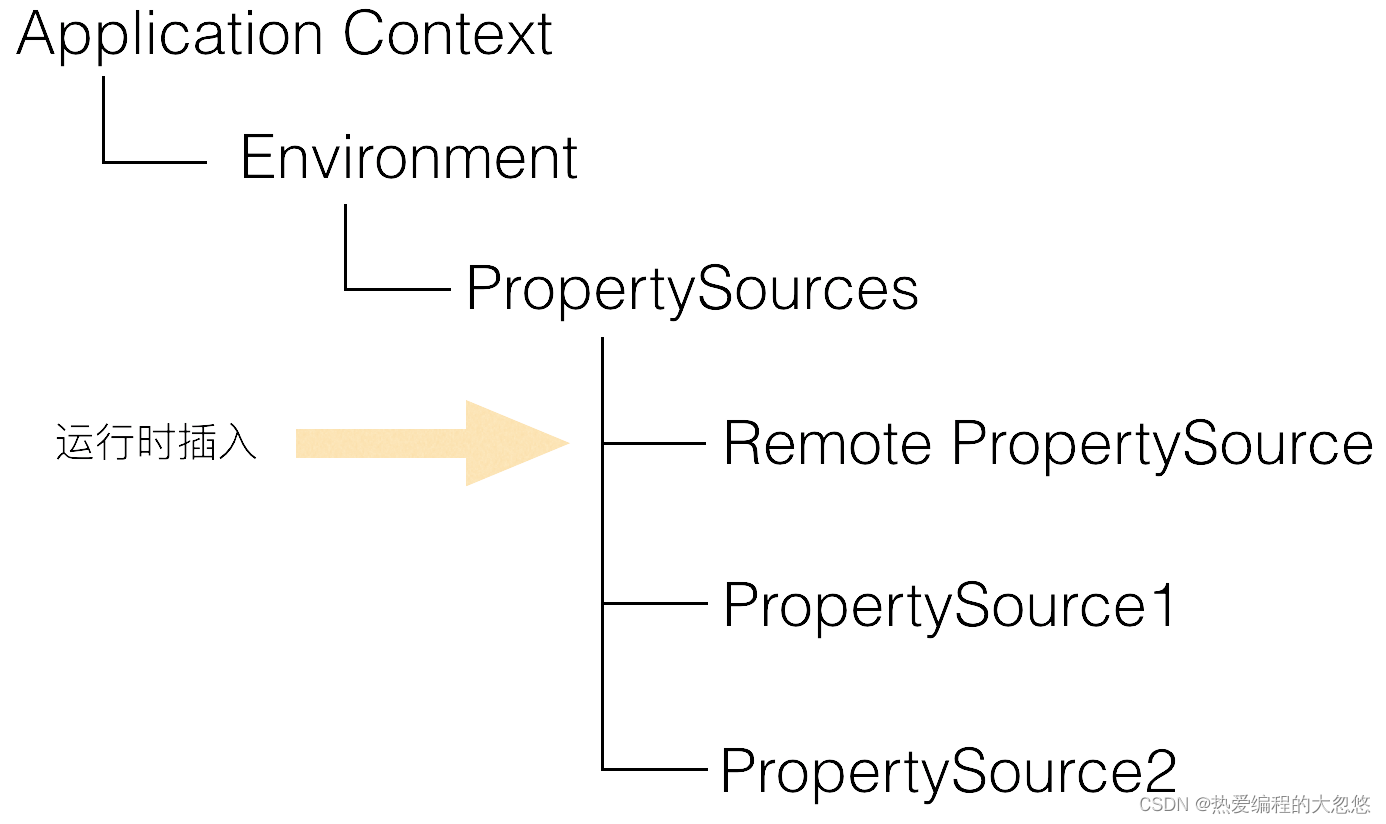
- apollo与spring整合的时候,是如何做到的呢?
- 还记得上面看到的EnvironmentPostProcessor环境后置处理器嘛? 其实apollo在和Spring整合的时候就是添加了一个EnvironmentPostProcessor
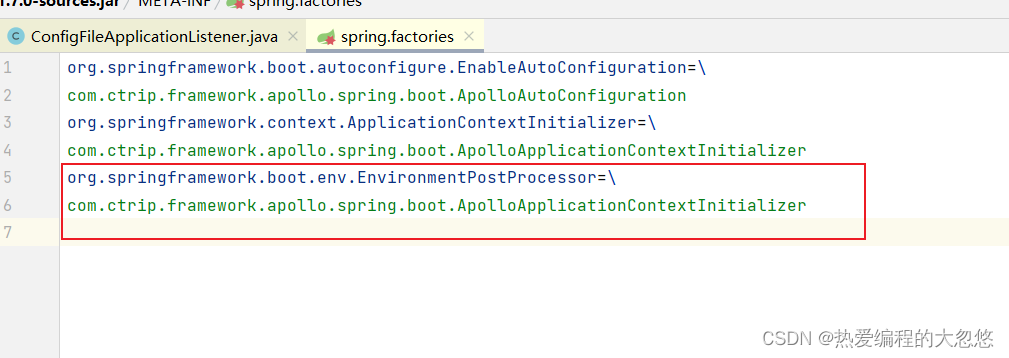
Apollo在最开始的,是通过提供一个ApplicationContextInitializer,在prepareContext方法中会调用ApplicationContextInitializer的initialize方法,Apollo在此处完成命名空间配置拉取,然后包装成PropertySource加入环境上下文的属性源集合中。
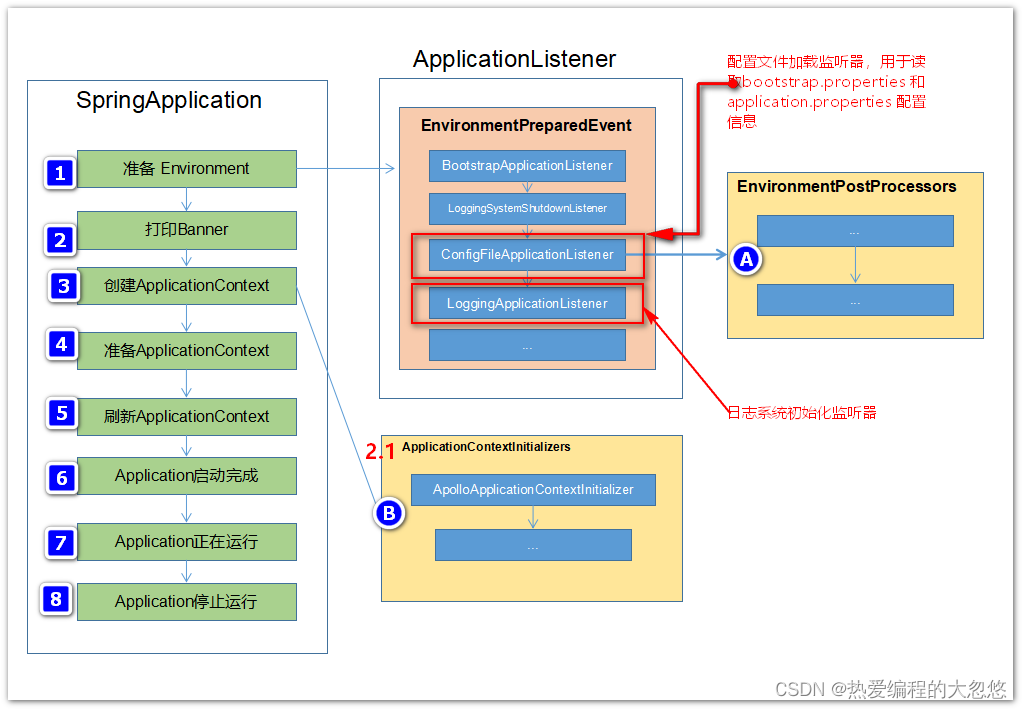
但是问题是加载配置信息的时机比日志系统初始化晚,如果要让logbak-spring.xml文件能够正常读取Apollo的配置,则有两种方案可供选择:
- 方案一:在ConfigFileApplicationListener 和LoggingApplicationListener之间插入一个监听器,用于初始化Apollo 配置信息;
这种方式在SpringBoot模式下想在这两者之间插入一个Listener 有点问题,Spring Boot 会将添加的Listener踢掉,目前还没弄清楚咋回事;另外这种插入方式和Listener的Order顺序有关,写死顺序不是很优雅;
- 方案二:实现一个EnvironmentPostProcessor,供ConfigFileApplicationListener在加载好bootstrap.properties 和application.properties之后加载Apollo的配置信息
这种方式比较好些,添加一个EnvironmentPostProcessor实现,然后在spring.factories里面指定即可
注意:
- 这种方式使得Apollo的加载顺序放到了日志系统加载之前,会导致Apollo的启动过程无法通过日志的方式输出(因为执行Apollo加载的时候,日志系统压根没有准备好呢!所以在Apollo代码中使用Slf4j的日志输出便没有任何内容)
详细参考github上提的pr: 增加EnvironmentPostProcessor处理,将Apollo配置加载提到初始化日志系统之前
- ApolloApplicationContextInitializer–>postProcessEnvironment
  /**
   * 为了能够尽可能早的在spring加载日志系统之前加载apollo配置,ApolloApplicationContextInitializer的postProcessEnvironment可以在ConfigFileApplicationListener被成功调用后执行
   *
   * 此时的处理顺序会如下所示:
   * Load Bootstrap properties and application properties -----> load Apollo configuration properties ----> Initialize Logging systems
   */
  @Override
  public void postProcessEnvironment(ConfigurableEnvironment configurableEnvironment, SpringApplication springApplication) {

    //应始终首先初始化系统属性,例如 app.id --> 先从environment中取出app.id,apollo.meta等值
    //设置进System系统属性集合中
    initializeSystemProperty(configurableEnvironment);
    //apollo.bootstrap.eagerLoad.enabled是否被设置为true
    Boolean eagerLoadEnabled = configurableEnvironment.getProperty(PropertySourcesConstants.APOLLO_BOOTSTRAP_EAGER_LOAD_ENABLED, Boolean.class, false);

    //EnvironmentPostProcessor should not be triggered if you don't want Apollo Loading before Logging System Initialization
    if (!eagerLoadEnabled) {
      return;
    }
     //apollo.bootstrap.enabled属性为true才会启用apollo
    Boolean bootstrapEnabled = configurableEnvironment.getProperty(PropertySourcesConstants.APOLLO_BOOTSTRAP_ENABLED, Boolean.class, false);

    if (bootstrapEnabled) {
      initialize(configurableEnvironment);
    }

  }
protected void initialize(ConfigurableEnvironment environment) {
//apollo会向environment中新增一个名为ApolloBootstrapPropertySources的propertysource
if(environment.getPropertySources().contains(PropertySourcesConstants.APOLLO_BOOTSTRAP_PROPERTY_SOURCE_NAME)) {
      //already initialized
      return;
    }
    //获取我们配置文件中配置的apollo.bootstrap.namespaces配置,如果没配置,默认加载的命名空间为application
    String namespaces = environment.getProperty(PropertySourcesConstants.APOLLO_BOOTSTRAP_NAMESPACES, ConfigConsts.NAMESPACE_APPLICATION);
    logger.debug("Apollo bootstrap namespaces: {}", namespaces);
    List<String> namespaceList = NAMESPACE_SPLITTER.splitToList(namespaces);
    //创建一个名为ApolloBootstrapPropertySources的CompositePropertySource
    CompositePropertySource composite = new CompositePropertySource(PropertySourcesConstants.APOLLO_BOOTSTRAP_PROPERTY_SOURCE_NAME);
    //依次拉取各个命名空间下的配置
    for (String namespace : namespaceList) {
      Config config = ConfigService.getConfig(namespace);
      //每个命名空间下的配置创建一个ConfigPropertySource接收
      composite.addPropertySource(configPropertySourceFactory.getConfigPropertySource(namespace, config));
    }
   //将apollo对应的CompositePropertySource放在environment中PropertySources列表头部
    //说明具有最高优先级
    environment.getPropertySources().addFirst(composite);
  }

@Value注解的热更新原理
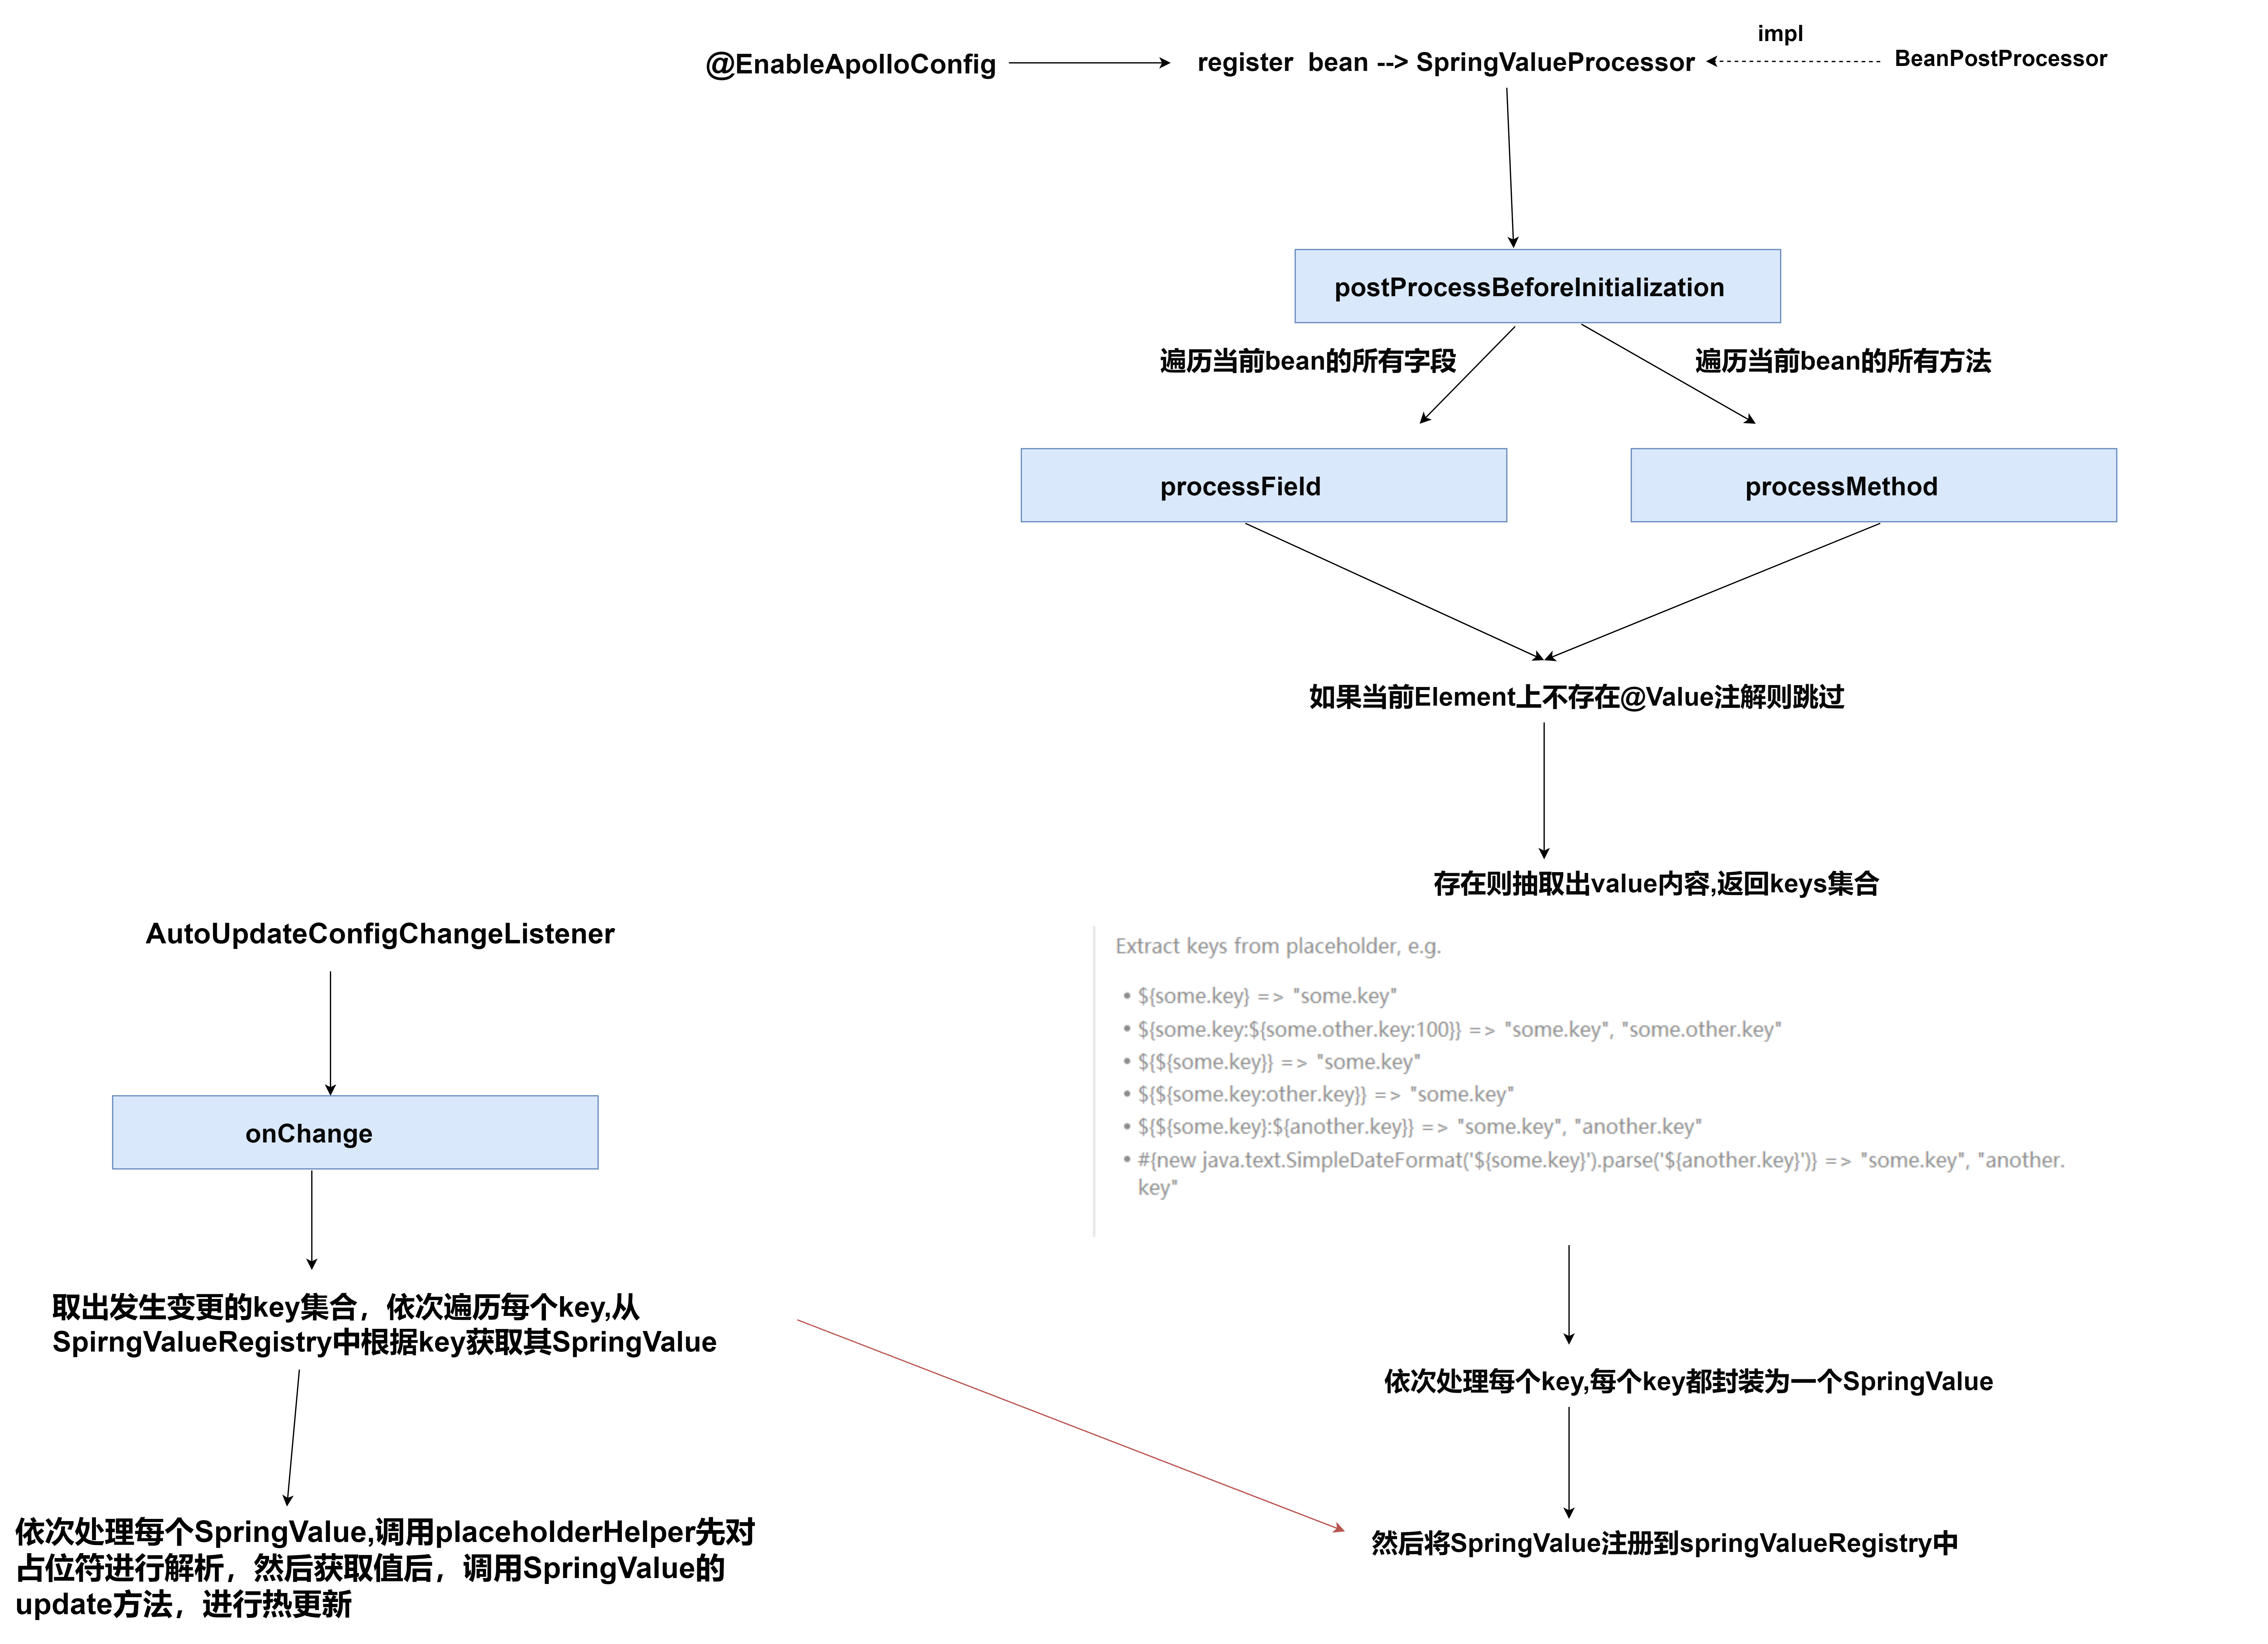
- SpringValue的update方法
  public void update(Object newVal) throws IllegalAccessException, InvocationTargetException {
    if (isField()) {
      injectField(newVal);
    } else {
      injectMethod(newVal);
    }
  }

  private void injectField(Object newVal) throws IllegalAccessException {
    Object bean = beanRef.get();
    if (bean == null) {
      return;
    }
    boolean accessible = field.isAccessible();
    field.setAccessible(true);
    field.set(bean, newVal);
    field.setAccessible(accessible);
  }

  private void injectMethod(Object newVal)
      throws InvocationTargetException, IllegalAccessException {
    Object bean = beanRef.get();
    if (bean == null) {
      return;
    }
    methodParameter.getMethod().invoke(bean, newVal);
  }

