回顾
在之前的学习过程中,我们掌握了进程的相关概念,冯诺依曼体系结构,进程地址空间概念,进程状态,进程控制,进程退出,进程替换…等等一系列的基础知识,这些基础知识让我们清楚的知道进程从加载到运行到接收退出信息,操作系统是如何一步步进行控制的,也了解到相关操作系统的相关概念。
我们还学习到通过进程替换的方式,让操作系统使子进程执行另一个全新的进程却并未创建子进程的操作
废话不多说,直接开整!
1. 输出提示符
[hx@VM-12-2-centos myshell]$ cat myshell.c
#include <stdio.h>
#include <string.h>
#include <stdlib.h>
#include <unistd.h>
#include <sys/types.h>
#include <sys/wait.h>
#include <assert.h>

int main()
{
  printf("用户名@主机名 当前路径# ");
  fflush(stdout);
  sleep(10);
  return 0;
}
因为printf当中未带\n,所以要fflush(强制刷新缓冲区,将缓冲区的数据读取到显示器上)

2. 获取用户输入
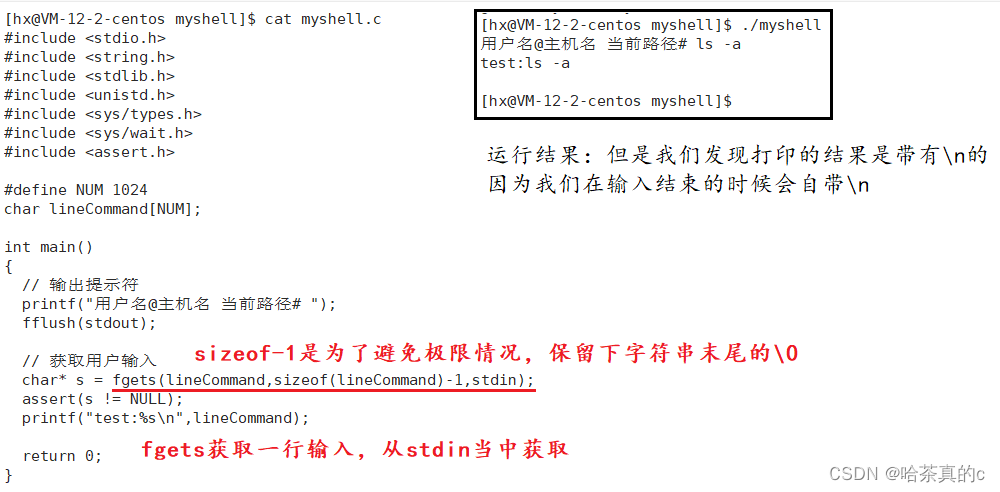
3. 解决输入结尾带\n的问题
[hx@VM-12-2-centos myshell]$ cat myshell.c
#include <stdio.h>
#include <string.h>
#include <stdlib.h>
#include <unistd.h>
#include <sys/types.h>
#include <sys/wait.h>
#include <assert.h>

#define NUM 1024
char lineCommand[NUM];

int main()
{
  // 输出提示符
  printf("用户名@主机名 当前路径# ");
  fflush(stdout);

  // 获取用户输入
  char* s = fgets(lineCommand,sizeof(lineCommand)-1,stdin);
  assert(s != NULL);
  // 清除最后一个\n
  lineCommand[strlen(lineCommand)-1] = 0;
  printf("test:%s\n",lineCommand);
  return 0;
}

4. 字符串切割
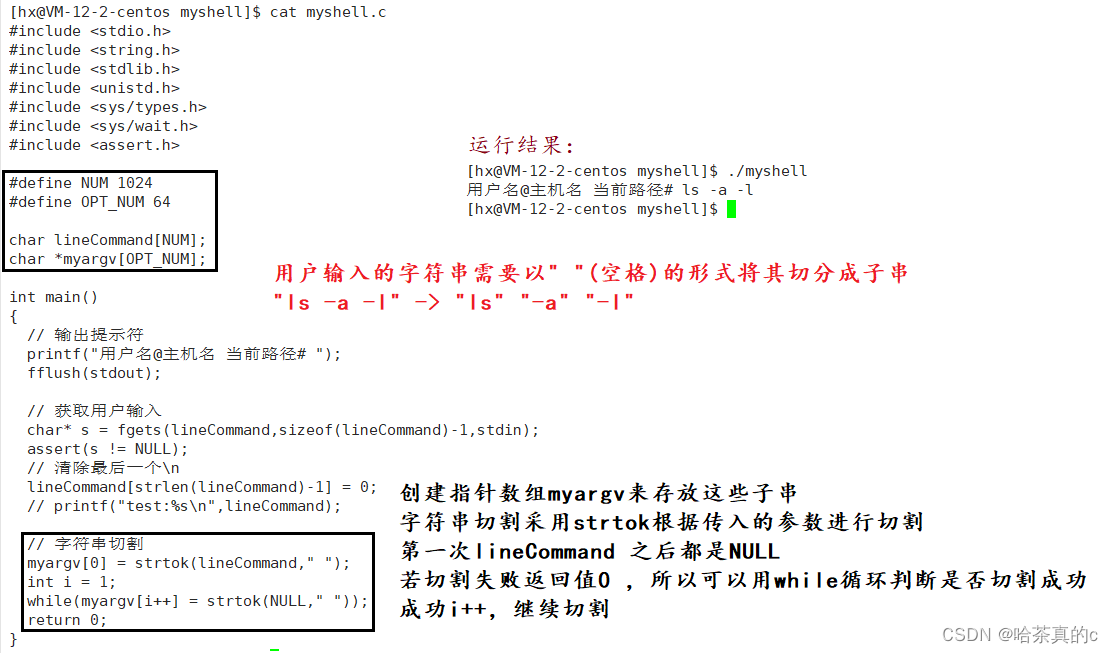
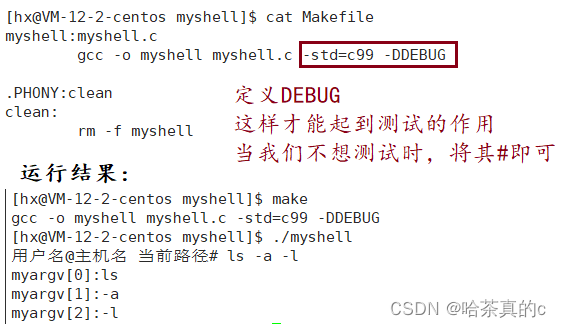
5. 测试切割是否成功
采用条件编译的方式进行测试,后续不想要测试随时取消#define定义值即可
[hx@VM-12-2-centos myshell]$ cat myshell.c
#include <stdio.h>
#include <string.h>
#include <stdlib.h>
#include <unistd.h>
#include <sys/types.h>
#include <sys/wait.h>
#include <assert.h>

#define NUM 1024
#define OPT_NUM 64

char lineCommand[NUM];
char *myargv[OPT_NUM];

int main()
{
  // 输出提示符
  printf("用户名@主机名 当前路径# ");
  fflush(stdout);

  // 获取用户输入
  char* s = fgets(lineCommand,sizeof(lineCommand)-1,stdin);
  assert(s != NULL);
  // 清除最后一个\n
  lineCommand[strlen(lineCommand)-1] = 0;
  // printf("test:%s\n",lineCommand);

  // 字符串切割
  myargv[0] = strtok(lineCommand," ");
  int i = 1;
  while(myargv[i++] = strtok(NULL," "));

  //测试切割是否成功
#ifdef DEBUG
  // myargv数组中最后1个是NULL 正好拿来判断循环结束
  for(int i = 0; myargv[i];i++)
  {
    printf("myargv[%d]:%s\n",i,myargv[i]);
  }
#endif
  return 0;
}
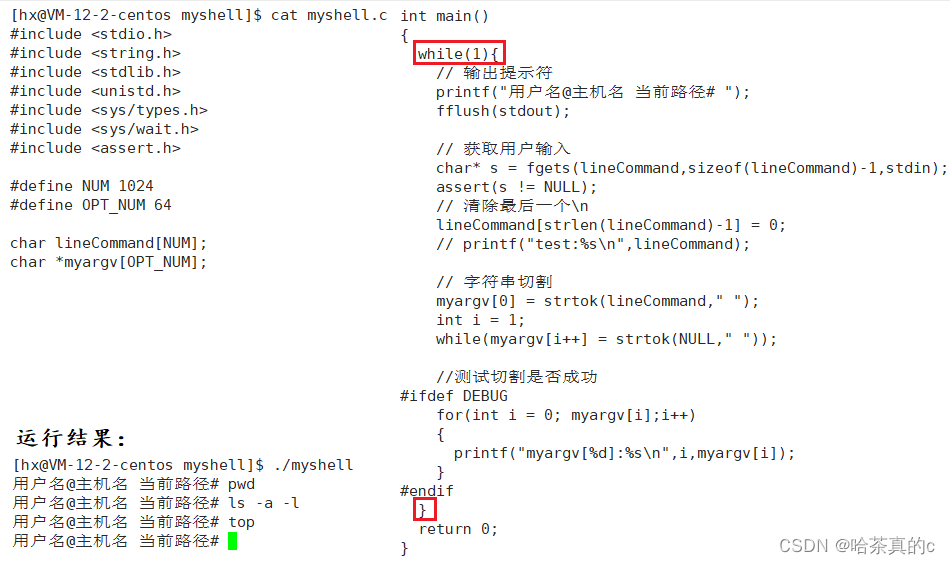
6. 嵌套循环
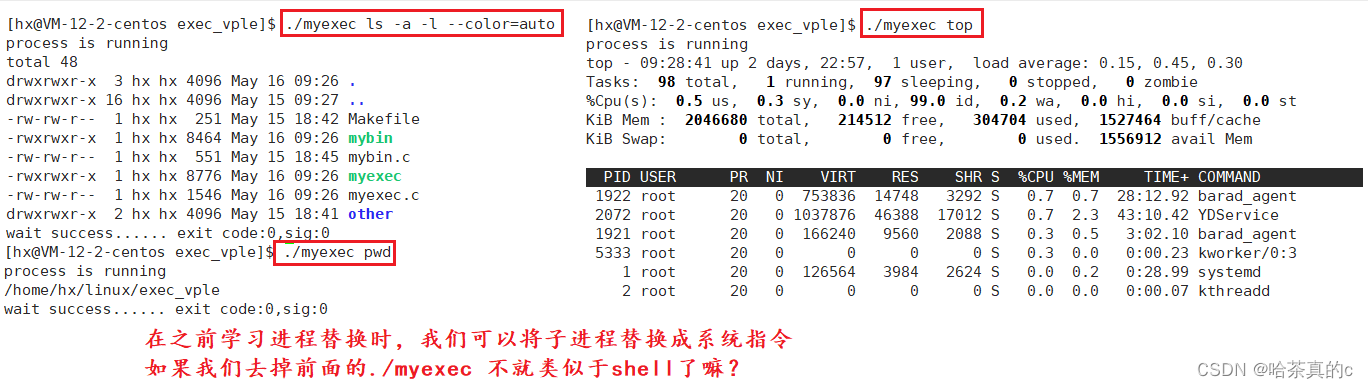
7. 执行命令
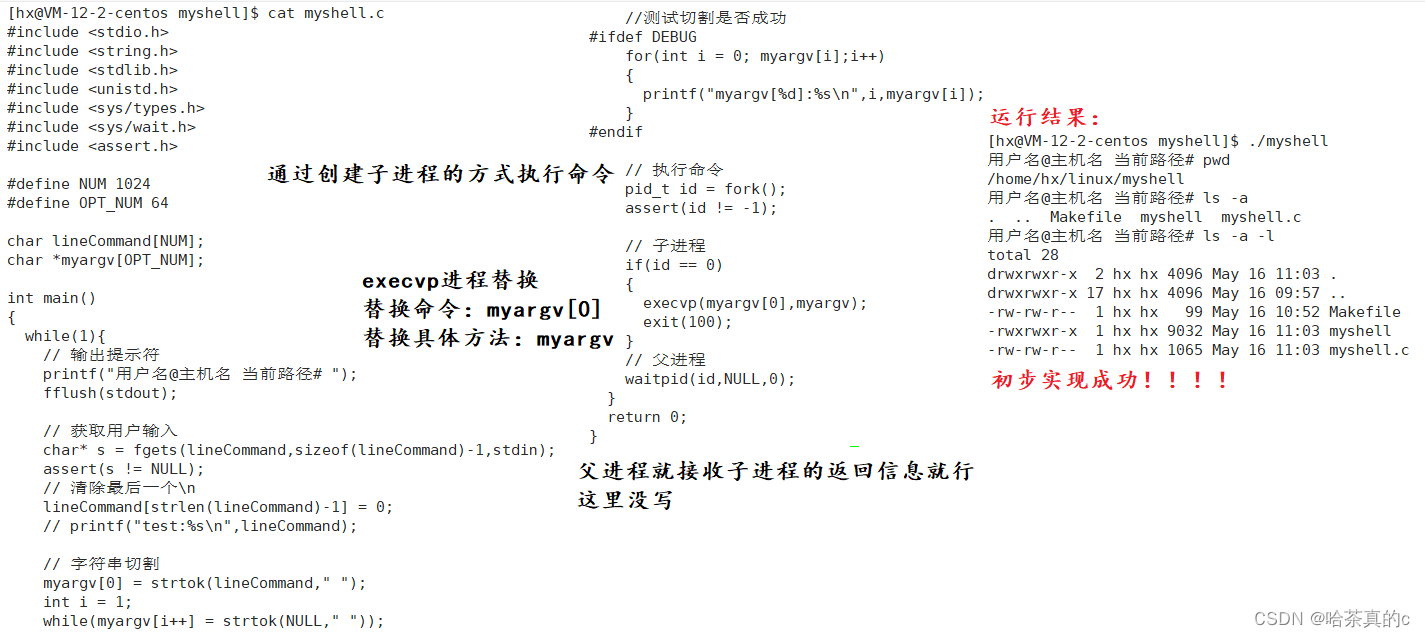
所以,到这里我们也就知道了shell底层执行命令行的原理:通过提取命令行上的指令对其分析(切割子串),再通过exec*系列接口调用所对应的命令来显示到显示器上。
乍一看好像已经实现完成了,还存在什么缺陷嘛?
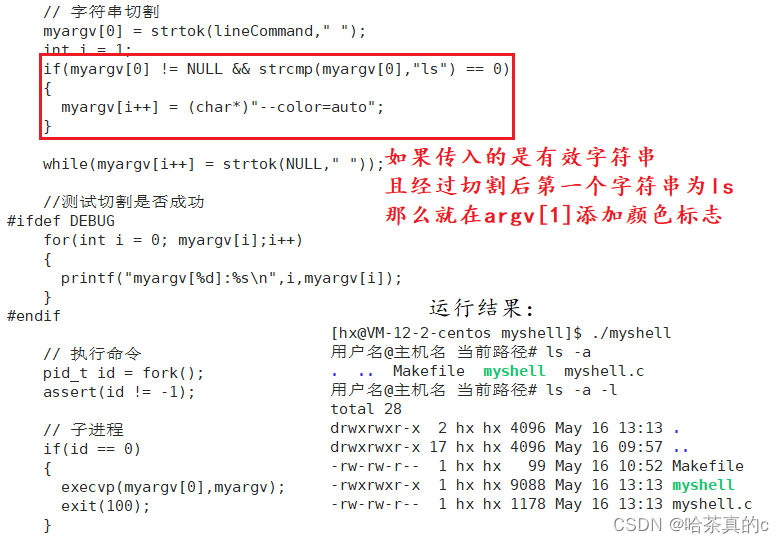
ls在执行时并没有颜色上的区分
8. ls – 添加颜色
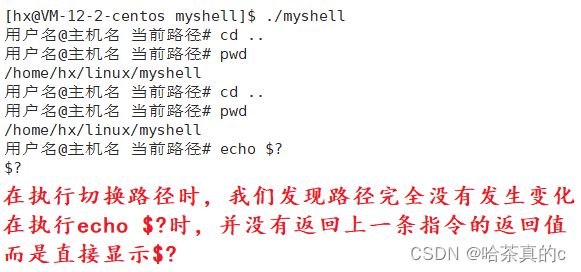
9. 内建命令cd
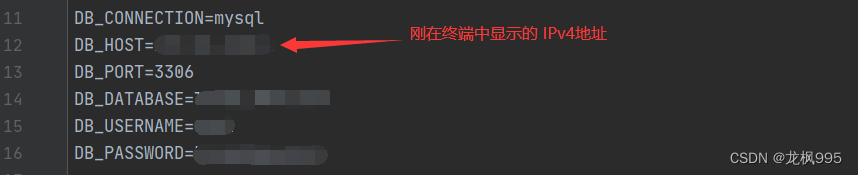
9.1 当前路径的认识
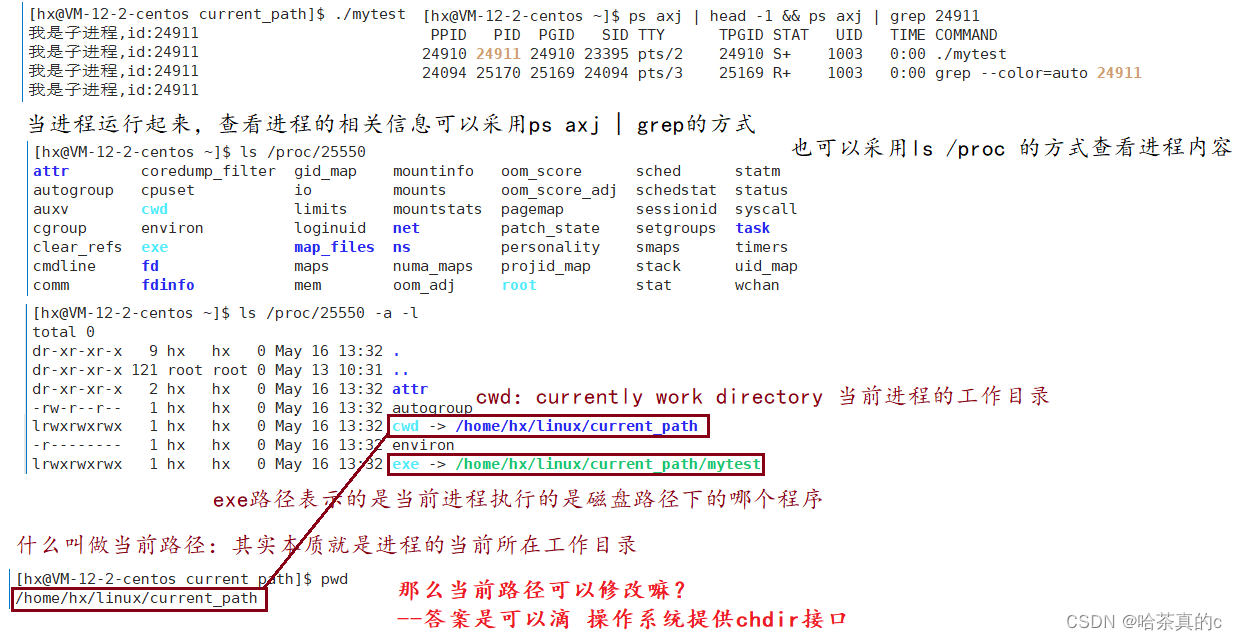
但这同样没有解决myshell当中cd切换不了路径的问题鸭,那么该如何理解呢?
shell在进行执行时,都是先通过fork创建子进程来执行对应的命令,那么也就是子进程执行的cd命令,子进程也存在自己的工作目录,当我们进行cd命令时更改的是子进程我的工作目录,当子进程执行完毕时,由父进程接收其返回值,之后使用的还是父进程shell,所以我们在父进程shell中观察不到子进程切换路径的现象
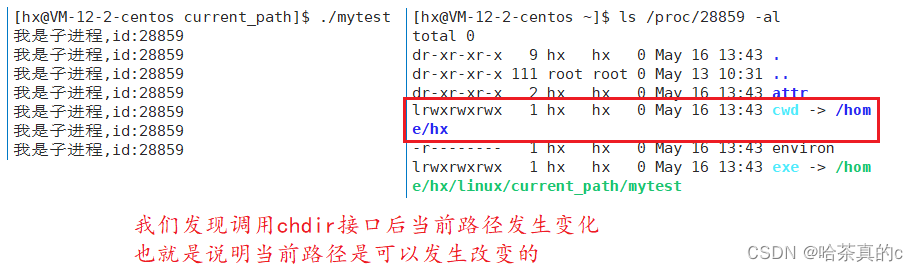
说了这么多,该如何操作实现呢?
9.2 增加内建命令cd的判断
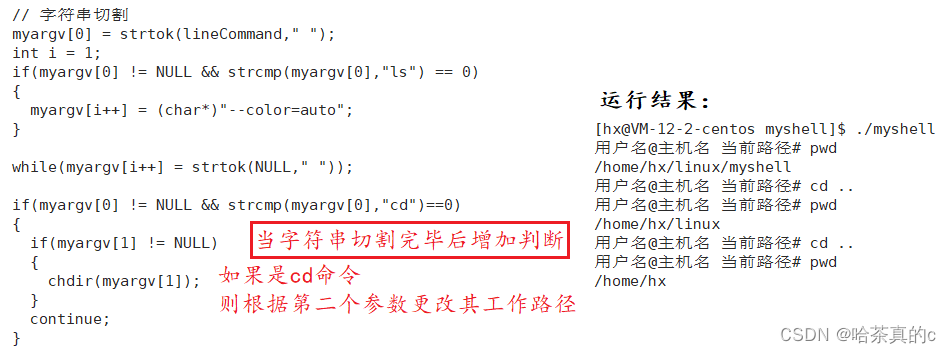
对于这种不需要子进程执行,而是让shell执行的命令,我们称之为内建/内置命令
10. 内建命令echo $?

11. 最终代码
如下所示:
[hx@VM-12-2-centos myshell]$ cat myshell.c
#include <stdio.h>
#include <string.h>
#include <stdlib.h>
#include <unistd.h>
#include <sys/types.h>
#include <sys/wait.h>
#include <assert.h>

#define NUM 1024
#define OPT_NUM 64

char lineCommand[NUM];
char *myargv[OPT_NUM];
int lastCode = 0;
int lastSig = 0;

int main()
{
  while(1){
    // 输出提示符
    printf("用户名@主机名 当前路径# ");
    fflush(stdout);

    // 获取用户输入
    char* s = fgets(lineCommand,sizeof(lineCommand)-1,stdin);
    assert(s != NULL);
    // 清除最后一个\n
    lineCommand[strlen(lineCommand)-1] = 0;
    // printf("test:%s\n",lineCommand);

    // 字符串切割
    myargv[0] = strtok(lineCommand," ");
    int i = 1;
    if(myargv[0] != NULL && strcmp(myargv[0],"ls") == 0)
    {
      myargv[i++] = (char*)"--color=auto";
    }

    while(myargv[i++] = strtok(NULL," "));

    if(myargv[0] != NULL && strcmp(myargv[0],"cd")==0)
    {
      if(myargv[1] != NULL)
      {
        chdir(myargv[1]);
      }
      continue;
    }
    if(myargv[0] != NULL && myargv[1] != NULL && strcmp(myargv[0],"echo")==0)
    {
      if(strcmp(myargv[1],"$?")==0)
      {
        printf("%d,%d\n",lastCode,lastSig);
      }
      else
      {
        printf("%s\n",myargv[1]);
      }
      continue;
    }


    //测试切割是否成功
#ifdef DEBUG
    for(int i = 0; myargv[i];i++)
    {
      printf("myargv[%d]:%s\n",i,myargv[i]);
    }
#endif

    // 执行命令
    pid_t id = fork();
    assert(id != -1);

    // 子进程
    if(id == 0)
    {
      execvp(myargv[0],myargv);
      exit(100);
    }
    // 父进程
    int status = 0;
    pid_t ret = waitpid(id,&status,0);
    assert(ret>0);
    lastCode = ((status>>8) & 0xFF);
    lastSig = (status & 0x7F);
  }
  return 0;
}
[hx@VM-12-2-centos myshell]$ cat Makefile
myshell:myshell.c
	gcc -o myshell myshell.c -std=c99 # -DDEBUG

.PHONY:clean
clean:
	rm -f myshell


![[PyTorch][chapter 34][池化层与采样]](https://img-blog.csdnimg.cn/d0d9c551720d43f5aa3c54ceebf7e783.png)