当我们买了一个手机或者平板,按下电源键的那一刻,到进入Launcher,选择我们想要使用的某个App进入,这个过程中,系统到底在做了什么事,伙伴们有仔细的研究过吗?可能对于Framework这块晦涩难懂的专题比较枯燥,那么从这篇文章开始,将会对Framework相关的知识进行全面的剖析,先从系统启动流程开始。
1 系统启动流程分析
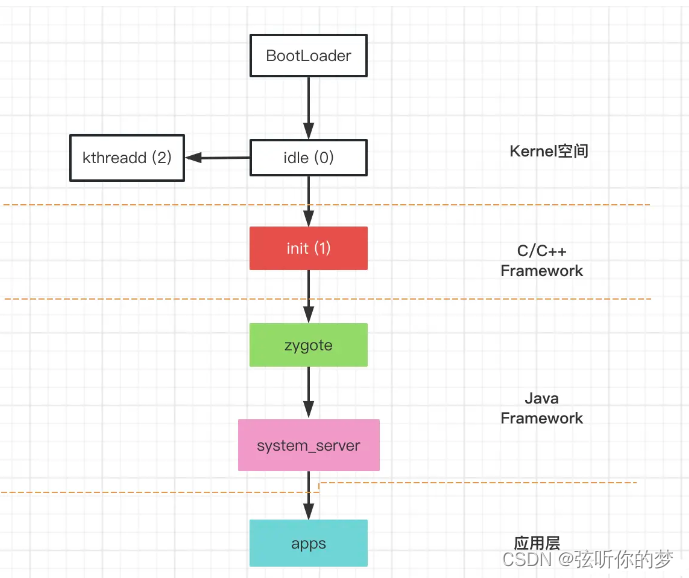
当我们打开电源键的时候,硬件执行的第一段代码就是BootLoader,会做一些初始化的操作,例如初始化CPU速度、内存等。然后会启动第一个进程idle进程(pid = 0),这个进程是在内核空间初始化的。
idle进程作为系统启动的第一个进程,它会创建两个进程,系统创建进程都是通过fork的形式完成,其中在Kernel空间会创建kthreadd进程,还有一个就是在用户空间创建init进程(pid = 1),这个进程想必我们都非常熟悉了。
像我们启动app,或者系统应用,都需要zygote进程来孵化进程,那么zygote进程也是通过init进程来创建完成的,像系统服务的创建和启动,是通过system_server进程来管理,而system_server进程则是由zygote进程fork创建。
所以通过下面这个图,我们就能大致了解,从电源按下的那一刻到应用启动的流程。
如需完整版Android 学习资料 请点击此处免费获取
接下来我们分析每个进程启动流程。
2 C/C++ Framework Native层
2.1 init进程启动分析
通过上面的流程图,我们知道init进程是通过内核空间启动的,所以我们看一下内核层的代码。
kernel_common/init/main.c
在内核层的main.c文件中,有一个静态方法kernel_init,这个方法会首先执行。
//
static int kernel_init(void *);
static int __ref kernel_init(void *unused)
{
	int ret;

	kernel_init_freeable();
	/* need to finish all async __init code before freeing the memory */
	async_synchronize_full();
	kprobe_free_init_mem();
	ftrace_free_init_mem();
	free_initmem();
	mark_readonly();

	/*
	 * Kernel mappings are now finalized - update the userspace page-table
	 * to finalize PTI.
	 */
	pti_finalize();

	system_state = SYSTEM_RUNNING;
	numa_default_policy();

	rcu_end_inkernel_boot();
        //初始化文件
	if (!try_to_run_init_process("/sbin/init") ||
	    !try_to_run_init_process("/etc/init") ||
	    !try_to_run_init_process("/bin/init") ||
	    !try_to_run_init_process("/bin/sh"))
		return 0;

	panic("No working init found.  Try passing init= option to kernel. "
	      "See Linux Documentation/admin-guide/init.rst for guidance.");
}
在kernel_init方法中,我们看到会调用try_to_run_init_process函数去加载一些文件,例如我们需要关心的/bin/init,这个文件就是在设备system/bin/init下的。

init可以看做是一个模块,它与install、gzip等系统能力属于平级,都是通过系统源码编译过来的一种二进制文件,那么在这个文件加载的时候,具体执行的是哪些代码呢,这个需要我们看这个模块具体是怎么编译出来的,需要看下Android.bp文件。
cc_binary {
    name: "init_second_stage",
    recovery_available: true,
    stem: "init",
    defaults: ["init_defaults"],
    static_libs: ["libinit"],
    srcs: ["main.cpp"],
    symlinks: ["ueventd"],
    target: {
        platform: {
            required: [
                "init.rc",
                "ueventd.rc",
                "e2fsdroid",
                "extra_free_kbytes",
                "make_f2fs",
                "mke2fs",
                "sload_f2fs",
            ],
        },
        recovery: {
            cflags: ["-DRECOVERY"],
            exclude_static_libs: [
                "libxml2",
            ],
            exclude_shared_libs: [
                "libbinder",
                "libutils",
            ],
            required: [
                "init_recovery.rc",
                "ueventd.rc.recovery",
                "e2fsdroid.recovery",
                "make_f2fs.recovery",
                "mke2fs.recovery",
                "sload_f2fs.recovery",
            ],
        },
    },
    visibility: ["//packages/modules/Virtualization/microdroid"],
}
当系统编译init模块的时候,对应的srcs源码为main.cpp,也就是说系统system/bin/下的init模块入口函数为main.cpp,当kernel内核执行kernel_init函数的时候,其实就会执行init模块的main.cpp。
system/core/init/main.cpp
int main(int argc, char** argv) {
#if __has_feature(address_sanitizer)
    __asan_set_error_report_callback(AsanReportCallback);
#endif

    if (!strcmp(basename(argv[0]), "ueventd")) {
        return ueventd_main(argc, argv);
    }

    if (argc > 1) {
        if (!strcmp(argv[1], "subcontext")) {
            android::base::InitLogging(argv, &android::base::KernelLogger);
            const BuiltinFunctionMap function_map;

            return SubcontextMain(argc, argv, &function_map);
        }

        if (!strcmp(argv[1], "selinux_setup")) {
            return SetupSelinux(argv);
        }

        if (!strcmp(argv[1], "second_stage")) {
            return SecondStageMain(argc, argv);
        }
    }

    return FirstStageMain(argc, argv);
}
所有函数的入口都是main函数,所以看下main函数中做了什么事。首先我们看到当第一次进来时,会执行FirstStageMain这个函数,如果再次进入,此时就会走SecondStageMain。那么我们首先进入第一阶段,看系统做了什么事。
system/core/init/ first_stage_init.cpp
这个类中,我们找一些关键的代码来看一下,
int FirstStageMain(int argc, char** argv) {
    if (REBOOT_BOOTLOADER_ON_PANIC) {
        //核心代码1
        //init如果挂掉,就会重启
        InstallRebootSignalHandlers();
    }

    boot_clock::time_point start_time = boot_clock::now();

    std::vector<std::pair<std::string, int>> errors;
#define CHECKCALL(x) \
    if (x != 0) errors.emplace_back(#x " failed", errno);

    // Clear the umask.
    umask(0);

    //核心代码2
    CHECKCALL(clearenv());
    CHECKCALL(setenv("PATH", _PATH_DEFPATH, 1));
    // Get the basic filesystem setup we need put together in the initramdisk
    // on / and then we'll let the rc file figure out the rest.
    CHECKCALL(mount("tmpfs", "/dev", "tmpfs", MS_NOSUID, "mode=0755"));
    CHECKCALL(mkdir("/dev/pts", 0755));
    CHECKCALL(mkdir("/dev/socket", 0755));
    CHECKCALL(mount("devpts", "/dev/pts", "devpts", 0, NULL));
#define MAKE_STR(x) __STRING(x)
    CHECKCALL(mount("proc", "/proc", "proc", 0, "hidepid=2,gid=" MAKE_STR(AID_READPROC)));
#undef MAKE_STR
    // Don't expose the raw commandline to unprivileged processes.
    CHECKCALL(chmod("/proc/cmdline", 0440));
    gid_t groups[] = {AID_READPROC};
    CHECKCALL(setgroups(arraysize(groups), groups));
    CHECKCALL(mount("sysfs", "/sys", "sysfs", 0, NULL));
    CHECKCALL(mount("selinuxfs", "/sys/fs/selinux", "selinuxfs", 0, NULL));

    CHECKCALL(mknod("/dev/kmsg", S_IFCHR | 0600, makedev(1, 11)));

    if constexpr (WORLD_WRITABLE_KMSG) {
        CHECKCALL(mknod("/dev/kmsg_debug", S_IFCHR | 0622, makedev(1, 11)));
    }

    CHECKCALL(mknod("/dev/random", S_IFCHR | 0666, makedev(1, 8)));
    CHECKCALL(mknod("/dev/urandom", S_IFCHR | 0666, makedev(1, 9)));

    // This is needed for log wrapper, which gets called before ueventd runs.
    CHECKCALL(mknod("/dev/ptmx", S_IFCHR | 0666, makedev(5, 2)));
    CHECKCALL(mknod("/dev/null", S_IFCHR | 0666, makedev(1, 3)));

    // These below mounts are done in first stage init so that first stage mount can mount
    // subdirectories of /mnt/{vendor,product}/.  Other mounts, not required by first stage mount,
    // should be done in rc files.
    // Mount staging areas for devices managed by vold
    // See storage config details at http://source.android.com/devices/storage/
    CHECKCALL(mount("tmpfs", "/mnt", "tmpfs", MS_NOEXEC | MS_NOSUID | MS_NODEV,
                    "mode=0755,uid=0,gid=1000"));
    // /mnt/vendor is used to mount vendor-specific partitions that can not be
    // part of the vendor partition, e.g. because they are mounted read-write.
    CHECKCALL(mkdir("/mnt/vendor", 0755));
    // /mnt/product is used to mount product-specific partitions that can not be
    // part of the product partition, e.g. because they are mounted read-write.
    CHECKCALL(mkdir("/mnt/product", 0755));

    // /apex is used to mount APEXes
    CHECKCALL(mount("tmpfs", "/apex", "tmpfs", MS_NOEXEC | MS_NOSUID | MS_NODEV,
                    "mode=0755,uid=0,gid=0"));

    // /debug_ramdisk is used to preserve additional files from the debug ramdisk
    CHECKCALL(mount("tmpfs", "/debug_ramdisk", "tmpfs", MS_NOEXEC | MS_NOSUID | MS_NODEV,
                    "mode=0755,uid=0,gid=0"));
#undef CHECKCALL

    SetStdioToDevNull(argv);
    // Now that tmpfs is mounted on /dev and we have /dev/kmsg, we can actually
    // talk to the outside world...
    //初始化日志模块
    InitKernelLogging(argv);

    //......

    const char* path = "/system/bin/init";
    const char* args[] = {path, "selinux_setup", nullptr};
    execv(path, const_cast<char**>(args));

    // execv() only returns if an error happened, in which case we
    // panic and never fall through this conditional.
    PLOG(FATAL) << "execv(\"" << path << "\") failed";

    return 1;
}
2.2 init进程启动总结
到此init进程的主要任务就完成了,我们总结一下init进程主要干了什么事:
(1)init进程是由内核进程idle进程fork出来的,因此init进程初始化,也是由kernel启动的,即调用了kernel_int方法,此时会从系统的system/bin文件夹下查找init二进制文件;
(2)init二进制文件,是通过Android.bp脚本编译,从bp文件中可以看到,init关联的srcs为main.cpp,也就是system/core/init/main.cpp文件,其入口为main函数;
(3)当进入到main函数中时,首先会执行FirstStageMain函数,在这个函数中主要是:注册signal,挂载文件或者创建文件,进行一些初始化操作,然后再次进入到main函数中;
(4)此时进入main函数会执行SetupSeLinux,这里主要做linux的一些安全策略,然后会再次执行init的main函数;
(5)此时会执行SecondStageMain函数,在这个函数中,首先会初始化属性域,注册到enpoll中;然后解析init.rc文件,随后进入while循环,继续执行init.rc中的command指令。
3 Java Framework层
过了C/C++源码,真正到.java文件结尾的源码,就是Zygote进程,是由init进程fork出来的,也就是说Zygote才是Java进程的鼻祖。
3.1 init.rc文件
前面我们提到了,在SecondStageMain函数中,会进行init.rc文件的解析,那么init.rc到底是什么呢?你可以理解为就是一个脚本文件,只不过在脚本文件中,需要系统执行指令。
system/core/rootdir/init.rc
import /init.${ro.zygote}.rc

# Mount filesystems and start core system services.
on late-init
    //......
    # Now we can start zygote for devices with file based encryption
    trigger zygote-start

on zygote-start && property:ro.crypto.state=unencrypted
    # A/B update verifier that marks a successful boot.
    exec_start update_verifier_nonencrypted
    start netd
    start zygote
    start zygote_secondary
从init.rc文件中我们可以看到,当在SecondStageMain中解析init.rc文件的时候,就会启动Zygote进程,所以这个时候,才会真正进入到了Java的进程。
从脚本中看,start zygote最终会执行import进来的init.zygote.rc文件。
3.2 Zygote启动流程
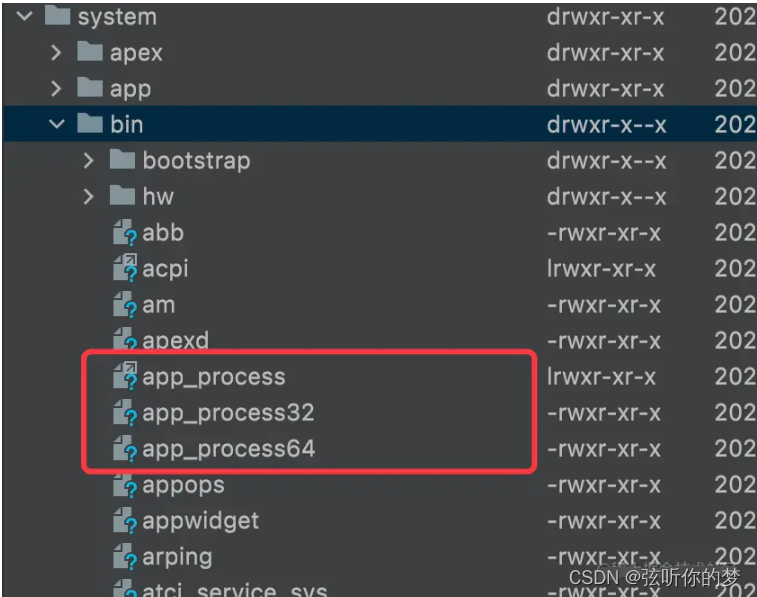
所以当启动Zygote进程的时候,如果是32位的操作系统,那么就会解析init.zygote32.rc文件
service zygote /system/bin/app_process -Xzygote /system/bin --zygote --start-system-server
 class main
 priority -20
 user root
 group root readproc reserved_disk
 socket zygote stream 660 root system
 socket usap_pool_primary stream 660 root system
 onrestart write /sys/android_power/request_state wake
 onrestart write /sys/power/state on
 onrestart restart audioserver
 onrestart restart cameraserver
 onrestart restart media
 onrestart restart netd
 onrestart restart wificond
 writepid /dev/cpuset/foreground/tasks
对于.rc文件的语法,这里简单介绍一下,对于service命令,具体格式为:
service <name> <pathname> [args......]
name:服务的名称;
pathname:可执行的二进制文件路径,service的文件路径
args:要启动service所要带的参数
这里我们会看到启动Zygote服务进程,会执行/system/bin/app_process二进制文件,对于二进制文件是通过Android.bp来编译生成的,我们看下对应的文件。
cc_binary {
 name: "app_process",
 srcs: ["app_main.cpp"],
 multilib: {
 lib32: {
 suffix: "32",
 },
 lib64: {
 suffix: "64",
 },
 },
}
我们可以看到,对于app_process可执行文件,其函数入口为app_main.cpp文件,也就是在启动Zygote进程之后,就会进入到app_main.cpp。
3.3 native启动Zygote进程总结
至此,在native层的Zygote进程就已经启动完成了,我们来简单总结一下,当解析init.rc文件的时候,init进程就会fork出zygote进程。
此时系统执行init.rc中的脚本:执行start zygote时,会执行import进来的init.zygote.rc脚本,此时会根据系统版本,决定执行32位的脚本或者64位的脚本。当执行service zygote命令时,会执行系统system/bin下的二进制执行文件app_process,会进入到app_main.cpp中的main函数。
此时会调用AndroidRuntime的start方法执行ZygoteInit.java.main方法,在此之前会在native层创建VM虚拟机,并注册JNI函数保证C++和Java层之前的双向通信调用。
3.4 Java层的Zygote启动
通过前面我们知道,native层启动Zygote时,会调用Java层的ZygoteInit.java.main方法,我们看下这个类。
public static void main(String[] argv) {
    ZygoteServer zygoteServer = null;

    //......

    Runnable caller;
    try {

        // ......

        boolean startSystemServer = false;
        String zygoteSocketName = "zygote";
        String abiList = null;
        boolean enableLazyPreload = false;
        // 与nativ层一致,也是在根据传入的属性给一些状态位赋值
        for (int i = 1; i < argv.length; i++) {
            if ("start-system-server".equals(argv[i])) {
                startSystemServer = true;
            } else if ("--enable-lazy-preload".equals(argv[i])) {
                enableLazyPreload = true;
            } else if (argv[i].startsWith(ABI_LIST_ARG)) {
                abiList = argv[i].substring(ABI_LIST_ARG.length());
            } else if (argv[i].startsWith(SOCKET_NAME_ARG)) {
                zygoteSocketName = argv[i].substring(SOCKET_NAME_ARG.length());
            } else {
                throw new RuntimeException("Unknown command line argument: " + argv[i]);
            }
        }
        // .....

        // In some configurations, we avoid preloading resources and classes eagerly.
        // In such cases, we will preload things prior to our first fork.
        //核心代码 1
        if (!enableLazyPreload) {
            bootTimingsTraceLog.traceBegin("ZygotePreload");
            EventLog.writeEvent(LOG_BOOT_PROGRESS_PRELOAD_START,
                    SystemClock.uptimeMillis());
            preload(bootTimingsTraceLog);
            EventLog.writeEvent(LOG_BOOT_PROGRESS_PRELOAD_END,
                    SystemClock.uptimeMillis());
            bootTimingsTraceLog.traceEnd(); // ZygotePreload
        }

        // Do an initial gc to clean up after startup
        bootTimingsTraceLog.traceBegin("PostZygoteInitGC");
        gcAndFinalize();
        bootTimingsTraceLog.traceEnd(); // PostZygoteInitGC

        bootTimingsTraceLog.traceEnd(); // ZygoteInit

        Zygote.initNativeState(isPrimaryZygote);

        ZygoteHooks.stopZygoteNoThreadCreation();
        //创建 Socket对象
        zygoteServer = new ZygoteServer(isPrimaryZygote);
        //核心代码 2
        if (startSystemServer) {
            Runnable r = forkSystemServer(abiList, zygoteSocketName, zygoteServer);

            // {@code r == null} in the parent (zygote) process, and {@code r != null} in the
            // child (system_server) process.
            if (r != null) {
                r.run();
                return;
            }
        }

        Log.i(TAG, "Accepting command socket connections");

        // The select loop returns early in the child process after a fork and
        // loops forever in the zygote.
        caller = zygoteServer.runSelectLoop(abiList);
    } catch (Throwable ex) {
        Log.e(TAG, "System zygote died with fatal exception", ex);
        throw ex;
    } finally {
        if (zygoteServer != null) {
            zygoteServer.closeServerSocket();
        }
    }

    // We're in the child process and have exited the select loop. Proceed to execute the
    // command.
    if (caller != null) {
        caller.run();
    }
}
在方法的开始,有一个ZygoteServer对象,它其实是一个Socket,用于与各个进程间通信;既然使用到进程间通信了,为什么不使用Binder呢?
不知有没有伙伴会考虑这个问题,为什么要使用Socket呢?例如AMS想要创建一个进程,那么就会通知Zygote来孵化出一个进程,此时创建进程就需要通过fork这种形式,其实相当于是做了一次进程copy,那么当前进程所有线程、对象都会被copy到新的进程,那么此时线程就不再拥有线程的特性而是一个对象,此时在子进程中如果调用线程的方法,那么是无效的;还有就是如果在父进程中,某个线程持有一把锁,那么在子进程中想要竞争这把锁对象,但是这把锁可能永远无法被释放,导致死锁的情况发生。
所以在Zygote进程中,如果使用Binder,因其内部是多线程组成的线程池,会有发生死锁的可能性,通过Socket进行进程间通信,也是为了避免这种情况的发生。
3.5 Java层启动Zygote进程总结
当fork出system_server进程之后,Java层的Zygote进程将会进入死循环,接收消息并执行,简单总结一下:
(1)当在native层创建JVM,并注册JNI函数之后,就会执行Zygote.java.main方法,进入到Java代码中;
(2)在main方法中,首先会解析传入的参数,给一些标志位赋值;然后会根据标志位进行判断是否支持预加载,预加载包括但不限于classes、resources,目的为了快速启动进程;
(3)在预加载完成之后(如有需要),那么就会创建Socket连接;然后调用forkSystemServer方法,fork system_server进程,最终调用的还是C++层的函数,调用系统的fork函数;
(4)随后会调用ZygoteServer(scoket)的runSelectLoop方法,开启死循环,socket服务端会接收客户端发送的消息进行处理,例如AMS想要创建一个进程。


