C++编译Boost读写并解析JSON文件和XML文件
- 需求分析
- 前提环境(Win11、VS 2015)
- 1、Boost简介
- 1.1 为何使用Boost?
- 1.2 Boost快速上手(Windows系统)
- 2、Boost 安装和使用
- 2.1 自己下载源码编译生成Boost库(v 1.82.0)
- 2.2 从官网下载编译好的Boost库(v 1.82.0)
- 2.3 入门Demo测试(VS 2015 + Boost)
- 2.3.1 VS 新建 C++ 项目
- 2.3.2 添加源代码(main.cpp)
- 2.3.3 项目配置.h文件和.lib库文件(Boost)
- 2.3.4 运行结果
- 3、Boost解析JSON和XML文件实例
- 3.1 C++调用Boost库读写JSON文件
- 3.1.1 参考文档
- 3.1.2 执行代码(main.cpp)
- 3.1.3 运行结果(config_out.json)
- 3.2 C++调用Boost库读写XML文件
- 3.2.1 参考文档
- 3.2.2 输入数据文件(debug_settings.xml)
- 3.2.3 C++执行代码(debug_settings.cpp)
- 3.2.4 控制台运行结果(输出debug_settings_out.xml)
- 4、总结
需求分析
值得一提的是,C++语言的的确确是一门面向对象、功能强大、计算高效的后端语言,深受作者的喜爱。在平时的工作、学习和生活中,为了高效地对一些配置数据(如JSON文件、XML文件)进行处理或者分析,开发者需要了解各类数据文件的格式、组织方式来加以解析,但往往苦于不足的精力和时间,考虑到经济、时间等成本,亦或是个人编写的标准数据解析代码可能没有较好的通用性和普适性,也没能进行大量的实际测试,即不知是否能够经受时间和实践的双重检验,所以为了临时满足自己的个性化需求,暂时选择已有的开源库来达到目的并满足现实性要求,接下来的内容亦是如此。
就拿解析JSON和XML文件而言,凭借自己的历史经验和编程实践,本人觉得C#、Java、Python和JavaScript在功能实现上都有现成的库或者工具来快速实现,而如果用C、C++语言来自己实现的话,相对来说并不会十分容易,查阅了互联网上现有的资料,经探索发现 Boost库是个 不错和实用的选择,当然大家如果有其他更好选择的话,欢迎共同探讨、热情留言和积极评论哦!
前提环境(Win11、VS 2015)

| 
|
1、Boost简介
Boost是一个基于C++标准库、跨平台、开源、可移植、可扩展的程序库,有望成为下一代C++标准库的内容,一经问世以来便在社区产生了广泛而又深远的影响力。

The Boost C++ Libraries,按照功能划分,Boost库包含字符串和文本处理、容器、迭代器、算法、函数对象及高阶编程、泛型编程、模板元编程、预处理元编程、并发编程、数学、数据结构、图像处理、输入输出、跨语言混合编程、内存管理、解析、编程接口和综合类库等功能。Boost库中的大部分功能仅需包含对应的 .h头文件即可,少数功能才需要链接.lib库文件,代码的构造极为精巧,值得精心研读、耐心学习。


1.1 为何使用Boost?
如果有人要问我,为何要使用Boost库?只好借用官方的大气回复:生产力使然。像 Boost 这样高质量的库既能加快初始开发速度、减少错误,又能减少车轮的重新发明和长期维护的高昂经济成本。

1.2 Boost快速上手(Windows系统)
本文所述是基于Windows操作系统进行的,强烈建议大家阅读官方的快速上手指导和Github上Boostorg提供的Wiki帮助来进一步深入了解、学习、测试和实践。(附:Boost文档)

| 
|
2、Boost 安装和使用
为了学习Boost库代码,这里介绍两种方式来得到编译好的Boost库:(1)直接在官网下载;(2)源码编译(为主)。利用编译好的Boost库对入门级Demo代码进行实测,查看运行效果。

| 
|
2.1 自己下载源码编译生成Boost库(v 1.82.0)
首先下载boost_1_82_0.zip文件并解压,编译过程中的细节可参考B2 User Manual,这里将压缩包解压至E:\jing_zhong\boost_1_82_0目录下,如下图所示:


查看本机所安装VS 2015对应的VC控制台,具体打开开始菜单,找到VS2015下的VS 2015 x64本机工具命令提示符,同样在VS 2015安装目录下也可找到cl.exe,如D:\Program Files (x86)\Microsoft Visual Studio 2015\VC\bin,由于自己选择AMD 64位的所以选择了bin目录下amd64文件夹下的cl.exe作为控制台来编译Boost。

| 
|
必须注意的是,Boost编译需要依赖C++标准库,需要利用VC编译器,所以这里打开VS 2015自带的VC控制台窗口(内置C++库环境)来依次执行如下命令去编译Boost源码,最后设置编译后的Boost库生成到D:\Boost-SDK(无需自己新建文件夹,会自动生成)文件夹。(注:在得到b2.exe后可利用help查看编译、安装的详细参数Options,按自己需求进行设置即可,这里直接采用默认了)
cd "E:\jing_zhong\boost_1_82_0"
E:
bootstrap.bat
b2 install --prefix="D:\Boost-SDK"
编译执行过程如下,大概花费半个小时左右:
D:\Program Files (x86)\Microsoft Visual Studio 2015\VC>cd "E:\jing_zhong\boost_1_82_0"

D:\Program Files (x86)\Microsoft Visual Studio 2015\VC>E:

E:\jing_zhong\boost_1_82_0>bootstrap.bat
Building Boost.Build engine
LOCALAPPDATA=C:\Users\Lenovo\AppData\Local
could not find "vswhere"
###
### Using 'vc14' toolset.
###

E:\jing_zhong\boost_1_82_0\tools\build\src\engine>"cl" /nologo /MP /MT /TP /Feb2 /wd4996 /O2 /GL /EHsc   -DNDEBUG  builtins.cpp class.cpp command.cpp compile.cpp constants.cpp cwd.cpp debug.cpp debugger.cpp execcmd.cpp execnt.cpp execunix.cpp filent.cpp filesys.cpp fileunix.cpp frames.cpp function.cpp glob.cpp hash.cpp hcache.cpp hdrmacro.cpp headers.cpp jam.cpp jamgram.cpp lists.cpp make.cpp make1.cpp md5.cpp mem.cpp modules.cpp native.cpp object.cpp option.cpp output.cpp parse.cpp pathnt.cpp pathsys.cpp pathunix.cpp regexp.cpp rules.cpp scan.cpp search.cpp jam_strings.cpp startup.cpp subst.cpp sysinfo.cpp timestamp.cpp variable.cpp w32_getreg.cpp modules/order.cpp modules/path.cpp modules/property-set.cpp modules/regex.cpp modules/sequence.cpp modules/set.cpp /link kernel32.lib advapi32.lib user32.lib
builtins.cpp
class.cpp
command.cpp
compile.cpp
constants.cpp
cwd.cpp
debug.cpp
debugger.cpp
execcmd.cpp
execnt.cpp
execunix.cpp
filent.cpp
filesys.cpp
fileunix.cpp
function.cpp
frames.cpp
glob.cpp
hash.cpp
hcache.cpp
hdrmacro.cpp
headers.cpp
jam.cpp
jamgram.cpp
lists.cpp
make.cpp
make1.cpp
md5.cpp
mem.cpp
modules.cpp
native.cpp
object.cpp
option.cpp
output.cpp
parse.cpp
pathnt.cpp
pathsys.cpp
pathunix.cpp
regexp.cpp
rules.cpp
scan.cpp
search.cpp
jam_strings.cpp
startup.cpp
subst.cpp
sysinfo.cpp
timestamp.cpp
variable.cpp
w32_getreg.cpp
order.cpp
path.cpp
property-set.cpp
regex.cpp
sequence.cpp
set.cpp
正在生成代码
已完成代码的生成

E:\jing_zhong\boost_1_82_0\tools\build\src\engine>dir *.exe
 驱动器 E 中的卷是 新加卷
 卷的序列号是 1E83-C7E3

 E:\jing_zhong\boost_1_82_0\tools\build\src\engine 的目录

2023/05/14  12:43           483,840 b2.exe
               1 个文件        483,840 字节
               0 个目录 371,485,462,528 可用字节

Generating Boost.Build configuration in project-config.jam for msvc...

Bootstrapping is done. To build, run:

    .\b2

To adjust configuration, edit 'project-config.jam'.
Further information:

    - Command line help:
    .\b2 --help

    - Getting started guide:
    http://boost.org/more/getting_started/windows.html

    - Boost.Build documentation:
    http://www.boost.org/build/


E:\jing_zhong\boost_1_82_0>.\b2 --help
B2 4.9-git

Project-specific help:

  Project has jamfile at Jamroot

Usage:

  b2 [options] [properties] [install|stage]

  Builds and installs Boost.

Targets and Related Options:

  install                 Install headers and compiled library files to the
  =======                 configured locations (below).

  --prefix=<PREFIX>       Install architecture independent files here.
                          Default: C:\Boost on Windows
                          Default: /usr/local on Unix, Linux, etc.

  --exec-prefix=<EPREFIX> Install architecture dependent files here.
                          Default: <PREFIX>

  --libdir=<LIBDIR>       Install library files here.
                          Default: <EPREFIX>/lib

  --includedir=<HDRDIR>   Install header files here.
                          Default: <PREFIX>/include

  --cmakedir=<CMAKEDIR>   Install CMake configuration files here.
                          Default: <LIBDIR>/cmake

  --no-cmake-config       Do not install CMake configuration files.

  stage                   Build and install only compiled library files to the
  =====                   stage directory.

  --stagedir=<STAGEDIR>   Install library files here
                          Default: ./stage

Other Options:

  --build-type=<type>     Build the specified pre-defined set of variations of
                          the libraries. Note, that which variants get built
                          depends on what each library supports.

                              -- minimal -- (default) Builds a minimal set of
                              variants. On Windows, these are static
                              multithreaded libraries in debug and release
                              modes, using shared runtime. On Linux, these are
                              static and shared multithreaded libraries in
                              release mode.

                              -- complete -- Build all possible variations.

  --build-dir=DIR         Build in this location instead of building within
                          the distribution tree. Recommended!

  --show-libraries        Display the list of Boost libraries that require
                          build and installation steps, and then exit.

  --layout=<layout>       Determine whether to choose library names and header
                          locations such that multiple versions of Boost or
                          multiple compilers can be used on the same system.

                              -- versioned -- Names of boost binaries include
                              the Boost version number, name and version of
                              the compiler and encoded build properties. Boost
                              headers are installed in a subdirectory of
                              <HDRDIR> whose name contains the Boost version
                              number.

                              -- tagged -- Names of boost binaries include the
                              encoded build properties such as variant and
                              threading, but do not including compiler name
                              and version, or Boost version. This option is
                              useful if you build several variants of Boost,
                              using the same compiler.

                              -- system -- Binaries names do not include the
                              Boost version number or the name and version
                              number of the compiler. Boost headers are
                              installed directly into <HDRDIR>. This option is
                              intended for system integrators building
                              distribution packages.

                          The default value is 'versioned' on Windows, and
                          'system' on Unix.

  --buildid=ID            Add the specified ID to the name of built libraries.
                          The default is to not add anything.

  --python-buildid=ID     Add the specified ID to the name of built libraries
                          that depend on Python. The default is to not add
                          anything. This ID is added in addition to --buildid.

  --help                  This message.

  --with-<library>        Build and install the specified <library>. If this
                          option is used, only libraries specified using this
                          option will be built.

  --without-<library>     Do not build, stage, or install the specified
                          <library>. By default, all libraries are built.

Properties:

  toolset=toolset         Indicate the toolset to build with.

  variant=debug|release   Select the build variant

  link=static|shared      Whether to build static or shared libraries

  threading=single|multi  Whether to build single or multithreaded binaries

  runtime-link=static|shared
                          Whether to link to static or shared C and C++
                          runtime.


General command line usage:

    b2 [options] [properties] [targets]

  Options, properties and targets can be specified in any order.

Important Options:

  * --clean Remove targets instead of building
  * -a Rebuild everything
  * -n Don't execute the commands, only print them
  * -d+2 Show commands as they are executed
  * -d0 Suppress all informational messages
  * -q Stop at first error
  * --reconfigure Rerun all configuration checks
  * --debug-configuration Diagnose configuration
  * --debug-building Report which targets are built with what properties
  * --debug-generator Diagnose generator search/execution

Further Help:

  The following options can be used to obtain additional documentation.

  * --help-options Print more obscure command line options.
  * --help-internal B2 implementation details.
  * --help-doc-options Implementation details doc formatting.

...found 1 target...

E:\jing_zhong\boost_1_82_0>b2 install --prefix="D:\Boost-SDK"

打开D:\Boost-SDK目录,查看编译后的Boost文件,如下图所示:


| 
|
2.2 从官网下载编译好的Boost库(v 1.82.0)
由于本人电脑使用的是Microsoft Visual Studio 2015,对应Microsoft Visual C++ 14.0版本,因此需要首先下载对应版本的安装包文件:boost_1_82_0-msvc-14.0-64.exe,之后双击该exe直接安装,点击下一步即可,当然本文的重点确实不在于此,遂不再赘述。
 |  |
 |


| 
|
细心的你可能会发现,安装包安装得到的库文件的数量要多一些,这与自己利用源码编译时所设置的参数有关,有兴趣的开发者可细心琢磨,不过能够满足自身需求即可哦!!!
2.3 入门Demo测试(VS 2015 + Boost)
此Demo旨在验证Boost是否引入成功,是否能被顺利调用和执行,输入一个数返回这个数的3倍对应的数值。
2.3.1 VS 新建 C++ 项目
打开VS 2015后,在菜单中点击新建C++ Win32控制台应用程序,输入项目名称后点击确定,之后选择空项目即可完成新项目的创建。
 |  |
 |
2.3.2 添加源代码(main.cpp)
在右侧的解决方案管理器窗口中右击源文件弹出添加新项窗口,选择Visual C++->C++ 文件,并输入名称为main.cpp后点击确定即可,之后将以下代码复制其中,另外记得将项目配置改为Release、x64配置。

main.cpp代码:
#include <iostream>
#include <iterator>
#include <algorithm>
#include <boost/lambda/lambda.hpp>

int main()
{
    using namespace boost::lambda;
    typedef std::istream_iterator<int> in;

    std::for_each(
        in(std::cin), in(), std::cout << (_1 * 3) << " " );
}

2.3.3 项目配置.h文件和.lib库文件(Boost)
项目->右键找到属性并点击,在弹出的属性页窗口左侧找到配置属性-》VC++目录,对其中的包含目录和库目录进行如图所示的设置,即分别将.h头文件所在的目录(D:\Boost-SDK\include\boost-1_82;)输入到包含目录中,将.lib库文件所在的目录输入(D:\Boost-SDK\lib;)到库目录中即可。

2.3.4 运行结果
项目运行成功后,在控制台中输入数字,可见会返回输出该数字的3倍,最后输入字符串结束。

3、Boost解析JSON和XML文件实例
下面就调用编译后的Boost库来分别进行JSON文件和XML文件解析实战。
3.1 C++调用Boost库读写JSON文件
接下来从参考文档、执行代码和运行结果三个方面来介绍Boost读写JSON数据文件的方法,其实无论是采用JSON或是Property Tree都可以进行JSON数据的解析、读写。(此处由于时间匆忙,仍未来得及深入学习,深感功能强大,一时间对调用方法不甚熟练,仍有待认真参考官方文档,细心学习)
3.1.1 参考文档
请认真阅读Boost.JSON、JSON-Quick-Look、JSON Parser章节的指导。
3.1.2 执行代码(main.cpp)
#include <iostream>
#include <boost/json.hpp>
#include <boost/json/parser.hpp>
#include <boost/property_tree/ptree.hpp>
#include <boost/property_tree/json_parser.hpp>

using namespace std;
using namespace boost::json;
using namespace boost::property_tree;

void json_function_test()
{
	boost::json::value value = boost::json::parse("{ \"test\": true }");// 文档模型中的容器类型分为数组(array)、对象(object)、字符串(string)、值(value)
	std::cout << value << std::endl;
	boost::json::value jv(boost::json::object_kind);
	assert(jv.kind() == boost::json::kind::object);// 判断值的类型
	assert(jv.is_object());// 判断值是否为object类型
	assert(!jv.is_number());// 判断值是否为number类型
	assert(jv.is_array());// 判断值是否为array类型
	assert(jv.is_string());// 判断值是否为string类型
	object jo1 = { { "john", 100 },{ "dave", 500 },{ "joe", 300 } };

	boost::json::object obj;
	obj["pi"] = 3.141;
	obj["happy"] = true;
	obj["name"] = "Boost";
	obj["nothing"] = nullptr;
	obj["answer"].emplace_object()["everything"] = 42;
	obj["list"] = { 1, 0, 2 };
	obj["object"] = { { "currency", "USD" },{ "value", 42.99 } };
	std::cout << obj << std::endl;
	std::cout << obj.at("name") << std::endl;

	object obj2({ { "key1", "value1" },{ "key2", 42 },{ "key3", false } });
	boost::json::value jv_array = { 1, 2, 3 };
	assert(jv_array.is_array());
	std::string s = boost::json::serialize(jv_array); //值序列化为字符串
	std::cout << s << std::endl;

	boost::json::value jv1 = { { "hello", 42 },{ "world", 43 } };
	assert(jv1.is_object());
	assert(jv1.as_object().size() == 2);
	assert(serialize(jv1) == R"({"hello":42,"world":43})");
}

void write_json(std::string out_jsonFile)
{
	using namespace boost::property_tree;
	ptree root;
	ptree arr;
	root.put("version", 1);
	ptree node1, node2;
	node1.put("frame_rate", 0);
	node1.put("bit_rate", 1);
	node1.put("resolution", 3);
	node1.put("boot", 0);
	node1.put("ssfs", 2);
	root.add_child("first", node1);
	root.add_child("second", node1);
	root.add_child("third", node1);

	stringstream s;
	write_json(s, root, false);
	std::string out = s.str();
	ofstream oftream(out_jsonFile, std::ios_base::out);
	oftream << out;
	oftream.close();
}

void read_json(std::string in_jsonFile)
{
	using namespace boost::property_tree;
	ifstream ifs(in_jsonFile, std::ios_base::in);
	ptree node;//根节点
	read_json(ifs, node); // 将json文件读入根节点
	cout << "根节点包含" << node.size() <<"个孩子节点!"<< endl;
	for (boost::property_tree::ptree::iterator it = node.begin(); it != node.end(); ++it)
	{
		if (it->first != "version")
		{
			cout << it->first << " : " << endl;
			ptree node2 = node.get_child(it->first);// it->second;
			for (boost::property_tree::ptree::iterator it2 = node2.begin(); it2 != node2.end(); ++it2)
			{
				cout << it2->first << " : " << it2->second.data() << endl;
			}
		}
		else
		{
			cout << it->first << " : " << it->second.data() << endl; // key : value
		}
	}
	ifs.close();
}

int main()
{
	cout << "开始测试json函数:" << endl;
	json_function_test();
	cout << "json函数测试完毕!:" << endl;

	cout << "开始写入json文件(config_out.json):" << endl;
	write_json("config_out.json");
	cout << "json文件写入完毕!" << endl;

	cout << "开始读取json文件(config_out.json):" << endl;
	read_json("config_out.json");
	cout << "json文件读取完毕!" << endl;
	system("pause");
	return 0;
}
3.1.3 运行结果(config_out.json)

config_out.json文件内容如下:
{"version":"1","first":{"frame_rate":"0","bit_rate":"1","resolution":"3","boot":"0","ssfs":"2"},"second":{"frame_rate":"0","bit_rate":"1","resolution":"3","boot":"0","ssfs":"2"},"third":{"frame_rate":"0","bit_rate":"1","resolution":"3","boot":"0","ssfs":"2"}}

3.2 C++调用Boost库读写XML文件
下面将从参考文档、输入数据文件、执行代码、运行结果四个方面来具体介绍XML文件的读写方法。
3.2.1 参考文档
开始之前请认真阅读XML Parser和XML-Five Minute Tutorial,debug_settings.cpp。
3.2.2 输入数据文件(debug_settings.xml)
首先用记事本Notepad新建一个txt文件,并将文件重命名为debug_settings.xml后输入如下内容:
debug_settings.xml内容如下:
<debug>
    <filename>debug.log</filename>
    <modules>
        <module>Finance</module>
        <module>Admin</module>
        <module>HR</module>
    </modules>
    <level>2</level>
</debug>

3.2.3 C++执行代码(debug_settings.cpp)
debug_settings.cpp代码如下:
#include <string>
#include <set>
#include <exception>
#include <iostream>

#include <boost/foreach.hpp>
#include <boost/property_tree/ptree.hpp>
#include <boost/property_tree/xml_parser.hpp>

struct debug_settings
{
	std::string m_file;
	int m_level;
	std::set<std::string> m_modules;
	void load(const std::string &filename);
	void save(const std::string &filename);
};

void debug_settings::load(const std::string &filename)
{
	using boost::property_tree::ptree;
	ptree pt;
	read_xml(filename, pt);
	m_file = pt.get<std::string>("debug.filename");
	m_level = pt.get("debug.level", 0);
	BOOST_FOREACH(ptree::value_type &v, pt.get_child("debug.modules"))
		m_modules.insert(v.second.data());
}

void debug_settings::save(const std::string &filename)
{
	using boost::property_tree::ptree;
	ptree pt;
	pt.put("debug.filename", m_file);
	pt.put("debug.level", m_level);
	BOOST_FOREACH(const std::string &name, m_modules)
		pt.add("debug.modules.module", name);
	write_xml(filename, pt);
}

int main()
{
	try
	{
		debug_settings ds;
		ds.load("debug_settings.xml");
		ds.save("debug_settings_out.xml");
		std::cout << "Success\n";
	}
	catch (std::exception &e)
	{
		std::cout << "Error: " << e.what() << "\n";
	}

	system("pause");
	return 0;
}
3.2.4 控制台运行结果(输出debug_settings_out.xml)
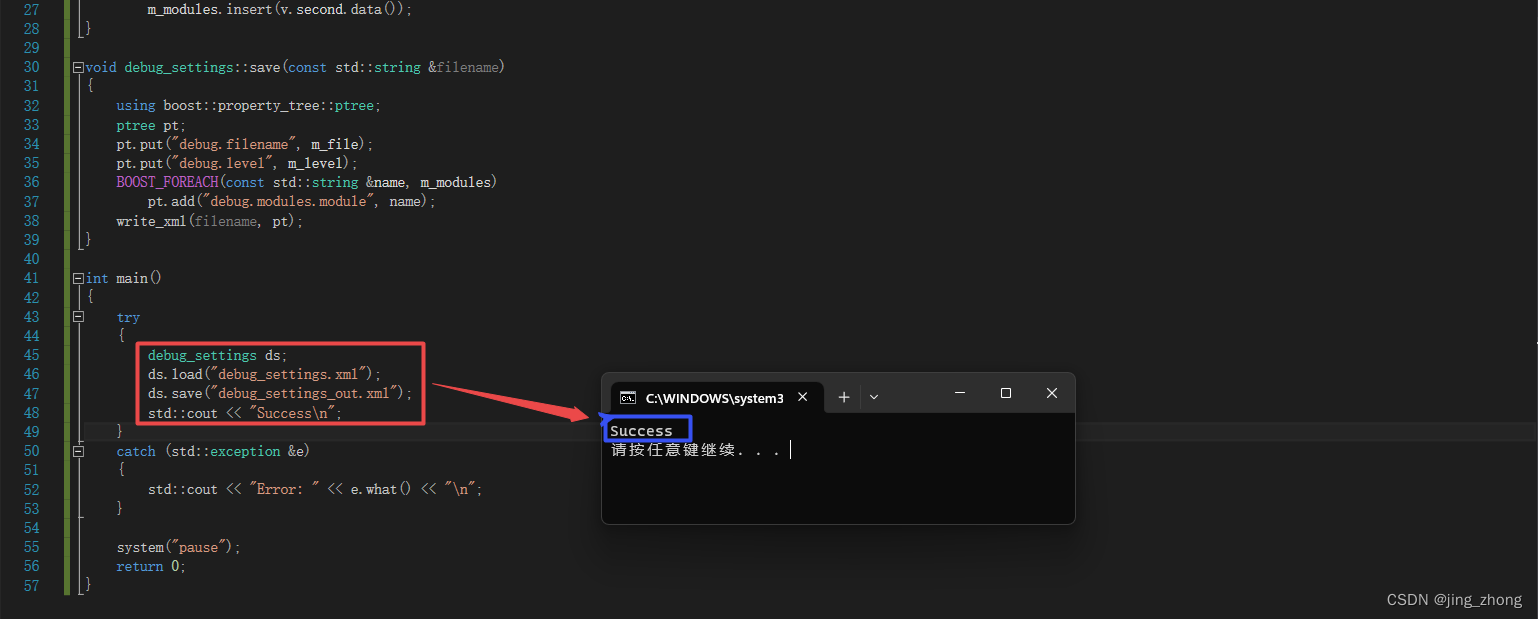
在VS 2015中运行后控制台会打印Success,同时项目文件夹内会生成debug_settings_out.xml文件,内容如下所示。

4、总结
实践(Practice)是检验真理(Examine Truth)的唯一标准(Unique Standard),优秀的产品和精致的服务都需要坚实的底层技术作为支撑和保障,毕竟安全第一,正如饭碗要牢牢端在自己手中,核心技术同样应该被牢牢掌握,技术从未过时,技术需要创新引领,需要一代又一代年轻、富有梦想、充满朝气的青年激发内在动力去迭代升级,更新优化。
随着系统软件国产化趋势的不断推动,对于软件和信息技术服务行业而言,软件公司、互联网厂商、企业组织往往更喜欢拥有本质的代码,同时借助成千上万的开发者共同在具有良好生态环境的社区平台中进行源码开发、维护和改进测试,得到良好的反馈并修复漏洞,当然除了一些特定的应用领域(军事和国家安全等保密需要)除外,供应商可以致力于核心业务的专注开发。
🔔🔔🔔不禁感叹,成百上千的开发者愿意贡献自己的时间,不谋而合地力求将他们认为值得的项目做到极致和完美,在磨练自身技术技能的同时,也默默为社区做出不可磨灭的贡献,这种宽广高远的心胸和不懈追求的精神和绝非为了个人成就和名誉私利,而是为了世界的高质量发展、科技的快速进步、人类的共同繁荣。感恩曾经的先行者们,向他们致敬!!!👍👍👍

❤️❤️❤️最后,正逢今天是母亲节,二O二三年五月的第二个星期日,✨✨✨曾经的少年,他踏过千山万水,看过云卷云舒,💎💎💎正处在并将长期处在历经风吹雨打,尝尽酸甜苦辣的路上,始终觉得母亲的怀抱最温暖,内心依旧难以忘怀!
不论我走多远,心中永远眷恋。祝亲爱的妈妈母亲节快乐!!!🎁🎁🎁🌈🌈🌈





![[abc复盘] abc301 20230514](https://img-blog.csdnimg.cn/6c53ebaa4a9344bb932d9f62e474816f.png)


