jdbcTemp
Spring 框架对 JDBC 进行封装,使用 JdbcTemplate 方便实现对数据库操作。
JdbcTemp的使用
对应依赖
 <!-- MySQL驱动 -->
        <dependency>
            <groupId>mysql</groupId>
            <artifactId>mysql-connector-java</artifactId>
            <version>8.0.30</version>
        </dependency>

        <!-- 数据源 -->
        <dependency>
            <groupId>com.alibaba</groupId>
            <artifactId>druid</artifactId>
            <version>1.2.15</version>
        </dependency>

        <dependency>
            <groupId>org.springframework</groupId>
            <artifactId>spring-jdbc</artifactId>
            <version>5.3.20</version>
        </dependency>
创建jdbc.properties属性文件
jdbc.user=root
jdbc.password=
jdbc.url=jdbc:mysql://localhost:3306/spring?characterEncoding=utf8&useSSL=false
jdbc.driver=com.mysql.cj.jdbc.Driver
创建bean.xml,配置配置文件引入和jdbctemp配置
<?xml version="1.0" encoding="UTF-8"?>
<beans xmlns="http://www.springframework.org/schema/beans"
       xmlns:xsi="http://www.w3.org/2001/XMLSchema-instance"
       xmlns:context="http://www.springframework.org/schema/context"
       xsi:schemaLocation="http://www.springframework.org/schema/beans
       http://www.springframework.org/schema/beans/spring-beans.xsd
       http://www.springframework.org/schema/context
       http://www.springframework.org/schema/context/spring-context.xsd">
    <!--    引入外部的数据源配置文件-->
    <context:property-placeholder location="classpath:jdbc.properties"></context:property-placeholder>
    <!--    通过数据源的文件将数据注入bean中-->
    <!--    通过${}在数据源的配置文件中进行取值-->
    <bean id="jdbcDriver" class="com.alibaba.druid.pool.DruidDataSource">
        <property name="url" value="${jdbc.url}"></property>
        <property name="username" value="${jdbc.user}"></property>
        <property name="password" value="${jdbc.password}"></property>
        <property name="driverClassName" value="${jdbc.driver}"></property>
    </bean>

    <!--    jdbcTemp配置-->
    <bean id="jdbcTemp" class="org.springframework.jdbc.core.JdbcTemplate">
        <property name="dataSource" ref="jdbcDriver"></property>
    </bean>
</beans>
创建数据库和表
CREATE DATABASE `spring`;

use `spring`;

CREATE TABLE `t_emp` (
  `id` int(11) NOT NULL AUTO_INCREMENT,
  `name` varchar(20) DEFAULT NULL COMMENT '姓名',
  `age` int(11) DEFAULT NULL COMMENT '年龄',
  `sex` varchar(2) DEFAULT NULL COMMENT '性别',
  PRIMARY KEY (`id`)
) ENGINE=InnoDB DEFAULT CHARSET=utf8mb4;
创建接收类
public class User {
    private Integer id;
    private String name;
    private Integer age;
    private String sex;

    public Integer getId() {
        return id;
    }

    public void setId(Integer id) {
        this.id = id;
    }

    public String getName() {
        return name;
    }

    public void setName(String name) {
        this.name = name;
    }

    public Integer getAge() {
        return age;
    }

    public void setAge(Integer age) {
        this.age = age;
    }

    public String getSex() {
        return sex;
    }

    public void setSex(String sex) {
        this.sex = sex;
    }

    @Override
    public String toString() {
        return "User{" +
                "id=" + id +
                ", name='" + name + '\'' +
                ", age=" + age +
                ", sex='" + sex + '\'' +
                '}';
    }
}
测试例子一(修改):
import org.springframework.context.ApplicationContext;
import org.springframework.context.support.ClassPathXmlApplicationContext;
import org.springframework.jdbc.core.JdbcTemplate;

public class updateTest {

    //获取JdbcTemple
    ApplicationContext context = new ClassPathXmlApplicationContext("bean.xml");
    JdbcTemplate template = context.getBean(JdbcTemplate.class);

    //增加数据
    @org.junit.jupiter.api.Test
    public void addTest() {
        String sql = "insert into t_emp value(?, ?, ?, ?)";
        template.update(sql, null, "秃狼1", 18, "男");
    }
    //删除数据
    @org.junit.jupiter.api.Test
    public void deleteTest() {
        String sql = "delete from t_emp where id = ?";
        template.update(sql, 1);

    }
    //修改数据
    @org.junit.jupiter.api.Test
    public void updateTest() {
        String sql = "update t_emp set name = ? where id = ?";
        template.update(sql, "tolen", 2);
    }
}
测试例子二(查询):
import org.junit.jupiter.api.Test;
import org.springframework.context.ApplicationContext;
import org.springframework.context.support.ClassPathXmlApplicationContext;
import org.springframework.jdbc.core.BeanPropertyRowMapper;
import org.springframework.jdbc.core.JdbcTemplate;

import java.util.List;

public class selectTest {

    //获取JdbcTemple
    ApplicationContext context = new ClassPathXmlApplicationContext("bean.xml");
    JdbcTemplate template = context.getBean(JdbcTemplate.class);
    //获取一个数据
    @Test
    public void queryForObject() {
        String sql = "select * from t_emp where id = ?";
        //BeanPropertyRowMapper自动封装数据的实现类,通过构造方法中传入的Class来确定封装类
        User user = template.queryForObject(sql, new BeanPropertyRowMapper<>(User.class), 2);
        System.out.println(user.getName());
    }
    //获取所有数据
    @Test
    public void queryList() {
        String sql = "select * from t_emp";
        List<User> result = template.query(sql, new BeanPropertyRowMapper(User.class));
        for (int i = 0; i < result.size(); i++) {
            System.out.println(result.get(i).toString());
        }
    }
    //获取数据的个数
    @Test
    public void queryCount() {
        String sql = "select count(*) from t_emp";
        //在queryForObject中,如果第二个参数为Integer.class类型时,就是返回符合对应条件的数据的个数
        Integer integer = template.queryForObject(sql, Integer.class);
        System.out.println("所有的数据个数:" + integer);
    }
}
声明式事务
在Transactional注解中存在一下属性可以设置。
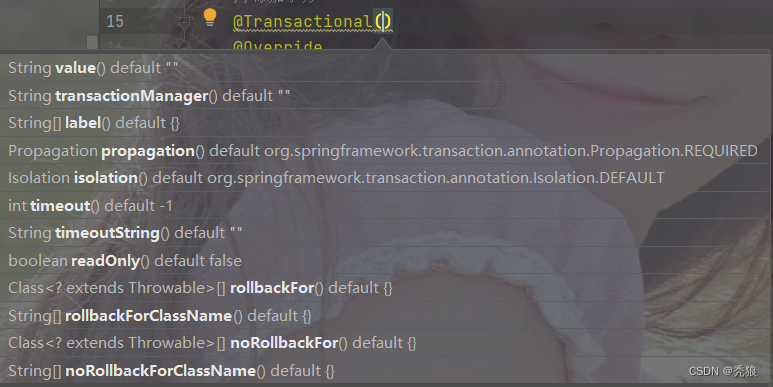
readOnly:默认为false,也就是不开启只读。(只读只允许select的查询操作,不能执行update操作)
timeout:表示超时时间,默认为-1,也就是永不超时。(这里的单位为Second)
rollbackForClassName/rollbackFor:表示当存在对应的类的时候就进行回滚,如果是ClassName的话,输入的值就是类的全路径,如果是For的话,就是对应类的.Class。
noRollbackForClassName/NoRollbackFor:与上述相反,就是不出现对应的类时就是进行回滚。
isolation:就是设置事务的隔离级别。用于处理脏读,不可重复读,幻读。

| 隔离级别 | 脏读 | 不可重复读 | 幻读 |
|---|---|---|---|
| READ UNCOMMITTED | 有 | 有 | 有 |
| READ COMMITTED | 无 | 有 | 有 |
| REPEATABLE READ | 无 | 无 | 有 |
| SERIALIZABLE | 无 | 无 | 无 |
隔离级别一共有四种:
-
读未提交:READ UNCOMMITTED
允许Transaction01读取Transaction02未提交的修改。
-
读已提交:READ COMMITTED、
要求Transaction01只能读取Transaction02已提交的修改。
-
可重复读:REPEATABLE READ
确保Transaction01可以多次从一个字段中读取到相同的值,即Transaction01执行期间禁止其它事务对这个字段进行更新。
-
串行化:SERIALIZABLE
确保Transaction01可以多次从一个表中读取到相同的行,在Transaction01执行期间,禁止其它事务对这个表进行添加、更新、删除操作。可以避免任何并发问题,但性能十分低下。
对应的效果越好,执行效率就越低
propagation:设置传播行为。
常用的就是:@Transactional(propagation = Propagation.REQUIRED), 默认情况,表示如果当前线程上有已经开启的事务可用,那么就在这个事务中运行。
@Transactional(propagation = Propagation.REQUIRES_NEW),表示不管当前线程上是否有已经开启的事务,都要开启新事务。、
测试例子
在啊数据库中插入对应的数据。
CREATE TABLE `t_book` (
  `book_id` int(11) NOT NULL AUTO_INCREMENT COMMENT '主键',
  `book_name` varchar(20) DEFAULT NULL COMMENT '图书名称',
  `price` int(11) DEFAULT NULL COMMENT '价格',
  `stock` int(10) unsigned DEFAULT NULL COMMENT '库存(无符号)',
  PRIMARY KEY (`book_id`)
) ENGINE=InnoDB AUTO_INCREMENT=3 DEFAULT CHARSET=utf8;
insert  into `t_book`(`book_id`,`book_name`,`price`,`stock`) values (1,'斗破苍穹',80,100),(2,'斗罗大陆',50,100);
CREATE TABLE `t_user` (
  `user_id` int(11) NOT NULL AUTO_INCREMENT COMMENT '主键',
  `username` varchar(20) DEFAULT NULL COMMENT '用户名',
  `balance` int(10) unsigned DEFAULT NULL COMMENT '余额(无符号)',
  PRIMARY KEY (`user_id`)
) ENGINE=InnoDB AUTO_INCREMENT=2 DEFAULT CHARSET=utf8;
insert  into `t_user`(`user_id`,`username`,`balance`) values (1,'admin',50);
配置bean.xml文件
<?xml version="1.0" encoding="UTF-8"?>
<beans xmlns="http://www.springframework.org/schema/beans"
       xmlns:xsi="http://www.w3.org/2001/XMLSchema-instance"
       xmlns:context="http://www.springframework.org/schema/context"
       xmlns:tx="http://www.springframework.org/schema/tx" xmlns:con="http://www.springframework.org/schema/context"
       xsi:schemaLocation="http://www.springframework.org/schema/beans
       http://www.springframework.org/schema/beans/spring-beans.xsd
       http://www.springframework.org/schema/context
       http://www.springframework.org/schema/context/spring-context.xsd
       http://www.springframework.org/schema/tx
       http://www.springframework.org/schema/tx/spring-tx.xsd">
    <!--    引入外部的数据源配置文件-->
    <context:property-placeholder location="classpath:jdbc.properties"></context:property-placeholder>
    <!--    通过数据源的文件将数据注入bean中-->
    <!--    通过${}在数据源的配置文件中进行取值-->
    <bean id="jdbcDriver" class="com.alibaba.druid.pool.DruidDataSource">
        <property name="url" value="${jdbc.url}"></property>
        <property name="username" value="${jdbc.user}"></property>
        <property name="password" value="${jdbc.password}"></property>
        <property name="driverClassName" value="${jdbc.driver}"></property>
    </bean>

    <!--    jdbcTemp配置-->
    <bean id="jdbcTemp" class="org.springframework.jdbc.core.JdbcTemplate">
        <property name="dataSource" ref="jdbcDriver"></property>
    </bean>

<!--    开启注解扫描-->
    <context:component-scan base-package="com.huang"></context:component-scan>
<!--    将事务类写入Bean容器-->
    <bean id="transactionManager" class="org.springframework.jdbc.datasource.DataSourceTransactionManager">
        <property name="dataSource" ref="jdbcDriver"></property>
    </bean>
<!--    开启事务注解驱动-->
    <tx:annotation-driven transaction-manager="transactionManager" />
</beans>
对应的jdbc.properties文件
jdbc.user=root
jdbc.password=
jdbc.url=jdbc:mysql://localhost:3306/spring?characterEncoding=utf8&useSSL=false
jdbc.driver=com.mysql.cj.jdbc.Driver
创建三层架构
在service层中创建 BuyBookServiceImpl和CheckServiceImpl。
BuyBookServiceImpl:
import com.huang.Dao.BuyBookDao;
import org.springframework.beans.factory.annotation.Autowired;
import org.springframework.stereotype.Service;
import org.springframework.transaction.annotation.Propagation;
import org.springframework.transaction.annotation.Transactional;

//实现的接口就是简单的接口
@Service
public class BuyBookServiceImpl implements BuyBookService{

    @Autowired
    BuyBookDao buyBookDao;

    //添加事务
    @Transactional(propagation = Propagation.REQUIRES_NEW)
    @Override
    public void BuyBook(Integer bookId, Integer userId) {
        buyBookDao.setBook(bookId);
        Integer price = buyBookDao.getPrice(bookId);
        System.out.println(price);
        buyBookDao.setUser(userId, price);
    }
}
CheckServiceImpl:
package com.huang.Service;

import org.springframework.beans.factory.annotation.Autowired;
import org.springframework.stereotype.Service;
import org.springframework.transaction.annotation.Transactional;

@Service
public class CheckServiceImpl implements CheckService {

    @Autowired
    BuyBookService buyBookService;

    @Transactional
    @Override
    public void CheckBook(Integer[] bookIds, Integer userId) {
        for (int i = 0; i < bookIds.length; i++) {
            buyBookService.BuyBook(bookIds[i], userId);
        }
    }
}
Controller层
import com.huang.Service.BuyBookService;
import com.huang.Service.CheckService;
import org.springframework.beans.factory.annotation.Autowired;
import org.springframework.stereotype.Controller;

@Controller
public class BuyBookController {

    @Autowired
    public BuyBookService buyBookService;
    @Autowired
    public CheckService checkService;

    public void buyBook(Integer[] bookIds, Integer userId) {
        checkService.CheckBook(bookIds, userId);
    }
}
编写测试例子
import com.huang.Controller.BuyBookController;
import org.springframework.context.ApplicationContext;
import org.springframework.context.support.ClassPathXmlApplicationContext;

public class Test {

      ApplicationContext context =  new ClassPathXmlApplicationContext("bean.xml");

        @org.junit.jupiter.api.Test
    public void Test1() {
            BuyBookController controller = context.getBean(BuyBookController.class);
//            controller.buyBook(1,1);
            Integer[] num = new Integer[]{1,2};
            controller.buyBook(num, 1);
        }
}
进行最终测试,我们可以看到当设置为@Transactional(propagation=Propagation.REQUIRES_NEW)时,每此调用buyBookService.BuyBook方法时都会创建一个新的事务,这几个事务不会相互影响,成功和失败不会相关联,其实就是当作当前方法中没有事务,自己开一个事务。
如果设置为@Transactional(propagation = Propagation.REQUIRED)时,每次调用buyBookService.BuyBook方法时都会先判断一下当前调用该方法的方法是否存在事务,如果存在事务就会将buyBookService.BuyBook方法的事务加入当前方法的事务中去,最终就能保住买书的这些操作要么都成功,要么都失败。
使用全注解开发事务
去除繁琐的bean.xml配置操作。
txConfig配置类
import com.alibaba.druid.pool.DruidDataSource;
import org.springframework.context.annotation.Bean;
import org.springframework.context.annotation.ComponentScan;
import org.springframework.context.annotation.Configuration;
import org.springframework.jdbc.core.JdbcTemplate;
import org.springframework.jdbc.datasource.DataSourceTransactionManager;
import org.springframework.transaction.TransactionManager;
import org.springframework.transaction.annotation.EnableTransactionManagement;

import javax.sql.DataSource;

@Configuration
@ComponentScan(value = "com.huang")
@EnableTransactionManagement
public class txConfig {

    //设置数据源
    @Bean
    public DataSource getDataSource() {
        DruidDataSource druidDataSource = new DruidDataSource();
        druidDataSource.setUrl("jdbc:mysql://localhost:3306/spring?characterEncoding=utf8&useSSL=false");
        druidDataSource.setUsername("root");
        druidDataSource.setPassword("");
        druidDataSource.setDriverClassName("com.mysql.cj.jdbc.Driver");
        return druidDataSource;
    }

    //设置JdbcTemplate
    @Bean
    public JdbcTemplate getJdbcTemplate(DataSource dataSource) {
        JdbcTemplate template = new JdbcTemplate();
        template.setDataSource(dataSource);
        return template;
    }

    //设置事务
    @Bean
    public TransactionManager getTransactionManager(DataSource dataSource) {
        DataSourceTransactionManager transactionManager = new DataSourceTransactionManager();
        transactionManager.setDataSource(dataSource);
        return transactionManager;
    }

}
编写测试类
import com.huang.Controller.BuyBookController;
import org.springframework.context.ApplicationContext;
import org.springframework.context.annotation.AnnotationConfigApplicationContext;

public class txTest {
//全注解开发时获取ApplicationContext,要使用AnnotationConfigApplicationContext
    ApplicationContext context =  new AnnotationConfigApplicationContext(com.huang.config.txConfig.class);

    @org.junit.jupiter.api.Test
    public void Test1() {
        BuyBookController controller = context.getBean(BuyBookController.class);
//            controller.buyBook(1,1);
        Integer[] num = new Integer[]{1,2};
        controller.buyBook(num, 1);
    }
}
终达到同样效果。
使用全xml文件开发
设置bean.xml文件(使用上述同样的环境)
<?xml version="1.0" encoding="UTF-8"?>
<beans xmlns="http://www.springframework.org/schema/beans"
       xmlns:xsi="http://www.w3.org/2001/XMLSchema-instance"
       xmlns:aop="http://www.springframework.org/schema/aop"
       xmlns:context="http://www.springframework.org/schema/context"
       xmlns:tx="http://www.springframework.org/schema/tx" xmlns:con="http://www.springframework.org/schema/context"
       xsi:schemaLocation="http://www.springframework.org/schema/beans
       http://www.springframework.org/schema/beans/spring-beans.xsd
       http://www.springframework.org/schema/context
       http://www.springframework.org/schema/context/spring-context.xsd
       http://www.springframework.org/schema/tx
       http://www.springframework.org/schema/tx/spring-tx.xsd
       http://www.springframework.org/schema/aop
       http://www.springframework.org/schema/aop/spring-aop.xsd">

    <!--    开启注解扫描-->
    <context:component-scan base-package="com.huang"></context:component-scan>

        <context:property-placeholder location="classpath:jdbc.properties"></context:property-placeholder>
    <!--    通过数据源的文件将数据注入bean中-->
    <!--    通过${}在数据源的配置文件中进行取值-->
        <bean id="jdbcDriver" class="com.alibaba.druid.pool.DruidDataSource">
            <property name="url" value="${jdbc.url}"></property>
            <property name="username" value="${jdbc.user}"></property>
            <property name="password" value="${jdbc.password}"></property>
            <property name="driverClassName" value="${jdbc.driver}"></property>
        </bean>


    <!--    jdbcTemp配置-->
    <bean id="jdbcTemp" class="org.springframework.jdbc.core.JdbcTemplate">
        <property name="dataSource" ref="jdbcDriver"></property>
    </bean>

<!--    将事务类写入Bean容器-->
    <bean id="transactionManager" class="org.springframework.jdbc.datasource.DataSourceTransactionManager">
        <property name="dataSource" ref="jdbcDriver"></property>
    </bean>

<!--手动配置事务切入点和增强事务通知-->

<!--    设置事务通知-->
    <tx:advice id="txAdvice" transaction-manager="transactionManager">
        <tx:attributes>
<!--            这里就是将所有以Buy开头的方法设置非只读和传播行为设置为默认-->
            <tx:method name="Buy*" read-only="false" propagation="REQUIRED"/>
        </tx:attributes>
    </tx:advice>
<!--设置切入点-->
    <aop:config>
<!--配置事务通知-->
        <aop:advisor advice-ref="txAdvice" pointcut="execution(* com.huang.Service.*.*(..))"></aop:advisor>
    </aop:config>
</beans>
不再需要在对应的方法上条件@Transactional。(已经完成了手动配置)
最终完成xml配置事务。


![[230513] TPO72 | 2022年托福阅读真题第1/36篇 | 10:45](https://img-blog.csdnimg.cn/541dd74588be4d6ea14909ba1df137c8.png)


