写在前面
Hello大家好, 我是【麟-小白】,一位软件工程专业的学生,喜好计算机知识。希望大家能够一起学习进步呀!本人是一名在读大学生,专业水平有限,如发现错误或不足之处,请多多指正!谢谢大家!!!
如果小哥哥小姐姐们对我的文章感兴趣,请不要吝啬你们的小手,多多点赞加关注呀!❤❤❤ 爱你们!!!
目录
写在前面
1. 元素的显示模式
1.1 CSS 长度单位
1.2 元素的三种显示模式
1.3 盒子模型的组成
1.4 盒子内容区(content)
1.5 盒子内边距(padding)
1.6 盒子边框(border)
1.7 盒子外边距(margin)
1.8 处理内容溢出
1.9 隐藏元素的方式
1.10 样式的继承
1.11 默认样式
1.12 布局小技巧
1.13 元素之间的空白问题
1.14 行内块的幽灵空白问题
结语
【往期回顾】
【CSS系列】第一章 · CSS基础
【CSS系列】第二章 · CSS选择器
【CSS系列】第三章 · CSS三大特性和颜色的表示
【CSS系列】第四章 · CSS字体属性
【CSS系列】第五章 · CSS文本属性
【CSS系列】第六章 · CSS列表、表格、背景、鼠标属性
【其他系列】
【HTML系列】
【Java基础系列】(已更新完)
1. 元素的显示模式
1.1 CSS 长度单位
- px :像素。
- em :相对元素 font-size 的倍数。
- rem :相对根字体大小,html标签就是根。
- % :相对父元素计算。
- 注意: CSS 中设置长度,必须加单位,否则样式无效!
代码演示:
<!DOCTYPE html>
<html lang="zh-CN">
<head>
    <meta charset="UTF-8">
    <title>01_CSS中常用的长度单位</title>
    <style>
        html {
            font-size: 40px;
        }
        #d1 {
            /* 第一种长度单位:px(像素) */
            width: 200px;
            height: 200px;
            font-size: 20px;
            background-color: skyblue;
        }
        #d2 {
            /* 第二种长度单位:em(相对于当前元素或其父元素的font-size的倍数) */
            width: 10em;
            height: 10em;
            font-size: 20px;
            background-color: orange;
        }
        #d3 {
            /* 第三种长度单位:rem(相对于根元素的font-size的倍数) */
            width: 5rem;
            height: 5rem;
            font-size: 20px;
            background-color: green;
        }
        #d4 {
            width: 200px;
            height: 200px;
            font-size: 20px;
            background-color: gray;
        }
        .inside {
            /* 第四种长度单位:%(相对其父元素的百分比) */
            width: 50%;
            height: 25%;
            font-size: 150%;
            background-color: orange;
        }
        .test {
            font-size: 20px;
            text-indent: 2em;
            background-color: yellowgreen;
        }
    </style>
</head>
<body>
    <div id="d1">1</div>
    <hr>
    <div id="d2">2</div>
    <hr>
    <div id="d3">3</div>
    <hr>
    <div id="d4">
        <div class="inside">4</div>
    </div>
    <hr>
    <div class="test">好好学习,天天向上</div>
</body>
</html>
1.2 元素的三种显示模式
块元素( block )
- 主体结构标签: <html> 、 <body>
- 排版标签: <h1> ~ <h6> 、 <hr> 、 <p> 、 <pre> 、 <div>
- 列表标签: <ul> 、 <ol> 、 <li> 、 <dl> 、 <dt> 、 <dd>
- 表格相关标签: <table> 、 <tbody> 、 <thead> 、 <tfoot> 、 <tr> 、<caption>
- <form> 与 <option>
行内元素( inline )
- 文本标签: <br> 、 <em> 、 <strong> 、 <sup> 、 <sub> 、 <del> 、 <ins>
- <a> 与 <label>
行内块元素( inline-block )
- 图片: <img>
- 单元格: <td> 、 <th>
- 表单控件: <input> 、 <textarea> 、 <select> 、 <button>
- 框架标签: <iframe>
修改元素的显示模式
- 通过 CSS 中的 display 属性可以修改元素的默认显示模式,常用值如下:
代码演示:
<!DOCTYPE html>
<html lang="zh-CN">
<head>
    <meta charset="UTF-8">
    <title>04_修改元素的显示模式</title>
    <style>
        div {
            width: 200px;
            height: 200px;
            font-size: 20px;
            display: inline-block;
        }
        #d1 {
            background-color: skyblue;
        }
        #d2 {
            background-color: orange;
        }
        #d3 {
            background-color: green;
        }
        a {
            width: 200px;
            height: 200px;
            font-size: 20px;
            display: block;
        }
        #s1 {
            background-color: skyblue;
        }
        #s2 {
            background-color: orange;
        }
        #s3 {
            background-color: green;
        }
    </style>
</head>
<body>
    <div id="d1">你好1</div>
    <div id="d2">你好2</div>
    <div id="d3">你好3</div>
    <hr>
    <a id="s1" href="https://www.baidu.com">去百度</a>
    <a id="s2" href="https://www.jd.com">去京东</a>
    <a id="s3" href="https://www.toutiao.com">去百头条</a>
</body>
</html>
1.3 盒子模型的组成
CSS 会把所有的 HTML 元素都看成一个 盒子 ,所有的样式也都是基于这个盒子。
- margin(外边距): 盒子与外界的距离。
- border(边框): 盒子的边框。
- padding(内边距): 紧贴内容的补白区域。
- content(内容):元素中的文本或后代元素都是它的内容。
图示如下: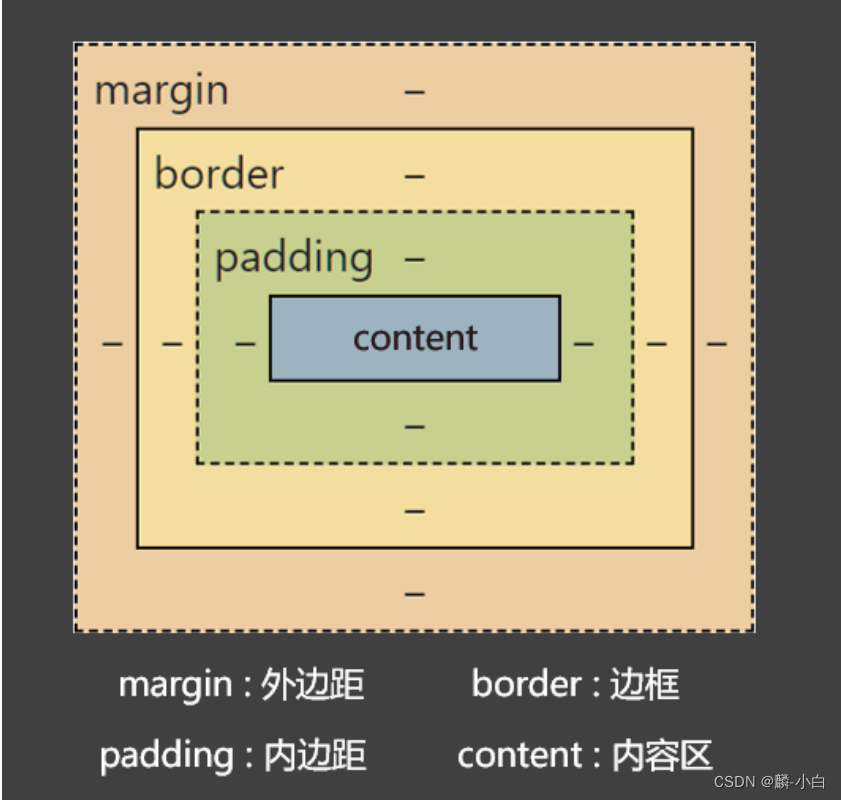
- 盒子的大小 = content + 左右 padding + 左右 border 。
- 注意:外边距 margin 不会影响盒子的大小,但会影响盒子的位置。
代码演示:<!DOCTYPE html> <html lang="zh-CN"> <head> <meta charset="UTF-8"> <title>05_盒子模型的组成部分</title> <style> div { /* 内容区的宽 */ width: 400px; /* 内容区的高 */ height: 400px; /* 内边距,设置的背景颜色会填充内边距区域 */ padding: 20px; /* 边框,设置的背景颜色会填充边框区域 */ border: 10px solid transparent; /* 外边距 */ margin: 50px; font-size: 20px; background-color: gray; } </style> </head> <body> <div>你好啊</div> </body> </html>
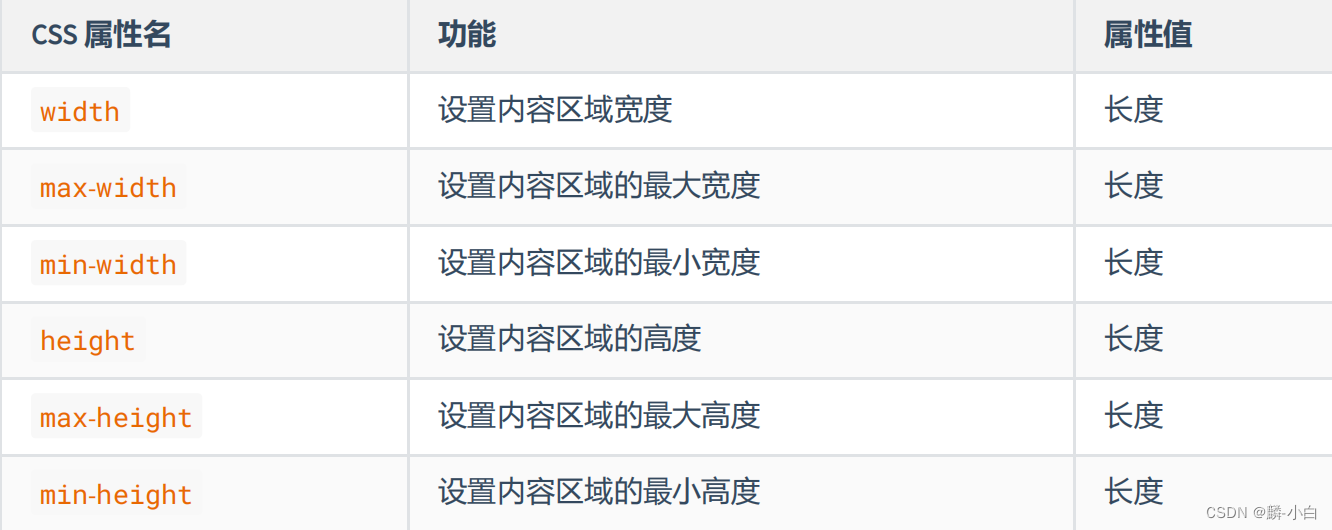
1.4 盒子内容区(content)
注意:
- max-width 、 min-width 一般不与 width 一起使用。
- max-height 、 min-height 一般不与 height 一起使用。
关于默认宽度
- 所谓的默认宽度,就是不设置 width 属性时,元素所呈现出来的宽度。
- 总宽度 = 父的 content — 自身的左右 margin 。
- 内容区的宽度 = 父的 content — 自身的左右 margin — 自身的左右 border — 自身的左右padding 。
代码演示:
<!DOCTYPE html>
<html lang="zh-CN">
<head>
    <meta charset="UTF-8">
    <title>06_盒子的内容区_content</title>
    <style>
        div {
            width: 800px;
            /* min-width: 600px; */
            /* max-width: 1000px; */

            height: 200px;
            /* min-height: 50px; */
            /* max-height: 400px; */
            background-color: skyblue;
        }
    </style>
</head>
<body>
    <div>Lorem ipsum dolor sit amet consectetur adipisicing elit. Impedit, atque optio, dicta error modi voluptatibus velit, nemo nesciunt dignissimos exercitationem incidunt ratione consectetur eos totam quisquam! Dolores minima magni necessitatibus, debitis sit, et tenetur temporibus quasi exercitationem porro, eligendi ipsam facilis adipisci praesentium aspernatur maxime quis itaque tempore enim saepe eveniet. Error soluta nobis facilis ut quia officia voluptas amet odio recusandae! Eos suscipit ab nihil. Perspiciatis ut impedit ea porro maiores ullam qui libero ipsam! Unde veniam id nostrum aliquid ex voluptas eum officia minus optio deserunt hic praesentium animi nihil, quisquam eveniet vitae nam doloribus non asperiores a expedita at saepe accusamus. Incidunt deleniti culpa est, consequuntur quis dolore amet vel tempore sequi beatae nulla accusamus fugit nihil mollitia. Aliquam consequatur, tempora suscipit porro distinctio illum autem architecto obcaecati vitae pariatur exercitationem hic totam et iusto, ut doloremque facilis voluptatibus, quo doloribus reiciendis placeat. Voluptatibus esse doloremque exercitationem blanditiis aliquid quo voluptate beatae labore itaque nostrum harum nemo unde ea deleniti rem quis nesciunt consequatur, vel modi a magnam atque! Necessitatibus, eligendi! Ipsum consequuntur officiis reiciendis laboriosam atque saepe inventore facere repellendus incidunt, nobis et deserunt! Sunt minima odio voluptas voluptatibus. At id nesciunt tempora quam consequatur omnis eos odit numquam! Possimus, consequuntur, nam maiores veniam ipsam consequatur repellat aspernatur earum soluta nisi voluptates molestiae amet magni facilis omnis natus nostrum placeat accusamus quasi sint facere perspiciatis tempora vel voluptatibus. Expedita voluptas quia cupiditate optio harum sapiente pariatur fuga corporis quas doloribus. Praesentium aut illum blanditiis, eaque placeat aliquid voluptatibus minima perferendis rerum aliquam veniam porro cum quia! Maiores, soluta dignissimos. Voluptatem delectus laudantium, temporibus, vel totam amet fugiat ducimus provident labore quos eligendi consequatur numquam dolore aspernatur fuga atque ut nobis! Quisquam alias labore culpa, nulla ut temporibus inventore, earum, quod ipsum ea amet iusto. Recusandae nihil laboriosam quis porro nemo nesciunt sed qui facere sint officia, omnis dolorum quam corrupti molestiae aspernatur, dolor ipsam voluptatem vitae fuga error. Cumque, neque eius quos ut est itaque tempora voluptatum repellendus. Nihil quas molestiae qui! Nihil ea atque veniam modi iure maxime in ipsam quisquam pariatur magni adipisci autem non id, ab labore odio nesciunt nostrum nemo laborum. Ea adipisci dignissimos, qui, omnis et eaque neque reiciendis ipsum at iure, numquam consectetur ipsa inventore doloribus minus dolorum optio nostrum doloremque praesentium magnam iusto sit voluptatum ut? Omnis, atque ratione soluta vitae veritatis officia quae iste placeat, commodi magni sit. Voluptates, temporibus perspiciatis. Omnis velit nemo vero minus alias est eveniet deserunt unde, at quo. Saepe, debitis impedit! Sint unde maxime eius voluptas blanditiis nobis aspernatur error temporibus nisi iste eligendi vitae, consectetur numquam culpa, debitis veritatis consequuntur aliquid. Labore porro, voluptatibus consequatur facilis, nulla, dignissimos aliquam similique ullam odio nesciunt animi commodi praesentium perspiciatis est eum error explicabo exercitationem tempora? Cupiditate debitis veniam, temporibus dicta amet tempore modi voluptatum optio ratione alias quidem earum in, maxime est quo vero recusandae beatae? Architecto, veniam pariatur. Numquam officia qui, dicta quaerat eius, cupiditate sequi dolorem dolorum molestias beatae tempora? Similique exercitationem corporis illo debitis eligendi cumque voluptate mollitia doloribus perspiciatis alias amet quam aut sapiente voluptatem tempora, numquam repellat id repudiandae totam ipsam quae velit. Ad reiciendis nulla mollitia quaerat doloremque, ducimus suscipit architecto voluptatem molestias iusto quibusdam expedita ab soluta corporis. Esse pariatur totam nisi voluptates neque ad eligendi, molestiae minima culpa sed ex perferendis natus rerum iusto quos iure, recusandae commodi magnam consectetur officiis adipisci veritatis quae tempore. Reprehenderit eius architecto id harum eos distinctio blanditiis nihil quod natus sunt, fuga aliquam odit dolore. Nostrum incidunt dicta quidem quas fugit fuga officia sit! Harum nam maiores eum tempore animi officia earum repudiandae reiciendis pariatur? Fuga repudiandae quia voluptatibus nobis omnis recusandae tempora ipsa reiciendis a obcaecati in et fugit amet cupiditate architecto, provident nostrum quisquam maxime? Praesentium earum modi consequuntur pariatur autem molestiae ea expedita dicta perferendis provident quis eveniet ducimus dolorum exercitationem enim dolorem, asperiores nesciunt nemo eaque nulla mollitia. Quae at eius eligendi laudantium quod natus dicta quam dolorem voluptatibus, facere quasi labore vitae magni sequi sunt nobis optio officiis pariatur deserunt reiciendis ipsa. Harum veniam eum ducimus cum odit reprehenderit fuga? Necessitatibus dolorem perspiciatis reiciendis quibusdam maiores fuga tempore distinctio et saepe, accusamus, nostrum deleniti assumenda, vel recusandae iusto ut nesciunt consequuntur vero unde sed debitis nihil? Impedit facere quod non optio officia eius, rerum culpa consequatur repellendus. Explicabo, vel nihil placeat optio expedita corrupti fugiat magni voluptatum deserunt, autem hic deleniti porro molestiae. Vero, culpa. Corrupti soluta nesciunt praesentium culpa nihil ratione eligendi excepturi quam ex totam incidunt nostrum minima eius provident repudiandae ipsam exercitationem, veniam nam. Explicabo cupiditate nulla similique labore, tenetur unde architecto esse neque quae repellat corporis pariatur iusto dicta provident dignissimos minus quaerat ipsa, aut consectetur. Odit iure aut rem corrupti perspiciatis repudiandae debitis recusandae officiis exercitationem quam quisquam, cumque rerum!</div>
</body>
</html>
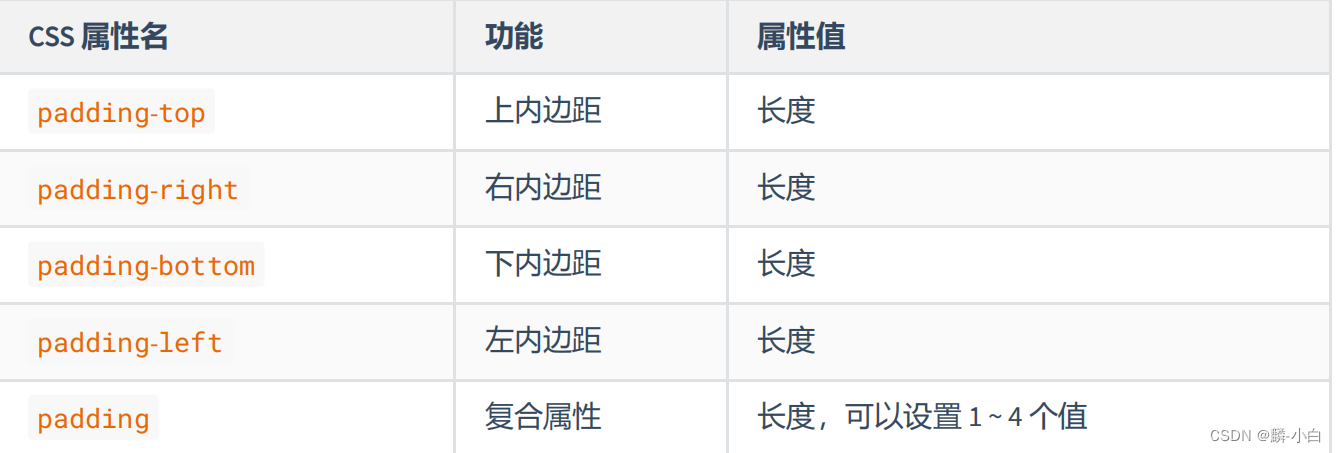
1.5 盒子内边距(padding)
padding 复合属性的使用规则:
- padding: 10px; 四个方向内边距都是 10px 。
- padding: 10px 20px; 上下 10px ,左右 20px 。(上下、左右)
- padding: 10px 20px 30px; 上 10px ,左右 20px ,下 30px 。(上、左右、下)
- padding: 10px 20px 30px 40px; 上 10px ,右 20px ,下 30px ,左 40px 。(上、右、下、左)
注意点:
- padding 的值不能为负数。
- 行内元素 的 左右内边距是没问题的,上下内边距不能完美的设置。
- 块级元素、行内块元素,四个方向内边距都可以完美设置。
代码演示:
<!DOCTYPE html>
<html lang="zh-CN">
<head>
    <meta charset="UTF-8">
    <title>08_盒子的内边距_padding</title>
    <style>
        #d1 {
            width: 400px;
            height: 400px;

            /* 左侧内边距 */
            /* padding-left: 20px; */

            /* 上内边距 */
            /* padding-top: 30px; */

            /* 右侧内边距 */
            /* padding-right: 40px; */

            /* 底内边距 */
            /* padding-bottom: 50px; */

            /* 复合属性,写一个值,含义:四个方向的内边距是一样的 */
            /* padding: 20px; */

            /* 复合属性,写两个值,含义:上下、左右 */
            /* padding: 10px 20px; */

            /* 复合属性,写三个值,含义:上、左右、下 */
            /* padding: 10px 20px 30px; */

            /* 复合属性,写四个值,含义:上、右、下、左 */
            /* padding: 10px 20px 30px 40px; */


            font-size: 20px;
            background-color: skyblue;
        }
        span {
            background-color: orange;
            font-size: 20px;
            padding-left: 20px;
            padding-right: 20px;
            padding-top: 20px;
            padding-bottom: 20px;
        }
        img {
            width: 200px;
            padding: 50px;
        }
    </style>
</head>
<body>
    <div id="d1">你好啊</div>
    <hr>
    <span>我很好</span>
    <div>Lorem ipsum dolor sit amet, consectetur adipisicing elit. Sunt, sint.</div>
    <hr>
    <img src="../images/小姐姐.gif" alt="">
    <div>小姐姐很想你呀</div>
</body>
</html>
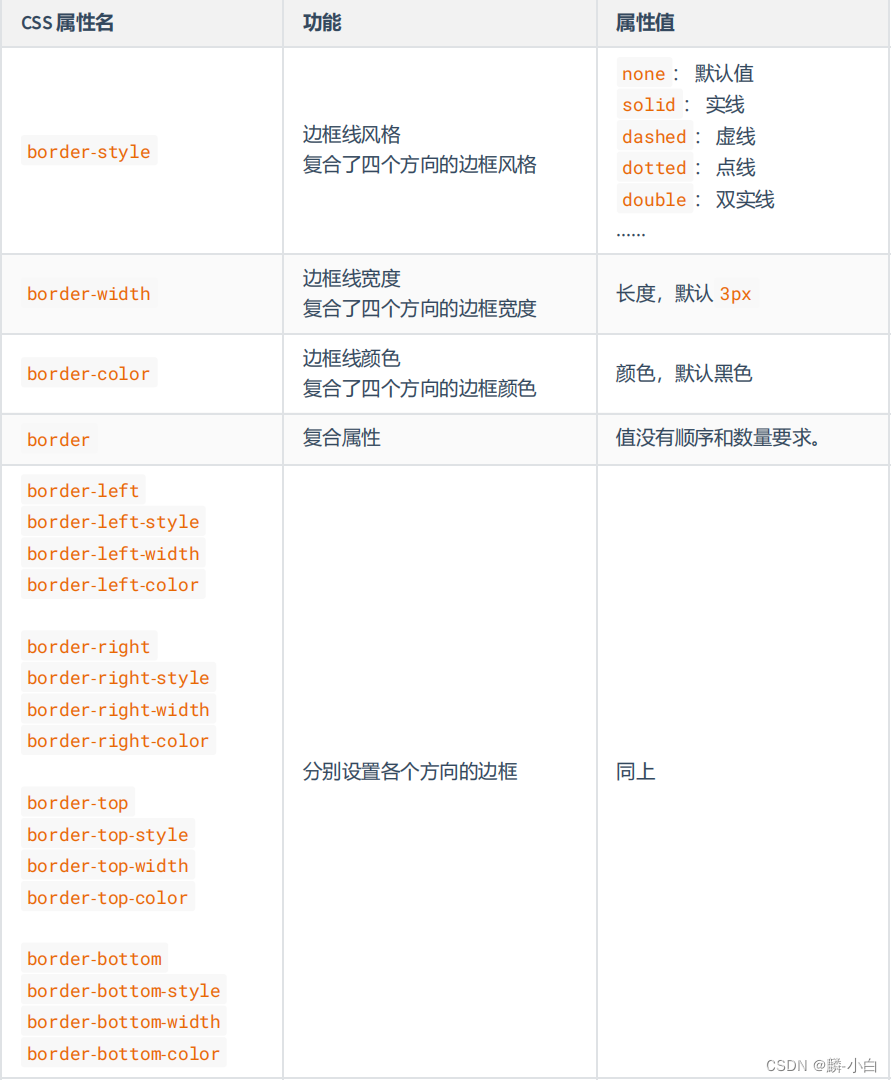
1.6 盒子边框(border)
- 边框相关属性共 20 个。
- border-style 、 border-width 、 border-color 其实也是复合属性。
代码演示:
<!DOCTYPE html>
<html lang="zh-CN">
<head>
    <meta charset="UTF-8">
    <title>09_盒子的边框_border</title>
    <style>
        div {
            width: 400px;
            height: 400px;
            background-color: skyblue;

            border-left-width: 10px;
            border-right-width: 20px;
            border-top-width: 30px;
            border-bottom-width: 40px;

            border-left-color: red;
            border-right-color: orange;
            border-top-color: green;
            border-bottom-color: tomato;

            border-left-style: solid;
            border-right-style: dashed;
            border-top-style: double;
            border-bottom-style: dotted;

            /* border-color: red; */
            /* border-width: 80px; */
            /* border-style: dashed; */

            border-left: 50px solid purple;
            border-right: 60px dashed orange;
            border-top: 70px double green;
            border-bottom: 80px dotted gray;

            /* border: 10px solid red; */
        }
    </style>
</head>
<body>
    <div>你好啊</div>
</body>
</html>
1.7 盒子外边距(margin)
代码演示:<!DOCTYPE html> <html lang="zh-CN"> <head> <meta charset="UTF-8"> <title>10_盒子的外边距_margin</title> <style> div { width: 400px; height: 400px; /* margin-left: 10px; */ /* margin-right: 20px; */ /* margin-top: 30px; */ /* margin-bottom: 40px; */ /* margin: 50px; */ /* margin: 10px 20px; */ /* margin: 10px 20px 30px; */ /* margin: 10px 20px 30px 40px; */ background-color: skyblue; } </style> </head> <body> <div>你好啊</div> </body> </html>margin 注意事项
- 子元素的 margin ,是参考父元素的 content 计算的。(因为是父亲的 content 中承装着子元素)
<!DOCTYPE html>
<html lang="zh-CN">
<head>
    <meta charset="UTF-8">
    <title>11_margin的注意事项1</title>
    <style>
        .outer {
            width: 400px;
            height: 400px;
            padding: 50px;
            background-color: gray;
        }
        .inner {
            width: 100px;
            height: 100px;
            margin: 100px;
            background-color: orange;
        }
    </style>
</head>
<body>
    <!-- 子元素的margin是参考父元素的content计算的。 -->
    <div class="outer">
        <div class="inner"></div>
    </div>
</body>
</html>
- 上 margin 、左 margin :影响自己的位置;下 margin 、右 margin :影响后面兄弟元素的位置。
<!DOCTYPE html>
<html lang="zh-CN">
<head>
    <meta charset="UTF-8">
    <title>12_margin的注意事项2</title>
    <style>
        .box {
            width: 200px;
            height: 200px;
        }
        .box1 {
            background-color: skyblue;
        }
        .box2 {
            background-color: orange;
            margin-top: 50px;
            margin-bottom: 50px;
        }
        .box3 {
            background-color: green;
        }
        .second {
            margin-left: 50px;
            margin-right: 50px;
        }
    </style>
</head>
<body>
    <!-- 上margin、左margin会影响自身的位置,下margin、右margin会影响兄弟元素的位置 -->
    <div class="box box1">1</div>
    <div class="box box2">2</div>
    <div class="box box3">3</div>
    <hr>
    <img src="../images/悟空.jpg" alt=""><img class="second" src="../images/悟空.jpg" alt=""><img src="../images/悟空.jpg" alt="">
</body>
</html>
- 块级元素、行内块元素,均可以完美地设置四个方向的 margin ;但行内元素,左右margin 可以完美设置,上下 margin 设置无效。
<!DOCTYPE html>
<html lang="zh-CN">
<head>
    <meta charset="UTF-8">
    <title>13_margin的注意事项3</title>
    <style>
        #d1 {
            width: 400px;
            height: 400px;
            margin: 50px;
            background-color: deepskyblue;
        }
        img {
            margin: 50px;
        }
        .one {
            background-color: skyblue;
        }
        .two {
            background-color: orange;
            margin-left: 50px;
            margin-right: 50px;
            margin-top: 3000px;
            margin-bottom: 3000px;
        }
        .three {
            background-color: green;
        }
    </style>
</head>
<body>
    <!-- 对于行内元素来说,左右的margin是可以完美设置的,上下的margin设置后是无效的。 -->
    <div id="d1">我是一个块级元素</div>
    <div>我是一段文字</div>
    <hr>
    <img src="../images/悟空.jpg" alt="悟空">
    <div>我是一段文字</div>
    <hr>
    <span class="one">人之初</span><span class="two">性本善</span><span class="three">性相近</span>
    <div>我是一段文字</div>
</body>
</html>
- margin 的值也可以是 auto ,如果给一个块级元素设置左右 margin 都为 auto ,该块级元素会在父元素中水平居中。
<!DOCTYPE html>
<html lang="zh-CN">
<head>
    <meta charset="UTF-8">
    <title>14_margin的注意事项4</title>
    <style>
        div {
            width: 800px;
            height: 100px;
            /* margin-left: auto; */
            /* margin-right: auto; */
            margin: 100px auto;
            background-color: deepskyblue;
        }
        span {
            background-color: purple;
            margin: 0 auto;
        }
    </style>
</head>
<body>
    <!-- margin的值也可以是auto,给一个块级元素左右margin设置auto可以实现该元素在其父元素内水平居中 -->
    <div>你好啊</div>
    <span>好好学习</span>
</body>
</html>
- margin 的值可以是负值。
<!DOCTYPE html>
<html lang="zh-CN">
<head>
    <meta charset="UTF-8">
    <title>15_margin的注意事项5</title>
    <style>
        .box {
            width: 200px;
            height: 200px;
        }
        .box1 {
            background-color: skyblue;
        }
        .box2 {
            margin-top: -200px;
            background-color: orange;
        }
    </style>
</head>
<body>
    <div class="box box1">1</div>
    <div class="box box2">2</div>
</body>
</html>
margin 塌陷问题什么是 margin 塌陷?
- 第一个子元素的上 margin 会作用在父元素上,最后一个子元素的下 margin 会作用在父元素上。
如何解决 margin 塌陷?
- 方案一:
- 给父元素设置不为 0 的 padding 。
- 方案二:
- 给父元素设置宽度不为 0 的 border 。
- 方案三:
- 给父元素设置 css 样式 overflow:hidden
<!DOCTYPE html>
<html lang="zh-CN">
<head>
    <meta charset="UTF-8">
    <title>16_margin塌陷问题</title>
    <style>
        .outer {
            width: 400px;
            /* height: 400px; */
            background-color: gray;
            /* border: 10px solid transparent; */
            /* padding: 10px; */
            overflow: hidden;
        }
        .inner1 {
            width: 100px;
            height: 100px;
            background-color: orange;
            /* 下面这行代码是有问题的 */
            margin-top: 50px;
        }
        .inner2 {
            width: 100px;
            height: 100px;
            background-color: green;
            margin-bottom: 50px;
        }
    </style>
</head>
<body>
    <div class="outer">
        <div class="inner1">inner1</div>
        <div class="inner2">inner2</div>
    </div>
    <div>我是一段测试的文字</div>
</body>
</html>
margin 合并问题什么是 margin 合并?
- 上面兄弟元素的下外边距和下面兄弟元素的上外边距会合并,取一个最大的值,而不是相加。
如何解决 margin 合并?
- 无需解决,布局的时候上下的兄弟元素,只给一个设置上下外边距就可以了。
<!DOCTYPE html>
<html lang="zh-CN">
<head>
    <meta charset="UTF-8">
    <title>17_margin合并问题</title>
    <style>
        .box {
            width: 200px;
            height: 200px;
        }
        .box1 {
            background-color: deepskyblue;
            /* margin-bottom: 110px; */
        }
        .box2 {
            background-color: orange;
            margin-top: 110px;
        }
        .test {
            width: 200px;
            height: 200px;
            display: inline-block;
        }
        .testa {
            background-color: purple;
            margin-right: 50px;
        }
        .testb {
            background-color: tomato;
            margin-left: 50px;
        }
    </style>
</head>
<body>
    <div class="box box1">1</div>
    <div class="box box2">2</div>
    <hr>
    <div class="test testa">a</div><div class="test testb">b</div>
</body>
</html>
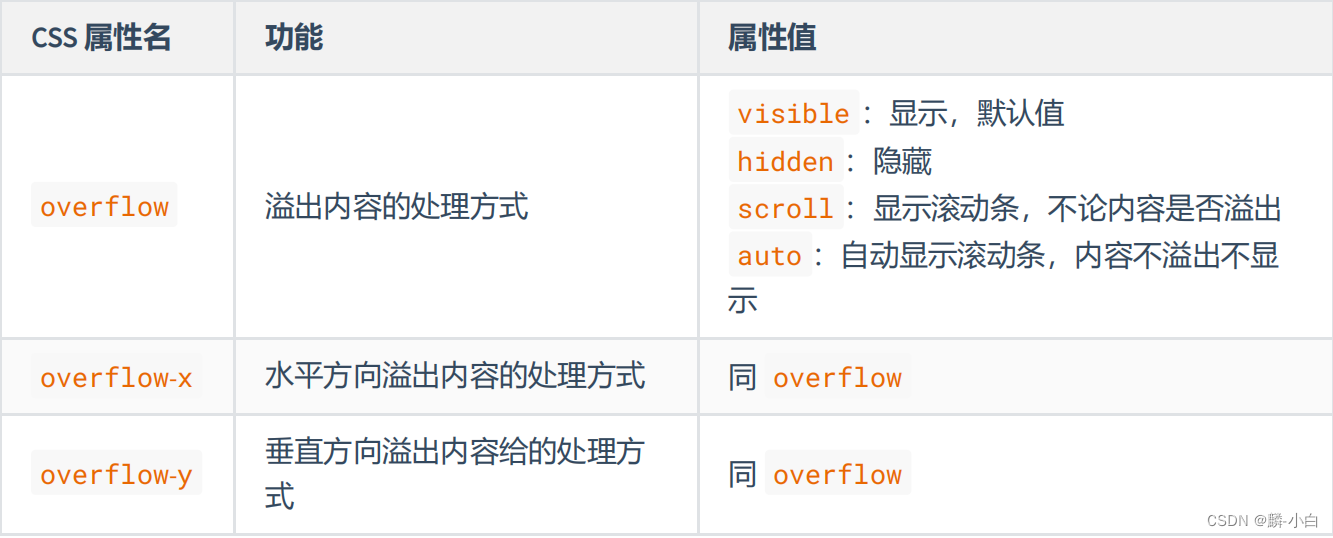
1.8 处理内容溢出
注意:
- overflow-x 、 overflow-y 不能一个是 hidden ,一个是 visible ,是实验性属性,不建议使用。
- overflow 常用的值是 hidden 和 auto ,除了能处理溢出的显示方式,还可以解决很多疑难杂症。
<!DOCTYPE html>
<html lang="zh-CN">
<head>
    <meta charset="UTF-8">
    <title>18_处理内容的溢出</title>
    <style>
        #d1 {
            width: 400px;
            height: 200px;
            background-color: skyblue;
            overflow: auto;
            /* overflow-x: visible; */
            /* overflow-y: hidden; */
        }
        #d2 {
            width: 1000px;
            background-color: orange;
        }
    </style>
</head>
<body>
    <div id="d1">
        Lorem ipsum dolor sit amet consectetur adipisicing elit. Quo accusantium veritatis reiciendis id
        molestiae magnam aspernatur esse blanditiis est. Maiores reprehenderit porro dignissimos, perspiciatis suscipit
        <div id="d2">Lorem ipsum dolor sit amet, consectetur adipisicing elit. Consectetur alias provident quia, reiciendis incidunt rerum, perspiciatis quam nobis omnis quae maxime in esse architecto doloremque numquam tenetur eum quasi velit excepturi ut id inventore. Consequuntur, ad iure velit maiores obcaecati voluptatibus expedita molestiae natus sit mollitia veritatis vero aliquid adipisci?</div>
        ullam perferendis nam inventore sapiente earum voluptatem dolores ut quae fuga. Itaque delectus cum et illum
        enim dicta similique nemo pariatur, recusandae molestias. Repellendus ratione recusandae minima ea quis eligendi
        quae amet. Animi, nulla. Perferendis libero nihil eligendi ea! Accusantium molestias numquam reprehenderit
        quibusdam delectus, repellat impedit ratione. Iste nam autem vero magni facilis at ex ullam, officiis, corrupti
        voluptate tempora. Quibusdam, aperiam eveniet illo quidem excepturi, neque, repellat totam beatae in quas
        provident natus!
    </div>
</body>

</html>
1.9 隐藏元素的方式
方式一: visibility 属性
- visibility 属性默认值是 show ,如果设置为 hidden ,元素会隐藏。
- 元素看不见了,还占有原来的位置(元素的大小依然保持)。
方式二: display 属性
- 设置 display:none ,就可以让元素隐藏。
- 彻底地隐藏,不但看不见,也不占用任何位置,没有大小宽高。
<!DOCTYPE html>
<html lang="zh-CN">
<head>
    <meta charset="UTF-8">
    <title>19_隐藏元素的两种方式</title>
    <style>
        .box {
            width: 200px;
            height: 200px;
        }
        .box1 {
            background-color: skyblue;
            display: none;
            /* visibility: hidden; */
        }
        .box2 {
            background-color: orange;
        }
    </style>
</head>
<body>
    <div class="box box1">1</div>
    <div class="box box2">2</div>
</body>
</html>
1.10 样式的继承
- 有些样式会继承,元素如果本身设置了某个样式,就使用本身设置的样式;但如果本身没有设置某个样式,会从父元素开始一级一级继承(优先继承离得近的祖先元素)。
- 会继承的 css 属性
- 字体属性、文本属性(除了vertical-align)、文字颜色 等。
- 不会继承的 css 属性
- 边框、背景、内边距、外边距、宽高、溢出方式 等。
- 一个规律:能继承的属性,都是不影响布局的,简单说:都是和盒子模型没关系的。
<!DOCTYPE html>
<html lang="zh-CN">
<head>
    <meta charset="UTF-8">
    <title>20_样式的继承</title>
    <link rel="stylesheet" href="./index.css">
    <style>
        /* body {

        } */
        #d1 {
            height: 600px;
            padding: 50px;
            background-color: gray;
        }
        #d2 {
            height: 400px;
            padding: 50px;
            background-color: orange;
            font-size: 40px;
            color: yellow;
            font-weight: bold;
        }
        #d3 {
            height: 200px;
            background-color: green;
        }
    </style>
</head>
<body>
    <div id="d1">
        <div id="d2">
            <div id="d3" style="font-family: 隶书;">你好啊</div>
        </div>
    </div>
</body>
</html>
1.11 默认样式
元素一般都有些默认的样式,例如:
- <a> 元素:下划线、字体颜色、鼠标小手。
- <h1> ~ <h6> 元素:文字加粗、文字大小、上下外边距。
- <p> 元素:上下外边距
- <ul> 、 ol 元素:左内边距
- body 元素:8px 外边距(4个方向)
- 优先级:元素的默认样式 > 继承的样式,所以如果要重置元素的默认样式,选择器一定要直接选择器到该元素。
<!DOCTYPE html>
<html lang="zh-CN">
<head>
    <meta charset="UTF-8">
    <title>21_元素的默认样式</title>
    <style>
        body {
            margin: 0;
        }
        #d1 {
            font-size: 50px;
            color: orange;
            background-color: gray;
        }
        a {
            color: black;
            text-decoration: none;
            cursor: default;
        }
    </style>
</head>
<body>
    <div id="d1">
        <a href="https://www.baidu.com">去百度</a>
        <span>你好啊</span>
    </div>
    <hr>
    <h1>一级标题</h1>
    <h2>二级标题</h2>
    <hr>
    <p>我是一个段落</p>
    <hr>
    <ul>
        <li>张三</li>
        <li>李四</li>
    </ul>
</body>
</html>
1.12 布局小技巧
行内元素、行内块元素,可以被父元素当做文本处理。
- 即:可以像处理文本对齐一样,去处理:行内、行内块在父元素中的对齐。
- 例如: text-align 、 line-height 、 text-indent 等。
<!DOCTYPE html>
<html lang="zh-CN">
<head>
    <meta charset="UTF-8">
    <title>22_布局技巧1</title>
    <style>
        .outer {
            width: 400px;
            height: 400px;
            background-color: gray;
            overflow: hidden;
        }
        .inner {
            width: 200px;
            height: 100px;
            background-color: orange;
            margin: 0 auto;
            margin-top: 150px;
            text-align: center;
            line-height: 100px;
        }
    </style>
</head>
<body>
    <div class="outer">
        <div class="inner">inner</div>
    </div>
</body>
</html>
如何让子元素,在父亲中 水平居中:
- 若子元素为块元素,给子元素加上: margin:0 auto; 。
- 若子元素为行内元素、行内块元素,给父元素加上: text-align:center 。
<!DOCTYPE html>
<html lang="zh-CN">
<head>
    <meta charset="UTF-8">
    <title>23_布局技巧2</title>
    <style>
        .outer {
            width: 400px;
            height: 400px;
            background-color: gray;
            text-align: center;
            line-height: 400px;
        }
        .inner {
            background-color: orange;
            font-size: 20px;
        }
    </style>
</head>
<body>
    <div class="outer">
        <span class="inner">出来玩啊?</span>
    </div>
</body>
</html>
如何让子元素,在父亲中 垂直居中:
- 若子元素为块元素,给子元素加上: margin-top ,值为:(父元素 content -子元素盒子总高) / 2。
- 若子元素为行内元素、行内块元素:
- 让父元素的 height = line-height ,每个子元素都加上: vertical-align:middle;
- 补充:若想绝对垂直居中,父元素 font-size 设置为 0 。
<!DOCTYPE html>
<html lang="zh-CN">
<head>
    <meta charset="UTF-8">
    <title>24_布局技巧3</title>
    <style>
        .outer {
            width: 400px;
            height: 400px;
            background-color: gray;
            text-align: center;
            line-height: 400px;
            font-size: 0px;
            text-indent: 20px;
        }
        img {
            vertical-align: middle;
        }
        span {
            font-size: 40px;
            vertical-align: middle;
            background-color: orange;
        }
    </style>
</head>
<body>
    <div class="outer">
        <span>出来玩啊?</span>
        <img src="../images/悟空.jpg" alt="">
    </div>
</body>
</html>
1.13 元素之间的空白问题
产生的原因:
- 行内元素、行内块元素,彼此之间的换行会被浏览器解析为一个空白字符。
解决方案:
- 方案一: 去掉换行和空格(不推荐)。
- 方案二: 给父元素设置 font-size:0 ,再给需要显示文字的元素,单独设置字体大小(推荐)。
<!DOCTYPE html>
<html lang="zh-CN">
<head>
    <meta charset="UTF-8">
    <title>25_元素之间的空白问题</title>
    <style>
        div {
            height: 200px;
            background-color: gray;
            font-size: 0px;
        }
        .s1 {
            background-color: skyblue;
        }
        .s2 {
            background-color: orange;
        }
        .s3 {
            background-color: green;
        }
        span {
            font-size: 20px;
        }
    </style>
</head>
<body>
    <div>
        <span class="s1">人之初</span>
        <span class="s2">性本善</span>
        <span class="s3">性相近</span>
        <hr>
        <img src="../images/悟空.jpg" alt="">
        <img src="../images/悟空.jpg" alt="">
        <img src="../images/悟空.jpg" alt="">
    </div>
</body>
</html>
1.14 行内块的幽灵空白问题
产生原因:
- 行内块元素与文本的基线对齐,而文本的基线与文本最底端之间是有一定距离的。
解决方案:
- 方案一: 给行行内块设置 vertical ,值不为 baseline 即可,设置为 middel 、 bottom 、top 均可。
- 方案二: 若父元素中只有一张图片,设置图片为 display:block 。
- 方案三: 给父元素设置 font-size: 0 。如果该行内块内部还有文本,则需单独设置 font-size 。
<!DOCTYPE html>
<html lang="zh-CN">
<head>
    <meta charset="UTF-8">
    <title>26_行内块的幽灵空白问题</title>
    <style>
        div {
            width: 600px;
            background-color: skyblue;
            /* font-size: 0; */
        }
        img {
            height: 200px;
            /* vertical-align: bottom; */
            /* display: block; */
        }
    </style>
</head>
<body>
    <div>
        <img src="../images/我的自拍.jpg" alt="悟空">
    </div>
</body>
</html>
![]()
结语
本人会持续更新文章的哦!希望大家一键三连,你们的鼓励就是作者不断更新的动力








![Prompt learning 教学[案例篇]:文生文案例设定汇总,你可以扮演任意角色进行专业分析](https://img-blog.csdnimg.cn/bcc3379feb1d4d50873b79dba118eb28.png#pic_center)

