参考资料
- SpringBoot 最简单的使用异步线程案例 @Async
- Springboot Async异步扩展使用 结合 CompletableFuture
目录
- 一. 配置线程池
- 二. 耗时任务1
- 三. 耗时任务2
- 四. 调用
一. 配置线程池
- 当池子大小小于corePoolSize,就新建线程,并处理请求
- 当池子大小等于corePoolSize,把请求放入workQueue(QueueCapacity)中,
池子里的空闲线程就去workQueue中取任务并处理 - 当workQueue放不下任务时,就新建线程入池,并处理请求,如果池子大小撑到了maximumPoolSize,就用RejectedExecutionHandler来做拒绝处理
- 当池子的线程数大于corePoolSize时,多余的线程会等待keepAliveTime长时间,
如果无请求可处理就自行销毁
import org.springframework.context.annotation.Bean;
import org.springframework.context.annotation.ComponentScan;
import org.springframework.context.annotation.Configuration;
import org.springframework.scheduling.annotation.EnableAsync;
import org.springframework.scheduling.concurrent.ThreadPoolTaskExecutor;

import java.util.concurrent.Executor;

@Configuration
// 声明开启异步线程的包
@ComponentScan("com.example.jmw.thread_service")
// 开启异步线程
@EnableAsync
public class ThreadConfig {

    @Bean("myExecutor")
    public Executor getExecutor() {

        ThreadPoolTaskExecutor executor = new ThreadPoolTaskExecutor();
        // 设置核心线程数
        executor.setCorePoolSize(10);
        // 设置最大线程数
        executor.setMaxPoolSize(100);
        // 线程池所使用的缓冲队列
        executor.setQueueCapacity(250);
        // 设置线程名
        executor.setThreadNamePrefix("jmw-Async");

        // 设置多余线程等待的时间,单位:秒
        // executor.setKeepAliveSeconds();

        // 初始化线程
        executor.initialize();
        return executor;
    }
}
二. 耗时任务1
- 使用
@Async修饰的方法,表示是一个异步方法。 - 利用
@Async注解的方法,不能跟调用它的方法放在同个类里面,否则会循环依赖错误! @Async注解所修饰的函数不要定义为static类型,这样异步调用不会生效!
package com.example.jmw.thread_service;

import org.springframework.scheduling.annotation.Async;
import org.springframework.stereotype.Service;

import java.util.UUID;

@Service
public class ThreadService1 {

    @Async("myExecutor")
    public void task1() throws Exception {

        String threadName = Thread.currentThread().getName();
        System.out.println("task1 : " + threadName + "   " + UUID.randomUUID().toString());

        // 耗时10秒
        Thread.sleep(10000);

        System.out.println("task1耗时10秒之后执行完成");
    }

    @Async("myExecutor")
    public void task2() throws Exception {

        String threadName = Thread.currentThread().getName();
        System.out.println("task2 : " + threadName + "   " + UUID.randomUUID().toString());

        // 耗时1秒
        Thread.sleep(1000);

        System.out.println("task2耗时1秒之后执行完成");
    }
}
三. 耗时任务2
completedFuture用来存放耗时任务获取到的结果
package com.example.jmw.thread_service;

import org.springframework.scheduling.annotation.Async;
import org.springframework.stereotype.Service;

import java.util.HashMap;
import java.util.Map;
import java.util.concurrent.CompletableFuture;

@Service
public class ThreadService2 {

    @Async("myExecutor")
    public CompletableFuture<Map<String, String>> getData1() throws Exception {

        // 模拟从数据库或者第三方接口获取数据所消耗的时间
        Thread.sleep(2000);

        // 模拟从数据库或者第三方接口获取到的数据
        Map<String, String> date1Map = new HashMap<>() {
            {
                put("ID", "10");
                put("姓名", "贾飞天");
                put("地址", "地球");
            }
        };

        System.out.println("getData1方法获取数据成功!");

		// 将获取到的数据放到CompletableFuture中
        CompletableFuture<Map<String, String>> mapCompletableFuture = CompletableFuture.completedFuture(date1Map);
        return mapCompletableFuture;
    }

    @Async("myExecutor")
    public CompletableFuture<Map<String, String>> getData2() throws Exception {

        Thread.sleep(6000);

        Map<String, String> date2Map = new HashMap<>() {
            {
                put("ID", "20");
                put("姓名", "张三");
                put("地址", "宇宙");
            }
        };

        System.out.println("getData2方法获取数据成功!");

        CompletableFuture<Map<String, String>> mapCompletableFuture = CompletableFuture.completedFuture(date2Map);
        return mapCompletableFuture;
    }

    @Async("myExecutor")
    public CompletableFuture<Map<String, String>> getData3() throws Exception {

        Thread.sleep(2000);

        Map<String, String> date3Map = new HashMap<>() {
            {
                put("ID", "30");
                put("姓名", "李四");
                put("地址", "银河系");
            }
        };

        System.out.println("getData3方法获取数据成功!");

        CompletableFuture<Map<String, String>> mapCompletableFuture = CompletableFuture.completedFuture(date3Map);
        return mapCompletableFuture;
    }
}
四. 调用
import com.example.jmw.thread_service.ThreadService1;
import com.example.jmw.thread_service.ThreadService2;
import org.springframework.boot.CommandLineRunner;
import org.springframework.stereotype.Controller;
import javax.annotation.Resource;
import java.util.Date;
import java.util.Map;
import java.util.concurrent.CompletableFuture;
@Controller
public class Test29Controller implements CommandLineRunner {
@Resource
private ThreadService1 service1;
@Resource
private ThreadService2 service2;
@Override
public void run(String... args) throws Exception {
/*
因为使用了异步线程,task1的耗时时间比较久,所以task2先执行出结果
而task1后执行出结果
*/
service1.task1();
service1.task2();
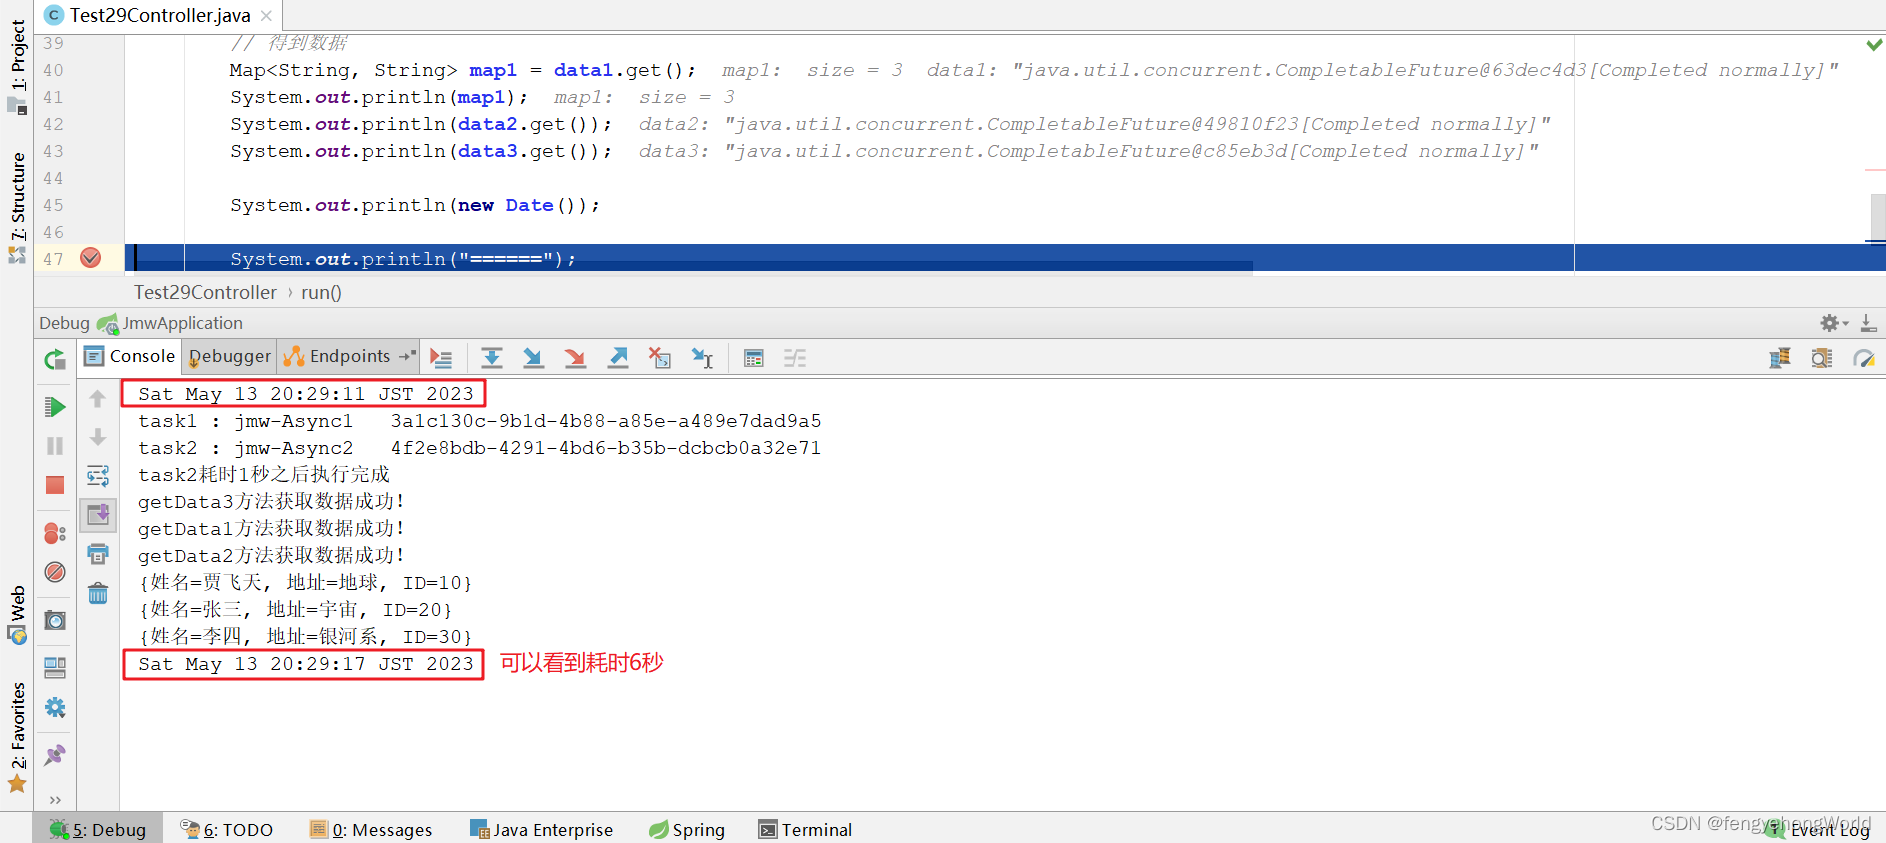
System.out.println(new Date());
// 获取3个耗时任务
CompletableFuture<Map<String, String>> data1 = service2.getData1();
CompletableFuture<Map<String, String>> data2 = service2.getData2();
CompletableFuture<Map<String, String>> data3 = service2.getData3();
/*
.allOf()同时执行所有的耗时任务
.join()阻塞线程等待所有的耗时任务执行完成
所消耗的总时间由耗时最长的任务决定
*/
CompletableFuture.allOf(data1, data2, data3).join();
// 得到数据
Map<String, String> map1 = data1.get();
System.out.println(map1);
System.out.println(data2.get());
System.out.println(data3.get());
System.out.println(new Date());
}
}
👇👇👇效果
![[golang gin框架] 31.Gin 商城项目- 提交订单逻辑操作以及去支付页面制作](https://img-blog.csdnimg.cn/img_convert/b7fd316a1d42b9863f1a58d27e31ff20.png)