网站全栈制作:
一:后端
为了跟公司后端更好的扯皮(不是),本人决定学一下java语言的后端接口书写。
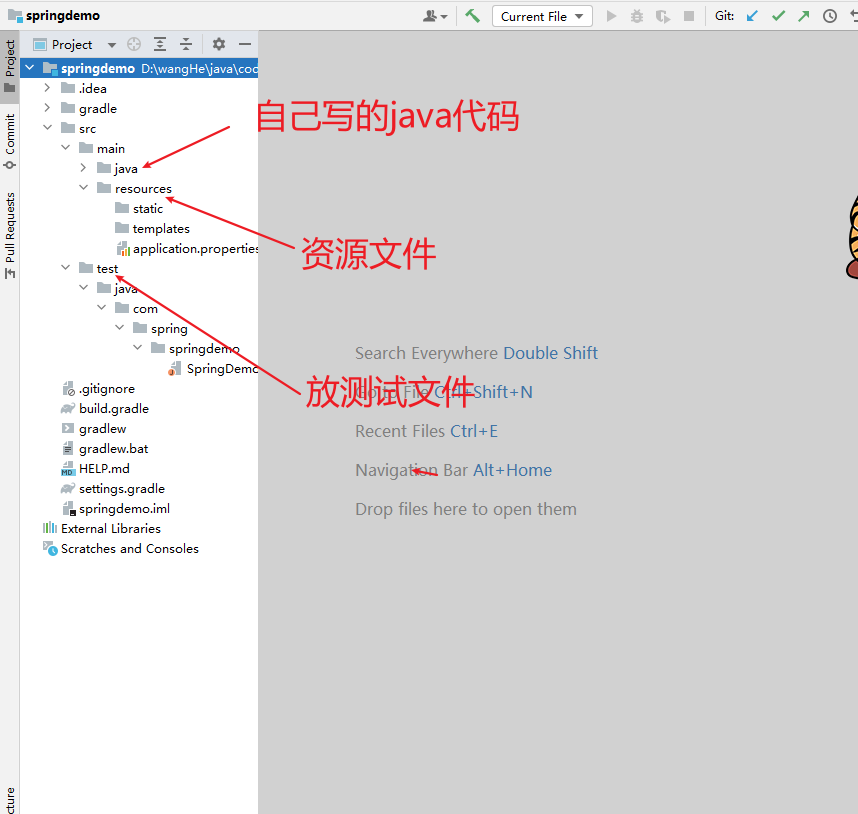
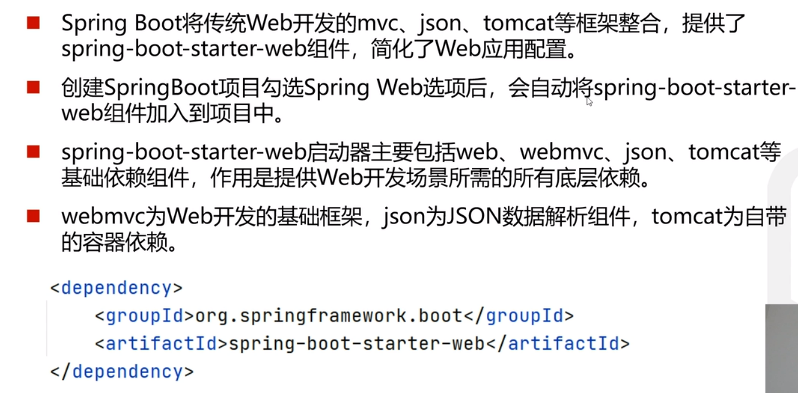
项目制作:后端采用SpringBoot+myBatis(plus)+mysql(IDE为IDEA软件)。前端采用Vue/React(IDE为VScode)。
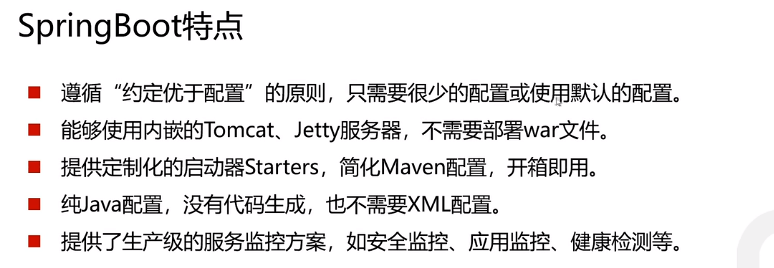
**注:**SSM即Spring、SpringMVC、MyBatis。但是SMM项目搭建起来非常的复杂,有大量的配置文件XML文件需要写,所以就有了Springboot框架,搭建项目更加简单。如果后续还想研究更深入更复杂的项目,还需要再研究一下spring。
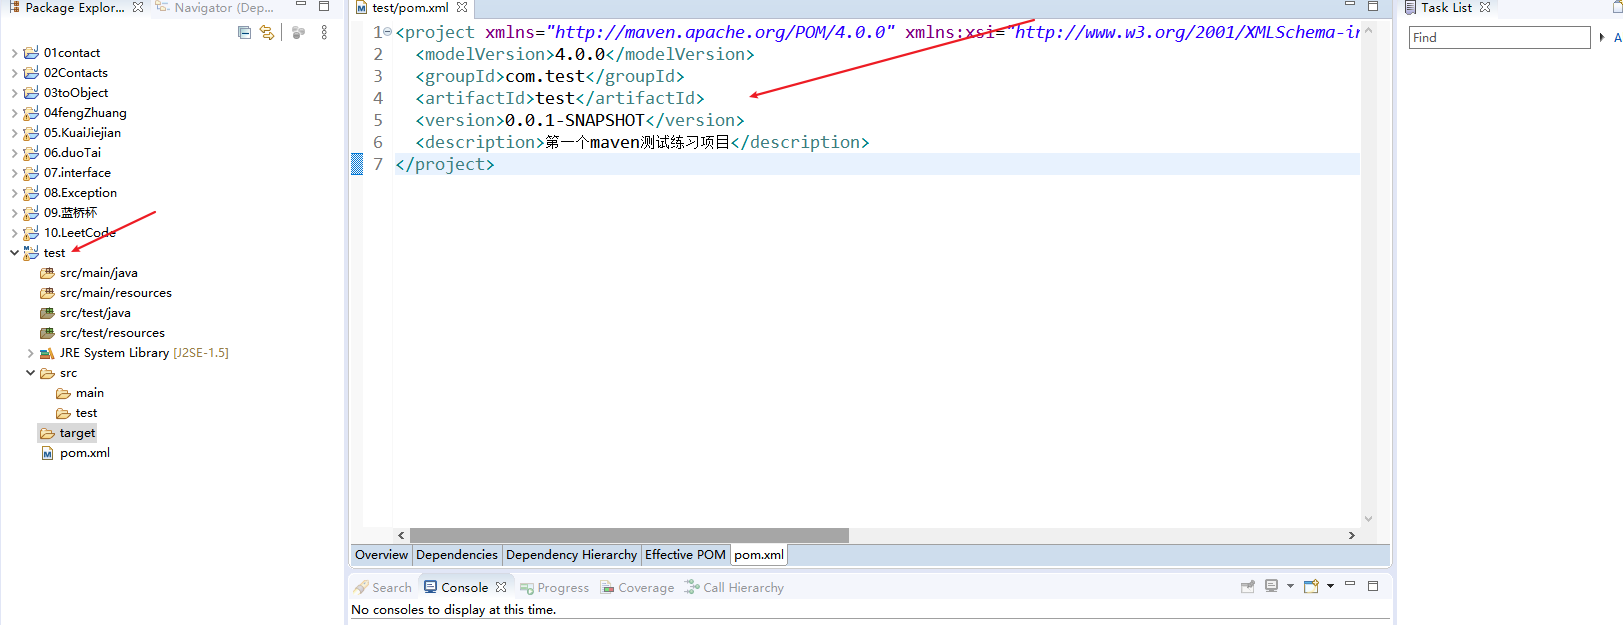
1. maven配置
maven是用于构建后端项目文件的工具,类似于前端的脚手架vue-cli构建项目。
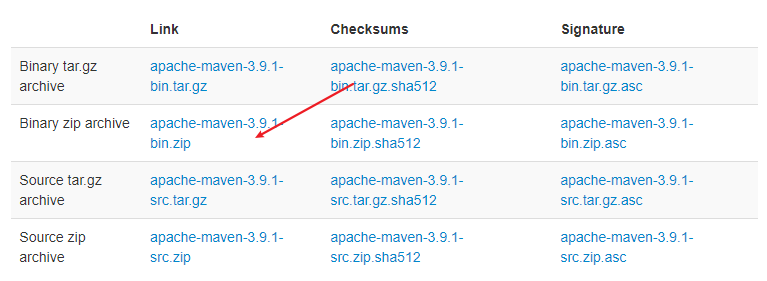
maven下载地址:https://maven.apache.org/download.cgi
eclipse创建maven项目:https://www.cnblogs.com/shanhubei/p/16779442.html
maven项目模板:
2. springBoot基础
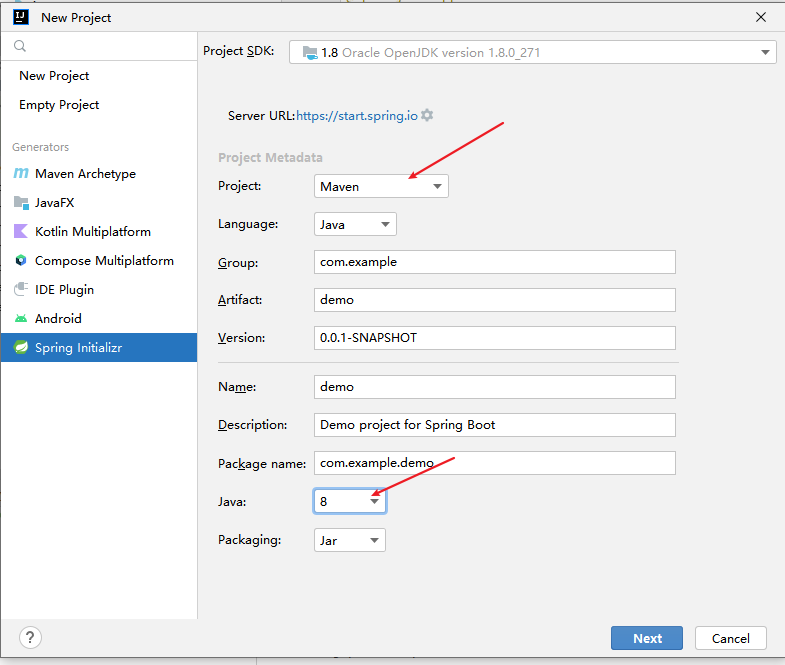
2.1 springboot项目制作过程
首先:file -> new project => springInitalizr创建spring项目。
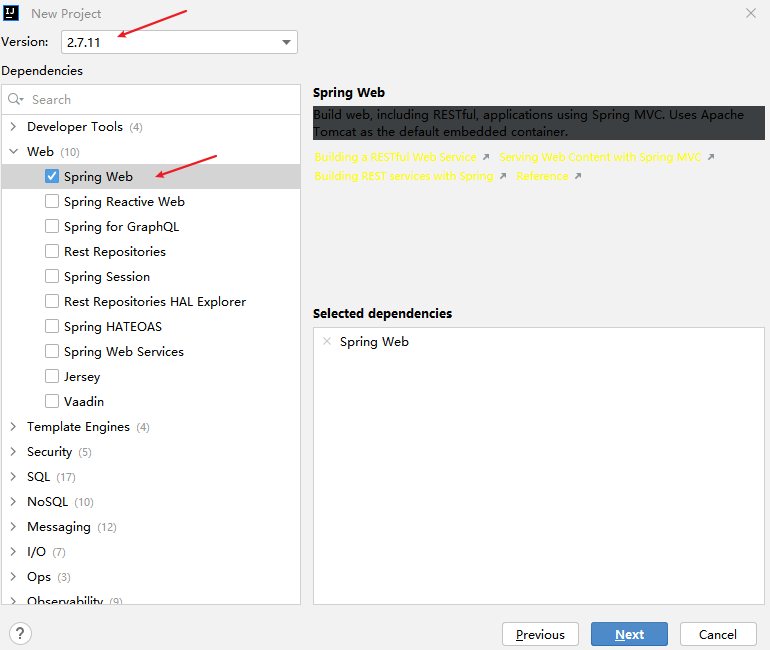
然后选择Web项目:
spring项目创建成功:
创建拦截器controller:
[外链图片转存失败,源站可能有防盗链机制,建议将图片保存下来直接上传(img-xEUju67X-1683894745795)(https://s2.loli.net/2023/05/12/9vDZC4aEHjbXzym.png)]
2.2 spring项目开发环境热部署
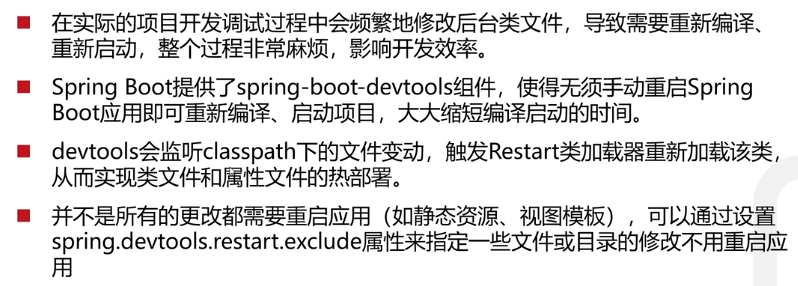
热部署配置:
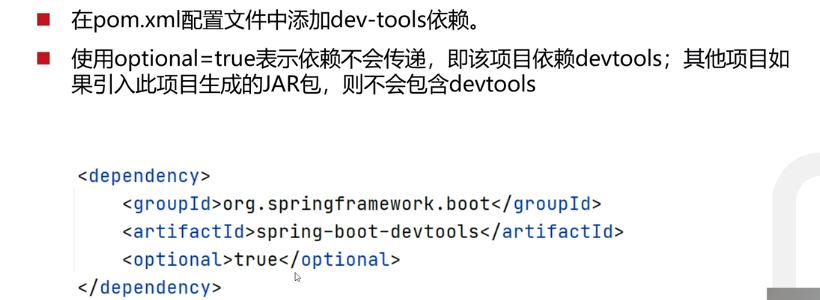
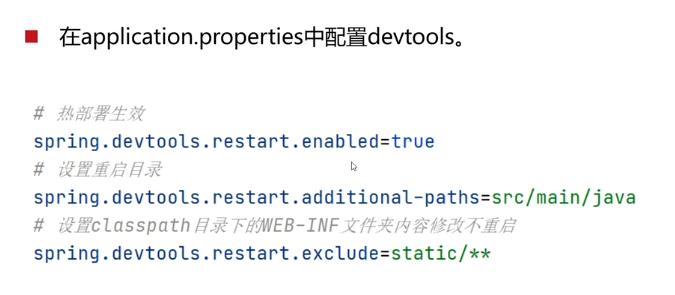
以上配置完成之后打开IDEA的保存重新编译就可以实现自动重新部署了。
3. web开发基础
3.1 web入门
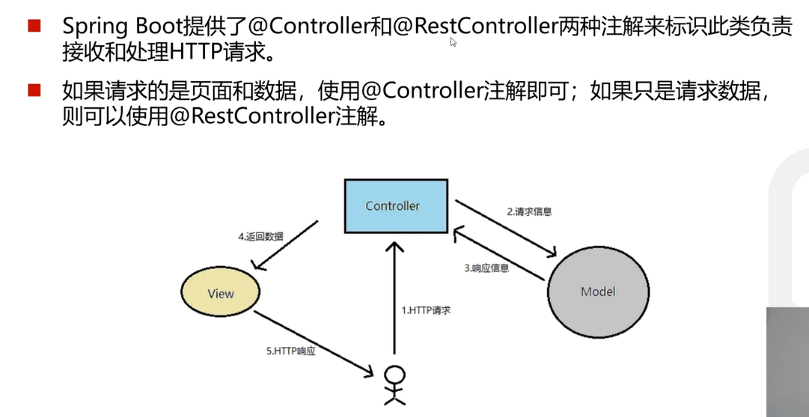
控制器:
3.2 路由映射
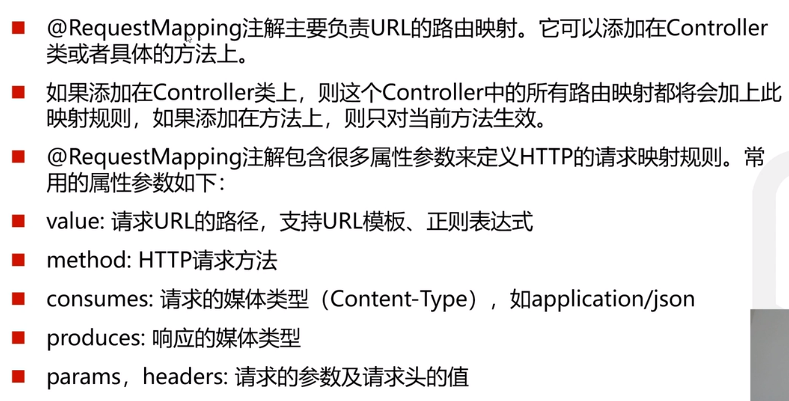

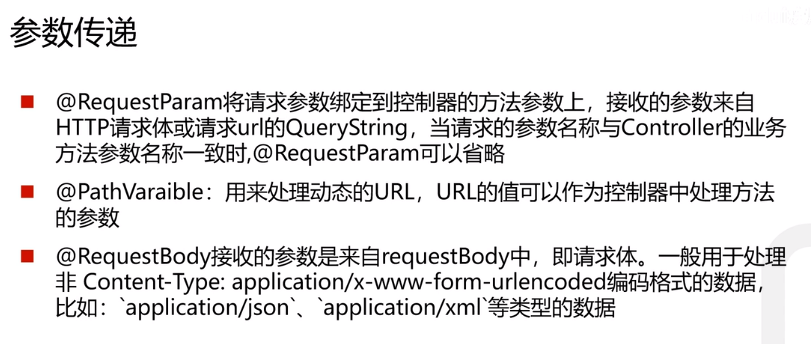
3.3 http参数传递
package com.springTest.demo.controller;

import com.springTest.demo.entity.User;
import jdk.nashorn.internal.ir.RuntimeNode;
import org.springframework.web.bind.annotation.*;

@RestController
public class HelloController {
    @RequestMapping(value = "/hello", method = RequestMethod.GET)
//    @GetMapping("/hello") 等同于上面,为使用get方式
//    http://localhost:8080/hello?name=wanghe&phone=123
    public String hello(String name, String phone) {
        System.out.println("hello" + name + phone);
        return "hello1";
    }

    @RequestMapping(value = "test1", method = RequestMethod.GET)
//    @RequestParam注解
    public String test1(@RequestParam(value = "nikename", required = false) String name) {
        System.out.println(name);
        return "get请求";
    }
    @RequestMapping(value = "test2", method = RequestMethod.POST)
    public String test2(String name) {
        System.out.println("我叫" + name);
        return  "post请求";
    }
    @RequestMapping(value = "test3", method = RequestMethod.POST)
    public String test3(User user) {
        System.out.println(user);
        return "post请求";
    }
    @RequestMapping(value = "test4", method = RequestMethod.POST)
//    @RequestBody是表明接收前端数据为JSON对象的注解
    public String test4(@RequestBody User user) {
        System.out.println(user);
        return "post请求";
    }

    //**表示通配符匹配,任意接收test/dd或test/ff
    @RequestMapping(value = "test/**", method = RequestMethod.POST)
//    @RequestBody是表明接收前端数据为JSON对象的注解
    public String test(@RequestBody User user) {
        System.out.println(user);
        return "通配符匹配";
    }
}
4. Web开发进阶
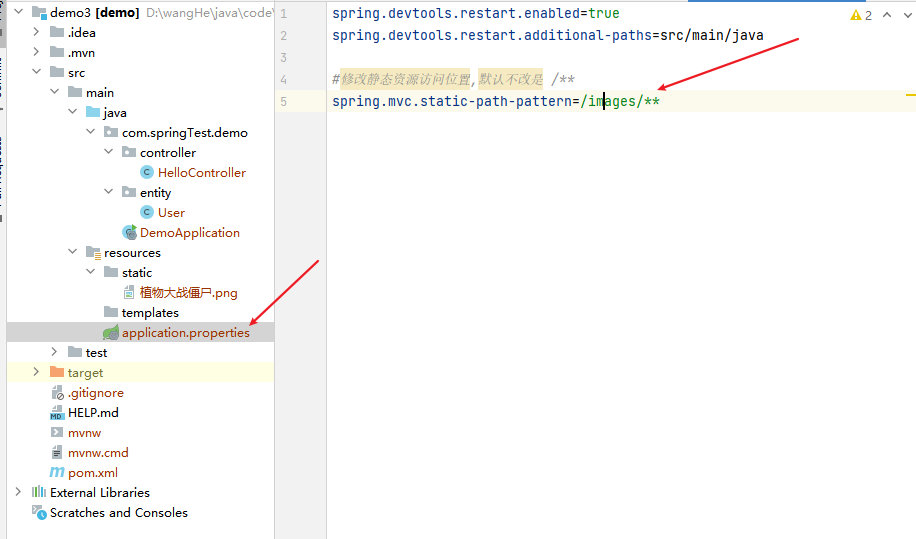
4.1 静态资源访问
[外链图片转存失败,源站可能有防盗链机制,建议将图片保存下来直接上传(img-NLNffxts-1683894745801)(https://s2.loli.net/2023/05/12/ygV5MTP4Gwdk3Je.png)]
修改静态资源访问位置:
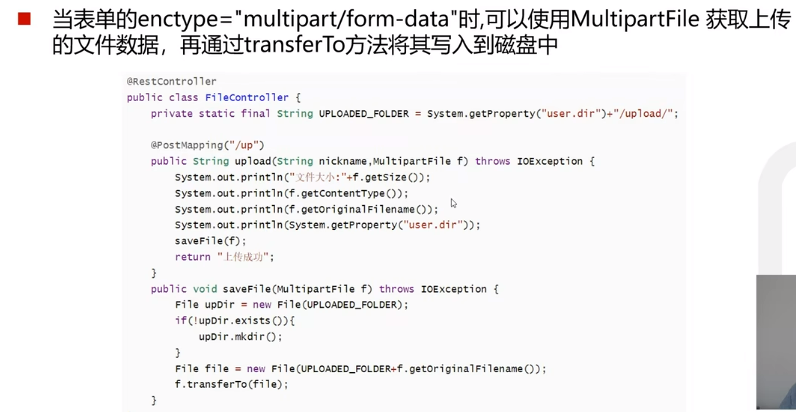
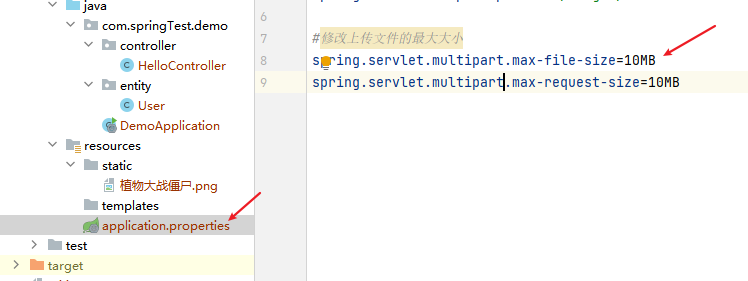
4.2 文件上传
[外链图片转存失败,源站可能有防盗链机制,建议将图片保存下来直接上传(img-4KmoOjTL-1683894745801)(https://s2.loli.net/2023/05/12/ZcPBJHCmyWIXnVN.png)]

4.3 拦截器
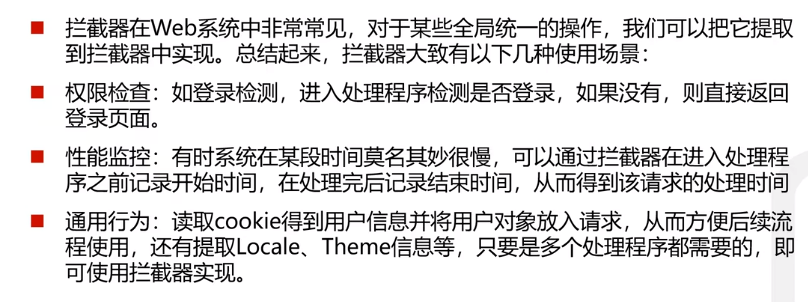
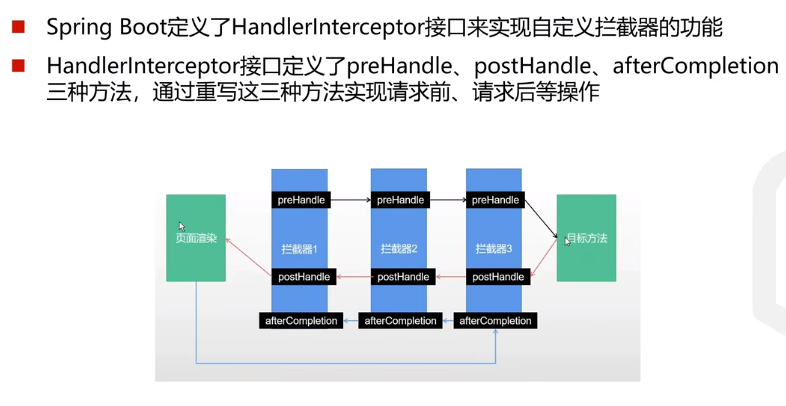
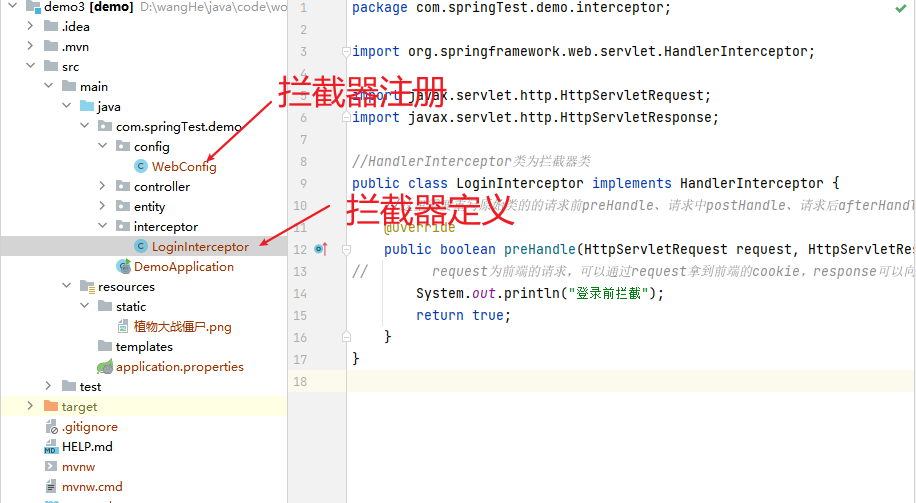
拦截器定义:
package com.springTest.demo.interceptor;

import org.springframework.web.servlet.HandlerInterceptor;

import javax.servlet.http.HttpServletRequest;
import javax.servlet.http.HttpServletResponse;

//HandlerInterceptor类为拦截器类
public class LoginInterceptor implements HandlerInterceptor {
    //这里需要重写原始类的的请求前preHandle、请求中postHandle、请求后afterHandle
    @Override
    public boolean preHandle(HttpServletRequest request, HttpServletResponse response, Object handler) {
//        request为前端的请求,可以通过request拿到前端的cookie,response可以向前端返回信息
        System.out.println("登录前拦截");
        return true;
    }
}
拦截器注册:
package config;

import com.springTest.demo.interceptor.LoginInterceptor;
import org.springframework.context.annotation.Configuration;
import org.springframework.web.servlet.config.annotation.InterceptorRegistry;
import org.springframework.web.servlet.config.annotation.WebMvcConfigurer;

//有了Configuration这个注解之后,springboot就会自动读取这个类,这样的话以下的配置才会生效
@Configuration
public class WebConfig implements WebMvcConfigurer {
    //需要重写增加拦截器的方法
    @Override
    public void addInterceptors(InterceptorRegistry registry) {
//        这里表示添加LoginInterceptor拦截器,当命中/user/**路由时就会命中该拦截器。
        registry.addInterceptor(new LoginInterceptor()).addPathPatterns("/user/**");
    }
}
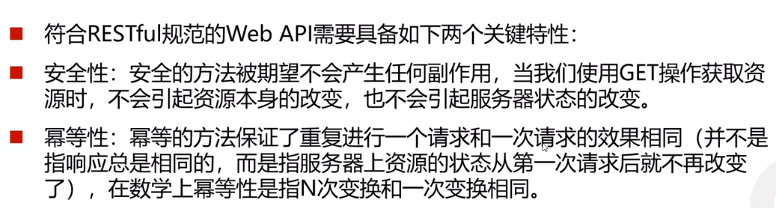
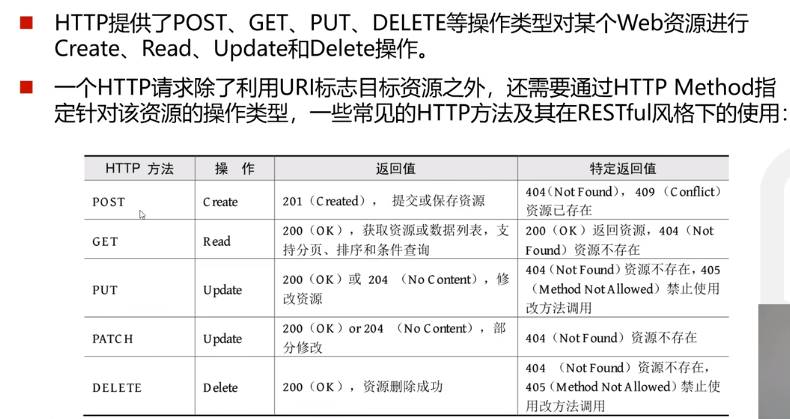
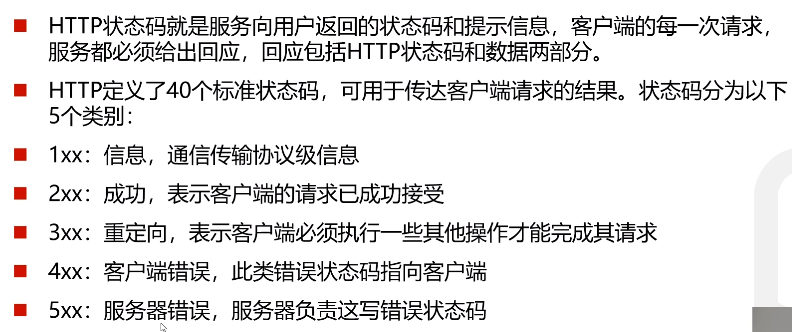
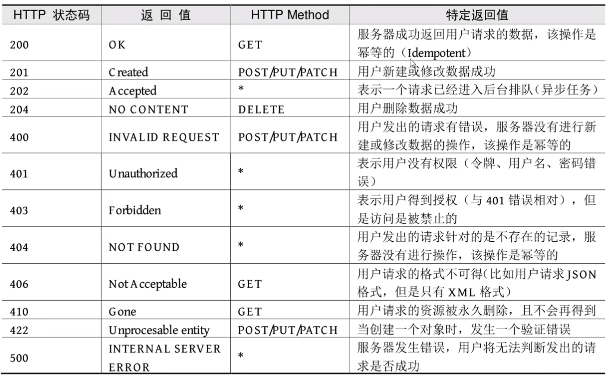
5. Restful服务构建
5.1 restful介绍
[外链图片转存失败,源站可能有防盗链机制,建议将图片保存下来直接上传(img-A4xVjZ7J-1683894745804)(https://s2.loli.net/2023/05/12/o2hLZJUyYA84lDp.png)]
restful特点[外链图片转存失败,源站可能有防盗链机制,建议将图片保存下来直接上传(img-rzopqmOj-1683894745804)(https://s2.loli.net/2023/05/12/62uGK38hqNFrWPQ.png)]
http方法
http状态码
5.2 构建RESTFul应用接口
Restful接口

restful格式
[外链图片转存失败,源站可能有防盗链机制,建议将图片保存下来直接上传(img-NkDKhwb6-1683894745805)(https://s2.loli.net/2023/05/12/l7IZaALjiOBwGoJ.png)]
springBoot实现RESTful API
package com.springTest.demo.controller;
import org.springframework.web.bind.annotation.*;
@RestController
public class UserController {
//restful格式的url
// 查id
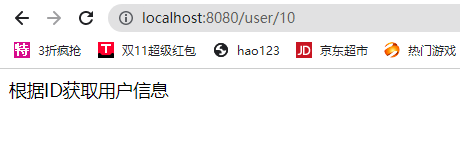
@GetMapping("user/{id}")
public String getUserById(@PathVariable int id) {
System.out.println(id);
return "根据ID获取用户信息";
}
//增
@PostMapping("/user")
public String save() {return "添加用户";}
//改
@PutMapping("/user/{id}")
public String update(@PathVariable int id) {
System.out.println(id);
return "修改用户";
}
//删
@DeleteMapping("/user/{id}")
public String delete(@PathVariable int id) {
System.out.println(id);
return "根据id删除用户";
}
}
前端请求:
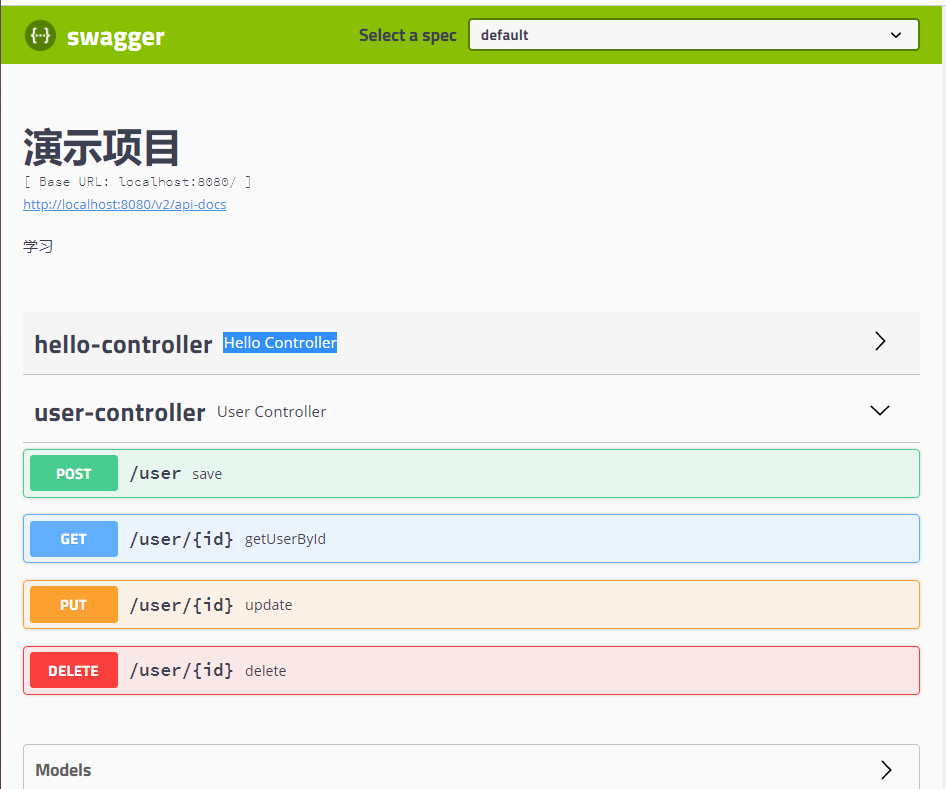
5.3 使用Swagger生成Web API文档

引入Swagger依赖
             <!-- Swagger -->
            <dependency>
                <groupId>io.springfox</groupId>
                <artifactId>springfox-swagger2</artifactId>
                <version>2.9.2</version>
            </dependency>
            <dependency>
                <groupId>io.springfox</groupId>
                <artifactId>springfox-swagger-ui</artifactId>
                <version>2.9.2</version>
            </dependency>
注册Swagger
package com.springTest.demo.config;
import org.springframework.context.annotation.Bean;
import org.springframework.context.annotation.Configuration;
import org.springframework.web.servlet.config.annotation.EnableWebMvc;
import org.springframework.web.servlet.config.annotation.ResourceHandlerRegistry;
import org.springframework.web.servlet.config.annotation.WebMvcConfigurer;
import springfox.documentation.builders.ApiInfoBuilder;
import springfox.documentation.builders.PathSelectors;
import springfox.documentation.builders.RequestHandlerSelectors;
import springfox.documentation.service.ApiInfo;
import springfox.documentation.spi.DocumentationType;
import springfox.documentation.spring.web.plugins.Docket;
import springfox.documentation.swagger2.annotations.EnableSwagger2;


@Configuration
@EnableSwagger2 //开始Swagger功能
@EnableWebMvc
public class SwaggerConfig implements WebMvcConfigurer {

    @Override
    public void addResourceHandlers(ResourceHandlerRegistry registry) {

        registry.addResourceHandler("/**").addResourceLocations(
                "classpath:/static/");
        registry.addResourceHandler("swagger-ui.html").addResourceLocations(
                "classpath:/META-INF/resources/");
        registry.addResourceHandler("/webjars/**").addResourceLocations(
                "classpath:/META-INF/resources/webjars/");
        WebMvcConfigurer.super.addResourceHandlers(registry);
    }

//    配置Swagger2相关的Bean
    @Bean
    public Docket createRestApi() {
        return new Docket(DocumentationType.SWAGGER_2)
                .apiInfo(apiInfo())
                .select()
                // com包下所有API都交给Swagger2管理
                .apis(RequestHandlerSelectors.basePackage("com"))
                .paths(PathSelectors.any()).build();
    }

      API文档页面显示信息
    private ApiInfo apiInfo() {
        return new ApiInfoBuilder()
                .title("演示项目")
                .description("学习")
                .build();
    }
}
Swagger进行接口测试
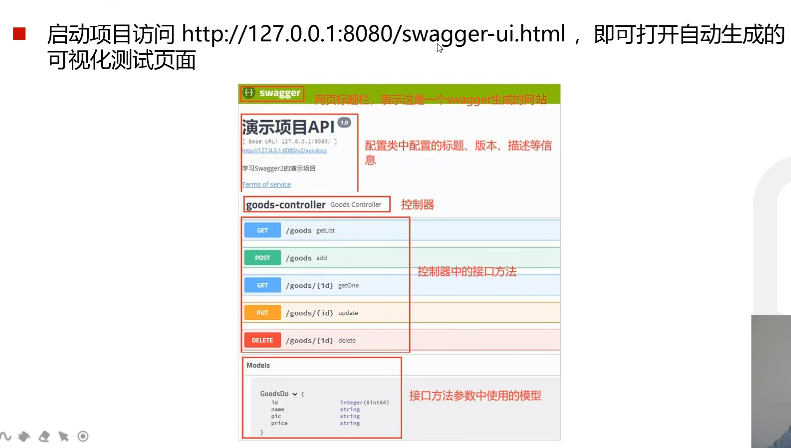
我的效果:
6. MyBatisPlus快速上手
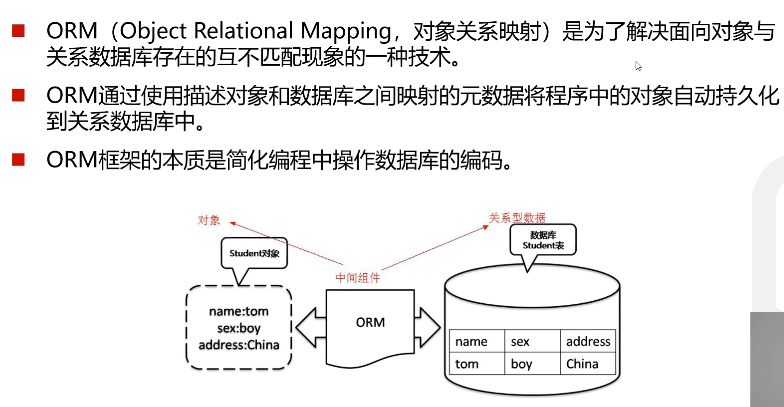
6.1 ORM介绍
6.2 MyBatis-Plus介绍
6.3 MyBatis-Plus CRUD操作
注:给实体类增加getter、setter方法,快捷键:alt+fn+insert
在pom.xml中添加依赖:
<!-- 链接数据库 -->
<dependency>
    <groupId>com.baomidou</groupId>
    <artifactId>mybatis-plus-boot-starter</artifactId>
    <version>3.4.2</version>
</dependency>
<dependency>
    <groupId>mysql</groupId>
    <artifactId>mysql-connector-java</artifactId>
    <version>5.1.47</version>
</dependency>
<dependency>
    <groupId>com.alibaba</groupId>
    <artifactId>druid-spring-boot-starter</artifactId>
    <version>1.1.20</version>
</dependency>
在application.properties中配置据库数链接信息:
#数据库链接的相关配置
spring.datasource.type=com.alibaba.druid.pool.DruidDataSource
spring.datasource.driver-class-name=com.mysql.jdbc.Driver
#mysql的端口都是3306  连接test数据库,重要!
spring.datasource.url=jdbc:mysql://localhost:3306/test?useSSL=false
#数据库账号,重要!
spring.datasource.username=root
spring.datasource.password="!!!!" //自己配置
mybatis-plus.configuration.log-impl=org.apache.ibatis.logging.stdout.StdOutImpl
数据库操作示例:
首先创建一个用于前端访问请求数据库的controller:UserByDbController.java
package com.springTest.demo.controller;

import com.springTest.demo.entity.User;
import com.springTest.demo.mapper.UserMapper;
import org.springframework.beans.factory.annotation.Autowired;
import org.springframework.web.bind.annotation.*;

import java.util.List;

@RestController
public class userByDbController {
    //Autowired 是一个注释,它可以对类成员变量、方法及构造函数进行标注,让 spring 完成 bean 自动装配的工作
    @Autowired
    private UserMapper userMapper;

//    查询用户
    @GetMapping("/userDb")
    public List<User> query() {
//        List是一个数据结构集合,其可以放置各种复杂数据类型,相比数组更加好用。有linkedList和ArrayList两种,类似于js中的数组Array
        List<User> list = userMapper.find(); //通过useMapper接口的find方法来查询数据库并将查询结果赋给list对象
        System.out.println(list);
        return list;
    }
//    增加用户
    @PostMapping("/userDb")
    public String insert(User user) {
        int insertNums = userMapper.insert(user);
        System.out.println(insertNums);
        if(insertNums > 0) {
            return "插入数据";
        } else {
            return "插入失败";
        }
    }
//    删除用户
    @DeleteMapping("/userDb")
    public String delete(int id) {
        System.out.println("删除"+id);
        int isDeleteSuccess = userMapper.delete(id);
        if (isDeleteSuccess == 0) {
            System.out.println("删除失败");
        } else {
            System.out.println("删除成功");
        }
        return "删除数据";
    }
//    修改用户
    @PatchMapping("/userDb")
    public String update(User user) {
        System.out.println("修改");
        System.out.println(user);
        int isUpdateSuccess = userMapper.update(user);
        if (isUpdateSuccess == 0) {
            System.out.println("更新失败");
        } else {
            System.out.println("更新成功");
        }
        return "更新数据";
    }

}
然后创建User实体类User.java:
package com.springTest.demo.entity;


import com.baomidou.mybatisplus.annotation.IdType;
import com.baomidou.mybatisplus.annotation.TableField;
import com.baomidou.mybatisplus.annotation.TableId;
import com.baomidou.mybatisplus.annotation.TableName;


//tableName表示关联数据库的表名
@TableName("user")
public class User {
//    表明user中的id是主键,且是自增的
    @TableId(type = IdType.AUTO)
    private String userName;
//   TableField其是一个对应映射的注解,表示user类中的password对应数据库的表中的password
    @TableField("password")
    private String password;
    private int id;
    private String birthday;

    public String getBirthday() {
        return birthday;
    }

    public String getPassword() {
        return password;
    }

    public int getId() {
        return id;
    }

    public void setId(int id) {
        this.id = id;
    }

    public void setBirthday(String birthday) {
        this.birthday = birthday;
    }

    public String getUserName() {
        return  userName;
    }

    public void setUserName(String userName) {
        this.userName = userName;
    }

    public String getUserPassword() {
        return  password;
    }

    public void setPassword(String password) {
        this.password = password;
    }

    @Override
    public String toString() {
        return "User{" +
                "userName='" + userName + '\'' +
                ", password='" + password + '\'' +
                ", id=" + id +
                ", birthday='" + birthday + '\'' +
                '}';
    }
}
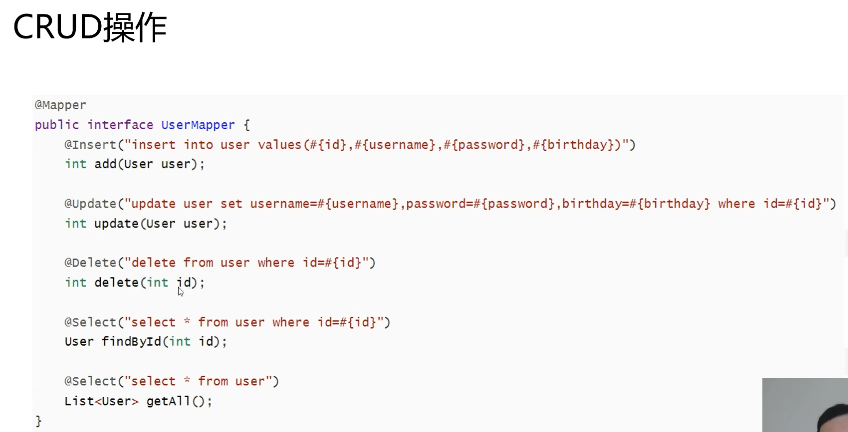
然后创建数据库操作interface接口:UserMapper.java(这里我们先学一下基础班Mybatis对数据库的操作,后面再讲MyBatisPlus更简易的数据库操作)
package com.springTest.demo.mapper;

import com.springTest.demo.entity.User;
// 注意这是Mybatis来做的,用mybatis需要手动写注解,而如果使用MyBatisPlus则就不用写注解了,可以理解是对Mybatis的简化
//使用MyBatis来写数据库的操作
import org.apache.ibatis.annotations.*;

import java.util.List;

//Mapper注解表明这个接口是一个mapper映射器,用于数据库查询与映射
@Mapper
//不需要写一个类,只需要写方法声明(接口),所有的实现都可以让MyBatis来完成,
// 注意这是Mybatis来做的,用mybatis需要手动写注解,
// 而如果使用MyBatisPlus则就不用写注解了,可以理解是对Mybatis的简化
public interface UserMapper {
//   在MyBatis写数据库操代码时,是在注解中写sql语句,查询的方法名无所谓
//   查询所有用户
    @Select("select * from user")
    public List<User> find();

//    增加用户,按照springBoot格式来写,注意#的使用
    @Insert("insert into user values (#{id}, #{userName}, #{password}, #{birthday})")
    public int insert(User user);  //返回值时插入几条记录,如果失败了返回值为0

//   删除用户,根据id进行删除
    @Delete("delete from user where id=#{id}")
    public int delete(int id);

//    更新用户
    @Update("update user set userName=#{userName},password=#{password},birthday=#{birthday} where id=#{id}")
    public int update(User user);
}
然后我们看一下使用MyBatisPlus更如何更加简易操作数据库数据的,这里重点是继承了MyBatisPlus的baseMapper接口,新建数据库操作接口文件:UserByMyBatisPlusMapper.java:
package com.springTest.demo.mapper;

//使用myBatiesPlus来写数据库操作
import com.baomidou.mybatisplus.core.mapper.BaseMapper;
import com.springTest.demo.entity.User;

//继承于MyBatisPlus的BaseMapper接口,这样传入User表,这样你就不用写基础的增删改查了,MyBatisPlus会自动帮你完成这些
public interface UserByMyBatisPlusMapper extends BaseMapper<User> {
}
controller中:
package com.springTest.demo.controller;

import com.springTest.demo.entity.User;
import com.springTest.demo.mapper.UserByMyBatisPlusMapper;
import org.springframework.beans.factory.annotation.Autowired;
import org.springframework.web.bind.annotation.*;

import java.util.List;

@RestController
public class userByDbController {
    //    查询用户
    @GetMapping("/userDb")
    public List<User> query() {
        //通过myBatisPlus自身提供的selectList来查找,这里需要传入null,表示查找表的所有项
         List<User> list1 = userPlusMapper.selectList(null);
        System.out.println(list1);
        return list1;
    }
    //    增加用户
    @PostMapping("/userDb")
    public String insert(User user) {
        int insertNums1 = userPlusMapper.insert(user);
        System.out.println(insertNums1);
        return "增加用户";
    }
}
7. 多表查询及分页查询
7.1 多表查询
myBatis实现多表查询,注:MyBatisPlus只是对单表查询做了增强:
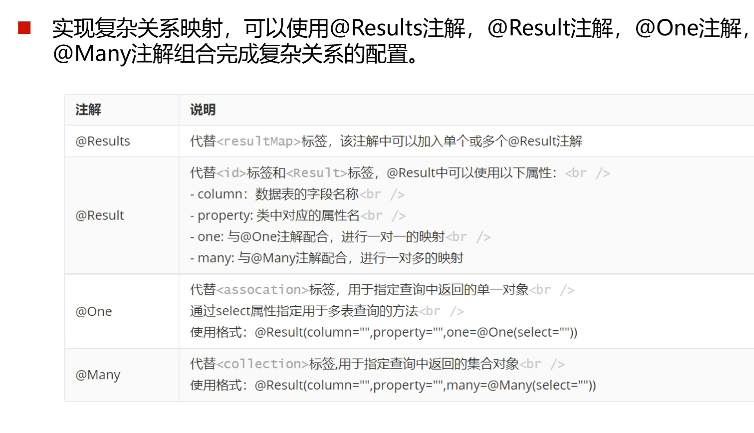
举例:实现查询所有用户,以及该用户对应的订单:(这里用户是一张表user,订单是另一个表t_order):
项目中:
首先为实体类User增添orders订单集合属性;
//tableName表示关联数据库的表名
@TableName("user")
public class User {
//    表明user中的id是主键,且是自增的
    @TableId(type = IdType.AUTO)
    private String userName;
//   TableField其是一个对应映射的注解,表示user类中的password对应数据库的表中的password
    @TableField("password")
    private String password;
    private int id;
    private String birthday;
//描述用户的所有订单,告诉MyBatisPlus,user类的order属性在user表中是不存在的
    @TableField(exist = false)
    private List<Order> orders;
}
订单实体类:Order.java:
package com.springTest.demo.entity;

import com.baomidou.mybatisplus.annotation.TableField;
import com.baomidou.mybatisplus.annotation.TableName;

//表示Order类对应数据库表中的t_order表
@TableName("t_order")
public class Order {

    private int id;
    private String orderTime;
    private int total;
    private int uid;
    @TableField(exist = false)
    private User user;

    public User getUser() {
        return user;
    }
    public void setUser(User user) {
        this.user = user;
    }
    public int getId() {
        return id;
    }
    public void setId(int id) {
        this.id = id;
    }

    public String getOrderTime() {
        return orderTime;
    }

    public void setOrderTime(String orderTime) {
        this.orderTime = orderTime;
    }

    public int getTotal() {
        return total;
    }

    public void setTotal(int total) {
        this.total = total;
    }

    public int getUid() {
        return uid;
    }

    public void setUid(int uid) {
        this.uid = uid;
    }

    @Override
    public String toString() {
        return "Order{" +
                "id=" + id +
                ", orderTime='" + orderTime + '\'' +
                ", total=" + total +
                ", uid=" + uid +
                ", user=" + user +
                '}';
    }
}
然后写userMapper.java数据库操作:
package com.springTest.demo.mapper;

//使用myBatiesPlus来写数据库操作
import com.baomidou.mybatisplus.core.mapper.BaseMapper;
import com.springTest.demo.entity.User;
import org.apache.ibatis.annotations.Many;
import org.apache.ibatis.annotations.Result;
import org.apache.ibatis.annotations.Results;
import org.apache.ibatis.annotations.Select;

import java.util.List;

//继承于MyBatisPlus的BaseMapper接口,这样传入User表,这样你就不用写基础的增删改查了,MyBatisPlus会自动帮你完成这些
public interface UserByMyBatisPlusMapper extends BaseMapper<User> {

    @Select("select * from user where id = #{id}")
    public User selectById(int id);

//    查询用户及其所有的订单
    @Select("select * from user") //Results是查询的结果映射,注意这里将用户对应的所有订单全都映射为orders属性
    @Results({
            @Result(column = "id", property = "id"),
            @Result(column = "userName", property = "userName"),
            @Result(column = "password", property = "password"),
            @Result(column = "birthday", property = "birthday"),
            @Result(column = "id", property = "orders", javaType = List.class,
                    many = @Many(select = "com.springTest.demo.mapper.OrderMapper.selectByUid")
            ),//many表示映射的一对多的关系,select=后面的语句表示要调用哪一个mapper的什么方法
    })
    public List<User> selectAllUserAndOrders();
}
然后写订单的数据库操作映射mapper:OrderMapper.java:
package com.springTest.demo.mapper;

import com.baomidou.mybatisplus.core.mapper.BaseMapper;
import com.springTest.demo.entity.Order;
import com.springTest.demo.entity.User;
import org.apache.ibatis.annotations.One;
import org.apache.ibatis.annotations.Result;
import org.apache.ibatis.annotations.Results;
import org.apache.ibatis.annotations.Select;

import java.util.List;

public interface OrderMapper extends BaseMapper<Order> {
    @Select("select * from t_order where uid = #{uid}")
    public List<Order> selectByUid(int uid);

//    查询所有订单,同时查询订单所对应的用户,注意一个订单仅对应一个用户,所以用@One
    @Select("select * from t_order")
    @Results({
            @Result(column = "id", property = "id"),
            @Result(column = "orderTime", property = "orderTime"),
            @Result(column = "total", property = "total"),
            @Result(column = "uid", property = "user", javaType = User.class,
                one = @One(select = "com.springTest.demo.mapper.UserByMyBatisPlusMapper.selectById")
            ),
    })
    public List<Order> selectAllOrdersAndUser();
}
在控制器controller中进行调用:
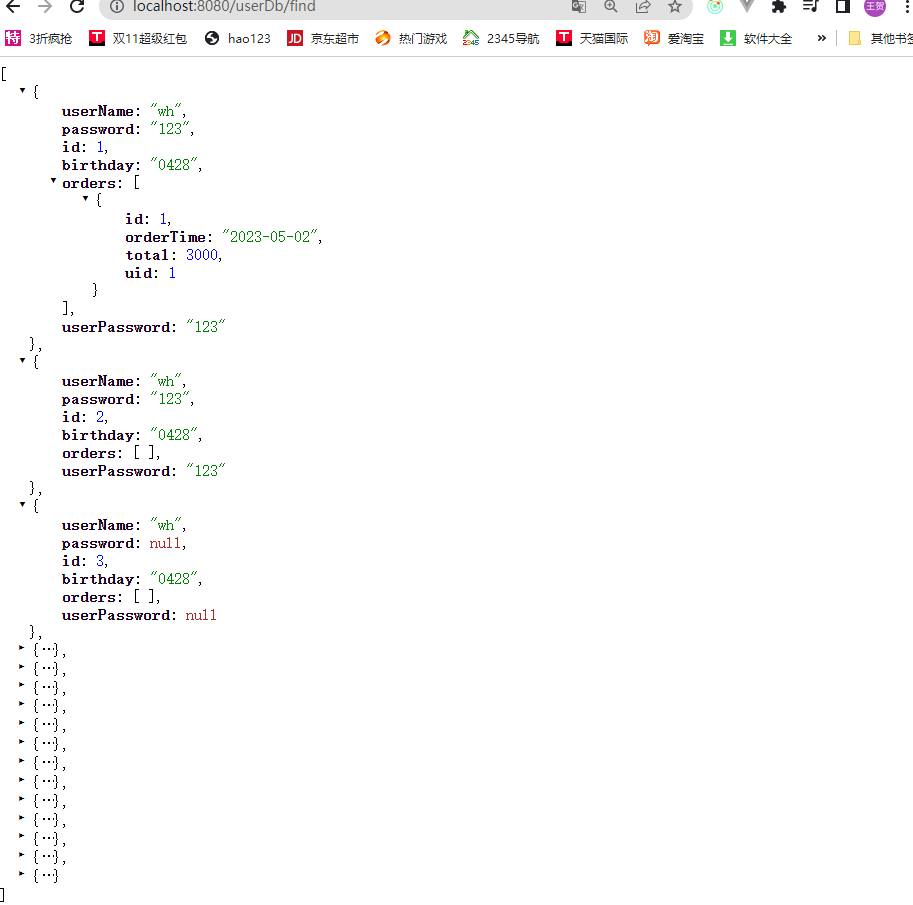
//    查询所有用户,以及用户所对应的订单
    @GetMapping("/userDb/find")
    public List<User> find(){
        return userPlusMapper.selectAllUserAndOrders();
    }
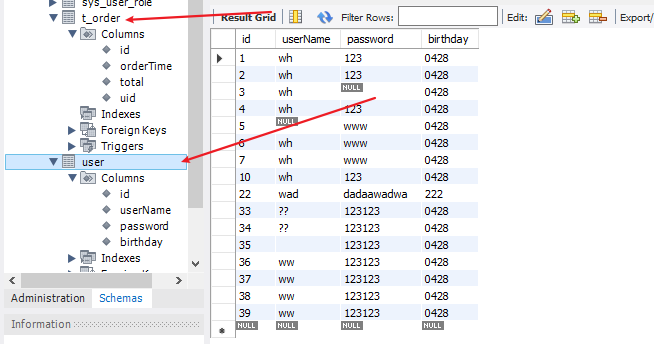
访问http://localhost:8080/userDb/find,最终前端呈现效果:
7.2 条件查询
// 条件查询
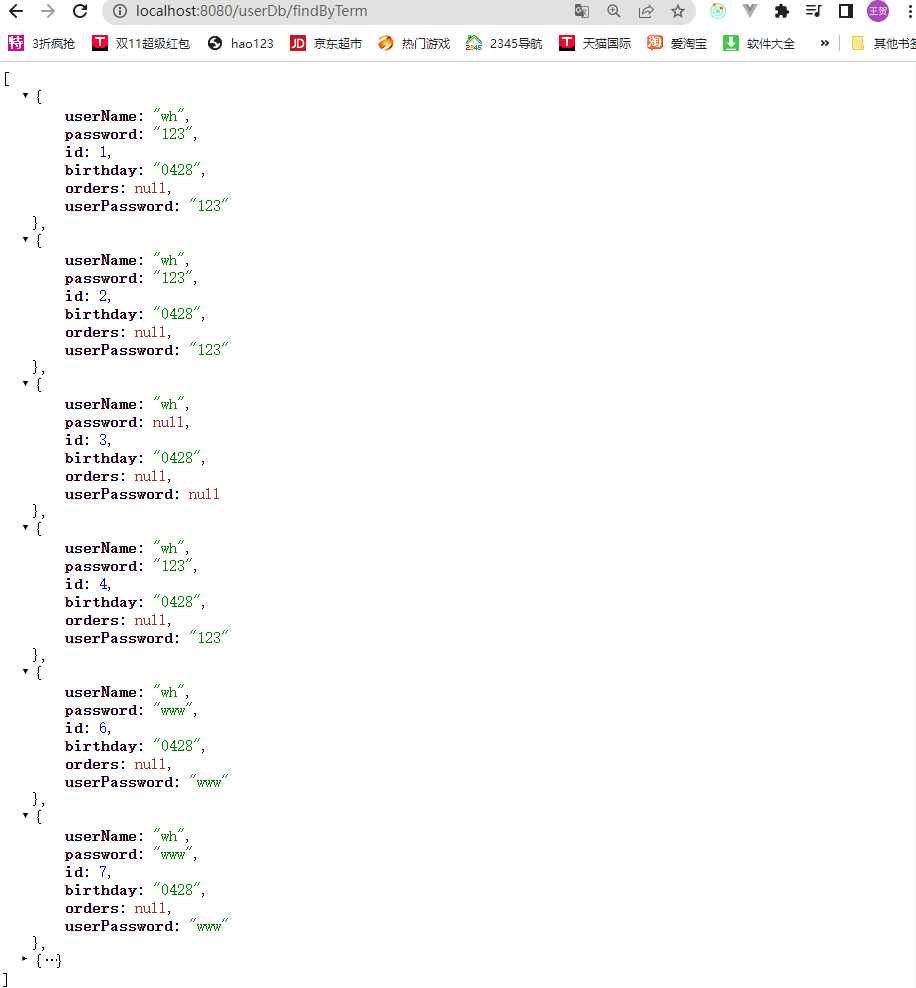
@GetMapping("/userDb/findByTerm")
public List<User> findByTerm() {
// 使用条件构造器QueryWrapper
QueryWrapper<User> queryWrapper = new QueryWrapper<>();
queryWrapper.eq("userName", "wh"); //插入相等条件eq,还有其他条件比如lt小于
return userPlusMapper.selectList(queryWrapper);
}
访问:http://localhost:8080/userDb/findByTerm,效果展示:
7.3 分页查询
设置MyBatisPlus拦截器MyBatisPlusConfig.java:
//分页查询配置
@Configuration
public class MyBatisPlusConfig {
//    配置MyBatisPlus数据库拦截器
    @Bean
    public MybatisPlusInterceptor paginationInterceptor(){
        MybatisPlusInterceptor mybatisPlusInterceptor = new MybatisPlusInterceptor();
        PaginationInnerInterceptor paginationInnerInterceptor = new PaginationInnerInterceptor(DbType.MYSQL);  //数据库类型是mysql
        mybatisPlusInterceptor.addInnerInterceptor(paginationInnerInterceptor); //paginationInnerInterceptor表示分页查询
        return mybatisPlusInterceptor;
    }
}
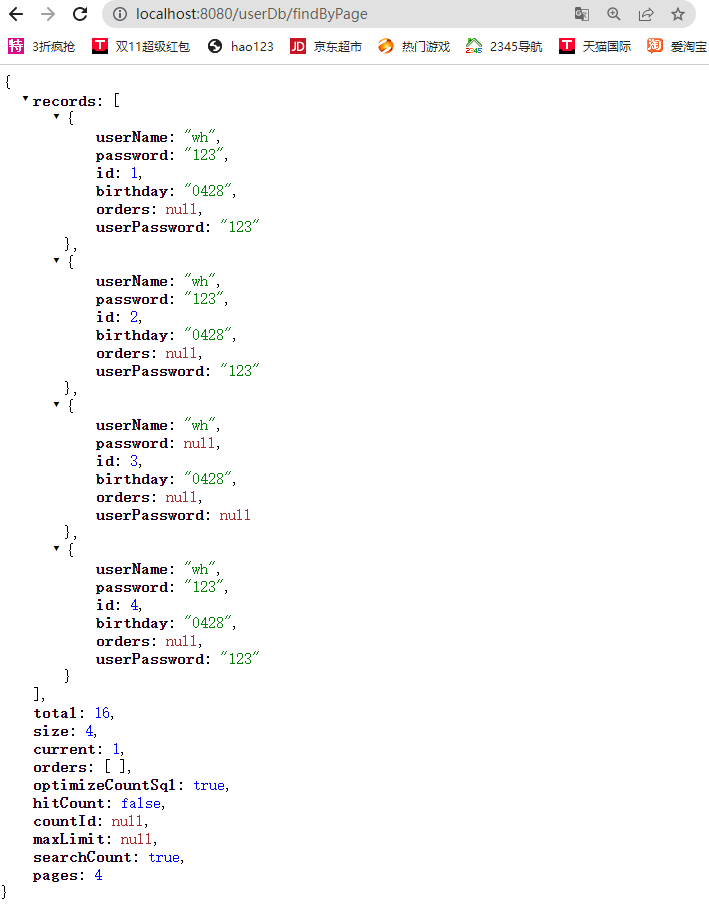
然后在controller中实现/userDb/findByPage路由:
//    分页查询
    @GetMapping("/userDb/findByPage")
    public IPage<User> findByPage() {
        //设置起始值及每页条数。表示返回几条数据
        Page<User> page = new Page<>(0, 4); //第一个参数为从第几条开始取,第二个参数为取几条
        //返回结果集
        IPage<User> ipage = userPlusMapper.selectPage(page, null);
        return ipage;
    }
访问http://localhost:8080/userDb/findByPage前端效果展示:
二:前端
Vue实现前端页面:
这里前端采用vue实现页面组件实现。vue-cli+Vue2+element-UI
1. vue简单介绍

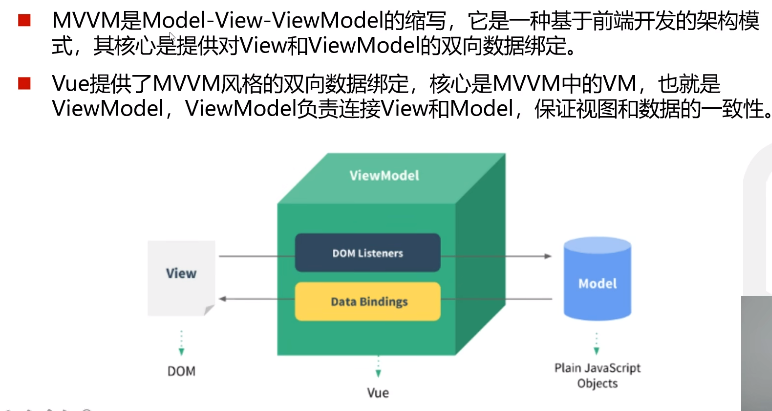
1.1 MVVM模式
MVVM与后端的MVC类似。MVC即model-view-controller,也就是我们通过controller,将model即数据库中的数据渲染到view视图中。这里我理解的MVC是之前的前后端不分离的架构模式。
2. Vuecli脚手架使用

vue-cli官方文档:https://cli.vuejs.org/zh/guide/creating-a-project.html
通过以下指令创建vue项目:
vue create demo3_frontend
项目目录展示:
3. element-UI框架
element-UI是一个UI框架,能够更快捷地构建前端页面。
官方网站:https://element.eleme.cn/#/zh-CN/component/installation
element-ui安装指令:
cnpm i element-ui -S
4. 安装第三方图标库font-awesome
font-awesome为第三方图标库,设计图标更加美观方便。
安装指令:
cnpm install font-awesome -S
5.解决跨域方式:
5.1配置前端通过代理跨域
创建webpack配置文件,解决前端CORS跨域问题,vue.config.js:
// 添加全局配置文件
const path = require("path");
module.exports = {
  // 关闭esList语法检测功能
  lintOnSave: false,
  // 开发服务器相关的配置
  devServer: {
    // 配置静态资源目录
    contentBase: path.join(__dirname, "public"),
    compress: true,
    // 设置开发服务器的端口号
    port: 8080,
    proxy: {
      "/": {
        target: "http://localhost:8080/",
        changeOrigin: true, //是否允许跨越
        pathRewrite: {
          "^/": "/",
        },
      },
    },
  },
};
5.2配置后端跨域
在后端springboot项目中增加配置文件:
//此配置类是在配置后端允许跨域的方式
@Configuration
public class CrossOrigin implements WebMvcConfigurer {
    @Override
    public void addCorsMappings(CorsRegistry registry) {
        registry.addMapping("/**") //允许跨域访问的路径
                .allowedOrigins("*") //允许所有网站跨域
                .allowedMethods("POST", "GET", "OPTIONS", "DELETE") //允许的方法
                .maxAge(168000) //预检间隔时间
                .allowedHeaders("*");  //允许头部设置
                //.allowCredentials(true); //是否支持发送cookie
    }
}
或者使用springBoot能力,直接在某个controller中增加注解@CrossOrigin 设置允许跨域:
@RestController
@CrossOrigin  //springBoot设置允许跨域
public class userByDbController {
}
6. Axios前后端通信
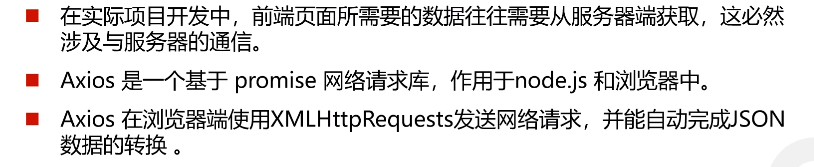
axios网站:http://www.axios-js.com/zh-cn/docs/
axios安装:
cnpm install axios -S
axios请求举例:
// 为给定 ID 的 user 创建请求
axios.get('/user?ID=12345')
  .then(function (response) {
    console.log(response);
  })
  .catch(function (error) {
    console.log(error);
  });

// 上面的请求也可以这样做
axios.get('/user', {
    params: {
      ID: 12345
    }
  })
  .then(function (response) {
    console.log(response);
  })
  .catch(function (error) {
    console.log(error);
  });
  //执行post请求
  axios.post('/user', {
    firstName: 'Fred',
    lastName: 'Flintstone'
  })
  .then(function (response) {
    console.log(response);
  })
  .catch(function (error) {
    console.log(error);
  });
自定义axios实例:/util/request.js:
// 封装异步请求的方法

// 导入BASE_URL
// 导入Nprogress ,加载进度条
import NProgress from "nprogress";
import "nprogress/nprogress.css";
import axios from "axios";
import base from "../config/index";
// 初始化一个axios对象
var instance = axios.create({
  // 设置接口地址根路径
  baseURL: base.baseDev,
  // 设置超时时间
  // timeout: 10000,
  // withCredentials: true, //表示跨域请求时是否需要使用凭证
  // 设置请求头
  headers: {
    token: sessionStorage.getItem("token"),
  },
});

// 创建一个get请求方法
let get = async (url, params) => {
  // get ,post方法是axios实例自带的api,里面的url属性会自动与baseURL进行拼接
  // 因为在axios的get请求中,请求参数为一个对象,对象中包含了params属性
  let { data } = await instance.get(url, { params: params });
  return data;
};
// 创建一个post请求方法
let post = async (url, params) => {
  let { data } = await instance.post(url, params);
  return data;
};

// 创建一个将token信息保存到请求头的方法
function setToken() {
  instance.defaults.headers.common["token"] = sessionStorage.getItem("token");
}

// 添加请求拦截器
// instance.interceptors.request.use(
//   function (config) {
//     // 在发送请求之前做些什么
//     NProgress.start();
//     return config;
//   },
//   function (error) {
//     // 对请求错误做些什么
//     // 关闭进度条
//     NProgress.done();
//     return Promise.reject(error);
//   }
// );

// 添加响应拦截器
// instance.interceptors.response.use(
//   function (response) {
//     // 对响应数据做点什么
//     // 进度条结束
//     NProgress.done();
//     return response;
//   },
//   function (error) {
//     // 对响应错误做点什么
//     // NProgress.done();
//     return Promise.reject(error);
//   }
// );

// 导出一个get和post方法
export default { get, post, setToken };
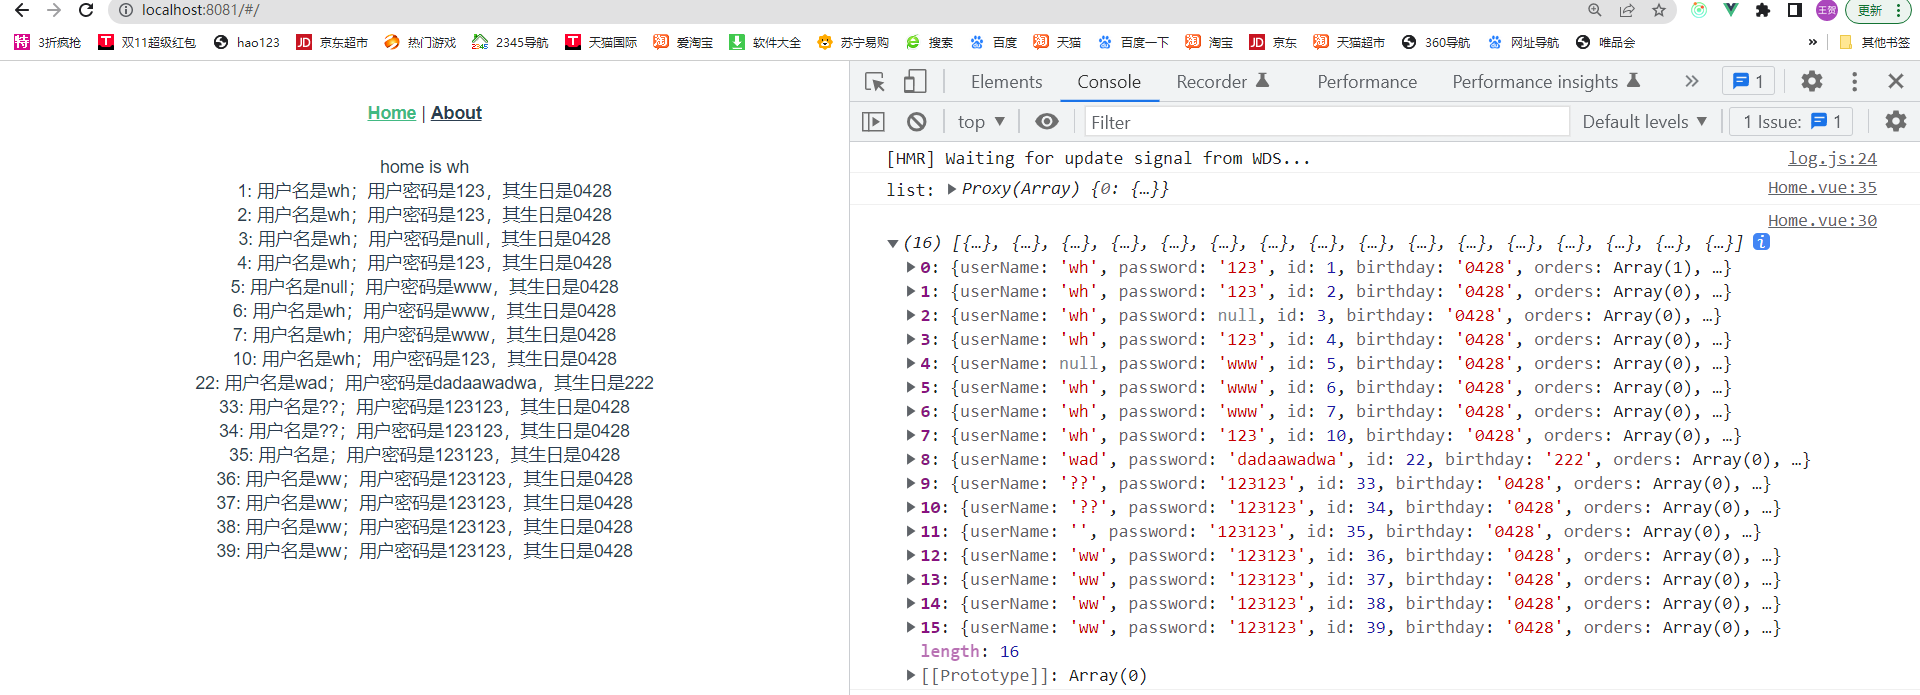
在前端组件中使用axios向后端进行异步请求数据:
<template>
  <div class="home">

    home is {{ name }}
    <div v-for="(item, index) in userlist" :key="index">
      {{ `${item.id}: 用户名是${item.userName};用户密码是${item.password},其生日是${item.birthday}`}}
    </div>
  </div>
</template>

<script>
// @ is an alias to /src
import Vue from "vue"
import axios from "axios"
import $http from "../util/request"
export default {
  name: 'Home',
  data() {
    return {
      name: "wh",
      userlist: [{ userName: "wh" }]
    }
  },
  async created() {
    // axios.get("/userDb/find").then((res) =>{
    //   console.log(res);
    //   this.userlist = res.data;
    // })
    let list = await $http.get("/userDb/find");
    console.log(list);
    this.userlist = list;
  },
  mounted() {
    console.log("list:", this.userlist);
  },
  components: {
  }
}
</script>
后端响应数据并渲染:
**以上就完成了最基础的前后端请求与响应通信。**以下介绍拓展内容,包括互联网企业中最常见前登录解决方案以及前后端项目云部署等。
React实现前端页面:
三:企业级集成方案
1. vue-element-admin介绍
vue-element-admin是一个前台网站的后端管理系统解决方案,比如:淘宝网站的后端管理系统就可以用这个方案进行生成其后台管理系统,更加便于制作后台。

官方网站地址:https://panjiachen.github.io/vue-element-admin-site/zh/guide/
2. 安装与使用
# 克隆项目
git clone https://github.com/PanJiaChen/vue-element-admin.git

# 进入项目目录
cd vue-element-admin

#注意把 "tui-editor": "1.3.3"这个富文本库先删了再npm i安装,这个库改名字了已经,所以会报错。

# 安装依赖
npm install

# 建议不要用 cnpm 安装 会有各种诡异的bug 可以通过如下操作解决 npm 下载速度慢的问题
npm install --registry=https://registry.npmmirror.com

# 本地开发 启动项目
npm run dev
前端页面展示:

3. 跨域认证
项目本身是采用mock拦截接口,使用本地模拟数据来进行页面渲染。这里进行改造,来使用自己写的SpringBoot后端接口响应的数据。
3.1 Session认证
互联网服务离不开用户认证。一般流程是下面这样。
用户向服务器发送用户名和密码。
服务器验证通过后,在当前对话(session)里面保存相关数据(sssion对象),比如用户角色、
登录时间等。
服务器向用户返回一个 session_id,写入用户的 Cookie。
用户随后的每一次请求,都会通过 Cookie,将 session_id 传回服务器。
服务器收到 session_id,找到前期保存的数据,由此得知用户的身份
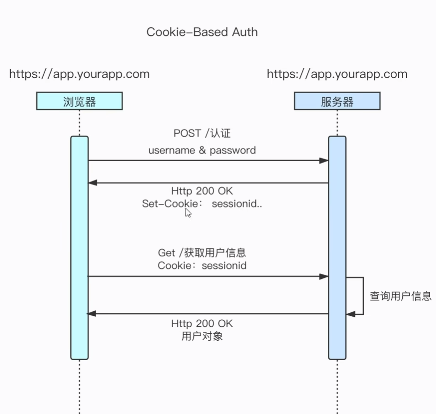
session认证特点:
session 认证的方式应用非常普遍,但也存在一些问题,扩展性不好,如果是服务
器集群,或者是跨域的服务导向架构,就要求 session 数据共享,每台服务器都能
够读取 session,针对此种问题一般有两种方案:
- 一种解决方案是session 数据持久化,写入数据库或别的持久层。各种服务收
到请求后,都向持久层请求数据。这种方案的优点是架构清晰,缺点是工程量
比较大。
- 一种方案是服务器不再保存 session 数据,所有数据都保存在客户端,每次请
求都发回服务器。Token认证就是这种方案的一个代表。
3.2 Token认证
Token 是在服务端产生的一串字符串,是客户端访问资源接口(API)时所需要的资
源凭证,流程如下:
客户端使用用户名跟密码请求登录,服务端收到请求,去验证用户名与密码验证成功后,服务端会签发一个 token 并把这个 token 发送给客户端。
客户端收到 token 以后,会把它存储起来,比如放在 cookie 里或者localStorage 里。
客户端每次向服务端请求资源的时候需要带着服务端签发的 token。
服务端收到请求,然后去验证客户端请求里面带着的 token ,如果验证成功,就向客户端返回请求的数据。
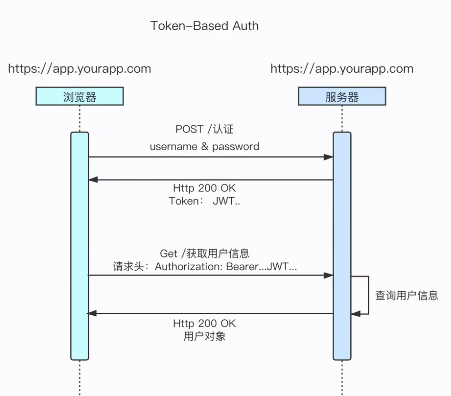
Token认证特点:
- 基于 token 的用户认证是一种服务端无状态的认证方式,服务端不用存放token 数据。
- 用解析 token 的计算时间换取 session 的存储空间,从而减轻服务器的压力,减少频繁的查询数据库。
- token 完全由应用管理,所以它可以避开同源策略。
3.3 JWT的使用
JSON Web Token(简称 JWT)是一个token认证的具体实现方式,是目前最流行的跨域认证解决方案。JWT 的原理是,服务器认证以后,生成一个 JSON 对象,发回给用户,具体如下:
用户与服务端通信的时候,都要发回这个 JSON 对象。服务器完全只靠这个对象认定用户身份。为了防止用户篡改数据,服务器在生成这个对象的时候,会加上签名。
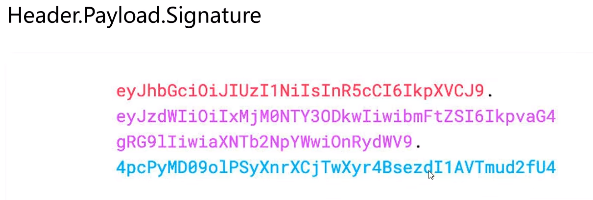
JWT 的由三个部分组成,依次如下:
- Header(头部)
- Payload(负载)
- Signature(签名)
三部分最终组合为完整的字符串,中间使用 . 分隔,如下:
Header
Header 是一个 JSON 对象,描述 JWT 的元数据。

alg属性表示签名的算法(algorithm),默认是 HMAC SHA256(写成HS256)
typ属性表示这个令牌(token)的类型(type),JWT 令牌统一写为JWT
最后,将上面的 JSON 对象使用 Base64URL 算法转成字符串。
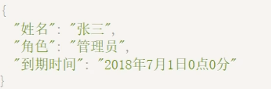
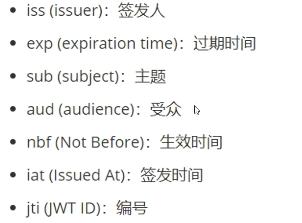
Payload
Payload 部分也是一个 JSON 对象,用来存放实际需要传递的数据。JWT 规定了7个官方字段,供选用。
注意,JWT并没有进行加密,任何人都可以读到,读到但是不能修改,因为一旦修改内容,那么在服务器端就会根据其签名进行比对不一致,则失效。所以不要把秘密信息放在这个部分。
这个 JSON 对象也要使用 Base64URL 算法转成字符串。
Signature
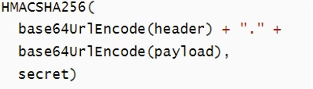
Signature是对前两部分的签名,防止数据篡改。
首先,需要指定一个密钥(secret)。这个密钥只有服务器才知道,不能泄露给用户。然后,使用 Header 里面指定的签名算法(默认是 HMAC SHA256),按照下面的公式产生签名。
JWT特点
算出签名以后,把 Header、Payload、Signature 三个部分拼成一个字符串,每个部分之间用"点"(.)分隔,就可以返回给用户。
[外链图片转存失败,源站可能有防盗链机制,建议将图片保存下来直接上传(img-uMJUcLAp-1683894745814)(https://s2.loli.net/2023/05/12/LpXqowiBJ8dMbKs.png)]
JWT特点:
- 客户端收到服务器返回的 JWT,可以储存在 Cookie 里面,也可以储存在localStorage。
- 客户端每次与服务器通信,都要带上这个 JWT,可以把它放在 Cookie 里面自动发送,但是这样不能跨域。
- 更好的做法是放在 HTTP 请求的头信息
Authorization字段里面,单独发送
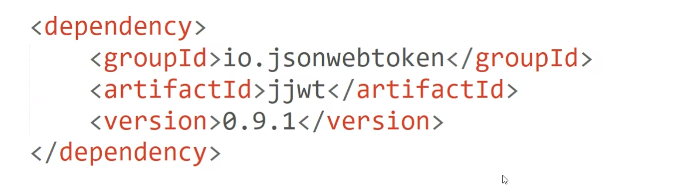
JWT的实现(java实现)
加入依赖:
生成token:
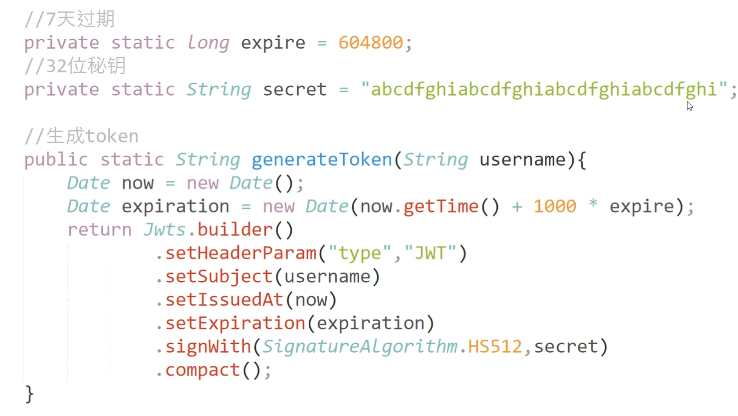
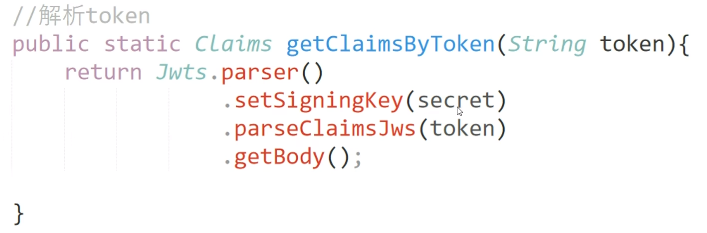
每次前端请求时,携带的JWT格式的token,后端都需要对其进行解析,查看数据是否经过篡改,但凡经过篡改即为无效token,禁止后续操作:
四:云服务器部署
当前后端项目都制作完成后,就可以对整个项目进行云端部署了。
1. 云服务器介绍
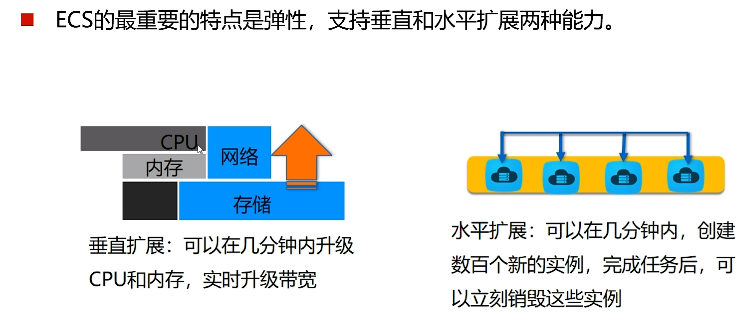
云服务器概念:
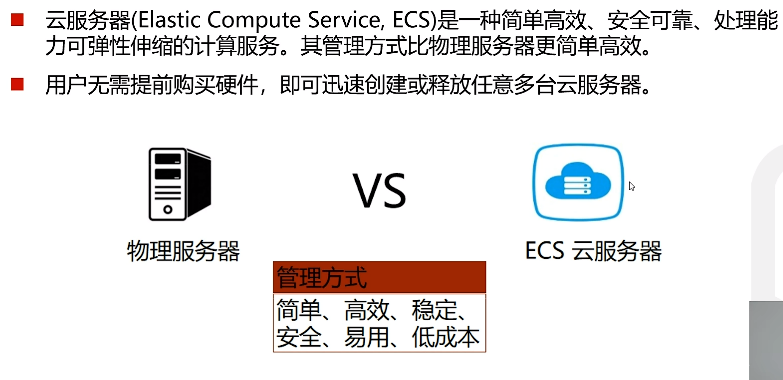
云服务器特点:
2. 阿里云ECS的使用
地址:https://www.aliyun.com/
3. 云端环境准备
这里因为要部署前后端应用,所以需要设计后端(JDK安装)、数据库(MySQL)以及前端(nginx)的运行环境。具体细节可根据以下按步骤具体搜索linux系统配置安装细节。