主要内容:
基于ant-design树的穿梭框,实现穿梭后右侧是已选树,(当前antd右侧只有一个层级)
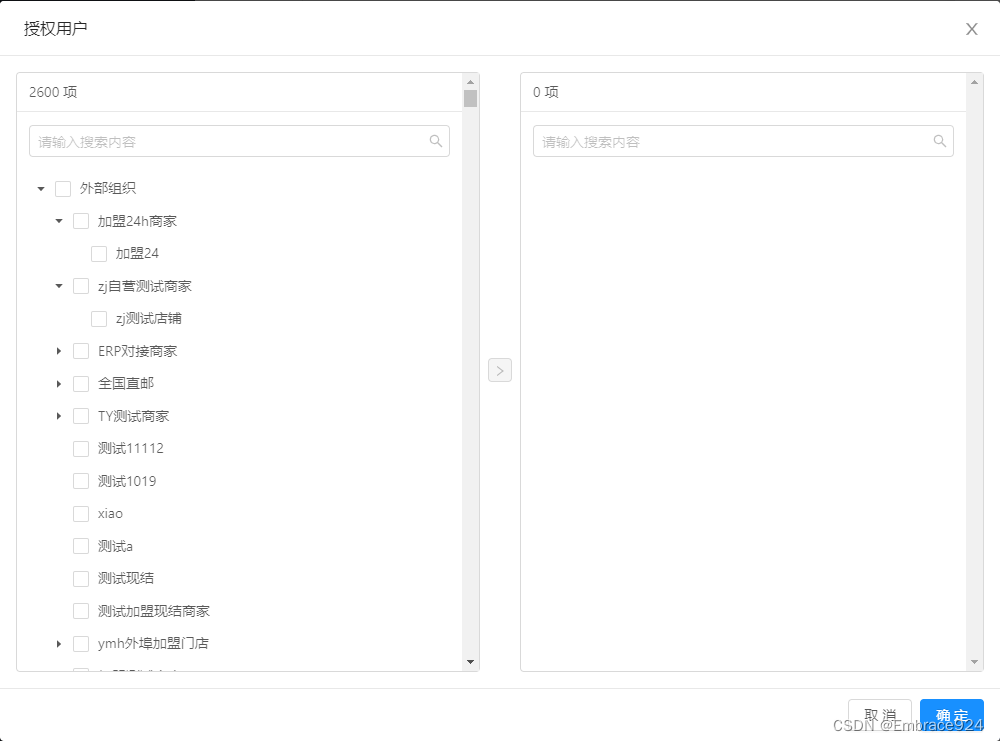
理想的树的穿梭框:
左边是完整的树,右边是已选的树,左边已选穿梭到右边左边已选的消失,右边增加已选,右边也可以选择然后穿梭回去左边,左边出现右边消失。
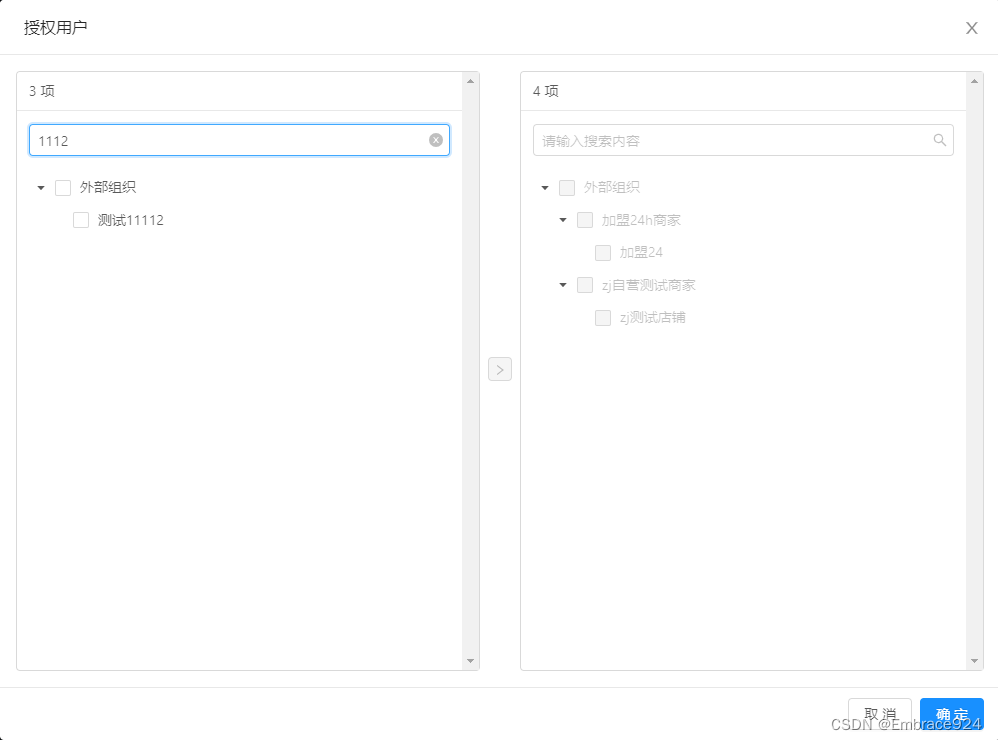
目前实现的效果:
左边是完整的树,右边是已选的树,左边已选穿梭到右边,左边不变,右边只可以看结果,不可以操作,这样右边的是结果,操作都在左边。
目标1:右边是已选的树,左边已选穿梭到右边,左边树不变可以继续操作,右边只可以看结果
目标2:右边是已选的树,左边已选穿梭到右边,左边已选的disabled,右边可以选择穿梭回去
目标2:右边是已选的树,左边已选穿梭到右边,左边已选的消失掉,右边可以选择穿梭回去
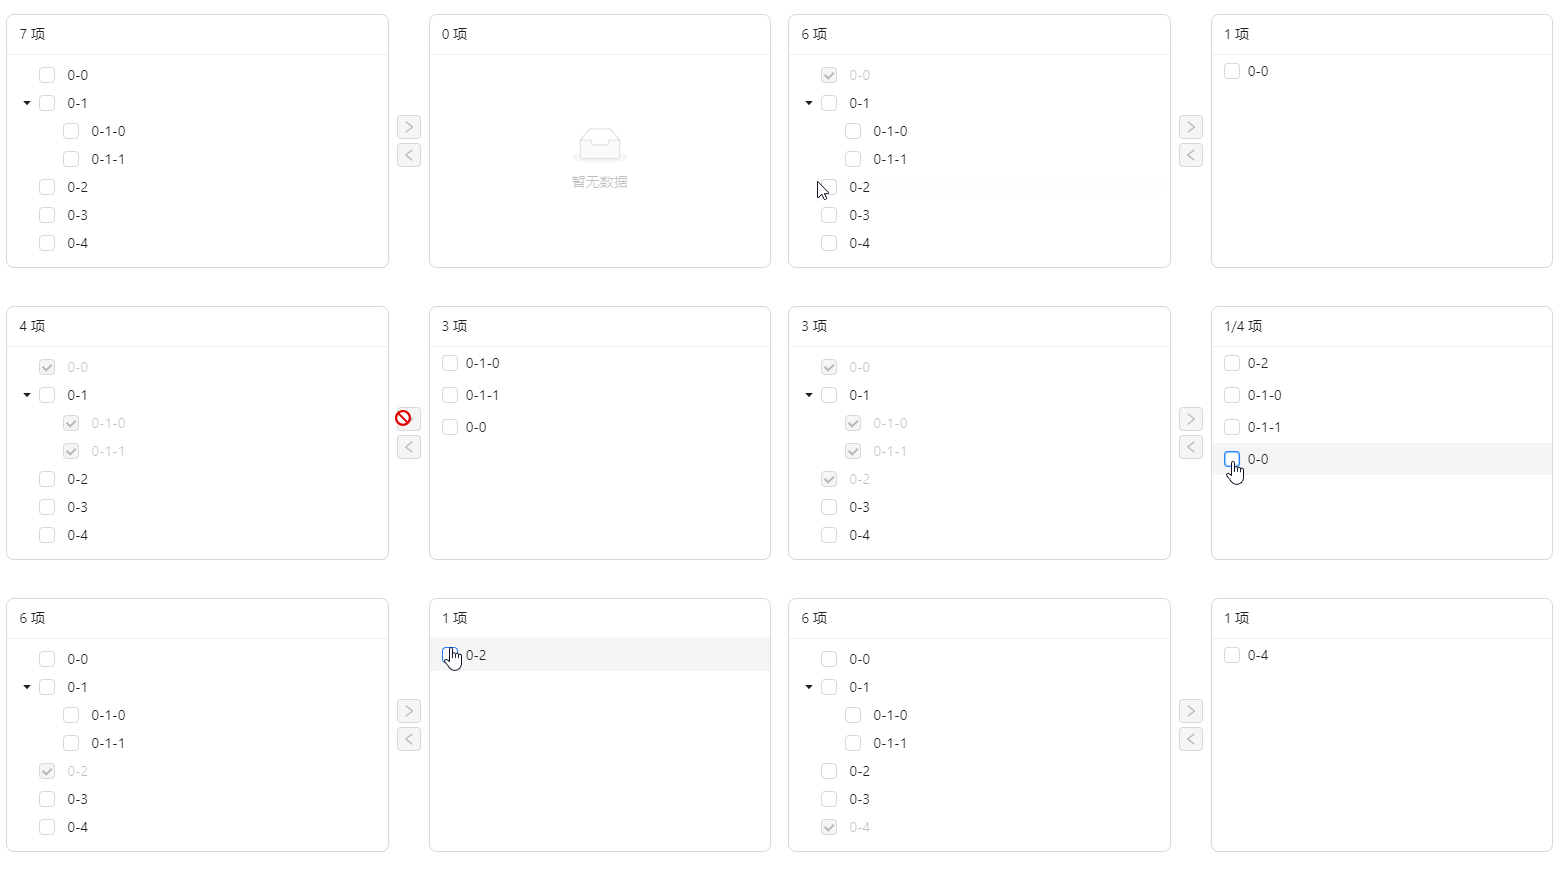
ant-design树的穿梭框:
不足:右侧不是树结构,混乱了层级
目标1:目前大致效果 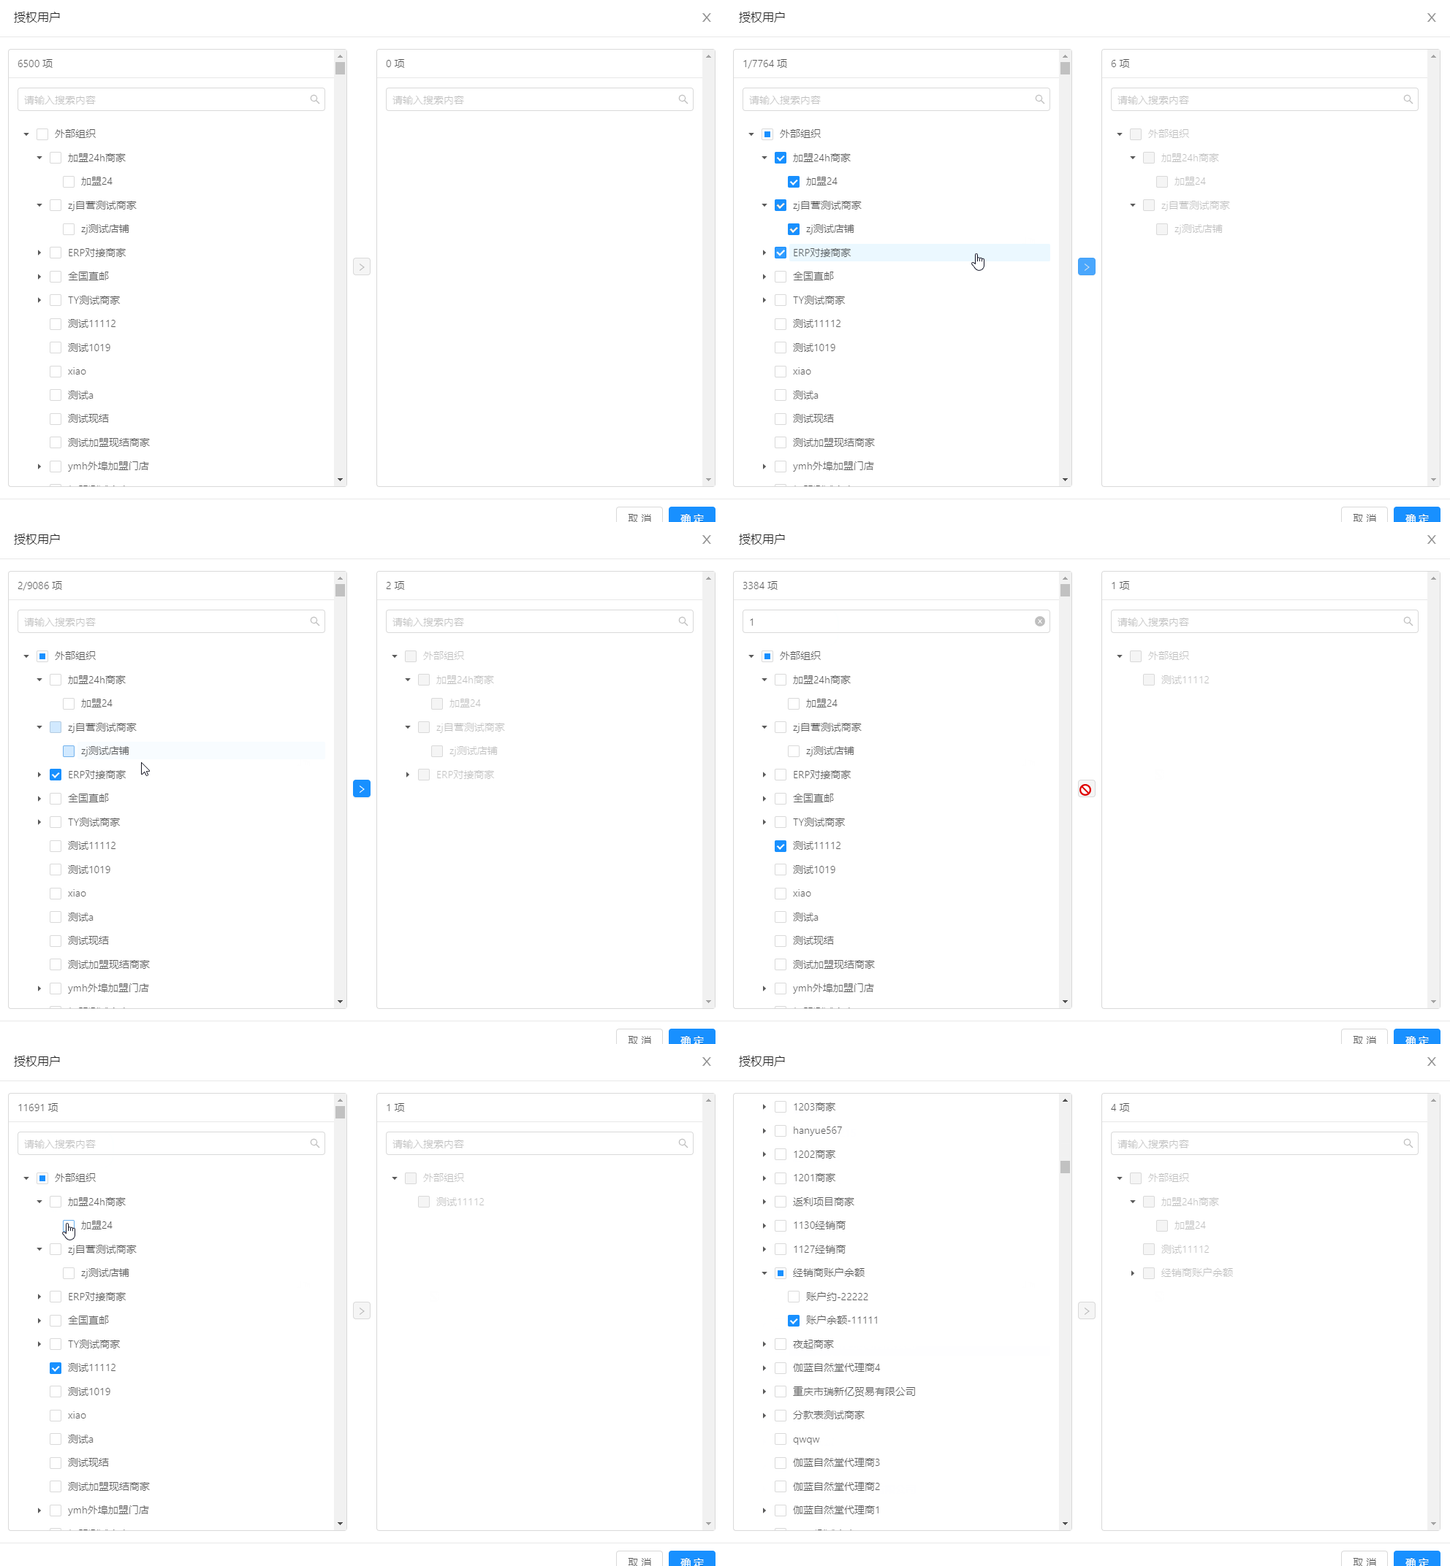
步骤一:应用ant-design树的穿梭框代码(穿梭框 Transfer - Ant Design)
更改内部的代码

改动代码:
          {({ direction, onItemSelect, selectedKeys }) => {
            if (direction === 'left') {
              const checkedKeys = [...selectedKeys, ...currTargetKeys];
              return (
                <Tree
                  blockNode
                  autoExpandParent={true}
                  disabled={disabled}
                  checkable
                  checkedKeys={checkedKeys}
                  onCheck={(_, even) => {
                    const {
                      checkedNodes,
                      node: {
                        props: { eventKey },
                      },
                    } = even;
                    // 筛选出最底层的子集 集合
                    const checkedChildKeys = checkedNodes.reduce((arr, e) => {
                      if (e.props.children.length <= 0) {
                        arr.push(e.key);
                      }
                      return arr;
                    }, []);

                    this.setState({ currTargetKeys: checkedChildKeys });
                    onItemSelect(eventKey, !isChecked(checkedKeys, eventKey));
                    // 增加随机数 为了可以触发向右穿梭的按钮 触发后删除随机数
                    onItemSelect('DEL' + Math.random(), true);
                  }}
                 >
                  {generateTree(newDataSource, targetKeys, searchValue, disabled)}
                </Tree>
              );
            }
            if (direction === 'right') {
              return (
                <Tree blockNode checkable autoExpandParent={true} disabled={disabled}>
                  {generateTree(rightDataSource, targetKeys, searchValue, true)}
                </Tree>
              );
            }
          }}
1.处理树的内部自定义内容 ( generateTree())
// 处理树的内部自定义内容
const generateTree = (treeNodes = [], checkedKeys = [], searchValue, disabled = false) => {
  return treeNodes.map(({ children, ...props }) => {
    return (
      <TreeNode
        {...props}
        disabled={disabled}
        key={props.key}
        title={
          <Tooltip placement='topLeft' title={props.label}>
            <span className='title-over' style={{ color: props.label.indexOf(searchValue) >= 0 ? 'red' : '' }}>
              {props.label} // 根据数据情况显示
            </span>
          </Tooltip>
        }>
        {generateTree(children, checkedKeys, searchValue, disabled)}
      </TreeNode>
    );
  });
};
generateTree的四个参数:treeNodes (树数据), checkedKeys (已选值), searchValue(搜索值), disabled(是否禁止)
左边的treeNodes :原本的树/通过搜索后的树
  if (direction === 'left') {
              const checkedKeys = [...selectedKeys, ...currTargetKeys];
              return (
                <Tree
                  blockNode
                  autoExpandParent={true}
                  disabled={disabled}
                  checkable
                  checkedKeys={checkedKeys}
                  onCheck={(_, even) => {
                   // ...
                  }}
                 >
                  {generateTree(newDataSource, targetKeys, searchValue, disabled)}
                </Tree>
              );
            }
右边的treeNodes :已选的树/已选通过搜索后的树
右侧同理
 if (direction === 'right') {
              return (
                <Tree blockNode checkable autoExpandParent={true} disabled={disabled}>
                  {generateTree(rightDataSource, targetKeys, searchValue, true)}
                </Tree>
              );
            }
当onCheck的时候,我们需要拿到的是最底层的子集集合
2.筛选出最底层的子集 集合
 // 筛选出最底层的子集 集合
                   const checkedChildKeys = checkedNodes.reduce((arr, e) => {
                      if (e.props.children.length <= 0) {
                        arr.push(e.key);
                      }
                      return arr;
                    }, []);
3.手动设置已选的唯一key
// 设置已选的id
    this.setState({ currTargetKeys: checkedChildKeys })
注意点:
处理选中还是没选的样式,因为如果我勾选后取消勾选,不能触发antd内部的变化函数,所以它以为没变化,往右穿梭框不会可点击
;所以手动添加了一个随机号(加特殊标识),就会触发更新按钮变成
,然后后面通过(特殊标识)删掉手动添加的随机数。
                    onItemSelect(eventKey, !isChecked(checkedKeys, eventKey));
                    // 增加随机数 为了可以触发向右穿梭的按钮 触发后删除随机数
                    onItemSelect('DEL' + Math.random(), true);
onsearch:
主要代码,其实目标二 三 也可以使用类似的方法 处理 ,
思路:
左边将已选值当做搜索关键字一样,把左边已选内容除掉,
右边反向操作,只留下已选值的树,
  onSearch={(dir, val) => {
            if (dir === 'left') {
              if (val !== '') {
                // 递归查找存在的父级
                const deepFilter = (i, val) => {
                  return (
                    i.children.filter((o) => {
                      if (o.label.indexOf(val) > -1) {
                        return true;
                      }
                      if (o.children && o.children.length > 0) {
                        return deepFilter(o, val);
                      }
                    }).length > 0
                  );
                };
                const filterMenu = (list, val) => {
                  return list
                    .filter((item) => {
                      if (item.label.indexOf(val) > -1) {
                        return true;
                      }
                      if (item.children && item.children.length > 0) {
                        return deepFilter(item, val);
                      }
                      return false;
                    })
                    .map((item) => {
                      item = Object.assign({}, item);
                      if (item.children) {
                        item.children = item.children.filter((res) => res.label.indexOf(val) > -1);
                        filterMenu(item.children, val);
                      }
                      return item;
                    });
                };
                const newDeptList = filterMenu(dataSource, val);
                newDataSource = newDeptList;
              } else {
                newDataSource = dataSource;
              }
            }
          }}
TreeTransfer 整个组件代码
import React, { Component } from 'react';
import './index.less';
import { Transfer, Tree, Tooltip, Input } from 'antd';
const { Search } = Input;
const { TreeNode } = Tree;
const isChecked = (selectedKeys, eventKey) => {
  return selectedKeys.indexOf(eventKey) !== -1;
};

const generateTree = (treeNodes = [], checkedKeys = [], searchValue, disabled = false) => {
  return treeNodes.map(({ children, ...props }) => {
    return (
      <TreeNode
        {...props}
        disabled={disabled}
        key={props.key}
        title={
          <Tooltip placement='topLeft' title={props.label}>
            <span className='title-over' style={{ color: props.label.indexOf(searchValue) >= 0 ? 'red' : '' }}>
              {props.label}
            </span>
          </Tooltip>
        }>
        {generateTree(children, checkedKeys, searchValue, disabled)}
      </TreeNode>
    );
  });
};

class TreeTransfer extends Component {
  constructor(props, context) {
    super(props, context);
    this.stores = this.props.UserMgtMod;
    this.state = {
      searchValue: null,
      transferDataSource: [],
      currTargetKeys: [],
      defaultExpandAll: true,
    };
  }
  componentDidMount() {
    const { dataSource, targetKeys } = this.props;
    this.flatten(dataSource); // 扁平化层级为一维数组
    this.setState({ currTargetKeys: targetKeys }); // 设置传入的默认已选值
  }
  // 及时更新
  UNSAFE_componentWillReceiveProps(nextprops) {
    this.flatten(nextprops.dataSource);
    this.setState({ currTargetKeys: nextprops.targetKeys });
  }
  // 扁平化层级为一维数组
  flatten(list = []) {
    const dataSource = this.state.transferDataSource;
    list.forEach((item) => {
      dataSource.push(item);
      this.setState({ transferDataSource: dataSource });
      this.flatten(item.children);
    });
  }
  // 搜索关键字
  onChange(e) {
    this.setState({
      searchValue: e.target.value,
    });
  }

  render() {
    const {
      dataSource, // 左侧树 原始数据
      targetKeys, // 外部传入的已选key
      rightDataSource, // 左侧已选数据 移入到右侧的数据
      disabled, // 是否禁用(只能查看的时候)
      ...restProps
    } = this.props;
    const {
      transferDataSource, // 扁平化的数据(显示总数目)
      searchValue, // 搜索关键字
      currTargetKeys, // 内部管理的当前已选key
    } = this.state;
    let newDataSource = dataSource || [];

    return (
      <div>
        <Transfer
          {...restProps}
          disabled={disabled}
          targetKeys={currTargetKeys}
          dataSource={transferDataSource}
          className='tree-transfer'
          render={(item) => item.label}
          showSearch
          showSelectAll={false}
          // 搜索
          onSearch={(dir, val) => {
            if (dir === 'left') {
              if (val !== '') {
                // 递归查找存在的父级
                const deepFilter = (i, val) => {
                  return (
                    i.children.filter((o) => {
                      if (o.label.indexOf(val) > -1) {
                        return true;
                      }
                      if (o.children && o.children.length > 0) {
                        return deepFilter(o, val);
                      }
                    }).length > 0
                  );
                };
                const filterMenu = (list, val) => {
                  return list
                    .filter((item) => {
                      if (item.label.indexOf(val) > -1) {
                        return true;
                      }
                      if (item.children && item.children.length > 0) {
                        return deepFilter(item, val);
                      }
                      return false;
                    })
                    .map((item) => {
                      item = Object.assign({}, item);
                      if (item.children) {
                        item.children = item.children.filter((res) => res.label.indexOf(val) > -1);
                        filterMenu(item.children, val);
                      }
                      return item;
                    });
                };
                const newDeptList = filterMenu(dataSource, val);
                newDataSource = newDeptList;
              } else {
                newDataSource = dataSource;
              }
            }
          }}>
          {({ direction, onItemSelect, selectedKeys }) => {
            if (direction === 'left') {
              const checkedKeys = [...selectedKeys, ...currTargetKeys];
              return (
                newDataSource.length > 0 ? (
                  <Tree
                    blockNode
                    defaultExpandParent={true} // 初始化生效 异步加载的情况下 使用newDataSource.length > 0
                    disabled={disabled}
                    checkable
                    checkedKeys={checkedKeys}
                    onCheck={(_, even) => {
                      const {
                        checkedNodes,
                        node: {
                          props: { eventKey },
                        },
                      } = even;
                      // 筛选出最底层的子集 集合
                      const checkedChildKeys = checkedNodes.reduce((arr, e) => {
                        if (e.props.children.length <= 0) {
                          arr.push(e.key);
                        }
                        return arr;
                      }, []);
                      // 设置已选key
                      this.setState({ currTargetKeys: checkedChildKeys });
                      // 设置已选效果
                      onItemSelect(eventKey, !isChecked(checkedKeys, eventKey));
                      // 增加随机数 为了可以触发向右穿梭的按钮 触发后删除随机数
                      onItemSelect('DEL' + Math.random(), true);
                    }}
                    onSelect={(
                      _,
                      {
                        node: {
                          props: { eventKey },
                        },
                      },
                    ) => {
                      this.setState({ currTargetKeys: _ });
                      onItemSelect(eventKey, !isChecked(checkedKeys, eventKey));
                    }}>
                    {generateTree(newDataSource, targetKeys, searchValue, disabled)}
                  </Tree>
                )
              ) : (
                <div></div>
              );
            }
            if (direction === 'right') {
              return (
                rightDataSource.length > 0 ? (
                  <Tree blockNode checkable defaultExpandAll={true} disabled={disabled}>
                    {generateTree(rightDataSource, targetKeys, searchValue, true)}
                  </Tree>
                )
              ); : (
                <div></div>
              )
            }
          }}
        </Transfer>
      </div>
    );
  }
}
export default TreeTransfer;
组件引用案例:
        <Modal
          width={1000}
          title={'所属角色'}
          className='user-modal'
          visible={this.state.roleModal}
          onOk={() => {
            this.setState({ roleModal: false, rightDataSource: [] });
          }}
          onCancel={() => {
            this.setState({ roleModal: false, rightDataSource: [] });
          }}>
          <Spin spinning={roleLoading}>
            {this.state.roleModal && (
              <TreeTransfer
                disabled={'' + title === 'detail' ? true : false}
                dataSource={roleList} // 原始树结构
                rightDataSource={rightDataSource}
                targetKeys={roleTargetKeys}
                onChange={this.handleChange.bind(this)}
              />
            )}
          </Spin>
        </Modal>
关键函数
 handleChange = (newTargetKeys) => {
    const targetKeys = newTargetKeys.reduce((arr, e) => {
      // 增加随机数 为了可以触发向右穿梭的按钮 触发后删除随机数
      if (e.indexOf('DEL') < 0) {
        arr.push(e);
      }
      return arr;
    }, []);
    // 递归查找是否存在包含选中key的父级
    const deepFilter = (i, arr) => {
      return (
        i.children.filter((o) => {
          if (arr.includes(o.key)) {
            return true;
          }
          if (o.children && o.children.length > 0) {
            return deepFilter(o, arr);
          }
        }).length > 0
      );
    };
  // 找到一个存在key的父级 然后遍历获取层级内容
    const filterMenu = (list, arr) => {
      return list
        .filter((item) => {
          if (arr.includes(item.key)) {
            return true;
          }
          if (item.children && item.children.length > 0) {
            return deepFilter(item, arr);
          }
          return false;
        })
        .map((item) => {
          item = Object.assign({}, item);
          if (item.children) {
            item.children = filterMenu(item.children, arr);
          }
          return item;
        });
    };
    if (this.state.roleModal) {
      const { roleList } = toJS(this.stores.state);
      this.setState({ roleTargetKeys: [...new Set(targetKeys)] }); // 去重
      const rightDataSource = filterMenu(roleList, targetKeys); // 查询组装已选树
      this.stores.saveInfoModal({ roleIds: targetKeys });
      this.props.form.setFieldsValue({ roleIds: targetKeys });
      this.setState({ rightDataSource: rightDataSource || [] });
    }

  };
触发方法:
  <div style={{ display: 'flex' }}>
              <YxButton
                type='primary'
                style={{ marginRight: '10px' }}
                onClick={() => {
                  this.setState({ roleModal: true });
                  setTimeout(() => {
                    this.handleChange(this.state.roleTargetKeys);
                  }, 100);
                }}>
                {'' + title === 'detail' ? '查看' : '请选择'}
              </YxButton>
              已选{this.state.roleTargetKeys.length}项
            </div>
目标一就完成了,
