SpringBoot配置文件内容分为两类:
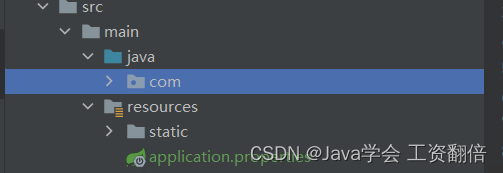
1.Spring自带的配置,比如server.port(这玩意就自己躺在application.properties里)
2.自定义的配置
配置文件的格式分为两种
1.properties格式
2.yml格式
properties和yml的区别
1.通用性
properties是SpringBoot项目默认的配置文件!他已经很老了,只支持Java,yml是新的配置格式,它支持很多种种语言,如如: Java,C/C++, Ruby, Python, Perl, C#, PHP等
2.简易性
先看properties 这
spring.datasource.url= spring.datasource.username= spring.datasource.password= 这三个参数spring.datasource重复写了三次,冗余!
再看这个yml 多简单!
spring:
  datasource:
    url:
    username:
    password:
3.优先级
properties比yml优先级高
properties的使用
一、注册配置
直接在这个application.properties里面写!
server.port=8080

mykey=keyy!!
二、使用
然后在demo目录下面创建一个类
package com.example.demo;

import org.springframework.beans.factory.annotation.Value;
import org.springframework.stereotype.Component;

import javax.annotation.PostConstruct;

@Component
public class Read {
    @Value("${mykey}")
    private String key;
    @PostConstruct
    public void postConstruct(){
        System.out.println("success:"+key);
    }
}
@Component是五大类注解 想用@Value注解就必须先使用五大类注解
@Value是要引入某个配置 这个格式一定要记住括号里面要用""包裹住${} 然后括号里面才是自己定义的key名(如果我想引用port的话 里面就要用@Value("${server.port}") 也就是说这个key的全名都要带上)
然后用一个String接收这个内容 变量起啥名都可以
yml的使用
在resources路径下面创建一个application.yml文件(和.properties并列)
(一定要叫这个名字才能识别!因为“约定大于配置”!!)
看刚才的例子(这回递归了)
我们不用.来分级了而是像我们做文件的多级目录一样
spring:一级 datasource:二级 url username password 三级
现在我们直接开始使用yml
一、准备配置
我们在这个.yml文件中写入
server:
  port: 8090

mystr:
  str1: str1
  str2: str2
  str3: str3
注意!注意!注意!这个:后面要加一个空格 不然后面的内容不会高亮(也不会识别)
二、使用
这个和之前.properties没有区别
package com.example.demo;

import org.springframework.beans.factory.annotation.Value;
import org.springframework.stereotype.Component;

import javax.annotation.PostConstruct;

@Component
public class Read {
    @Value("${mystr.str1}")
    private String str1;
    @PostConstruct
    public void postConstruct(){
        System.out.println("success:"+str1);
    }
}
两种配置都支持多种类型返回(需要对应类型变量接收),这里用yml举例
server:
  port: 8090

int:
  value: 18
float:
  value: 1.1
boolean:
  value: true
package com.example.demo; import org.springframework.beans.factory.annotation.Value; import org.springframework.stereotype.Component; import javax.annotation.PostConstruct; @Component public class Read { @Value("${int.value1}") private int intvalue; @Value("${float.value2}") private float floatvalue; @Value("${boolean.value3}") private boolean booleanvalue; @PostConstruct public void postConstruct(){ System.out.println("int:"+intvalue); System.out.println("float:"+floatvalue); System.out.println("boolean:"+booleanvalue); } }
还有一点就是 字符串默认是不加单 双引号的 如果加了双引号会使字符串里面的转义字符生效
单引号会使特殊字符变回正常字符
str.str1=helloworld!
str.str2="hello\nworld"!
package com.example.demo; import org.springframework.beans.factory.annotation.Value; import org.springframework.stereotype.Component; import javax.annotation.PostConstruct; @Component public class Read { @Value("${str.str1}") private String str1; @Value("${str.str2}") private String str2; @PostConstruct public void postConstruct(){ System.out.println("str1:"+str1); System.out.println("str2:"+str2); } }
yml配置对象
有两种写法
student1:
  name: 张三
  age: 18

student2: {name: 李四,age: 20}
第一种是原始写法
第二种是行内写法 行内写法注意每个key-value之间用逗号分割 且:后面一定要有空格
对象的使用
@Component
@ConfigurationProperties(prefix="student1")
public class Student {
    private String name;
    private int age;

    public String getName() {
        return name;
    }

    public void setName(String name) {
        this.name = name;
    }

    public int getAge() {
        return age;
    }

    public void setAge(int age) {
        this.age = age;
    }

    @Override
    public String toString() {
        return "Student{" +
                "name='" + name + '\'' +
                ", age=" + age +
                '}';
    }
}
对象的使用不能用@Value要用@ConfigurationProperties注解 后面的参数是key
注意一定要有setter方法才可以写入!! (getter,tostring是我一键生成的....)
或者在这个位置加一个@Data注解 就等于写了Setter和getter方法了!
yml配置集合
和类的配置大致相同
list:
  name:
    张三
    李四
    王五
package com.example.demo;
import lombok.Data;
import org.springframework.boot.context.properties.ConfigurationProperties;
import org.springframework.stereotype.Component;
import java.util.List;
@Component
@ConfigurationProperties(prefix="list")
@Data
public class Student {
private List<String> name;
@Override
public String toString() {
return "Student{" +
"name=" + name +
'}';
}
}
唯一需要注意的是
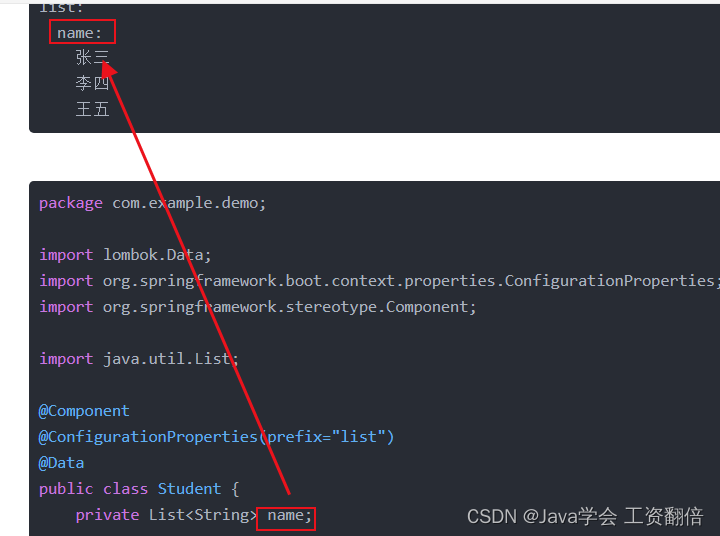
这两个必须相同 其实仔细想想蛮好理解 list下面可以有多个二级 上面的prefix圈住一个list
那怎么确定是哪个二级呢?那就只能用变量名去确定了
package com.example.demo;

import org.springframework.beans.factory.annotation.Autowired;
import org.springframework.beans.factory.annotation.Value;
import org.springframework.stereotype.Component;

import javax.annotation.PostConstruct;

@Component
public class Read {
    @Autowired
    Student student;
    @PostConstruct
    public void postConstruct(){
        System.out.println(student);
    }
}
