前提: 需要注册高德开放平台,之后创建应用并且开通
Web端(JS API)平台,然后拿到securityJsCode和key
1. 基础抽取(还原示例)
1.1 组件代码
代码说明:
- 需要修改
securityJsCode和key为自己的allowCollision为标注是否避让marker,默认为false不避让markers为地图上的标记数组layer为一个标注层,可以理解为一个图层- 流程其实就是将
markers装载到layer再将layer装载到map就可以实现了this.map.setFitView(null, false, [100, 150, 10,10]);
- 根据地图上添加的覆盖物分布情况,自动缩放地图到合适的视野级别,参数均可缺省。
overlayList为覆盖物数组,缺省时为当前地图上添加的所有覆盖物图层,immediately代表是否需要动画过程,avoid代表上下左右的像素避让宽度,maxZoom代表fitView之后的最大级- 参数说明:
setFitView(overlays, immediately, avoid, maxZoom)
- overlays
(Array<Overlay>)覆盖物- immediately
(Boolean = false)是否立即过渡- avoid
(Array<Number> = [60,60,60,60])四周边距,上、下、左、右- maxZoom
(Number = zooms[1])最大 zoom 级别allowCollisionFunc和notAllowCollisionFunc方法我没有使用,主要作用是控制标注避让marker
- 如果需要这个功能新建两个按钮,点击事件绑定这个两个方法即可;
toggleBtn方法是修改控制标注避让按钮的是否使用(disable)
- 如果需要vue实现这个功能只需要将对应的按钮的disable绑定为
allowCollision即可;
<template>
  <div id="container"></div>
</template>

<script>
  //这里可以导入其他文件(比如: 组件, 工具 js, 第三方插件 js, json文件, 图片文件等等)
  //例如: import 《组件名称》 from '《组件路径》 ';

  import AMapLoader from "@amap/amap-jsapi-loader";
  import moment from "moment";
  import {getTrackList} from '@/services/attendance/statistics.js'
  // 设置安全密钥
  window._AMapSecurityConfig = {
    securityJsCode: 'xxxx你的securityJsCodexxxx',
  }
  export default {
    name: 'PositionContainer',
    //import 引入的组件需要注入到对象中才能使用
    components: {},
    props: {
    },
    data() {
      //这里存放数据
      return {
        AMap: null,
        //此处不声明 map 对象,可以直接使用 this.map赋值或者采用非响应式的普通对象来存储。
        map: null,
        mouseTool: null,
        marker: null,
        allowCollision: false,//标注避让marker
        markers: [],
        layer: null,
      };
    },
    //计算属性 类似于 data 概念
    computed: {},
    //监控 data 中的数据变化
    watch: {
    },
    //方法集合
    methods: {
      allowCollisionFunc () {
        this.allowCollision = true;
        this.layer.setAllowCollision(true);
        this.toggleBtn();
      },
      notAllowCollisionFunc () {
        this.allowCollision = false;
        this.layer.setAllowCollision(false);
        this.toggleBtn();
      },
      toggleBtn (){
        var allowCollisionBtn = document.getElementById('allowCollision');
        var notAllowCollisionBtn = document.getElementById('notAllowCollision');
        var disableClass = 'disable';

        if(this.allowCollision){
          allowCollisionBtn.classList.add(disableClass);
          notAllowCollisionBtn.classList.remove(disableClass);
        }else {
          allowCollisionBtn.classList.remove(disableClass);
          notAllowCollisionBtn.classList.add(disableClass);
        }
      },
      initMarkers(AMap) {
        // 设置一个图标对象
        var icon = {
          // 图标类型,现阶段只支持 image 类型
          type: 'image',
          // 图片 url
          image: 'https://a.amap.com/jsapi_demos/static/demo-center/marker/express2.png',
          // 图片尺寸
          size: [64, 30],
          // 图片相对 position 的锚点,默认为 bottom-center
          anchor: 'center',
        };
        var textStyle = {
          fontSize: 12,
          fontWeight: 'normal',
          fillColor: '#22886f',
          strokeColor: '#fff',
          strokeWidth: 2,
          fold: true,
          padding: '2, 5',
        };
        var LabelsData = [
          {
            name: '自提点1',
            position: [116.461009, 39.991443],
            zooms: [10, 20],
            opacity: 1,
            zIndex: 10,
            fold: true,
            icon,
            text: {
              // 要展示的文字内容
              content: '中邮速递易',
              // 文字方向,有 icon 时为围绕文字的方向,没有 icon 时,则为相对 position 的位置
              direction: 'right',
              // 在 direction 基础上的偏移量
              offset: [-20, -5],
              // 文字样式
              style: {
                // 字体大小
                fontSize: 12,
                // 字体颜色
                fillColor: '#22886f',
                //
                strokeColor: '#fff',
                strokeWidth: 2,
                fold: true,
                padding: '2, 5',
              }
            }
          },
          {
            name: '自提点2',
            position: [116.466994, 39.984904],
            zooms: [10, 20],
            opacity: 1,
            zIndex: 16,
            icon,
            text: {
              content: '丰巢快递柜-花家地北里',
              direction: 'right',
              offset: [-20, -5],
              style: textStyle
            }
          },
          {
            name: '自提点3',
            position: [116.472914, 39.987093],
            zooms: [10, 20],
            opacity: 1,
            zIndex: 8,
            icon,
            text: {
              content: '丰巢快递柜-中环南路11号院',
              direction: 'right',
              offset: [-20, -5],
              style: textStyle
            }
          },
          {
            name: '自提点4',
            position: [116.471814, 39.995856],
            zooms: [10, 20],
            opacity: 1,
            zIndex: 23,
            icon,
            text: {
              content: '丰巢快递柜-合生麒麟社',
              direction: 'right',
              offset: [-20, -5],
              style: textStyle
            }
          },
          {
            name: '自提点5',
            position: [116.469639, 39.986889],
            zooms: [10, 20],
            opacity: 1,
            zIndex: 6,
            icon,
            text: {
              content: '速递易快递柜-望京大厦',
              direction: 'right',
              offset: [-20, -5],
              style: textStyle
            }
          },
          {
            name: '自提点6',
            position: [116.467361, 39.996361],
            zooms: [10, 20],
            opacity: 1,
            zIndex: 5,
            icon,
            text: {
              content: 'E栈快递柜-夏都家园',
              direction: 'right',
              offset: [-20, -5],
              style: textStyle
            }
          },
          {
            name: '自提点7',
            position: [116.462327, 39.996071],
            zooms: [10, 20],
            opacity: 1,
            zIndex: 4,
            icon,
            text: {
              content: '丰巢自提柜-圣馨大地家园',
              direction: 'right',
              offset: [-20, -5],
              style: textStyle
            }
          },
          {
            name: '自提点8',
            position: [116.462349, 39.996067],
            zooms: [10, 20],
            opacity: 1,
            zIndex: 3,
            icon,
            text: {
              content: '丰巢快递-圣馨大地家园',
              direction: 'right',
              offset: [-20, -5],
              style: textStyle
            }
          },
          {
            name: '自提点9',
            position: [116.456474, 39.991563],
            zooms: [10, 20],
            zIndex: 2,
            opacity: 1,
            icon,
            text: {
              content: 'E栈快递柜-南湖渠西里',
              direction: 'right',
              offset: [-20, -5],
              style: textStyle
            }
          }
        ];

        this.layer = new AMap.LabelsLayer({
          zooms: [3, 20],
          zIndex: 1000,
          // collision: false,
          // 设置 allowCollision:true,可以让标注避让用户的标注
          allowCollision: this.allowCollision,
        });
        this.layer.add(this.markers);
        // 图层添加到地图
        this.map.add(this.layer);

        // 初始化 labelMarker
        for (var i = 0; i < LabelsData.length; i++) {
          var curData = LabelsData[i];
          curData.extData = {
            index: i
          };

          var labelMarker = new AMap.LabelMarker(curData);

          this.markers.push(labelMarker);

        }
        // 将 marker 添加到图层
        this.layer.add(this.markers);

        this.map.setFitView(null, false, [100, 150, 10, 10]);

        this.toggleBtn()
      },
      initMap() {
        AMapLoader.load({
          key: "xxxx你的keyCodexxxx",             // 申请好的Web端开发者Key,首次调用 load 时必填
          version: "2.0",      // 指定要加载的 JSAPI 的版本,缺省时默认为 1.4.15
          "plugins": [
            "AMap.Scale",
            "AMap.HawkEye",
            "AMap.ToolBar",
            "AMap.AutoComplete",
            "AMap.PlaceSearch",
            "AMap.ControlBar",
            "AMap.MouseTool",
            "AMap.DragRoute",
            "AMap.MoveAnimation"],         // 需要使用的的插件列表,如比例尺'AMap.Scale'等
        }).then((AMap) => {

          this.AMap=AMap
          this.map = new AMap.Map("container", {  //设置地图容器id
            zoom: 15.8,   // 初始化地图级别
            center: [116.469881, 39.993599], //中心点坐标  成都 104.065735, 30.659462
            showIndoorMap: false,
          });

          this.initMarkers(AMap);


        }).catch(e => {
          console.log(e);
        })
      },
    },
    //生命周期 - 创建完成(可以访问当前 this 实例)
    created() {
      // this.getLineArr(this.equipmentId,moment().valueOf())
    },
    //生命周期 - 挂载完成(可以访问 DOM 元素)
    mounted() {
      this.initMap();
    },
    //生命周期 - 创建之前
    beforeCreate() {
    },
    //生命周期 - 挂载之前
    beforeMount() {
    },
    //生命周期 - 更新之前
    beforeUpdate() {
    },
    //生命周期 - 更新之后
    updated() {
    },
    //生命周期 - 销毁之前
    beforeDestroy() {
    },
    //生命周期 - 销毁完成
    destroyed() {
    },
    //如果页面有 keep-alive 缓存功能, 这个函数会触发
    activated() {
    },
  }
</script>

<style scoped>
  #container {
    padding: 0px;
    margin: 0px;
    width: 100%;
    height: 800px;
  }
  .input-item {
    height: 2.2rem;
  }

  .input-card {
    display: flex;
    flex-direction: column;
    min-width: 0;
    word-wrap: break-word;
    background-color: #fff;
    background-clip: border-box;
    border-radius: .25rem;
    width: 10rem;
    border-width: 0;
    border-radius: 0.4rem;
    box-shadow: 0 2px 6px 0 rgba(114, 124, 245, .5);
    position: fixed;
    bottom: 12rem;
    right: 2rem;
    -ms-flex: 1 1 auto;
    flex: 1 1 auto;
    padding: 0.75rem 1.25rem;
  }
</style>
1.2 使用示例
引入组件即可
<template>
  <PositionContainer></PositionContainer>
</template>

<script>
  //这里可以导入其他文件(比如: 组件, 工具 js, 第三方插件 js, json文件, 图片文件等等)
  //例如: import 《组件名称》 from '《组件路径》 ';
  import PositionContainer from '@/pages/components/map/PositionContainer';
  export default {
    name: 'Position',
    //import 引入的组件需要注入到对象中才能使用
    components: {PositionContainer},
    props: {},
    data() {
      //这里存放数据
      return {};
    },
    //计算属性 类似于 data 概念
    computed: {},
    //监控 data 中的数据变化
    watch: {},
    //方法集合
    methods: {},
    //生命周期 - 创建完成(可以访问当前 this 实例)
    created() {},
    //生命周期 - 挂载完成(可以访问 DOM 元素)
    mounted() {},
    //生命周期 - 创建之前
    beforeCreate() {},
    //生命周期 - 挂载之前
    beforeMount() {},
    //生命周期 - 更新之前
    beforeUpdate() {},
    //生命周期 - 更新之后
    updated() {},
    //生命周期 - 销毁之前
    beforeDestroy() {},
    //生命周期 - 销毁完成
    destroyed() {},
    //如果页面有 keep-alive 缓存功能, 这个函数会触发
    activated() {},
  }
</script>

<style scoped>

</style>
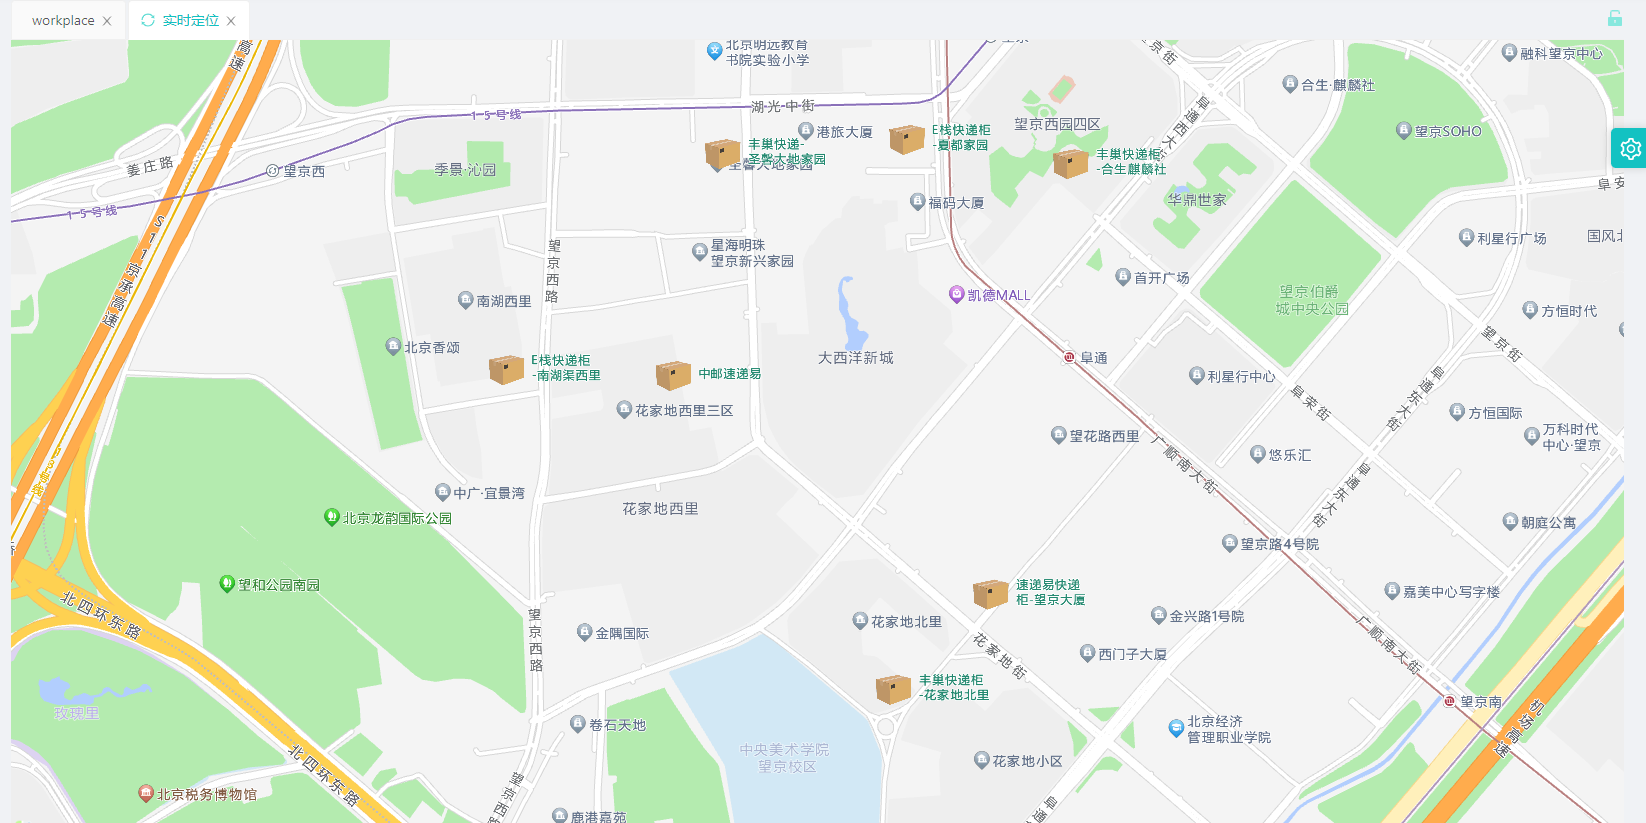
1.3 实现效果
2. 进阶抽取(自定义点位+每个点位不同图标+每个点位不同标注)
这里的点位数据为后端返回数据,有需要的可以自己模拟数据
后端返回数据结构类似于如下
[
  {
    "sys_time": 1674206183000,
    "user_name": "名称1",
    "jingdu": 104.751846,
    "weidu": 31.767537,
    "sendTime": "2023-01-20 17:16:23"

  },
  {
    "sys_time": 1677735439000,
    "user_name": "名称2",
    "jingdu": 104.7560758,
    "weidu": 31.767168,
    "sendTime": "2023-01-20 17:16:23"
  }
]
2.1组件代码
代码说明:
getNewestPositions方法是调用后端接口返回数据- 然后将后端的list遍历组装为我们需要的数组
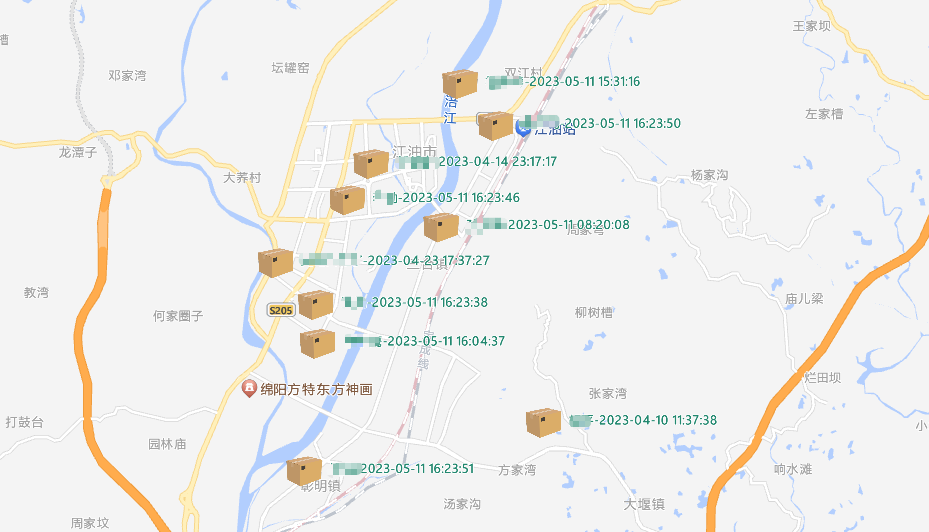
LabelsDatacontent: item.user_name+'-'+item.sendTime设置我们展示lable,image: 'https://a.amap.com/jsapi_demos/static/demo-center/marker/express2.png',设置我们点位的图标,后续用户有图标后可以从后端取数据,这里我就先写死- 将后端数据的第一个数据设置为地图中心center
<template>
  <div id="container"></div>
</template>

<script>
  //这里可以导入其他文件(比如: 组件, 工具 js, 第三方插件 js, json文件, 图片文件等等)
  //例如: import 《组件名称》 from '《组件路径》 ';

  import AMapLoader from "@amap/amap-jsapi-loader";
  import {getNewestPositions} from '@/services/attendance/position.js'
  // 设置安全密钥
  window._AMapSecurityConfig = {
    securityJsCode: 'xxxx你的securityJsCodexxxx',
  }
  export default {
    name: 'PositionContainer',
    //import 引入的组件需要注入到对象中才能使用
    components: {},
    props: {
    },
    data() {
      //这里存放数据
      return {
        AMap: null,
        //此处不声明 map 对象,可以直接使用 this.map赋值或者采用非响应式的普通对象来存储。
        map: null,
        mouseTool: null,
        marker: null,
        allowCollision: false,//标注避让marker
        markers: [],
        layer: null,
        LabelsData:[],
        center: [104.065735, 30.659462],
      };
    },
    //计算属性 类似于 data 概念
    computed: {},
    //监控 data 中的数据变化
    watch: {
    },
    //方法集合
    methods: {
      newestPositions () {
        getNewestPositions().then(res => {
          if (res.data.code==0){
            var postions = res.data.data
            console.log(res.data.data)
            this.LabelsData =res.data.data.map(item=>{
              var labelsData = {
                name: item.user_name,
                position: [item.jingdu, item.weidu],
                zooms: [10, 20],
                opacity: 1,
                zIndex: 10,
                fold: true,
                icon: {
                  // 图标类型,现阶段只支持 image 类型
                  type: 'image',
                  // 图片 url
                  image: 'https://a.amap.com/jsapi_demos/static/demo-center/marker/express2.png',
                  // 图片尺寸
                  size: [64, 30],
                  // 图片相对 position 的锚点,默认为 bottom-center
                  anchor: 'center',
                },
                text: {
                  // 要展示的文字内容
                  content: item.user_name+'-'+item.sendTime,
                  // 文字方向,有 icon 时为围绕文字的方向,没有 icon 时,则为相对 position 的位置
                  direction: 'right',
                  // 在 direction 基础上的偏移量
                  offset: [-20, -5],
                  // 文字样式
                  style: {
                    // 字体大小
                    fontSize: 12,
                    // 字体颜色
                    fillColor: '#22886f',
                    //
                    strokeColor: '#fff',
                    strokeWidth: 2,
                    fold: false,
                    padding: '2, 5',
                  }
                }
              }
              return labelsData
            })
            this.center=[postions[0].jingdu, postions[0].weidu]
            this.initMap()
          }else {
            this.$message.error(res.data.msg)
          }

        })
      },
      initMarkers(AMap) {


        this.layer = new AMap.LabelsLayer({
          zooms: [3, 20],
          zIndex: 1000,
          // collision: false,
          // 设置 allowCollision:true,可以让标注避让用户的标注
          allowCollision: this.allowCollision,
        });
        this.layer.add(this.markers);
        // 图层添加到地图
        this.map.add(this.layer);

        // 初始化 labelMarker
        for (var i = 0; i < this.LabelsData.length; i++) {
          var curData = this.LabelsData[i];
          curData.extData = {
            index: i
          };

          var labelMarker = new AMap.LabelMarker(curData);

          this.markers.push(labelMarker);

        }
        // 将 marker 添加到图层
        this.layer.add(this.markers);

        this.map.setFitView(null, false, [100, 150, 10, 10]);

        // this.toggleBtn()
      },
      initMap() {
        AMapLoader.load({
          key: "xxxx你的keyxxxx",             // 申请好的Web端开发者Key,首次调用 load 时必填
          version: "2.0",      // 指定要加载的 JSAPI 的版本,缺省时默认为 1.4.15
          "plugins": [
            "AMap.Scale",
            "AMap.HawkEye",
            "AMap.ToolBar",
            "AMap.AutoComplete",
            "AMap.PlaceSearch",
            "AMap.ControlBar",
            "AMap.MouseTool",
            "AMap.DragRoute",
            "AMap.MoveAnimation"],         // 需要使用的的插件列表,如比例尺'AMap.Scale'等
        }).then((AMap) => {
          this.AMap=AMap
          this.map = new AMap.Map("container", {  //设置地图容器id
            zoom: 15.8,   // 初始化地图级别
            center: this.center, //中心点坐标  成都 104.065735, 30.659462
            showIndoorMap: false,
          });

          this.initMarkers(AMap);


        }).catch(e => {
          console.log(e);
        })
      },
    },
    //生命周期 - 创建完成(可以访问当前 this 实例)
    created() {
      this.newestPositions()
    },
    //生命周期 - 挂载完成(可以访问 DOM 元素)
    mounted() {
      this.initMap();
    },
    //生命周期 - 创建之前
    beforeCreate() {
    },
    //生命周期 - 挂载之前
    beforeMount() {
    },
    //生命周期 - 更新之前
    beforeUpdate() {
    },
    //生命周期 - 更新之后
    updated() {
    },
    //生命周期 - 销毁之前
    beforeDestroy() {
    },
    //生命周期 - 销毁完成
    destroyed() {
    },
    //如果页面有 keep-alive 缓存功能, 这个函数会触发
    activated() {
    },
  }
</script>

<style scoped>
  #container {
    padding: 0px;
    margin: 0px;
    width: 100%;
    height: 800px;
  }
  .input-item {
    height: 2.2rem;
  }

  .input-card {
    display: flex;
    flex-direction: column;
    min-width: 0;
    word-wrap: break-word;
    background-color: #fff;
    background-clip: border-box;
    border-radius: .25rem;
    width: 10rem;
    border-width: 0;
    border-radius: 0.4rem;
    box-shadow: 0 2px 6px 0 rgba(114, 124, 245, .5);
    position: fixed;
    bottom: 12rem;
    right: 2rem;
    -ms-flex: 1 1 auto;
    flex: 1 1 auto;
    padding: 0.75rem 1.25rem;
  }
</style>
2.2 使用示例
参照1.2 ,没有任何改变
2.3 抽取效果
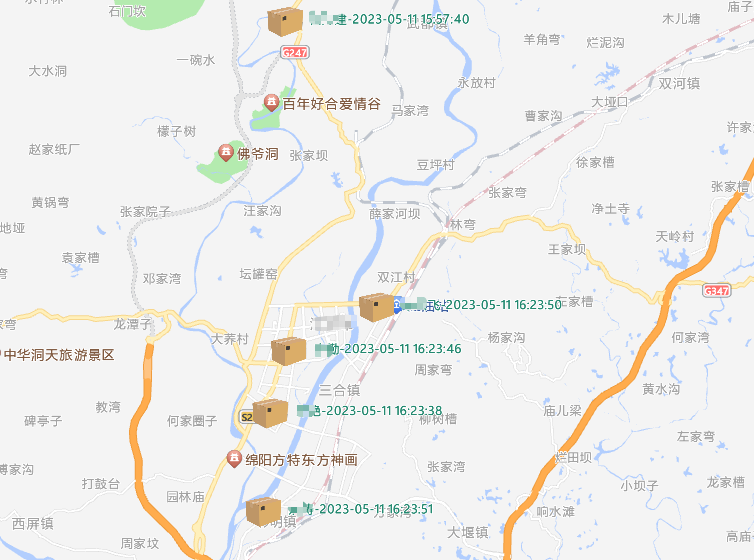
放大地图后
3.最终抽取(定时刷新点位)
3.1 组件代码
代码说明:
- 使用定时器来做定时任务
this.timer = setInterval(this.newestPositionsWithoutInitMap, 120 * 1000);- 切记
beforeDestroy()的时候要clearInterval(this.timer);this.map.setFitView(null, false, [100, 150, 10, 10]);地图缩放到合适的位置
- 就会导致我们每次刷新都会地图缩放到最大,就是因为这个
- 核心思路就是通过定时器来定时请求后端接口,然后渲染地图标记即可
<template>
  <div id="container"></div>
</template>

<script>
  //这里可以导入其他文件(比如: 组件, 工具 js, 第三方插件 js, json文件, 图片文件等等)
  //例如: import 《组件名称》 from '《组件路径》 ';

  import AMapLoader from "@amap/amap-jsapi-loader";
  import {getNewestPositions} from '@/services/attendance/position.js'
  // 设置安全密钥
  window._AMapSecurityConfig = {
    securityJsCode: 'xxxx你的securityJsCodexxxx',
  }
  export default {
    name: 'PositionContainer',
    //import 引入的组件需要注入到对象中才能使用
    components: {},
    props: {
    },
    data() {
      //这里存放数据
      return {
        AMap: null,
        //此处不声明 map 对象,可以直接使用 this.map赋值或者采用非响应式的普通对象来存储。
        map: null,
        mouseTool: null,
        marker: null,
        allowCollision: false,//标注避让marker
        markers: [],
        layer: null,
        LabelsData:[],
        center: [104.065735, 30.659462],
        timer: '',
        zoom: '',
      };
    },
    //计算属性 类似于 data 概念
    computed: {},
    //监控 data 中的数据变化
    watch: {
    },
    //方法集合
    methods: {
      createLable: function (res) {
        var postions = res.data.data
        this.LabelsData = res.data.data.map(item => {
          var labelsData = {
            name: item.user_name,
            position: [item.jingdu, item.weidu],
            zooms: [10, 20],
            opacity: 1,
            zIndex: 10,
            fold: true,
            icon: {
              // 图标类型,现阶段只支持 image 类型
              type: 'image',
              // 图片 url
              image: 'https://a.amap.com/jsapi_demos/static/demo-center/marker/express2.png',
              // 图片尺寸
              size: [64, 30],
              // 图片相对 position 的锚点,默认为 bottom-center
              anchor: 'center',
            },
            text: {
              // 要展示的文字内容
              content: item.user_name + '-' + item.sendTime,
              // 文字方向,有 icon 时为围绕文字的方向,没有 icon 时,则为相对 position 的位置
              direction: 'right',
              // 在 direction 基础上的偏移量
              offset: [-20, -5],
              // 文字样式
              style: {
                // 字体大小
                fontSize: 12,
                // 字体颜色
                fillColor: '#22886f',
                //
                strokeColor: '#fff',
                strokeWidth: 2,
                fold: false,
                padding: '2, 5',
              }
            }
          }
          return labelsData
        })
        this.center = [postions[0].jingdu, postions[0].weidu]
      },

      newestPositions () {
        getNewestPositions().then(res => {
          if (res.data.code==0){
            this.createLable(res);
            this.initMap()
          }else {
            this.$message.error(res.data.msg)
          }

        })
      },


      newestPositionsWithoutInitMap () {
        getNewestPositions().then(res => {
          if (res.data.code==0){
            this.createLable(res);
            this.initMarkers(this.AMap)
          }else {
            this.$message.error(res.data.msg)
          }

        })
      },
      initMarkers(AMap) {
        this.markers=[]

        this.layer = new AMap.LabelsLayer({
          zooms: [3, 20],
          zIndex: 1000,
          // collision: false,
          // 设置 allowCollision:true,可以让标注避让用户的标注
          allowCollision: this.allowCollision,
        });
        this.layer.add(this.markers);
        // 图层添加到地图
        this.map.clearMap()
        this.map.add(this.layer);

        // 初始化 labelMarker
        for (var i = 0; i < this.LabelsData.length; i++) {
          var curData = this.LabelsData[i];
          curData.extData = {
            index: i
          };

          var labelMarker = new AMap.LabelMarker(curData);

          this.markers.push(labelMarker);

        }
        // 将 marker 添加到图层
        this.layer.add(this.markers);

        // this.map.setFitView(null, false, [100, 150, 10, 10]);  //地图缩放到合适的位置,开启每次都会缩放到最大状态

        // this.toggleBtn()
      },
      initMap() {
        AMapLoader.load({
          key: "xxxx你的keyxxxx",             // 申请好的Web端开发者Key,首次调用 load 时必填
          version: "2.0",      // 指定要加载的 JSAPI 的版本,缺省时默认为 1.4.15
          "plugins": [
            "AMap.Scale",
            "AMap.HawkEye",
            "AMap.ToolBar",
            "AMap.AutoComplete",
            "AMap.PlaceSearch",
            "AMap.ControlBar",
            "AMap.MouseTool",
            "AMap.DragRoute",
            "AMap.MoveAnimation"],         // 需要使用的的插件列表,如比例尺'AMap.Scale'等
        }).then((AMap) => {
          this.AMap=AMap
          this.map = new AMap.Map("container", {  //设置地图容器id
            zoom: 15.8,   // 初始化地图级别
            center: this.center, //中心点坐标  成都 104.065735, 30.659462
            showIndoorMap: false,
          });

          this.initMarkers(AMap);

          // this.map.on('zoomend', function (e) {
          //   this.zoom =this.map.getZoom();
          //   console.log(this.zoom)
          //
          // }.bind(this));


        }).catch(e => {
          console.log(e);
        })
      },
    },
    //生命周期 - 创建完成(可以访问当前 this 实例)
    created() {
      this.newestPositions()
    },
    //生命周期 - 挂载完成(可以访问 DOM 元素)
    mounted() {
      this.timer = setInterval(this.newestPositionsWithoutInitMap, 120 * 1000);
      this.initMap();
    },
    //生命周期 - 创建之前
    beforeCreate() {
    },
    //生命周期 - 挂载之前
    beforeMount() {
    },
    //生命周期 - 更新之前
    beforeUpdate() {
    },
    //生命周期 - 更新之后
    updated() {
    },
    //生命周期 - 销毁之前
    beforeDestroy() {
      clearInterval(this.timer);
    },
    //生命周期 - 销毁完成
    destroyed() {
    },
    //如果页面有 keep-alive 缓存功能, 这个函数会触发
    activated() {
    },
  }
</script>

<style scoped>
  #container {
    padding: 0px;
    margin: 0px;
    width: 100%;
    height: 800px;
  }
  .input-item {
    height: 2.2rem;
  }

  .input-card {
    display: flex;
    flex-direction: column;
    min-width: 0;
    word-wrap: break-word;
    background-color: #fff;
    background-clip: border-box;
    border-radius: .25rem;
    width: 10rem;
    border-width: 0;
    border-radius: 0.4rem;
    box-shadow: 0 2px 6px 0 rgba(114, 124, 245, .5);
    position: fixed;
    bottom: 12rem;
    right: 2rem;
    -ms-flex: 1 1 auto;
    flex: 1 1 auto;
    padding: 0.75rem 1.25rem;
  }
</style>
3.2 使用示例
参照1.2 ,没有任何改变
3.3 抽取效果
在2.3的效果基础上每2分钟刷新一次位置
