前言
今天我们 一起学习Verdi的一种回退仿真机制。也即:reverse
为了使用verdi reverse debug 机制,以下注意事项必须满足:
(1)Reverse Debug page 必须设置为交互模式:tools-》preferences->Interaction Debug

该页面下两个附加选项:(1)Preserve up to 40 Automatic Checkpoints during Simulation Run: This option allows you to set the checkpoints for the simulation stops. The default value is 40. This option can undo five most recent simulation controls.(2)Use Half of the Checkpoints for Linear Distribution:This option allows you to make reverse execution faster when you need to go to the execution time far away from the current time. If you need to go to the
recent simulation execution time, you can disable this option to reduce memory consumption. This option is enabled by default.
(2)vcs 编译选项必须添加:为了在Verdi GUI 界面 使能Reverse Debug 选项, +reverse
必须添加在 VCS 编译选项列表。vcs -sverilog t1.v -full64 -lca -debug_access+all+reverse …
实验
我们启动makefile, 编译成功之后,会生成.simv 可执行文件。然后,./simv -verdi & 启动GUI 界面。如下图:我们可以通过instance/declaration/object/class 等,找到我们想要添加断点的设计文件或者tb 文件,双击跳转进入。

接着,我们在代码左侧点击鼠标左键,施加checkpoint.
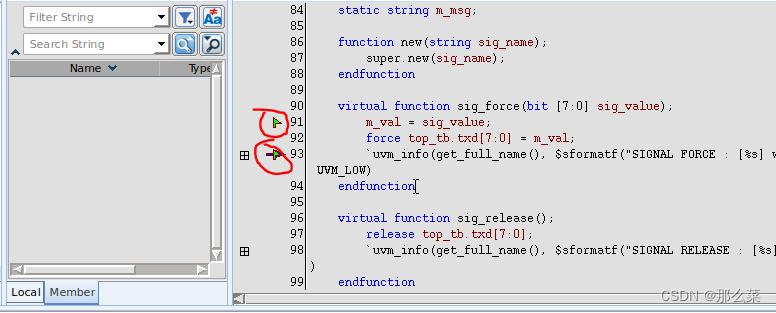
最后,在verdi的console控制台中,输入run,启动仿真。

大家也可以通过上方按钮,选择自己仿真流程。

利用reverse功能,实现回退式仿真。这样当仿真不小心过了我们的设定点,可以使用reverse功能,回退到这个点。从而避免重新启动仿真。


