Packet Tracer 模拟配置AAA认证
拓扑图

地址分配表
| 设备 | 接口 | IP 地址 | 子网掩码 | 默认网关 |
| R1 | F0/0 | 172.16.10.1 | 255.255.255.0 | 不适用 |
| S0/3/0 | 10.1.1.1 | 255.255.255.0 | 不适用 | |
| F0/1 | 192.168.1.1 | 255.255.255.0 | 不适用 | |
| R2 | F0/0 | 192.168.2.1 | 255.255.255.0 | 不适用 |
| S0/3/0 | 10.1.1.2 | 255.255.255.0 | 不适用 | |
| RADIUS 服务器 | Fa0 | 172.16.10.10 | 255.255.255.0 | 172.16.10.1 |
| TACACS+ 服务器 | Fa0 | 192.168.2.10 | 255.255.255.0 | 192.168.2.1 |
| PC1 | Fa0 | 192.168.1.10 | 255.255.255.0 | 192.168.1.1 |
目标
· 在 R1 上配置本地用户账户并使用本地 AAA 在控制台和 vty 线路上配置认证。
· 从 R1 控制台和 PC1 客户端验证本地 AAA 认证。
· 使用 TACACS+ 配置基于服务器的 AAA 认证。
· 使用 RADIUS 配置基于服务器的 AAA 认证。
· 从 PC1 客户端验证基于服务器的 AAA 认证。
背景/ 场景
网络拓扑中显示路由器 R1和 R2,需要你来构建AAA认证网络。
AAA(Authentication, Authorization, and Accounting)配置适用于需要对网络用户进行身份验证、授权和计费的场景。它通常用于企业网络或ISP(Internet Service Provider)中,以确保只有经过身份验证且授权的用户才能访问网络资源。
具体来说,AAA 可以帮助企业网络管理者实现以下目标:
1.认证用户身份:通过 AAA,管理员可以要求用户提供有效的用户名和密码或其他凭据以验证其身份。这可以帮助防止未经授权的访问和安全威胁。
2.授权访问:管理员可以使用 AAA 配置授权规则,以确定特定用户可以访问哪些网络资源(例如,特权EXEC命令、网络设备或应用程序等)。这可以帮助确保网络安全,防止未经授权的访问和数据泄露。
3.记录和计费:通过 AAA,管理员可以跟踪用户在网络中的活动并记录它们的计费信息。这可以帮助企业网络管理者进行计费,对网络使用进行监控,并更好地了解网络上的活动。
因此,AAA 配置适用于任何需要确保网络安全和管理网络访问的场景,例如企业网络、ISP、公共机构和教育机构等。
实验步骤:
1.基础配置:
R1:
Router>enable
Router#conf t
Enter configuration commands, one per line. End with CNTL/Z.
Router(config)#hostname R1
R1(config)#interface f0/0
R1(config-if)#ip address 172.16.10.1 255.255.255.0
R1(config-if)#no shutdown
R1(config-if)#
%LINK-5-CHANGED: Interface FastEthernet0/0, changed state to up
%LINEPROTO-5-UPDOWN: Line protocol on Interface FastEthernet0/0, changed state to up
R1(config-if)#interface f0/1
R1(config-if)#ip address 192.168.1.1 255.255.255.0
R1(config-if)#no shutdown
R1(config-if)#
%LINK-5-CHANGED: Interface FastEthernet0/1, changed state to up
%LINEPROTO-5-UPDOWN: Line protocol on Interface FastEthernet0/1, changed state to up
%IP-4-DUPADDR: Duplicate address 192.168.1.10 on FastEthernet0/1, sourced by 0001.42CC.8663
R1(config-if)#exit
R1(config)#interface s0/3/0
R1(config-if)#ip address 10.1.1.1 255.255.255.0
R1(config-if)#no shutdown
R1(config-if)#exit
%LINK-5-CHANGED: Interface Serial0/3/0, changed state to down
R1(config)#ip domain-name cisco.com
R1(config)#crypto key generate rsa
The name for the keys will be: R1.cisco.com
Choose the size of the key modulus in the range of 360 to 2048 for your
General Purpose Keys. Choosing a key modulus greater than 512 may take
a few minutes.
How many bits in the modulus [512]: 1024
% Generating 1024 bit RSA keys, keys will be non-exportable...[OK]
R1(config)#ip ssh version 2
R1(config)#enable secret cisco
R1(config-if)#end
R1#
%SYS-5-CONFIG_I: Configured from console by console
R1#wr
Building configuration...
[OK]
R1#
R2:
Router>en
Router#conf t
Enter configuration commands, one per line. End with CNTL/Z.
Router(config)#hostname R2
R2(config)#interface s0/3/0
R2(config-if)#ip address 10.1.1.2 255.255.255.0
R2(config-if)#no shutdown
R2(config-if)#
%LINK-5-CHANGED: Interface Serial0/3/0, changed state to up
R2(config-if)#exit
R2(config)#interface f0/0
%LINEPROTO-5-UPDOWN: Line protocol on Interface Serial0/3/0, changed state to up
192.
R2(config-if)#ip address 192.168.2.1 255.255.255.0
R2(config-if)#no shutdown
R2(config-if)#exit
%LINK-5-CHANGED: Interface FastEthernet0/0, changed state to up
%LINEPROTO-5-UPDOWN: Line protocol on Interface FastEthernet0/0, changed state to up
R2(config)#ip domain-name cisco.com
R2(config)#crypto key generate rsa
The name for the keys will be: R2.cisco.com
Choose the size of the key modulus in the range of 360 to 2048 for your
General Purpose Keys. Choosing a key modulus greater than 512 may take
a few minutes.
How many bits in the modulus [512]: 1024
% Generating 1024 bit RSA keys, keys will be non-exportable...[OK]
R2(config)#ip ssh version 2
R2(config)#enable secret cisco
R2(config-if)#end
R2#
%SYS-5-CONFIG_I: Configured from console by console
R2#wr
Building configuration...
[OK]
R2#
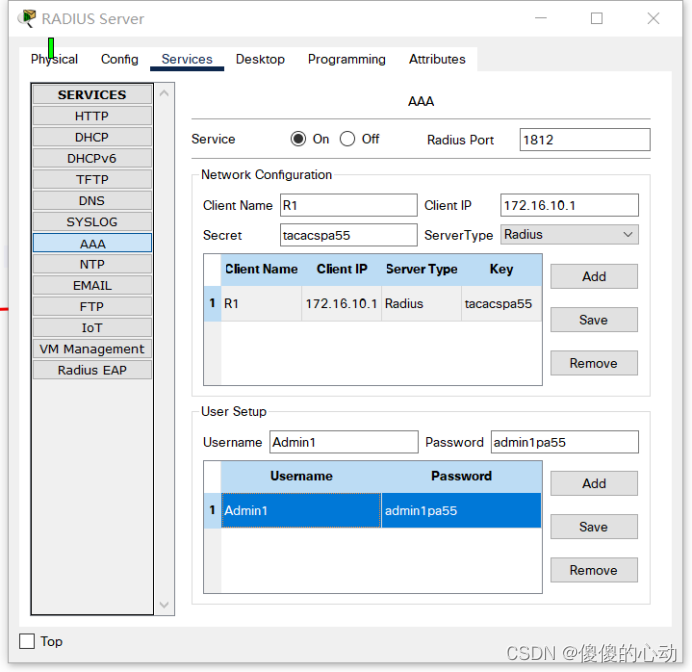
RADIUS Server:
IP地址:
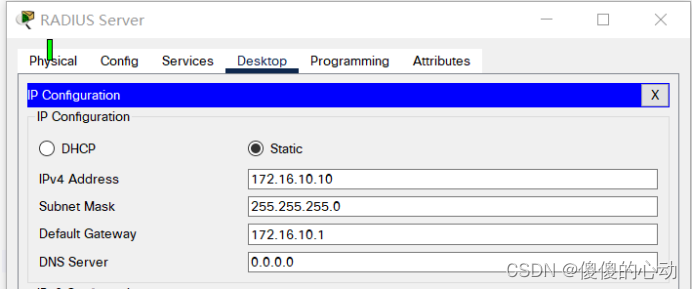
AAA配置:
TACACS+ Server:
IP地址:
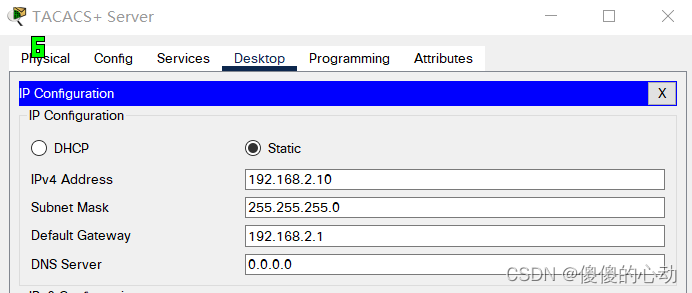
AAA配置:
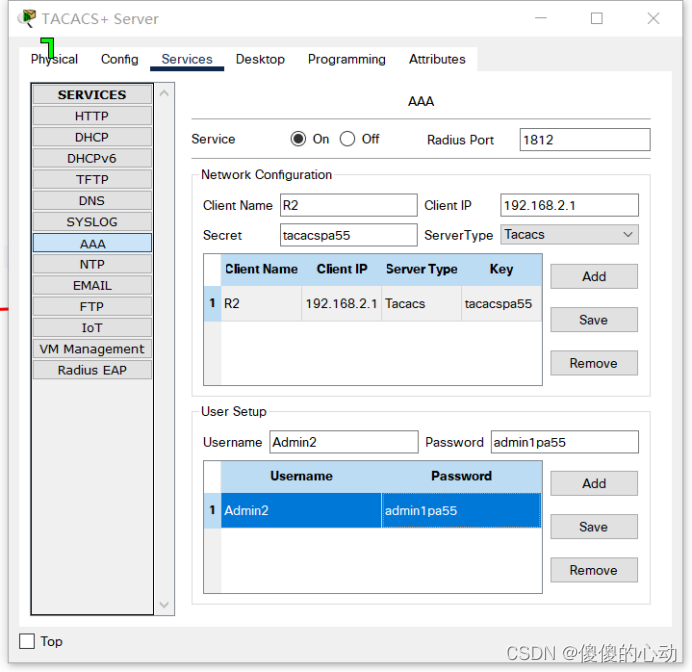
请注意,共享密钥必须在客户端和服务器之间共享,所以客户端和服务器之间必须使用相同的共享密钥。因此,在实际应用中,必须在客户端和服务器之间协商并确认共享密钥。另外,强烈建议使用更加安全的密钥,比如随机生成的复杂密码,以增强安全性。
PC1:
IP地址:

2.连通设备配置:
R1:
R1(config)#ip route 192.168.2.0 255.255.255.0 s0/3/0
%Default route without gateway, if not a point-to-point interface, may impact performance
R1(config)#
R2:
R2(config)#ip route 192.168.1.0 255.255.255.0 s0/3/0
%Default route without gateway, if not a point-to-point interface, may impact performance
R2(config)#ip route 172.16.10.0 255.255.255.0 s0/3/0
%Default route without gateway, if not a point-to-point interface, may impact performance
R2(config)#
3.测试连通性
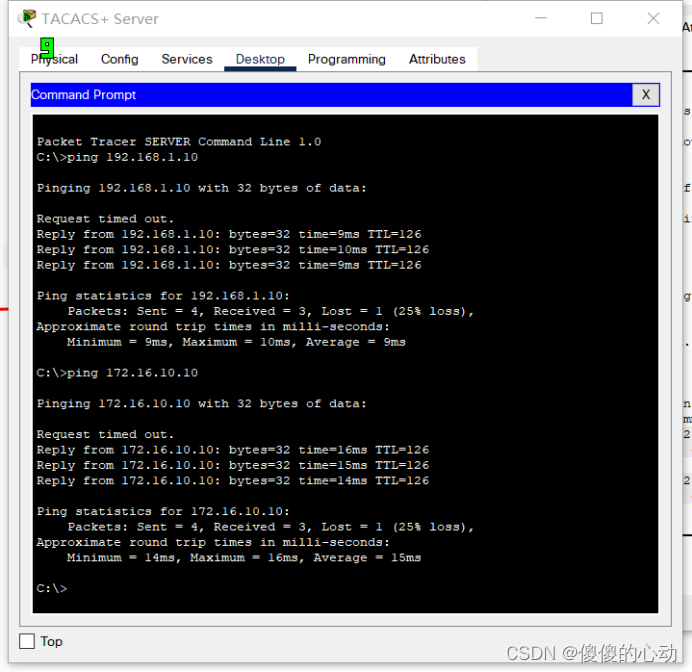
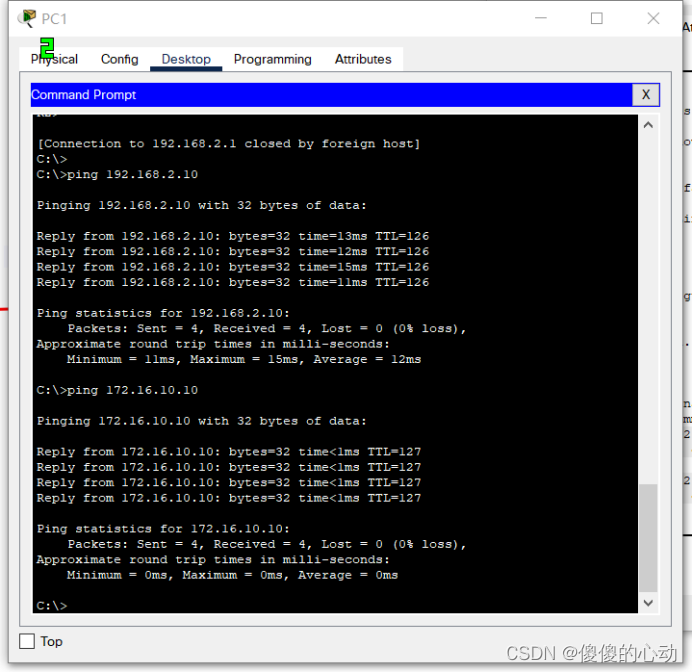

4.配置AAA
启用AAA
R1(config)#aaa new-model
配置 RADIUS 服务器
R1(config)#radius-server host 172.16.10.10 auth-port 1812
R1(config)#radius-server key tacacspa55
启用AAA
R2(config)#aaa new-model
配置 TACACS+ 服务器
R2(config)#tacacs-server host 192.168.2.10
R2(config)#tacacs-server key tacacspa55
配置本地账户作为备用方法
R1(config)#username Admin1 secret admin1pa55
R2(config)#username Admin2 secret admin2pa55
配置 AAA 认证
R1(config)#aaa authentication login default group tacacs+ local
R2(config)#aaa authentication login default group tacacs+ local
配置终端访问
R1(config)#line vty 0 4
R1(config-line)#transport input ssh
R1(config-line)#login authentication default
R2(config)#line vty 0 4
R2(config-line)#transport input ssh
R2(config-line)#login authentication default
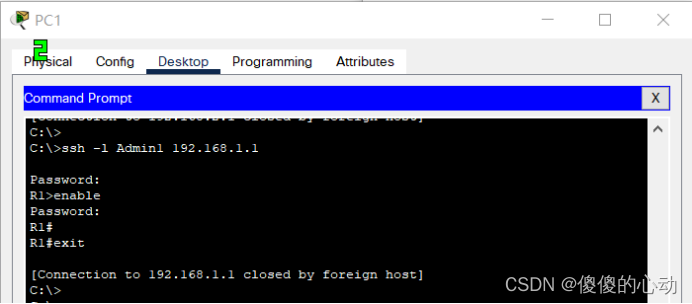
- 进行登录验证:
C:\>ssh -l Admin1 192.168.1.1
Password: admin1pa55
R1>enable
Password: cisco
R1#
R1#exit
[Connection to 192.168.1.1 closed by foreign host]
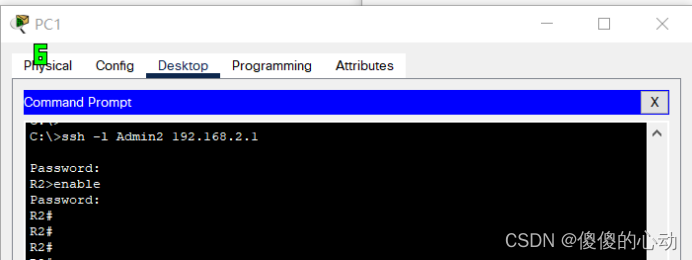
C:\>ssh -l Admin2 192.168.2.1
Password: admin1pa55
R2>enable
Password: cisco
R2#
到此实验算是模拟成功了!

