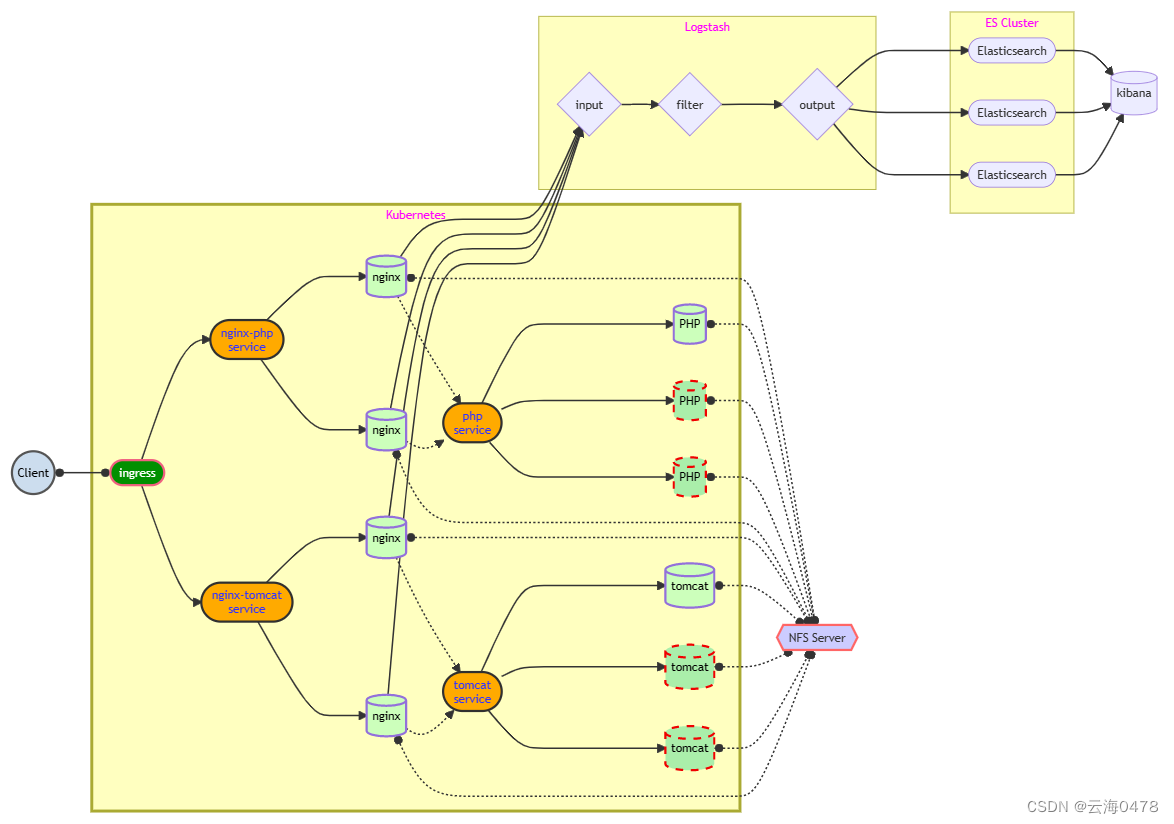
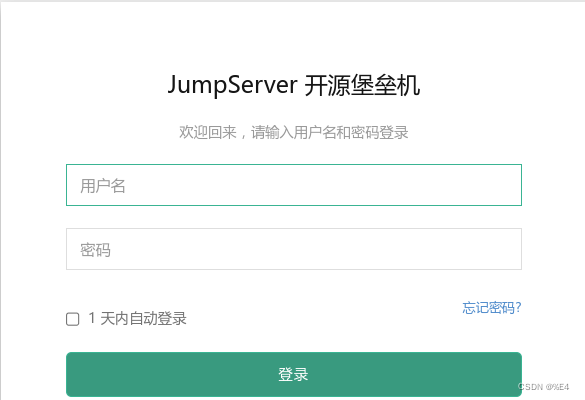
Jumpserver是一款开源的堡垒机,可使系统的管理员和开发人员安全的连接到企业内部服务器上执行操作,并且支持大部分操作系统,是一款非常安全的远程连接工具
安装JumpServer
jumpserver.org官网去下载安装,有一键安装(里面的文档也可以帮你解决问题)
解包后cd进去 ./jmsctl.sh install #一路回车
http://x.x.x.x访问页面如下:用户名admin,密码admin登录,会让修改密码,使用新密码登录即可
JumpServer使用
在jumpserver里面两种用户:

1、用户管理里面的用户:这个用户指堡垒机账号, 就是你能用这个账号登录web页面, 登录跳板机服务器的用户

2、资产管理里面的系统用户:
	它又分为 特权用户 和 普通用户
	特权用户: 是资产已存在的, 并且拥有 高级权限 的系统用户,如root用户, JumpServer 使用该用户来 `推送系统用户`、`获取资产硬件信息` 等;
	普通用户:是JumpServer 登录资产时使用的账号,普通用户 可以在资产上预先存在,也可以由 特权用户 来自动创建。
- Jumpserver 对外需要开放 80 443 和 2222 端口
1.创建普通用户(登录jumpserver用)
2.创建资产管理里面的普通用户与特权用户
3.创建资产管理里面的资产列表去创建主机
4.授权 授权管理里面的资产授权
当自查
Harbor
1)节省网络带宽,针对于每个镜像不用每个人都去中央仓库上面去下载,只需要从私有仓库中下载即可;
2)提供镜像资源利用,针对于公司内部使用的镜像,推送到本地私有仓库中,以供公司内部相关人员使用。
VMware公司开源了企业级Registry项目Harbor,其的目标是帮助用户迅速搭建一个企业级的Docker registry 服务。
安装docker 开启路由转发 部署 修改
[k8s@harbor ~]$ sudo -s
[root@harbor k8s]# echo 'net.ipv4.ip_forward = 1' >> /etc/sysctl.conf
[root@harbor k8s]# sysctl -p
harbor主机安装docker服务,并启动
[root@harbor k8s]# cd /root/harbor/
[root@harbor harbor]# yum -y install docker-ce
[root@harbor harbor]# systemctl enable --now docker部署harbor
[root@harbor harbor]# mv docker-compose /usr/sbin/
[root@harbor harbor]# chmod +x /usr/sbin/docker-compose
[root@harbor harbor]# tar -xf harbor-offline-installer-v2.4.2.tgz -C /usr/local/修改配置文件
[root@harbor harbor]# cd /usr/local/harbor
[root@harbor harbor]# cp harbor.yml.tmpl harbor.yml #拷贝harbor配置文件
[root@harbor harbor]# vim harbor.yml
5 hostname: harbor #访问harbor管理界面地址,写成主机名,后面做主机名解析
#以下配置加上注释,否则需要证书
13 #https: #加上注释
14 # https port for harbor, default is 443
15 #port: 443 #加上注释
16 # The path of cert and key files for nginx
17 #certificate: /your/certificate/path #加上注释
18 #private_key: /your/private/key/path #加上注释安装harbor
[root@harbor harbor]# ./install.sh
.......
✔ ----Harbor has been installed and started successfully.----
[root@harbor harbor]# ss -antpu | grep 80
tcp LISTEN 0 1024 [::]:80 [::]:* users:(("docker-proxy",pid=15459,fd=4))登录harbor
http://公网IP地址:80,用户名:admin 密码:Harbor12345
制作镜像(omcat、filebeat镜像)
使用test主机测试,test主机安装docker软件
[k8s@test ~]$ sudo -s
[root@test k8s]# yum -y install docker-ce

更改配置文件,指定私有仓库地址
[root@test k8s]# mkdir /etc/docker
[root@test k8s]# vim /etc/docker/daemon.json
{
    "exec-opts": ["native.cgroupdriver=systemd"],
    "registry-mirrors": ["https://08fd0a6fce0026040ffdc0158fe37d60.mirror.swr.myhuaweicloud.com"],
    "insecure-registries":["harbor:80"]
}
[root@test k8s]# systemctl enable --now docker
[root@test k8s]# vim /etc/hosts	#配置主机名解析
192.168.1.100 harbor

[root@test k8s]# docker login http://harbor:80	#测试登录Harbor镜像仓库
Username: admin 			#用户名
Password: Harbor12345 		#密码
Login Succeeded

#密码信息会存储在/root/.docker/config.json中

测试,在test主机导入镜像,上传至harbor主机,tomcat软件在2阶段
[root@jumpserver ~]# scp -r /root/5/public/myos.tar.xz  apache-tomcat-9.0.6.tar.gz 192.168.1.101:/root/
[root@test k8s]# cd /root/
[root@test ~]# docker load  -i /root/myos.tar.xz

制作tomcat镜像
[root@test ~]# mkdir tomcat
[root@test ~]# cd tomcat/
[root@test tomcat]# mv /root/apache-tomcat-9.0.6.tar.gz ./
[root@test tomcat]# vim Dockerfile
FROM myos:v2009
RUN  yum install -y java-1.8.0-openjdk && yum clean all
ADD  apache-tomcat-9.0.6.tar.gz /usr/local/
WORKDIR /usr/local/apache-tomcat-9.0.6/webapps
EXPOSE 8080
CMD ["/usr/local/apache-tomcat-9.0.6/bin/catalina.sh", "run"]
[root@test tomcat]# docker build -t myos:tomcat .

测试镜像是否有问题
[root@test tomcat]# docker run -itd myos:tomcat
[root@test tomcat]# curl 172.17.0.2:8080		#可以正常访问

制作filebeat镜像并上传
[root@test tomcat]# mkdir /root/filebeat
[root@test tomcat]# cd /root/filebeat
[root@test filebeat]# scp 192.168.1.252:/root/5/elk/filebeat-6.8.8-x86_64.rpm ./
[root@test filebeat]# vim Dockerfile
FROM myos:v2009
ADD  filebeat-6.8.8-x86_64.rpm  ./
RUN  yum -y install ./filebeat-6.8.8-x86_64.rpm
CMD  ["/usr/share/filebeat/bin/filebeat", "-c", "/etc/filebeat/filebeat.yml", "-path.home", "/usr/share/filebeat", "-path.config", "/etc/filebeat", "-path.data", "/var/lib/filebeat", "-path.logs", "/var/log/filebeat"]

制作镜像
[root@test filebeat]# docker build -t myos:filebeat .
[root@test filebeat]# docker run -itd myos:filebeat
[root@test filebeat]# docker ps  | grep filebeat   #查看是否启动
打标签上传镜像
[root@test filebeat]# docker tag myos:filebeat harbor:80/library/myos:filebeat
[root@test filebeat]# docker tag myos:tomcat harbor:80/library/myos:tomcat
[root@test filebeat]# docker tag myos:nginx harbor:80/library/myos:nginx
[root@test filebeat]# docker tag myos:phpfpm harbor:80/library/myos:phpfpm
[root@test filebeat]# docker push harbor:80/library/myos:filebeat
[root@test filebeat]# docker push harbor:80/library/myos:tomcat
[root@test filebeat]# docker push harbor:80/library/myos:nginx
[root@test filebeat]# docker push harbor:80/library/myos:phpfpm
登录harbor查看,可以看到上传的镜象
测试下载镜像
将系统中目前有的镜像文件删除, 从私有镜像仓库中下载镜像
[root@test filebeat]# docker rmi harbor:80/library/myos:nginx
[root@test filebeat]# docker pull harbor:80/library/myos:nginx
[root@test filebeat]# docker images
如果harbor停止了,可以通过堡垒机jumpserver连接harbor
使用如下命令启动
[k8s@harbor ~]$ sudo -s
[root@harbor k8s]# cd /usr/local/harbor/
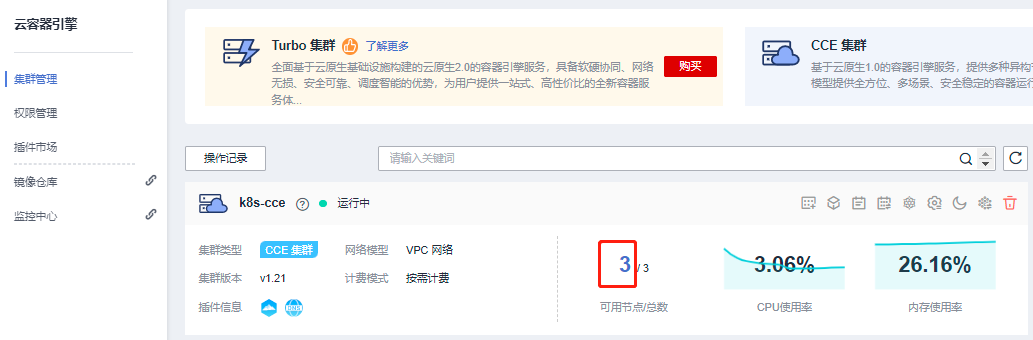
[root@harbor harbor]# docker-compose up -d搭建CCE容器集群
在华为云购买CCE集群,选择合适版本买
此时k8s集群已经搭建完毕,有三个node节点,如果需要把集群放入到jumpserver管理,可以直接按照之前添加资产的配置放入,直接使用k8s的用户进行管理即可,使用cce搭建的k8s集群master节点是无法连接的,这里我们使用堡垒机配置kubectl管理node节点
kubectl配置
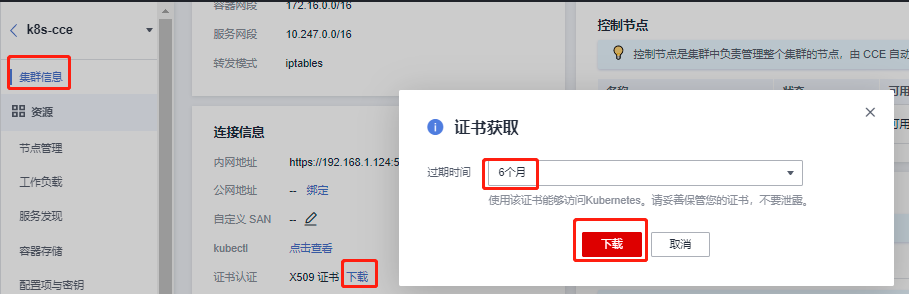
下载证书
使用kubectl访问k8s-cce
需要先下载kubectl以及配置文件,拷贝到jumpserver主机,完成配置后,即可使用kubectl访问k8s集群
1、下载kubectl:https://github.com/kubernetes/kubernetes/blob/master/CHANGELOG/README.md 下载与集群版本对应的或者更新的kubectl
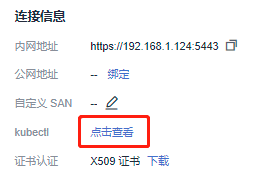
2、下载kubectl配置文件:请点击此处(k8s-cce连接信息-kubectl-点击查看 查找)下载(公网apiserver地址变更后请重新下载)
3、安装和配置kubectl:上传kubernetes-client-linux-amd64.tar.gz 和 kubeconfig.json配置文件到jumpserver主机的/root目录下
[root@jumpserver ~]# tar -xf kubernetes-client-linux-amd64.tar.gz
[root@jumpserver ~]# mv kubernetes/client/bin/kubectl /usr/local/bin/
4、登录到jumpserver主机,配置kubectl,若是root用户登录,可以直接执行
[root@jumpserver ~]# mkdir -p $HOME/.kube
[root@jumpserver ~]# mv -f kubeconfig.json $HOME/.kube/config
5、配置kubectl的tab键,节省输入时间
[root@jumpserver ~]# kubectl completion bash >/etc/bash_completion.d/kubectl
[root@jumpserver ~]# kubectl get nodes 可以看到结果
NAME STATUS ROLES AGE VERSION
192.168.1.19 Ready <none> 23h v1.21.7-r0-CCE22.3.1.B012
192.168.1.34 Ready <none> 23h v1.21.7-r0-CCE22.3.1.B012
192.168.1.65 Ready <none> 23h v1.21.7-r0-CCE22.3.1.B012
注:把k8s-cce容器集群的安全组改为和其他云主机的安全组一致,如使用的是default安全组,或者自己设置的其他安全组,否则后面实验会有影响配置集群访问harbor镜像仓库
使用jumpserver主机连接三台k8s计算节点,更改hosts文件,做主机名和IP地址解析,更改daemon.json文件,使其后期可以下载镜像,三台机器都需要配置(以其中一台为例)
方法一:可以通过提前配置好的jumpserver资产连接,配置
[root@jumpserver ~]# ssh k8s@192.168.1.252 -p2222
按p,查看资产,输入id进入相关node节点
[root@k8s-cce-72569-uvmyk ~]# sudo -s
[root@k8s-cce-72569-uvmyk ~]# vim /etc/hosts
192.168.1.100 harbor

[root@k8s-cce-72569-uvmyk ~]# vim /etc/docker/daemon.json
{
   "storage-driver": "overlay2",	#加上,
    "insecure-registries":["harbor:80"]	#只添加这一行
}
[root@k8s-cce-72569-uvmyk ~]# systemctl restart docker

方法二:也可以直接连接配置
[root@jumpserver ~]# kubectl get nodes		#获取节点IP地址
NAME           STATUS   ROLES    AGE   VERSION
192.168.1.19   Ready    <none>   23h   v1.21.7-r0-CCE22.3.1.B012
192.168.1.34   Ready    <none>   23h   v1.21.7-r0-CCE22.3.1.B012
192.168.1.65   Ready    <none>   23h   v1.21.7-r0-CCE22.3.1.B012

[root@jumpserver ~]# ssh 192.168.1.19
[root@k8s-cce-72569-uvmyk ~]# vim /etc/hosts
192.168.1.100 harbor

[root@k8s-cce-72569-uvmyk ~]# vim /etc/docker/daemon.json
{
   "storage-driver": "overlay2",
   "insecure-registries":["harbor:80"]	#只添加这一行
}
[root@k8s-cce-72569-uvmyk ~]# systemctl restart docker
搭建ELK集群
[root@es-0001 elk]# vim /etc/hosts
192.168.1.71 es-0001
192.168.1.72 es-0002
192.168.1.73 es-0003
192.168.1.74 kibana
192.168.1.75 logstash
ES主机上安装java-1.8.0-openjdk,elasticserach
更改配置文件
[root@es-0001 elk]# vim /etc/elasticsearch/elasticsearch.yml
17 cluster.name: es    			     #集群的名称。
23 node.name: es-0001   			 #该节点主机名。
55 network.host: 0.0.0.0		     #任意地址。
68 discovery.zen.ping.unicast.hosts: ["es-0001", "es-0002", "es-0003"] #集群节点主机列表
[root@es-0001 elk]# systemctl enable --now elasticsearch

配置es-0002和0003
[root@es-0001 elk]# scp /etc/elasticsearch/elasticsearch.yml  192.168.1.72:/etc/elasticsearch/
[root@es-0001 elk]# scp /etc/elasticsearch/elasticsearch.yml  192.168.1.73:/etc/elasticsearch/
查看ES集群信息
[root@es-0003 ~]# curl -XGET http://192.168.1.71:9200/_cluster/health?pretty
{
"cluster_name" : "es",
"status" : "green",
"timed_out" : false,
"number_of_nodes" : 3,
"number_of_data_nodes" : 3,
"active_primary_shards" : 0,
"active_shards" : 0,
"relocating_shards" : 0,
"initializing_shards" : 0,
"unassigned_shards" : 0,
"delayed_unassigned_shards" : 0,
"number_of_pending_tasks" : 0,
"number_of_in_flight_fetch" : 0,
"task_max_waiting_in_queue_millis" : 0,
"active_shards_percent_as_number" : 100.0
}
安装head插件:ES官方没有为ES提供界面管理工具,仅仅提供了后台服务。elasticsearch-head是一个为ES开发的web页面客户端工具
[root@es-0001 elk]# vim /etc/elasticsearch/elasticsearch.yml
http.cors.enabled : true
http.cors.allow-origin : "*"
http.cors.allow-methods : OPTIONS, HEAD, GET, POST, PUT, DELETE
http.cors.allow-headers : X-Requested-With,X-Auth-Token,Content-Type,Content-Length
[root@es-0001 ~]# systemctl restart elasticsearch

es-0001主机安装head插件,提供访问es的页面
[root@es-0001 elk]# yum -y install httpd
[root@es-0001 elk]# scp 192.168.1.252:/root/5/public/head.tar.gz /root
[root@es-0001 elk]# tar -xf /root/head.tar.gz -C /var/www/html/
[root@es-0001 elk]# vim /etc/httpd/conf/httpd.conf
 42 Listen 8081	   #更改访问端口,后期其他服务会用80
[root@es-0001 elk]# systemctl enable --now httpd
配置ELB
创建监听器(9200),添加后端服务器群组
服务器列表—>弹性负载均衡ELB—>购买负载均衡ELB—>监听器及后端服务
监听器添加9200与8081端口做监听
head插件和es的监听一样,只需要监听8081,添加后端服务器群组,把es-0001上面8081端口监听,测试即可
访问head插件:elb的公网ip,http://公网IP:8081/es-head/
默认打开是未连接状态。将http://localhost:9200/改为http://公网IP:9200,并点击连接。
部署kibana
安装kibana软件包
[elk@kibana ~]$ sudo -s
[root@kibana elk]# yum -y install kibana
更改kibana服务配置文件
[root@kibana elk]# vim /etc/kibana/kibana.yml
2 server.port: 5601                 				#提供服务的端口
7 server.host: "192.168.1.74"       				#服务器监听地址
28 elasticsearch.hosts: ["http://192.168.1.71:9200"]  #用于查询es主机地址,集群里任选其一
113 i18n.locale: "zh-CN"		#这是中文

启动服务器并查看端口是否启用
[root@kibana elk]# systemctl enable --now kibana
[root@kibana elk]# ss -antpu | grep 5601
通过浏览器访问kibana,华为云弹性负载均衡创建监听器,并添加后端服务器。监听端口为5601,添加后端服务kibana
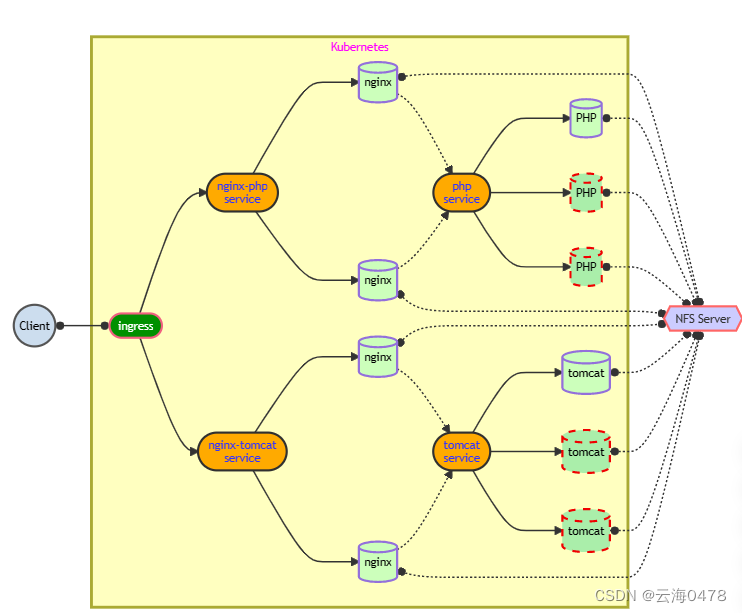
NFS
[k8s@test ~]$ sudo -s
[root@test k8s]# yum -y install nfs-utils
#nginx的共享网页目录
[root@test k8s]# mkdir -m 777 /var/nginxphp
#tomcat的共享目录
[root@test k8s]# mkdir -m 777 /var/nginxtomcat
[root@test k8s]# vim /etc/exports
/var/nginxphp  *(rw)
/var/nginxtomcat  *(rw)
[root@test ~]# systemctl enable --now nfs
[root@test ~]# cd /var/nginxphp
[root@test nginxphp]# scp  192.168.1.252:/root/5/public/info.php ./ #拷贝nginx的动态页面
[root@test nginphp]# echo hello world > info.html	#创建nginx静态页面
[root@test nginxphp]# vim /var/nginxtomcat/test.jsp
	#编写tomcat的共享文件
<html>
<body>
<center>
Now time is: <%=new java.util.Date()%>
</center>
</body>
</html>
[root@test nginxphp]# exit
exit
[k8s@test ~]$ exit
logout
[Host]> exit
编写资源文件(创建nginx,php,filebeat容器)
jumpserver主机创建pv和pvc的资源,共享网页资源
[root@jumpserver ~]# mkdir nginx
[root@jumpserver ~]# cd nginx/
[root@jumpserver nginx]# vim pv-nfs.yaml
---
apiVersion: v1
kind: PersistentVolume
metadata:
  name: pv-nfs
spec:
  volumeMode: Filesystem
  capacity:
    storage: 30Gi
  accessModes:
  - ReadWriteMany
  - ReadOnlyMany
  - ReadWriteOnce
  persistentVolumeReclaimPolicy: Retain
  nfs:
    path: /var/nginxphp
    server: 192.168.1.101
[root@jumpserver nginx]# vim pvc-nfs.yaml
---
apiVersion: v1
kind: PersistentVolumeClaim
metadata:
name: pvc-nfs
spec:
volumeMode: Filesystem
accessModes:
- ReadWriteMany
resources:
requests:
storage: 25Ginginx加载pvc,使用nfs共享目录
[root@jumpserver nginx]# vim nginx-deployment.yaml
---
apiVersion: apps/v1
kind: Deployment
metadata:
  name: nginx
spec:
  selector:
    matchLabels:
      app: nginx
  replicas: 1
  template:
    metadata:
      labels:
        app: nginx
    spec:
      volumes:
      - name: web-site                  #引用
        persistentVolumeClaim:          #使用pvc
          claimName: pvc-nfs            #名称
      containers:
      - name: nginx
        image: harbor:80/library/myos:nginx
        ports:
        - protocol: TCP
          containerPort: 80
        volumeMounts:
        - name: web-site                          #加载pvc
          mountPath: /usr/local/nginx/html        #指定目录
      restartPolicy: Always
php加载pvc,使用nfs共享目录
[root@jumpserver nginx]# vim php-deployment.yaml
---
apiVersion: apps/v1
kind: Deployment
metadata:
  name: php-fpm
spec:
  selector:
    matchLabels:
      app: php-fpm
  replicas: 1
  template:
    metadata:
      labels:
        app: php-fpm
    spec:
      volumes:
      - name: web-site           #引用
        persistentVolumeClaim:   #使用pv
          claimName: pvc-nfs     #名称
      containers:
      - name: php-fpm
        image: harbor:80/library/myos:phpfpm
        ports:
        - protocol: TCP
          containerPort: 9000
        volumeMounts:
        - name: web-site                        #加载pv
          mountPath: /usr/local/nginx/html      #指定目录
      restartPolicy: Always
让nginx和php连接,编写php-service.yaml文件
[root@jumpserver nginx]# vim php-service.yaml
---
apiVersion: v1
kind: Service
metadata:
  name: phpfpm-service
spec:
  ports:
  - protocol: TCP
    port: 9000
    targetPort: 9000
  selector:
    app: php-fpm     #需要和php-deployment.yaml里面labels里面定义的一致
  type: ClusterIP
使用configmap映射nginx配置文件,实现动静分离
[root@jumpserver nginx]# yum -y install docker-ce
[root@jumpserver nginx]# vim /etc/hosts
192.168.1.100 harbor

[root@jumpserver nginx]# vim /etc/docker/daemon.json
{
    "exec-opts": ["native.cgroupdriver=systemd"],
    "registry-mirrors": ["https://08fd0a6fce0026040ffdc0158fe37d60.mirror.swr.myhuaweicloud.com"],
    "insecure-registries":["harbor:80"]
}
[root@jumpserver nginx]# systemctl restart docker
[root@jumpserver nginx]# docker run -itd --name nginx harbor:80/library/myos:nginx
[root@jumpserver nginx]# docker cp nginx:/usr/local/nginx/conf/nginx.conf ./
[root@jumpserver nginx]# vim nginx.conf		#21,22,23,25行去掉#号
 21     log_format  main  '$http_x_forwarded_for - $remote_user [$time_local] "$request" '
 22                       '$status $body_bytes_sent "$http_referer" '
 23                       '"$http_user_agent"';		#更改
 24
 25     access_log  logs/access.log  main;			#更改
 ...
 65         location ~ \.php$ {
 66             root           html;
 67             fastcgi_pass   phpfpm-service:9000;		#更改
 68             fastcgi_index  index.php;
 69             include        fastcgi.conf;		    #更改
 70         }
使用configmap进行映射nginx配置文件
[root@jumpserver nginx]# kubectl create configmap nginx-conf --from-file=nginx.conf
[root@jumpserver nginx]# kubectl get configmaps

让nginx加载ConfigMap
[root@jumpserver nginx]# vim nginx-deployment.yaml
...
      - name: nginx-php                 #新添加confgiMap
        configMap:                      #新添加
          name: nginx-conf              #新添加
      containers:
      - name: nginx
        image: harbor:80/library/myos:nginx
        ports:
        - protocol: TCP
          containerPort: 80
        volumeMounts:
        - name: web-site
          mountPath: /usr/local/nginx/html
        - name: nginx-php                               #引用configMap
          mountPath: /usr/local/nginx/conf/nginx.conf   #新添加
          subPath: nginx.conf                           #新添加
      restartPolicy: Always
更改php配置文件,能够监听所有端口,解析php代码
[root@jumpserver nginx]# docker run -itd --name myphp harbor:80/library/myos:phpfpm
[root@jumpserver nginx]# docker cp myphp:/etc/php-fpm.d/www.conf ./
[root@jumpserver nginx]# vim www.conf
12 listen = 0.0.0.0:9000
24 ; listen.allowed_clients = 127.0.0.1

创建configmap,进行映射php-fpm配置文件
[root@jumpserver nginx]# kubectl create configmap php --from-file=www.conf
[root@jumpserver nginx]# vim php-deployment.yaml
...
      - name: php-conf           #新添加
        configMap:               #新添加
          name: php              #新添加
      containers:
      - name: php-fpm
        image: harbor:80/library/myos:phpfpm
        ports:
        - protocol: TCP
          containerPort: 9000
        volumeMounts:
        - name: web-site
          mountPath: /usr/local/nginx/html
        - name: php-conf                        #新添加
          mountPath: /etc/php-fpm.d/www.conf    #新添加
          subPath: www.conf                     #新添加
      restartPolicy: Always
编写filebeat的configMap配置,使其和nginx共享日志
[root@jumpserver nginx]# docker run -itd --name filebeat harbor:80/library/myos:filebeat
[root@jumpserver nginx]# docker cp filebeat:/etc/filebeat/filebeat.yml ./

修改filebeat的配置文件
[root@jumpserver nginx]# vim filebeat.yml
 24   enabled: true						#打开收集模块
 28     - /var/weblog/access.log	#指定filebeat读取的日志文件
 45   fields:
 46     my_type: nginx_log				#新添加自定义标签
 149 #output.elasticsearch:				#加上注释
 151   #hosts: ["localhost:9200"]		 #加上注释
162 output.logstash:					#去掉注释
164   hosts: ["192.168.1.75:5044"]		 #指定logstash主机IP地址
180 #processors:						#加上注释
181   #- add_host_metadata: ~			 #加上注释
182   #- add_cloud_metadata: ~			 #加上注释
[root@jumpserver nginx]# kubectl create configmap filebeat --from-file=filebeat.yml
编写nginx-deployment.yaml资源清单文件,把filebeat和nginx放到同一个pod中,收集nginx日志,到elk可以进行分析
[root@jumpserver nginx]# vim nginx-deployment.yaml
...
      - name: filebeat                  #新添加
        configMap:                      #新添加
          name: filebeat                #新添加
      - name: log-data                  #新添加
        hostPath:                       #新添加
          path: /var/weblog             #新添加
          type: DirectoryOrCreate       #新添加
      containers:
      - name: nginx
        image: harbor:80/library/myos:nginx
        ports:
        - protocol: TCP
          containerPort: 80
        volumeMounts:
        - name: web-site
          mountPath: /usr/local/nginx/html
        - name: nginx-php
          mountPath: /usr/local/nginx/conf/nginx.conf
          subPath: nginx.conf
        - name: log-data                                #新添加
          mountPath: /usr/local/nginx/logs              #新添加
      - name: filebeat                                  #新添加
        image: harbor:80/library/myos:filebeat          #新添加
        volumeMounts:                                   #新添加
        - name: filebeat                                #新添加
          mountPath: /etc/filebeat/filebeat.yml         #新添加
          subPath: filebeat.yml                         #新添加
        - name: log-data                                #新添加
          mountPath: /var/weblog                        #新添加
      restartPolicy: Always
编写nginx的service服务文件
[root@jumpserver nginx]# vim nginx-service.yaml
---
apiVersion: v1
kind: Service
metadata:
  name: nginx-service
spec:
  ports:
  - protocol: TCP
    port: 80
    targetPort: 80
  selector:
    app: nginx     #需要和nginx-deployment.yaml里面labels里面定义的一致
  type: ClusterIP

执行上面创建的资源文件
[root@jumpserver nginx]# kubectl apply -f pv-nfs.yaml
[root@jumpserver nginx]# kubectl apply -f pvc-nfs.yaml
[root@jumpserver nginx]# kubectl apply -f nginx-service.yaml
[root@jumpserver nginx]# kubectl apply -f nginx-deployment.yaml
[root@jumpserver nginx]# kubectl apply -f php-service.yaml
[root@jumpserver nginx]# kubectl apply -f php-deployment.yaml