开源项目
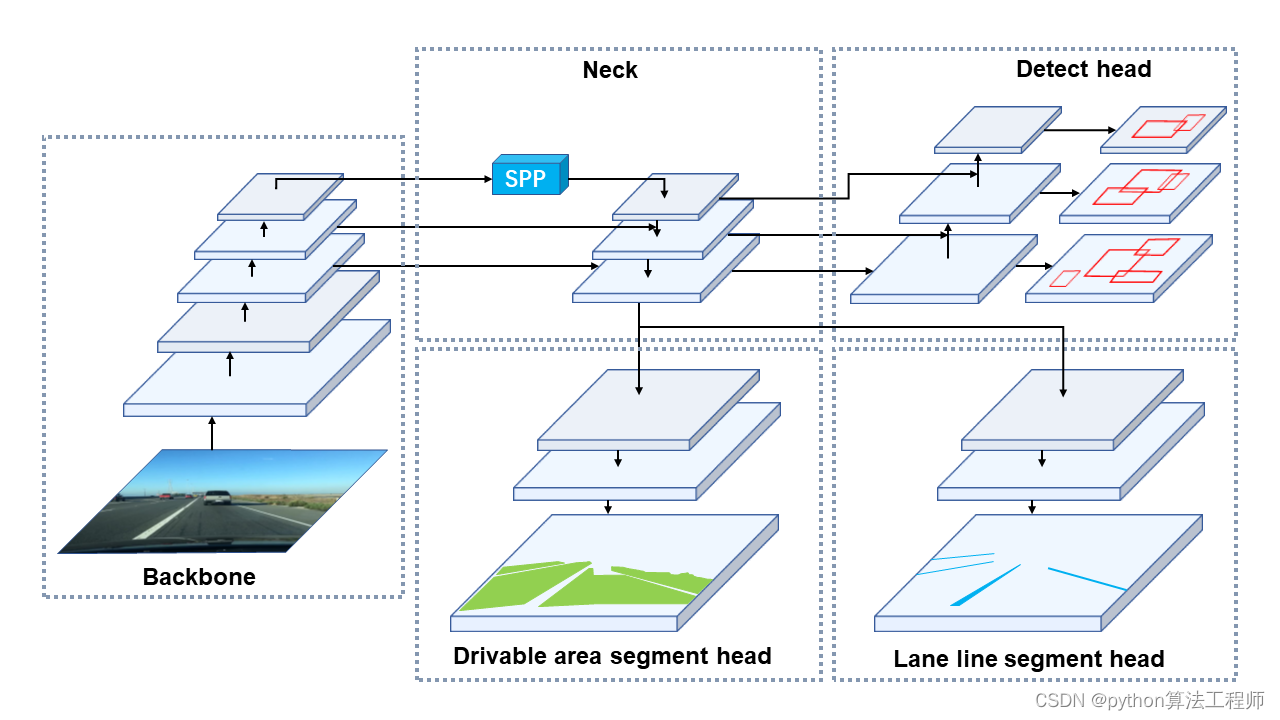 MCnet 是一个神经网络模型,用于实现车辆视觉感知的任务,比如车道线检测、行驶区域分割和物体检测等。MCnet 的全称是 Multitask CNN,它在单个神经网络模型中集成了多个任务的网络结构,可以同时对输入图像进行多个任务的处理和输出。MCnet 的设计灵感来源于 YOLOv4 和 CSPNet 等神经网络结构,它的网络结构包括了车道线和行驶区域分割头以及物体检测头,其中行驶区域分割和车道线检测任务都是二分类问题,而物体检测则是一个多分类问题。
MCnet 的设计目标是实现高效的车辆视觉感知,它的网络结构采用了各种优化技术,如残差连接、深度可分离卷积和SPP(Spatial Pyramid Pooling,空间金字塔池化)等,以提高模型的准确率和速度。MCnet 的训练过程采用交叉熵损失函数和随机梯度下降(SGD)优化器进行优化,训练数据集包括了多个数据源,如 BDD100K、KITTI、TuSimple 等,以提高模型的泛化能力。
https://github.com/hpc203/YOLOP-opencv-dnn
使用OpenCV部署全景驾驶感知网络YOLOP,可同时处理交通目标检测、可驾驶区域分割、车道线检测,三项视觉感知任务,包含C++和Python两种版本的程序实现。本套程序只依赖opencv库就可以运行, 从而彻底摆脱对任何深度学习框架的依赖。
使用OpenCV部署全景驾驶感知网络YOLOP,可同时处理交通目标检测、可驾驶区域分割、车道线检测,三项视觉感知任务,依然是包含C++和Python两种版本的程序实现
onnx文件从百度云盘下载,链接:https://pan.baidu.com/s/1A_9cldUHeY9GUle_HO4Crg 提取码:mf1x
C++版本的主程序文件是main.cpp,Python版本的主程序文件是main.py。把onnx文件下载到主程序文件所在目录后,就可以运行程序了。文件夹images 里含有若干张测试图片,来自于bdd100k自动驾驶数据集。
本套程序是在华中科技大学视觉团队在最近发布的项目https://github.com/hustvl/YOLOP 的基础上做的一个opencv推理部署程序,本套程序只依赖opencv库就可以运行, 从而彻底摆脱对任何深度学习框架的依赖。如果程序运行出错,那很有可能是您安装的opencv版本低了,这时升级opencv版本就能正常运行的。
此外,在本套程序里,还有一个export_onnx.py文件,它是生成onnx文件的程序。不过,export_onnx.py文件不能本套程序目录内运行的, 假如您想了解如何生成.onnx文件,需要把export_onnx.py文件拷贝到https://github.com/hustvl/YOLOP 的主目录里之后,并且修改lib/models/common.py里的代码, 这时运行export_onnx.py就可以生成onnx文件了。在lib/models/common.py里修改哪些代码,可以参见我的csdn博客文章 https://blog.csdn.net/nihate/article/details/112731327
export_onnx怎么写?
在PyTorch中,可以使用torch.onnx.export函数将模型导出为ONNX格式。下面是一个简单的示例,演示如何使用torch.onnx.export将PyTorch模型导出为ONNX格式:
import torch

# 定义模型
class MyModel(torch.nn.Module):
    def __init__(self):
        super(MyModel, self).__init__()
        self.linear = torch.nn.Linear(1, 1)

    def forward(self, x):
        return self.linear(x)

# 创建示例输入
input_data = torch.randn(1, 1)

# 加载模型
model = MyModel()

# 导出ONNX模型
torch.onnx.export(model, input_data, "my_model.onnx")
这将把MyModel模型导出为ONNX格式,并将其保存到当前工作目录中的my_model.onnx文件中。
在导出模型时,你需要指定模型、示例输入以及要保存的ONNX文件的名称。你还可以通过指定其他参数来控制导出过程,例如opset_version参数可以用于指定使用的ONNX运算符集版本。更多信息,请查看PyTorch文档中的torch.onnx.export函数说明。
export_onnx.py
import torch
import torch.nn as nn
from lib.models.common import Conv, SPP, Bottleneck, BottleneckCSP, Focus, Concat, Detect, SharpenConv
from torch.nn import Upsample
import cv2

# The lane line and the driving area segment branches without share information with each other and without link车道线和行驶区段分支之间没有共享信息,也没有链接。
YOLOP = [
    [24, 33, 42],  # Det_out_idx, Da_Segout_idx, LL_Segout_idx
    [-1, Focus, [3, 32, 3]],  # 0
    [-1, Conv, [32, 64, 3, 2]],  # 1
    [-1, BottleneckCSP, [64, 64, 1]],  # 2
    [-1, Conv, [64, 128, 3, 2]],  # 3
    [-1, BottleneckCSP, [128, 128, 3]],  # 4
    [-1, Conv, [128, 256, 3, 2]],  # 5
    [-1, BottleneckCSP, [256, 256, 3]],  # 6
    [-1, Conv, [256, 512, 3, 2]],  # 7
    [-1, SPP, [512, 512, [5, 9, 13]]],  # 8
    [-1, BottleneckCSP, [512, 512, 1, False]],  # 9
    [-1, Conv, [512, 256, 1, 1]],  # 10
    [-1, Upsample, [None, 2, 'nearest']],  # 11
    [[-1, 6], Concat, [1]],  # 12
    [-1, BottleneckCSP, [512, 256, 1, False]],  # 13
    [-1, Conv, [256, 128, 1, 1]],  # 14
    [-1, Upsample, [None, 2, 'nearest']],  # 15
    [[-1, 4], Concat, [1]],  # 16         #Encoder

    [-1, BottleneckCSP, [256, 128, 1, False]],  # 17
    [-1, Conv, [128, 128, 3, 2]],  # 18
    [[-1, 14], Concat, [1]],  # 19
    [-1, BottleneckCSP, [256, 256, 1, False]],  # 20
    [-1, Conv, [256, 256, 3, 2]],  # 21
    [[-1, 10], Concat, [1]],  # 22
    [-1, BottleneckCSP, [512, 512, 1, False]],  # 23
    [[17, 20, 23], Detect,
     [1, [[3, 9, 5, 11, 4, 20], [7, 18, 6, 39, 12, 31], [19, 50, 38, 81, 68, 157]], [128, 256, 512]]],
    # Detection head 24

    [16, Conv, [256, 128, 3, 1]],  # 25
    [-1, Upsample, [None, 2, 'nearest']],  # 26
    [-1, BottleneckCSP, [128, 64, 1, False]],  # 27
    [-1, Conv, [64, 32, 3, 1]],  # 28
    [-1, Upsample, [None, 2, 'nearest']],  # 29
    [-1, Conv, [32, 16, 3, 1]],  # 30
    [-1, BottleneckCSP, [16, 8, 1, False]],  # 31
    [-1, Upsample, [None, 2, 'nearest']],  # 32
    [-1, Conv, [8, 2, 3, 1]],  # 33 Driving area segmentation head

    [16, Conv, [256, 128, 3, 1]],  # 34
    [-1, Upsample, [None, 2, 'nearest']],  # 35
    [-1, BottleneckCSP, [128, 64, 1, False]],  # 36
    [-1, Conv, [64, 32, 3, 1]],  # 37
    [-1, Upsample, [None, 2, 'nearest']],  # 38
    [-1, Conv, [32, 16, 3, 1]],  # 39
    [-1, BottleneckCSP, [16, 8, 1, False]],  # 40
    [-1, Upsample, [None, 2, 'nearest']],  # 41
    [-1, Conv, [8, 2, 3, 1]]  # 42 Lane line segmentation head
]

class MCnet(nn.Module):
    def __init__(self, block_cfg):
        super(MCnet, self).__init__()
        layers, save = [], []
        self.nc = 1
        self.detector_index = -1
        self.det_out_idx = block_cfg[0][0]
        self.seg_out_idx = block_cfg[0][1:]
        self.num_anchors = 3
        self.num_outchannel = 5 + self.nc
        # Build model
        for i, (from_, block, args) in enumerate(block_cfg[1:]):
            block = eval(block) if isinstance(block, str) else block  # eval strings
            if block is Detect:
                self.detector_index = i
            block_ = block(*args)
            block_.index, block_.from_ = i, from_
            layers.append(block_)
            save.extend(x % i for x in ([from_] if isinstance(from_, int) else from_) if x != -1)  # append to savelist
        assert self.detector_index == block_cfg[0][0]

        self.model, self.save = nn.Sequential(*layers), sorted(save)
        self.names = [str(i) for i in range(self.nc)]

        # set stride、anchor for detector
        # Detector = self.model[self.detector_index]  # detector
        # if isinstance(Detector, Detect):
        #     s = 128  # 2x min stride
        #     # for x in self.forward(torch.zeros(1, 3, s, s)):
        #     #     print (x.shape)
        #     with torch.no_grad():
        #         model_out = self.forward(torch.zeros(1, 3, s, s))
        #         detects, _, _ = model_out
        #         Detector.stride = torch.tensor([s / x.shape[-2] for x in detects])  # forward
        #     # print("stride"+str(Detector.stride ))
        #     Detector.anchors /= Detector.stride.view(-1, 1, 1)  # Set the anchors for the corresponding scale
        #     check_anchor_order(Detector)
        #     self.stride = Detector.stride
    def forward(self, x):
        cache = []
        out = []
        det_out = None
        for i, block in enumerate(self.model):
            if block.from_ != -1:
                x = cache[block.from_] if isinstance(block.from_, int) else [x if j == -1 else cache[j] for j in block.from_]  # calculate concat detect
            x = block(x)
            if i in self.seg_out_idx:  # save driving area segment result
                # m = nn.Sigmoid()
                # out.append(m(x))
                out.append(torch.sigmoid(x))
            if i == self.detector_index:
                det_out = x
            cache.append(x if block.index in self.save else None)
        out[0] = out[0].view(2, 640, 640)
        out[1] = out[1].view(2, 640, 640)
        return det_out, out[0], out[1]

if __name__ == "__main__":
    device = 'cuda' if torch.cuda.is_available() else 'cpu'
    model = MCnet(YOLOP)
    checkpoint = torch.load('weights/End-to-end.pth', map_location=device)
    model.load_state_dict(checkpoint['state_dict'])
    model.eval()
    output_onnx = 'yolop.onnx'
    inputs = torch.randn(1, 3, 640, 640)
    # with torch.no_grad():
    #     output = model(inputs)
    # print(output)

    torch.onnx.export(model, inputs, output_onnx, verbose=False, opset_version=12, input_names=['images'], output_names=['det_out', 'drive_area_seg', 'lane_line_seg'])
    print('convert', output_onnx, 'to onnx finish!!!')

    try:
        dnnnet = cv2.dnn.readNet(output_onnx)
        print('read sucess')
    except cv2.error as err:
        print('Your Opencv version : {} may be incompatible, please consider upgrading'.format(cv2.__version__))
        print('Read failed : ', err)
这段代码实现了一个名为MCnet的神经网络模型,其使用了YOLOP作为模型结构的配置参数。该模型包括了车道线和行驶区域分割头以及检测头。模型的前向传播过程通过 forward 函数实现,其中输入数据 x 通过遍历模型中的每个 block 依次计算得到输出。在模型的前向传播过程中,如果当前 block 的下标 i 在 seg_out_idx 列表中,则将该 block 的输出添加到 out 列表中,最终返回模型的三个输出:det_out、drive_area_seg 和 lane_line_seg。该代码还实现了将模型转换为 ONNX 格式并保存的功能,可以通过调用 torch.onnx.export() 函数实现。
DNN
在使用 OpenCV 进行目标检测时,可以使用 OpenCV 提供的 DNN 模块来加载和前向推理深度学习模型。DNN 模块提供了一个统一的接口,可以加载和运行各种深度学习框架的模型,包括 TensorFlow、Caffe、Darknet、ONNX 等。
在使用 DNN 模块进行前向推理时,需要先加载模型文件并解析模型结构,然后将输入图像转换为模型需要的格式(例如使用 blobFromImage 函数将图像转换为 blob),最后调用网络的 forward 方法进行前向计算,并获取输出结果。输出结果可以是一个或多个张量,表示模型对输入图像的预测结果。这些张量可以使用 OpenCV 的 Mat 类型进行表示和处理。最后,可以根据具体应用场景对预测结果进行解析和可视化。
需要注意的是,虽然使用 OpenCV 进行前向推理可以方便地集成到 OpenCV 项目中,但其在模型的灵活性、性能和扩展性等方面可能不如使用原生的深度学习框架,因此根据具体需求选择合适的工具和技术是很重要的。
main.cpp
#include <fstream>
#include <sstream>
#include <iostream>
#include <opencv2/dnn.hpp>
#include <opencv2/imgproc.hpp>
#include <opencv2/highgui.hpp>

using namespace cv;
using namespace dnn;
using namespace std;

/**
这段代码定义了一个名为 YOLO 的类,实现了基于 YOLO 完成目标检测的
功能。类中包含了目标检测所需要的参数和方法,包括模型路径、阈值、锚
点、步长、类别文件、输入图像的宽高、类别等信息。类中的 detect 方法
用于对输入图像进行目标检测,返回检测结果的 Mat 表示形式。类中还包
含了一些辅助方法,如 resize_image 用于调整图像大小并返回调整后的
图像,normalize 用于对图像进行归一化处理,drawPred 用于将检测结
果绘制在原图上。其中,resize_image 方法还可以保持图像的长宽比不
变,即将图像缩放到指定大小并在较小的一维上补充为黑色像素。
**/
class YOLO
{
public:
	YOLO(string modelpath, float confThreshold, float nmsThreshold, float objThreshold);
	Mat detect(Mat& frame);
private:
	const float mean[3] = { 0.485, 0.456, 0.406 };
	const float std[3] = { 0.229, 0.224, 0.225 };
	const float anchors[3][6] = { {3,9,5,11,4,20}, {7,18,6,39,12,31},{19,50,38,81,68,157} };
	const float stride[3] = { 8.0, 16.0, 32.0 };
	const string classesFile = "bdd100k.names";
	const int inpWidth = 640;
	const int inpHeight = 640;
	float confThreshold;
	float nmsThreshold;
	float objThreshold;
	const bool keep_ratio = true;
	vector<string> classes;
	Net net;
	Mat resize_image(Mat srcimg, int* newh, int* neww, int* top, int* left);
	void normalize(Mat& srcimg);
	void drawPred(int classId, float conf, int left, int top, int right, int bottom, Mat& frame);
};
/**
这段代码是 YOLO 类的构造函数实现。构造函数接受四个参数,分别是模型
路径、置信度阈值、非极大值抑制(NMS)阈值和目标置信度阈值。在函数体
内,将构造函数参数的值分别保存到类的成员变量中。然后,使用
ifstream 对象读取类别文件(classesFile)中的类别名称,并将它们
保存到类的成员变量 classes 中。最后,使用 OpenCV 的 readNet 方
法读取模型(modelpath)并将结果保存到类的成员变量 net 中。
**/
YOLO::YOLO(string modelpath, float confThreshold, float nmsThreshold, float objThreshold)
{
	this->confThreshold = confThreshold;
	this->nmsThreshold = nmsThreshold;
	this->objThreshold = objThreshold;

	ifstream ifs(this->classesFile.c_str());
	string line;
	while (getline(ifs, line)) this->classes.push_back(line);
	this->net = readNet(modelpath);
}
/**
这段代码实现了 YOLO 类中的 resize_image 方法,用于调整输入图像
的大小。方法接受一个输入图像 srcimg 和四个指针参数 newh、neww、
top 和 left,分别表示调整后的图像高度、宽度、在高度方向的上方空白
像素数和在宽度方向的左侧空白像素数。方法返回调整后的图像 dstimg。
在函数体内,首先获取输入图像的高度和宽度,然后将 newh 和 neww 初
始化为类中定义的 inpHeight 和 inpWidth,即目标图像的高度和宽
度。如果类中定义了 keep_ratio 为 true,且输入图像的高度和宽度不
相等,则按照一定规则调整图像大小并保持长宽比不变。具体来说,如果高
宽比大于1,则将图像的高度调整为 inpHeight,宽度按比例缩放,并在图
像的左侧和右侧各填充一定数量的黑色像素,使图像宽度达到 inpWidth。
如果高宽比小于等于1,则将图像的宽度调整为 inpWidth,高度按比例缩
放,并在图像的上方和下方各填充一定数量的黑色像素,使图像高度达到
inpHeight。如果 keep_ratio 为 false,则直接使用 OpenCV 的
resize 函数将图像调整到指定大小。
最后,将调整后的图像 dstimg 返回。
**/
Mat YOLO::resize_image(Mat srcimg, int* newh, int* neww, int* top, int* left)
{
	int srch = srcimg.rows, srcw = srcimg.cols;
	*newh = this->inpHeight;
	*neww = this->inpWidth;
	Mat dstimg;
	if (this->keep_ratio && srch != srcw)
	{
		float hw_scale = (float)srch / srcw;
		if (hw_scale > 1)
		{
			*newh = this->inpHeight;
			*neww = int(this->inpWidth / hw_scale);
			resize(srcimg, dstimg, Size(*neww, *newh), INTER_AREA);
			*left = int((this->inpWidth - *neww) * 0.5);
			copyMakeBorder(dstimg, dstimg, 0, 0, *left, this->inpWidth - *neww - *left, BORDER_CONSTANT, 0);
		}
		else
		{
			*newh = (int)this->inpHeight * hw_scale;
			*neww = this->inpWidth;
			resize(srcimg, dstimg, Size(*neww, *newh), INTER_AREA);
			*top = (int)(this->inpHeight - *newh) * 0.5;
			copyMakeBorder(dstimg, dstimg, *top, this->inpHeight - *newh - *top, 0, 0, BORDER_CONSTANT, 0);
		}
	}
	else
	{
		resize(srcimg, dstimg, Size(*neww, *newh), INTER_AREA);
	}
	return dstimg;
}
/**
这段代码实现了 YOLO 类中的 normalize 方法,用于对输入图像进行归
一化处理。方法接受一个 Mat 类型的输入图像 img,将其转换为 CV_32F 类型。然后,遍历图像中的每个像素,对其进行归一化处理。

具体来说,对于每个像素,将其 RGB 三个通道的值乘以一个 scale 值(即 1/255),然后减去类中定义的均值(mean)并除以类中定义的标准差(std)进行归一化。归一化后的像素值保存回原始像素中,最后 normalize 方法返回归一化后的图像。

需要注意的是,这里假设输入图像是 RGB 格式的,因此对每个像素的三个通道进行了归一化处理。如果输入图像是 BGR 格式的,则需要将归一化的顺序从 RGB 改为 BGR。
**/
void YOLO::normalize(Mat& img)
{
	img.convertTo(img, CV_32F);
	int i = 0, j = 0;
	const float scale = 1.0 / 255.0;
	for (i = 0; i < img.rows; i++)
	{
		float* pdata = (float*)(img.data + i * img.step);
		for (j = 0; j < img.cols; j++)
		{
			pdata[0] = (pdata[0] * scale - this->mean[0]) / this->std[0];
			pdata[1] = (pdata[1] * scale - this->mean[1]) / this->std[1];
			pdata[2] = (pdata[2] * scale - this->mean[2]) / this->std[2];
			pdata += 3;
		}
	}
}
/**
这段代码实现了 YOLO 类中的 drawPred 方法,用于将目标检测结果绘制在原图上。方法接受六个参数,分别是类别 ID、目标置信度、目标框左上角和右下角的坐标、原始图像 frame。

在函数体内,首先使用 OpenCV 的 rectangle 函数在原图上绘制目标检测结果的边界框,其中左上角和右下角的坐标分别为 left、top 和 right、bottom。绘制的边界框的颜色为红色(Scalar(0, 0, 255)),线宽为2。

然后,获取目标检测结果的类别名称和置信度,并将它们组合成一个字符串 label。其中,类别名称保存在类的成员变量 classes 中,类别 ID 作为 label 字符串的索引。置信度保存在 conf 变量中,使用 format 函数将其转换为字符串并添加到 label 字符串后面。最后,使用 OpenCV 的 putText 函数将 label 字符串绘制在边界框的左上角,字体为 FONT_HERSHEY_SIMPLEX,字体大小为1,颜色为绿色(Scalar(0, 255, 0)),线宽为1。

需要注意的是,如果 label 字符串过长,可能会超出边界框的范围。为了避免这种情况,先计算 label 字符串的大小,将绘制字符串的起始位置 top 修改为 label 字符串的高度和当前 top 的最大值。同时,可以使用 rectangle 函数绘制一个矩形框作为背景,并将矩形框的左上角和右下角的坐标分别设置为 left 和 top。这样可以确保 label 字符串始终在边界框的上方,且不会超出边界框的范围。
**/
void YOLO::drawPred(int classId, float conf, int left, int top, int right, int bottom, Mat& frame)   // Draw the predicted bounding box
{
	//Draw a rectangle displaying the bounding box
	rectangle(frame, Point(left, top), Point(right, bottom), Scalar(0, 0, 255), 2);

	//Get the label for the class name and its confidence
	string label = format("%.2f", conf);
	label = this->classes[classId] + ":" + label;

	//Display the label at the top of the bounding box
	int baseLine;
	Size labelSize = getTextSize(label, FONT_HERSHEY_SIMPLEX, 0.5, 1, &baseLine);
	top = max(top, labelSize.height);
	//rectangle(frame, Point(left, top - int(1.5 * labelSize.height)), Point(left + int(1.5 * labelSize.width), top + baseLine), Scalar(0, 255, 0), FILLED);
	putText(frame, label, Point(left, top), FONT_HERSHEY_SIMPLEX, 1, Scalar(0, 255, 0), 1);
}
/**
这段代码实现了 YOLO 类中的 detect 方法,用于对输入图像进行目标检测并将检测结果可视化。方法接受一个输入图像 srcimg,并返回可视化后的图像 outimg。

在函数体内,首先调用 resize_image 方法将输入图像调整为模型可以接受的大小,并使用 normalize 方法对图像进行归一化处理。然后,使用 OpenCV 的 blobFromImage 函数将归一化后的图像转换为网络的输入 blob,并将其设置为网络的输入数据。调用网络的 forward 方法进行前向计算,并将输出结果保存到 outs 中。这里假设网络的输出结果共有三个,分别对应检测结果、车道线分割结果和行驶区域分割结果。

接下来,使用 clone 函数将输入图像 srcimg 复制到 outimg 中,并计算新的高度和宽度与原始图像的比例。然后,遍历输出结果中第二个和第三个元素(即车道线和行驶区域分割结果),对每个像素进行判断。如果该像素对应的行驶区域置信度大于车道线置信度,则将该像素标记为行驶区域,颜色为绿色(0, 255, 0);否则将该像素标记为车道线,颜色为红色(255, 0, 0)。

需要注意的是,由于 resize_image 方法可能会在图像的上、下、左、右四个方向填充黑色像素,因此在对输出结果进行遍历时需要使用 padh 和 padw 来计算实际的像素坐标。同时,由于网络的输入大小可能与输出大小不一致,因此需要根据输入大小(inpHeight 和 inpWidth)计算行驶区域和车道线分割结果在 outs 中的起始地址(pdata_drive 和 pdata_lane_line)。
**/
Mat YOLO::detect(Mat& srcimg)
{
	int newh = 0, neww = 0, padh = 0, padw = 0;
	Mat dstimg = this->resize_image(srcimg, &newh, &neww, &padh, &padw);
	this->normalize(dstimg);
	Mat blob = blobFromImage(dstimg);
	this->net.setInput(blob);
	vector<Mat> outs;
	this->net.forward(outs, this->net.getUnconnectedOutLayersNames());

	Mat outimg = srcimg.clone();
	float ratioh = (float)newh / srcimg.rows;
	float ratiow = (float)neww / srcimg.cols;
	int i = 0, j = 0, area = this->inpHeight*this->inpWidth;
	float* pdata_drive = (float*)outs[1].data;  ///drive area segment
	float* pdata_lane_line = (float*)outs[2].data;  ///lane line segment
	for (i = 0; i < outimg.rows; i++)
	{
		for (j = 0; j < outimg.cols; j++)
		{
			const int x = int(j*ratiow) + padw;
			const int y = int(i*ratioh) + padh;
			if (pdata_drive[y * this->inpWidth + x] < pdata_drive[area + y * this->inpWidth + x])
			{
				outimg.at<Vec3b>(i, j)[0] = 0;
				outimg.at<Vec3b>(i, j)[1] = 255;
				outimg.at<Vec3b>(i, j)[2] = 0;
			}
			if (pdata_lane_line[y * this->inpWidth + x] < pdata_lane_line[area + y * this->inpWidth + x])
			{
				outimg.at<Vec3b>(i, j)[0] = 255;
				outimg.at<Vec3b>(i, j)[1] = 0;
				outimg.at<Vec3b>(i, j)[2] = 0;
			}
		}
	}
	/generate proposals
	vector<int> classIds;
	vector<float> confidences;
	vector<Rect> boxes;
	ratioh = (float)srcimg.rows / newh;
	ratiow = (float)srcimg.cols / neww;
	int n = 0, q = 0, nout = this->classes.size() + 5, row_ind = 0;
	float* pdata = (float*)outs[0].data;
	for (n = 0; n < 3; n++)   ///�߶�
	{
		int num_grid_x = (int)(this->inpWidth / this->stride[n]);
		int num_grid_y = (int)(this->inpHeight / this->stride[n]);
		for (q = 0; q < 3; q++)    ///anchor��
		{
			const float anchor_w = this->anchors[n][q * 2];
			const float anchor_h = this->anchors[n][q * 2 + 1];
			for (i = 0; i < num_grid_y; i++)
			{
				for (j = 0; j < num_grid_x; j++)
				{
					const float box_score = pdata[4];
					if (box_score > this->objThreshold)
					{
						Mat scores = outs[0].row(row_ind).colRange(5, outs[0].cols);
						Point classIdPoint;
						double max_class_socre;
						// Get the value and location of the maximum score
						minMaxLoc(scores, 0, &max_class_socre, 0, &classIdPoint);
						if (max_class_socre > this->confThreshold)
						{
							float cx = (pdata[0] * 2.f - 0.5f + j) * this->stride[n];  ///cx
							float cy = (pdata[1] * 2.f - 0.5f + i) * this->stride[n];   ///cy
							float w = powf(pdata[2] * 2.f, 2.f) * anchor_w;   ///w
							float h = powf(pdata[3] * 2.f, 2.f) * anchor_h;  ///h

							int left = (cx - 0.5*w - padw)*ratiow;
							int top = (cy - 0.5*h - padh)*ratioh;

							classIds.push_back(classIdPoint.x);
							confidences.push_back(max_class_socre * box_score);
							boxes.push_back(Rect(left, top, (int)(w*ratiow), (int)(h*ratioh)));
						}
					}
					row_ind++;
					pdata += nout;
				}
			}
		}
	}

	// Perform non maximum suppression to eliminate redundant overlapping boxes with
	// lower confidences
	vector<int> indices;
	NMSBoxes(boxes, confidences, this->confThreshold, this->nmsThreshold, indices);
	for (size_t i = 0; i < indices.size(); ++i)
	{
		int idx = indices[i];
		Rect box = boxes[idx];
		this->drawPred(classIds[idx], confidences[idx], box.x, box.y,
			box.x + box.width, box.y + box.height, outimg);
	}
	return outimg;
}

int main()
{
/**
这段代码演示了如何使用 YOLO 类进行目标检测并将结果可视化。首先,创建一个 YOLO 类的实例 yolo_model,并指定模型文件路径为 "yolop.onnx"。同时,指定三个阈值,分别对应目标置信度、NMS 阈值和类别置信度阈值。

然后,读取待检测的图像并保存到 srcimg 中。调用 yolo_model 的 detect 方法对图像进行目标检测并将结果保存到 outimg 中。最后,使用 OpenCV 的 namedWindow 和 imshow 函数将可视化后的图像 outimg 显示在一个窗口中,并等待用户按下任意键后关闭窗口。

需要注意的是,由于 YOLO 模型通常需要较大的计算资源和时间,因此在实际应用中可能需要对图像进行分块处理或使用其他优化技术来提高检测速度。另外,模型的准确率也与训练数据、模型结构和参数等因素有关,可能需要根据具体应用场景进行调整和优化。
**/
	YOLO yolo_model("yolop.onnx", 0.25, 0.45, 0.5);
	string imgpath = "images/0ace96c3-48481887.jpg";
	Mat srcimg = imread(imgpath);
	Mat outimg = yolo_model.detect(srcimg);

	static const string kWinName = "Deep learning object detection in OpenCV";
	namedWindow(kWinName, WINDOW_NORMAL);
	imshow(kWinName, outimg);
	waitKey(0);
	destroyAllWindows();
}
main.py
import cv2
import argparse
import numpy as np

class yolop():
    def __init__(self, confThreshold=0.25, nmsThreshold=0.5, objThreshold=0.45):
        with open('bdd100k.names', 'rt') as f:
            self.classes = f.read().rstrip('\n').split('\n')   ###这个是在bdd100k数据集上训练的模型做opencv部署的,如果你在自己的数据集上训练出的模型做opencv部署,那么需要修改self.classes
        num_classes = len(self.classes)
        anchors = [[3,9,5,11,4,20], [7,18,6,39,12,31], [19,50,38,81,68,157]]
        self.nl = len(anchors)
        self.na = len(anchors[0]) // 2
        self.no = num_classes + 5
        self.stride = np.array([8., 16., 32.])
        self.anchor_grid = np.asarray(anchors, dtype=np.float32).reshape(self.nl, -1, 2)
        self.inpWidth = 640
        self.inpHeight = 640
        self.generate_grid()
        self.net = cv2.dnn.readNet('yolop.onnx')
        self.confThreshold = confThreshold
        self.nmsThreshold = nmsThreshold
        self.objThreshold = objThreshold
        self.mean = np.array([0.485, 0.456, 0.406], dtype=np.float32).reshape(1, 1, 3)
        self.std = np.array([0.229, 0.224, 0.225], dtype=np.float32).reshape(1, 1, 3)
        self.keep_ratio = True
    def generate_grid(self):
        self.grid = [np.zeros(1)] * self.nl
        self.length = []
        self.areas = []
        for i in range(self.nl):
            h, w = int(self.inpHeight/self.stride[i]), int(self.inpWidth/self.stride[i])
            self.length.append(int(self.na * h * w))
            self.areas.append(h*w)
            if self.grid[i].shape[2:4] != (h,w):
                self.grid[i] = self._make_grid(w, h)
    def _make_grid(self, nx=20, ny=20):
        xv, yv = np.meshgrid(np.arange(ny), np.arange(nx))
        return np.stack((xv, yv), 2).reshape((-1, 2)).astype(np.float32)

    def postprocess(self, frame, outs, newh, neww, padh, padw):
        frameHeight = frame.shape[0]
        frameWidth = frame.shape[1]
        ratioh, ratiow = frameHeight / newh, frameWidth / neww
        # Scan through all the bounding boxes output from the network and keep only the
        # ones with high confidence scores. Assign the box's class label as the class with the highest score.
        classIds = []
        confidences = []
        boxes = []
        for detection in outs:
            scores = detection[5:]
            classId = np.argmax(scores)
            confidence = scores[classId]
            if confidence > self.confThreshold and detection[4] > self.objThreshold:
                center_x = int((detection[0]-padw) * ratiow)
                center_y = int((detection[1]-padh) * ratioh)
                width = int(detection[2] * ratiow)
                height = int(detection[3] * ratioh)
                left = int(center_x - width / 2)
                top = int(center_y - height / 2)
                classIds.append(classId)
                confidences.append(float(confidence) * detection[4])
                boxes.append([left, top, width, height])

        # Perform non maximum suppression to eliminate redundant overlapping boxes with
        # lower confidences.
        indices = cv2.dnn.NMSBoxes(boxes, confidences, self.confThreshold, self.nmsThreshold)
        for i in indices:
            i = i[0]
            box = boxes[i]
            left = box[0]
            top = box[1]
            width = box[2]
            height = box[3]
            frame = self.drawPred(frame, classIds[i], confidences[i], left, top, left + width, top + height)
        return frame
    def drawPred(self, frame, classId, conf, left, top, right, bottom):
        # Draw a bounding box.
        cv2.rectangle(frame, (left, top), (right, bottom), (0, 0, 255), thickness=2)

        label = '%.2f' % conf
        label = '%s:%s' % (self.classes[classId], label)

        # Display the label at the top of the bounding box
        labelSize, baseLine = cv2.getTextSize(label, cv2.FONT_HERSHEY_SIMPLEX, 0.5, 1)
        top = max(top, labelSize[1])
        # cv.rectangle(frame, (left, top - round(1.5 * labelSize[1])), (left + round(1.5 * labelSize[0]), top + baseLine), (255,255,255), cv.FILLED)
        cv2.putText(frame, label, (left, top - 10), cv2.FONT_HERSHEY_SIMPLEX, 1, (0, 255, 0), thickness=1)
        return frame
    def resize_image(self, srcimg):
        padh, padw, newh, neww = 0, 0, self.inpHeight, self.inpWidth
        if self.keep_ratio and srcimg.shape[0] != srcimg.shape[1]:
            hw_scale = srcimg.shape[0] / srcimg.shape[1]
            if hw_scale > 1:
                newh, neww = self.inpHeight, int(self.inpWidth / hw_scale)
                img = cv2.resize(srcimg, (neww, newh), interpolation=cv2.INTER_AREA)
                padw = int((self.inpWidth - neww) * 0.5)
                img = cv2.copyMakeBorder(img, 0, 0, padw, self.inpWidth - neww - padw, cv2.BORDER_CONSTANT,
                                         value=0)  # add border
            else:
                newh, neww = int(self.inpHeight * hw_scale), self.inpWidth
                img = cv2.resize(srcimg, (neww, newh), interpolation=cv2.INTER_AREA)
                padh = int((self.inpHeight - newh) * 0.5)
                img = cv2.copyMakeBorder(img, padh, self.inpHeight - newh - padh, 0, 0, cv2.BORDER_CONSTANT, value=0)
        else:
            img = cv2.resize(srcimg, (self.inpWidth, self.inpHeight), interpolation=cv2.INTER_AREA)
        return img, newh, neww, padh, padw

    def _normalize(self, img):  ### c++: https://blog.csdn.net/wuqingshan2010/article/details/107727909
        img = img.astype(np.float32) / 255.0
        img = (img - self.mean) / self.std
        return img
    def detect(self, srcimg):
        img, newh, neww, padh, padw = self.resize_image(srcimg)
        img = self._normalize(img)
        blob = cv2.dnn.blobFromImage(img)
        # Sets the input to the network
        self.net.setInput(blob)

        # Runs the forward pass to get output of the output layers
        outs = self.net.forward(self.net.getUnconnectedOutLayersNames())
        # inference output
        outimg = srcimg.copy()
        drive_area_mask = outs[1][:, padh:(self.inpHeight - padh), padw:(self.inpWidth - padw)]
        seg_id = np.argmax(drive_area_mask, axis=0).astype(np.uint8)
        seg_id = cv2.resize(seg_id, (srcimg.shape[1], srcimg.shape[0]), interpolation=cv2.INTER_NEAREST)
        outimg[seg_id == 1] = [0, 255, 0]

        lane_line_mask = outs[2][:, padh:(self.inpHeight - padh), padw:(self.inpWidth - padw)]
        seg_id = np.argmax(lane_line_mask, axis=0).astype(np.uint8)
        seg_id = cv2.resize(seg_id, (srcimg.shape[1], srcimg.shape[0]), interpolation=cv2.INTER_NEAREST)
        outimg[seg_id == 1] = [255, 0, 0]

        det_out = outs[0]
        row_ind = 0
        for i in range(self.nl):
            det_out[row_ind:row_ind+self.length[i], 0:2] = (det_out[row_ind:row_ind+self.length[i], 0:2] * 2. - 0.5 + np.tile(self.grid[i],(self.na, 1))) * int(self.stride[i])
            det_out[row_ind:row_ind+self.length[i], 2:4] = (det_out[row_ind:row_ind+self.length[i], 2:4] * 2) ** 2 * np.repeat(self.anchor_grid[i], self.areas[i], axis=0)
            row_ind += self.length[i]
        outimg = self.postprocess(outimg, det_out, newh, neww, padh, padw)
        return outimg

if __name__ == "__main__":
    parser = argparse.ArgumentParser()
    parser.add_argument("--imgpath", type=str, default='images/0ace96c3-48481887.jpg', help="image path")
    parser.add_argument('--confThreshold', default=0.25, type=float, help='class confidence')
    parser.add_argument('--nmsThreshold', default=0.45, type=float, help='nms iou thresh')
    parser.add_argument('--objThreshold', default=0.5, type=float, help='object confidence')
    args = parser.parse_args()

    yolonet = yolop(confThreshold=args.confThreshold, nmsThreshold=args.nmsThreshold, objThreshold=args.objThreshold)
    srcimg = cv2.imread(args.imgpath)
    outimg = yolonet.detect(srcimg)

    winName = 'Deep learning object detection in OpenCV'
    cv2.namedWindow(winName, 0)
    cv2.imshow(winName, outimg)
    cv2.waitKey(0)
    cv2.destroyAllWindows()
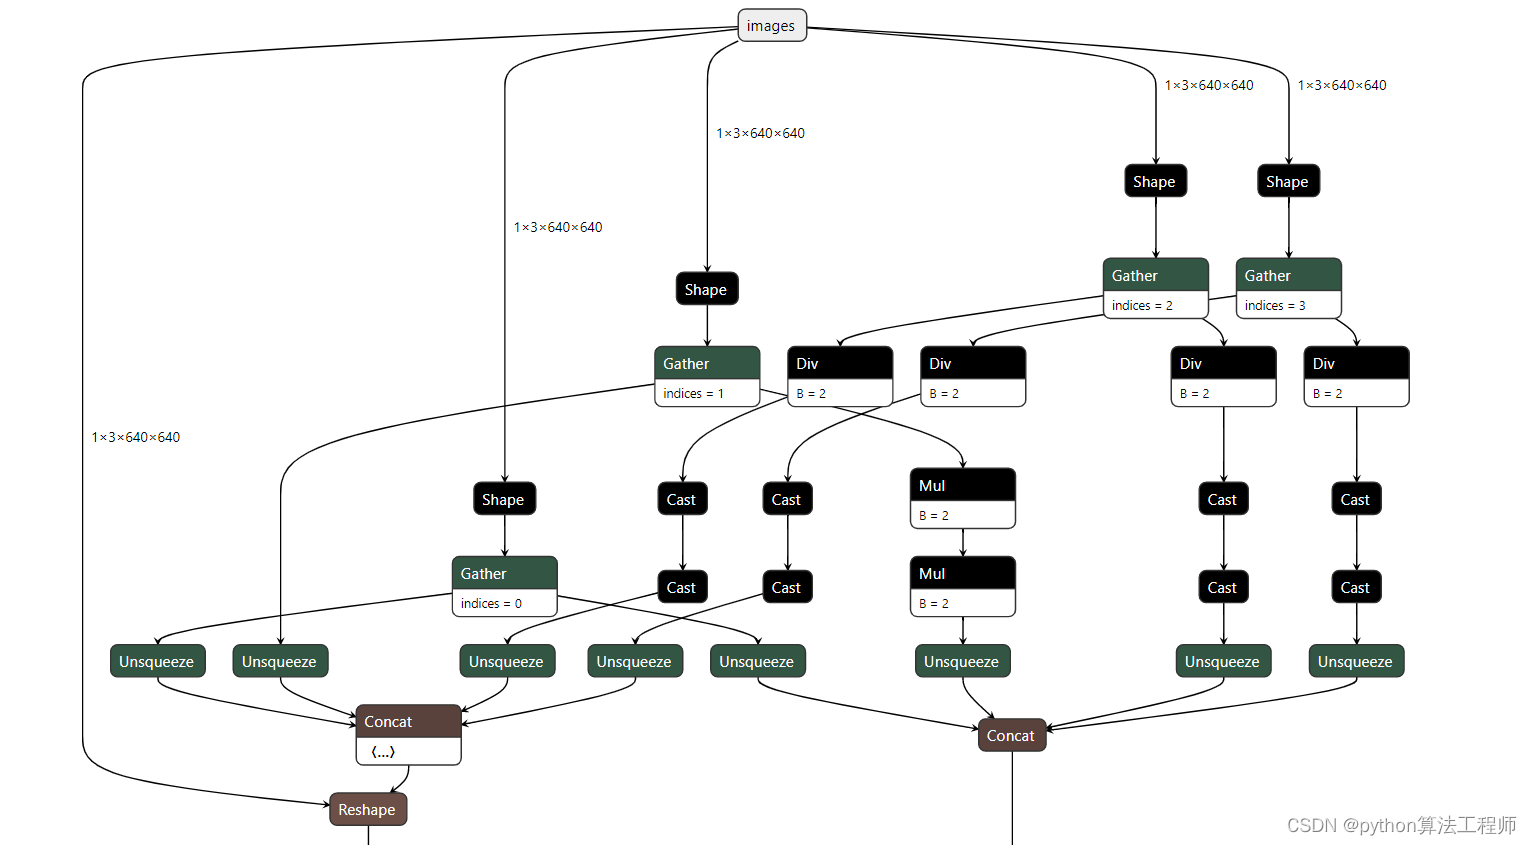
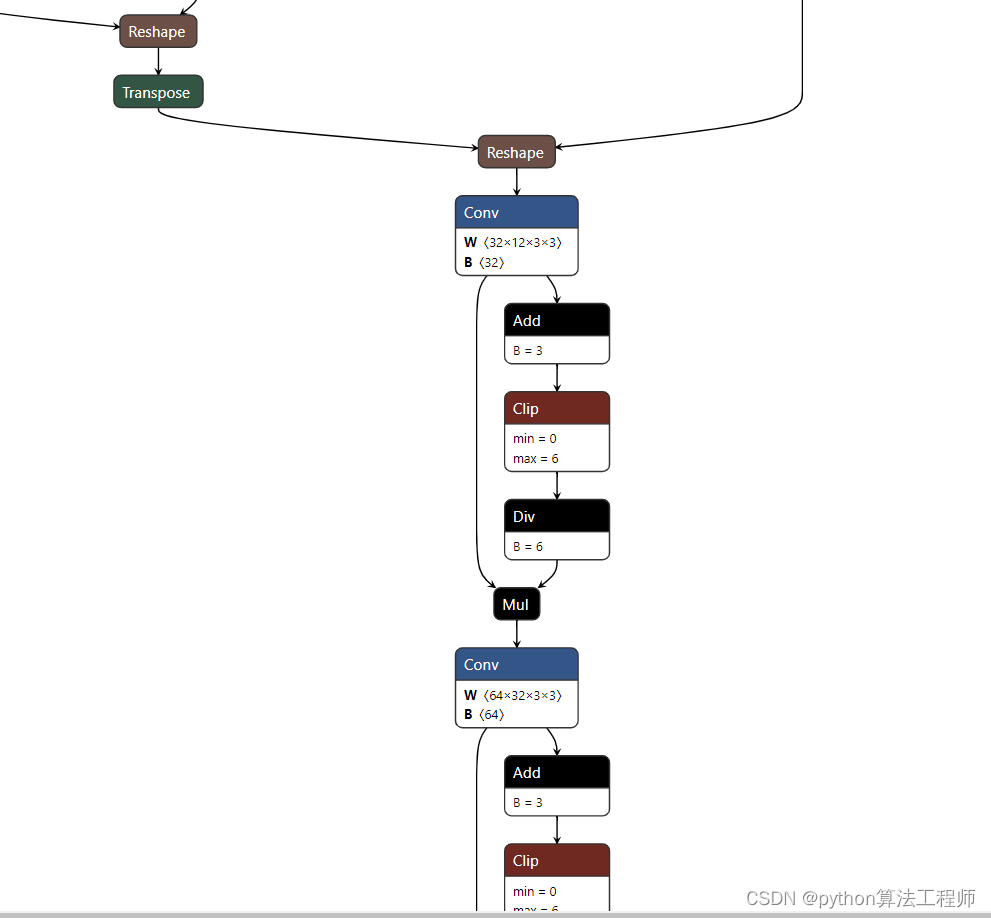
网络结构图
