python小游戏编程arcade----坦克动画图片合成
- 前言
- 坦克动画图片合成
- 1、PIL image
- 1.1 读取文件并转换
- 1.2 裁切,粘贴
- 1.3 效果图
- 1.4 代码实现
- 2、处理图片的透明度问题
- 2.1 past 函数的三个参数
- 2.2 注意点1
- 2.3 注意点2
- 2.4 效果
- 2.4 代码实现
前言
接上篇文章继续解绍arcade游戏编程的基本知识。如何通过程序合成所需的动画图片
坦克动画图片合成
游戏素材
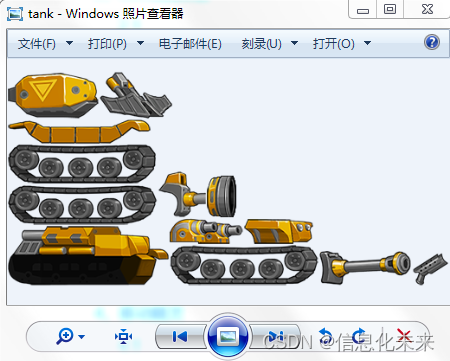
如何通过程序合成所需的动画图片
1、PIL image
1.1 读取文件并转换
from PIL import Image
img = Image.open(“images/tank.png”).convert(“RGBA”) #读取系统的内照片
1.2 裁切,粘贴
    def crop(self, box=None):
        """
        Returns a rectangular region from this image. The box is a
        4-tuple defining the left, upper, right, and lower pixel
        coordinate. See :ref:`coordinate-system`.

        Note: Prior to Pillow 3.4.0, this was a lazy operation.

        :param box: The crop rectangle, as a (left, upper, right, lower)-tuple.
        :rtype: :py:class:`~PIL.Image.Image`
        :returns: An :py:class:`~PIL.Image.Image` object.
        """

        if box is None:
            return self.copy()

        if box[2] < box[0]:
            raise ValueError("Coordinate 'right' is less than 'left'")
        elif box[3] < box[1]:
            raise ValueError("Coordinate 'lower' is less than 'upper'")

        self.load()
        return self._new(self._crop(self.im, box))
crop函数带的参数为(起始点的横坐标,起始点的纵坐标,宽度,高度)
paste函数的参数为(需要修改的图片,粘贴的起始点的横坐标,粘贴的起始点的纵坐标)
1.3 效果图

1.4 代码实现
from PIL import Image
import colorsys

i = 1
j = 1
img = Image.open("images/tank.png").convert("RGBA") #读取系统的内照片

box=(0,179,185,256)
pp = img.crop(box)
box=(0,132,175,179)
pp2 = img.crop(box)
print(pp2.size)
pp2.show()
nimg= Image.new("RGBA",(200,200))
nimg.paste(pp)
nimg.show()
# nimg.putalpha(pp2)
nimg.paste(pp2,(5,47,180,94))

nimg.show()
透明度不对
2、处理图片的透明度问题
2.1 past 函数的三个参数
    def paste(self, im, box=None, mask=None):
        """
        Pastes another image into this image. The box argument is either
        a 2-tuple giving the upper left corner, a 4-tuple defining the
        left, upper, right, and lower pixel coordinate, or None (same as
        (0, 0)). See :ref:`coordinate-system`. If a 4-tuple is given, the size
        of the pasted image must match the size of the region.

        If the modes don't match, the pasted image is converted to the mode of
        this image (see the :py:meth:`~PIL.Image.Image.convert` method for
        details).

        Instead of an image, the source can be a integer or tuple
        containing pixel values.  The method then fills the region
        with the given color.  When creating RGB images, you can
        also use color strings as supported by the ImageColor module.

        If a mask is given, this method updates only the regions
        indicated by the mask. You can use either "1", "L", "LA", "RGBA"
        or "RGBa" images (if present, the alpha band is used as mask).
        Where the mask is 255, the given image is copied as is.  Where
        the mask is 0, the current value is preserved.  Intermediate
        values will mix the two images together, including their alpha
        channels if they have them.

        See :py:meth:`~PIL.Image.Image.alpha_composite` if you want to
        combine images with respect to their alpha channels.

        :param im: Source image or pixel value (integer or tuple).
        :param box: An optional 4-tuple giving the region to paste into.
           If a 2-tuple is used instead, it's treated as the upper left
           corner.  If omitted or None, the source is pasted into the
           upper left corner.

           If an image is given as the second argument and there is no
           third, the box defaults to (0, 0), and the second argument
           is interpreted as a mask image.
        :param mask: An optional mask image.
        """

        if isImageType(box) and mask is None:
            # abbreviated paste(im, mask) syntax
            mask = box
            box = None

        if box is None:
            box = (0, 0)

        if len(box) == 2:
            # upper left corner given; get size from image or mask
            if isImageType(im):
                size = im.size
            elif isImageType(mask):
                size = mask.size
            else:
                # FIXME: use self.size here?
                raise ValueError("cannot determine region size; use 4-item box")
            box += (box[0] + size[0], box[1] + size[1])

        if isinstance(im, str):
            from . import ImageColor

            im = ImageColor.getcolor(im, self.mode)

        elif isImageType(im):
            im.load()
            if self.mode != im.mode:
                if self.mode != "RGB" or im.mode not in ("LA", "RGBA", "RGBa"):
                    # should use an adapter for this!
                    im = im.convert(self.mode)
            im = im.im

        self._ensure_mutable()

        if mask:
            mask.load()
            self.im.paste(im, box, mask.im)
        else:
            self.im.paste(im, box)
2.2 注意点1
原图读取时要有透明度层的数据
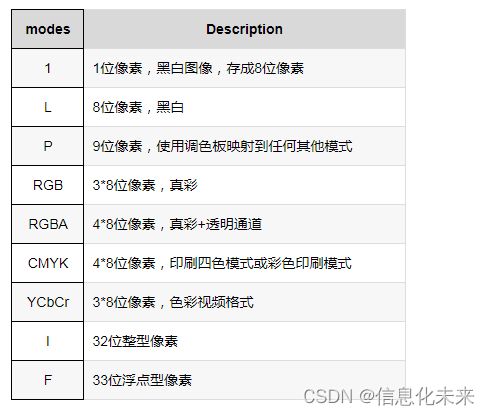
img = Image.open(“images/tank.png”).convert(“RGBA”) #读取系统的内照片
2.3 注意点2
pp2 = img.crop(box)
#分离通道
r, g, b, a = pp2.split()
#粘贴要加mask
nimg.paste(pp2,(5,47,180,94),mask=a)
2.4 效果
微调数据

2.4 代码实现
# _*_ coding: UTF-8 _*_
# 开发团队: 信息化未来
# 开发人员: Administrator
# 开发时间:2022/11/30 20:17
# 文件名称: 图片合成.py
# 开发工具: PyCharm

from PIL import Image
import colorsys

i = 1
j = 1
img = Image.open("images/tank.png").convert("RGBA") #读取系统的内照片

box=(0,179,185,256)
pp = img.crop(box)
print(pp.size)
box=(0,132,175,179)
pp2 = img.crop(box)
r, g, b, a = pp2.split()
print(pp2.size)
pp2.show()
nimg= Image.new("RGBA",(200,200))
nimg.paste(pp,(0,123,185,200))
nimg.show()
# nimg.putalpha(pp2)
nimg.paste(pp2,(0,153,175,200),mask=a)

nimg.show()
今天是以此模板持续更新此育儿专栏的第 39/50次。
可以关注我,点赞我、评论我、收藏我啦。

![[附源码]Python计算机毕业设计Django电影推荐网站](https://img-blog.csdnimg.cn/986219b90bb84dc0aad3078a5f483c5d.png)
