提示:页面架构是通过UICollectionView做的分页,分页点PageControl使用的是<SDCycleScrollView/TAPageControl.h> ,布局架构使用的是Masonry
前言
为了实现UICollectionView无限翻动,连续滑动,主要是利用pagingEnabled属性,配合 UIScrollViewDelegate的代理方法来实现的。
一、准备列表数据和计算思路
1.数据源的创建(9个元素,作为数据源),目的是让翻页效果是3页。
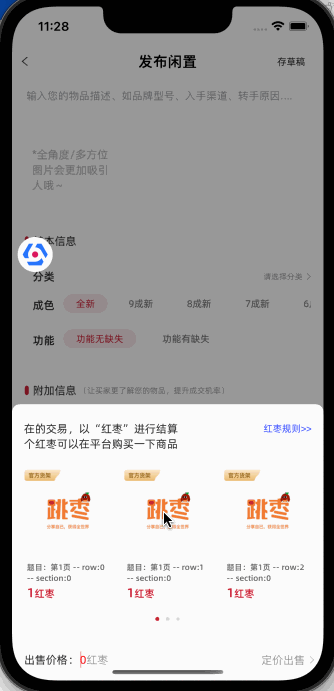
最终达到效果:
2. 思路:通过设置轮播倍数目的是通过建立多个section来实现轮播联动在最后一次循环从头开始排序达到循环播放。
二、使用步骤
1.初始化尺寸数据准备
代码如下(示例):
static CGFloat const Cell_Height = 174;
static CGFloat const PageDot_Height = 30;

// 轮播倍数Num
static const int kLoopMaxMultiple = 4;
-(void)setArr_data:(NSMutableArray *)arr_data{
_arr_data = arr_data;
self.pageControl.numberOfPages = arr_data.count%3==0?arr_data.count/3:(arr_data.count/3+1);
self.pageControl.currentPage = 0;
[self.mainCV reloadData];
}2.绘画view
代码如下(示例):
- (void)drawView {
    self.backgroundColor = [UIColor clearColor];
    CGFloat img_w = (SCREEN_WIDTH - 15 * 4) / 3.0;

    [self addSubview:self.bkgView];
    self.bkgView.backgroundColor = [UIColor clearColor];
    [self.bkgView mas_makeConstraints:^(MASConstraintMaker *make) {
        make.left.top.right.mas_equalTo(self);
        make.height.mas_equalTo(Cell_Height+PageDot_Height);
    }];

    //collectionview
    [self.bkgView addSubview:self.mainCV];
    self.mainCV.delegate = self;
    self.mainCV.dataSource = self;
    [self.mainCV mas_makeConstraints:^(MASConstraintMaker *make) {
        make.top.mas_equalTo(self.bkgView.mas_top);
        make.left.mas_equalTo(self.bkgView.mas_left).mas_offset(15);
        make.right.mas_equalTo(self.bkgView.mas_right).mas_offset(-0);
        make.height.mas_equalTo(Cell_Height);
    }];

    [self.mainCV registerClass:[UICollectionViewCell class] forCellWithReuseIdentifier:@"cell"];
    [self.mainCV registerClass:[TZUploadNewPriceGoodsColCell class] forCellWithReuseIdentifier:@"TZUploadNewPriceGoodsColCell"];

    //pagecontrol
    [self.bkgView addSubview:self.pageControl];
    self.pageControl.frame = CGRectMake(0, Cell_Height, SCREEN_WIDTH, 30);
}
- (UIImage *)zd_imageWithColor:(UIColor *)color
                          size:(CGSize)size
                          text:(NSString *)text
                textAttributes:(NSDictionary *)textAttributes
                      circular:(BOOL)isCircular {
    if (!color || size.width <= 0 || size.height <= 0) return nil;
    CGRect rect = CGRectMake(0, 0, size.width, size.height);
    UIGraphicsBeginImageContextWithOptions(rect.size, NO, 0);
    CGContextRef context = UIGraphicsGetCurrentContext();
    // circular
    if (isCircular) {
        CGPathRef path = CGPathCreateWithEllipseInRect(rect, NULL);
        CGContextAddPath(context, path);
        CGContextClip(context);
        CGPathRelease(path);
    }
    // color
    CGContextSetFillColorWithColor(context, color.CGColor);
    CGContextFillRect(context, rect);
    //    // text
    //    CGSize textSize = [text sizeWithAttributes:textAttributes];
    //    [text drawInRect:CGRectMake((size.width - textSize.width) / 2, (size.height - textSize.height) / 2, textSize.width, textSize.height) withAttributes:textAttributes];
    UIImage *image = UIGraphicsGetImageFromCurrentImageContext();
    UIGraphicsEndImageContext();
    return image;
}

#pragma mark - get -
-(UIView *)bkgView{
    if(!_bkgView){
        _bkgView = [[UIView alloc]init];
        _bkgView.backgroundColor = [UIColor clearColor];
        _bkgView.userInteractionEnabled = YES;
    }
    return _bkgView;
}

-(UICollectionView *)mainCV{
    if(!_mainCV){
        CGFloat img_w = (SCREEN_WIDTH - 15 * 4) / 3.0;
        UICollectionViewFlowLayout *flowLayout = [[UICollectionViewFlowLayout alloc] init];
        flowLayout.itemSize = CGSizeMake(img_w, img_w*2);

        //管上下缝隙 minimumLineSpacing
        flowLayout.minimumLineSpacing = 15;
        //管左右缝隙 minimumInteritemSpacing
        flowLayout.minimumInteritemSpacing = 15;
        flowLayout.sectionInset = UIEdgeInsetsMake(0, 15, 0, 0);
        flowLayout.scrollDirection = UICollectionViewScrollDirectionHorizontal;
        _mainCV = [[UICollectionView alloc] initWithFrame:CGRectZero collectionViewLayout:flowLayout];
        _mainCV.bounces = YES;
        _mainCV.pagingEnabled = YES;
        _mainCV.backgroundColor = [UIColor clearColor];
        _mainCV.showsHorizontalScrollIndicator = NO;
        _mainCV.showsVerticalScrollIndicator = NO;
    }
    return _mainCV;
}

- (TAPageControl *)pageControl {
    if (_pageControl == nil) {
        _pageControl = [[TAPageControl alloc] init];
        _pageControl.currentDotImage = [self zd_imageWithColor:[UIColor colorWithHexString:@"#C32136"] size:CGSizeMake(5, 5) text:@"" textAttributes:@{} circular:YES];
        _pageControl.dotImage = [self zd_imageWithColor:[UIColor colorWithHexString:@"#DEDEDE" alpha:1.0] size:CGSizeMake(5, 5) text:@"" textAttributes:@{} circular:YES];
        _pageControl.shouldResizeFromCenter = YES;
    }
    return _pageControl;
}
3.关键步骤和思路
1.获取显示页面cell的index目的是为了计算页面的页数
/**
 获取scrollView的index

 @param scrollView scrollView
 @return index
 */
- (NSIndexPath* )indexWithScrollView:(UIScrollView * _Nonnull)scrollView {

    UICollectionView *cv = scrollView;
    NSArray* visibleCellIndex = cv.indexPathsForVisibleItems;
     NSArray *sortedIndexPaths = [visibleCellIndex sortedArrayUsingComparator:^NSComparisonResult(id obj1, id obj2) {
            NSIndexPath *path1 = (NSIndexPath *)obj1;
            NSIndexPath *path2 = (NSIndexPath *)obj2;
            return [path1 compare:path2];
        }];

    NSIndexPath* indexPath = [sortedIndexPaths firstObject];
    return indexPath;
}
2.滚动到相应的页数collectionview和Pagecontrol联动
/**
 滚动到指定索引

 @param scrollView scrollView
 */
- (void)scrollToIndex:(UIScrollView *)scrollView {
    NSIndexPath* index = [self indexWithScrollView:scrollView];

    NSInteger item_section = index.section;
    if (index.section == kLoopMaxMultiple - 1) {
        item_section = 0;
    }
    NSIndexPath *indexPath = [NSIndexPath indexPathForItem: index.row inSection:item_section];
    [self.mainCV scrollToItemAtIndexPath:indexPath atScrollPosition:UICollectionViewScrollPositionLeft animated:NO];

    self.pageControl.currentPage = index.row/3;

}
3.UICollectionView代理方法(将分格空间做在cell 里面,不然整页翻动会有偏移偏移的量为分隔空间的倍数),将数据赋值多份通过多个section来实现第一次最后一帧能够与第一帧接上
#pragma mark-- 数据 --

- (NSInteger)numberOfSectionsInCollectionView:(UICollectionView *)collectionView {
    return kLoopMaxMultiple;
}
- (NSInteger)collectionView:(UICollectionView *)collectionView numberOfItemsInSection:(NSInteger)section {

    return self.arr_data.count;
}

- (UICollectionViewCell *)collectionView:(UICollectionView *)collectionView cellForItemAtIndexPath:(NSIndexPath *)indexPath {

    TZUploadNewPriceGoodsColCell *cell = [collectionView dequeueReusableCellWithReuseIdentifier:@"TZUploadNewPriceGoodsColCell" forIndexPath:indexPath];

    cell.titL.text = [NSString stringWithFormat:@"题目:第%ld页 -- row:%ld  -- section:%ld",indexPath.row/3+1,indexPath.row,indexPath.section];
    return cell;
}

- (void)collectionView:(UICollectionView *)collectionView didSelectItemAtIndexPath:(NSIndexPath *)indexPath {

}

- (CGSize)collectionView:(UICollectionView *)collectionView layout:(UICollectionViewLayout *)collectionViewLayout sizeForItemAtIndexPath:(NSIndexPath *)indexPath {
    CGFloat img_w = (SCREEN_WIDTH - 15 * 4) / 3.0;

    return CGSizeMake(floor(img_w)+15, Cell_Height);
}

- (UIEdgeInsets)collectionView:(UICollectionView *)collectionView layout:(UICollectionViewLayout *)collectionViewLayout insetForSectionAtIndex:(NSInteger)section {
    return UIEdgeInsetsMake(0, 0, 0, 0);
}
- (CGFloat)collectionView:(UICollectionView *)collectionView layout:(UICollectionViewLayout *)collectionViewLayout minimumLineSpacingForSectionAtIndex:(NSInteger)section {
    return 0.000001;
}
- (CGFloat)collectionView:(UICollectionView *)collectionView layout:(UICollectionViewLayout *)collectionViewLayout minimumInteritemSpacingForSectionAtIndex:(NSInteger)section {
    return 0.000001;
}

// 设置区头尺寸高度
- (CGSize)collectionView:(UICollectionView *)collectionView layout:(UICollectionViewLayout *)collectionViewLayout referenceSizeForHeaderInSection:(NSInteger)section {
    CGSize size = CGSizeMake(0.00001, 0.00001);
    return size;
}

// 设置区尾尺寸高度
- (CGSize)collectionView:(UICollectionView *)collectionView layout:(UICollectionViewLayout *)collectionViewLayout referenceSizeForFooterInSection:(NSInteger)section {
    return CGSizeMake(0.00001, 0.00001);
}
4.UIScrollViewDelegate代理方法
-
scrollViewDidEndScrollingAnimation 不是人为滚动的方法
-
scrollViewDidEndDecelerating 是人为滑动的方法
#pragma mark - UIScrollViewDelegate
- (void)scrollViewDidScroll:(UIScrollView *)scrollView {
    NSIndexPath *indexP = [self indexWithScrollView:scrollView];
    NSInteger index = indexP.row/3;
    self.pageControl.currentPage = index;
}

//不是人为滚动
- (void)scrollViewDidEndScrollingAnimation:(UIScrollView *)scrollView {
    [self scrollToIndex:scrollView];
}

- (void)scrollViewWillBeginDragging:(UIScrollView *)scrollView {

}
//是人为滚动
- (void)scrollViewDidEndDecelerating:(UIScrollView *)scrollView {
    [self scrollToIndex:scrollView];
}
总结
-
通过UICollectionView的属性@property (nonatomic, readonly) NSArray<NSIndexPath *> *indexPathsForVisibleItems;来获取当前页面上显示的cell再排序(**排序很重要)
-
当当前cell的index.section == kLoopMaxMultiple - 1 是最后一个分区的时候一定要去滚动到第一个分区从新开始 [self.mainCV scrollToItemAtIndexPath:indexPath atScrollPosition:UICollectionViewScrollPositionLeft animated:NO]; (动画要关了)
-
UIScrollViewDelegate的代理一定要区分停止滚动的类型(人为拖拽scrollViewDidEndDecelerating、和代码自动滚动scrollViewDidEndScrollingAnimation)