水到渠成,冲呀冲呀
文章目录
- 1 准备工作
- 1.1 在Idea创建一个Maven项目
- 1.2 引入servlet,masql,jackson依赖
- 1.3 准备web.xml文件
- 2. 数据库建表
- 3. 封装DBUtil
- 4. 创建实体类
- 4.1 Blog类
- 4.2 User类
- 5. 封装数据库的增删改查
- 5.1 对于blog的操作
- 5.1.1 增加操作
- 5.1.2 根据blogId查询
- 5.1 3 根据userId进行查询
- 5.2 对user表的操作
- 6. 前后端接口的实现
- 6.1 登陆页面
- 6.1.1 对登录注册进行响应
- 6.1.2 获取用户信息
- 6.2 博客列表页,博客详情页,博客编辑页
- 6.2.1 博客列表页与博客详情页
- 6.2.2 博客编辑页
- 6.3 注销用户信息
- 7. 部署到服务器上
1 准备工作
1.1 在Idea创建一个Maven项目
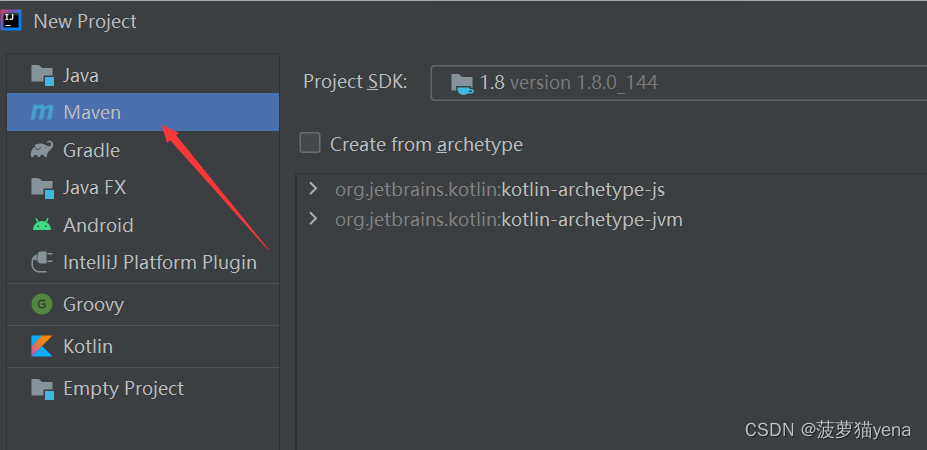
File->new Project ->Maven.
1.2 引入servlet,masql,jackson依赖
在浏览器搜索maven仓库,下图为官网。

搜索sevlet->选择Java Servlet API->根据Tomcat版本,选择对应的Sevlet版本(在这个网站搜索对应版本 :http://tomcat.apache.org/whichversion.html ),我选的是3.0.1,点击。

复制如下代码

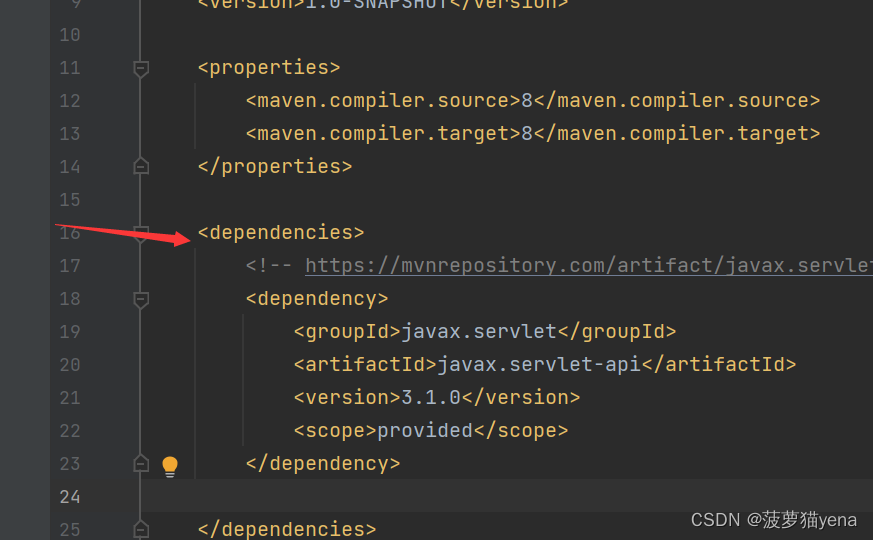
打开Maven中的pom.xml文件,复制到文件中,如下图所示,注意,要先添加 ,之后再复制
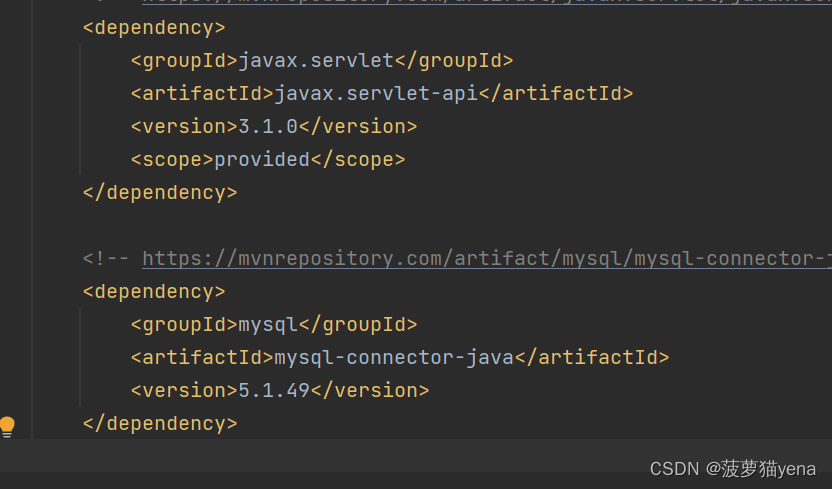
之后,再maven仓库中搜索mysql->选择mysql Connector Java->选择是5.几的版本,复制代码到pom.xml

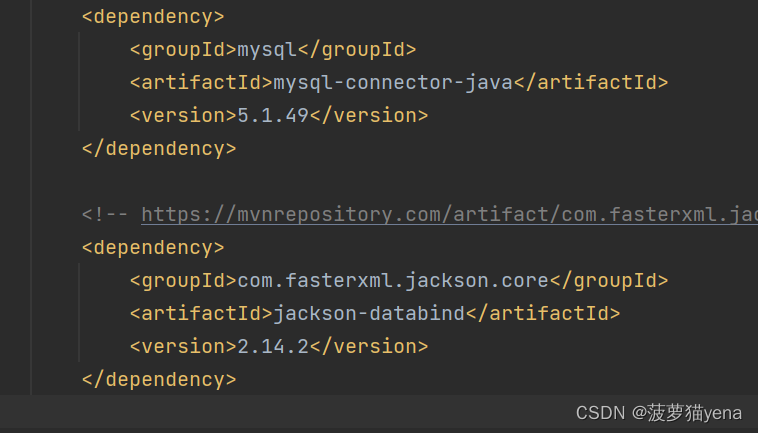
再引入jackson依赖,在maven仓库中搜索jackson->选择jackson databind->这里选择的是2.14.2,复制代码到pom.xml中,如下图所示。
1.3 准备web.xml文件
在Idea中main目录下,创建目录,名字为webapp
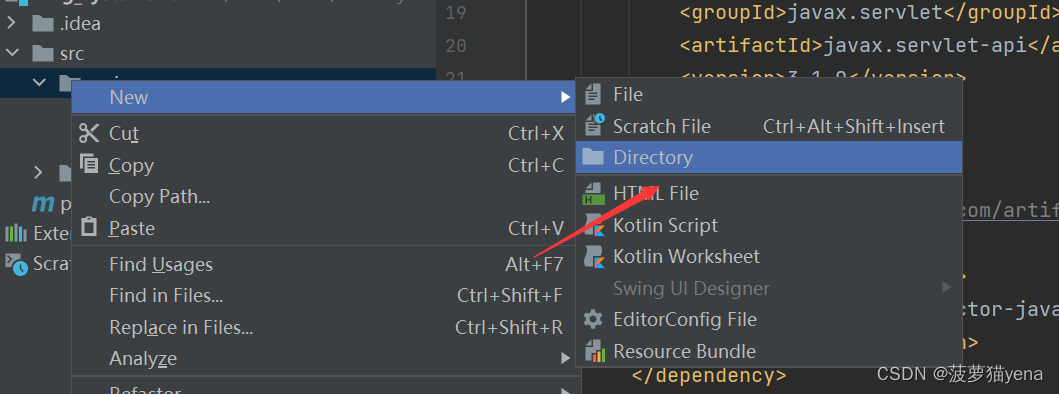
在webapp目录下创建目录,目录名为WEB-INF
在WEB-INF目录下创建文件web.xml

直接复制如下代码到web.xml中,不需要记下来,用的时候复制就行。
<!DOCTYPE web-app PUBLIC
        "-//Sun Microsystems, Inc.//DTD Web Application 2.3//EN"
        "http://java.sun.com/dtd/web-app_2_3.dtd" >

<web-app>
    <display-name>Archetype Created Web Application</display-name>
</web-app>
2. 数据库建表
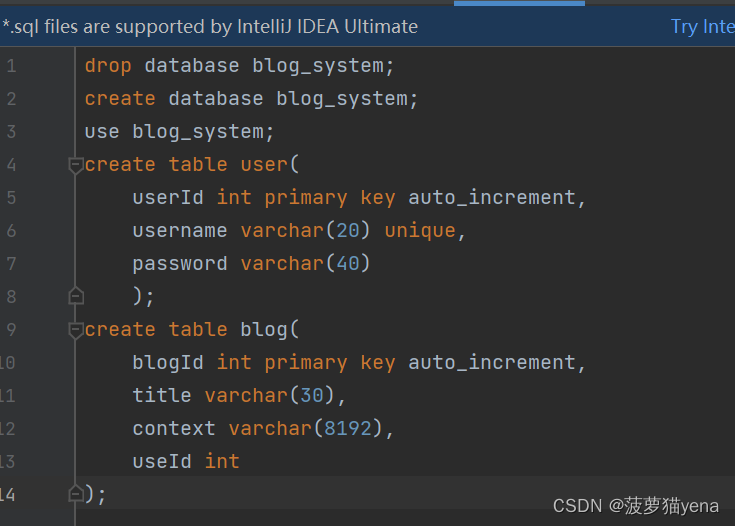
这个项目中有两个对象,博客信息与用户信息,且用户与博客是一对多的关系。所以,我们需要在数据库中创建两张表,如下,图,在test目录下,创建文件- - dp.sql,我们在这里,写数据库创建表的操作,这里可以相当于代码的保存,下次创建数据库,直接在这里复制就行,不需要再重复敲一遍。
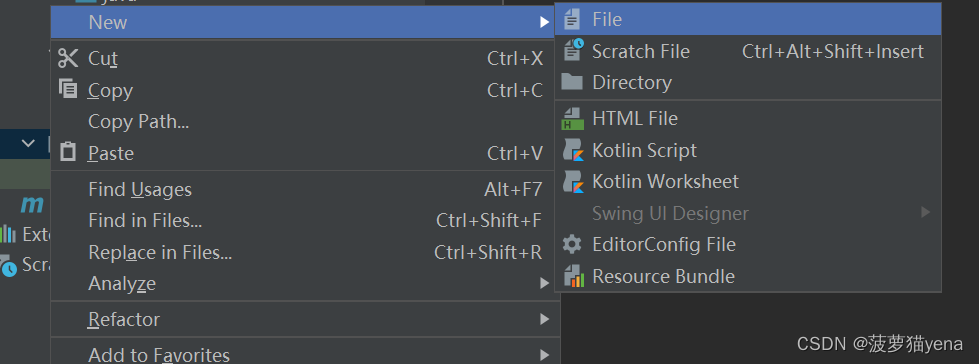
创建表,如下图所示。
3. 封装DBUtil
这里主要是IDEA与数据库的连接和断开操作。
首先,我们在java目录下新建两个包,一个名为api,用于编写前后端接口,另一个名为model,用于创建实体类,与表的增删改查。
在model包中,新建java文件,名为DBUtil

先建立一个用于数据库与IDEA建立和断开连接的对象。
private static DataSource dataSource = new MysqlDataSource();
给对象添加属性,3306为数据库端口号,安装的时候,默认为3306,若有修改,则按修改之后的来。blog_system是要操作的数据库名,以自己的库名为基准,utf8为字符集设置。root为用户名,默认为root,之后,是数据库密码,填写自己的数据库密码即可。
	 static {
        ((MysqlDataSource)dataSource).setUrl("jdbc:mysql://127.0.0.1:3306/blog_system?characterEncoding=utf8&userSSL=false");
        ((MysqlDataSource)dataSource).setUser("root");
        ((MysqlDataSource)dataSource).setPassword("");
    }
之后,建立和断开连接
//建立连接
 	 public static Connection getConnection() throws SQLException {
        return dataSource.getConnection();
    }

    //断开连接
    public static void close(Connection connection, PreparedStatement statement, ResultSet resultSet){
        if(connection != null){
            try {
                connection.close();
            } catch (SQLException throwables) {
                throwables.printStackTrace();
            }
        }
        if(statement != null){
            try {
                statement.close();
            } catch (SQLException throwables) {
                throwables.printStackTrace();
            }
        }
        if(resultSet != null){
            try {
                resultSet.close();
            } catch (SQLException throwables) {
                throwables.printStackTrace();
            }
        }
     }
总体代码如下
package model;

import com.mysql.jdbc.jdbc2.optional.MysqlDataSource;

import javax.sql.DataSource;
import java.sql.Connection;
import java.sql.PreparedStatement;
import java.sql.ResultSet;
import java.sql.SQLException;

public class DBUtil {
    private static DataSource dataSource = new MysqlDataSource();
    static {
        ((MysqlDataSource)dataSource).setUrl("jdbc:mysql://127.0.0.1:3306/blog_system?characterEncoding=utf8&userSSL=false");
        ((MysqlDataSource)dataSource).setUser("root");
        ((MysqlDataSource)dataSource).setPassword("");
    }
    public static Connection getConnection() throws SQLException {
        return dataSource.getConnection();
    }
    public static void close(Connection connection, PreparedStatement statement, ResultSet resultSet){
        if(connection != null){
            try {
                connection.close();
            } catch (SQLException throwables) {
                throwables.printStackTrace();
            }
        }
        if(statement != null){
            try {
                statement.close();
            } catch (SQLException throwables) {
                throwables.printStackTrace();
            }
        }
        if(resultSet != null){
            try {
                resultSet.close();
            } catch (SQLException throwables) {
                throwables.printStackTrace();
            }
        }
    }
}
4. 创建实体类
创建与表对应的blog类与user类,类中的一个对象就对相应数据库中的一条数据。
对象的属性与数据库中相对应。
如下图,在model包中新增Blog类与User类
4.1 Blog类
对应数据库里的属性,为Blog对象添加属性。
之后如下图,选中代码->右键->选中generate->选择Getter and Setter,一键添加get与set方法。
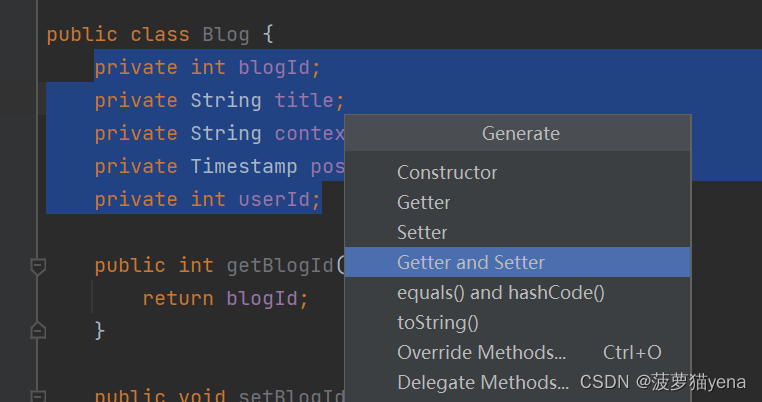
在方法getpostTime()中,由于要显示的时间是标准格式,所有,在这个方法中,要改一下代码。修改后如下图,注意,要改变方法的返回值类型。
	public String getPostTime() {
        //将时间格式化显示
        SimpleDateFormat simpleDateFormat = new SimpleDateFormat("yyyy-MM-dd hh:mm:ss");
        return simpleDateFormat.format(postTime);
    }
4.2 User类
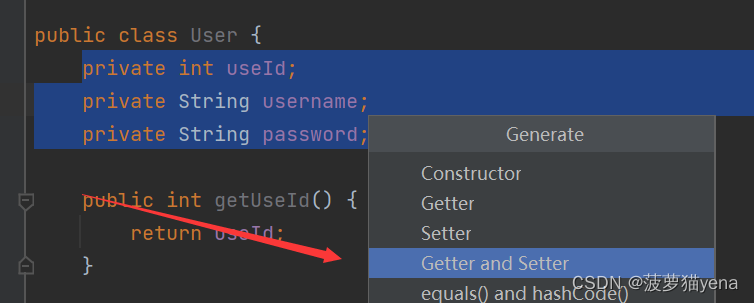
同样的操作,为User类添加成员属性与set、get方法。这步无特殊操作
5. 封装数据库的增删改查
我们首先要了解通过IDEA操作数据库的基本流程
- 建立连接
- 构造sql语句
- 执行sql语句
- 断开连接
5.1 对于blog的操作
5.1.1 增加操作
建立连接
connection = DBUtil.getConnection();
构造sql语句
			String sql = "insert into blog(null, ?, ?, ?, ?)";
			statement = connection.prepareStatement(sql);
			//这里给statement设置的属性,是根据传入的变量的类型和数目决定
            statement.setString(1, blog.getTitle());
            statement.setString(2, blog.getContext());
            statement.setString(3, blog.getPostTime());
            statement.setInt(4, blog.getUserId());
执行sql语句,这句语句要根据具体情况进行调节,如果是查询,就是statement.executeQuery();
statement.executeUpdate();
断开连接,这里的三个参数是coonection,statement,和resultSet,由于这里没有结果集,resultSet为空。
DBUtil.close(connection, statement, null);
完整代码如下
	public void add(Blog blog){
        Connection connection = null;
        PreparedStatement statement = null;
        try {
            connection = DBUtil.getConnection();
            String sql = "insert into blog(null, ?, ?, ?, ?)";
            statement = connection.prepareStatement(sql);
            statement.setString(1, blog.getTitle());
            statement.setString(2, blog.getContext());
            statement.setString(3, blog.getPostTime());
            statement.setInt(4, blog.getUserId());
            //执行sql语句
            statement.executeUpdate();

        } catch (SQLException throwables) {
            throwables.printStackTrace();
        }finally {
            DBUtil.close(connection, statement, null);
        }
    }
5.1.2 根据blogId查询
建立连接
connection = DBUtil.getConnection();
构造sql语句,由于这里传的参数是blogId,所以statement的属性是一个int.
String sql = "select * from blog where blogId = ?";
statement = connection.prepareStatement(sql);
statement.setInt(1, blogId);
执行sql语句,返回值为一个结果集。由于blogId唯一,所以结果集就有一条数据,遍历时用if就够了。创建一个新的Blog对象,将结果集的值赋给对应的对象成员变量,返回对象。
		resultSet = statement.executeQuery();
		if(resultSet.next()){
                Blog blog = new Blog();
                blog.setBlogId(resultSet.getInt("blogId"));
                blog.setTitle(resultSet.getString("blogTitle"));
                blog.setContext(resultSet.getString("context"));
                blog.setUserId(resultSet.getInt("userId"));
                return blog;
            }
断开连接
DBUtil.close(connection, statement, resultSet);
完整代码如下图所示
    public Blog selectById(int blogId){
       Connection connection = null;
       PreparedStatement statement = null;
       ResultSet resultSet = null;
       //建立连接
       try {
           connection = DBUtil.getConnection();
           String sql = "select * from blog where blogId = ?";
           statement = connection.prepareStatement(sql);
           statement.setInt(1, blogId);
           //执行sql
           resultSet = statement.executeQuery();
           if(resultSet.next()){
               Blog blog = new Blog();
               blog.setBlogId(resultSet.getInt("blogId"));
               blog.setTitle(resultSet.getString("blogTitle"));
               blog.setContext(resultSet.getString("context"));
               blog.setUserId(resultSet.getInt("userId"));
               return blog;
           }
       } catch (SQLException throwables) {
           throwables.printStackTrace();
       }finally {
           DBUtil.close(connection, statement, resultSet);
       }
       return null;
   }
5.1 3 根据userId进行查询
输入用户名,打开用户的博客列表。 由于用户对于博客是一对多的关系,所以返回值是一个List集合。
由于只是展示博客列表,不需要将博客的所有内容都展示出来。所以这里,我们要限制context的长度。
完整代码如下
    public List<Blog> selectByUserId(int userId){
       List<Blog> blogs = new ArrayList<>();
       Connection connection = null;
       PreparedStatement statement = null;
       ResultSet resultSet = null;
       try {
           connection = DBUtil.getConnection();
           //构造sql语句
           String sql = "select * from blog where userId = ?";
           statement = connection.prepareStatement(sql);
           statement.setInt(1, userId);
           //执行sql
           resultSet = statement.executeQuery();
           while(resultSet.next()){
               Blog blog = new Blog();
               blog.setBlogId(resultSet.getInt("blogId"));
               blog.setTitle(resultSet.getString("title"));
               String context = resultSet.getString("context");
               if(context == null){
                   context = "";
               }
               if(context.length() > 100){

               }
               blog.setContext(resultSet.getString("context"));
               blog.setPostTime(resultSet.getTimestamp("postTime"));
               blog.setUserId(resultSet.getInt("useId"));
               blogs.add(blog);
           }
       } catch (SQLException throwables) {
           throwables.printStackTrace();
       }finally {
           DBUtil.close(connection, statement, resultSet);
       }
       return blogs;
   }
5.2 对user表的操作
操作有,增加用户信息,根据userId查询博客,根据username查询博客,完整代码如下,步骤是相同的,不做赘述
package model;

import java.sql.Connection;
import java.sql.PreparedStatement;
import java.sql.ResultSet;
import java.sql.SQLException;

public class UserDao {
   public void add(User user){
       Connection connection = null;
       PreparedStatement statement = null;
       try {
           //和数据库建立连接
           connection = DBUtil.getConnection();
           //构造SQL 语句
           String sql = "insert into user (null, ?, ?)";
           statement = connection.prepareStatement(sql);
           statement.setString(1, user.getUsername());
           statement.setString(2, user.getPassword());
           //执行sql
           statement.executeUpdate();

       } catch (SQLException throwables) {
           throwables.printStackTrace();
       }finally {
           DBUtil.close(connection,statement,null);
       }
   }
   public User selectById(int userId){
       Connection connection = null;
       PreparedStatement statement = null;
       ResultSet resultSet = null;
       try {
           //建立连接
           connection = DBUtil.getConnection();
           //构造sql语句
           String sql = "select * from user where userI d =?";
           statement = connection.prepareStatement(sql);
           statement.setInt(1, userId);
           //执行sql
           resultSet = statement.executeQuery();
           if(resultSet.next()){
               User user = new User();
               user.setUserId(resultSet.getInt("userId"));
               user.setPassword(resultSet.getString("password"));
               return user;
           }
       } catch (SQLException throwables) {
           throwables.printStackTrace();
       }finally {
           DBUtil.close(connection,statement,resultSet);
       }
       return null;
   }

   public User selectByUsername(String username){
       Connection connection = null;
       PreparedStatement statement = null;
       ResultSet resultSet = null;
       try {
           //建立连接
           connection = DBUtil.getConnection();
           //构造sql语句
           String sql = "select * from user where username = ?";
           statement = connection.prepareStatement(sql);
           statement.setString(1, username);
           //执行sql语句
           resultSet = statement.executeQuery();
           if(resultSet.next()){
               User user = new User();
               user.setUserId(resultSet.getInt("userId"));
               user.setUsername(resultSet.getString("username"));
               user.setPassword(resultSet.getString("password"));
               return user;
           }
       } catch (SQLException throwables) {
           throwables.printStackTrace();
       }finally {
           DBUtil.close(connection, statement, resultSet);
       }
       return null;
   }
}
6. 前后端接口的实现
6.1 登陆页面
提交用户名密码,若正确。则获取个人的博客列表。若用户未登录,则会强制跳转到登陆页面。
所以,这里的post()方法就是对客户端提交登录的个人信息进行响应,并且根据信息的状态来判断是否能登陆成功
get()方法是返回用户信息。
6.1.1 对登录注册进行响应
设置请求的格式,以便Servlet去理解
设置响应的格式,使Servlet以固定的格式构造响应
req.setCharacterEncoding("utf8");
resp.setContentType("text/html;charset=utf8");
获取到用户名和密码
String username = req.getParameter("username");
String password = req.getParameter("password");
若有一个是空,则提示错误并返回
		if (username == null || "".equals(username) || password == null || "".equals(password)) {
            // 登录失败!!
            String html = "<h3>登录失败! 缺少 username 或者 password 字段</h3>";
            resp.getWriter().write(html);
            return;
        }
若都不为空,判断用户是否注册,也就是在服务器数据库中是否能查到用户名,若未注册,则自动注册,之后返回。
// 2. 读数据库, 看看用户名是否存在, 并且密码是否匹配
        UserDao userDao = new UserDao();
        User user = userDao.selectByUsername(username);
        if (user == null) {
// // 用户不存在.
//           自动创建用户信息,插入数据
      // 构造 User 对象
            User user2 = new User();
            user2.setUsername(username);
            user2.setPassword(password);
       // 插入数据库
            userDao.add(user2);
       //创造Session对话,将用户数据以键值对的形式保存到服务器数据库中
            HttpSession session = req.getSession(true);
            session.setAttribute("user", user2);
            resp.sendRedirect("blog_list.html");
            return;
        }
若用户存在,但密码不匹配,则显示错误信息,并返回。
	else if (!password.equals(user.getPassword())) {
            // 密码不对
            String html = "<h3>登录失败! 用户名或密码错误</h3>";
            resp.getWriter().write(html);
            return;
        }
若密码匹配,则创建对话,跳转到主页
 // 3. 用户名密码验证通过, 登录成功, 接下来就创建会话. 使用该会话保存用户信息.
       HttpSession session = req.getSession(true);
       session.setAttribute("user", user);
       // 4. 进行重定向. 跳转到博客列表页
       resp.sendRedirect("blog_list.html");
   }
完整代码如下
		protected void doPost(HttpServletRequest req, HttpServletResponse resp) throws ServletException, IOException {
        // 设置请求的编码. 告诉 servlet 按照啥格式来理解请求
        req.setCharacterEncoding("utf8");
        // 设置响应的编码. 告诉 servlet 按照啥格式来构造响应
        // resp.setCharacterEncoding("utf8");
        resp.setContentType("text/html;charset=utf8");
        // 1. 读取参数中的用户名和密码
        //    注意!! 如果用户名密码包含中文, 此处的读取可能会乱码.
        String username = req.getParameter("username");
        String password = req.getParameter("password");
        if (username == null || "".equals(username) || password == null || "".equals(password)) {
            // 登录失败!!
            String html = "<h3>登录失败! 缺少 username 或者 password 字段</h3>";
            resp.getWriter().write(html);
            return;
        }
        // 2. 读数据库, 看看用户名是否存在, 并且密码是否匹配
        UserDao userDao = new UserDao();
        User user = userDao.selectByUsername(username);
        if (user == null) {
//            // 用户不存在.
//           自动创建用户信息,插入数据库。
            // 构造 User 对象
            User user2 = new User();
            user2.setUsername(username);
            user2.setPassword(password);
            // 插入数据库
            userDao.add(user2);
            HttpSession session = req.getSession(true);
            session.setAttribute("user", user2);
            resp.sendRedirect("blog_list.html");
            return;
        }else if (!password.equals(user.getPassword())) {
            // 密码不对
            String html = "<h3>登录失败! 用户名或密码错误</h3>";
            resp.getWriter().write(html);
            return;
        }
        // 3. 用户名密码验证通过, 登录成功, 接下来就创建会话. 使用该会话保存用户信息.
        HttpSession session = req.getSession(true);
        session.setAttribute("user", user);
        // 4. 进行重定向. 跳转到博客列表页
        resp.sendRedirect("blog_list.html");
    }
6.1.2 获取用户信息
使用get()方法,判断用户的登录状态。首先,用户登录一定是建立了Session对话,所以,首先判断session对象是否为空,为空,则需要重新登陆。
		HttpSession session = req.getSession(false);
        if (session == null) {
            // 未登录, 返回一个空的 user 对象
            User user = new User();
            String respJson = objectMapper.writeValueAsString(user);
            resp.getWriter().write(respJson);
            return;
        }
若session不为空,判断服务器数据库中user是否为空,有时特殊的网址或者App,例如中国农业银行这种,登录后长时间不使用,就会自动退出登录。这时session对话还在,但需要强制重新登录
		User user = (User) session.getAttribute("user");
        if (user == null) {
            user = new User();
            String respJson = objectMapper.writeValueAsString(user);
            resp.getWriter().write(respJson);
            return;
        }
一切都正常,则取出user对象,直接返回即可。
// 确实成功取出了 user 对象, 就直接返回即可.
        String respJson = objectMapper.writeValueAsString(user);
        resp.getWriter().write(respJson);
完整代码如下
package api;

import com.fasterxml.jackson.databind.ObjectMapper;
import model.User;
import model.UserDao;

import javax.servlet.ServletException;
import javax.servlet.annotation.WebServlet;
import javax.servlet.http.HttpServlet;
import javax.servlet.http.HttpServletRequest;
import javax.servlet.http.HttpServletResponse;
import javax.servlet.http.HttpSession;
import java.io.IOException;

@WebServlet("/login")
public class LoginServlet extends HttpServlet {
    private ObjectMapper objectMapper = new ObjectMapper();

    @Override
    protected void doPost(HttpServletRequest req, HttpServletResponse resp) throws ServletException, IOException {
        // 设置请求的编码. 告诉 servlet 按照啥格式来理解请求
        req.setCharacterEncoding("utf8");
        // 设置响应的编码. 告诉 servlet 按照啥格式来构造响应
        // resp.setCharacterEncoding("utf8");
        resp.setContentType("text/html;charset=utf8");
        // 1. 读取参数中的用户名和密码
        //    注意!! 如果用户名密码包含中文, 此处的读取可能会乱码.
        String username = req.getParameter("username");
        String password = req.getParameter("password");
        if (username == null || "".equals(username) || password == null || "".equals(password)) {
            // 登录失败!!
            String html = "<h3>登录失败! 缺少 username 或者 password 字段</h3>";
            resp.getWriter().write(html);
            return;
        }
        // 2. 读数据库, 看看用户名是否存在, 并且密码是否匹配
        UserDao userDao = new UserDao();
        User user = userDao.selectByUsername(username);
        if (user == null) {
//            // 用户不存在.
//           自动创建用户信息,插入数据库。
            // 构造 User 对象
            User user2 = new User();
            user2.setUsername(username);
            user2.setPassword(password);
            // 插入数据库
            userDao.add(user2);
            HttpSession session = req.getSession(true);
            session.setAttribute("user", user2);
            resp.sendRedirect("blog_list.html");
            return;
        }else if (!password.equals(user.getPassword())) {
            // 密码不对
            String html = "<h3>登录失败! 用户名或密码错误</h3>";
            resp.getWriter().write(html);
            return;
        }
        // 3. 用户名密码验证通过, 登录成功, 接下来就创建会话. 使用该会话保存用户信息.
        HttpSession session = req.getSession(true);
        session.setAttribute("user", user);
        // 4. 进行重定向. 跳转到博客列表页
        resp.sendRedirect("blog_list.html");
    }

    @Override
    protected void doGet(HttpServletRequest req, HttpServletResponse resp) throws ServletException, IOException {
        resp.setContentType("application/json; charset=utf8");
        // 使用这个方法来获取到用户的登录状态.

        // 如果用户未登录, 这里的会话就拿不到!!
        HttpSession session = req.getSession(false);
        if (session == null) {
            // 未登录, 返回一个空的 user 对象
            User user = new User();
            String respJson = objectMapper.writeValueAsString(user);
            resp.getWriter().write(respJson);
            return;
        }
        User user = (User) session.getAttribute("user");
        if (user == null) {
            user = new User();
            String respJson = objectMapper.writeValueAsString(user);
            resp.getWriter().write(respJson);
            return;
        }
        // 确实成功取出了 user 对象, 就直接返回即可.
        String respJson = objectMapper.writeValueAsString(user);
        resp.getWriter().write(respJson);
    }
}
6.2 博客列表页,博客详情页,博客编辑页
6.2.1 博客列表页与博客详情页
根据queryatring中是否能获取到blogId,来判断获取的是博客详情还是博客列表。
 		String blogId = req.getParameter("blogId");
        if (blogId == null) {
            //根据querystring是否为空,来判断,获取的是博客列表还是博客详情
            // queryString 不存在, 说明这次请求是获取博客列表
            List<Blog> blogs = blogDao.selectAll();
            // 需要把 blogs 转成符合要求的 json 格式字符串.
            String respJson = objectMapper.writeValueAsString(blogs);
            resp.setContentType("application/json; charset=utf8");
            resp.getWriter().write(respJson);
        }
不为空,则展示固定博客内容
			else{
            // queryString 存在, 说明本次请求获取的是指定 id 的博客.
            Blog blog = blogDao.selectById(Integer.parseInt(blogId));
            //blogId未查询到对应博客
            if (blog == null) {
                System.out.println("当前 blogId = " + blogId + " 对应的博客不存在!");
            }
            String respJson = objectMapper.writeValueAsString(blog);
            resp.setContentType("application/json; charset=utf8");
            resp.getWriter().write(respJson);
        }
6.2.2 博客编辑页
根据前端接口约定,post请求为博客编辑页的客户端请求
首先,根据session对话是否存在,及是否能获取到user,判断登陆是否有效
		HttpSession httpSession = req.getSession(false);
        if (httpSession == null) {
            resp.setContentType("text/html; charset=utf8");
            resp.getWriter().write("当前未登录, 无法发布博客!");
            return;
        }
        User user = (User) httpSession.getAttribute("user");
        if (user == null) {
            resp.setContentType("text/html; charset=utf8");
            resp.getWriter().write("当前未登录, 无法发布博客!");
            return;
        }
判断博客内容是否有误,获取body中的博客内容,并判断内容是否为空。
		req.setCharacterEncoding("utf8");
        String title = req.getParameter("title");
        String content = req.getParameter("content");
        if (title == null || "".equals(title) || content == null || "".equals(content)) {
            resp.setContentType("text/html; charset=utf8");
            resp.getWriter().write("当前提交数据有误! 标题或者正文为空!");
            return;
        }
若一切正常,构造新的博客对象,插入数据库
		// 构造 Blog 对象
        Blog blog = new Blog();
        blog.setTitle(title);
        blog.setContent(content);
        blog.setUserId(user.getUserId());
        // 发布时间, 在 java 中生成 / 数据库中生成 都行
        blog.setPostTime(new Timestamp(System.currentTimeMillis()));
        // 插入数据库
        BlogDao blogDao = new BlogDao();
        blogDao.add(blog);

        // 跳转到博客列表页
        resp.sendRedirect("blog_list.html");
完整代码如下
package api;

import com.fasterxml.jackson.databind.ObjectMapper;
import model.Blog;
import model.BlogDao;
import model.User;

import javax.servlet.ServletException;
import javax.servlet.annotation.WebServlet;
import javax.servlet.http.HttpServlet;
import javax.servlet.http.HttpServletRequest;
import javax.servlet.http.HttpServletResponse;
import javax.servlet.http.HttpSession;
import java.io.IOException;
import java.sql.Timestamp;
import java.util.List;

@WebServlet("/blog")
public class BlogServlet extends HttpServlet {
    private ObjectMapper objectMapper = new ObjectMapper();

    @Override
    protected void doGet(HttpServletRequest req, HttpServletResponse resp) throws ServletException, IOException {
        // 尝试获取一下 queryString 中的 blogId 字段.
        BlogDao blogDao = new BlogDao();
        String blogId = req.getParameter("blogId");
        //String userId = req.getParameter("userId");
        //String username = req.getParameter("username");
        if (blogId == null) {
            //根据querystring是否为空,来判断,获取的是博客列表还是博客详情
            // queryString 不存在, 说明这次请求是获取博客列表
            List<Blog> blogs = blogDao.selectAll();
            // 需要把 blogs 转成符合要求的 json 格式字符串.
            String respJson = objectMapper.writeValueAsString(blogs);
            resp.setContentType("application/json; charset=utf8");
            resp.getWriter().write(respJson);
        }else{
            // queryString 存在, 说明本次请求获取的是指定 id 的博客.
            Blog blog = blogDao.selectById(Integer.parseInt(blogId));
            //blogId未查询到对应博客
            if (blog == null) {
                System.out.println("当前 blogId = " + blogId + " 对应的博客不存在!");
            }
            String respJson = objectMapper.writeValueAsString(blog);
            resp.setContentType("application/json; charset=utf8");
            resp.getWriter().write(respJson);
        }
    }

    @Override
    protected void doPost(HttpServletRequest req, HttpServletResponse resp) throws ServletException, IOException {
        // 发布博客
        // 读取请求, 构造 Blog 对象, 插入数据库中即可!!
        HttpSession httpSession = req.getSession(false);
        if (httpSession == null) {
            resp.setContentType("text/html; charset=utf8");
            resp.getWriter().write("当前未登录, 无法发布博客!");
            return;
        }
        User user = (User) httpSession.getAttribute("user");
        if (user == null) {
            resp.setContentType("text/html; charset=utf8");
            resp.getWriter().write("当前未登录, 无法发布博客!");
            return;
        }
        // 确保登录之后, 就可以把作者给拿到了.

        // 获取博客标题和正文
        req.setCharacterEncoding("utf8");
        String title = req.getParameter("title");
        String content = req.getParameter("content");
        if (title == null || "".equals(title) || content == null || "".equals(content)) {
            resp.setContentType("text/html; charset=utf8");
            resp.getWriter().write("当前提交数据有误! 标题或者正文为空!");
            return;
        }

        // 构造 Blog 对象
        Blog blog = new Blog();
        blog.setTitle(title);
        blog.setContent(content);
        blog.setUserId(user.getUserId());
        // 发布时间, 在 java 中生成 / 数据库中生成 都行
        blog.setPostTime(new Timestamp(System.currentTimeMillis()));
        // 插入数据库
        BlogDao blogDao = new BlogDao();
        blogDao.add(blog);

        // 跳转到博客列表页
        resp.sendRedirect("blog_list.html");
    }
}
6.3 注销用户信息
先判断用户是否注册,再移除用户信息。
	protected void doGet(HttpServletRequest req, HttpServletResponse resp) throws ServletException, IOException {
        HttpSession httpSession = req.getSession(false);
        if (httpSession == null) {
            // 未登录状态, 就直接提示出错.
            resp.setContentType("text/html; charset=utf8");
            resp.getWriter().write("当前未登录!");
            return;
        }
        //移除
        httpSession.removeAttribute("user");
        resp.sendRedirect("login.html");
    }
7. 部署到服务器上
打印war包,将war包拷贝到Tomcat的webapps目录下,即为部署完毕。执行结果如下。


