程序示例精选
Python+Yolov5电梯口跌倒识别
如需安装运行环境或远程调试,见文章底部个人QQ名片,由专业技术人员远程协助!
前言
这篇博客针对<<Python+Yolov5电梯口跌倒识别>>编写代码,代码整洁,规则,易读。 学习与应用推荐首选。
文章目录
一、所需工具软件
二、使用步骤
1. 引入库
2. 代码实现
3. 运行结果
三、在线协助
一、所需工具软件
1. Python,Pycharm
2. Yolov5
二、使用步骤
1.引入库
import argparse
import time
from pathlib import Path

import cv2
import torch
import torch.backends.cudnn as cudnn
from numpy import random

from models.experimental import attempt_load
from utils.datasets import LoadStreams, LoadImages
from utils.general import check_img_size, check_requirements, check_imshow, non_max_suppression, apply_classifier, \
    scale_coords, xyxy2xywh, strip_optimizer, set_logging, increment_path
from utils.plots import plot_one_box
from utils.torch_utils import select_device, load_classifier, time_synchronized
2. 代码实现
代码如下:
def detect(save_img=False):
    source, weights, view_img, save_txt, imgsz = opt.source, opt.weights, opt.view_img, opt.save_txt, opt.img_size
    webcam = source.isnumeric() or source.endswith('.txt') or source.lower().startswith(
        ('rtsp://', 'rtmp://', 'http://'))

    # Directories
    save_dir = Path(increment_path(Path(opt.project) / opt.name, exist_ok=opt.exist_ok))  # increment run
    (save_dir / 'labels' if save_txt else save_dir).mkdir(parents=True, exist_ok=True)  # make dir

    # Initialize
    set_logging()
    device = select_device(opt.device)
    half = device.type != 'cpu'  # half precision only supported on CUDA

    # Load model
    model = attempt_load(weights, map_location=device)  # load FP32 model
    stride = int(model.stride.max())  # model stride
    imgsz = check_img_size(imgsz, s=stride)  # check img_size
    if half:
        model.half()  # to FP16

    # Second-stage classifier
    classify = False
    if classify:
        modelc = load_classifier(name='resnet101', n=2)  # initialize
        modelc.load_state_dict(torch.load('weights/resnet101.pt', map_location=device)['model']).to(device).eval()

    # Set Dataloader
    vid_path, vid_writer = None, None
    if webcam:
        view_img = check_imshow()
        cudnn.benchmark = True  # set True to speed up constant image size inference
        dataset = LoadStreams(source, img_size=imgsz, stride=stride)
    else:
        save_img = True
        dataset = LoadImages(source, img_size=imgsz, stride=stride)

    # Get names and colors
    names = model.module.names if hasattr(model, 'module') else model.names
    colors = [[random.randint(0, 255) for _ in range(3)] for _ in names]

    # Run inference
    if device.type != 'cpu':
        model(torch.zeros(1, 3, imgsz, imgsz).to(device).type_as(next(model.parameters())))  # run once
    t0 = time.time()
        # Apply NMS
        pred = non_max_suppression(pred, opt.conf_thres, opt.iou_thres, classes=opt.classes, agnostic=opt.agnostic_nms)
        t2 = time_synchronized()

        # Apply Classifier
        if classify:
            pred = apply_classifier(pred, modelc, img, im0s)

        # Process detections
        for i, det in enumerate(pred):  # detections per image
            if webcam:  # batch_size >= 1
                p, s, im0, frame = path[i], '%g: ' % i, im0s[i].copy(), dataset.count
            else:
                p, s, im0, frame = path, '', im0s, getattr(dataset, 'frame', 0)

            p = Path(p)  # to Path
            save_path = str(save_dir / p.name)  # img.jpg
            txt_path = str(save_dir / 'labels' / p.stem) + ('' if dataset.mode == 'image' else f'_{frame}')  # img.txt
            s += '%gx%g ' % img.shape[2:]  # print string
            gn = torch.tensor(im0.shape)[[1, 0, 1, 0]]  # normalization gain whwh
            if len(det):
                # Rescale boxes from img_size to im0 size
                det[:, :4] = scale_coords(img.shape[2:], det[:, :4], im0.shape).round()

                # Print results

                for c in det[:, -1].unique():
                    n = (det[:, -1] == c).sum()  # detections per class
                    s += f"{n} {names[int(c)]}{'s' * (n > 1)}, "  # add to string


                # Write results
                for *xyxy, conf, cls in reversed(det):
                    if save_txt:  # Write to file
                        xywh = (xyxy2xywh(torch.tensor(xyxy).view(1, 4)) / gn).view(-1).tolist()  # normalized xywh
                        line = (cls, *xywh, conf) if opt.save_conf else (cls, *xywh)  # label format
                        with open(txt_path + '.txt', 'a') as f:
                            f.write(('%g ' * len(line)).rstrip() % line + '\n')

                    if save_img or view_img:  # Add bbox to image
                        label = f'{names[int(cls)]} {conf:.2f}'
                        plot_one_box(xyxy, im0, label=label, color=colors[int(cls)], line_thickness=3)

            # Print time (inference + NMS)
            print(f'{s}Done. ({t2 - t1:.3f}s)')

            # Stream results
            if view_img:
                cv2.imshow(str(p), im0)
                cv2.waitKey(1)  # 1 millisecond

            # Save results (image with detections)
            if save_img:
                if dataset.mode == 'image':
                    cv2.imwrite(save_path, im0)
                else:  # 'video'
                    if vid_path != save_path:  # new video
                        vid_path = save_path
                        if isinstance(vid_writer, cv2.VideoWriter):
                            vid_writer.release()  # release previous video writer

                        fourcc = 'mp4v'  # output video codec
                        fps = vid_cap.get(cv2.CAP_PROP_FPS)
                        w = int(vid_cap.get(cv2.CAP_PROP_FRAME_WIDTH))
                        h = int(vid_cap.get(cv2.CAP_PROP_FRAME_HEIGHT))
                        vid_writer = cv2.VideoWriter(save_path, cv2.VideoWriter_fourcc(*fourcc), fps, (w, h))
                    vid_writer.write(im0)

    if save_txt or save_img:
        s = f"\n{len(list(save_dir.glob('labels/*.txt')))} labels saved to {save_dir / 'labels'}" if save_txt else ''
        print(f"Results saved to {save_dir}{s}")

    print(f'Done. ({time.time() - t0:.3f}s)')


if __name__ == '__main__':
    parser = argparse.ArgumentParser()
    parser.add_argument('--weights', nargs='+', type=str, default='yolov5_crack_wall_epoach150_batchsize5.pt', help='model.pt path(s)')
    parser.add_argument('--source', type=str, default='data/images', help='source')  # file/folder, 0 for webcam
    parser.add_argument('--img-size', type=int, default=640, help='inference size (pixels)')
    parser.add_argument('--conf-thres', type=float, default=0.4, help='object confidence threshold')
    parser.add_argument('--iou-thres', type=float, default=0.45, help='IOU threshold for NMS')
    parser.add_argument('--device', default='', help='cuda device, i.e. 0 or 0,1,2,3 or cpu')
    parser.add_argument('--view-img', action='store_true', help='display results')
    parser.add_argument('--save-txt', action='store_true', help='save results to *.txt')
    parser.add_argument('--save-conf', action='store_true', help='save confidences in --save-txt labels')
    parser.add_argument('--classes', nargs='+', type=int, help='filter by class: --class 0, or --class 0 2 3')
    parser.add_argument('--agnostic-nms', action='store_true', help='class-agnostic NMS')
    parser.add_argument('--augment', action='store_true', help='augmented inference')
    parser.add_argument('--update', action='store_true', help='update all models')
    parser.add_argument('--project', default='runs/detect', help='save results to project/name')
    parser.add_argument('--name', default='exp', help='save results to project/name')
    parser.add_argument('--exist-ok', action='store_true', help='existing project/name ok, do not increment')
    opt = parser.parse_args()

    print(opt)
    check_requirements()

    with torch.no_grad():
        if opt.update:  # update all models (to fix SourceChangeWarning)
            for opt.weights in ['yolov5s.pt', 'yolov5m.pt', 'yolov5l.pt', 'yolov5x.pt']:
                detect()
                strip_optimizer(opt.weights)
        else:
            detect()
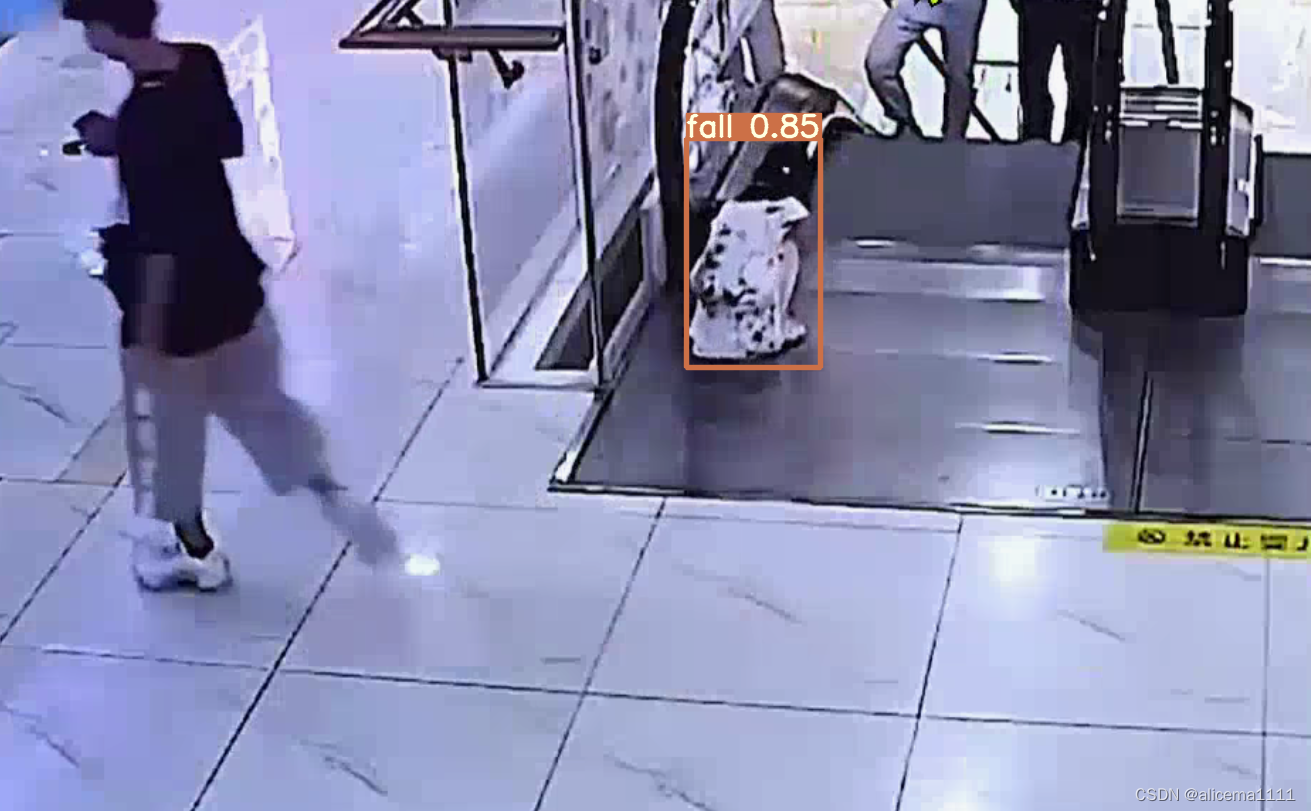
3. 运行结果
三、在线协助:
如需安装运行环境或远程调试,见文章底部个人 QQ 名片,由专业技术人员远程协助!
1)远程安装运行环境,代码调试
2)Qt, C++, Python入门指导
3)界面美化
4)软件制作
博主推荐文章:python人脸识别统计人数qt窗体-CSDN博客
博主推荐文章:Python Yolov5火焰烟雾识别源码分享-CSDN博客
Python OpenCV识别行人入口进出人数统计_python识别人数-CSDN博客
个人博客主页:alicema1111的博客_CSDN博客-Python,C++,网页领域博主
博主所有文章点这里:alicema1111的博客_CSDN博客-Python,C++,网页领域博主