目录
手动实现 Spring 底层机制【初始化 IOC容器+依赖注入+BeanPostProcessor 机制+AOP】
前面我们实际上已经用代码简单实现了
代码演示使用框架
创建一个maven项目
创建UserAction类
创建UserDao类
创建UserService类
创建beans.xml
说明
创建AppMain类
运行效果 如图
思考问题
创建MyBeanPostProce ssor.java类
修改类beans.xml
创建UserService类
完成测试AppMain
思考问题
创建SmartAnimalable接口
创建SmartDog类
创建SmartAnimalAspect切面类
修改类beans.xml
创建AppMain类
输出结果
简单分析
AOP 和 BeanPostProces关系
看一下 AnnotationAwareAspectJAutoProxyCreator 的类图
分析
手动实现Spring机制
Spring 整体架构分析
实现任务阶段 1
知识扩展:类加载器
说明: 编写自己 Spring 容器,实现扫描包, 得到 b得到 bean的class对象
● 分析示意图
创建ComponentScan.java注解
创建Component注解
创建 WyxSpringConfig类
创建 MonsterService.java类
创建MonsterDao类
创建WyxSpringApplicationContext类
创建AppMain
完成测试,输出效果
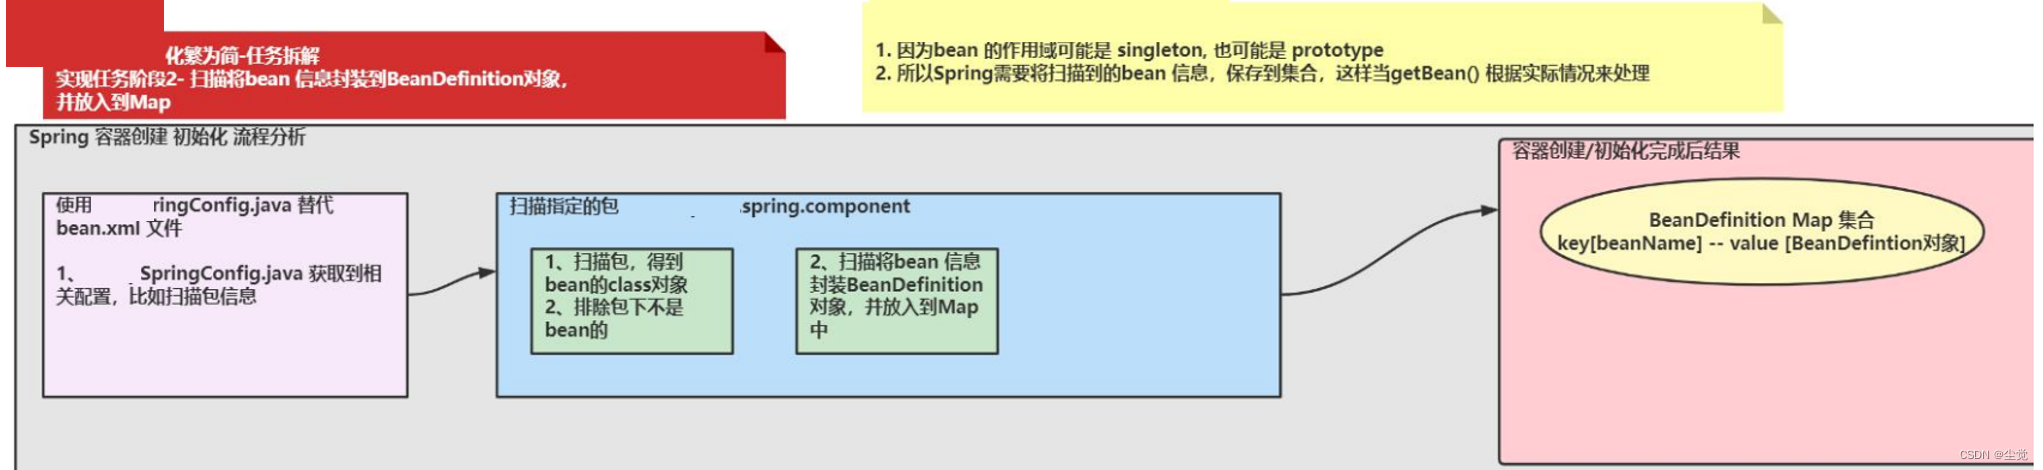
实现任务阶段 2- 扫描将 bean 信息封装到 BeanDefinition 对象, 并放入到 Map
● 分析示意图
创建Scope.java注解
修改,增加@ScopeMonsterService.java类
创建BeanDefinition类
修改WyxSpringApplicationContext类
完成测试,输出效果
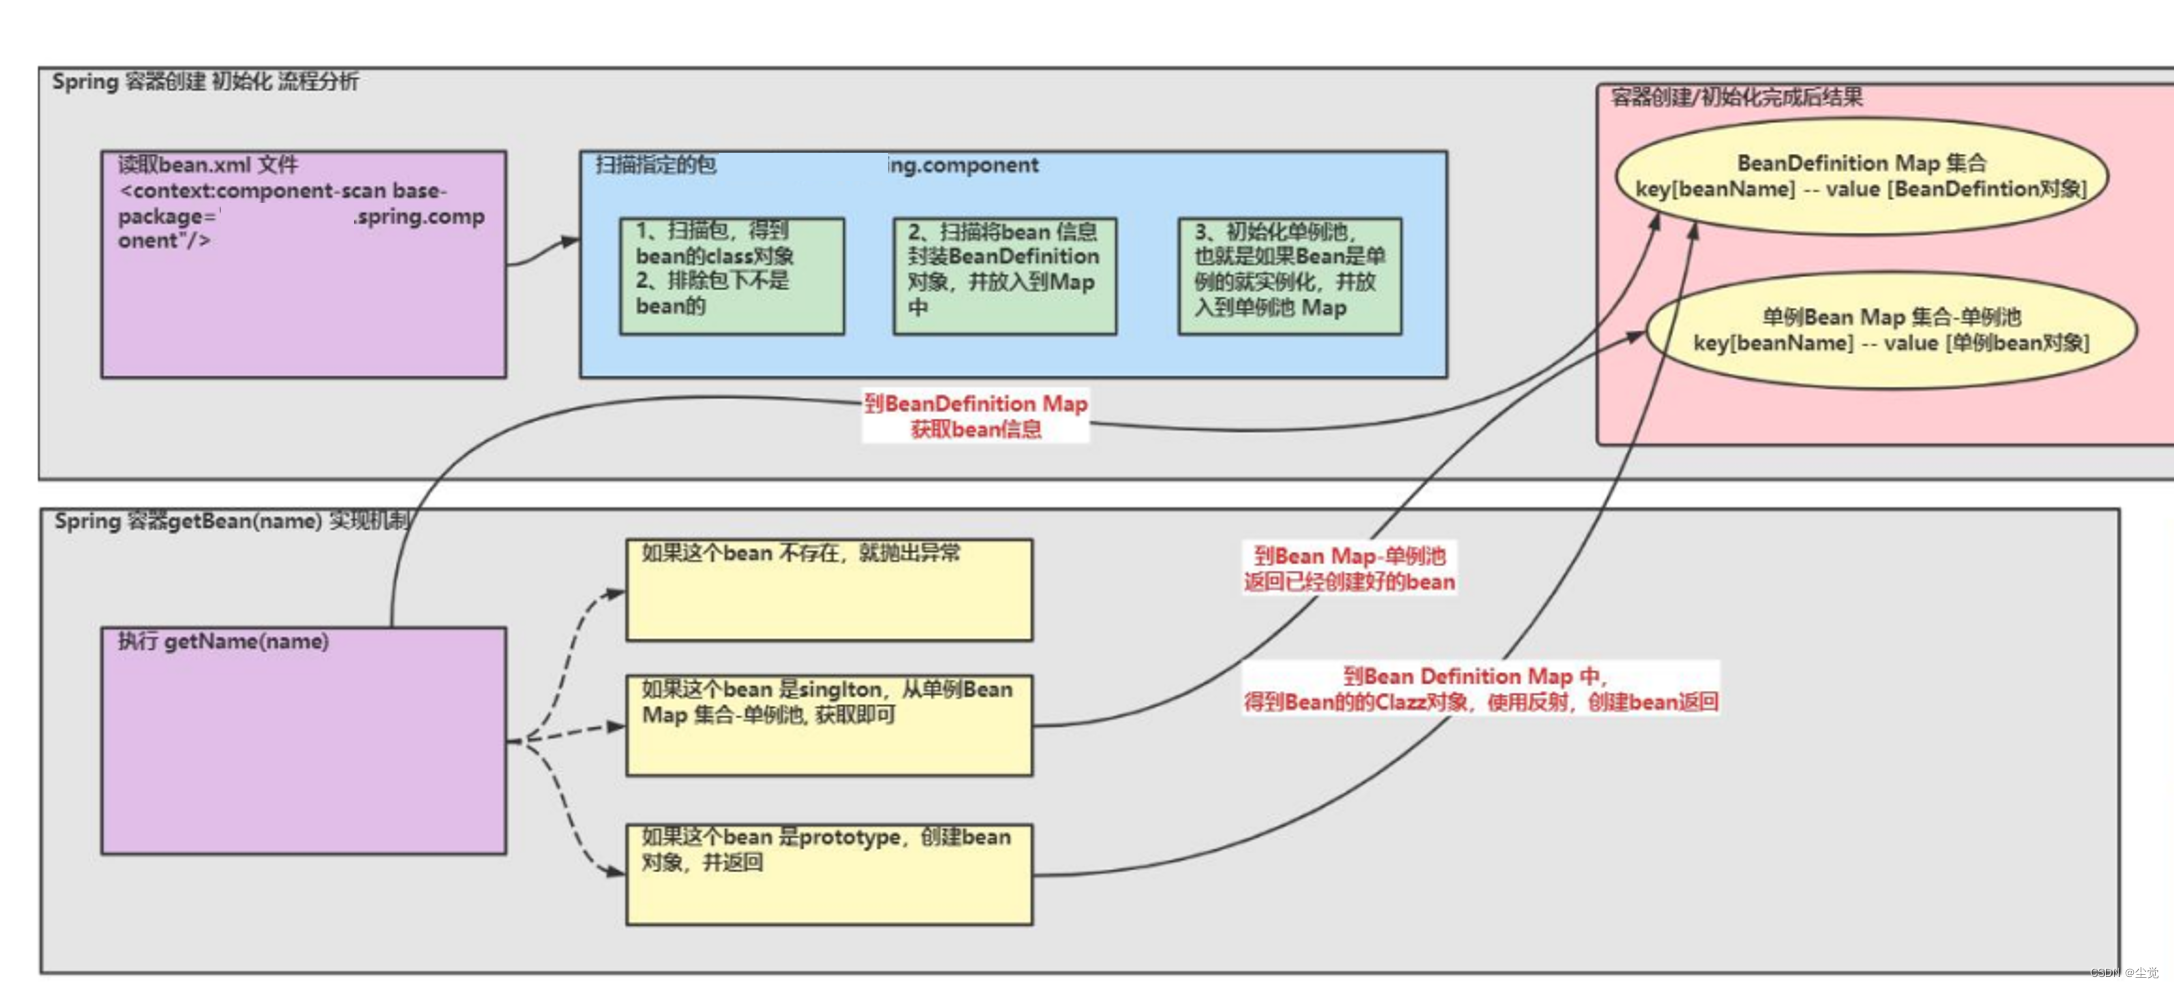
实现任务阶段 3- 初始化 bean 单例池,并完成 getBean 方法 , createBean 方法
修改WyxSpringApplicationContext类
增加相应的业务代码
修改AppMain
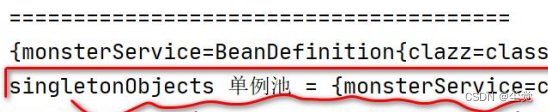
完成测试,输出效果
实现任务阶段 4- 完成依赖注入
● 分析示意图
创建Autowired.java注解
修改MonsterDao类
修改MonsterService.java类
修改WyxSpringApplicationContext类
修改AppMain
运行完成测试
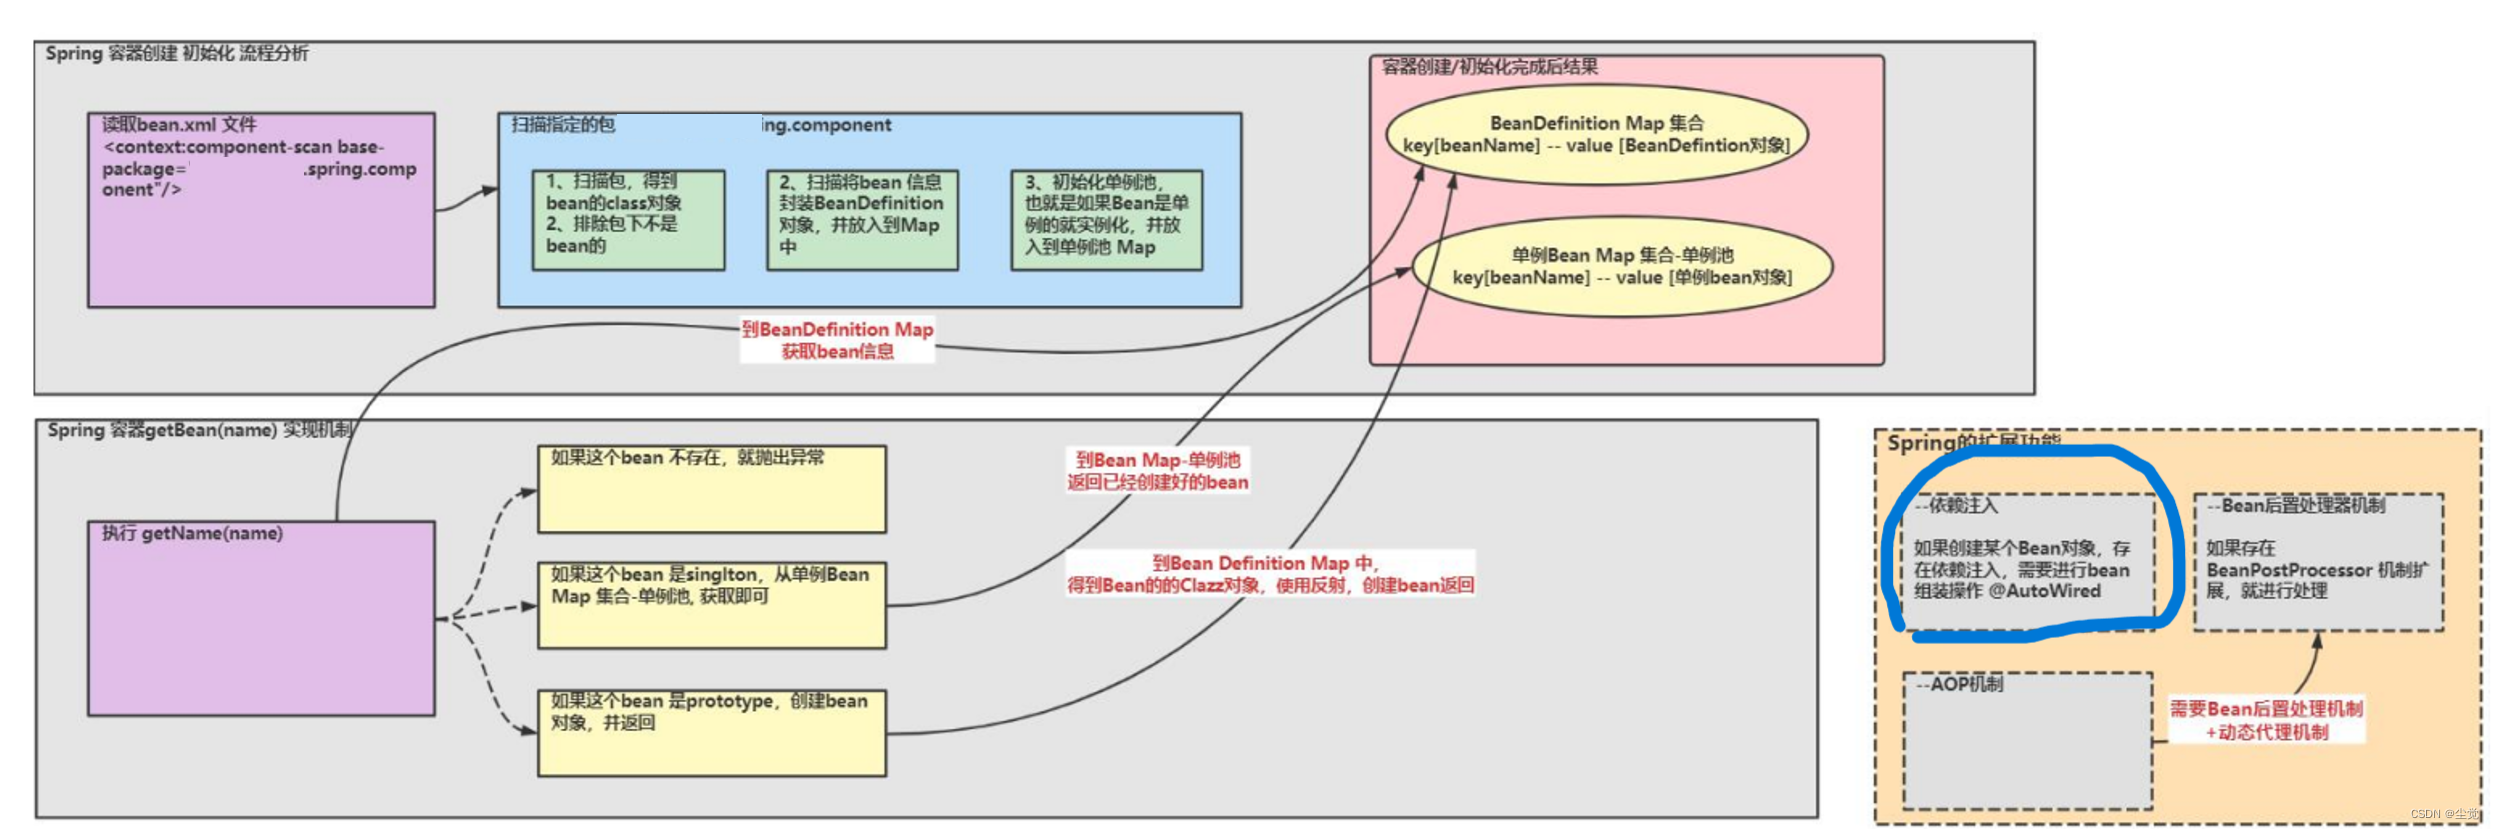
实现任务阶段 5- bean 后置处理器
● 分析示意图
创建InitializingBean接口
修改MonsterService.java类
修改WyxSpringApplicationContext类
运行完成测试
创建 BeanPostProcessor接口
创建 WyxBeanPostProcessor类
修改WyxSpringApplicationContext类
运行完成测试
实现任务阶段 6- AOP 机制
这里方便大家阅读我就重新全部发一次
示意图
编辑
第一步把创建annotation包
Scope注解
ComponentScan注解
Component注解
Autowired 注解
第二步创建component包
创建Car 类
创建MonsterDao 类
创建MonsterService 类
创建SmartAnimalable 接口
创建SmartAnimalAspect 类
创建SmartDog类
创建WyxBeanPostProcesso类
第三步创建ioc包
创建BeanDefinition 类
创建WyxSpringApplicationContext类
创建WyxSpringConfig 类
第四步创建processor包
创建BeanPostProcessor 接口
创建InitializingBean 接口
最后一步完成测试
创建AppMain类
小结
手动实现 Spring 底层机制【初始化 IOC容器+依赖注入+BeanPostProcessor 机制+AOP】
前面我们实际上已经用代码简单实现了
1 Spring XML 注入 bean
2 Spring 注解方式注入 bean
3 Spring AOP 动态代理实现
4.继续思考-原生 Spring 如何实现依赖注入和 singleton、prototype
代码演示使用框架
创建一个maven项目
如果不会请看之前写的博客手动实现
tomcat
maven的博客
<?xml version="1.0" encoding="UTF-8"?>
<project xmlns="http://maven.apache.org/POM/4.0.0"
         xmlns:xsi="http://www.w3.org/2001/XMLSchema-instance"
         xsi:schemaLocation="http://maven.apache.org/POM/4.0.0 http://maven.apache.org/xsd/maven-4.0.0.xsd">
    <modelVersion>4.0.0</modelVersion>

    <groupId>com.wyxde</groupId>
    <artifactId>wyxde-spring</artifactId>
    <version>1.0-SNAPSHOT</version>

    <dependencies>
        <!--加入spring开发的基本包-->
        <dependency>
            <groupId>org.springframework</groupId>
            <artifactId>spring-context</artifactId>
            <version>5.3.8</version>
        </dependency>
        <!--加入spring开发切面编程需要的包-->
        <dependency>
            <groupId>org.springframework</groupId>
            <artifactId>spring-aspects</artifactId>
            <version>5.3.8</version>
        </dependency>
    </dependencies>

</project>
创建UserAction类
也可以使用@Controller
在默认情况下 我们配置@Component @Controller @Service @Repository 是单例
@Scope(value = "prototype") 表示以多实例形式,返回UserAction bean
@Component
//@Scope(value = "prototype")
public class UserAction {
}
创建UserDao类
//可以使用@Repository
@Component
public class UserDao {

    public void hi() {
        System.out.println("UserDao-hi()---");
    }
}
创建UserService类
//也可以使用@Service
@Component
public class UserService {

    //定义属性
    //思考:加入 @Autowired , Spring容器时如何实现依赖注入?
    //也可以使用@Resource
    @Autowired
    private UserDao userDao;

    public void m1() {
        userDao.hi();
    }

    //这里我们需要指定init() 是初始化方法
    @PostConstruct
    public void init() {
        System.out.println("UserService-init()");
    }

}
创建beans.xml
说明
1. 如果我们是普通的java项目, beans.xml 放在src下
2. 如果我们是java maven 项目, beans.xml 放在 src/main/resources
<?xml version="1.0" encoding="UTF-8"?>
<beans xmlns="http://www.springframework.org/schema/beans"
       xmlns:xsi="http://www.w3.org/2001/XMLSchema-instance"
       xmlns:context="http://www.springframework.org/schema/context"
       xmlns:aop="http://www.springframework.org/schema/aop"
       xsi:schemaLocation="http://www.springframework.org/schema/beans http://www.springframework.org/schema/beans/spring-beans.xsd http://www.springframework.org/schema/context https://www.springframework.org/schema/context/spring-context.xsd http://www.springframework.org/schema/aop https://www.springframework.org/schema/aop/spring-aop.xsd">


    <!--配置自动扫描的包, 同时引入对应的名称空间-->
    <context:component-scan base-package="com.wyxde.spring.component"/>
</beans>
创建AppMain类
public class AppMain {
    public static void main(String[] args) {
        //测试看看是否可以得到spring容器中的bean , 同时看看依赖注入是否OK

        ApplicationContext ioc =
                new ClassPathXmlApplicationContext("beans.xml");
        UserAction userAction = (UserAction) ioc.getBean("userAction");
        UserAction userAction2 = (UserAction) ioc.getBean("userAction");

        System.out.println("userAction=" + userAction);
        System.out.println("userAction2=" + userAction2);

        UserDao userDao = (UserDao) ioc.getBean("userDao");
        System.out.println("userDao=" + userDao);

        UserService userService = (UserService) ioc.getBean("userService");
        System.out.println("userService=" + userService);

        //测试一下当前的依赖注入
        userService.m1();
}
}
运行效果 如图
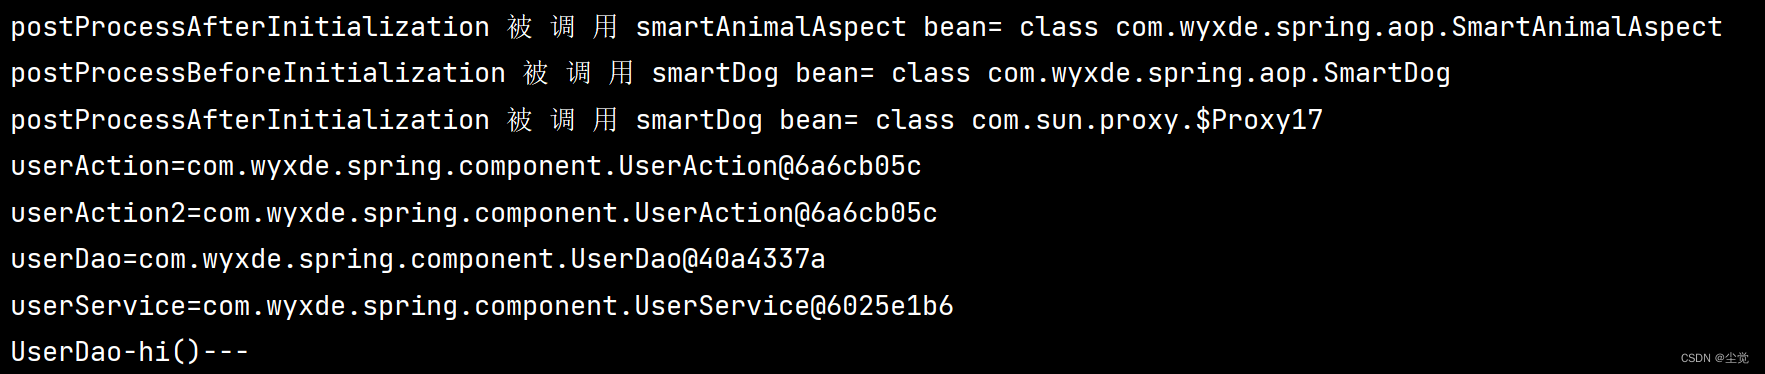
思考问题
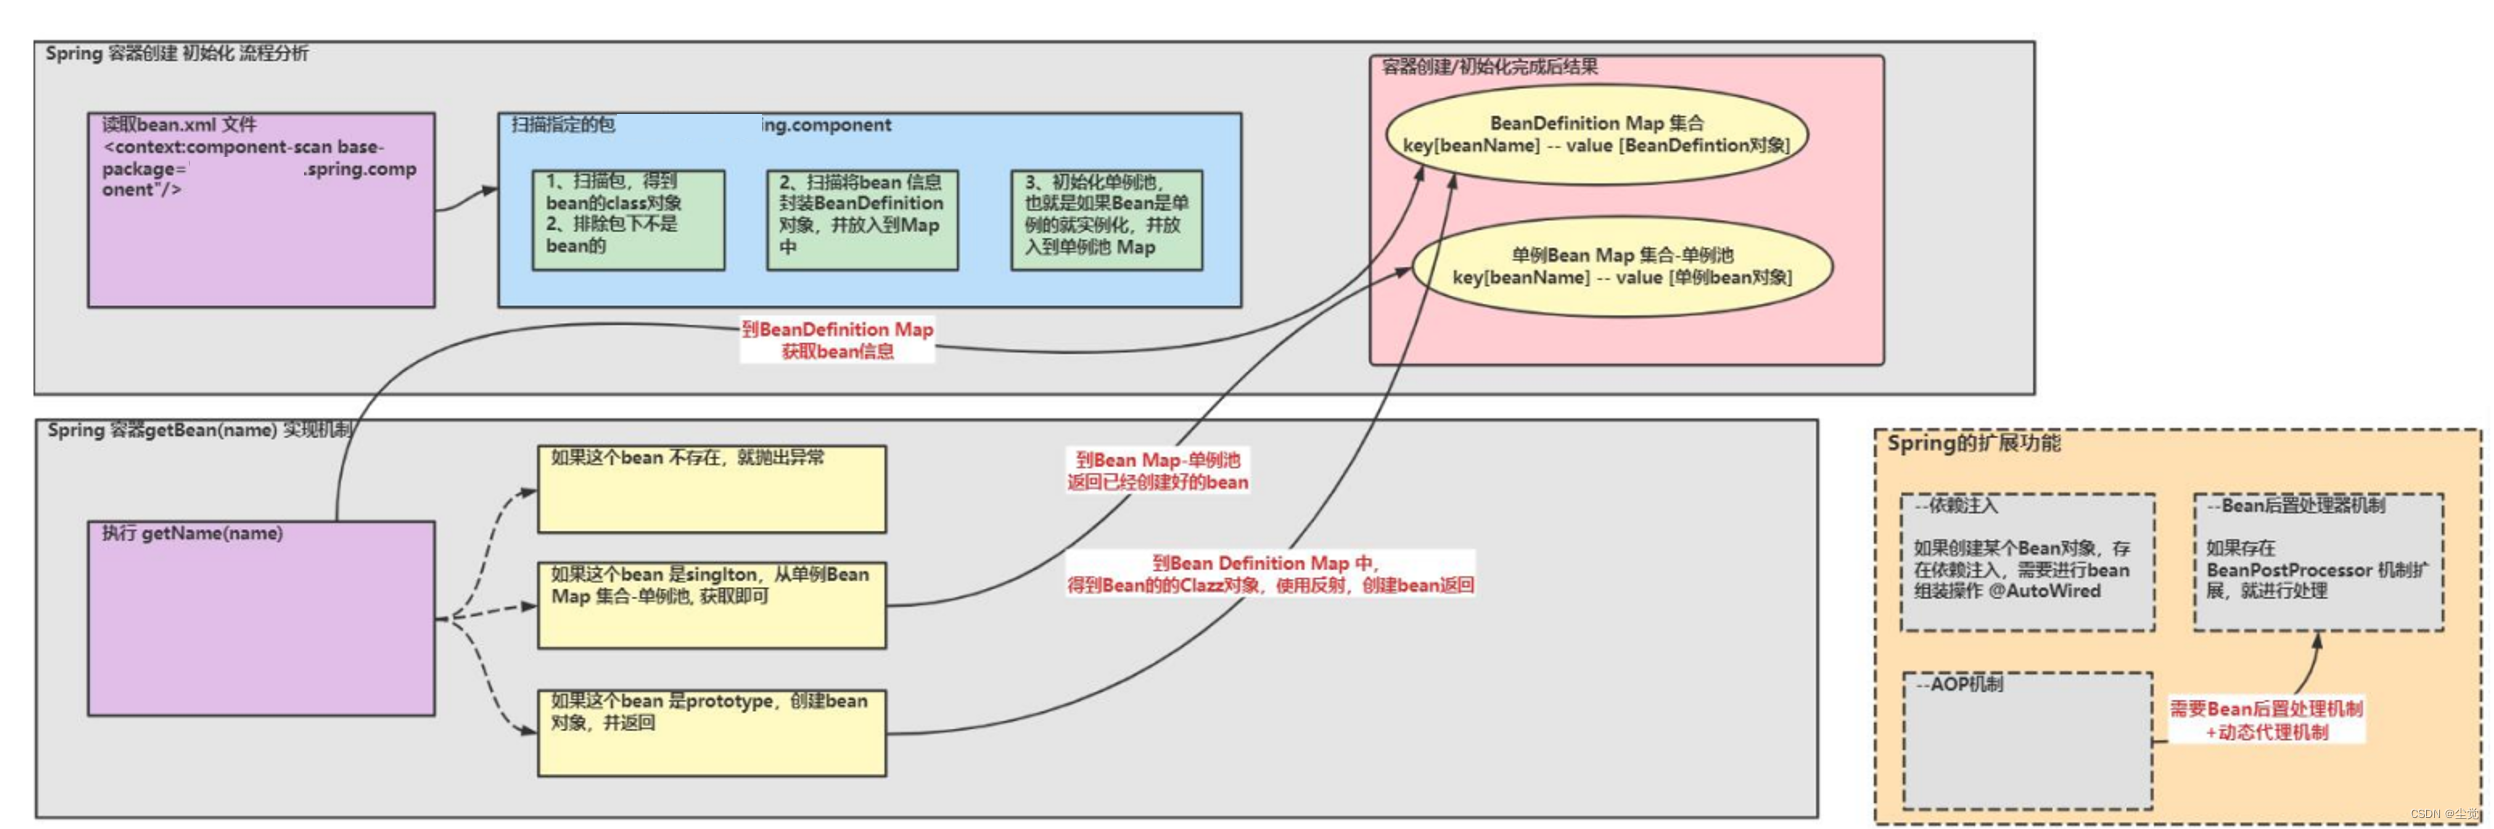
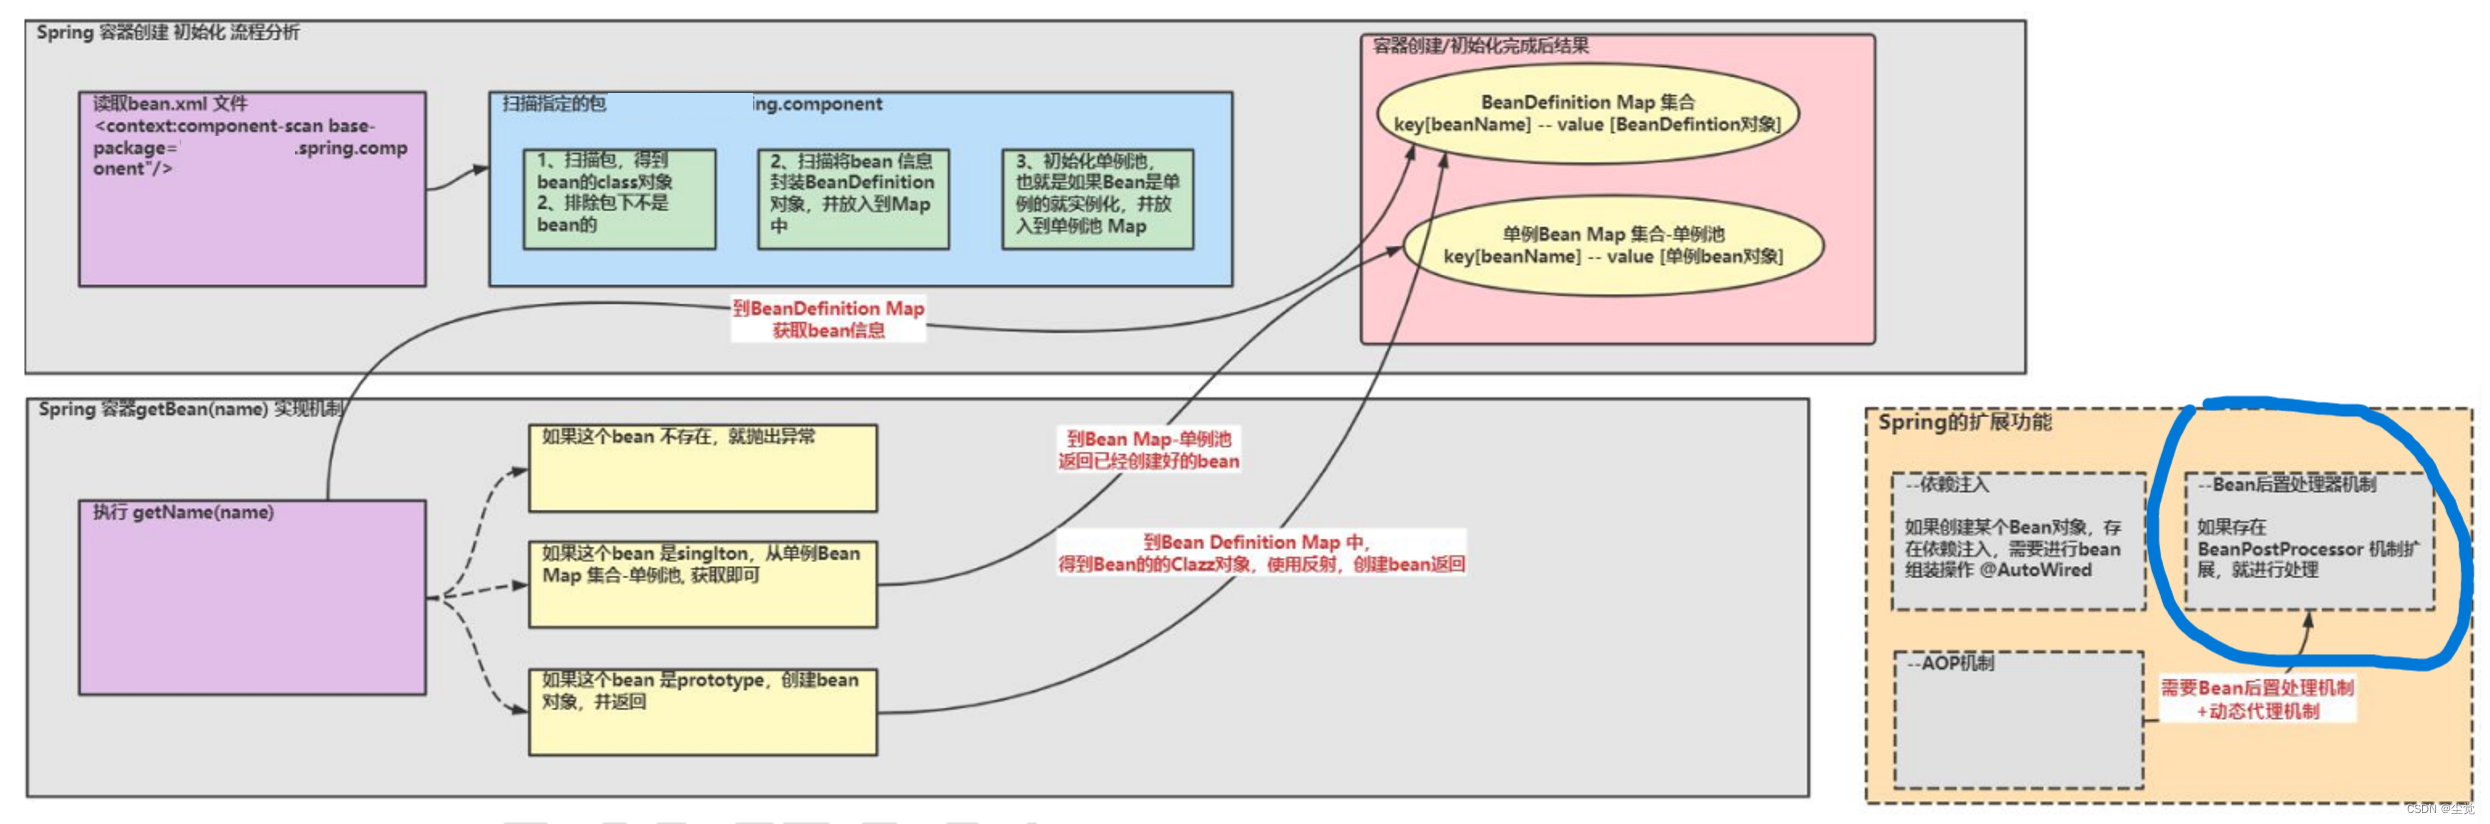
1 Spring 底层实现, 如何实现 IOC 容器创建和初始化【前面我们实现过,现在要再深入】
2 Spring 底层实现, 如何实现 getBean, 根据 singleton 和 prototype 来返回 bean 实例
3 继续思考-原生 Spring 如何实现 BeanPostPro
创建MyBeanPostProce ssor.java类
/**
 * 编写的一个后置处理器
 */
//@Component
public class MyBeanPostProcessor implements BeanPostProcessor {

    /**
     * 在Bean的 init初始化方法前调用-> 这个知识点,在前面讲解后置处理器时讲过的
     * @param bean
     * @param beanName
     * @return
     * @throws BeansException
     */
    public Object postProcessBeforeInitialization(Object bean, String beanName) throws BeansException {

        System.out.println("postProcessBeforeInitialization 被 调 用 " + beanName + " bean= " + bean.getClass());
        return bean;
    }

    /**
     * 在Bean的 init初始化方法后调用-> 这个知识点,在前面讲解后置处理器时讲过的
     * @param bean
     * @param beanName
     * @return
     * @throws BeansException
     */
    public Object postProcessAfterInitialization(Object bean, String beanName) throws BeansException {
        System.out.println("postProcessAfterInitialization 被 调 用 " + beanName + " bean= " + bean.getClass());
        return bean;
    }
}
修改类beans.xml
<!--配置后置处理器-->
    <bean class="com.wyxde.spring.process.MyBeanPostProcessor" id="myBeanPostProcessor"/>
创建UserService类
//也可以使用@Service
@Component
public class UserService {

    //定义属性
    //思考:加入 @Autowired , Spring容器时如何实现依赖注入?
    //也可以使用@Resource
    @Autowired
    private UserDao userDao;

    public void m1() {
        userDao.hi();
    }

    //这里我们需要指定init() 是初始化方法
    @PostConstruct
    public void init() {
        System.out.println("UserService-init()");
    }

}
完成测试AppMain

思考问题
1 Spring 底层实现, 如何实现 Bean 后置处理器机制
2.继续思考-原生 Spring 是如何实现
创建SmartAnimalable接口
public interface SmartAnimalable {
    float getSum(float i, float j);
    float getSub(float i, float j);
}
创建SmartDog类
@Component
public class SmartDog implements SmartAnimalable {

    public float getSum(float i, float j) {
        float res = i + j;
        System.out.println("SmartDog-getSum-res=" + res);
        return res;
    }

    public float getSub(float i, float j) {
        float res = i - j;
        System.out.println("SmartDog-getSub-res=" + res);
        return res;
    }
}
创建SmartAnimalAspect切面类
@Component
@Aspect
public class SmartAnimalAspect {

    //给SmartDog配置前置,返回,异常,最终通知

    //前置通知
    @Before(value = "execution(public float com.wyxde.spring.aop.SmartDog.getSum(float, float))")
    public void showBeginLog(JoinPoint joinPoint) {
        //通过连接点对象joinPoint 可以获取方法签名
        Signature signature = joinPoint.getSignature();
        System.out.println("SmartAnimalAspect-切面类showBeginLog()[使用的myPointCut()]-方法执行前-日志-方法名-" + signature.getName() + "-参数 "
                + Arrays.asList(joinPoint.getArgs()));
    }

   //返回通知
    @AfterReturning(value = "execution(public float com.wyxde.spring.aop.SmartDog.getSum(float, float))", returning = "res")
    public void showSuccessEndLog(JoinPoint joinPoint, Object res) {
        Signature signature = joinPoint.getSignature();
        System.out.println("SmartAnimalAspect-切面类showSuccessEndLog()-方法执行正常结束-日志-方法名-" + signature.getName() + " 返回的结果是=" + res);
    }


   //异常通知
    @AfterThrowing(value = "execution(public float com.wyxde.spring.aop.SmartDog.getSum(float, float))", throwing = "throwable")
    public void showExceptionLog(JoinPoint joinPoint, Throwable throwable) {
        Signature signature = joinPoint.getSignature();
        System.out.println("SmartAnimalAspect-切面类showExceptionLog()-方法执行异常-日志-方法名-" + signature.getName() + " 异常信息=" + throwable);
    }

    //最终通知
    @After(value = "execution(public float com.wyxde.spring.aop.SmartDog.getSum(float, float))")
    public void showFinallyEndLog(JoinPoint joinPoint) {
        Signature signature = joinPoint.getSignature();
        System.out.println("SmartAnimalAspect-切面类showFinallyEndLog()-方法最终执行完毕-日志-方法名-" + signature.getName());
    }

}
修改类beans.xml
配置自动扫描的包, 同时引入对应的名称空间
1. 如果我们是普通的java项目, beans.xml 放在src下
2. 如果我们是java maven 项目, beans.xml 放在 src/main/resources
<?xml version="1.0" encoding="UTF-8"?>
<beans xmlns="http://www.springframework.org/schema/beans"
       xmlns:xsi="http://www.w3.org/2001/XMLSchema-instance"
       xmlns:context="http://www.springframework.org/schema/context"
       xmlns:aop="http://www.springframework.org/schema/aop"
       xsi:schemaLocation="http://www.springframework.org/schema/beans http://www.springframework.org/schema/beans/spring-beans.xsd http://www.springframework.org/schema/context https://www.springframework.org/schema/context/spring-context.xsd http://www.springframework.org/schema/aop https://www.springframework.org/schema/aop/spring-aop.xsd">


    <context:component-scan base-package="com.wyxde.spring.component"/>
    <context:component-scan base-package="com.wyxde.spring.aop"/>

    <!--启用基于注解方式的AOP功能-->
    <aop:aspectj-autoproxy/>

    <!--配置后置处理器-->
    <bean class="com.wyxde.spring.process.MyBeanPostProcessor" id="myBeanPostProcessor"/>
</beans>
创建AppMain类
public class AppMain {
    public static void main(String[] args) {
        //测试看看是否可以得到spring容器中的bean , 同时看看依赖注入是否OK

        ApplicationContext ioc =
                new ClassPathXmlApplicationContext("beans.xml");
        UserAction userAction = (UserAction) ioc.getBean("userAction");
        UserAction userAction2 = (UserAction) ioc.getBean("userAction");

        System.out.println("userAction=" + userAction);
        System.out.println("userAction2=" + userAction2);

        UserDao userDao = (UserDao) ioc.getBean("userDao");
        System.out.println("userDao=" + userDao);

        UserService userService = (UserService) ioc.getBean("userService");
        System.out.println("userService=" + userService);

        //测试一下当前的依赖注入
        userService.m1();

        //测试一下AOP
        SmartAnimalable smartDog = ioc.getBean(SmartAnimalable.class);
        smartDog.getSum(10, 2);

    }
}
输出结果
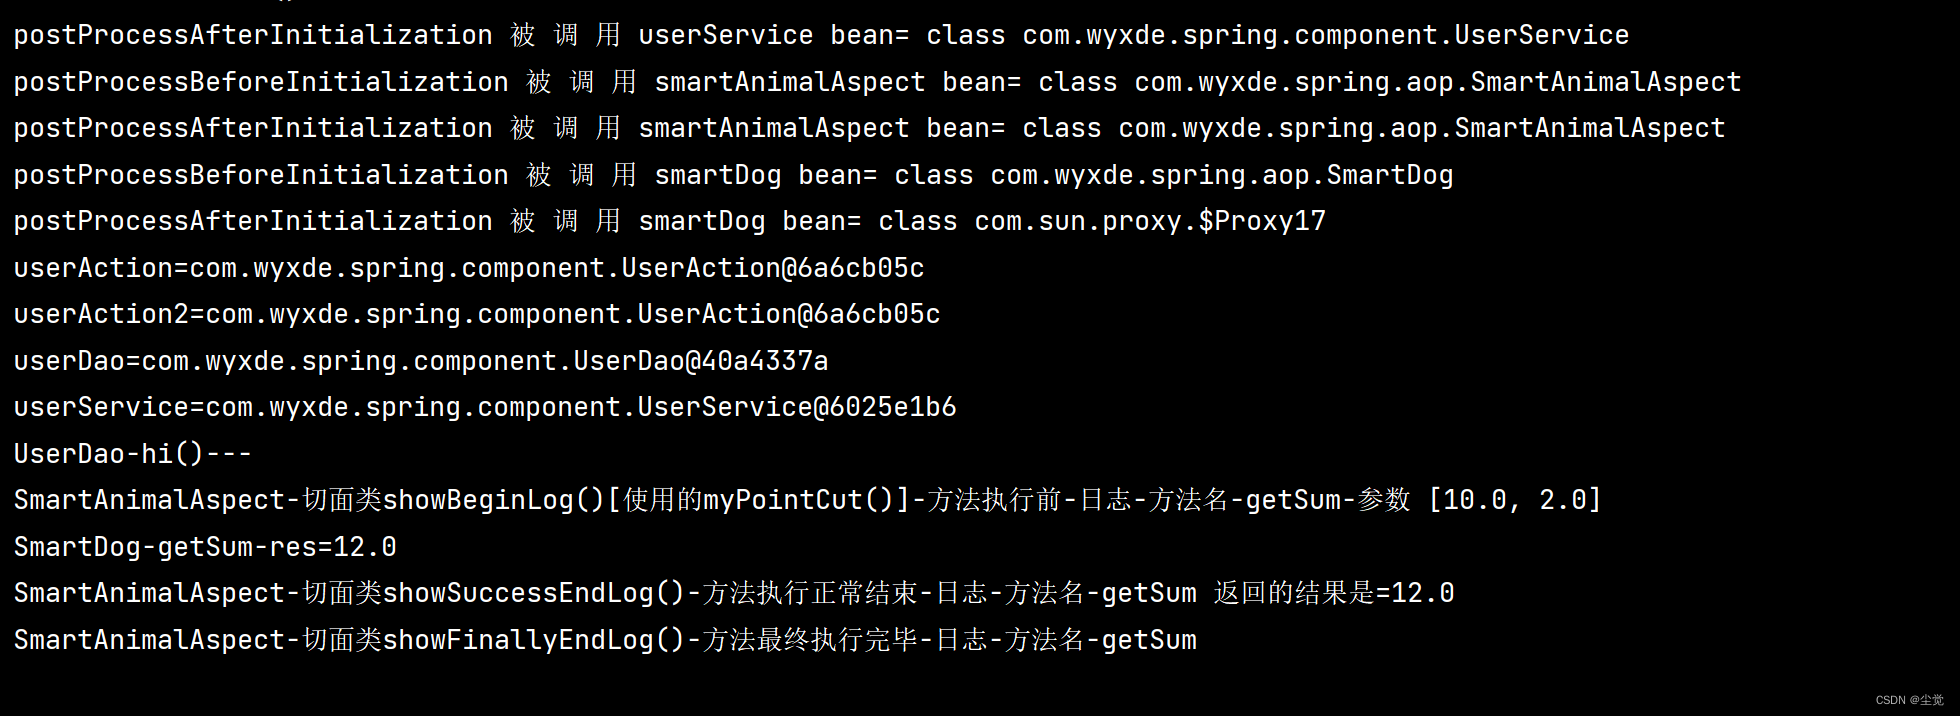
简单分析
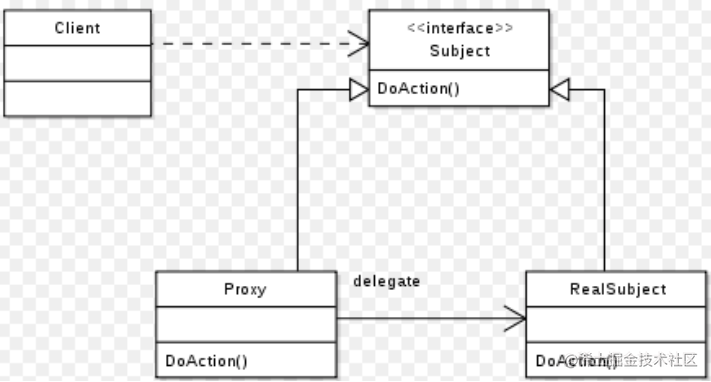
AOP 和 BeanPostProces关系
1. AOP 实现 Spring 可以通过给一个类,加入注解 @EnableAspectJAutoProxy 来指定, 比
如
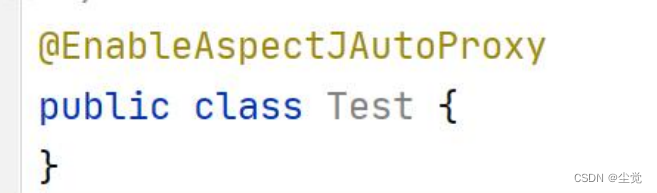
2. 我们来追一下@EnableAspectJAutoProxy


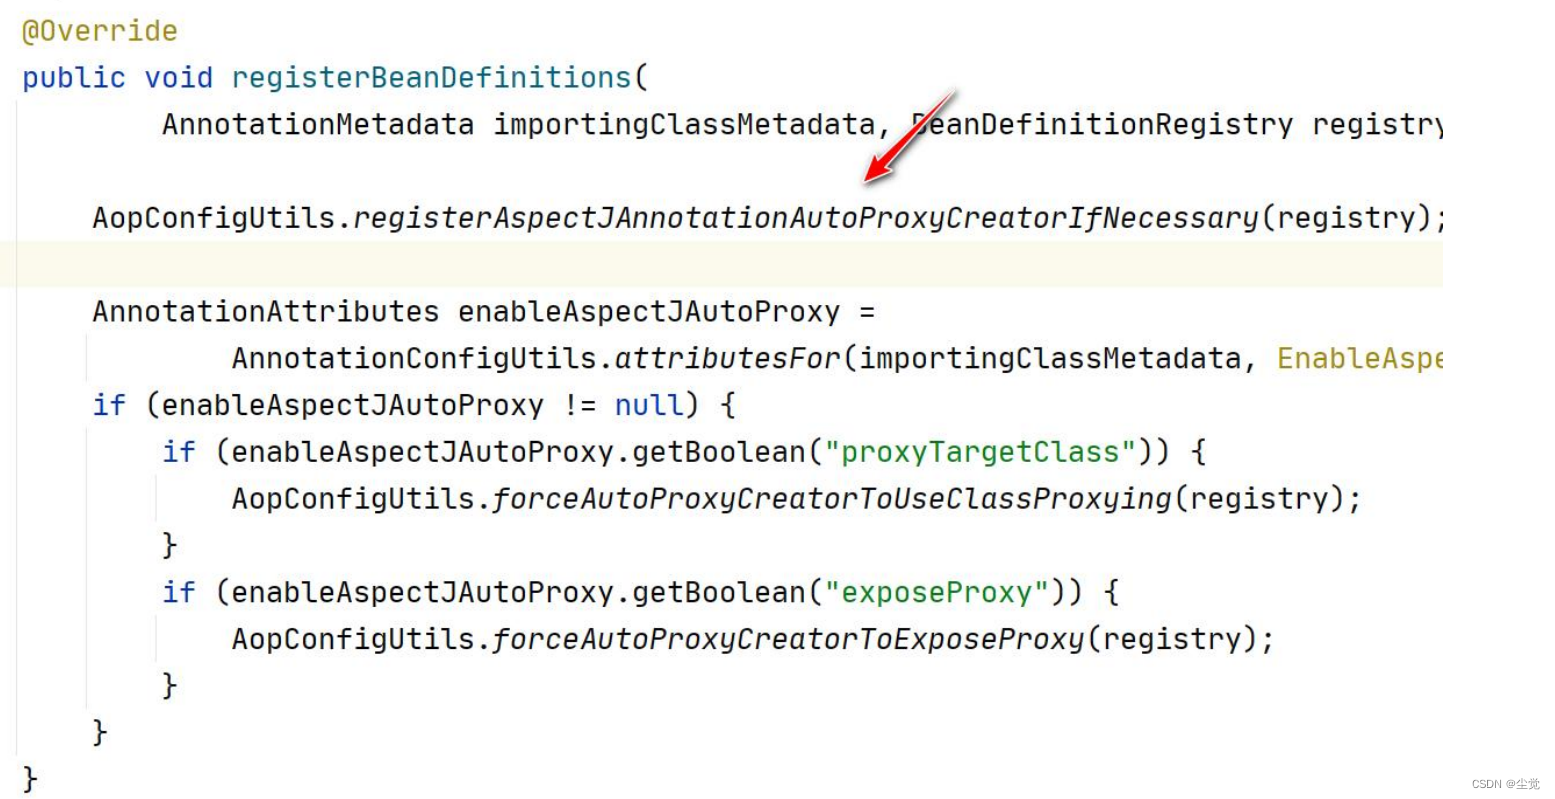


看一下 AnnotationAwareAspectJAutoProxyCreator 的类图

分析
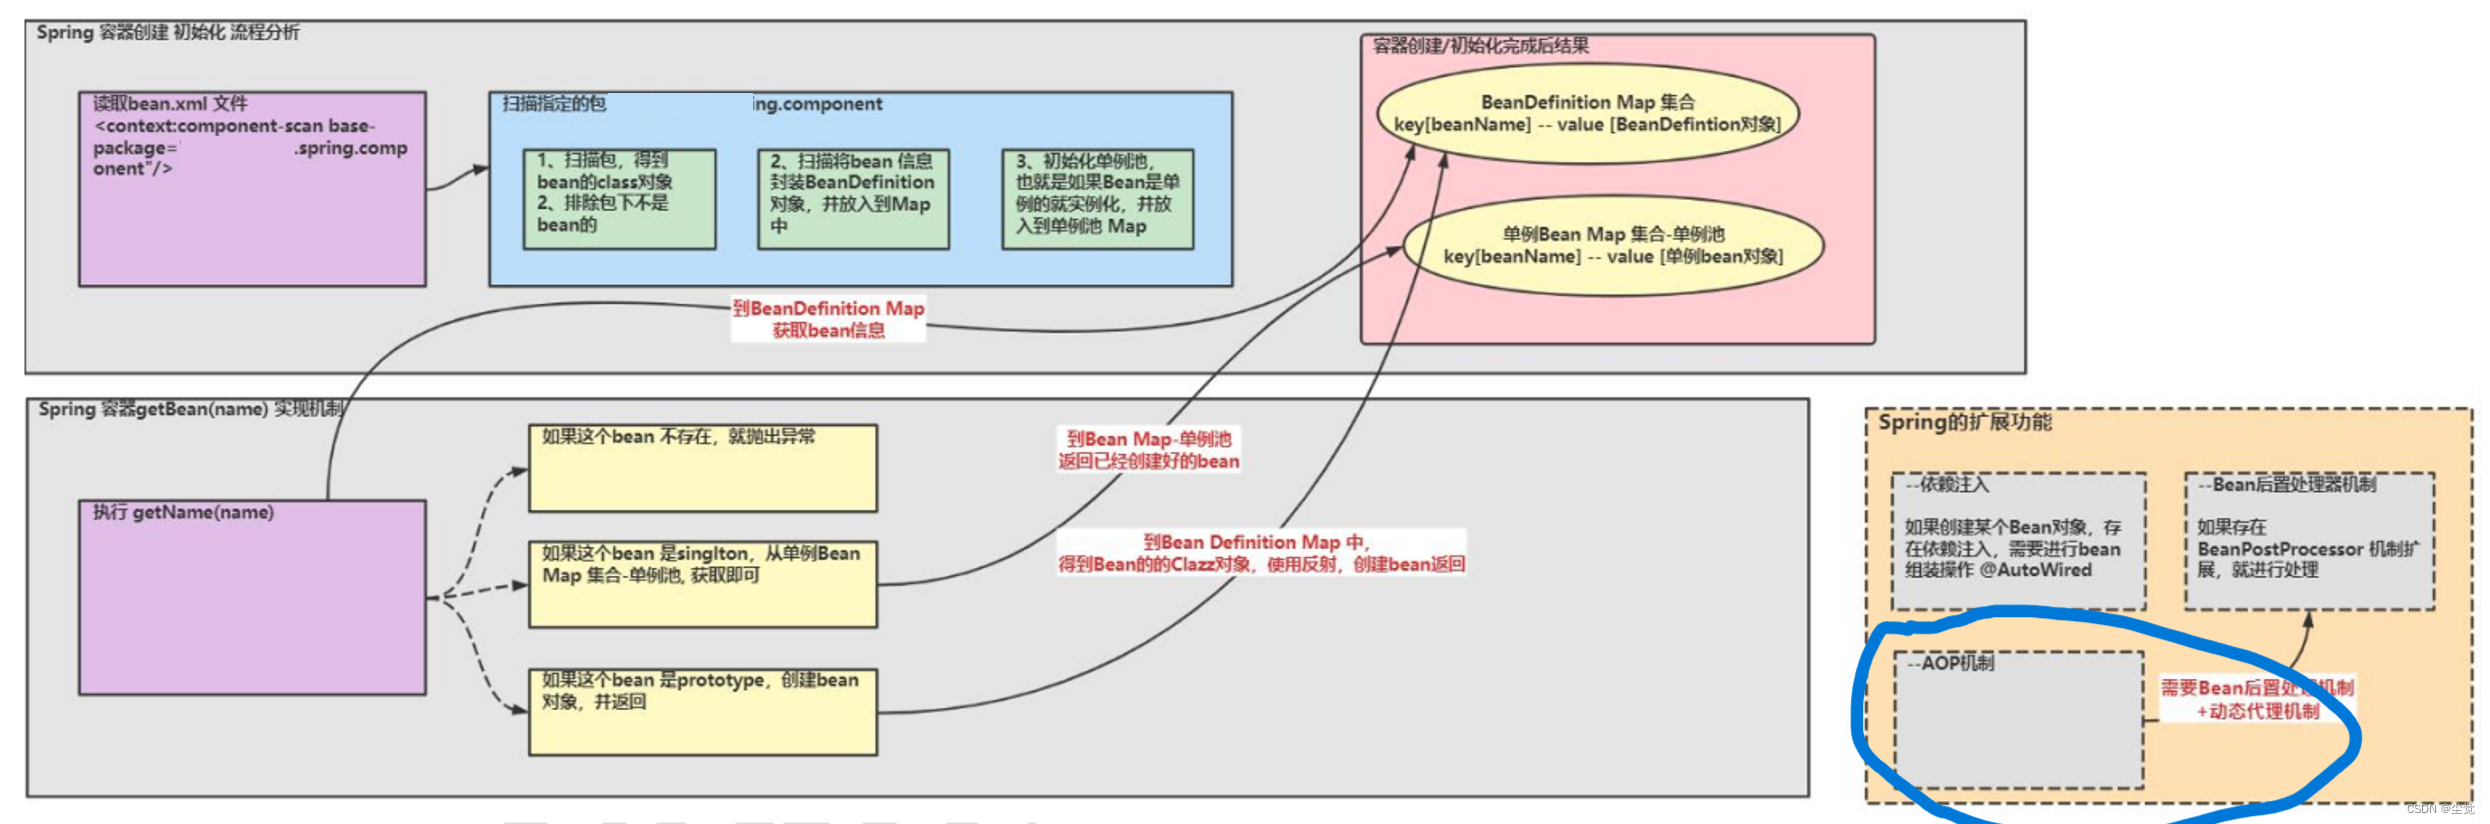
1) AOP 底层是基于 BeanPostProcessor 机制的.
2) 即在 Bean 创建好后,根据是否需要 AOP 处理,决定返回代理对象,还是原生 Bean
3) 在返回代理对象时,就可以根据要代理的类和方法来返回
4) 其实这个机制并不难,本质就是在 BeanPostProcessor 机制 + 动态代理技术
5) 下面我们就准备自己来实现 AOP 机制, 这样小伙伴们就不在觉得 AOP 神秘,通透很多了.
手动实现Spring机制
Spring 整体架构分析
实现任务阶段 1
编写自己 Spring 容器,实现扫描包, 得到 bean 的 class 对象
知识扩展:类加载器
● java 的类加载器 3 种
Bootstrap 类加载器--------------对应路径 jre/lib
Ext 类加载器--------------------对应路径 jre/lib/ext
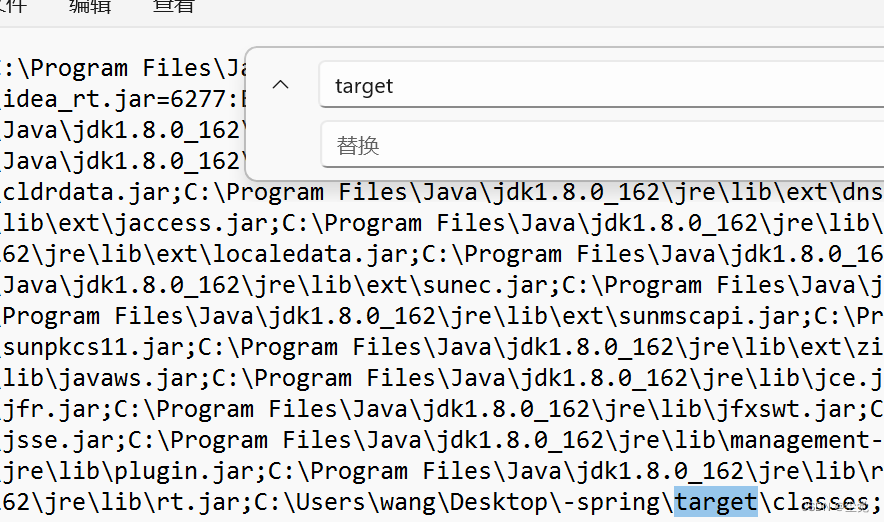
App 类加载器-------------------对应路径 classpath
● classpath 类路径,就是 java.exe 执行时,指定的路径,比如

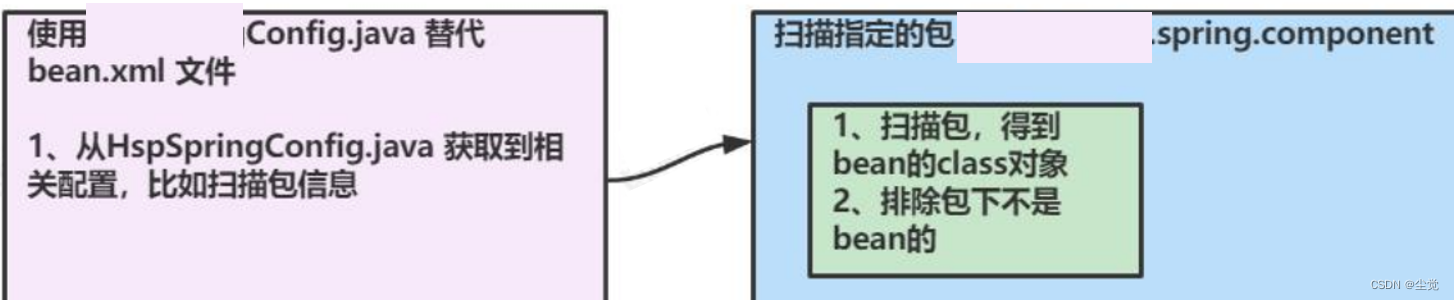
说明: 编写自己 Spring 容器,实现扫描包, 得到 b得到 bean的class对象
● 分析示意图
创建ComponentScan.java注解
@Target(ElementType.TYPE)
@Retention(RetentionPolicy.RUNTIME)
public @interface ComponentScan {
    //通过value可以指定要扫描的包
    String value() default "";
}
创建Component注解
@Target(ElementType.TYPE)
@Retention(RetentionPolicy.RUNTIME)
public @interface Component {
    //通过value可以给注入的bean/对象指定名字
    String value() default "";
}
创建 WyxSpringConfig类
@ComponentScan(value = "com.wyxdu.spring.component")
public class WyxSpringConfig {
}
创建 MonsterService.java类
@Component("monsterService")
public class MonsterService {
}
创建MonsterDao类
@Component("monsterDao")
public class MonsterDao {
}
创建WyxSpringApplicationContext类
1. 解析配置类
2. 获取到配置类的 @ComponentScan("com.Wyxedu.spring.component")
3. 获取扫描路径下所有的类文件
3.1 先得到类加载器, 使用 App 方式来加载.
ClassLoader classLoader=WyxSpringApplicationContext.class.getClassLoader();
3.2 将 path 转成 形式为 com/Wyxedu/spring/component
通过类加载器获取来类文件的 Clazz 对象
先 得 到 类 的 完 整 类 路 径 形 式 为com.Wyxedu.spring.component.MonsterService
public class WyxSpringApplicationContext {
    private Class configClass;
    public WyxSpringApplicationContext(Class configClass) {
        this.configClass = configClass;
        //1. 解析配置类
        //2. 获取到配置类的 @ComponentScan("com.Wyxedu.spring.component")
        ComponentScan componentScan = (ComponentScan)
                this.configClass.getDeclaredAnnotation(ComponentScan.class);
        String path = componentScan.value();
        System.out.println("扫描路径 = " + path);
            //3. 获取扫描路径下所有的类文件
           //(1) 先得到类加载器, 使用 App 方式来加载. ClassLoader classLoader = WyxSpringApplicationContext.class.getClassLoader();
             //在获取某个包的 d 对应的 URL 时,要求是 com/Wyxedu/spring/component
            //URL resource = classLoader.getResource("com/Wyxedu/spring/component");
            //(2) 将 path 转成 形式为 com/Wyxedu/spring/component
        path = path.replace(".", "/");
        URL resource = classLoader.getResource(path);
        File file = new File(resource.getFile());
        if(file.isDirectory()) {
            File[] files = file.listFiles();
            for (File f : files) {
                String fileAbsolutePath = f.getAbsolutePath();
                System.out.println("=======================================");
                System.out.println("文件绝对路径 = " + fileAbsolutePath);
                if(fileAbsolutePath.endsWith(".class")) {//说明是类文件
                //通过类加载器获取来类文件的 Clazz 对象
                // 先 得 到 类 的 完 整 类 路 径 形 式 为com.Wyxedu.spring.component.MonsterService
                    String className =
                            fileAbsolutePath.substring(fileAbsolutePath.lastIndexOf("\\")
                                    + 1, fileAbsolutePath.indexOf(".class"));
                    String classFullPath = path.replace("/", ".") + "." + className;
                    System.out.println("类名 = " + className);
                    System.out.println("类的全路径 = " + classFullPath);
                    try {
                            //获取到扫描包下的类的 clazz 对象
                            Class<?> clazz = classLoader.loadClass(classFullPath);

                            if(clazz.isAnnotationPresent(Component.class)) {
                                  //如果这个类有@Commponent, 说明是一个 spring bean
                                System.out.println("是一个 bean = " + clazz);
                            } else {
                               //如果这个类没有@Commponent, 说明不是一个 spring bean
                            System.out.println("不是一个 bean = " + clazz);
                        }
                    } catch (ClassNotFoundException e) {
                        e.printStackTrace();
                    }
                    System.out.println("=======================================");
                }
            }
        }
    }
    public Object getBean(String name) {
        return null;
    }
}
创建AppMain
public class AppMain {
public static void main(String[] args) {
//创建我们的 spring 容器对象
WyxSpringApplicationContext hspSpringApplicationContext =
new WyxSpringApplicationContext(WyxSpringConfig.class);
}
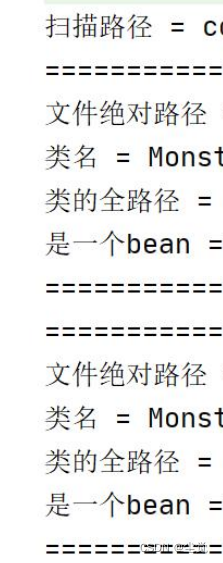
}完成测试,输出效果
实现任务阶段 2- 扫描将 bean 信息封装到 BeanDefinition 对象, 并放入到 Map
● 分析示意图
创建Scope.java注解
@Target(ElementType.TYPE)
@Retention(RetentionPolicy.RUNTIME)
public @interface Scope {
    //通过value可以指定singleton,prototype
    String value() default "";
}
修改,增加@ScopeMonsterService.java类
@Component("monsterService")
@Scope("prototype")
public class MonsterService{}
创建BeanDefinition类
/**
* BeanDefinition 用于封装/记录Bean的信息[
1. scope
2 Bean对应的Class对象, 反射可以生对应的对象]
 */
public class BeanDefinition {
    private String scope;
    private Class clazz;
    //可以根据需求,进行扩展

    public String getScope() {
        return scope;
    }

    public void setScope(String scope) {
        this.scope = scope;
    }

    public Class getClazz() {
        return clazz;
    }

    public void setClazz(Class clazz) {
        this.clazz = clazz;
    }

    @Override
    public String toString() {
        return "BeanDefinition{" +
                "scope='" + scope + '\'' +
                ", clazz=" + clazz +
                '}';
    }
}
修改WyxSpringApplicationContext类
将扫描到的 Bean 信息封装到 BeanDefinition 对象中,并保存到map中
public class WyxSpringApplicationContext {
    private Class configClass;
    //如果 bean 是单例的,就直接放在这个 单例 bean 对象池
    private ConcurrentHashMap<String,Object> singletonObjects =
new ConcurrentHashMap<>();
    //将 bean 的定义,放在这个 beanDefinitionMap 集合
    private ConcurrentHashMap<String, BeanDefinition> beanDefinitionMap =
            new ConcurrentHashMap<>();
    public WyxSpringApplicationContext(Class configClass) {
        //通过扫描,得到 beanDefinition 的 map
        beanDefinitionsByscan(configClass);
        System.out.println(beanDefinitionMap);
    }
    private void beanDefinitionsByscan(Class configClass) {
        this.configClass = configClass;
        //1. 解析配置类
        //2. 获取到配置类的 @ComponentScan("com.Wyxedu.spring.component")
        ComponentScan componentScan = (ComponentScan)
                this.configClass.getDeclaredAnnotation(ComponentScan.class);
        String path = componentScan.value();
        System.out.println("扫描路径 = " + path);
        //3. 获取扫描路径下所有的类文件
        //(1) 先得到类加载器, 使用 App 方式来加载. ClassLoader classLoader = WyxSpringApplicationContext.class.getClassLoader();
        //在获取某个包的 d 对应的 URL 时,要求是 com/Wyxedu/spring/component
        //URL resource = classLoader.getResource("com/Wyxedu/spring/component");
        //(2) 将 path 转成 形式为 com/Wyxedu/spring/component
        path = path.replace(".", "/");
        URL resource = classLoader.getResource(path);
        File file = new File(resource.getFile());
        if(file.isDirectory()) {
            File[] files = file.listFiles();
            for (File f : files) {
                String fileAbsolutePath = f.getAbsolutePath();
                System.out.println("=======================================");
                System.out.println("文件绝对路径 = " + fileAbsolutePath);
                if(fileAbsolutePath.endsWith(".class")) {//说明是类文件
                    //通过类加载器获取来类文件的 Clazz 对象
                    // 先 得 到 类 的 完 整 类 路 径 形 式 为
                    com.hspedu.spring.component.MonsterService
                    String className =
                            fileAbsolutePath.substring(fileAbsolutePath.lastIndexOf("\\")
                                    + 1, fileAbsolutePath.indexOf(".class"));
                    String classFullPath = path.replace("/", ".") + "." + className;
                    System.out.println("类名 = " + className);
                    System.out.println("类的全路径 = " + classFullPath);
                    try {
                        //获取到扫描包下的类的 clazz 对象
                        Class<?> clazz = classLoader.loadClass(classFullPath);
                        if(clazz.isAnnotationPresent(Component.class)) {
                            //如果这个类有@Commponent, 说明是一个 spring bean
                            System.out.println("是一个 bean = " + clazz);
                            //解读
                            //1. 因为这里不能直接将 bean 实例放入 singletonObjects
                            //2. 原因是如果 bean 是prototype是需要每次创建新的 bean对象
                            //3. 所以,Spring 底层是这样设计的: 将 bean 信息封装到
                            BeanDefinition 对象中, 便于 getBean 的操作
                            BeanDefinition beanDefinition = new BeanDefinition();
                            beanDefinition.setClazz(clazz);
                            //获取 bean 的 name
                            Component componentAnnotation =
                                    clazz.getDeclaredAnnotation(Component.class);
                            String beanName = componentAnnotation.value();
                            //获取 bean 的 scope
                            if(clazz.isAnnotationPresent(Scope.class)) { // 如 果 有
                                @Scope
                                Scope scopeAnnotation =
                                        clazz.getDeclaredAnnotation(Scope.class);
                                beanDefinition.setScope(scopeAnnotation.value());
                            } else { //如果没有@Scope, 默认是 singleton
                                beanDefinition.setScope("singleton");
                            }
                            //放入到 beanDefinitionMap
                            beanDefinitionMap.put(beanName, beanDefinition);
                        } else {
                            //如果这个类没有@Commponent, 说明不是一个 spring bean
                            System.out.println("不是一个 bean = " + clazz);
                        }
                    } catch (ClassNotFoundException e) {
                        e.printStackTrace();
                    }
                    System.out.println("=======================================");
                }
            }
        }
    }
    public Object getBean(String name) {
        return null;
    }
}
完成测试,输出效果

实现任务阶段 3- 初始化 bean 单例池,并完成 getBean 方法 , createBean 方法
说明: 初始化 bean 单例池,并完成 getBean 方法 , createBean 方法
修改WyxSpringApplicationContext类
增加相应的业务代码
- 通过扫描,得到 beanDefinition 的 map
- 通过 beanDefinitionMap , 初始化 singletonObjects bean 单列池
- 得到 beanName
- 通过 beanName 得到 beanDefinition
 public WyxSpringApplicationContext(Class configClass) {
            //通过扫描,得到 beanDefinition 的 map
        beanDefinitionsByscan(configClass);
        System.out.println(beanDefinitionMap);
        //通过 beanDefinitionMap , 初始化 singletonObjects bean 单列池
        Enumeration<String> keys = beanDefinitionMap.keys();
        while (keys.hasMoreElements()) {
            //得到 beanName
            String beanName = keys.nextElement();
            //通过 beanName 得到 beanDefinition
            BeanDefinition beanDefinition = beanDefinitionMap.get(beanName);
            if ("singleton".equalsIgnoreCase(beanDefinition.getScope())) {
                //将该 bean 实例放入 singletonObjects
                Object bean = createBean(beanDefinition);
                singletonObjects.put(beanName, bean);
            }
        }
        System.out.println("singletonObjects 单例池 = " + singletonObjects);
    }
    //先简单实现实现,后面在完善.
    private Object createBean(BeanDefinition beanDefinition) {
            //得到 bean 的类型
        Class clazz = beanDefinition.getClazz();
        try {
            //使用反射得到实例
            Object instance = clazz.getDeclaredConstructor().newInstance();
            return instance;
        } catch (InstantiationException e) {
            e.printStackTrace();
        } catch (IllegalAccessException e) {
            e.printStackTrace();
        } catch (InvocationTargetException e) {
            e.printStackTrace();
        } catch (NoSuchMethodException e) {
            e.printStackTrace();
        }
        //如果没有创建成功,返回 null
        return null;
    }
    public Object getBean(String name) {
        if(beanDefinitionMap.containsKey(name)) {
            BeanDefinition beanDefinition = beanDefinitionMap.get(name);
            //得到 bean 的 scope , 分别处理
            if("singleton".equalsIgnoreCase(beanDefinition.getScope())) {
            //单例,直接从 bean 单例池获取
                return singletonObjects.get(name);
            } else { //不是单例,则没有返回新的实例
                return createBean(beanDefinition);
            }
        } else {
            throw new NullPointerException("没有该 bean");
        }
    }
修改AppMain
public class AppMain {
    public static void main(String[] args) {
        //创建我们的 spring 容器对象
        HspSpringApplicationContext hspSpringApplicationContext =
                new HspSpringApplicationContext(HspSpringConfig.class);
        //通过 spring 容器对象, 获取 bean 对象
        System.out.println(hspSpringApplicationContext.getBean("monsterService"));
        System.out.println(hspSpringApplicationContext.getBean("monsterService"));
        System.out.println(hspSpringApplicationContext.getBean("monsterService"));
    }
}
完成测试,输出效果
实现任务阶段 4- 完成依赖注入
● 分析示意图
● 代码实现, 说明,整个实现思路,就是参考 Spring 规范
创建Autowired.java注解
@Target({ElementType.METHOD, ElementType.FIELD})
@Retention(RetentionPolicy.RUNTIME)
public @interface Autowired {
//这里属性,可以参考思路完成,还是比较简单
    //boolean required() default true;
}
修改MonsterDao类
@Component("monsterDao")
public class MonsterDao {
public void hi() {
System.out.println("hi 我是 monster Dao, select * from ....");
}
}
修改MonsterService.java类
@Component("monsterService")
@Scope("prototype")
public class MonsterService implements InitializingBean {
    @Autowired
    private MonsterDao monsterDao;
    public void m1() {
        //调用 monsterDao 的 hi()
        monsterDao.hi();
    }
}
修改WyxSpringApplicationContext类
 // 先简单实现实现,后面在完善. private Object createBean(BeanDefinition beanDefinition) {
    // 得到 bean 的类型
    Class clazz = beanDefinition.getClazz();
    try
    {
        // 使用反射得到实例
        Object instance = clazz.getDeclaredConstructor().newInstance();
        // 完成依赖注入
        for (Field declaredField : clazz.getDeclaredFields()) {
            if (declaredField.isAnnotationPresent(Autowired.class)) {
                // 处理@Autowired 注解的属性 required, 很简单,自己完成
                // Autowired annotation =
                declaredField.getAnnotation(Autowired.class);
                // System.out.println(annotation.required());
                // 如果该属性有@Autowired, 就进行组装
                Object bean = getBean(declaredField.getName());
                declaredField.setAccessible(true);// 因为属性是 private,需要暴破
                declaredField.set(instance, bean);
            }
        }
        return instance;
    } catch(InstantiationException e){
        e.printStackTrace();
    } catch(IllegalAccessException e){
        e.printStackTrace();
    } catch(InvocationTargetException e){
        e.printStackTrace();
    } catch(NoSuchMethodException e){
        e.printStackTrace();
    }
 // 如果没有创建成功,返回 null
   return null;
}
修改AppMain
public class AppMain {
    public static void main(String[] args) {
        //创建我们的 spring 容器对象
        WyxSpringApplicationContext wyxSpringApplicationContext =
                new WyxSpringApplicationContext(WyxSpringConfig.class);
        //通过 spring 容器对象, 获取 bean 对象
        //System.out.println(hspSpringApplicationContext.getBean("monsterService"));
        //System.out.println(hspSpringApplicationContext.getBean("monsterService"));
        //System.out.println(hspSpringApplicationContext.getBean("monsterService"));
        MonsterService monsterService = (MonsterService)
                wyxSpringApplicationContext.getBean("monsterService");
        monsterService.m1();
    }
}
运行完成测试

实现任务阶段 5- bean 后置处理器
● 分析示意图
● 代码实现, 说明,整个实现思路,就是参考 Spring 规范
创建InitializingBean接口
public interface InitializingBean {
    void afterPropertiesSet() throws Exception;
}
修改MonsterService.java类
去实现 InitializingBean 接口
1. afterPropertiesSet就是在bean的setter方法执行完毕后被spring容器调用
2 即就是初始化方法
@Component//(value = "monsterService") //把MonsterService注入我们自己的spring容器中
@Scope(value = "prototype")
public class MonsterService implements InitializingBean {
    //这里我们使用自己的@Autowired来修饰属性
    //表示该属性,是通过容器完成依赖注入
    //说明: 我们实现按照名字来进行组装即可
    @Autowired
    private MonsterDao monsterDao;

    public void m1() {
        monsterDao.hi();
    }

    /**
     * 1. afterPropertiesSet就是在bean的setter方法执行完毕后被spring容器调用
     * 2 即就是初始化方法
     * @throws Exception
     */
    @Override
    public void afterPropertiesSet() throws Exception {
        System.out.println("MonsterService 初始化方法被调用 程序员在这里加入初始化的业务..");
    }
}
修改WyxSpringApplicationContext类
在创建好 Bean 实例后,判断是否需要进行初始化 【容器中常.否实现了某个接口,来判断是否要执行某个业务逻辑, 这里其实就是 java 基础的接口编程实际运用
 //先简单实现实现,后面在完善.
    private Object createBean(String beanName, BeanDefinition beanDefinition) {
        //得到 bean 的类型
        Class clazz = beanDefinition.getClazz();
        try {
            //使用反射得到实例
            Object instance = clazz.getDeclaredConstructor().newInstance();
            //完成依赖注入
            for (Field declaredField : clazz.getDeclaredFields()) {
                if (declaredField.isAnnotationPresent(Autowired.class)) {
                    // 处理@Autowired 注解的属性 required, 很简单,自己完成
                    // Autowired annotation =declaredField.getAnnotation(Autowired.class);
                    // System.out.println(annotation.required());
                    //如果该属性有@Autowired, 就进行组装
                    Object bean = getBean(declaredField.getName());
                    declaredField.setAccessible(true);//因为属性是 private,需要暴破
                    declaredField.set(instance, bean);
                }
            }
            //这里还有其他,比如 Aware 回调. 不写了
            //这里调用初始化,如果 bean 实现了 InitializingBean
            System.out.println("======创建好了====" + instance);
            if (instance instanceof InitializingBean) {
                try {
                    ((InitializingBean) instance).afterPropertiesSet();
                } catch (Exception e) {
                    e.printStackTrace();
                }
            }
            return instance;
        } catch (InstantiationException e) {
            e.printStackTrace();
        } catch (IllegalAccessException e) {
            e.printStackTrace();
        } catch (InvocationTargetException e) {
            e.printStackTrace();
        } catch (NoSuchMethodException e) {
            e.printStackTrace();
        }
        //如果没有创建成功,返回 null
        return null;
    }
运行完成测试

创建 BeanPostProcessor接口
该接口可以参考原生 Spring 规范 , 注注意体会切面编程
1. 参考原生Spring容器定义一个接口BeanPostProcessor
2. 该接口有两个方法postProcessBeforeInitialization 和 postProcessAfterInitialization
3. 这两个方法,会对Spring容器的所有Bean生效, 已经是切面编程的概念.
public interface BeanPostProcessor {

    /**
     * 1. postProcessBeforeInitialization在Bean的初始化方法前调用
     * @param bean
     * @param beanName
     * @return
     */
    default Object postProcessBeforeInitialization(Object bean, String beanName) {
        return bean;
    }

    /**
     * 1. postProcessAfterInitialization在Bean的初始化方法后调用
     * @param bean
     * @param beanName
     * @return
     */
    default Object postProcessAfterInitialization(Object bean, String beanName) {
        return bean;
    }
}
创建 WyxBeanPostProcessor类
@Component
public class WyxBeanPostProcessor implements BeanPostProcessor {
    /**
     * 该方法时在 bean 创建好后,进行初始化前调用
     * @param bean : 创建好的 bean 对象
     * @param beanName 创建好的 bean 的名字
     * @return
     */
    @Override
    public Object postProcessBeforeInitialization(Object bean, String beanName) {
        //这里程序员来决定业务逻辑,spring 只是提供处理机制
        System.out.println("postProcessBeforeInitialization 被调用 " + beanName + " bean= " + bean.getClass());
        return bean;
    }
    /**
     * 该方法时在 bean 创建好后,初始化完成后调用
     * @param bean : 创建好的 bean 对象
     * @param beanName : 创建好的 bean 的名字
     * @return
     */
    @Override
    public Object postProcessAfterInitialization(Object bean, String beanName) {
        //这里程序员来决定业务逻辑,spring 只是提供处理机制
        System.out.println("postProcessAfterInitialization 被调用 " + beanName + " bean= " + bean.getClass());
        return bean;
    }
}
修改WyxSpringApplicationContext类
注意:这里 createBean(String beanName, BeanDefinition beanDefinition) 需要增加入 参 beanName, 就会导致好几个位置错误,需要根据错误提示,对应解决即可.
    private List<BeanPostProcessor> beanPostProcessorList = new ArrayList<>();

    private void beanDefinitionsByscan(Class configClass) {
        this.configClass = configClass;
        ComponentScan componentScan = (ComponentScan)
                this.configClass.getDeclaredAnnotation(ComponentScan.class);
        String path = componentScan.value();
        System.out.println("扫描路径 = " + path);
        path = path.replace(".", "/");
        URL resource = classLoader.getResource(path);
        File file = new File(resource.getFile());
        if (file.isDirectory()) {
            File[] files = file.listFiles();
            for (File f : files) {
                String fileAbsolutePath = f.getAbsolutePath();
                System.out.println("=======================================");
                System.out.println("文件绝对路径 = " + fileAbsolutePath);
                if (fileAbsolutePath.endsWith(".class")) {// 说明是类文件
                    // 通过类加载器获取来类文件的 Clazz 对象
                    // 先 得 到 类 的 完 整 类 路 径 形 式 为
                    com.hspedu.spring.component.MonsterService
                    String className =
                            fileAbsolutePath.substring(fileAbsolutePath.lastIndexOf("\\") + 1,
                                    fileAbsolutePath.indexOf(".class"));
                    String classFullPath = path.replace("/", ".") + "." + className;
                    System.out.println("类名 = " + className);
                    System.out.println("类的全路径 = " + classFullPath);
                    try {
                        // 获取到扫描包下的类的 clazz 对象
                        Class<?> clazz = classLoader.loadClass(classFullPath);
                        if (clazz.isAnnotationPresent(Component.class)) {

                        // 如果这个类有@Commponent, 说明是一个 spring bean
                            System.out.println("是一个 bean = " + clazz);

                        // 1. 增 加 一 个 逻 辑 , 如 果 这 个 clazz 类 型 是 实 现 了BeanPostProcessor 接口, 说明是一个 bean 处理器,特殊处理
                        // 2. 注意不能使用 clazz instanceof BeanPostProcessor 判断因为 clazz 并不是一个实例对象, 而是一个类对象
                        // 3. 这里实现是为了方便获取 bean 处理器对象,所以放在一个 beanPostProcessorList, spring 底层源码,
                        // 还 是 走 的 createBean(),getBean(), 只 是 需 要 在singletonObjects, 增加代码处理,
                            // 我这里主要讲的是 bean 处理器的工作机制,就不处理了,知道即可
                            if (BeanPostProcessor.class.isAssignableFrom(clazz)) {
                                // 创建一个实例对象
                                BeanPostProcessor beanPostProcessor =
                                        (BeanPostProcessor) clazz.newInstance();
                                // 放入到 beanPostProcessorList
                                beanPostProcessorList.add(beanPostProcessor);
                                continue;
                            // 1. 因为这里不能直接将 bean 实例放入 singletonObjects
                            // 2. 原因是如果 bean 是 prototype 是需要每次创建新的 bean 对象
                            // 3. 所 以 , Spring 底 层 是 这 样 设 计 的 : 将 bean 信 息 封 装 到
                            BeanDefinition 对象中, 便于 getBean 的操作
                            BeanDefinition beanDefinition = new BeanDefinition();
                            beanDefinition.setClazz(clazz);
                            // 获取 bean 的 name
                            Component componentAnnotation =
                                    clazz.getDeclaredAnnotation(Component.class);
                            String beanName = componentAnnotation.value();
                            // 获取 bean 的 scope
                            if (clazz.isAnnotationPresent(Scope.class)) { // 如果有@Scope
                                Scope scopeAnnotation =
                                        clazz.getDeclaredAnnotation(Scope.class);
                                beanDefinition.setScope(scopeAnnotation.value());
                            } else { // 如果没有@Scope, 默认是 singleton
                                beanDefinition.setScope("singleton");
                            }
                    // 放入到 beanDefinitionMap
                            beanDefinitionMap.put(beanName, beanDefinition);

                        } else {
                    // 如果这个类没有@Commponent, 说明不是一个 spring bean
                            System.out.println("不是一个 bean = " + clazz);
                        }
                    } catch (ClassNotFoundException e) {
                        e.printStackTrace();
                    } catch (IllegalAccessException e) {
                        e.printStackTrace();
                    } catch (InstantiationException e) {
                        e.printStackTrace();
                    }
                    System.out.println("=======================================");
                }
            }
        }
    }

        // 先简单实现实现,后面在完善. private Object createBean(String beanName, BeanDefinition beanDefinition) {
    // 得到 bean 的类型

    Class clazz = beanDefinition.getClazz();
    try
    {
        // 使用反射得到实例
        Object instance = clazz.getDeclaredConstructor().newInstance();
        // 完成依赖注入
        for (Field declaredField : clazz.getDeclaredFields()) {
            if (declaredField.isAnnotationPresent(Autowired.class)) {
            // 处理@Autowired 注解的属性 required, 很简单,自己完成
            // Autowired annotation = declaredField.getAnnotation(Autowired.class);
            // System.out.println(annotation.required());
            // 如果该属性有@Autowired, 就进行组装
                Object bean = getBean(declaredField.getName());
                declaredField.setAccessible(true);// 因为属性是 private,需要暴破
                declaredField.set(instance, bean);
            }
        }
        // 这里还有其他,比如 Aware 回调. 不写了
        // 说明
        // 1. 在 bean 初始化前调用所有 bean 处理器的 postProcessBeforeInitialization
        // 2. 调用时,不能保证顺序
        // 3. 可以通过加入@Order("值"), 来指定 bean 处理器调用顺序,同学们可以自行完成, 不难
        // 4. 如果希望指定对哪些 bean 进行初始化前处理 , 可以在处理器的postProcessBeforeInitialization()
        // 加入相关业务判断即可.比如:
        /**
         * @Override
         * public Object postProcessBeforeInitialization(Object bean, String
        beanName) {
         * if("monsterService".equalsIgnoreCase(beanName)) {
         * //这里程序员来决定业务逻辑,spring 只是提供处理机制
         * System.out.println("postProcessBeforeInitialization 被调用 " * + beanName + " bean= " + bean.getClass());
         * return bean;
         * }else {
         * return bean;
         * }
         * }
         */
        for (BeanPostProcessor beanPostProcessor : beanPostProcessorList) {
        // 4. 也会返回一个对象,这个返回的对象是什么,由程序员在编写 bean 处理器决定,可能是原来的 bean, 也可能被改变了

            instance = beanPostProcessor.postProcessBeforeInitialization(instance, beanName);
        }
            // 这里调用初始化,如果 bean 实现了 InitializingBean
            if (instance instanceof InitializingBean) {
            try {
                ((InitializingBean) instance).afterPropertiesSet();
            } catch (Exception e) {
                e.printStackTrace();
            }
        }
        // 说明
        // 1. 在 bean 初始化后调用所有 bean 处理器的 postProcessAfterInitialization
        // 2. 调用时,不能保证顺序
        // 3. 可以通过加入@Order("值"), 来指定 bean 处理器调用顺序,同学们可以自行完成, 不难
        // 4. 如 果 希 望 指 定 对 哪 些 bean 进 行 初 始 化 后 处 理 , 可 以 在 处 理 器 的postProcessAfterInitialization()
        // 加入相关业务判断即可
        for (BeanPostProcessor beanPostProcessor : beanPostProcessorList) {
        // 4. 也会返回一个对象,这个返回的对象是什么,由程序员在编写 bean 处理器决定,可能是原来的 bean, 也可能被改变了
            instance = beanPostProcessor.postProcessAfterInitialization(instance, beanName);
        }
        return instance;
    } catch(InstantiationException e){
        e.printStackTrace();
    } catch(IllegalAccessException e){
        e.printStackTrace();
    } catch(InvocationTargetException e){
        e.printStackTrace();
    } catch(NoSuchMethodException e){
        e.printStackTrace();
    }
        // 如果没有创建成功,返回 null
        return null;
运行完成测试

实现任务阶段 6- AOP 机制
这里方便大家阅读我就重新全部发一次
示意图
第一步把创建annotation包
Scope注解
// Scope 可以指定Bean的作用范围[singleton, prototype]

@Target(ElementType.TYPE)
@Retention(RetentionPolicy.RUNTIME)
public @interface Scope {
    //通过value可以指定singleton,prototype
    String value() default "";
}
ComponentScan注解
@Target(ElementType.TYPE)
@Retention(RetentionPolicy.RUNTIME)
public @interface ComponentScan {
    //通过value可以指定要扫描的包
    String value() default "";
}
Component注解
@Target(ElementType.TYPE)
@Retention(RetentionPolicy.RUNTIME)
public @interface Component {
    //通过value可以给注入的bean/对象指定名字
    String value() default "";
}
Autowired 注解
@Target({ElementType.METHOD, ElementType.FIELD})
@Retention(RetentionPolicy.RUNTIME)
public @interface Autowired {
    //这里属性,同学可以参考思路完成,还是比较简单
    //boolean required() default true;
}
第二步创建component包
创建Car 类
@Component
public class Car implements InitializingBean {
    @Override
    public void afterPropertiesSet() throws Exception {
        System.out.println("Car的初始化方法..");
    }
}
创建MonsterDao 类
@Component(value = "monsterDao")
//@Scope(value = "prototype")
public class MonsterDao implements InitializingBean {

    public void hi() {
        System.out.println("MonsterDao-hi()");
    }

    @Override
    public void afterPropertiesSet() throws Exception {
        System.out.println("MonsterDao 初始化方法被调用...");
    }
}
创建MonsterService 类
package com.wyxdu.spring.component;

import com.wyxdu.spring.annotation.Autowired;
import com.wyxdu.spring.annotation.Component;
import com.wyxdu.spring.annotation.Scope;
import com.wyxdu.spring.processor.InitializingBean;

/**
 * 说明MonsterService 是一个Service
 * 1. 如果指定了value,那么在注入spring容器时,以你指定为准
 * 2. 如果没有指定value ,则使用类名首字母小写名字
 */
@Component//(value = "monsterService") //把MonsterService注入我们自己的spring容器中
@Scope(value = "prototype")
public class MonsterService implements InitializingBean {
    //这里我们使用自己的@Autowired来修饰属性
    //表示该属性,是通过容器完成依赖注入
    //说明: 我们实现按照名字来进行组装即可
    @Autowired
    private MonsterDao monsterDao;

    public void m1() {
        monsterDao.hi();
    }

    /**
     * 1. afterPropertiesSet就是在bean的setter方法执行完毕后被spring容器调用
     * 2 即就是初始化方法
     * @throws Exception
     */
    @Override
    public void afterPropertiesSet() throws Exception {
        System.out.println("MonsterService 初始化方法被调用 程序员在这里加入初始化的业务..");
    }
}
创建SmartAnimalable 接口
public interface SmartAnimalable {
    float getSum(float i, float j);
    float getSub(float i, float j);
}
创建SmartAnimalAspect 类
当做一个切面类来使用
@Aspect //我们的注解
@Component //这是实现了
public class SmartAnimalAspect {

    @Before(value = "execution com.wyxdu.spring.aop.aspectj.SmartDog getSum")
    public static void showBeginLog() {

        System.out.println("前置通知..");
    }

    @AfterReturning(value = "execution com.wyxdu.spring.aop.aspectj.SmartDog getSum")
    public static void showSuccessLog() {

        System.out.println("返回通知..");
    }
}
创建SmartDog类
@Component(value = "smartDog")
public class SmartDog implements SmartAnimalable {
    public float getSum(float i, float j) {
        float res = i + j;
        System.out.println("SmartDog-getSum-res=" + res);
        return res;
    }

    public float getSub(float i, float j) {
        float res = i - j;
        System.out.println("SmartDog-getSub-res=" + res);
        return res;
    }
}
创建WyxBeanPostProcesso类
1. 这是我们自己的一个后置处理器
2. 实现了BeanPostProcessor
3. 我们可以重写before和after方法
4. 在Spring容器中,仍然把HspBeanPostProcessor当做一个Bean对象, 要在注入到容器
5. @Component 标识
6. 我们要让HspBeanPostProcessor成为真正的后置处理器, 需要在容器中加入业务代码
7. 还要考虑多个后置处理器对象注入到容器问题
package com.wyxdu.spring.component;

import com.wyxdu.spring.annotation.Component;
import com.wyxdu.spring.processor.BeanPostProcessor;

import java.lang.reflect.InvocationHandler;
import java.lang.reflect.Method;
import java.lang.reflect.Proxy;


@Component
public class WyxBeanPostProcessor implements BeanPostProcessor {

    @Override
    public Object postProcessBeforeInitialization(Object bean, String beanName) {

        //一定要体会到,后置处理器是会容器的创建的bean生效
        //,相当于是可以对多个对象编程, 切面编程
        //日志,权限,身份, 事务.......
        if (bean instanceof Car) {
            System.out.println("这是一个Car对象, 我可以处理");
            //((Car)bean)
        }
        System.out.println("后置处理器WyxBeanPostProcessor Before调用 bean类型="
                + bean.getClass() + " bean的名字=" + beanName);
        return bean;
    }

    @Override
    public Object postProcessAfterInitialization(Object bean, String beanName) {

        System.out.println("后置处理器WyxBeanPostProcessor After调用 bean类型="
                + bean.getClass() + " bean的名字=" + beanName);

        //实现AOP, 返回代理对象, 即对Bean进行包装
        //1. 先死后活-> 后面我们可以通过注解就可以更加灵活
        if ("smartDog".equals(beanName)) {
            //使用Jdk的动态代理,返回返回bean的代理对象
            //如果没有印象的,回去看的动态代理的博客
            Object proxyInstance = Proxy.newProxyInstance(WyxBeanPostProcessor.class.getClassLoader(),
                    bean.getClass().getInterfaces(), new InvocationHandler() {
                        @Override
                        public Object invoke(Object proxy, Method method, Object[] args)
                                throws Throwable {
                            System.out.println("method=" + method.getName());
                            Object result = null;
                            //假如我们进行前置通知+返回通知 处理的方法是getSum
                            //后面可以通过注解来做的更加灵活
                            if ("getSum".equals(method.getName())) {
                                SmartAnimalAspect.showBeginLog();
                                result = method.invoke(bean, args);//执行目标方法
                                //进行返回通知的处理
                                SmartAnimalAspect.showSuccessLog();
                            } else {
                                result = method.invoke(bean, args);//执行目标方法
                            }
                            return result;
                        }
                    });
            //如果bean是需要返回代理对象的, 这里就直接return proxyInstance
            return proxyInstance;
        }
        //如果不需要AOP, 返回 bean
        return bean;
    }
}
第三步创建ioc包
创建BeanDefinition 类
用于封装/记录Bean的信息
package com.wyxdu.spring.ioc;

/**
 * BeanDefinition 用于封装/记录Bean的信息[
* 1. scope
* 2 Bean对应的Class对象, 反射可以生对应的对象]
 */
public class BeanDefinition {
    private String scope;
    private Class clazz;
    //可以根据需求,进行扩展

    public String getScope() {
        return scope;
    }

    public void setScope(String scope) {
        this.scope = scope;
    }

    public Class getClazz() {
        return clazz;
    }

    public void setClazz(Class clazz) {
        this.clazz = clazz;
    }

    @Override
    public String toString() {
        return "BeanDefinition{" +
                "scope='" + scope + '\'' +
                ", clazz=" + clazz +
                '}';
    }
}
创建WyxSpringApplicationContext类
作用类似Spring原生ioc容器
package com.wyxdu.spring.ioc;

import com.wyxdu.spring.annotation.Autowired;
import com.wyxdu.spring.annotation.Component;
import com.wyxdu.spring.annotation.ComponentScan;
import com.wyxdu.spring.annotation.Scope;
import com.wyxdu.spring.processor.BeanPostProcessor;
import com.wyxdu.spring.processor.InitializingBean;
import org.apache.commons.lang.StringUtils;

import java.io.File;
import java.lang.reflect.Field;
import java.lang.reflect.InvocationTargetException;
import java.net.URL;
import java.util.ArrayList;
import java.util.Enumeration;
import java.util.List;
import java.util.concurrent.ConcurrentHashMap;

/**
 * WyxSpringApplicationContext 类的作用类似Spring原生ioc容器
 */
public class WyxSpringApplicationContext {
    private Class configClass;

    //定义属性BeanDefinitionMap -> 存放BeanDefinition对象
    private ConcurrentHashMap<String, BeanDefinition> beanDefinitionMap =
            new ConcurrentHashMap<>();
    //定义属性SingletonObjects -> 存放单例对象
    private ConcurrentHashMap<String, Object> singletonObjects =
            new ConcurrentHashMap<>();

    //定义一个属性beanPostProcessorList, => 存放后置处理器
    private List<BeanPostProcessor> beanPostProcessorList =
            new ArrayList<>();

    //构造器
    public WyxSpringApplicationContext(Class configClass) {

        //完成扫描指定包
        beanDefinitionsByScan(configClass);

        //通过beanDefinitionMap , 初始化singletonObjects 单例池
        //封装成方法
        //遍历所有的beanDefinition对象
        //这里是java基础->集合和枚举
        Enumeration<String> keys = beanDefinitionMap.keys();
        while (keys.hasMoreElements()) {
            //得到beanName
            String beanName = keys.nextElement();
            //通过beanName 得到对应的beanDefinition对象
            BeanDefinition beanDefinition = beanDefinitionMap.get(beanName);
            //判断该bean是singleton还是prototype
            if ("singleton".equalsIgnoreCase(beanDefinition.getScope())) {
                //将该bean实例放入到singletonObjects 集合
                Object bean = createBean(beanName, beanDefinition);
                singletonObjects.put(beanName, bean);
            }
        }
        //System.out.println("singletonObjects 单例池=" + singletonObjects);
        //System.out.println("beanDefinitionMap=" + beanDefinitionMap);

    }

    //该方法完成对指定包的扫描,并将Bean信息封装到BeanDefinition对象,在放入到Map
    public void beanDefinitionsByScan(Class configClass) {
        this.configClass = configClass;
        //获取要扫描的包
        //1. 先得到HspSpringConfig配置的的@ComponentScan(value = "com.hspedu.spring.component")
        ComponentScan componentScan =
                (ComponentScan) this.configClass.getDeclaredAnnotation(ComponentScan.class);

        //2. 通过componentScan的value=> 即要扫描的包
        String path = componentScan.value();
        System.out.println("要扫描的包= " + path);

        //得到要扫描的包下的所有资源(类 .class)
        //1.得到类的加载器->APP 类加载器
        ClassLoader classLoader =
                WyxSpringApplicationContext.class.getClassLoader();

        //2. 通过类的加载器获取到要扫描的包的资源 url=》类似一个路径
        path = path.replace(".", "/");//一定要把. 替换成 /
        URL resource =
                classLoader.getResource(path);
        System.out.println("resource=" + resource);

        //3. 将要加载的资源(.class) 路径下的文件进行遍历=>io
        File file = new File(resource.getFile());
        if (file.isDirectory()) {
            File[] files = file.listFiles();
            for (File f : files) {
                //System.out.println("=====================");
                //System.out.println("=" + f.getAbsolutePath());
                String fileAbsolutePath = f.getAbsolutePath();

                //这里我们只处理.class文件
                if (fileAbsolutePath.endsWith(".class")) {

                    //1. 获取到类名
                    String className =
                            fileAbsolutePath.substring(fileAbsolutePath.lastIndexOf("\\") + 1, fileAbsolutePath.indexOf(".class"));
                    //2. 获取类的完整的路径(全类名)
                    //解读 path.replace("/",".") => com.hspedu.spring.component.
                    String classFullName = path.replace("/", ".") + "." + className;

                    //3. 判断该类是不是需要注入容器, 就看该类是不是有注解 @Component @Service..
                    try {
                        Class<?> clazz = classLoader.loadClass(classFullName);
                        if (clazz.isAnnotationPresent(Component.class)) {

                            //如果该类使用了@Component, 说明是Spring bean
                            System.out.println("是一个Spring bean =" + clazz + " 类名=" + className);

                            //说明
                            //1. 为了方便,这里将后置处理器放入到一个ArrayList
                            //2. 如果发现是一个后置处理器, 放入到 beanPostProcessorList
                            //3. 在原生的Spring容器中, 对后置处理器还是走的getBean, createBean
                            //   , 但是需要我们在singletonObjects 加入相应的业务逻辑
                            //4. 因为这里我们是为了讲解后置处理去的机制,我就简化
                            //5. 如果,仍然走以前的逻辑,也可以,就是要麻烦一点


                            //判断当前的这个clazz有没有实现BeanPostProcessor
                            //说明, 这里我们不能使用 instanceof 来判断clazz是否实现了BeanPostProcessor
                            //原因: clazz不是一个实例对象,而是一个类对象/clazz, 使用isAssignableFrom
                            //将其当做一个语法理解
                            if (BeanPostProcessor.class.isAssignableFrom(clazz)) {

                                BeanPostProcessor beanPostProcessor =
                                        (BeanPostProcessor) clazz.newInstance();
                                //放入到beanPostProcessorList
                                beanPostProcessorList.add(beanPostProcessor);
                                continue;
                            }


                            //先得到beanName
                            //1. 得到Component注解
                            Component componentAnnotation =
                                    clazz.getDeclaredAnnotation(Component.class);
                            //2. 得到配置value值
                            String beanName = componentAnnotation.value();
                            if ("".equals(beanName)) {//如果没有写value

                                //将该类的类名首字母小写作为beanName
                                beanName = StringUtils.uncapitalize(className);
                            }

                            //3.将Bean的信息封装到BeanDefinition对象->放入到BeanDefinitionMap
                            BeanDefinition beanDefinition = new BeanDefinition();
                            beanDefinition.setClazz(clazz);
                            //4. 获取Scope值
                            if (clazz.isAnnotationPresent(Scope.class)) {
                                //如果配置了Scope, 获取他配置的值
                                Scope scopeAnnotation = clazz.getDeclaredAnnotation(Scope.class);
                                beanDefinition.setScope(scopeAnnotation.value());
                            } else {
                                //如果没有配置Scope, 就默认的值singleton
                                beanDefinition.setScope("singleton");
                            }

                            //蒋beanDefinition 对象放入到Map
                            beanDefinitionMap.put(beanName, beanDefinition);


                        } else {
                            //如果该类没有使用了@Component, 说明不是Spring bean
                            System.out.println("不是一个Spring bean =" + clazz + " 类名=" + className);
                        }
                    } catch (Exception e) {
                        e.printStackTrace();
                    }
                }
                System.out.println("===============================");
            }

        }
    }

    private Object createBean(String beanName, BeanDefinition beanDefinition) {

        //得到Bean的clazz对象
        Class clazz = beanDefinition.getClazz();
        try {
            //使用反射得到实例
            Object instance = clazz.getDeclaredConstructor().newInstance();

            //1. 遍历当前要创建的对象的所有字段
            for (Field declaredField : clazz.getDeclaredFields()) {
                //2. 判断这个字段是否有@Autowired
                if (declaredField.isAnnotationPresent(Autowired.class)) {
                    //提示一下
                    //处理@Autowired 的required ,很简单
                    //Autowired annotation = declaredField.getAnnotation(Autowired.class)
                    //annotation.required()=> 然后根据true, 是false 进行其它处理..
                    //3. 得到这个字段名字
                    String name = declaredField.getName();
                    //4. 通过getBean方法来获取要组装对象
                    Object bean = getBean(name);
                    //5. 进行组装
                    declaredField.setAccessible(true);//因为属性是pirvate, 需要暴破
                    declaredField.set(instance, bean);
                }
            }

            System.out.println("=====创建好实例====" + instance);


            //我们在Bean的初始化方法前,调用后置处理器的before方法
            for (BeanPostProcessor beanPostProcessor : beanPostProcessorList) {
                //在后置处理器的before方法,可以对容器的bean实例进行处理
                //然后返回处理后的bean实例, 相当于做一个前置处理
                Object current =
                        beanPostProcessor.postProcessBeforeInitialization(instance, beanName);
                if (current != null) {
                    instance = current;
                }
            }

            //这里判断是否要执行Bean初始化方法
            //1. 判断当前创建的Bean对象是否实现了InitializingBean
            //2. instanceof java基础中讲 表判断某个对象的运行类型是不是某个类型或者
            //   某个类型的子类型
            //3. 这里就使用到接口编程
            if (instance instanceof InitializingBean) {
                //3.将instance转成InitializingBean类型
                try {
                    ((InitializingBean) instance).afterPropertiesSet();
                } catch (Exception e) {
                    e.printStackTrace();
                }
            }

            //我们在Bean的初始化方法后,调用后置处理器的after方法
            for (BeanPostProcessor beanPostProcessor : beanPostProcessorList) {
                //在后置处理器的after方法,可以对容器的bean实例进行处理
                //然后返回处理后的bean实例, 相当于做一个后置处理
                //原生Spring容器,比我们这个还要复杂
                Object current =
                        beanPostProcessor.postProcessAfterInitialization(instance, beanName);
                if(current != null) {
                    instance = current;
                }
            }

            System.out.println("------------------------------");
            return instance;
        } catch (InstantiationException e) {
            e.printStackTrace();
        } catch (IllegalAccessException e) {
            e.printStackTrace();
        } catch (InvocationTargetException e) {
            e.printStackTrace();
        } catch (NoSuchMethodException e) {
            e.printStackTrace();
        }
        //如何反射创建对象失败
        return null;
    }


    //编写方法getBean(String name),编写方法返回对容器中对象
    public Object getBean(String name) {

        //老师加一个判断,传入的beanName是否在beanDefinitionMap中存在..
        if (beanDefinitionMap.containsKey(name)) {//如果存在

            BeanDefinition beanDefinition = beanDefinitionMap.get(name);
            //得到beanDefinition的scope, 分别进行处理
            if ("singleton".equalsIgnoreCase(beanDefinition.getScope())) {
                //说明是单例配置, 就直接从单例池获取
                return singletonObjects.get(name);
            } else {//如果不是单例的,我就调用createBean, 反射一个对象
                return createBean(name, beanDefinition);
            }
        } else {//如果不存在
            //抛出一个空指针异常-小伙伴也可以自定义-Java基础异常
            throw new NullPointerException("没有该bean");
        }

    }


}
创建WyxSpringConfig 类
package com.wyxdu.spring.ioc;

import com.wyxdu.spring.annotation.ComponentScan;

/**
 * 这是一个配置类, 作用类似我们原生spring的 beans.xml 容器配置文件
 */
@ComponentScan(value = "com.wyxdu.spring.component")
public class WyxSpringConfig {
}
第四步创建processor包
创建BeanPostProcessor 接口
参考原生Spring容器定义一个接口BeanPostProcessor
package com.wyxdu.spring.processor;

/**
 * 1. 参考原生Spring容器定义一个接口BeanPostProcessor
 * 2. 该接口有两个方法postProcessBeforeInitialization 和 postProcessAfterInitialization
 * 3. 这两个方法,会对Spring容器的所有Bean生效, 已经是切面编程的概念.
 */
public interface BeanPostProcessor {

    /**
     * 1. postProcessBeforeInitialization在Bean的初始化方法前调用
     * @param bean
     * @param beanName
     * @return
     */
    default Object postProcessBeforeInitialization(Object bean, String beanName) {
        return bean;
    }

    /**
     * 1. postProcessAfterInitialization在Bean的初始化方法后调用
     * @param bean
     * @param beanName
     * @return
     */
    default Object postProcessAfterInitialization(Object bean, String beanName) {
        return bean;
    }
}
创建InitializingBean 接口
这个方法就是初始化方法
package com.wyxdu.spring.processor;

/**
 * 1. 我们根据原生Spring 定义了一个InitializingBean
 * 2. 该InitializingBean接口有一个方法void afterPropertiesSet() throws Exception;
 * 3. afterPropertiesSet() 在Bean的 setter后执行,即就是我们原来的初始化方法
 * 4. 当一个Bean实现这个接口后,就实现afterPropertiesSet() , 这个方法就是初始化方法
 */
public interface InitializingBean {
    void afterPropertiesSet() throws Exception;
}
最后一步完成测试
创建AppMain类
package com.wyxdu.spring;

import com.wyxdu.spring.component.MonsterService;
import com.wyxdu.spring.component.SmartAnimalable;
import com.wyxdu.spring.ioc.WyxSpringApplicationContext;
import com.wyxdu.spring.ioc.WyxSpringConfig;

public class AppMain {
    public static void main(String[] args) {
        //创建自己的容器
        WyxSpringApplicationContext wyxSpringApplicationContext =
                new WyxSpringApplicationContext(WyxSpringConfig.class);

        //测试一下依赖注入的功能
        MonsterService monsterService =
                (MonsterService) wyxSpringApplicationContext.getBean("monsterService");

        monsterService.m1();

        //MonsterService monsterService =
        //        (MonsterService)wyxSpringApplicationContext.getBean("monsterService");
        //MonsterService monsterService2 =
        //        (MonsterService)wyxSpringApplicationContext.getBean("monsterService");
        //
        //System.out.println("monsterService=" + monsterService);
        //System.out.println("monsterService2=" + monsterService2);
        //
        //MonsterDao monsterDao =
        //        (MonsterDao)wyxSpringApplicationContext.getBean("monsterDao");
        //MonsterDao monsterDao2 =
        //        (MonsterDao)wyxSpringApplicationContext.getBean("monsterDao");
        //
        //System.out.println("monsterDao=" + monsterDao);
        //System.out.println("monsterDao2=" + monsterDao2);

        //这里我们测试一下AOP机制是否生效了

        SmartAnimalable smartDog = (SmartAnimalable) wyxSpringApplicationContext.getBean("smartDog");
        //System.out.println("smartDog=" + smartDog.getClass());

        smartDog.getSum(10, 2);

        smartDog.getSub(10,2);

        System.out.println("ok");
    }
}
小结
前面我们使用的硬编码,不灵活, 但是已经把 AOP 核心机制说清楚了
到此我们已经全部完成了
Spring的初始化 -IOC容器+-依赖注入-+BeanPostProcessor 机制-+AOP实现
感谢大家的耐心观看