今天我们分析seata分布式事务1.4版本TM注册到全流程的源码,这也是事务执行的核心开始:
首先分为客户端TM和服务端TC,业务发起肯定在TM端,接受在TC端。
整体类图:
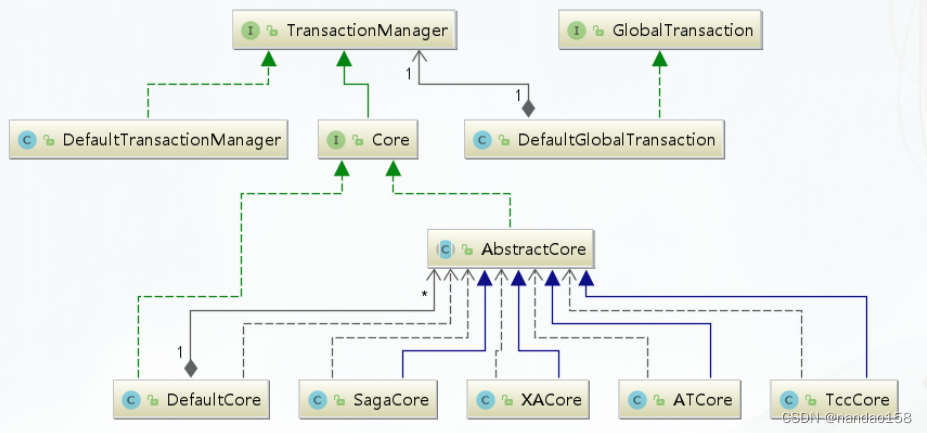
一、业务入口TM端:
1、GlobalTransactionalInterceptor 核心类,业务
怎么流转到此,前几篇已经分享过,此篇重点分析全局事务开启,事务发起:
@Override
    public Object invoke(final MethodInvocation methodInvocation) throws Throwable {
        Class<?> targetClass =
            methodInvocation.getThis() != null ? AopUtils.getTargetClass(methodInvocation.getThis()) : null;
        Method specificMethod = ClassUtils.getMostSpecificMethod(methodInvocation.getMethod(), targetClass);
        if (specificMethod != null && !specificMethod.getDeclaringClass().equals(Object.class)) {
            final Method method = BridgeMethodResolver.findBridgedMethod(specificMethod);
            // 获取@GlobalTransactional注解
            final GlobalTransactional globalTransactionalAnnotation =
                getAnnotation(method, targetClass, GlobalTransactional.class);
            // 获取@GlobalLock 注解
            final GlobalLock globalLockAnnotation = getAnnotation(method, targetClass, GlobalLock.class);
            boolean localDisable = disable || (degradeCheck && degradeNum >= degradeCheckAllowTimes);
            if (!localDisable) {
                if (globalTransactionalAnnotation != null) {//再次判断是否加注解
                    //如果方法上面有注解,则会执行到这里,核心方法,进入
                    return handleGlobalTransaction(methodInvocation, globalTransactionalAnnotation);
                } else if (globalLockAnnotation != null) {
                    return handleGlobalLock(methodInvocation, globalLockAnnotation);// 执行@GlobalLock事务
                }
            }
        }
        return methodInvocation.proceed();//如果没有全局事务注解,直接调用目标方法
    }
点击:return handleGlobalTransaction(methodInvocation, globalTransactionalAnnotation);
 Object handleGlobalTransaction(final MethodInvocation methodInvocation,
        final GlobalTransactional globalTrxAnno) throws Throwable {
        boolean succeed = true;
        try {
            /**
             * 直接使用内部类创建了一个TransactionalExecutor实例
             * TransactionalExecutor实例创建后,它包含了当前事务注解的信息和被代理执行的方法,
             * 接着就会调用执行模板TransactionalTemplate的execute方法,该方法是执行全局事务的核心方法,其中包含了AT模式下,两个阶段处理逻辑
             */
            return transactionalTemplate.execute(new TransactionalExecutor() {
                @Override
                public Object execute() throws Throwable {
                    /**
                     * 在JDBC 操作数据库时,执行SQL 语句的是PreparedStatement,
                     * 在Seata 中其代理类为 PreparedStatementProxy,其execute 方法会调用ExecuteTemplate的execute方法。
                     * 走代理类比较抽象
                     */
                    return methodInvocation.proceed();//核心业务方法
                }
                // 自定义或者格式化生成事务的名称
                public String name() {
                    String name = globalTrxAnno.name();
                    if (!StringUtils.isNullOrEmpty(name)) {
                        return name;
                    }
                    return formatMethod(methodInvocation.getMethod());
                }

                @Override// 将注解封装为成TransactionInfo对象
                public TransactionInfo getTransactionInfo() {
                    // reset the value of timeout   超时时间
                    int timeout = globalTrxAnno.timeoutMills();
                    if (timeout <= 0 || timeout == DEFAULT_GLOBAL_TRANSACTION_TIMEOUT) {
                        timeout = defaultGlobalTransactionTimeout;
                    }

                    TransactionInfo transactionInfo = new TransactionInfo();
                    transactionInfo.setTimeOut(timeout);
                    transactionInfo.setName(name());//事务名=
                    transactionInfo.setPropagation(globalTrxAnno.propagation());//传播行为
                    transactionInfo.setLockRetryInternal(globalTrxAnno.lockRetryInternal());
                    transactionInfo.setLockRetryTimes(globalTrxAnno.lockRetryTimes());
                    // 回滚规则
                    Set<RollbackRule> rollbackRules = new LinkedHashSet<>();
                    for (Class<?> rbRule : globalTrxAnno.rollbackFor()) {
                        rollbackRules.add(new RollbackRule(rbRule));
                    }
                    for (String rbRule : globalTrxAnno.rollbackForClassName()) {
                        rollbackRules.add(new RollbackRule(rbRule));
                    }
                    for (Class<?> rbRule : globalTrxAnno.noRollbackFor()) {
                        rollbackRules.add(new NoRollbackRule(rbRule));
                    }
                    for (String rbRule : globalTrxAnno.noRollbackForClassName()) {
                        rollbackRules.add(new NoRollbackRule(rbRule));
                    }
                    transactionInfo.setRollbackRules(rollbackRules);
                    return transactionInfo;
                }
            });
        } catch (TransactionalExecutor.ExecutionException e) {
            TransactionalExecutor.Code code = e.getCode();
            switch (code) {
                case RollbackDone:
                    throw e.getOriginalException();
                case BeginFailure:
                    succeed = false;
                    failureHandler.onBeginFailure(e.getTransaction(), e.getCause());
                    throw e.getCause();
                case CommitFailure:
                    succeed = false;
                    failureHandler.onCommitFailure(e.getTransaction(), e.getCause());
                    throw e.getCause();
                case RollbackFailure:
                    failureHandler.onRollbackFailure(e.getTransaction(), e.getOriginalException());
                    throw e.getOriginalException();
                case RollbackRetrying:
                    failureHandler.onRollbackRetrying(e.getTransaction(), e.getOriginalException());
                    throw e.getOriginalException();
                default:
                    throw new ShouldNeverHappenException(String.format("Unknown TransactionalExecutor.Code: %s", code));
            }
        } finally {
            if (degradeCheck) {
                EVENT_BUS.post(new DegradeCheckEvent(succeed));
            }
        }
    }
点击:transactionalTemplate.execute(new TransactionalExecutor(),里面会执行
execute、getTransactionInfo 方法,和普通的get、set一个道理。
2、来到 TransactionalTemplate 类:
public Object execute(TransactionalExecutor business) throws Throwable {
        // Get transactionInfo 取事务信息,上一步封装好的,可以去看一下 进入上一步 GlobalTransactionalInterceptor的(handleGlobalTransaction中的)getTransactionInfo()构造方法
        TransactionInfo txInfo = business.getTransactionInfo();
        if (txInfo == null) {
            throw new ShouldNeverHappenException("transactionInfo does not exist");
        }
        // 1.1 Get current transaction, if not null, the tx role is 'GlobalTransactionRole.Participant'.
        // 1. 从RootContext中获取xid,没有则返回NULL,
        // 这里是全局事务发起方,所有没有,直接返回NULL
        // 如果是被调用方,则会存在传递过来的xid,使用xid创建GlobalTransaction 对象
        GlobalTransaction tx = GlobalTransactionContext.getCurrent();//开启事务

        // 1.2 Handle the transaction propagation.
        // 事务传播行为,默认为REQUIRED
        // REQUIRED:如果本来有事务,则加入该事务,如果没有事务,则创建新的事务
        Propagation propagation = txInfo.getPropagation();
        SuspendedResourcesHolder suspendedResourcesHolder = null;
        //事务的传播机制, 根据不同的传播行为,执行不同的逻辑
        try {
            switch (propagation) {
                case NOT_SUPPORTED:
                    // If transaction is existing, suspend it.
                    if (existingTransaction(tx)) {
                        suspendedResourcesHolder = tx.suspend();
                    }
                    // Execute without transaction and return.
                    return business.execute();
                case REQUIRES_NEW:
                    // If transaction is existing, suspend it, and then begin new transaction.
                    if (existingTransaction(tx)) {
                        suspendedResourcesHolder = tx.suspend();
                        tx = GlobalTransactionContext.createNew();//进入
                    }
                    // Continue and execute with new transaction
                    break;
                case SUPPORTS:
                    // If transaction is not existing, execute without transaction.
                    if (notExistingTransaction(tx)) {
                        return business.execute();
                    }
                    // Continue and execute with new transaction
                    break;
                case REQUIRED://默认的事务类型,如果当前没有事务,则新建事务;如果当前存在事务,则加入当前事务,合并成一个事务
                    // If current transaction is existing, execute with current transaction,
                    // else continue and execute with new transaction.
                    break;
                case NEVER:
                    // If transaction is existing, throw exception.
                    if (existingTransaction(tx)) {
                        throw new TransactionException(
                            String.format("Existing transaction found for transaction marked with propagation 'never', xid = %s"
                                    , tx.getXid()));
                    } else {
                        // Execute without transaction and return.
                        return business.execute();
                    }
                case MANDATORY:
                    // If transaction is not existing, throw exception.
                    if (notExistingTransaction(tx)) {
                        throw new TransactionException("No existing transaction found for transaction marked with propagation 'mandatory'");
                    }
                    // Continue and execute with current transaction.
                    break;
                default:
                    throw new TransactionException("Not Supported Propagation:" + propagation);
            }

            // 1.3 If null, create new transaction with role 'GlobalTransactionRole.Launcher'.
            // 4. 不存在全局事务信息,创建一个
            if (tx == null) {
                tx = GlobalTransactionContext.createNew();
            }

            // set current tx config to holder
            GlobalLockConfig previousConfig = replaceGlobalLockConfig(txInfo);

            try {
                // 2. If the tx role is 'GlobalTransactionRole.Launcher', send the request of beginTransaction to TC,
                //    else do nothing. Of course, the hooks will still be triggered.
                beginTransaction(txInfo, tx);//核心代码, 开启全局事务,进去看看

                Object rs;
                try {
                    // Do Your Business 调用业务方法,即被代理方法,到 GlobalTransactionalInterceptor
                    // 里面(handleGlobalTransaction的)TransactionalExecutor实现的方法
                    rs = business.execute();
                } catch (Throwable ex) {
                    // 3. The needed business exception to rollback.发生异常 二阶段全局回滚 TM 发起回滚
                    completeTransactionAfterThrowing(txInfo, tx, ex);
                    throw ex;
                }

                // 4. everything is fine, commit.如果没有异常,进行二阶段提交,去调用告诉TC端,可以(循环)触发二阶段提交了,
                // TC端收到各分支请求后,开始循环二阶段提交,重点!!!
                commitTransaction(tx);

                return rs;
            } finally {
                //5. clear 释放资源
                resumeGlobalLockConfig(previousConfig);
                triggerAfterCompletion();
                cleanUp();
            }
        } finally {
            // If the transaction is suspended, resume it.
            if (suspendedResourcesHolder != null) {
                tx.resume(suspendedResourcesHolder);
            }
        }
    }
创建事务对象:tx = GlobalTransactionContext.createNew();
 public static GlobalTransaction createNew() {
        return new DefaultGlobalTransaction();//直接创建了一个默认的DefaultGlobalTransaction且使用的无参构造函数
    }
进入:
 DefaultGlobalTransaction() {
        //创建了一个角色为GlobalTransactionRole.Launcher 事物的发起者的对象,从这里就已经区分出了当前是 TM 还是 RM 角色
        this(null, GlobalStatus.UnKnown, GlobalTransactionRole.Launcher);
    }
进入:TransactionManagerHolder为创建单例TransactionManager的工厂,可以使用EnhancedServiceLoader的spi机制加载用户自定义的类,默认为 DefaultTransactionManager。
 DefaultGlobalTransaction(String xid, GlobalStatus status, GlobalTransactionRole role) {
        this.transactionManager = TransactionManagerHolder.get();//核心创建
        this.xid = xid;
        this.status = status;
        this.role = role;
    }
进入:
public static TransactionManager get() {
        if (SingletonHolder.INSTANCE == null) {
            throw new ShouldNeverHappenException("TransactionManager is NOT ready!");
        }
        return SingletonHolder.INSTANCE;//实例化对象
    }
进入:
private static class SingletonHolder {

        private static TransactionManager INSTANCE = null;

        static {
            try {
                INSTANCE = EnhancedServiceLoader.load(TransactionManager.class);
                LOGGER.info("TransactionManager Singleton {}", INSTANCE);
            } catch (Throwable anyEx) {
                LOGGER.error("Failed to load TransactionManager Singleton! ", anyEx);
            }
        }
    }
验证SPI机制:

3、开启全局事务:beginTransaction(txInfo, tx);//核心代码, 开启全局事务,进去看看
private void beginTransaction(TransactionInfo txInfo, GlobalTransaction tx) throws TransactionalExecutor.ExecutionException {
        try {// 开启全局事务之前钩子,可以业务自定义实现
            triggerBeforeBegin();
            tx.begin(txInfo.getTimeOut(), txInfo.getName());//重要的开始,进入DefaultGlobalTransaction子类
            triggerAfterBegin();// 开启全局事务之后钩子,可以业务自定义实现
        } catch (TransactionException txe) {
            throw new TransactionalExecutor.ExecutionException(tx, txe,
                TransactionalExecutor.Code.BeginFailure);

        }
    }
点击:tx.begin(txInfo.getTimeOut(), txInfo.getName())
4、来到其子类DefaultGlobalTransaction:
DefaultGlobalTransaction是GlobalTransaction接口的默认实现,它持有TransactionManager对象,默认开启事务超时时间为60秒,默认名称为default,因为调用者的业务方法可能多重嵌套创建多个GlobalTransaction对象开启事务方法,因此GlobalTransaction有GlobalTransactionRole角色属性,只有Launcher角色的才有开启、提交、回滚事务的权利。

进入 :
 @Override
    public void begin(int timeout, String name) throws TransactionException {
        if (role != GlobalTransactionRole.Launcher) {
            assertXIDNotNull();
            if (LOGGER.isDebugEnabled()) {
                LOGGER.debug("Ignore Begin(): just involved in global transaction [{}]", xid);
            }
            return;
        }
        assertXIDNull();//全局事务id现在为空,如果不为空报错
        String currentXid = RootContext.getXID();
        if (currentXid != null) {
            throw new IllegalStateException("Global transaction already exists," +
                " can't begin a new global transaction, currentXid = " + currentXid);
        }//创建返回全局事务id(从TC服务端返回),连接服务端开启全局事务,核心代码,进入 DefaultTransactionManager
        xid = transactionManager.begin(null, null, name, timeout);
        status = GlobalStatus.Begin;
        RootContext.bind(xid);//放在本地ThreadLocal中
        if (LOGGER.isInfoEnabled()) {
            LOGGER.info("Begin new global transaction [{}]", xid);
        }
    }
点击 xid = transactionManager.begin(null, null, name, timeout);
5、来到: DefaultTransactionManager implements TransactionManager
 @Override
    public String begin(String applicationId, String transactionServiceGroup, String name, int timeout)
        throws TransactionException {
        /**
         * 这里非常重要设置 全局事务开始的类型,return MessageType.TYPE_GLOBAL_BEGIN;
         * 对应TC端 AbstractNettyRemotingServer 执行 channelRead 方法时,流转转到 processMessage 方法的
         * final Pair<RemotingProcessor, ExecutorService> pair = this.processorTable.get((int) messageTypeAware.getTypeCode());
         * 在通过 pair.getFirst().process(ctx, rpcMessage); 获取进入到 ServerOnRequestProcessor
         * 为NettyRemotingServer 中这样配置的,如下:
         * super.registerProcessor(MessageType.TYPE_GLOBAL_BEGIN, onRequestProcessor, messageExecutor);//全局事务开始
         */
        GlobalBeginRequest request = new GlobalBeginRequest();
        request.setTransactionName(name);
        request.setTimeout(timeout);
        //远程调用通知seata服务端,在下游配置中心取服务端相关ip等信息,这里发送请求就是使用的Netty了
        GlobalBeginResponse response = (GlobalBeginResponse) syncCall(request);
        if (response.getResultCode() == ResultCode.Failed) {
            throw new TmTransactionException(TransactionExceptionCode.BeginFailed, response.getMsg());
        }
        /**
         * 到这里大家应该明白了 xid 的生成,那是怎么发送给 RM 的呢?
         * 上面再梳理过程的时候提到 Seata 重写了 OpenFeign 客户端,将xid 放入了 header中进行传播,
         * 这个重写的客户端就是 SeataFeignClient,这个在 spring-starter-alibaba-seata包中,参考
         * https://blog.csdn.net/qq_43692950/article/details/123457812?spm=1001.2101.3001.6661.1&utm_medium=distribute.pc_relevant_t0.none-task-blog-2%7Edefault%7ECTRLIST%7ERate-1-123457812-blog-108329792.pc_relevant_multi_platform_whitelistv6&depth_1-utm_source=distribute.pc_relevant_t0.none-task-blog-2%7Edefault%7ECTRLIST%7ERate-1-123457812-blog-108329792.pc_relevant_multi_platform_whitelistv6&utm_relevant_index=1
         * 这样 RPC 进来的请求,如果是全局事物的请求,就会将 全局事物ID xid 存入当前 ThreadLocal 中,这样就和最初的分析所呼应了。
         */
        return response.getXid();
    }
点击: (GlobalBeginResponse) syncCall(request);
 private AbstractTransactionResponse syncCall(AbstractTransactionRequest request) throws TransactionException {
        try {//客户端向服务端TC发送请求,返回数据。
            return (AbstractTransactionResponse) TmNettyRemotingClient.getInstance().sendSyncRequest(request);
        } catch (TimeoutException toe) {
            throw new TmTransactionException(TransactionExceptionCode.IO, "RPC timeout", toe);
        }
    }
点击 sendSyncRequest(request);
6、来到:AbstractNettyRemotingClient
@Override//TM / RM 发送请求的代码
    public Object sendSyncRequest(Object msg) throws TimeoutException {
        //通过事务组,负载选择一个服务端实例
        String serverAddress = loadBalance(getTransactionServiceGroup(), msg);
        int timeoutMillis = NettyClientConfig.getRpcRequestTimeout();//超时时间设置
        //组装请求对象,包括请求ID,序列号方式等
        RpcMessage rpcMessage = buildRequestMessage(msg, ProtocolConstants.MSGTYPE_RESQUEST_SYNC);

        // send batch message
        // put message into basketMap, @see MergedSendRunnable
        // 如果允许批量发送请求
        if (NettyClientConfig.isEnableClientBatchSendRequest()) {

            // send batch message is sync request, needs to create messageFuture and put it in futures.
            MessageFuture messageFuture = new MessageFuture();
            messageFuture.setRequestMessage(rpcMessage);
            messageFuture.setTimeout(timeoutMillis);
            // 生产MessageFuture放到futures中,key为请求ID
            futures.put(rpcMessage.getId(), messageFuture);

            // put message into basketMap
            // 将请求对象按照server地址放入basketMap中,供MergedSendRunnable任务从basketMap拉取请求,批量发送到server端
            BlockingQueue<RpcMessage> basket = CollectionUtils.computeIfAbsent(basketMap, serverAddress,
                key -> new LinkedBlockingQueue<>());
            if (!basket.offer(rpcMessage)) {
                LOGGER.error("put message into basketMap offer failed, serverAddress:{},rpcMessage:{}",
                        serverAddress, rpcMessage);
                return null;
            }
            if (LOGGER.isDebugEnabled()) {
                LOGGER.debug("offer message: {}", rpcMessage.getBody());
            }
            // 生产消费模式,唤醒MergedSendRunnable线程
            if (!isSending) {
                synchronized (mergeLock) {
                    mergeLock.notifyAll();
                }
            }

            try {
                // TC 服务端返回的响应最终会到ClientOnResponseProcessor进行处理
                // 通过ClientOnResponseProcessor关联MessageFuture获取结果
                return messageFuture.get(timeoutMillis, TimeUnit.MILLISECONDS);
            } catch (Exception exx) {
                LOGGER.error("wait response error:{},ip:{},request:{}",
                    exx.getMessage(), serverAddress, rpcMessage.getBody());
                if (exx instanceof TimeoutException) {
                    throw (TimeoutException) exx;
                } else {
                    throw new RuntimeException(exx);
                }
            }

        } else {
            Channel channel = clientChannelManager.acquireChannel(serverAddress);
            //正式继续调用
            return super.sendSync(channel, rpcMessage, timeoutMillis);
        }

    }
点击 return super.sendSync(channel, rpcMessage, timeoutMillis);
7、进入:AbstractNettyRemoting implements Disposable
protected Object sendSync(Channel channel, RpcMessage rpcMessage, long timeoutMillis) throws TimeoutException {
        if (timeoutMillis <= 0) {
            throw new FrameworkException("timeout should more than 0ms");
        }
        if (channel == null) {
            LOGGER.warn("sendSync nothing, caused by null channel.");
            return null;
        }

        MessageFuture messageFuture = new MessageFuture();
        messageFuture.setRequestMessage(rpcMessage);
        messageFuture.setTimeout(timeoutMillis);
        futures.put(rpcMessage.getId(), messageFuture);

        channelWritableCheck(channel, rpcMessage.getBody());

        String remoteAddr = ChannelUtil.getAddressFromChannel(channel);
        doBeforeRpcHooks(remoteAddr, rpcMessage);
        //正式通过netty的writeAndFlush 标准接口调用,并监听,写入数据;谁实现了ChannelFutureListener 接口,后续详细看看
        //跳过源码,下一步是到了 AbstractNettyRemotingServer extends AbstractNettyRemoting implements RemotingServer( channelRead(final ChannelHandlerContext ctx, Object msg))
        channel.writeAndFlush(rpcMessage).addListener((ChannelFutureListener) future -> {
            if (!future.isSuccess()) {
                MessageFuture messageFuture1 = futures.remove(rpcMessage.getId());
                if (messageFuture1 != null) {
                    messageFuture1.setResultMessage(future.cause());
                }
                destroyChannel(future.channel());
            }
        });

        try {//异步获取调用结果 等待结果,
            // TC 服务端返回的响应最终会到ClientOnResponseProcessor进行处理
            // 通过ClientOnResponseProcessor关联MessageFuture获取结果
            Object result = messageFuture.get(timeoutMillis, TimeUnit.MILLISECONDS);
            doAfterRpcHooks(remoteAddr, rpcMessage, result);
            return result;
        } catch (Exception exx) {
            LOGGER.error("wait response error:{},ip:{},request:{}", exx.getMessage(), channel.remoteAddress(),
                rpcMessage.getBody());
            if (exx instanceof TimeoutException) {
                throw (TimeoutException) exx;
            } else {
                throw new RuntimeException(exx);
            }
        }
    }
二、TC端接收处理:下期详细分析,敬请启动!!!
1、
2、
3、
4、
5、
8、
9、
10、

