文章目录
- 登录界面的开发
- 安装axios用于前后端交互
- 第一步、在项目目录下执行命令
- 第二步、在main.js文件夹添加如下代码
- 第三步、使用this.axios 即可访问到
- Login.vue 完整代码如下
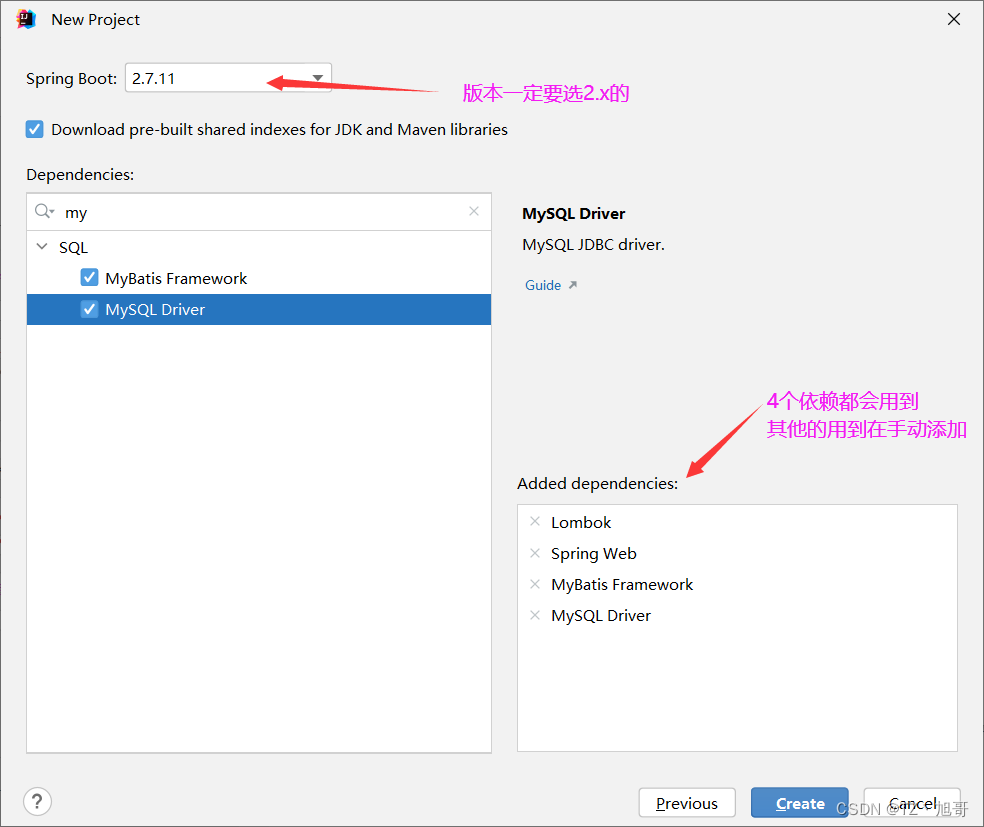
- 搭建第一个springboot项目
- 第一步、修改配置文件(application.properties)
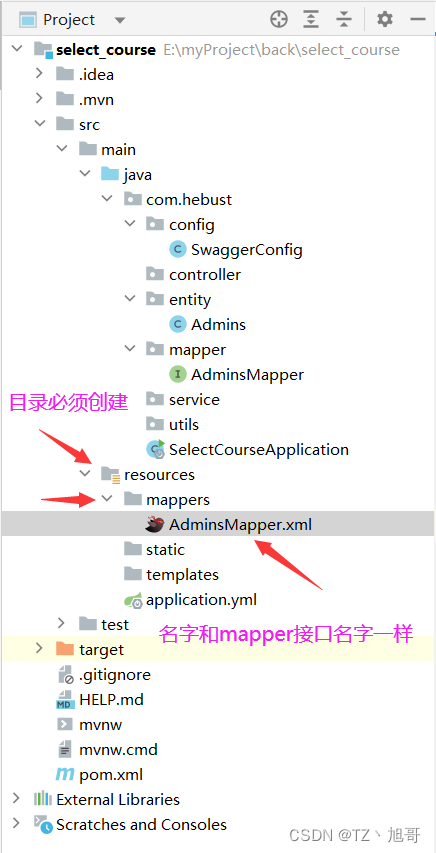
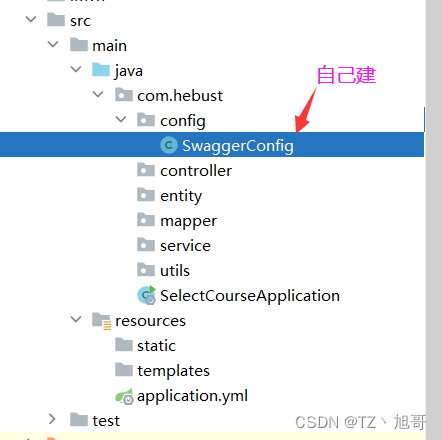
- 第二步、创建包目录
- 用springboot实现登录功能
- 第一步、创建数据库
- 第二步、编写实体类
- 第三步、编写mapper
- 第四步、编写mapper的映射xml文件
- 第五步、编写公共的返回类型
- 第六步、编写业务层接口
- 第七步、编写业务层的实现类
- 第八步、编写controller类
- 最后一步 重点!!! 启动类要加@MapperScan("com.hebust.mapper") 即你的mapper的 全限定名
- swagger接口文档的使用
- 第一步、添加依赖
- 注意:添加依赖后可能会报错,这是版本问题,需要把springboot的版本降低,同时数据库驱动的依赖也要修改
- 第二步、编写SwaggerConfig类
- 第三步、在controller所有类中添加注解,自动生成接口文档
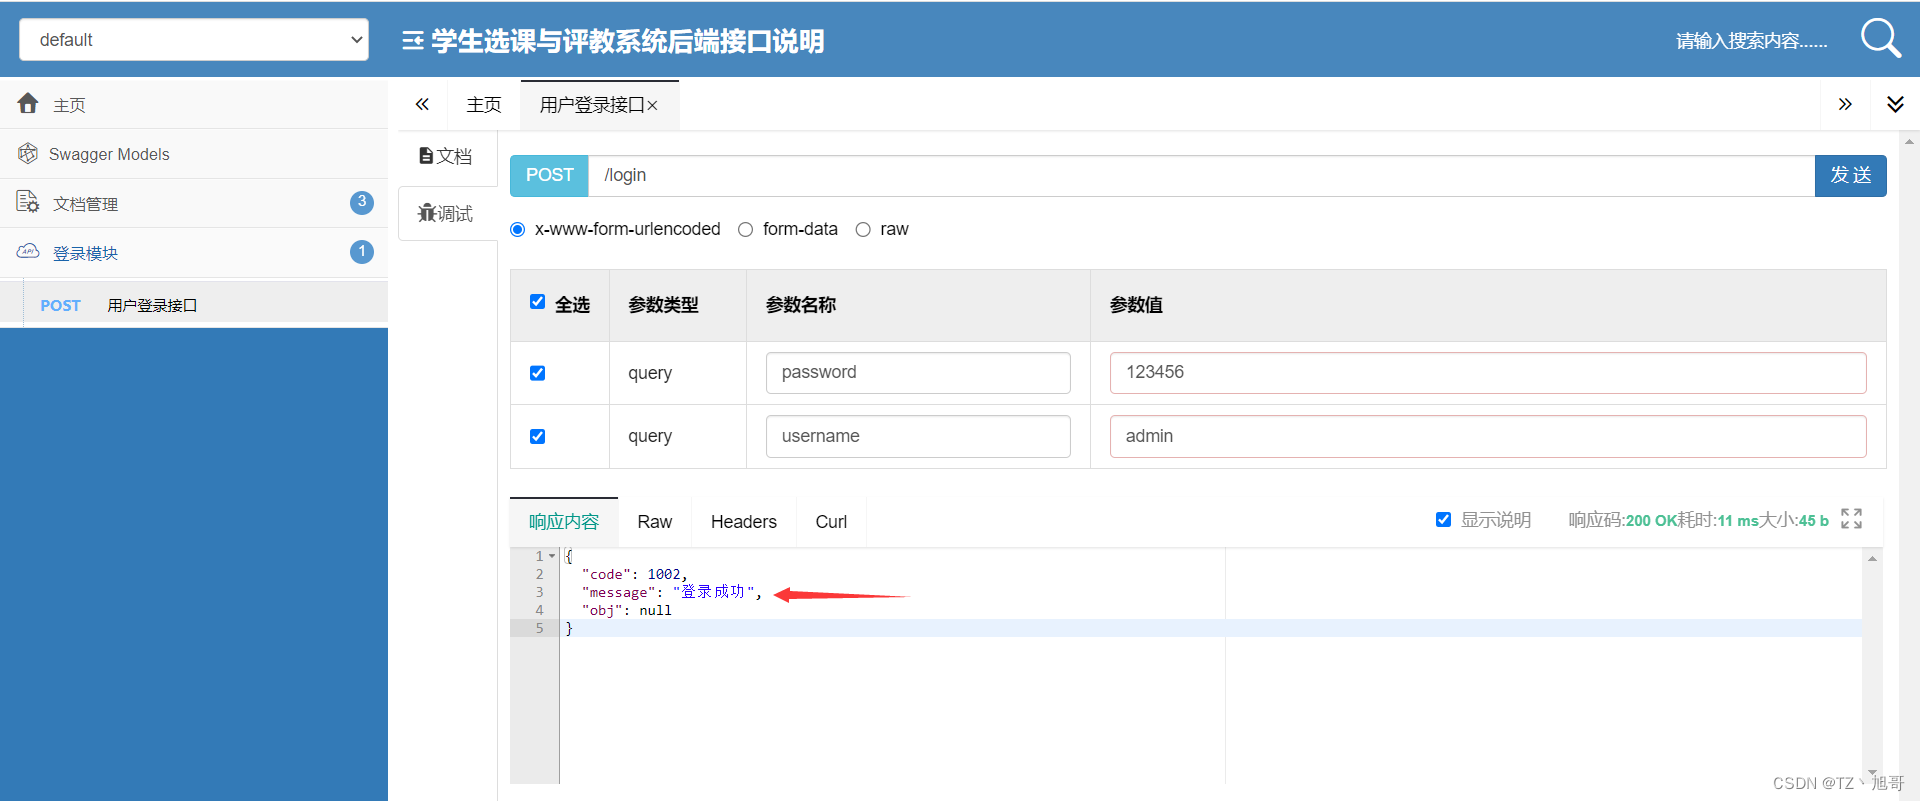
- 第四步、测试 地址 http://localhost:8081/doc.html
登录界面的开发
安装axios用于前后端交互
第一步、在项目目录下执行命令
npm install axios -S
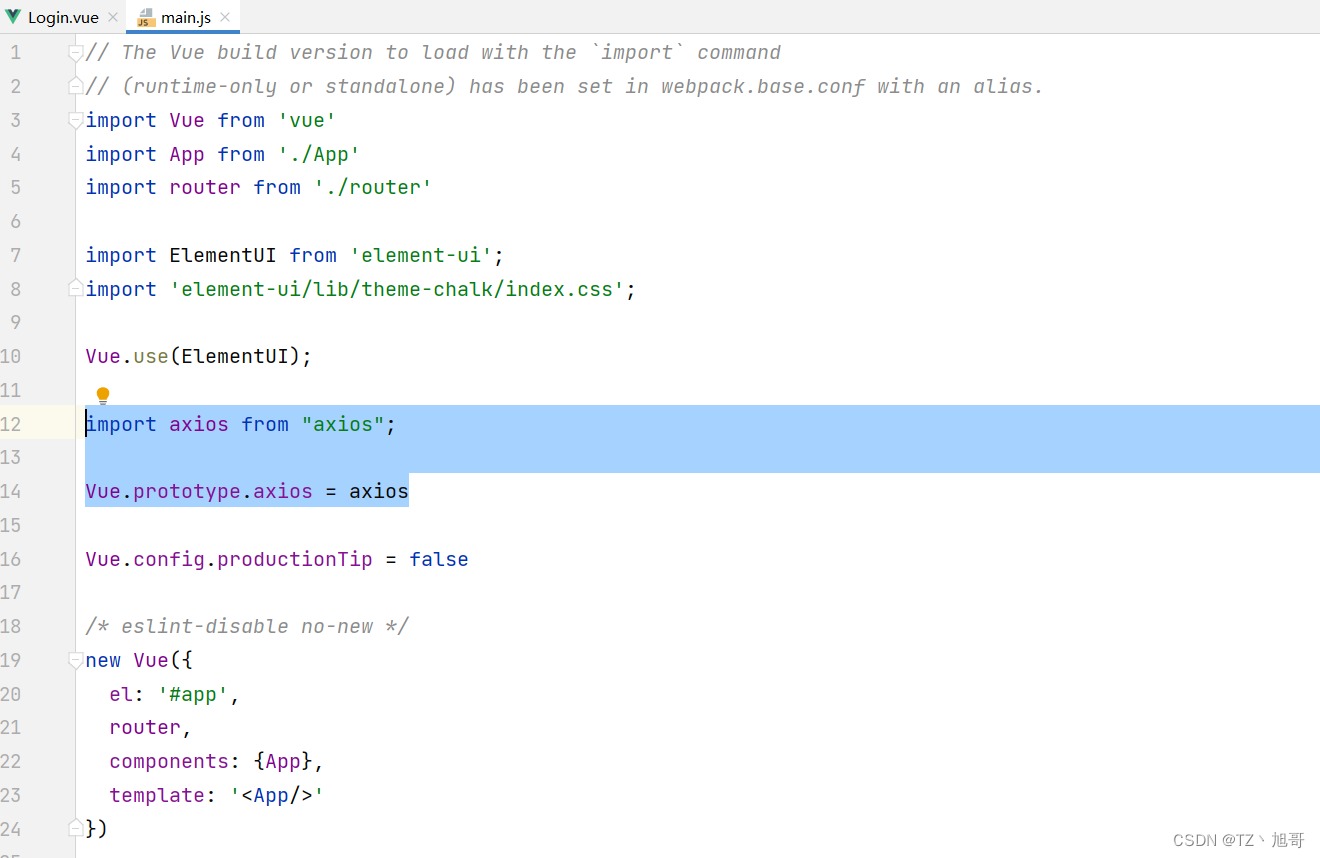
第二步、在main.js文件夹添加如下代码
import axios from "axios";

Vue.prototype.axios = axios
第三步、使用this.axios 即可访问到
Login.vue 完整代码如下
<template>
  <div class="box">
    <div class="ms-login">

      <el-form :model="ruleForm" :rules="rules" ref="ruleForm">
        <h3 class="loginTitle">学生选课与评教系统</h3>
        <el-form-item prop="name">
          <el-input v-model="ruleForm.name" placeholder="请输入用户名" prefix-icon="el-icon-user-solid"></el-input>
        </el-form-item>

        <el-form-item prop="password">
          <el-input v-model="ruleForm.password" placeholder="请输入密码" prefix-icon="el-icon-lock" show-password></el-input>
        </el-form-item>

        <el-radio v-model="radio" label="1">管理员</el-radio>
        <el-radio v-model="radio" label="2">教师</el-radio>
        <el-radio v-model="radio" label="3">学生</el-radio>
        <br>
        <br>

        <el-form-item>
          <el-button style="width: 100%" type="primary" @click="loginSubmit('ruleForm')">登录</el-button>
        </el-form-item>
      </el-form>

    </div>
  </div>
</template>

<script>

export default {
  name: "Login",
  data() {
    return {
      ruleForm: {
        name: '',
        password: ''
      },
      radio: '1',
      rules: {
        name: [
          {required: true, message: '请输入用户名', trigger: 'blur'},
          {min: 3, message: '用户名大于3位', trigger: 'blur'}
        ],
        password: [
          {required: true, message: '请输入密码', trigger: 'blur'}
        ]
      }
    };
  },
  methods: {
    // ref 的 loginForm
    loginSubmit(loginForm) {
      this.$refs[loginForm].validate((valid) => {
        if (valid) {
          // 去服务器端 查询数据库的用户名 密码
          this.axios.post('http://localhost:8081/login?' + "username=" + this.ruleForm.name + "&" + "password=" + this.ruleForm.password)
            .then(res => {
              // 回调函数
              if (res.data.code == 1002) {
                this.$router.push("/admin");
                this.$message.success("登录成功")
              } else if (res.data.code == 1000) {
                this.$message.error("用户名不存在");
              } else if (res.data.code == 1001) {
                this.$message.error("密码错误");
              }
            }).catch(err => {
            // 异常
            console.log(err);
          });
        } else {
          this.$message.error('请输入完整字段');
        }
      });
    }
  }
}
</script>

<style>

.box {
  width: 100%;
  height: 100%;
  /*background: antiquewhite;*/
  background-image: url("../assets/school.png");
  background-repeat: no-repeat;
}

.ms-login {
  width: 300px;
  height: 270px;
  border: 1px solid #eaeaea;
  position: absolute;
  left: 77%;
  top: 38%;
  margin: -150px 0 0 -190px;
  padding: 40px;
  border-radius: 15px;
  box-shadow: 0 0 25px #cac6c6;
  background: #fff;
}

.loginTitle {
  margin: 0px auto 40px auto;
  text-align: center;
}

</style>
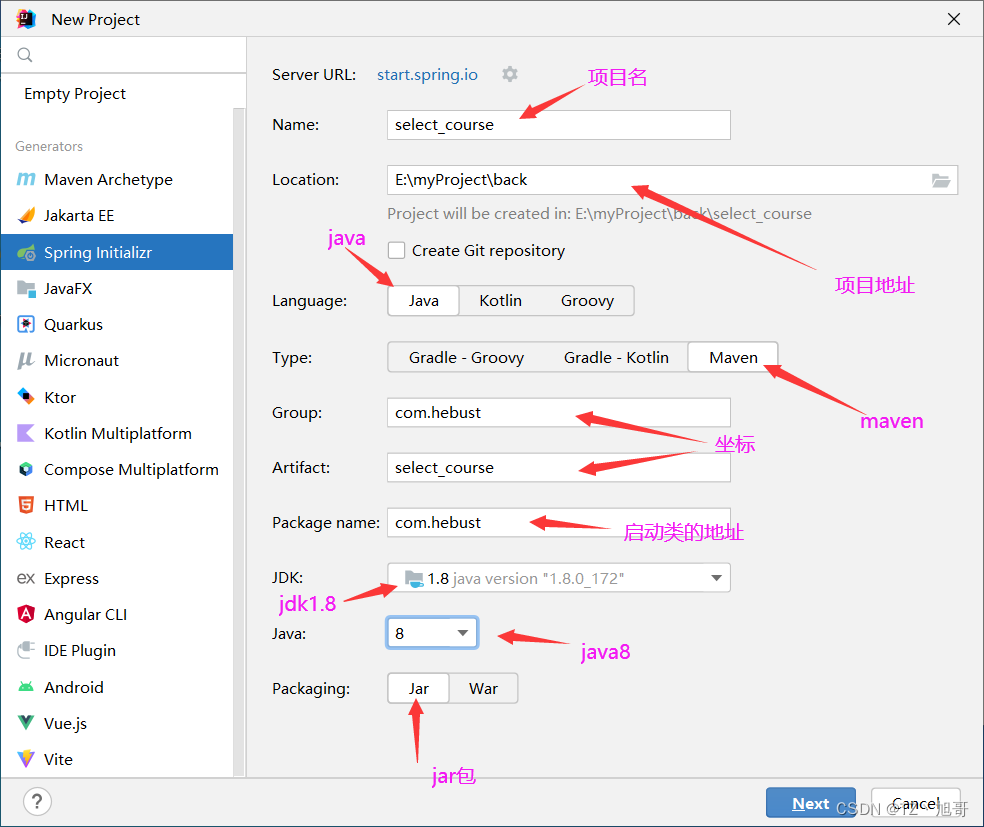
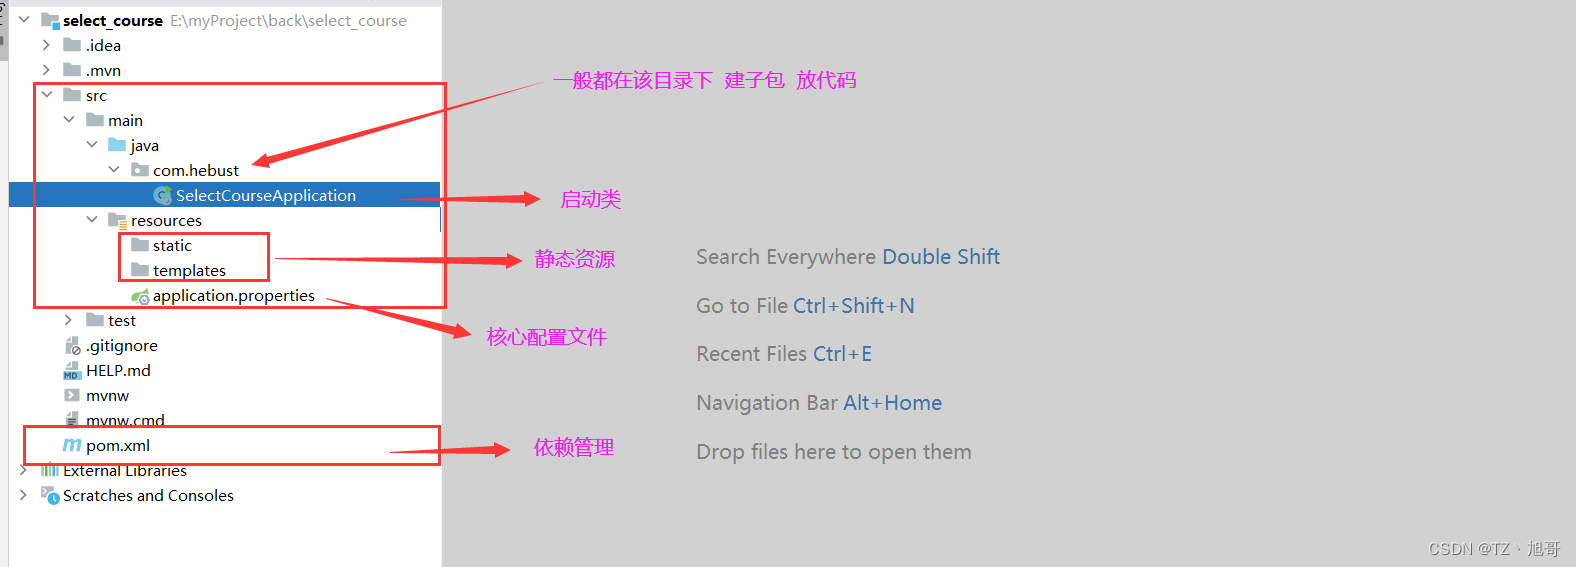
搭建第一个springboot项目
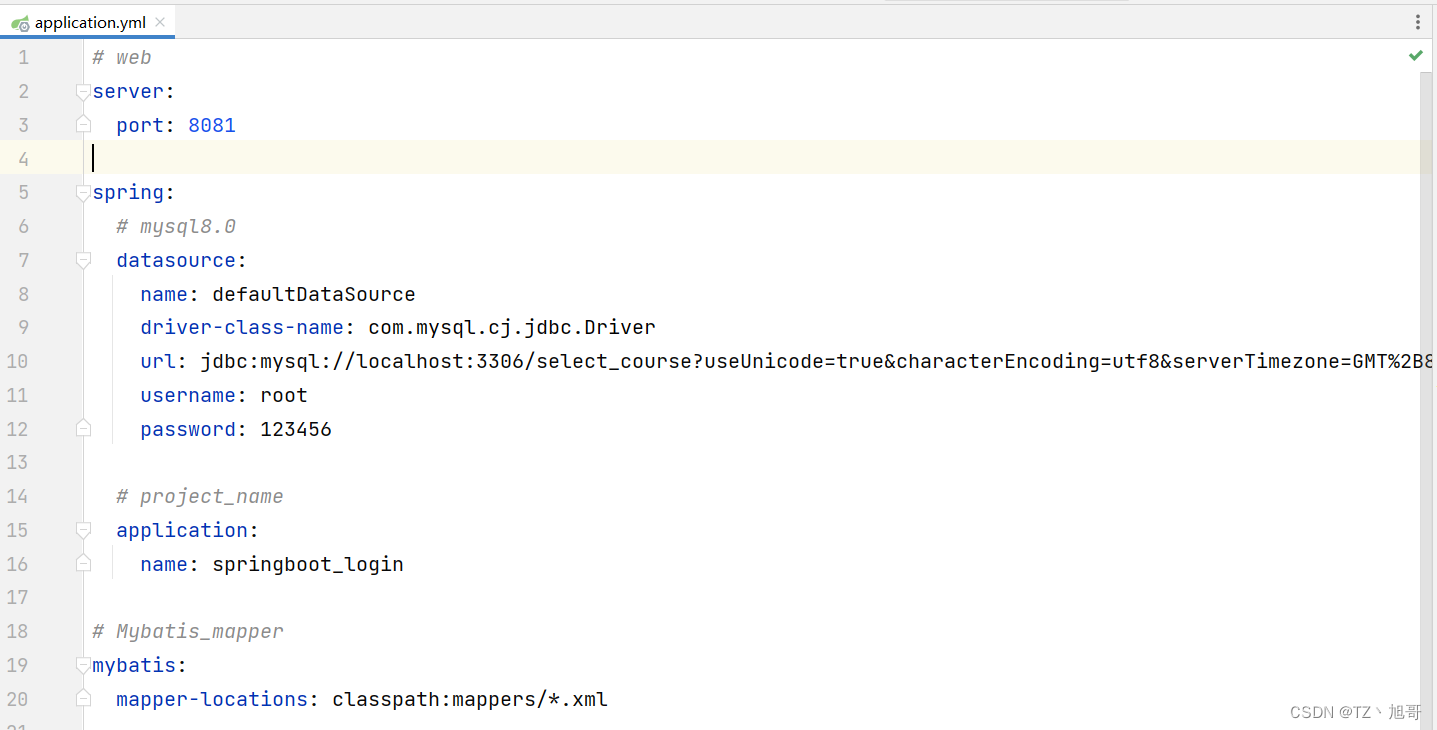
第一步、修改配置文件(application.properties)
后缀改为  .yml

添加以下内容

# web
server:
  port: 8081

spring:
  # mysql8.0
  datasource:
    name: defaultDataSource
    driver-class-name: com.mysql.cj.jdbc.Driver
    # 注意下面是8.0的写法  不要写成5.7的  数据库名字(rainng_course)改为自己的数据库名字
    url: jdbc:mysql://localhost:3306/rainng_course?useUnicode=true&characterEncoding=utf8&serverTimezone=GMT%2B8&useSSL=false&allowMultiQueries=true&autoReconnect=true
    # 数据库账号密码改为自己的
    username: root
    password: 123456

  # project_name
  application:
    name: springboot_login

# Mybatis_mapper
mybatis:
  mapper-locations: classpath:mappers/*.xml
第二步、创建包目录
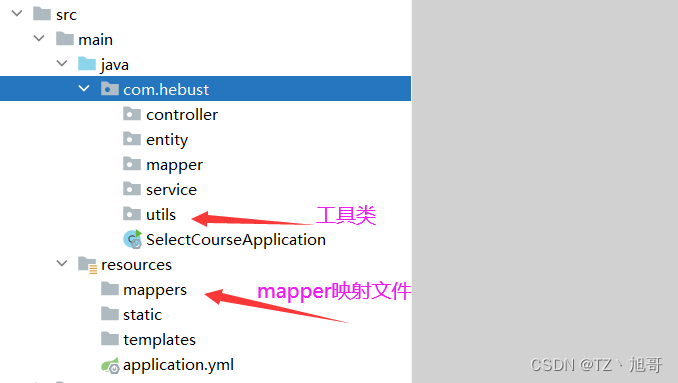
用springboot实现登录功能
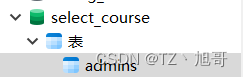
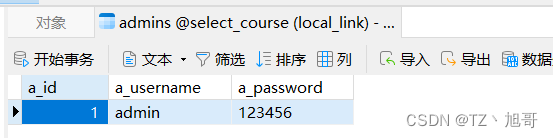
第一步、创建数据库
第二步、编写实体类

package com.hebust.entity;

import lombok.AllArgsConstructor;
import lombok.Data;
import lombok.NoArgsConstructor;

@Data
@AllArgsConstructor
@NoArgsConstructor
public class Admins {
    // 注意 映射时  大写字母 会被前面加个 _
    // 例如 a_id  == aId

    private Integer aId;

    private String aUsername;

    private String aPassword;

    // 实体类  表中的字段  和  类的属性  一一对应
}
第三步、编写mapper

package com.hebust.mapper;

// mapper 中都是接口

import com.hebust.entity.Admins;
import org.springframework.stereotype.Component;

@Component  // 注册为 容器组件
public interface AdminsMapper {
    // 接口中 没有方法体  且是抽象方法  但是abstract可以省略   public 也可以省略

    // 因为 mapper 是访问数据库的  所以返回值为 一条记录  即一个对象(entity下的对象)

    // @param 给参数起 别名   映射层可以用别名
    Admins login(@Param("username") String username);
}
第四步、编写mapper的映射xml文件
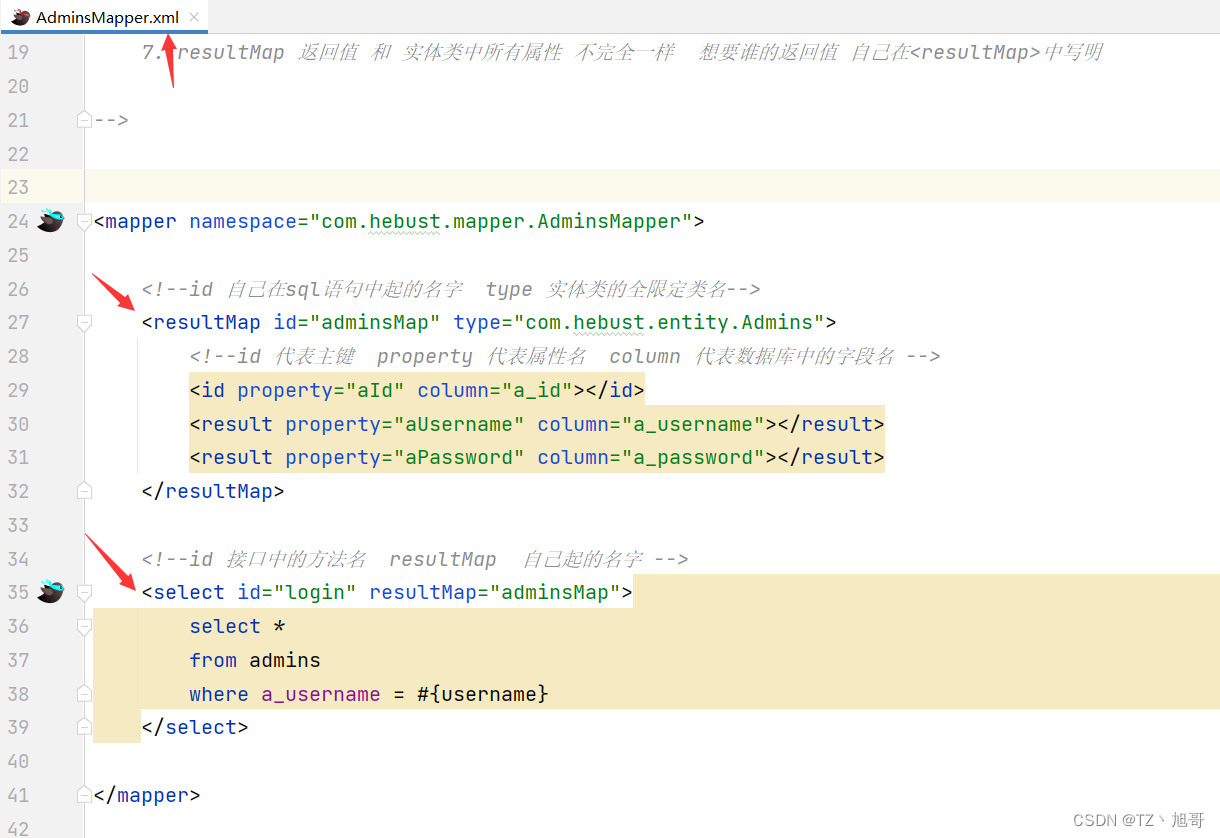
<?xml version="1.0" encoding="UTF-8" ?>
<!DOCTYPE mapper
        PUBLIC "-//mybatis.org//DTD Mapper 3.0//EN"
        "http://mybatis.org/dtd/mybatis-3-mapper.dtd">

<!--
    1. 此文件是 mybatis 的映射文件  是对 mapper 中接口的实现   用来写sql语句

    2. namespace  写mapper中文件的 全限定类名(从包名开始 一直到 类名) ctrl+shift+alt+c

    3. id 对应接口中 的方法名

    4. #{} 对应 接口中 方法的 参数名

    5. select  update  delete  insert   // 注意字符串类型的写法 @Param("名字")

    6. resultType 返回值 和 实体类中所有属性都一样  直接用 实体类的 全限定类名

    7. resultMap 返回值 和 实体类中所有属性 不完全一样  想要谁的返回值 自己在<resultMap>中写明

-->


<mapper namespace="com.hebust.mapper.AdminsMapper">

    <!--id 自己在sql语句中起的名字  type 实体类的全限定类名-->
    <resultMap id="adminsMap" type="com.hebust.entity.Admins">
        <!--id 代表主键  property 代表属性名  column 代表数据库中的字段名 -->
        <id property="aId" column="a_id"></id>
        <result property="aUsername" column="a_username"></result>
        <result property="aPassword" column="a_password"></result>
    </resultMap>

    <!--id 接口中的方法名  resultMap  自己起的名字 -->
    <select id="login" resultMap="adminsMap">
        select *
        from admins
        where a_username = #{username}
    </select>

</mapper>
第五步、编写公共的返回类型
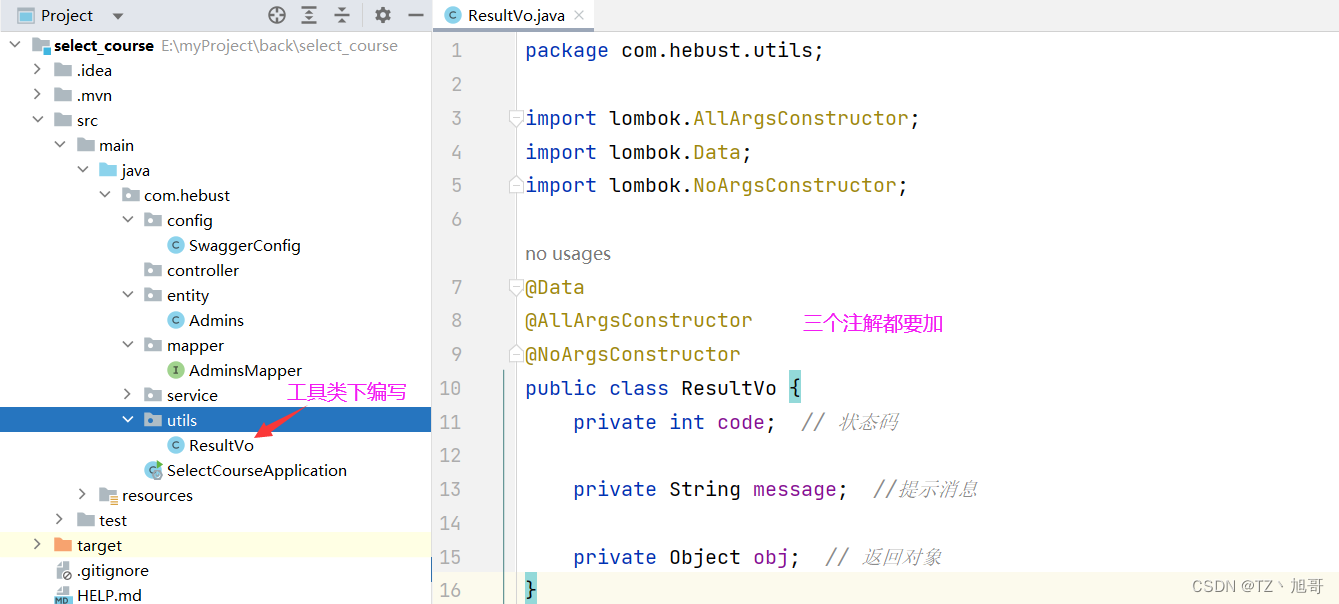
package com.hebust.utils;

import lombok.AllArgsConstructor;
import lombok.Data;
import lombok.NoArgsConstructor;

@Data
@AllArgsConstructor
@NoArgsConstructor
public class ResultVo {
    private int code;  // 状态码

    private String message;  //提示消息

    private Object obj;  // 返回对象
}
第六步、编写业务层接口
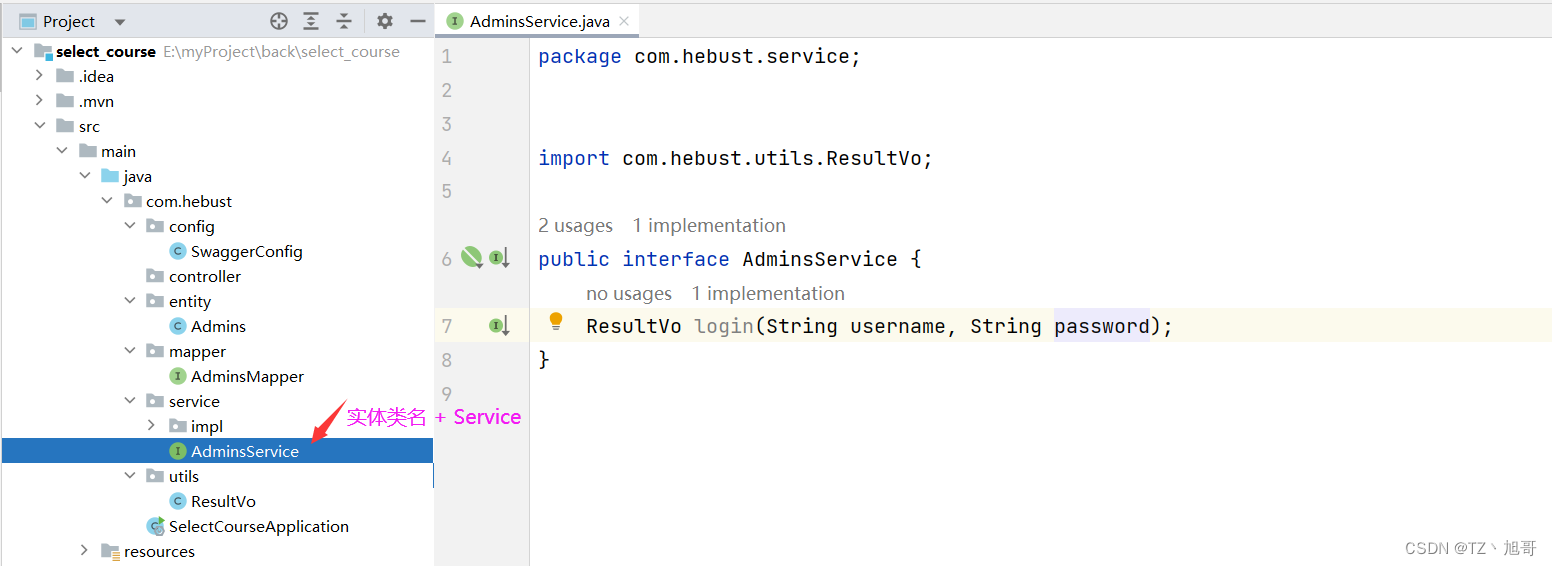
package com.hebust.service;

import com.hebust.utils.ResultVo;

public interface AdminsService {
    ResultVo login(String username, String password);
}
第七步、编写业务层的实现类
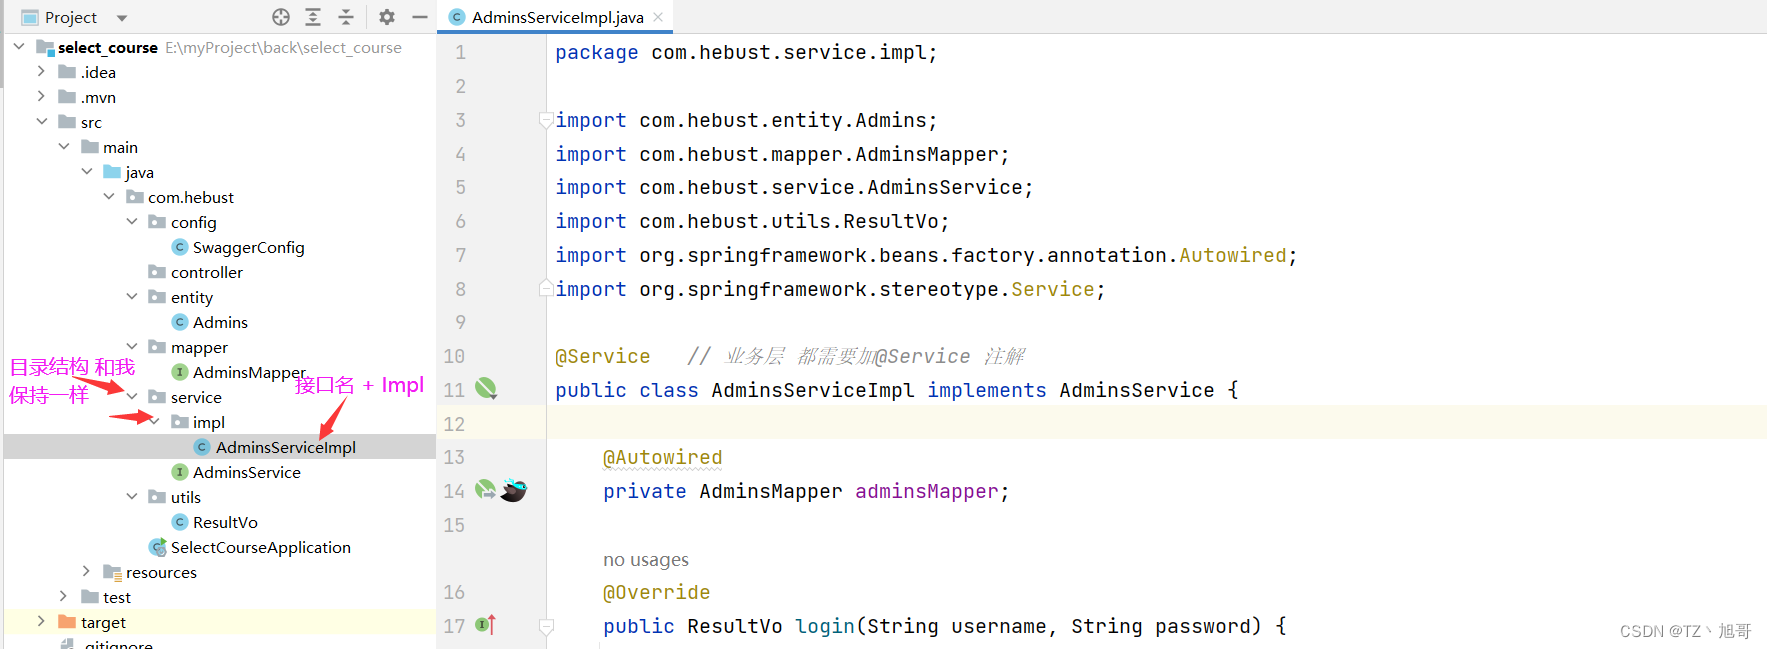
package com.hebust.service.impl;

import com.hebust.entity.Admins;
import com.hebust.mapper.AdminsMapper;
import com.hebust.service.AdminsService;
import com.hebust.utils.ResultVo;
import org.springframework.beans.factory.annotation.Autowired;
import org.springframework.stereotype.Service;

@Service   // 业务层 都需要加@Service 注解
public class AdminsServiceImpl implements AdminsService {

    @Autowired
    private AdminsMapper adminsMapper;

    @Override
    public ResultVo login(String username, String password) {
        Admins admins = adminsMapper.login(username);
        if (admins == null) {
            return new ResultVo(1000, "用户名不存在", null);
        } else {
            if (admins.getAPassword().equals(password)) {
                return new ResultVo(1002, "登录成功", null);
            } else {
                return new ResultVo(1001, "密码错误", null);
            }
        }
    }
}
第八步、编写controller类
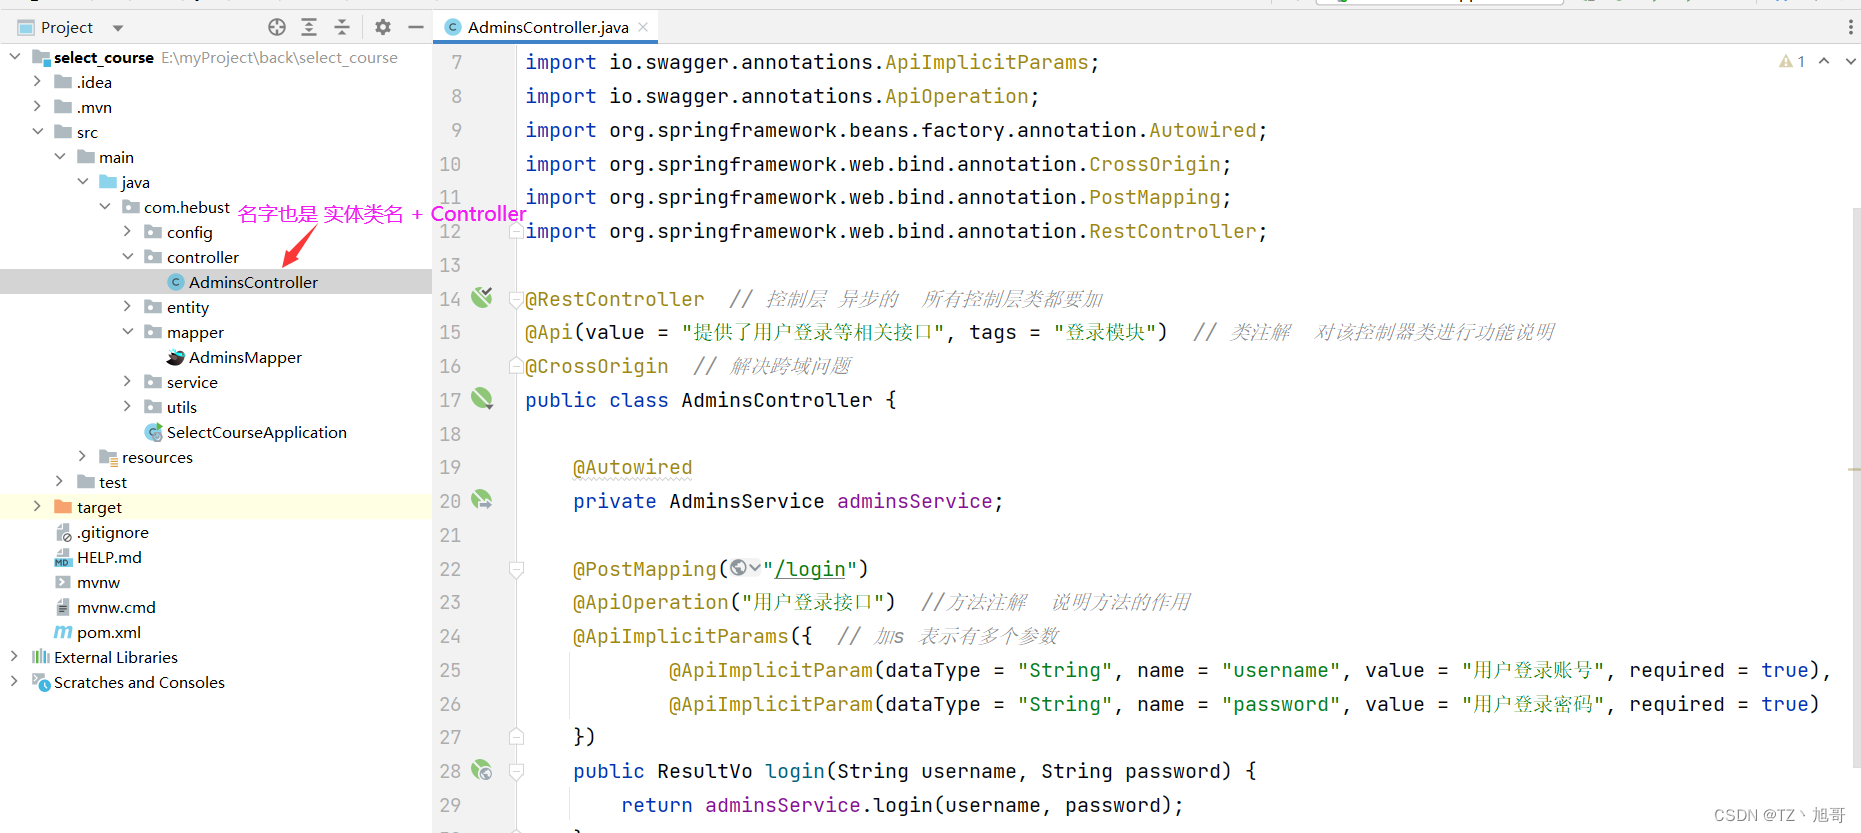
package com.hebust.controller;

import com.hebust.service.AdminsService;
import com.hebust.utils.ResultVo;
import io.swagger.annotations.Api;
import io.swagger.annotations.ApiImplicitParam;
import io.swagger.annotations.ApiImplicitParams;
import io.swagger.annotations.ApiOperation;
import org.springframework.beans.factory.annotation.Autowired;
import org.springframework.web.bind.annotation.CrossOrigin;
import org.springframework.web.bind.annotation.PostMapping;
import org.springframework.web.bind.annotation.RestController;

@RestController  // 控制层 异步的  所有控制层类都要加
@Api(value = "提供了用户登录等相关接口", tags = "登录模块")  // 类注解  对该控制器类进行功能说明
@CrossOrigin  // 解决跨域问题
public class AdminsController {

    @Autowired
    private AdminsService adminsService;

    @PostMapping("/login")
    @ApiOperation("用户登录接口")  //方法注解  说明方法的作用
    @ApiImplicitParams({  // 加s 表示有多个参数
            @ApiImplicitParam(dataType = "String", name = "username", value = "用户登录账号", required = true),
            @ApiImplicitParam(dataType = "String", name = "password", value = "用户登录密码", required = true)
    })
    public ResultVo login(String username, String password) {
        return adminsService.login(username, password);
    }
}
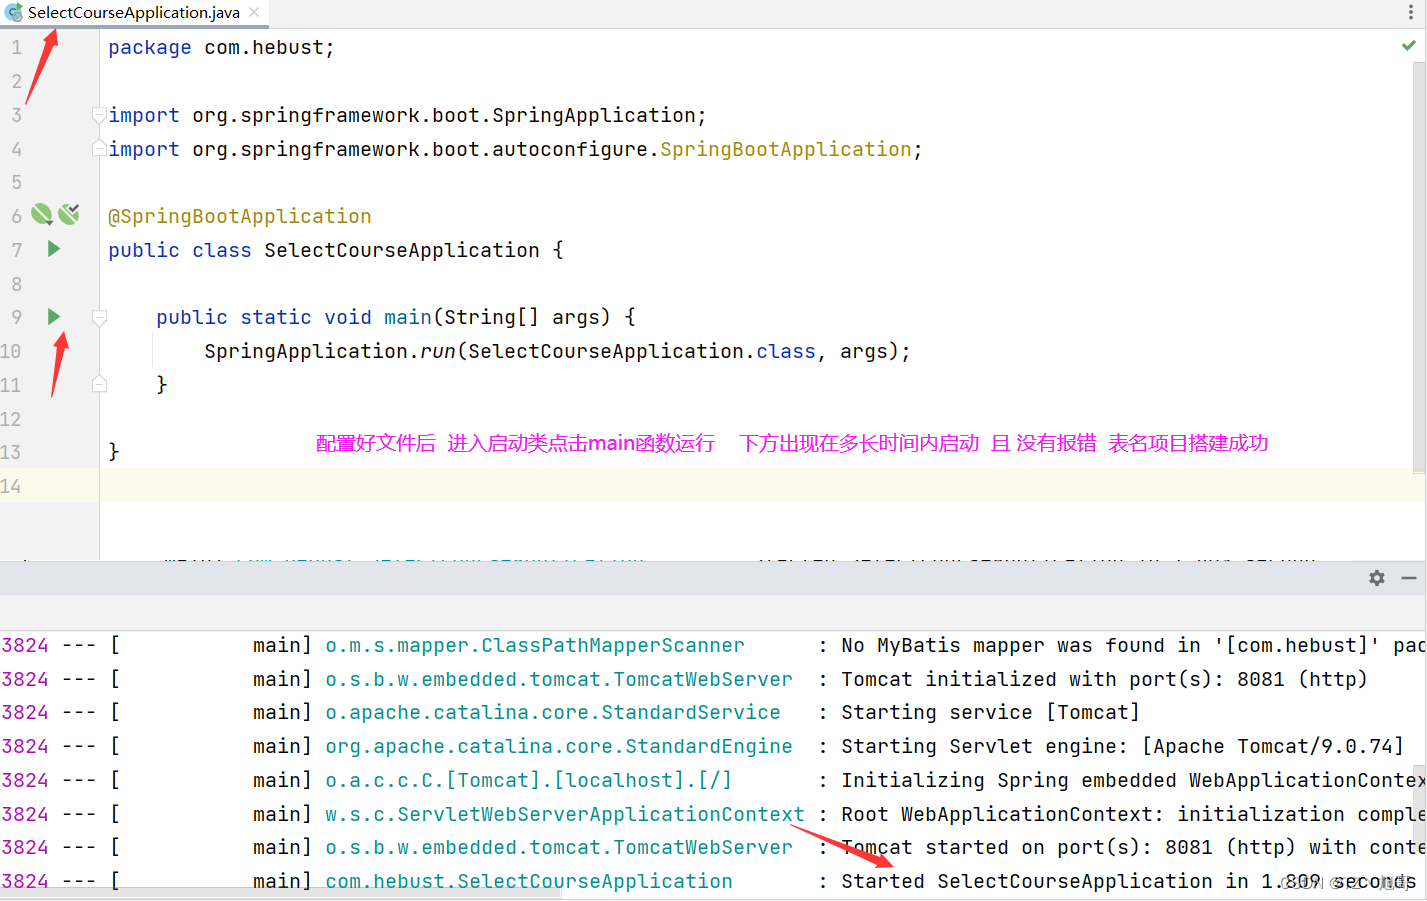
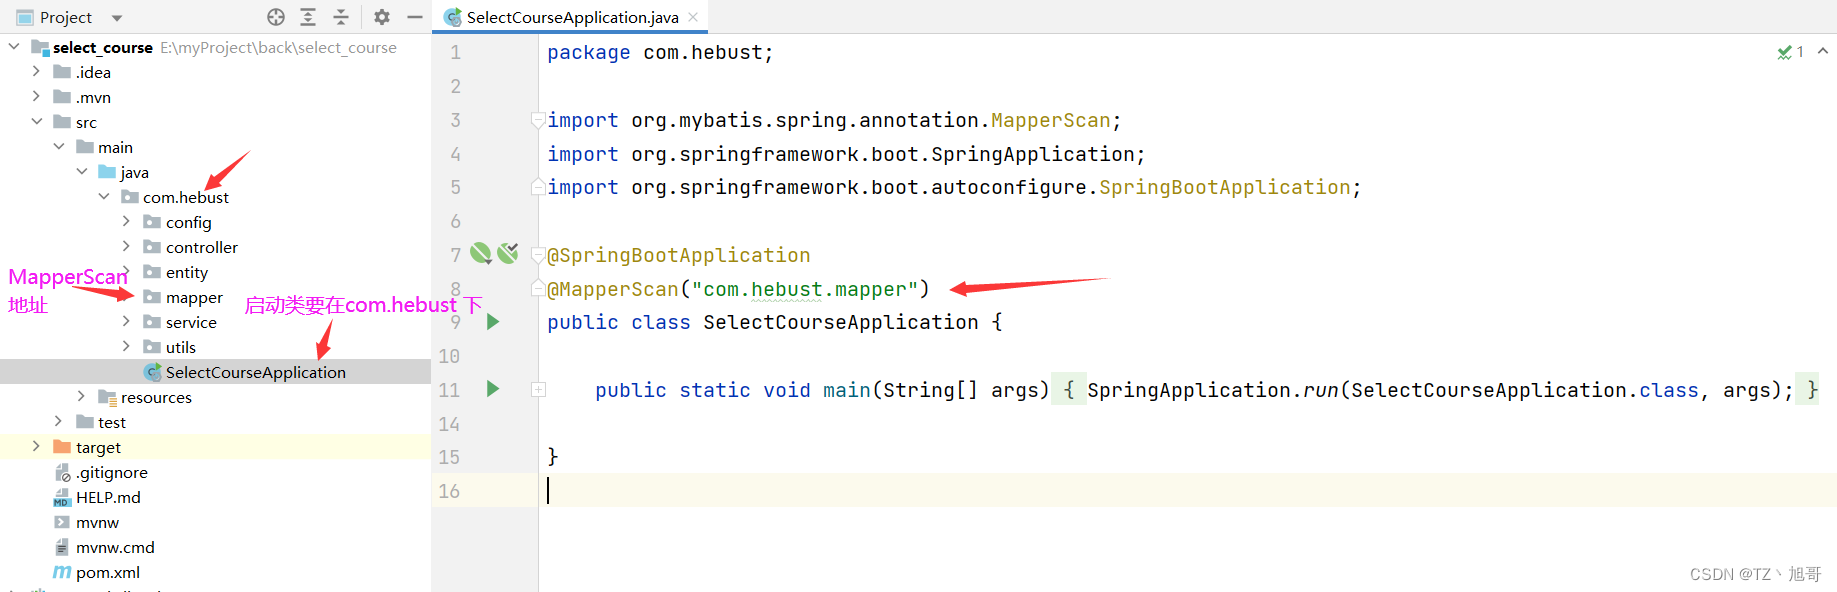
最后一步 重点!!! 启动类要加@MapperScan(“com.hebust.mapper”) 即你的mapper的 全限定名
swagger接口文档的使用
第一步、添加依赖
 <!--下面三个依赖是 swagger 接口文档用的依赖-->
        <dependency>
            <groupId>io.springfox</groupId>
            <artifactId>springfox-swagger-ui</artifactId>
            <version>2.9.2</version>
        </dependency>
        <dependency>
            <groupId>io.springfox</groupId>
            <artifactId>springfox-swagger2</artifactId>
            <version>2.9.2</version>
        </dependency>
        <dependency>
            <groupId>com.github.xiaoymin</groupId>
            <artifactId>swagger-bootstrap-ui</artifactId>
            <version>1.9.2</version>
        </dependency>
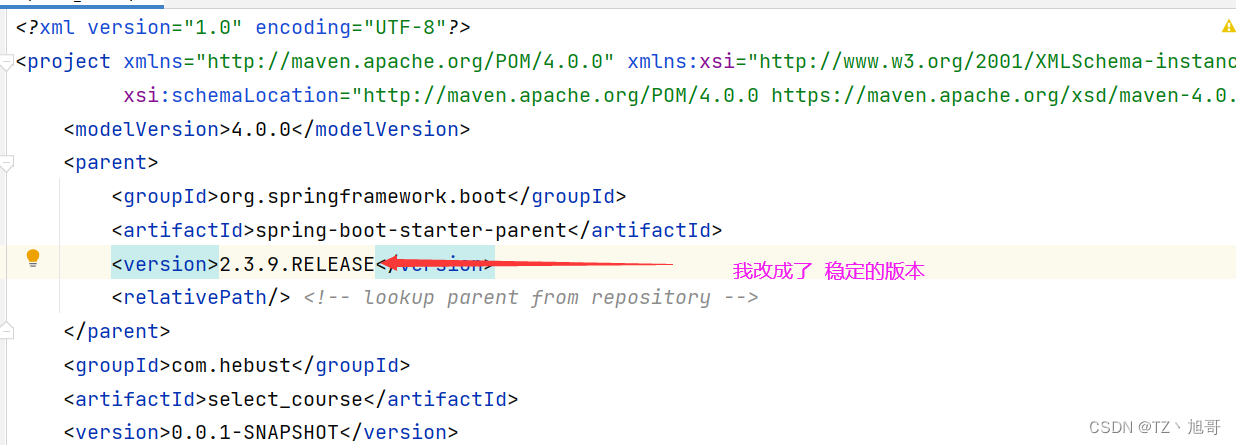
注意:添加依赖后可能会报错,这是版本问题,需要把springboot的版本降低,同时数据库驱动的依赖也要修改

第二步、编写SwaggerConfig类
@Configuration
@EnableSwagger2
public class SwaggerConfig {

    @Bean
    public Docket getDocket() {
        // 创建封面对象
        ApiInfoBuilder apiInfoBuilder = new ApiInfoBuilder();
        apiInfoBuilder.title("学生选课与评教系统后端接口说明")
                .description("此文档详细说明了学生选课与评教系统的后端接口规范")
                .version("v1.0.0")
                .contact(new Contact("TZ丶旭哥", "https://tz-xuge.blog.csdn.net/", "320084130@qq.com"));
        ApiInfo apiInfo = apiInfoBuilder.build();

        Docket docket = new Docket(DocumentationType.SWAGGER_2)
                .apiInfo(apiInfo)  // 指定生成的文档中的封面信息
                .select()
                .apis(RequestHandlerSelectors.basePackage("com.hebust.controller"))  // 对controller生成接口文档
                .paths(PathSelectors.any())
                .build();
        return docket;
    }
}
第三步、在controller所有类中添加注解,自动生成接口文档
@Api(value = "提供了用户登录等相关接口", tags = "登录模块")  // 类注解  对该控制器类进行功能说明

 @ApiOperation("用户登录接口")  //方法注解  说明方法的作用
    @ApiImplicitParams({  // 加s 表示有多个参数
            @ApiImplicitParam(dataType = "String", name = "username", value = "用户登录账号", required = true),
            @ApiImplicitParam(dataType = "String", name = "password", value = "用户登录密码", required = true)
    })
第四步、测试 地址 http://localhost:8081/doc.html


![Linux学习[9]查找文件指令:which whereis locate find](https://img-blog.csdnimg.cn/7e39389d51dc4c6fae0e4fbc03b8c3e2.png)