程序示例精选
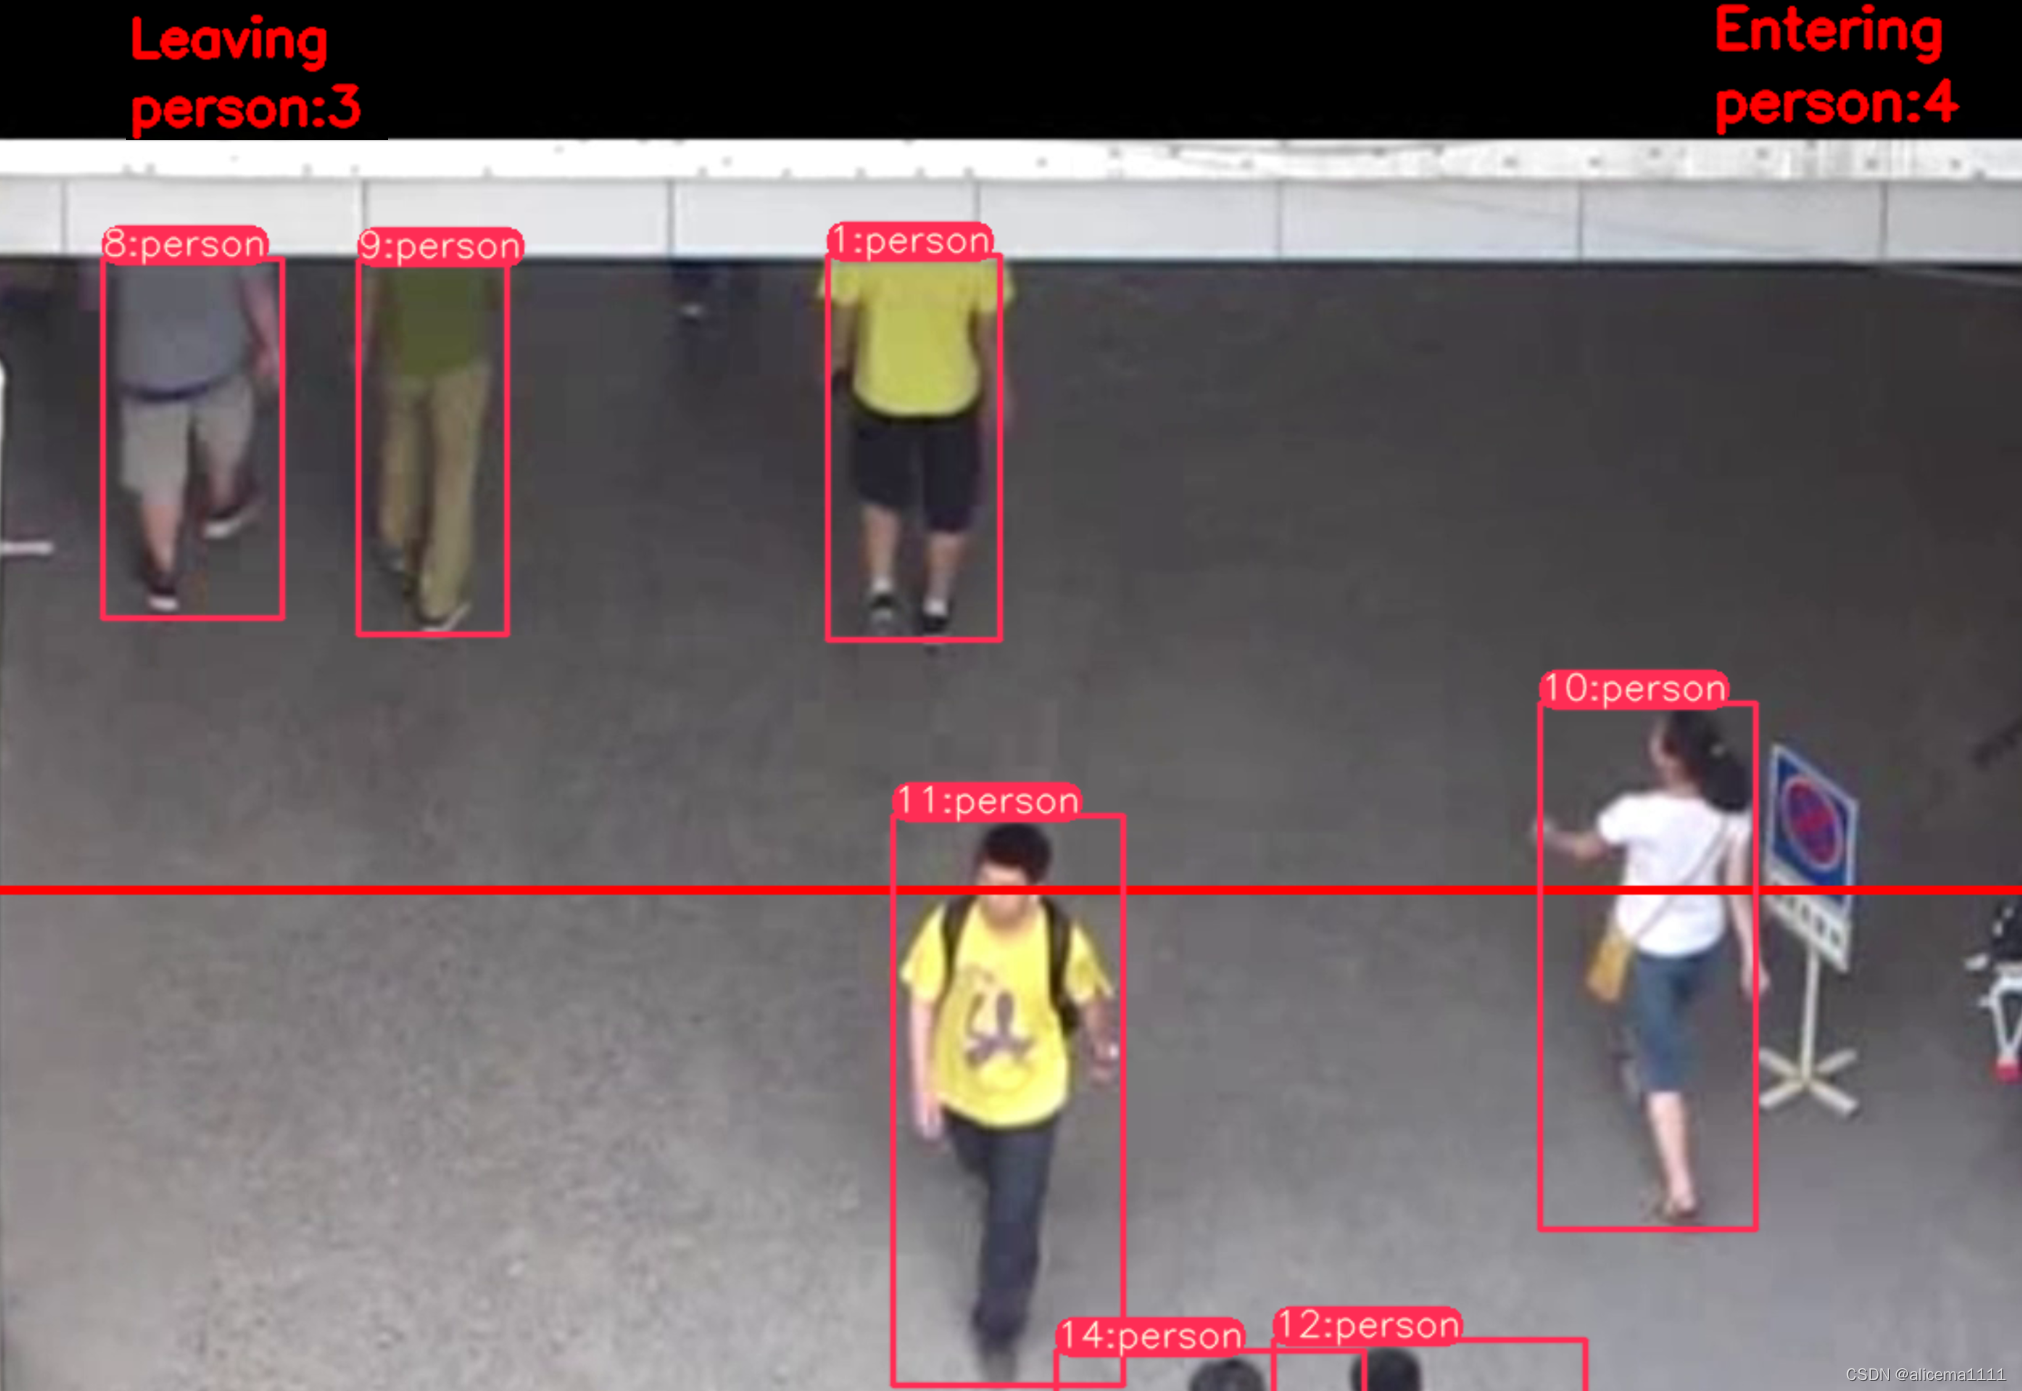
Python+Yolov8+Deepsort入口人流量统计
如需安装运行环境或远程调试,见文章底部个人QQ名片,由专业技术人员远程协助!
前言
这篇博客针对<<Python+Yolov8+Deepsort入口人流量统计>>编写代码,代码整洁,规则,易读。 学习与应用推荐首选。
文章目录
一、所需工具软件
二、使用步骤
1. 引入库
2. 代码实现
3. 运行结果
三、在线协助
一、所需工具软件
1. Python
2. OpenCV,Yolov8
二、使用步骤
1.引入库
import hydra
import torch
import argparse
import time
from pathlib import Path

import cv2
import torch
import torch.backends.cudnn as cudnn
from numpy import random
from ultralytics.yolo.engine.predictor import BasePredictor
from ultralytics.yolo.utils import DEFAULT_CONFIG, ROOT, ops
from ultralytics.yolo.utils.checks import check_imgsz
from ultralytics.yolo.utils.plotting import Annotator, colors, save_one_box

import cv2
from deep_sort_pytorch.utils.parser import get_config
from deep_sort_pytorch.deep_sort import DeepSort
from collections import deque
import numpy as np
2. 代码实现
代码如下:
def init_tracker():
    global deepsort
    cfg_deep = get_config()
    cfg_deep.merge_from_file("deep_sort_pytorch/configs/deep_sort.yaml")

    deepsort= DeepSort(cfg_deep.DEEPSORT.REID_CKPT,
                            max_dist=cfg_deep.DEEPSORT.MAX_DIST, min_confidence=cfg_deep.DEEPSORT.MIN_CONFIDENCE,
                            nms_max_overlap=cfg_deep.DEEPSORT.NMS_MAX_OVERLAP, max_iou_distance=cfg_deep.DEEPSORT.MAX_IOU_DISTANCE,
                            max_age=cfg_deep.DEEPSORT.MAX_AGE, n_init=cfg_deep.DEEPSORT.N_INIT, nn_budget=cfg_deep.DEEPSORT.NN_BUDGET,
                            use_cuda=True)
#########################################################################################
def xyxy_to_tlwh(bbox_xyxy):
    tlwh_bboxs = []
    for i, box in enumerate(bbox_xyxy):
        x1, y1, x2, y2 = [int(i) for i in box]
        top = x1
        left = y1
        w = int(x2 - x1)
        h = int(y2 - y1)
        tlwh_obj = [top, left, w, h]
        tlwh_bboxs.append(tlwh_obj)
    return tlwh_bboxs

def compute_color_for_labels(label):
    """
    Simple function that adds fixed color depending on the class
    """
    if label == 0: #person
        color = (85,45,255)
    elif label == 2: # Car
        color = (222,82,175)
    elif label == 3:  # Motobike
        color = (0, 204, 255)
    elif label == 5:  # Bus
        color = (0, 149, 255)
    else:
        color = [int((p * (label ** 2 - label + 1)) % 255) for p in palette]
    return tuple(color)

def draw_border(img, pt1, pt2, color, thickness, r, d):
    x1,y1 = pt1
    x2,y2 = pt2
    # Top left
    cv2.line(img, (x1 + r, y1), (x1 + r + d, y1), color, thickness)
    cv2.line(img, (x1, y1 + r), (x1, y1 + r + d), color, thickness)
    cv2.ellipse(img, (x1 + r, y1 + r), (r, r), 180, 0, 90, color, thickness)
    # Top right
    cv2.line(img, (x2 - r, y1), (x2 - r - d, y1), color, thickness)
    cv2.line(img, (x2, y1 + r), (x2, y1 + r + d), color, thickness)
    cv2.ellipse(img, (x2 - r, y1 + r), (r, r), 270, 0, 90, color, thickness)
    # Bottom left
    cv2.line(img, (x1 + r, y2), (x1 + r + d, y2), color, thickness)
    cv2.line(img, (x1, y2 - r), (x1, y2 - r - d), color, thickness)
    cv2.ellipse(img, (x1 + r, y2 - r), (r, r), 90, 0, 90, color, thickness)
    # Bottom right
    cv2.line(img, (x2 - r, y2), (x2 - r - d, y2), color, thickness)
    cv2.line(img, (x2, y2 - r), (x2, y2 - r - d), color, thickness)
    cv2.ellipse(img, (x2 - r, y2 - r), (r, r), 0, 0, 90, color, thickness)

    cv2.rectangle(img, (x1 + r, y1), (x2 - r, y2), color, -1, cv2.LINE_AA)
    cv2.rectangle(img, (x1, y1 + r), (x2, y2 - r - d), color, -1, cv2.LINE_AA)

    cv2.circle(img, (x1 +r, y1+r), 2, color, 12)
    cv2.circle(img, (x2 -r, y1+r), 2, color, 12)
    cv2.circle(img, (x1 +r, y2-r), 2, color, 12)
    cv2.circle(img, (x2 -r, y2-r), 2, color, 12)

    return img

def UI_box(x, img, color=None, label=None, line_thickness=None):
    # Plots one bounding box on image img
    tl = line_thickness or round(0.002 * (img.shape[0] + img.shape[1]) / 2) + 1  # line/font thickness
    color = color or [random.randint(0, 255) for _ in range(3)]
    c1, c2 = (int(x[0]), int(x[1])), (int(x[2]), int(x[3]))
    cv2.rectangle(img, c1, c2, color, thickness=tl, lineType=cv2.LINE_AA)
    if label:
        tf = max(tl - 1, 1)  # font thickness
        t_size = cv2.getTextSize(label, 0, fontScale=tl / 3, thickness=tf)[0]

        img = draw_border(img, (c1[0], c1[1] - t_size[1] -3), (c1[0] + t_size[0], c1[1]+3), color, 1, 8, 2)

        cv2.putText(img, label, (c1[0], c1[1] - 2), 0, tl / 3, [225, 255, 255], thickness=tf, lineType=cv2.LINE_AA)


def intersect(A,B,C,D):
    return ccw(A,C,D) != ccw(B,C,D) and ccw(A,B,C) != ccw(A,B,D)

def ccw(A,B,C):
    return (C[1]-A[1]) * (B[0]-A[0]) > (B[1]-A[1]) * (C[0]-A[0])


def get_direction(point1, point2):
    direction_str = ""

    # calculate y axis direction
    if point1[1] > point2[1]:
        direction_str += "South"
    elif point1[1] < point2[1]:
        direction_str += "North"
    else:
        direction_str += ""

    # calculate x axis direction
    if point1[0] > point2[0]:
        direction_str += "East"
    elif point1[0] < point2[0]:
        direction_str += "West"
    else:
        direction_str += ""

    return direction_str
def draw_boxes(img, bbox, names,object_id, identities=None, offset=(0, 0)):
    cv2.line(img, line[0], line[1], (0,0,255), 3)

    height, width, _ = img.shape
    # remove tracked point from buffer if object is lost
    for key in list(data_deque):
      if key not in identities:
        data_deque.pop(key)

    for i, box in enumerate(bbox):
        x1, y1, x2, y2 = [int(i) for i in box]
        x1 += offset[0]
        x2 += offset[0]
        y1 += offset[1]
        y2 += offset[1]

        # code to find center of bottom edge
        center = (int((x2+x1)/ 2), int((y2+y2)/2))

        # get ID of object
        id = int(identities[i]) if identities is not None else 0

        # create new buffer for new object
        if id not in data_deque:
          data_deque[id] = deque(maxlen= 64)
        color = compute_color_for_labels(object_id[i])
        obj_name = names[object_id[i]]
        label = '{}{:d}'.format("", id) + ":"+ '%s' % (obj_name)

        # add center to buffer
        data_deque[id].appendleft(center)
        if len(data_deque[id]) >= 2:
          direction = get_direction(data_deque[id][0], data_deque[id][1])
          if intersect(data_deque[id][0], data_deque[id][1], line[0], line[1]):
              cv2.line(img, line[0], line[1], (255, 255, 255), 3)
              if "South" in direction:
                if obj_name not in object_counter:
                    object_counter[obj_name] = 1
                else:
                    object_counter[obj_name] += 1
              if "North" in direction:
                if obj_name not in object_counter1:
                    object_counter1[obj_name] = 1
                else:
                    object_counter1[obj_name] += 1
        UI_box(box, img, label=label, color=color, line_thickness=2)
        # draw trail
        for i in range(1, len(data_deque[id])):
            # check if on buffer value is none
            if data_deque[id][i - 1] is None or data_deque[id][i] is None:
                continue
            # generate dynamic thickness of trails
            thickness = int(np.sqrt(64 / float(i + i)) * 1.5)
            # draw trails
            #cv2.line(img, data_deque[id][i - 1], data_deque[id][i], color, thickness)

    #4. Display Count in top right corner
        for idx, (key, value) in enumerate(object_counter1.items()):
            cnt_str = str(key) + ":" +str(value)
            #cv2.line(img, (width - 500,25), (width,25), [85,45,255], 40)
            cv2.putText(img, f'Entering', (width - 500, 35), 0, 1, [0,0,255], thickness=2, lineType=cv2.LINE_AA)
            #cv2.line(img, (width - 500, 65 + (idx*40)), (width, 65 + (idx*40)), [85, 45, 255], 30)
            cv2.putText(img, cnt_str, (width - 500, 75 + (idx*40)), 0, 1, [0,0,255], thickness = 2, lineType = cv2.LINE_AA)

        for idx, (key, value) in enumerate(object_counter.items()):
            cnt_str1 = str(key) + ":" +str(value)
            #cv2.line(img, (20,25), (500,25), [85,45,255], 40)
            cv2.putText(img, f'Leaving', (11, 35), 0, 1, [0,0,255], thickness=2, lineType=cv2.LINE_AA)
            #cv2.line(img, (20,65+ (idx*40)), (127,65+ (idx*40)), [85,45,255], 30)
            cv2.putText(img, cnt_str1, (11, 75+ (idx*40)), 0, 1, [0,0,255], thickness=2, lineType=cv2.LINE_AA)


    return img


class DetectionPredictor(BasePredictor):

    def get_annotator(self, img):
        return Annotator(img, line_width=self.args.line_thickness, example=str(self.model.names))

    def preprocess(self, img):
        img = torch.from_numpy(img).to(self.model.device)
        img = img.half() if self.model.fp16 else img.float()  # uint8 to fp16/32
        img /= 255  # 0 - 255 to 0.0 - 1.0
        return img

    def postprocess(self, preds, img, orig_img):
        preds = ops.non_max_suppression(preds,
                                        self.args.conf,
                                        self.args.iou,
                                        agnostic=self.args.agnostic_nms,
                                        max_det=self.args.max_det)

        for i, pred in enumerate(preds):
            shape = orig_img[i].shape if self.webcam else orig_img.shape
            pred[:, :4] = ops.scale_boxes(img.shape[2:], pred[:, :4], shape).round()

        return preds

    def write_results(self, idx, preds, batch):
        p, im, im0 = batch
        all_outputs = []
        log_string = ""
        if len(im.shape) == 3:
            im = im[None]  # expand for batch dim
        self.seen += 1
        im0 = im0.copy()
        if self.webcam:  # batch_size >= 1
            log_string += f'{idx}: '
            frame = self.dataset.count
        else:
            frame = getattr(self.dataset, 'frame', 0)

        self.data_path = p
        save_path = str(self.save_dir / p.name)  # im.jpg
        self.txt_path = str(self.save_dir / 'labels' / p.stem) + ('' if self.dataset.mode == 'image' else f'_{frame}')
        log_string += '%gx%g ' % im.shape[2:]  # print string
        self.annotator = self.get_annotator(im0)

        det = preds[idx]
        all_outputs.append(det)
        if len(det) == 0:
            return log_string
        for c in det[:, 5].unique():
            n = (det[:, 5] == c).sum()  # detections per class
            log_string += f"{n} {self.model.names[int(c)]}{'s' * (n > 1)}, "
        # write
        gn = torch.tensor(im0.shape)[[1, 0, 1, 0]]  # normalization gain whwh
        xywh_bboxs = []
        confs = []
        oids = []
        outputs = []
        for *xyxy, conf, cls in reversed(det):
            x_c, y_c, bbox_w, bbox_h = xyxy_to_xywh(*xyxy)
            xywh_obj = [x_c, y_c, bbox_w, bbox_h]
            xywh_bboxs.append(xywh_obj)
            confs.append([conf.item()])
            oids.append(int(cls))
        xywhs = torch.Tensor(xywh_bboxs)
        confss = torch.Tensor(confs)

        outputs = deepsort.update(xywhs, confss, oids, im0)
        if len(outputs) > 0:
            bbox_xyxy = outputs[:, :4]
            identities = outputs[:, -2]
            object_id = outputs[:, -1]

            draw_boxes(im0, bbox_xyxy, self.model.names, object_id,identities)

        return log_string


@hydra.main(version_base=None, config_path=str(DEFAULT_CONFIG.parent), config_name=DEFAULT_CONFIG.name)
def predict(cfg):
    init_tracker()
    cfg.model = cfg.model or "yolov8n.pt"
    cfg.imgsz = check_imgsz(cfg.imgsz, min_dim=2)  # check image size
    #cfg.source = cfg.source if cfg.source is not None else ROOT / "assets"
    cfg.source = "imagesVideo/test2.mp4"
    predictor = DetectionPredictor(cfg)
    predictor()


if __name__ == "__main__":
    predict()
3. 运行结果
三、在线协助:
如需安装运行环境或远程调试,见文章底部个人 QQ 名片,由专业技术人员远程协助!
1)远程安装运行环境,代码调试
2)Qt, C++, Python入门指导
3)界面美化
4)软件制作
博主推荐文章:python人脸识别统计人数qt窗体-CSDN博客
博主推荐文章:Python Yolov5火焰烟雾识别源码分享-CSDN博客
Python OpenCV识别行人入口进出人数统计_python识别人数-CSDN博客
个人博客主页:alicema1111的博客_CSDN博客-Python,C++,网页领域博主
博主所有文章点这里:alicema1111的博客_CSDN博客-Python,C++,网页领域博主
![[java]云HIS运维运营分系统功能实现(springboot框架)](https://img-blog.csdnimg.cn/58586826632646e29303a6c1253334a7.png)