推荐课程:U-Net网络结构讲解(语义分割)_哔哩哔哩_bilibili
感谢博主霹雳吧啦Wz 提供视频讲解和源码支持,真乃神人也!
目录
1. U-net网络模型
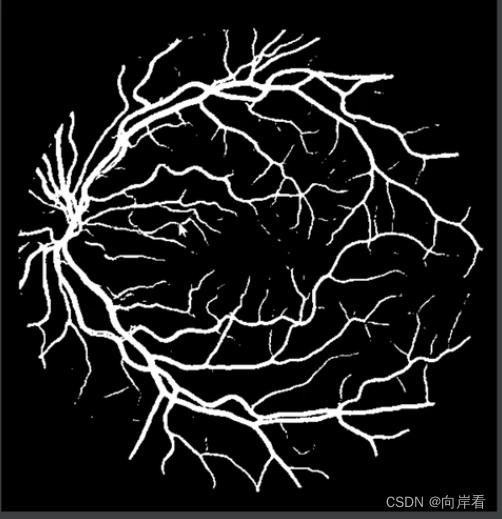
2. 分割效果
3. U-Net源码解析(Pytorch版)
4. 测试结果
1. U-net网络模型

U-Net网络由两部分构成,contracting path(收缩路径) 和 expanding path(扩展路径)。
U-Net网络训练过程:
1. contracting path(收缩路径):由4组 { 两个3x3卷积层 + 一个池化层(下采样) } 构成。
输入特征图(572 x 572 x 1) --conv(3x3卷积)--> 长、宽、通道数(570 x 570 x 64)--conv(3x3卷积)--> (568 x 568 x 64)--max_pooling(池化)(减半)--> (284 x 284 x 64), 两个卷积层 + 一个池化层……最后到特征图(32 x 32 x 512)。
2. 中间又经过两个3x3卷积层:特征图(32 x 32 x 512) --conv(3x3卷积)--> (30 x 30 x 1024)--conv(3x3卷积)--> (28 x 28 x 1024)
3. expanding path(扩展路径):由4组 { 中心裁剪和拼接 + 一个上采样层(转置卷积) + 两个3x3卷积层 } 构成。
注意:copy and cope 中心裁剪和拼接,先进行裁剪 (64 x 64 x 512)--crop(中心裁剪)--> (56 x 56 x 512) 。这里裁剪的是contracting path(收缩路径)中的一个特征图。再在 expanding path(扩展路径)中进行拼接。
特征图(28 x 28 x 1024) --up-conv(上采样,转置卷积)--> (56 x 56 x 512)--cope(拼接,上面中心裁剪得到的特征图)-->(56 x 56 x 1024)--conv(3x3卷积)--> (54 x 54 x 512)--conv(3x3卷积)--> (52 x 52 x 512) ,一次中心裁剪 + 一个上采样层(转置卷积) + 两个卷积层……最后得到特征图(388 x 388 x 64)。
4. 最后进行一次1x1卷积:特征图(388 x 388 x 64)--conv(1x1卷积)--> 特征图(388 x 388 x 2)。最后输出一个388 x 388 x 2的分割图。
U-Net网络模型改进:在步骤2和步骤3中的卷积层改为大小为3x3,填充为1的卷积层,这样 expanding path(扩展路径)中的特征图经过上采样后的大小与contracting path(收缩路径)中对应的特征图大小一致,可以省去中心裁剪这一步直接拼接。
2. 分割效果

3. U-Net源码解析(Pytorch版)
unet源码:https://github.com/WZMIAOMIAO/deep-learning-for-image-processing/tree/master/pytorch_segmentation/unet
DRIVE数据集下载地址 :百度云链接: https://pan.baidu.com/s/1Tjkrx2B9FgoJk0KviA-rDw 密码: 8no8
unet源码:
  ├── src: 搭建U-Net模型代码
  ├── train_utils: 训练、验证以及多GPU训练相关模块
  ├── my_dataset.py: 自定义dataset用于读取DRIVE数据集(视网膜血管分割)
  ├── train.py: 以单GPU为例进行训练
  ├── train_multi_GPU.py: 针对使用多GPU的用户使用
  ├── predict.py: 简易的预测脚本,使用训练好的权重进行预测测试
  └── compute_mean_std.py: 统计数据集各通道的均值和标准差
DRIVE数据集:
test:
        1st_manual目录:标注图片,金标准
        2nd_manual目录:标注图片,验证
        images目录:用于分割的原图片
        mask目录:分割区域,
training:
        1st_manual目录:标注图片
        images目录:用于分割的原图片
        mask目录:分割区域
改进的U-Net网络模型:

(1) U-Net网络模型代码
unet.py
from typing import Dict
import torch
import torch.nn as nn
import torch.nn.functional as F

# 在uent中卷积一般成对使用
class DoubleConv(nn.Sequential):
    # 输入通道数, 输出通道数, mid_channels为成对卷积中第一个卷积层的输出通道数
    def __init__(self, in_channels, out_channels, mid_channels=None):
        if mid_channels is None:
            mid_channels = out_channels
        super(DoubleConv, self).__init__(
            # 3*3卷积,填充为1,卷积之后输入输出的特征图大小一致
            nn.Conv2d(in_channels, mid_channels, kernel_size=3, padding=1, bias=False),
            nn.BatchNorm2d(mid_channels),
            nn.ReLU(inplace=True),
            nn.Conv2d(mid_channels, out_channels, kernel_size=3, padding=1, bias=False),
            nn.BatchNorm2d(out_channels),
            nn.ReLU(inplace=True)
        )

# 下采样
class Down(nn.Sequential):
    def __init__(self, in_channels, out_channels):
        super(Down, self).__init__(
            # 1.最大池化的窗口大小为2, 步长为2
            nn.MaxPool2d(2, stride=2),
            # 2.两个卷积
            DoubleConv(in_channels, out_channels)
        )


# 上采样
class Up(nn.Module):
    # bilinear是否采用双线性插值
    def __init__(self, in_channels, out_channels, bilinear=True):
        super(Up, self).__init__()
        if bilinear:
            # 使用双线性插值上采样
            # 上采样率为2,双线性插值模式
            self.up = nn.Upsample(scale_factor=2, mode='bilinear', align_corners=True)
            self.conv = DoubleConv(in_channels, out_channels, in_channels // 2)
        else:
            # 使用转置卷积上采样
            self.up = nn.ConvTranspose2d(in_channels, in_channels // 2, kernel_size=2, stride=2)
            self.conv = DoubleConv(in_channels, out_channels)

    def forward(self, x1: torch.Tensor, x2: torch.Tensor) -> torch.Tensor:
        x1 = self.up(x1)
        # [N, C, H, W]
        # 上采样之后的特征图与要拼接的特征图,高度方向的差值
        diff_y = x2.size()[2] - x1.size()[2]
        # 上采样之后的特征图与要拼接的特征图,宽度方向的差值
        diff_x = x2.size()[3] - x1.size()[3]

        # padding_left, padding_right, padding_top, padding_bottom
        # 1.填充差值
        x1 = F.pad(x1, [diff_x // 2, diff_x - diff_x // 2,
                        diff_y // 2, diff_y - diff_y // 2])

        # 2.拼接
        x = torch.cat([x2, x1], dim=1)
        # 3.两个卷积
        x = self.conv(x)
        return x

# 最后的1*1输出卷积
class OutConv(nn.Sequential):
    def __init__(self, in_channels, num_classes):
        super(OutConv, self).__init__(
            nn.Conv2d(in_channels, num_classes, kernel_size=1)
        )


# unet网络模型
class UNet(nn.Module):
    # 参数: 输入通道数, 分割任务个数, 是否使用双线插值, 网络中第一个卷积通道个数
    def __init__(self,
                 in_channels: int = 1,
                 num_classes: int = 2,
                 bilinear: bool = True,
                 base_c: int = 64):
        super(UNet, self).__init__()
        self.in_channels = in_channels
        self.num_classes = num_classes
        self.bilinear = bilinear

        self.in_conv = DoubleConv(in_channels, base_c)
        # 下采样,参数:输入通道,输出通道
        self.down1 = Down(base_c, base_c * 2)
        self.down2 = Down(base_c * 2, base_c * 4)
        self.down3 = Down(base_c * 4, base_c * 8)
        # 如果采用双线插值上采样为 2,采用转置矩阵上采样为 1
        factor = 2 if bilinear else 1
        # 最后一个下采样,如果是双线插值则输出通道为512,否则为1024
        self.down4 = Down(base_c * 8, base_c * 16 // factor)
        # 上采样,参数:输入通道,输出通道
        self.up1 = Up(base_c * 16, base_c * 8 // factor, bilinear)
        self.up2 = Up(base_c * 8, base_c * 4 // factor, bilinear)
        self.up3 = Up(base_c * 4, base_c * 2 // factor, bilinear)
        self.up4 = Up(base_c * 2, base_c, bilinear)
        # 最后的1*1输出卷积
        self.out_conv = OutConv(base_c, num_classes)

    # 正向传播过程
    def forward(self, x: torch.Tensor) -> Dict[str, torch.Tensor]:
        # 1. 定义最开始的两个卷积层
        x1 = self.in_conv(x)
        # 2. contracting path(收缩路径)
        x2 = self.down1(x1)
        x3 = self.down2(x2)
        x4 = self.down3(x3)
        x5 = self.down4(x4)
        # 3. expanding path(扩展路径)
        x = self.up1(x5, x4)
        x = self.up2(x, x3)
        x = self.up3(x, x2)
        x = self.up4(x, x1)
        # 4. 最后1*1输出卷积
        logits = self.out_conv(x)

        return {"out": logits}
(2)加载数据集
my_dataset.py
import os
from PIL import Image
import numpy as np
from torch.utils.data import Dataset

# 载入数据集,继承Dataset类
class DriveDataset(Dataset):
    # 获取文件路劲。参数:根目录, T 载入训练集/F 测试集, 数据预处理方式
    def __init__(self, root: str, train: bool, transforms=None):
        super(DriveDataset, self).__init__()
        # train为 T,flag为training,否则为test
        self.flag = "training" if train else "test"
        data_root = os.path.join(root, "DRIVE", self.flag)
        # 判断路径是否存在
        assert os.path.exists(data_root), f"path '{data_root}' does not exists."
        self.transforms = transforms
        # 遍历data_root下的images目录,得到以.tif结尾的文件名称
        img_names = [i for i in os.listdir(os.path.join(data_root, "images")) if i.endswith(".tif")]
        # 获取文件路径
        self.img_list = [os.path.join(data_root, "images", i) for i in img_names]
        self.manual = [os.path.join(data_root, "1st_manual", i.split("_")[0] + "_manual1.gif")
                       for i in img_names]
        # check files
        for i in self.manual:
            if os.path.exists(i) is False:
                raise FileNotFoundError(f"file {i} does not exists.")

        self.roi_mask = [os.path.join(data_root, "mask", i.split("_")[0] + f"_{self.flag}_mask.gif")
                         for i in img_names]
        # check files
        for i in self.roi_mask:
            if os.path.exists(i) is False:
                raise FileNotFoundError(f"file {i} does not exists.")

    #
    def __getitem__(self, idx):
        # 转化为RGB灰度图片
        img = Image.open(self.img_list[idx]).convert('RGB')
        manual = Image.open(self.manual[idx]).convert('L')
        # 前景区域像素值变为1,背景区域像素值变为0
        manual = np.array(manual) / 255
        roi_mask = Image.open(self.roi_mask[idx]).convert('L')
        # 感兴趣的区域像素值变为0,不感兴趣的区域像素值变为255
        roi_mask = 255 - np.array(roi_mask)
        mask = np.clip(manual + roi_mask, a_min=0, a_max=255)

        # 这里转回PIL的原因是,transforms中是对PIL数据进行处理
        mask = Image.fromarray(mask)

        if self.transforms is not None:
            # 进行图片预处理
            img, mask = self.transforms(img, mask)

        return img, mask

    def __len__(self):
        # 返回用于分割的原图片个数
        return len(self.img_list)

    @staticmethod
    def collate_fn(batch):
        images, targets = list(zip(*batch))
        batched_imgs = cat_list(images, fill_value=0)
        batched_targets = cat_list(targets, fill_value=255)
        return batched_imgs, batched_targets


def cat_list(images, fill_value=0):
    max_size = tuple(max(s) for s in zip(*[img.shape for img in images]))
    batch_shape = (len(images),) + max_size
    batched_imgs = images[0].new(*batch_shape).fill_(fill_value)
    for img, pad_img in zip(images, batched_imgs):
        pad_img[..., :img.shape[-2], :img.shape[-1]].copy_(img)
    return batched_imgs
(3)训练和评估
Dice similarity coefficient用于衡量两个集合的相似性,是分割网络中最常用的评价指标之一。
计算公式:
Dice计算过程:
预测前景gailv矩阵X和前景标签矩阵进行数乘,再除以两个矩阵所有元素之和。如下图:


构建前景和背景GT标签过程:
我们在计算dice,应该分别根据前景和背景分别计算一个dice系数。因此需要分别构建前景和背景GT标签。

在GT标签中元素0为背景区域,1为前景区域,255为应该被忽略的区域(不感兴趣的区域)。将首先,所有的255元素变为0,然后进行one-hot操作,通道为0的矩阵所有为0的元素变为1,所有为1的元素变为0,得到background GT。通道为1的矩阵,元素不变,得到foreground GT。
前景和背景GT标签构建 + Dice计算 + Dice_Loss计算代码实现:
dice_coefficient_loss.py(前景和背景GT标签构建 + Dice计算 + Dice_Loss计算)
import torch
import torch.nn as nn

# 构建前景和背景GT标签
def build_target(target: torch.Tensor, num_classes: int = 2, ignore_index: int = -100):
    """build target for dice coefficient"""
    dice_target = target.clone()
    # 是否有255元素
    if ignore_index >= 0:
        ignore_mask = torch.eq(target, ignore_index)
        # 将所有的255元素变为0
        dice_target[ignore_mask] = 0
        # [N, H, W] -> [N, H, W, C]
        # 2个通道,通道为0的矩阵所有0变1,1变0。通道为1的矩阵元素不变
        dice_target = nn.functional.one_hot(dice_target, num_classes).float()
        # 将255元素复原
        dice_target[ignore_mask] = ignore_index
    else:
        dice_target = nn.functional.one_hot(dice_target, num_classes).float()

    return dice_target.permute(0, 3, 1, 2)


def dice_coeff(x: torch.Tensor, target: torch.Tensor, ignore_index: int = -100, epsilon=1e-6):
    # Average of Dice coefficient for all batches, or for a single mask
    # 计算一个batch中所有图片某个类别的dice_coefficient
    d = 0.
    batch_size = x.shape[0]
    for i in range(batch_size):
        x_i = x[i].reshape(-1)
        t_i = target[i].reshape(-1)
        if ignore_index >= 0:
            # 找出mask中不为ignore_index的区域
            roi_mask = torch.ne(t_i, ignore_index)
            x_i = x_i[roi_mask]
            t_i = t_i[roi_mask]
        inter = torch.dot(x_i, t_i)
        sets_sum = torch.sum(x_i) + torch.sum(t_i)
        if sets_sum == 0:
            sets_sum = 2 * inter

        d += (2 * inter + epsilon) / (sets_sum + epsilon)

    return d / batch_size


def multiclass_dice_coeff(x: torch.Tensor, target: torch.Tensor, ignore_index: int = -100, epsilon=1e-6):
    """Average of Dice coefficient for all classes"""
    dice = 0.
    for channel in range(x.shape[1]):
        dice += dice_coeff(x[:, channel, ...], target[:, channel, ...], ignore_index, epsilon)

    return dice / x.shape[1]

# 计算dice_loss
def dice_loss(x: torch.Tensor, target: torch.Tensor, multiclass: bool = False, ignore_index: int = -100):
    # Dice loss (objective to minimize) between 0 and 1
    x = nn.functional.softmax(x, dim=1)
    fn = multiclass_dice_coeff if multiclass else dice_coeff
    return 1 - fn(x, target, ignore_index=ignore_index)
train_and_eval.py(训练 + 评估)
import torch
from torch import nn
import train_utils.distributed_utils as utils
from .dice_coefficient_loss import dice_loss, build_target

# dice计算 + dice_loss计算
def criterion(inputs, target, loss_weight=None, num_classes: int = 2, dice: bool = True, ignore_index: int = -100):
    losses = {}
    for name, x in inputs.items():
        # 忽略target中值为255的像素,255的像素是目标边缘或者padding填充
        loss = nn.functional.cross_entropy(x, target, ignore_index=ignore_index, weight=loss_weight)
        if dice is True:
            dice_target = build_target(target, num_classes, ignore_index)
            # dice_loss
            loss += dice_loss(x, dice_target, multiclass=True, ignore_index=ignore_index)
        losses[name] = loss

    if len(losses) == 1:
        return losses['out']

    return losses['out'] + 0.5 * losses['aux']

# 评估
def evaluate(model, data_loader, device, num_classes):
    model.eval()
    confmat = utils.ConfusionMatrix(num_classes)
    dice = utils.DiceCoefficient(num_classes=num_classes, ignore_index=255)
    metric_logger = utils.MetricLogger(delimiter="  ")
    header = 'Test:'
    with torch.no_grad():
        for image, target in metric_logger.log_every(data_loader, 100, header):
            image, target = image.to(device), target.to(device)
            output = model(image)
            output = output['out']

            confmat.update(target.flatten(), output.argmax(1).flatten())
            # dice验证指标
            dice.update(output, target)

        confmat.reduce_from_all_processes()
        dice.reduce_from_all_processes()

    return confmat, dice.value.item()

# 训练一个轮回
def train_one_epoch(model, optimizer, data_loader, device, epoch, num_classes,
                    lr_scheduler, print_freq=10, scaler=None):
    model.train()
    metric_logger = utils.MetricLogger(delimiter="  ")
    metric_logger.add_meter('lr', utils.SmoothedValue(window_size=1, fmt='{value:.6f}'))
    header = 'Epoch: [{}]'.format(epoch)

    if num_classes == 2:
        # 设置cross_entropy中背景和前景的loss权重(根据自己的数据集进行设置)
        loss_weight = torch.as_tensor([1.0, 2.0], device=device)
    else:
        loss_weight = None

    for image, target in metric_logger.log_every(data_loader, print_freq, header):
        image, target = image.to(device), target.to(device)
        with torch.cuda.amp.autocast(enabled=scaler is not None):
            output = model(image)
            loss = criterion(output, target, loss_weight, num_classes=num_classes, ignore_index=255)

        optimizer.zero_grad()
        if scaler is not None:
            scaler.scale(loss).backward()
            scaler.step(optimizer)
            scaler.update()
        else:
            loss.backward()
            optimizer.step()

        lr_scheduler.step()

        lr = optimizer.param_groups[0]["lr"]
        metric_logger.update(loss=loss.item(), lr=lr)

    return metric_logger.meters["loss"].global_avg, lr


def create_lr_scheduler(optimizer,
                        num_step: int,
                        epochs: int,
                        warmup=True,
                        warmup_epochs=1,
                        warmup_factor=1e-3):
    assert num_step > 0 and epochs > 0
    if warmup is False:
        warmup_epochs = 0

    def f(x):
        """
        根据step数返回一个学习率倍率因子,
        注意在训练开始之前,pytorch会提前调用一次lr_scheduler.step()方法
        """
        if warmup is True and x <= (warmup_epochs * num_step):
            alpha = float(x) / (warmup_epochs * num_step)
            # warmup过程中lr倍率因子从warmup_factor -> 1
            return warmup_factor * (1 - alpha) + alpha
        else:
            # warmup后lr倍率因子从1 -> 0
            # 参考deeplab_v2: Learning rate policy
            return (1 - (x - warmup_epochs * num_step) / ((epochs - warmup_epochs) * num_step)) ** 0.9

    return torch.optim.lr_scheduler.LambdaLR(optimizer, lr_lambda=f)
4. 测试结果

:类别 i 被预测成类别 j 的像素个数(预测正确的部分)
:目标类别个数(包含背景)
:目标类别 i 的总像素个数(真实标签)
使用DIRVE数据集进行训练和测试结果:

通过测试预测的分割结果图片:
