一、官方地址:
https://developer.android.google.cn/reference/kotlin/android/widget/RelativeLayout?hl=en
二、概述
相对布局(RelativeLayout)是一种根据父容器和兄弟控件作为参照来确定控件位置的布局方式
三、基本格式
<RelativeLayout xmlns:android="http://schemas.android.com/apk/res/android"
    xmlns:app="http://schemas.android.com/apk/res-auto"
    xmlns:tools="http://schemas.android.com/tools"
    android:layout_width="match_parent"
    android:layout_height="match_parent"
    tools:context=".MainActivity">
 ....

</RelativeLayout>
四、根据父容器定位
android:layout_alignParentLeft="true" 父容器左边
android:layout_alignParentRight="true" 父容器右边
android:layout_alignParentTop="true" 父容器顶部
android:layout_alignParentBottom="true" 父容器底部
android:layout_centerHorizontal="true" 水平方向居中
android:layout_centerVertical="true" 垂直方向居中
android:layout_centerInParent="true" 水平垂直都居中
示例一:
android:layout_alignParentRight="true"
android:layout_alignParentTop="true"
该控件处于父容器右上角
示例二:
android:layout_alignParentLeft="true"
android:layout_centerVertical="true"
该控件处于父容器左边垂直居中位置
五、根据兄弟控件定位
android:layout_toLeftOf="@+id/button1"    在button1控件左方
android:layout_toRightOf="@+id/button1"   在button1控件右方
android:layout_above="@+id/button1"       在button1控件上方
android:layout_below="@+id/button1"       在button1控件下方
android:layout_alignLeft="@+id/button1"   与button1控件左边平齐
android:layout_alignRight="@+id/button1"  与button1控件右边平齐
android:layout_alignTop="@+id/button1"    与button1控件上边平齐
android:layout_alignBottom="@+id/button1" 与button1控件下边平齐
示例一:
android:layout_toLeftOf="@+id/button1"
android:layout_below="@+id/button1"
控件处于button1的左下方位置
示例二:
android:layout_toLeftOf="@+id/button1" 和layout_alignTop="@+id/button1"
该控件处于button1的正左方
六、示例
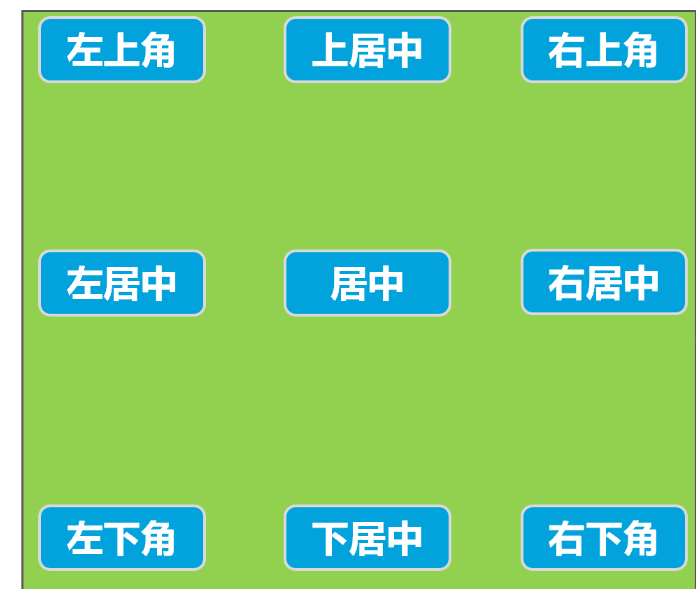
一、根据父元素定位九个button

<RelativeLayout xmlns:android="http://schemas.android.com/apk/res/android"
xmlns:app="http://schemas.android.com/apk/res-auto"
xmlns:tools="http://schemas.android.com/tools"
android:layout_width="match_parent"
android:layout_height="match_parent"
tools:context=".activity.RelativeLayoutActivity"
>
<Button
android:layout_width="wrap_content"
android:layout_height="wrap_content"
android:layout_margin="20dp"
android:text="左上角">
</Button>
<Button
android:layout_width="wrap_content"
android:layout_height="wrap_content"
android:layout_margin="20dp"
android:layout_alignParentRight="true"
android:text="右上角">
</Button>
<Button
android:layout_width="wrap_content"
android:layout_height="wrap_content"
android:layout_margin="20dp"
android:layout_centerHorizontal="true"
android:text="水平居中">
</Button>
<Button
android:layout_width="wrap_content"
android:layout_height="wrap_content"
android:layout_margin="20dp"
android:layout_centerVertical="true"
android:text="左居中">
</Button>
<Button
android:layout_width="wrap_content"
android:layout_height="wrap_content"
android:layout_margin="20dp"
android:layout_centerInParent="true"
android:text="居中">
</Button>
<Button
android:layout_width="wrap_content"
android:layout_height="wrap_content"
android:layout_margin="20dp"
android:layout_alignParentRight="true"
android:layout_centerVertical="true"
android:text="右居中">
</Button>
<Button
android:layout_width="wrap_content"
android:layout_height="wrap_content"
android:layout_margin="20dp"
android:layout_alignParentBottom="true"
android:text="左下角">
</Button>
<Button
android:layout_width="wrap_content"
android:layout_height="wrap_content"
android:layout_margin="20dp"
android:layout_alignParentBottom="true"
android:layout_centerHorizontal="true"
android:text="下居中">
</Button>
<Button
android:layout_width="wrap_content"
android:layout_height="wrap_content"
android:layout_margin="20dp"
android:layout_alignParentBottom="true"
android:layout_alignParentRight="true"
android:text="右下角">
</Button>
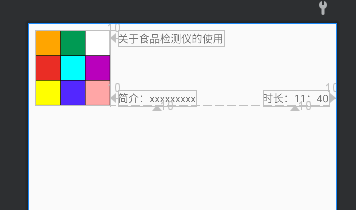
</RelativeLayout>二、根据兄弟控件定位
<RelativeLayout xmlns:android="http://schemas.android.com/apk/res/android"
    xmlns:app="http://schemas.android.com/apk/res-auto"
    xmlns:tools="http://schemas.android.com/tools"
    android:layout_width="match_parent"
    android:layout_height="match_parent"
    tools:context=".activity.RelativeLayoutBrotherActivity"
    >

    <ImageView
        android:id="@+id/imageView"
        android:layout_width="100dp"
        android:layout_height="100dp"
        android:layout_marginTop="@dimen/dp_10"
        android:layout_marginLeft="10dp"
        android:background="#ff0000"
        tools:srcCompat="@drawable/magic" />

    <TextView
        android:id="@+id/textView"
        android:layout_width="wrap_content"
        android:layout_height="wrap_content"
        android:layout_alignTop="@id/imageView"
        android:layout_toRightOf="@+id/imageView"
        android:layout_marginLeft="10dp"
        android:text="关于食品检测仪的使用" />

    <TextView
        android:id="@+id/textView2"
        android:layout_width="wrap_content"
        android:layout_height="wrap_content"
        android:layout_toRightOf="@id/imageView"
        android:layout_alignBottom="@id/imageView"
        android:layout_marginLeft="10dp"
        android:text="简介:xxxxxxxxx" />

    <TextView
        android:id="@+id/textView3"
        android:layout_width="wrap_content"
        android:layout_height="wrap_content"
        android:layout_alignBottom="@id/imageView"
        android:layout_alignParentRight="true"
        android:layout_marginRight="10dp"
        android:text="时长:11:40" />
</RelativeLayout>


![P1045 [NOIP2003 普及组] 麦森数](https://img-blog.csdnimg.cn/img_convert/db0982748b792a85823a9de3033031f4.png)