提示:文章写完后,目录可以自动生成,如何生成可参考右边的帮助文档
文章目录
- 前言
- 一、cache是什么?
- 二、使用步骤
- 1.使用方式
- 1.引入依赖
- 2.搭建项目依赖问题
- application.yml
- TestController
- TestService
- TestServiceImpl
- UserMapper
- MyRedisConfig
- userMapper
- MybatisTest
- 总结
前言
提示:这里可以添加本文要记录的大概内容:
springboot整合cache+redis
提示:以下是本篇文章正文内容,下面案例可供参考
一、cache是什么?
示例:springboot的缓存,提高了生产效率问题
二、使用步骤
1.使用方式
1.引入依赖
必须引入 cache2.2 和 redis依赖 2.2
否则会出现异常
  <dependencies>
        <dependency>
            <groupId>org.springframework.boot</groupId>
            <artifactId>spring-boot-starter-web</artifactId>
            <version>2.7.7</version>
        </dependency>
        <!-- https://mvnrepository.com/artifact/org.springframework.boot/spring-boot-starter-cache -->
        <dependency>
            <groupId>org.springframework.boot</groupId>
            <artifactId>spring-boot-starter-cache</artifactId>
            <version>2.6.6</version>
        </dependency>


        <dependency>
            <groupId>org.springframework.boot</groupId>
            <artifactId>spring-boot-starter-web</artifactId>
            <version>2.7.7</version>
        </dependency>

        <dependency>
            <groupId>mysql</groupId>
            <artifactId>mysql-connector-java</artifactId>
            <version>8.0.28</version>
        </dependency>

        <dependency>
            <groupId>org.mybatis.spring.boot</groupId>
            <artifactId>mybatis-spring-boot-starter</artifactId>
            <version>2.2.2</version>
        </dependency>

        <dependency>
            <groupId>org.springframework.boot</groupId>
            <artifactId>spring-boot-starter-test</artifactId>
            <version>2.7.7</version>
        </dependency>

        <dependency>
            <groupId>org.springframework.boot</groupId>
            <artifactId>spring-boot-starter-data-redis</artifactId>
            <version>2.6.6</version>
        </dependency>

        <dependency>
            <groupId>junit</groupId>
            <artifactId>junit</artifactId>
            <version>4.13.2</version>
            <scope>test</scope>
        </dependency>
    </dependencies>
2.搭建项目依赖问题
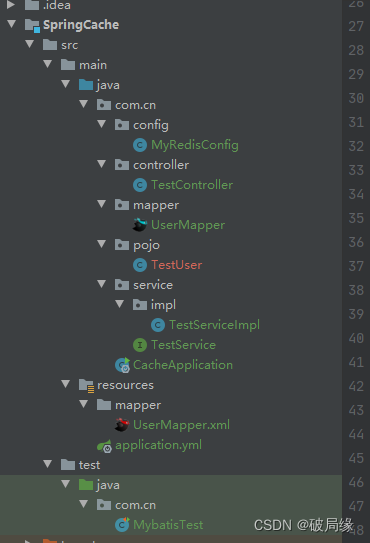
application.yml
server:
  port: 10001
spring:
  #解决循环依赖
  main:
    allow-circular-references: true
  #链接redis
  redis:
    host: 192.168.47.128
    port: 6379
  # 缓存类型
  cache:
    #缓存的时间
    redis:
      time-to-live: 180000
    type: redis
  datasource:
    url: jdbc:mysql://192.168.47.128:3306/test?useUnicode=true&characterEncoding=utf-8&useSSL=true&serverTimezone=UTC
    username: root
    password: 123456
    driver-class-name: com.mysql.jdbc.Driver
mybatis:
  mapper-locations: classpath:mapper/UserMapper.xml
  type-aliases-package: com.cn.pojo
  configuration:
    log-impl: org.apache.ibatis.logging.stdout.StdOutImpl
#showSql
logging:
  level:
    com:
      example:
        mapper : debug
注意在修改的时候返回值必须是对象类型,否则会发现错误信息
TestController
import com.cn.pojo.TestUser;
import com.cn.service.TestService;
import org.springframework.beans.factory.annotation.Autowired;
import org.springframework.web.bind.annotation.*;


@RestController
@RequestMapping("cache")
public class TestController {

    @Autowired
    private TestService testService;


    /**
     * 查询ID、信息
     * @param id
     * @return
     * 测试的方式
     * 1.发起请求第一从数据库中查询数据
     * 2.发起请求第二次从redis中查询数据
     */
    @GetMapping("/cacheFindById/{id}")
    public TestUser cacheFindById(@PathVariable("id") String id){
       TestUser user =testService.cacheFindById(id);
       return user;
    }

    /**
     * 更行成功
     * @param testUser
     * @return
     * 1.发送更新请求
     * 2.发送查询请求
     * 3.检查是否修改后的数据
     */
    @PostMapping("/cacheUpdate")
    public TestUser cacheUpdate(@RequestBody TestUser testUser){
        testService.cacheUpdate(testUser);
        return testUser;
    }

    /**
     * 删除
     * @param id
     * @return
     */
    @DeleteMapping("cacheDelete/{id}")
    public String cacheDelete(@PathVariable("id") String id ){
       int i =testService.cacheDelete(id);
       return "成功";
    }


}
TestService
public interface TestService {

    /**
     * value 存储空间
     * key 参数名称
     * 多个参数 通过+方式进行拼接 列如#id+#name
     * @param id
     * @return
     * unless 用于否决缓存的,不像condition,该表达式只在方 法执行之后判断,此时可以拿到返回值result进行判断。条件为true不会缓存,fasle才缓存
     */
    @Cacheable(value = "cacheFindById",key = "#id",unless = "#result==null")
    TestUser cacheFindById(String id);

    @CachePut(value = "cacheFindById",key = "#result.id")
    TestUser cacheUpdate(TestUser testUser);

    /**
     * 参数的说明方式
     * 出现异常是否清除缓存
     * beforeInvocation = true
     * 是否清除所有缓存
     * allEntries = true
     * @param id
     * @return
     */
    @CacheEvict(value = "cacheFindById",key = "#id")
    int cacheDelete(String id);

}
TestServiceImpl
import com.cn.mapper.UserMapper;
import com.cn.pojo.TestUser;
import com.cn.service.TestService;
import org.slf4j.Logger;
import org.slf4j.LoggerFactory;
import org.springframework.beans.factory.annotation.Autowired;
import org.springframework.cache.annotation.CacheConfig;
import org.springframework.stereotype.Service;


@Service
@CacheConfig
public class TestServiceImpl implements TestService {

    @Autowired
    private UserMapper userMapper;

    private Logger log = LoggerFactory.getLogger(TestServiceImpl.class);

    /**
     * 根据id查询方式
     * @param id
     * @return
     */
    @Override
    public TestUser cacheFindById(String id) {
        log.info("数据库查询方式,{}",id);
        System.out.println("查询ID为"+id);
        TestUser testUser =userMapper.cacheFindById(id);
        return testUser;
    }

    /**
     * 更新
     * @param testUser
     * @return
     */
    @Override
    public TestUser cacheUpdate(TestUser testUser) {
        userMapper.cacheUpdate(testUser);
        log.info("数据更行");
        return testUser;
    }

    /**
     * 删除
     * @param id
     * @return
     */
    @Override
    public int cacheDelete(String id) {
        int i=userMapper.cacheDelete(id);
        log.info("数据删除");
        return i;
    }


}
UserMapper
import com.cn.pojo.TestUser;

import java.util.List;

public interface UserMapper{

    List<TestUser> selectList();

    void BatchList(List<TestUser> testUserList);

    void cacheUpdate(TestUser testUser);

    int cacheDelete(String id);

    TestUser cacheFindById(String id);
}
出现乱码

MyRedisConfig
解决redis出现乱码问题
import com.cn.pojo.TestUser;
import org.springframework.context.annotation.Bean;
import org.springframework.context.annotation.Configuration;
import org.springframework.context.annotation.Primary;
import org.springframework.data.redis.cache.RedisCacheConfiguration;
import org.springframework.data.redis.cache.RedisCacheManager;
import org.springframework.data.redis.connection.RedisConnectionFactory;
import org.springframework.data.redis.core.RedisTemplate;
import org.springframework.data.redis.serializer.Jackson2JsonRedisSerializer;
import org.springframework.data.redis.serializer.RedisSerializationContext;
import org.springframework.data.redis.serializer.StringRedisSerializer;

@Configuration
public class MyRedisConfig {


    //Department的Redis序列化器
    @Bean
    public RedisTemplate<Object, TestUser> deptRedisTemplate(RedisConnectionFactory redisConnectionFactory) {
        RedisTemplate<Object, TestUser> template = new RedisTemplate<>();
        Jackson2JsonRedisSerializer<TestUser> serializer = new Jackson2JsonRedisSerializer<TestUser>(TestUser.class);
        //根据源码查看可以自定义设置默认的序列化器
        template.setDefaultSerializer(serializer);
        template.setConnectionFactory(redisConnectionFactory);
        return template;
    }

    /**
     * 针对于Employee序列化的RedisCacheManager
     * @Bean 默认使用方法名作为bean的id
     * @param redisConnectionFactory
     * @return
     */
    @Primary
    @Bean
    public RedisCacheManager redisCacheManager(RedisConnectionFactory redisConnectionFactory){
        RedisCacheConfiguration configuration = RedisCacheConfiguration.defaultCacheConfig()
                //配置对key的序列化,这里使用string来序列化
                .serializeKeysWith(RedisSerializationContext.SerializationPair.fromSerializer(new StringRedisSerializer()))
                //配置对value的序列化,使用jsong来序列化
                .serializeValuesWith(RedisSerializationContext.SerializationPair.fromSerializer(new Jackson2JsonRedisSerializer<TestUser>(TestUser.class)))
                //不保存null值的缓存
                .disableCachingNullValues()
                //设置key的前缀 默认为: prefix + cache name + "::" + cache entry key
                .prefixCacheNameWith("->");

        RedisCacheManager cacheManager = RedisCacheManager.builder(redisConnectionFactory)
                //配置RedisCacheManager的相关配置信息并将缓存中的内容和spring中的事务同步
                .cacheDefaults(configuration).transactionAware().build();

        return cacheManager;
    }
}
userMapper
<?xml version="1.0" encoding="UTF-8"?>
<!DOCTYPE mapper PUBLIC "-//mybatis.org//DTD Mapper 3.0//EN" "http://mybatis.org/dtd/mybatis-3-mapper.dtd">
<mapper namespace="com.cn.mapper.UserMapper">

    <insert id="BatchList" useGeneratedKeys="true" keyColumn="id" keyProperty="id">
        INSERT INTO test_user (
        id,
        name,
        username,
        password,
        address
        ) VALUES
        <foreach item="data" collection="list" separator=",">
            (
            #{data.id},
            #{data.name},
            #{data.username},
            #{data.password},
            #{data.address}
            )
        </foreach>
    </insert>
    <update id="cacheUpdate">
          update test_user
            set
        <if test=" id !=null and id != '' ">
        id   = #{id},
        </if>
        name = #{name},
        username      = #{username},
        password  = #{password},
        address       = #{address}
    where id = #{id};
    </update>
    <delete id="cacheDelete">
        delete from test_user where id=#{id}
    </delete>


    <select id="selectList" resultType="com.cn.pojo.TestUser">
        select * from test_user
    </select>
    <select id="cacheFindById" resultType="com.cn.pojo.TestUser">
        select * from test_user where id =#{id}
    </select>
</mapper>
MybatisTest
import com.cn.mapper.UserMapper;
import com.cn.pojo.TestUser;
import org.junit.Test;
import org.junit.runner.RunWith;
import org.slf4j.Logger;
import org.slf4j.LoggerFactory;
import org.springframework.beans.factory.annotation.Autowired;
import org.springframework.boot.test.context.SpringBootTest;
import org.springframework.data.redis.core.RedisTemplate;
import org.springframework.data.redis.core.StringRedisTemplate;
import org.springframework.test.context.junit4.SpringRunner;
import org.springframework.util.StopWatch;

import java.util.ArrayList;
import java.util.List;

@SpringBootTest
@RunWith(SpringRunner.class)
public class MybatisTest {


    @Autowired
    private UserMapper userMapper;


    @Autowired
    private StringRedisTemplate stringRedisTemplate;

    @Autowired
    private RedisTemplate<Object,TestUser> redisTemplate;

    private  Logger log = LoggerFactory.getLogger(MybatisTest.class);

    @Test
    public void test(){
        StopWatch stopWatch = new StopWatch();
        stopWatch.start();
        List<TestUser> testUserList = new ArrayList<>();
        for (int i = 0; i <100000 ; i++) {
            TestUser testUser = new TestUser();
            testUser.setId(10000+i+"");
            testUser.setAddress("陕西北京"+i);
            testUser.setName("天天"+i);
            testUser.setPassword("123456"+i);
            testUser.setUsername("123456");
            testUserList.add(testUser);
        }
        stopWatch.stop();
        long lastTaskTimeMillis = stopWatch.getLastTaskTimeMillis();
        long totalTimeMillis = stopWatch.getTotalTimeMillis();
        log.info("时间"+lastTaskTimeMillis,lastTaskTimeMillis);
        log.debug("时间",lastTaskTimeMillis);
        System.out.println("lastTaskTimeMillis="+lastTaskTimeMillis);
        System.out.println("totalTimeMillis="+totalTimeMillis);
    }


    /**
     * 测试redis是否序列化
     */
    @Test
    public void redisIO(){
        TestUser testUser = new TestUser();
        testUser.setUsername("123");
        testUser.setPassword("234");
        testUser.setName("234");
        testUser.setAddress("sdf");
        testUser.setAddress("1");
        redisTemplate.opsForValue().set("emp",testUser);
    }


}
测试的url
保存
http://localhost:10001/cache/cacheUpdate
//查询
http://localhost:10001/cache/cacheFindById/15
总结
提示:这里对文章进行总结:
例如:以上就是今天要讲的内容,本文仅仅简单介绍了pandas的使用,而pandas提供了大量能使我们快速便捷地处理数据的函数和方法。








![[陇剑杯 2021]之Misc篇(NSSCTF)刷题记录④](https://img-blog.csdnimg.cn/70ede0abb56241d480e636535a33db45.png)
