目录
1. Spring Security详细介绍
2. Spring Security详细使用
3. Spring Security实现JWT token验证
4. JWT(JSON Web Token,JSON令牌)
5. Spring Security安全注解
认证流程
1.集中式认证流程
(1)用户认证
使用UsernamePasswordAuthenticationFilter过滤器中attemptAuthentication方法实现认证功能,该过滤器父类中successfulAuthentication方法实现认证成功后的操作
(2)身份校验
使用BasicAuthenticationFilter过滤器中doFilterInternal方法验证是否登录,以决定能否进入后续过滤器。
2.分布式认证流程
(1)用户认证
由于分布式项目,多数是前后端分离的架构设计,要满足可以接受异步post的认证请求参数,需要修改UsernamePasswordAuthenticationFilter过滤器中attemptAuthentication方法,让其能够接收请求体。另外,默认successfulAuthentication方法在认证通过后,是把用户信息直接放入session就完事了,现在我们需要修改这个方法,在认证通过后生成token并返回给用户。
(2)身份校验
原来BasicAuthenticationFilter过滤器中doFilterInternal()方法校验用户是否登录,就是看session中是否有用户信息。修改为,验证用户携带的token是否合法,并解析出用户信息,交给Spring Security,以便于后续的授权功能可以正常使用。
基本使用Spring Security
1.引入Spring Security的依赖包
<dependency>
    <groupId>org.springframework.boot</groupId>
    <artifactId>spring-boot-starter-security</artifactId>
</dependency>
①:这个时候不在配置文件中做任何配置,随便写一个Controller
@RestController
public class HelloController {

    @GetMapping("/hello")
    public String hello() {
        return "hello";
    }
}
启动项目,会发现有这么一段日志

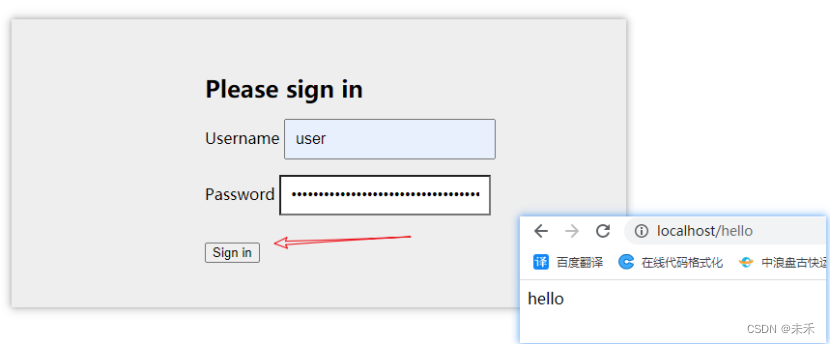
此时表示Security生效,默认对项目进行了保护,当访问该Controller中的接口,会见到如下登录界面
登录后才能访问/hello接口。默认用户名是user,而登录密码则在每次启动项目时随机生成,可以在项目启动日志中找到。
用户名:user
密码:日志中的“ab74417f-45d8-4645-825f-531919bacfcd”
输入之后,可以看到此时可以正常访问该接口
配置用户名和密码
如果对默认的用户名和密码不满意,可以在application.properties/yml中配置默认的用户名、密码和角色。这样项目启动后就不会随机生成密码了,而是使用配置的用户、密码,并且登录后还具有一个admin角色。
spring.security.user.name=hangge
spring.security.user.password=123
spring.security.user.roles=admin
②:添加一个Security配置类
/**
 *  WebSecurityConfigurerAdapter是Spring提供的对安全配置的适配器
 *  使用@EnableWebSecurity来开启Web安全
 */
@Configuration
@EnableWebSecurity
public class SecurityConfig extends WebSecurityConfigurerAdapter {

    /**
     * 重写configure方法来满足需求
     * 此处允许Basic登录
     */
    @Override
    protected void configure(HttpSecurity http) throws Exception {
        http.httpBasic()  // 允许Basic登录
                .and()
                .authorizeRequests()  // 对请求进行授权
                .anyRequest()  // 任何请求
                .authenticated();   // 都需要身份认证
    }
}
重启项目,访问/hello接口,输入用户凭证后结果一致。
2.配置Spring Security(安全信息)
@EnableWebSecurity注解:启用Web安全功能
其本身并没有什么用处,Spring Security的配置类还需实现WebSecurityConfigurer或继承WebSecurityConfigurerAdapter类(配置简单)
WebSecurityConfigurerAdapter类
通过重载该类的三个configure()方法来制定Web安全的细节
保护路径的配置方法
①configure(WebSecurity)
通过重载该方法,可配置Spring Security的Filter链
②configure(HttpSecurity)
通过重载该方法,可配置如何通过拦截器保护请求
| 方法 | 描述 |
|---|---|
| access(String) | 如果给定的SpEL表达式计算结果为true,就允许访问 |
| anonymous() | 允许匿名用户访问 |
| authenticated() | 允许认证过的用户访问 |
| denyAll() | 无条件拒绝所有访问 |
| fullyAuthenticated() | 如果用户是完整认证的话(不是通过Remember-me功能认证的),就允许访问 |
| hasAnyAuthority(String…) | 如果用户具备给定权限中的某一个的话,就允许访问 |
| hasAnyRole(String…) | 如果用户具备给定角色中的某一个的话,就允许访问 |
| hasAuthority(String) | 如果用户具备给定权限的话,就允许访问 |
| hasIpAddress(String) | 如果请求来自给定IP地址的话,就允许访问 |
| hasRole(String) | 如果用户具备给定角色的话,就允许访问 |
| not() | 对其他访问方法的结果求反 |
| permitAll() | 无条件允许访问 |
| rememberMe() | 如果用户是通过Remember-me功能认证的,就允许访问 |
Spring Security支持的所有SpEL表达式
| 安全表达式 | 计算结果 |
|---|---|
| authentication | 用户认证对象 |
| denyAll | 结果始终为false |
| hasAnyRole(list of roles) | 如果用户被授权指定的任意权限,结果为true |
| hasRole(role) | 如果用户被授予了指定的权限,结果 为true |
| hasIpAddress(IP Adress) | 用户地址 |
| isAnonymous() | 是否为匿名用户 |
| isAuthenticated() | 不是匿名用户 |
| isFullyAuthenticated | 不是匿名也不是remember-me认证 |
| isRemberMe() | remember-me认证 |
| permitAll | 始终true |
| principal | 用户主要信息对象 |
③configure(AuthenticationManagerBuilder)
通过重载该方法,可配置user-detail(用户详细信息)服务
配置用户详细信息的方法
| 方法 | 描述 |
|---|---|
| accountExpired(boolean) | 定义账号是否已经过期 |
| accountLocked(boolean) | 定义账号是否已经锁定 |
| and() | 用来连接配置 |
| authorities(GrantedAuthority…) | 授予某个用户一项或多项权限 |
| authorities(List) | 授予某个用户一项或多项权限 |
| authorities(String…) | 授予某个用户一项或多项权限 |
| credentialsExpired(boolean) | 定义凭证是否已经过期 |
| disabled(boolean) | 定义账号是否已被禁用 |
| password(String) | 定义用户的密码 |
| roles(String…) | 授予某个用户一项或多项角色 |
用户信息存储方式(三种)
(1)使用基于内存的用户存储
通过inMemoryAuthentication()方法,可以启用、配置并任意填充基于内存的用户存储。并且,可以调用withUser()方法为内存用户存储添加新的用户,这个方法的参数是username。withUser()方法返回的是UserDetailsManagerConfigurer.UserDetailsBuilder,这个对象提供了多个进一步配置用户的方法,包括设置用户密码的password()方法以及为给定用户授予一个或多个角色权限的roles()方法。需要注意的是,roles()方法是authorities()方法的简写形式。roles()方法所给定的值都会添加一个ROLE_前缀,并将其作为权限授予给用户。因此上诉代码用户具有的权限为:ROLE_USER,ROLE_ADMIN。而借助passwordEncoder()方法来指定一个密码转码器(encoder),可以对用户密码进行加密存储
(2)基于数据库表进行认证
用户数据通常会存储在关系型数据库中,并通过JDBC进行访问。为了配置Spring Security使用以JDBC为支撑的用户存储,可以使用jdbcAuthentication()方法,并配置他的DataSource,这样的话,就能访问关系型数据库
(3)基于LDAP进行认证
为了让Spring Security使用基于LDAP的认证,可以使用ldapAuthentication()方法
(1)内存用户
/**
 * WebSecurityConfigurerAdapter是Spring提供的对安全配置对适配器
 */
@Configuration
@EnableWebSecurity  // 使用@EnableWebSecurity来开启Web安全
public class SecurityConfig extends WebSecurityConfigurerAdapter {

	// 配置用户及其对应的角色
	@Override
	protected void configure(AuthenticationManagerBuilder auth) throws Exception {
		auth.inMemoryAuthentication()
		 .withUser("root").password("123").roles("ADMIN", "DBA")
		 .and()
		 .withUser("admin").password("123").roles("ADMIN", "USER")
		 .and()
		 .withUser("test").password("123").roles("USER");
	}

	/**
	* 配置URL访问权限。重写configure()来满足需求
	* @param http
	* @throws Exception
	*/
	@Override
	protected void configure(HttpSecurity http) throws Exception {
		http.authorizeRequests()  // 开启HttpSecurity配置
		.antMatchers("/admin/**").hasRole("ADMIN")  // admin/**模式URL必须具备ADMIN角色
		.antMatchers("/user/**").access("hasAnyRole('ADMIN','USER')")  // 该模式需要ADMIN或USER角色
		.antMatchers("/db/**").access("hasRole('ADMIN') and hasRole('DBA')")  // 需ADMIN和DBA角色
		.anyRequest().authenticated()  // 用户访问其它URL都必须认证后访问(登录后访问)
		.and()
		.formLogin() // 允许表单登录
		.loginPage("/login.html")  // 设置表单登录页
		.loginProcessingUrl("/login")  // 使用/login的url来处理表单登录请求
		.and()
		.authorizeRequests()  // 对请求进行授权
		.antMatchers("/index.html").permitAll()  // 对index.html页面放行
		.anyRequest()  // 任何请求
		.authenticated()  // 都需要身份认证
		.and()
		.csrf().disable();  // 关闭跨站请求伪造防护
	}

	/**
	* 指定密码的加密方式
	* 添加一个加密工具对bean,PasswordEncoder为接口
	* BCryptPasswordEncoder为实现类,也可以用其他加密实现类代替。如MD5等
	* @return
	*/
	@Bean
	public PasswordEncoder bCryptPasswordEncoder() {
		// 方式①:
		return new BCryptPasswordEncoder();

		// 方式②:
		return new PasswordEncoder() {
			@Override
			public String encode(CharSequence charSequence) {
				return charSequence.toString();
			}
			@Override
			public boolean matches(CharSequence charSequence, String s) {
				return Objects.equals(charSequence.toString(), s);
			}
		};

	}
}
HttpSecurity常用方法
| 方法 | 描述 |
|---|---|
| openidLogin() | 用于基于Open Id的验证 |
| headers() | 将安全标头添加到响应 |
| cors() | 配置跨域资源共享(CORS) |
| sessionManagement() | 允许配置会话管理 |
| portMapper() | 允许配置一个PortMapper(HttpSecurity#(getSharedObject(class))),其他提供SecurityConfigurer的对象使用 PortMapper 从 HTTP 重定向到 HTTPS 或者从 HTTPS 重定向到 HTTP。默认情况下,Spring Security使用一个PortMapperImpl映射 HTTP 端口8080到 HTTPS 端口8443,HTTP 端口80到 HTTPS 端口443 |
| jee() | 配置基于容器的预认证。 在这种情况下,认证由Servlet容器管理 |
| x509() | 配置基于x509的认证 |
| rememberMe() | 允许配置“记住我”的验证 |
| authorizeRequests() | 允许基于使用HttpServletRequest限制访问 |
| requestCache() | 允许配置请求缓存 |
| exceptionHandling() | 允许配置错误处理 |
| securityContext() | 在HttpServletRequests之间的SecurityContextHolder上设置SecurityContext的管理。 当使用WebSecurityConfigurerAdapter时,这将自动应用 |
| servletApi() | 将HttpServletRequest方法与在其上找到的值集成到SecurityContext中。 当使用WebSecurityConfigurerAdapter时,这将自动应用 |
| csrf() | 添加 CSRF 支持,使用WebSecurityConfigurerAdapter时,默认启用 |
| logout() | 添加退出登录支持。当使用WebSecurityConfigurerAdapter时,这将自动应用。默认情况是,访问URL”/ logout”,使HTTP Session无效来清除用户,清除已配置的任何#rememberMe()身份验证,清除SecurityContextHolder,然后重定向到”/login?success” |
| anonymous() | 允许配置匿名用户的表示方法。 当与WebSecurityConfigurerAdapter结合使用时,这将自动应用。 默认情况下,匿名用户将使用org.springframework.security.authentication.AnonymousAuthenticationToken表示,并包含角色 “ROLE_ANONYMOUS” |
| formLogin() | 指定支持基于表单的身份验证。如果未指定FormLoginConfigurer#loginPage(String),则将生成默认登录页面 |
| oauth2Login() | 根据外部OAuth 2.0或OpenID Connect 1.0提供程序配置身份验证 |
| requiresChannel() | 配置通道安全。为了使该配置有用,必须提供至少一个到所需信道的映射 |
| httpBasic() | 配置Http Basic验证 |
| addFilterAt() | 在指定的Filter类的位置添加过滤器 |
(2)数据库来配置用户与角色
不配置内存用户,将UserService配置到AuthenticationManagerBuilder中
通过数据库来配置用户与角色,但认证规则仍然是使用HttpSecurity进行配置,还是不够灵活;无法实现资源和角色之间的动态调整
@Configuration
@EnableWebSecurity
public class SecurityConfig extends WebSecurityConfigurerAdapter {

    @Autowired
    private UserService userService;

    @Bean
    public PasswordEncoder passwordEncoder() {
        return new BCryptPasswordEncoder();
    }

    // 配置用户及其对应的角色
    @Override
    protected void configure(AuthenticationManagerBuilder auth) throws Exception {
        auth.userDetailsService(userService);
    }

    // 配置基于内存的URL访问权限
    @Override
    protected  void configure(HttpSecurity http) throws Exception {
        http.authorizeRequests()  // 开启HttpSecurity配置
                .antMatchers("/admin/**").hasRole("ADMIN")  // admin/**模式URL必须具备ADMIN角色
                .antMatchers("/user/**").access("hasAnyRole('ADMIN','USER')")  // 该模式需要ADMIN或USER角色
                .antMatchers("/db/**").access("hasRole('ADMIN') and hasRole('DBA')")  // 需ADMIN和DBA角色
                .anyRequest().authenticated()  // 用户访问其它URL都必须认证后访问(登录后访问)
                .and().formLogin().loginProcessingUrl("/login").permitAll()  // 开启表单登录并配置登录接口
                .and().csrf().disable();  // 关闭csrf
    }

}
(3)实现动态配置URL权限(自定义权限配置)
要实现动态配置权限,首先需要自定义FilterInvocationSecurityMetadataSource:自定义FilterInvocationSecurityMetadataSource主要实现该接口中的getAttributes()方法,该方法用来确定一个请求需要哪些角色
基于数据库resource表和role_resource表的URL权限规则配置
①首先创建resourceMapper接口:获取所有的资源
@Mapper
public interface ResourceMapperDao {
    // 获取所有的资源
    public List<Resources> getAllResources();
}
<select id="getAllResources" resultMap="ResourcesMap">
SELECT
         r.*,
         re.id AS roleId,
         re.`name`,
         re.description
        FROM resources AS r
        LEFT JOIN role_resource AS rr  ON r.id = rr.resource_id
        LEFT JOIN role AS re ON re.id = rr.role_id
</select>
②自定义实现FilterInvocationSecurityMetadataSource接口:确定请求需要角色
注意:自定义FilterInvocationSecurityMetadataSource主要实现该接口中的getAttributes()方法,该方法用来确定一个请求需要哪些角色
@Component
public class CustomFilterInvocationSecurityMetadataSource implements FilterInvocationSecurityMetadataSource {
    // 创建一个AntPathMatcher,主要用来实现ant风格的URL匹配
    AntPathMatcher antPathMatcher = new AntPathMatcher();

    @Autowired
    private ResourceMapperDao resourceMapperDao;

    @Override
    public Collection<ConfigAttribute> getAttributes(Object object) throws IllegalArgumentException {
        // 从参数中提取出当前请求的URL
        String requestUrl = ((FilterInvocation) object).getRequestUrl();

        // 从数据库中获取所有的资源信息,即本案例中的Resources表以及Resources所对应的role
        // 在真实项目环境中,开发者可以将资源信息缓存在Redis或者其他缓存数据库中
        List<Resources> allResources = resourceMapperDao.getAllResources();
        // 遍历资源信息,遍历过程中获取当前请求的URL所需要的角色信息并返回
        for (Resources resource : allResources) {
            if (antPathMatcher.match(resource.getPattern(), requestUrl)) {
                List<Role> roles = resource.getRoles();
                if(!CollectionUtils.isEmpty(roles)){
                    List<ConfigAttribute> allRoleNames = roles.stream()
                            .map(role -> new SecurityConfig(role.getName().trim()))
                            .collect(Collectors.toList());
                    return allRoleNames;
                }
            }
        }
        // 如果当前请求的URL在资源表中不存在相应的模式,就假设该请求登录后即可访问,即直接返回 ROLE_LOGIN
        return SecurityConfig.createList("ROLE_LOGIN");
    }

    // 该方法用来返回所有定义好的权限资源,Spring Security在启动时会校验相关配置是否正确
    @Override
    public Collection<ConfigAttribute> getAllConfigAttributes() {
        // 如果不需要校验,那么该方法直接返回null即可
        return null;
    }

    // supports方法返回类对象是否支持校验
    @Override
    public boolean supports(Class<?> clazz) {
        return FilterInvocation.class.isAssignableFrom(clazz);
    }
}
③自定义实现AccessDecisionManager接口:角色对比
当一个请求走完FilterInvocationSecurityMetadataSource中的getAttributes()方法后,接下来就会来到AccessDecisionManager类中进行角色信息的对比
@Component
public class CustomAccessDecisionManager implements AccessDecisionManager {
    // 该方法判断当前登录的用户是否具备当前请求URL所需要的角色信息
    @Override
    public void decide(Authentication auth, Object object, Collection<ConfigAttribute> ConfigAttributes) {
        Collection<? extends GrantedAuthority> userHasAuthentications = auth.getAuthorities();
        // 如果具备权限,则不做任何事情即可
        for (ConfigAttribute configAttribute : ConfigAttributes) {
            // 如果需要的角色是ROLE_LOGIN,说明当前请求的URL用户登录后即可访问
            // 如果auth是UsernamePasswordAuthenticationToken的实例,说明当前用户已登录,该方法到此结束
            if ("ROLE_LOGIN".equals(configAttribute.getAttribute())
                    && auth instanceof UsernamePasswordAuthenticationToken) {
                return;
            }
            // 否则进入正常的判断流程
            for (GrantedAuthority authority : userHasAuthentications) {
                // 如果当前用户具备当前请求需要的角色,那么方法结束
                if (configAttribute.getAttribute().equals(authority.getAuthority())) {
                    return;
                }
            }
        }
        // 如果不具备权限,就抛出AccessDeniedException异常
        throw new AccessDeniedException("权限不足");
    }

    @Override
    public boolean supports(ConfigAttribute attribute) {
        return true;
    }

    @Override
    public boolean supports(Class<?> clazz) {
        return true;
    }
}
④配置Spring Security
这里与前文的配置相比,主要是修改了configure(HttpSecurity http)方法的实现并添加了两个 Bean。至此实现了动态权限配置,权限和资源的关系可以在role_resource表中动态调整
// 配置基于数据库的URL访问权限
@Override
protected void configure(HttpSecurity http) throws Exception {
	http.authorizeRequests()
		.withObjectPostProcessor(new ObjectPostProcessor<FilterSecurityInterceptor>() {

		@Override
		public <O extends FilterSecurityInterceptor> O postProcess(O object) {
			object.setSecurityMetadataSource(accessMustRoles());
			object.setAccessDecisionManager(rolesCheck());
			return object;
		}

	})
	.and().formLogin().loginProcessingUrl("/login").permitAll()  // 开启表单登录并配置登录接口
	.and().csrf().disable();  // 关闭csrf
}

@Bean
public CustomFilterInvocationSecurityMetadataSource accessMustRoles() {
	return new CustomFilterInvocationSecurityMetadataSource();
}

@Bean
public CustomAccessDecisionManager rolesCheck() {
	return new CustomAccessDecisionManager();
}
要配置角色继承关系,只需在Spring Security的配置类中提供一个RoleHierarchy即可
// 配置角色继承关系
@Bean
RoleHierarchy roleHierarchy() {
	RoleHierarchyImpl roleHierarchy = new RoleHierarchyImpl();
	String hierarchy = "ROLE_DBA > ROLE_ADMIN > ROLE_USER";
	roleHierarchy.setHierarchy(hierarchy);
	return roleHierarchy;
}
⑤自定义登录页面、登录接口、登录成功或失败的处理逻辑
首先修改 Spring Security 配置,增加相关的自定义代码:
将登录页改成使用自定义页面,并配置登录请求处理接口,以及用户密码提交时使用的参数名
自定义了登录成功、登录失败的处理逻辑,根据情况返回响应的JSON数据
@Configuration
public class MyWebSecurityConfig extends WebSecurityConfigurerAdapter {

    // 指定密码的加密方式
    @SuppressWarnings("deprecation")
    @Bean
    public PasswordEncoder passwordEncoder(){
        return NoOpPasswordEncoder.getInstance();  // 不对密码进行加密
    }

    // 配置用户及其对应的角色
    @Override
    protected void configure(AuthenticationManagerBuilder auth) throws Exception {
        auth.inMemoryAuthentication()
                .withUser("root").password("123").roles("DBA")
                .and()
                .withUser("admin").password("123").roles("ADMIN")
                .and()
                .withUser("hangge").password("123").roles("USER");
    }

    // 配置URL访问权限
    @Override
    protected void configure(HttpSecurity http) throws Exception {
        http.authorizeRequests() // 开启HttpSecurity配置
                .antMatchers("/db/**").hasRole("DBA") // db/** 模式URL需DBA角色
                .antMatchers("/admin/**").hasRole("ADMIN") // admin/**模式URL需ADMIN角色
                .antMatchers("/user/**").hasRole("USER") // user/** 模式URL需USER角色
                .anyRequest().authenticated() // 用户访问其它URL都必须认证后访问(登录后访问)
                .and().formLogin()  // 开启登录表单功能
                .loginPage("/login_page") // 使用自定义的登录页面,不再使用SpringSecurity提供的默认登录页
                .loginProcessingUrl("/login") // 配置登录请求处理接口,自定义登录页面、移动端登录都使用该接口
                .usernameParameter("name") // 修改认证所需的用户名的参数名(默认为username)
                .passwordParameter("passwd") // 修改认证所需的密码的参数名(默认为password)
                // 定义登录成功的处理逻辑(可以跳转到某一个页面,也可以返会一段JSON)
                .successHandler(new AuthenticationSuccessHandler() {
                    @Override
                    public void onAuthenticationSuccess(HttpServletRequest req,
                                                        HttpServletResponse resp,
                                                        Authentication auth)
                            throws IOException, ServletException {
                        // 可以跳转到指定页面
                        // resp.sendRedirect("/index");
                        // 也可以返回一段JSON提示
                        // 获取当前登录用户的信息,在登录成功后,将当前登录用户的信息一起返回给客户端
                        Object principal = auth.getPrincipal();
                        resp.setContentType("application/json;charset=utf-8");
                        PrintWriter out = resp.getWriter();
                        resp.setStatus(200);
                        Map<String, Object> map = new HashMap<>();
                        map.put("status", 200);
                        map.put("msg", principal);
                        ObjectMapper om = new ObjectMapper();
                        out.write(om.writeValueAsString(map));
                        out.flush();
                        out.close();
                    }
                })
                // 定义登录失败的处理逻辑(可以跳转到某一个页面,也可以返会一段 JSON)
                .failureHandler(new AuthenticationFailureHandler() {
                    @Override
                    public void onAuthenticationFailure(HttpServletRequest req,
                                                        HttpServletResponse resp,
                                                        AuthenticationException e)
                            throws IOException, ServletException {
                        resp.setContentType("application/json;charset=utf-8");
                        PrintWriter out = resp.getWriter();
                        resp.setStatus(401);
                        Map<String, Object> map = new HashMap<>();
                        // 通过异常参数可以获取登录失败的原因,进而给用户一个明确的提示。
                        map.put("status", 401);
                        if (e instanceof LockedException) {
                            map.put("msg", "账户被锁定,登录失败!");
                        }else if(e instanceof BadCredentialsException){
                            map.put("msg","账户名或密码输入错误,登录失败!");
                        }else if(e instanceof DisabledException){
                            map.put("msg","账户被禁用,登录失败!");
                        }else if(e instanceof AccountExpiredException){
                            map.put("msg","账户已过期,登录失败!");
                        }else if(e instanceof CredentialsExpiredException){
                            map.put("msg","密码已过期,登录失败!");
                        }else{
                            map.put("msg","登录失败!");
                        }
                        ObjectMapper mapper = new ObjectMapper();
                        out.write(mapper.writeValueAsString(map));
                        out.flush();
                        out.close();
                    }
                })
				// 配置一个 LogoutHandler,开发者可以在这里完成一些数据清除工做
				.addLogoutHandler(new LogoutHandler() {
						@Override
						public void logout(HttpServletRequest req,HttpServletResponse resp,Authentication auth) {
							System.out.println("注销登录,开始清除Cookie。");
						}
				})
				// 配置一个 LogoutSuccessHandler,开发者可以在这里处理注销成功后的业务逻辑
				.logoutSuccessHandler(new LogoutSuccessHandler() {
					@Override
					public void onLogoutSuccess(HttpServletRequest req,HttpServletResponse resp,Authentication auth)
											throws IOException, ServletException {
						// 可以跳转到登录页面
						// resp.sendRedirect("/login");
						// 也可以返回一段JSON提示
						resp.setContentType("application/json;charset=utf-8");
						PrintWriter out = resp.getWriter();
						resp.setStatus(200);
						Map<String, Object> map = new HashMap<>();
						map.put("status", 200);
						map.put("msg", "注销成功!");
						ObjectMapper om = new ObjectMapper();
						out.write(om.writeValueAsString(map));
						out.flush();
						out.close();
					}
				})
                .permitAll() // 允许访问登录表单、登录接口
                .and().csrf().disable(); // 关闭csrf
    }
}
3.用户实体类(实现UserDetails)
UserDetails接口封装了Spring Security登录所需要的所有信息。如果在数据库中取用户数据,用户实体类需要实现该接口
public class User implements UserDetails {
	private Integer id;
	private String userName;
	private String password;
	private boolean enable;
	private boolean locked;
	private Set<Role> userRoles;
    // 省略...
}
省略数据库操作
package org.springframework.security.core.userdetails;

// 该接口封装了SpringSecurity登录所需要的所有信息。如果在数据库中取用户数据,用户实体类需要实现该接口
public interface UserDetails extends Serializable {
	// 获取用户权限信息
	Collection<? extends GrantedAuthority> getAuthorities();
	// 获取用户密码
	String getPassword();
	// 获取用户名称
	String getUsername();
	// 用户是否过期(true未过期,false过期)
	boolean isAccountNonExpired();
	// 用户是否锁定
	boolean isAccountNonLocked();
	// 密码是否过期
	boolean isCredentialsNonExpired();
	// 用户是否可用
	boolean isEnabled();
}
默认情况下不需要开发者自己进行密码角色等信息的比对,开发者只需要提供相关信息即可,例如:
| 方法 | 描述 |
|---|---|
| getPassword() | 返回密码和用户输入的登录密码不匹配,会自动抛出BadCredentialsException异常 |
| isAccountNonLocked() | 返回了false,会自动抛出AccountExpiredException异常 |
| getAuthorities() | 用来获取当前用户所具有的角色信息 |
本案例中,用户所具有的角色存储在roles属性中,因此该方法直接遍历roles属性,然后构造SimpleGrantedAuthority集合并返回
4.用户校验逻辑业务(实现UserDetailsService接口)
定义的UserService实现UserDetailsService接口,并实现该接口中的loadUserByUsername方法,该方法将在用户登录时自动调用。
loadUserByUsername()方法的参数就是用户登录时输入的用户名,通过用户名去数据库中查找用户:
①:如果没有查找到用户,就抛出一个账户不存在的异常。
②:如果查找到了用户,就继续查找该用户所具有的角色信息,并将获取到的user对象返回,再由系统提供的DaoAuthenticationProvider类去比对密码是否正确

@Service
@Slf4j
public class UserService implements UserDetailsService {
	@Autowired
	private PasswordEncoder passwordEncoder;
	@Autowired
	private UserMapper userMapper;

    /**
     * 根据用户名查找用户信息,该用户信息可以从数据库中取出,然后拼装成UserDetails对象
     * @param username
     * @return
     * @throws UsernameNotFoundException
     */
    @Override
    public UserDetails loadUserByUsername(String username) throws UsernameNotFoundException {
		// 先设置假的权限
        List<GrantedAuthority> authorities = new ArrayList<>();
        // 传入角色
        authorities.add(new SimpleGrantedAuthority("ROLE_USER"));
        // 创建用户
        User user = new User(username, "{noop}admin", authorities) ;

        log.info("登录用户名:" + username);
        // 下面User类是Spring Security自带实现UserDetails接口的一个用户类
        // 构造方法①:
		// 使用加密工具对密码进行加密
		String password = passwordEncoder.encode("123456");
		log.info("密码:" + password);
		        return new User(username,password
		                , AuthorityUtils.commaSeparatedStringToAuthorityList("admin"));
		// 构造方法②:
		return new User(username,passwordEncoder.encode("123456")
		, true, true, true, true
		, AuthorityUtils.commaSeparatedStringToAuthorityList("admin"));
		// 实际业务③:
		User user = userMapperDao.loadUserByUsername(username);
		if (user == null) {
		throw new UsernameNotFoundException("账户不存在!");
		}
		// 数据库用户密码没加密,这里手动设置
		String encodePassword = passwordEncoder.encode(user.getPassword());
		System.out.println("加密后的密码:" + encodePassword);
		user.setPassword(encodePassword);
		Set<Role> userRoles = userMapperDao.getUserRolesByUid(user.getId());
		user.setUserRoles(userRoles);
		return user;
    }
}
经过接口访问后,然后换一个浏览器访问该接口;密码都是一样,加密出来却不一样。这主要要从BCryptPasswordEncoder加密和密码比对的两个方法来看
public class BCryptPasswordEncoder implements PasswordEncoder {
    private Pattern BCRYPT_PATTERN;
    private final Log logger;
    private final BCryptPasswordEncoder.BCryptVersion version;
    private final int strength; // 密码长度
    private final SecureRandom random; // 随机种子

public String encode(CharSequence rawPassword) {
      if (rawPassword == null) {
          throw new IllegalArgumentException("rawPassword cannot be null");
      } else {
          String salt;
          if (this.random != null) {
			  // 生成一个随机加盐的前缀,而使用SecureRandom来生成随机盐是较为安全的
              salt = BCrypt.gensalt(this.version.getVersion(), this.strength, this.random);
          } else {
              salt = BCrypt.gensalt(this.version.getVersion(), this.strength);
          }
		  // 根据随机盐与密码进行一次SHA256的运算并在之前拼装随机盐得到最终密码
		  // 因为每次加密,随机盐是不同的,不然不叫随机了,所以加密出来的密文也不相同
          return BCrypt.hashpw(rawPassword.toString(), salt);
      }
}

  public boolean matches(CharSequence rawPassword, String encodedPassword) {
      if (rawPassword == null) {
          throw new IllegalArgumentException("rawPassword cannot be null");
      } else if (encodedPassword != null && encodedPassword.length() != 0) {
          if (!this.BCRYPT_PATTERN.matcher(encodedPassword).matches()) {
              this.logger.warn("Encoded password does not look like BCrypt");
              return false;
          } else {
			  // 密码比对的时候,先从密文中拿取随机盐,而不是重新生成新的随机盐
			  // 再通过该随机盐与要比对的密码进行一次Sha256的运算,再在前面拼装上该随机盐与密文进行比较
              return BCrypt.checkpw(rawPassword.toString(), encodedPassword);
          }
      } else {
          this.logger.warn("Empty encoded password");
          return false;
      }
  }
}
这里面的重点在于密文没有掌握在攻击者手里,是安全的,也就是攻击者无法得知随机盐是什么,而SecureRandom产生伪随机的条件非常苛刻,一般是一些计算机内部的事件。但是这是一种慢加密方式,对于要登录吞吐量较高的时候无法满足需求,但要说明的是MD5已经不安全了,可以被短时间内(小时记,也不是几秒内)暴力破解
Spring Security自带User说明
public User(String username, String password, Collection<? extends GrantedAuthority> authorities) {
    this(username, password, true, true, true, true, authorities);
}

1、用户名:提供给DaoAuthenticationProvider
2、密码:应该提供给用户的密码DaoAuthenticationProvider
3、是否可用/启用(true启用,false不启用)
4、账户是否过期(true未过期,false过期)
5、密码是否过期(true未过期,false过期)
6、账户是否被锁定(true未锁定,false锁定)
7、用户权限:如果提供了正确的用户名和密码并启用了用户,则应授予用户权限。不为空
public User(String username, String password, boolean enabled, boolean accountNonExpired, boolean credentialsNonExpired, boolean accountNonLocked, Collection<? extends GrantedAuthority> authorities) {
    if (username != null && !"".equals(username) && password != null) {
        this.username = username;
        this.password = password;
        this.enabled = enabled;
        this.accountNonExpired = accountNonExpired;
        this.credentialsNonExpired = credentialsNonExpired;
        this.accountNonLocked = accountNonLocked;
        this.authorities = Collections.unmodifiableSet(sortAuthorities(authorities));
    } else {
        throw new IllegalArgumentException("Cannot pass null or empty values to constructor");
    }
}
5.编写接口类(Controller)
@Controller
public class MainController {
    @RequestMapping("/")
    public String root() {
        return "redirect:/index";
    }

    @ResponseBody
    @RequestMapping("/index")
    public String index() {
        return "当前为未经安全认证的页面";
    }

    @ResponseBody
    @RequestMapping("/user/index")
    public String userIndex() {
        SecurityContext securityContext = SecurityContextHolder.getContext();
        return "user/index";
    }

    @RequestMapping("/login")
    public String login() {
        return "login";
    }

    @ResponseBody
    @RequestMapping("/login-error")
    public String loginError(Model model) {
		//  model.addAttribute("loginError", true);
		return "login-error";
    }
}
6.登录页面
位置:src/main/resources/templates/login.html
前后端分离:http://locahost/login
重新启动项目,访问/hello接口,被转向到指定的html登录页面。输入用户名user,密码123456后,/hello接口访问成功
<!DOCTYPE html>
<html xmlns="http://www.w3.org/1999/xhtml" xmlns:th="https://www.thymeleaf.org">
    <head>
        <title>Login page</title>
        <meta charset="utf-8" />
        <link rel="stylesheet" href="/css/main.css" th:href="@{/css/main.css}" />
    </head>
    <body>
        <h1>Login page</h1>
        <form th:action="@{/login}" method="post">
            <label for="username">Username</label>:
            <input type="text" id="username" name="username" autofocus="autofocus" />
			<br />
            <label for="password">Password</label>:
            <input type="password" id="password" name="password" /> <br />
            <input type="submit" value="Log in" />
        </form>
        <p><a href="/index" th:href="@{/index}">Back to home page</a></p>
    </body>
</html>
7.效果
- 当直接访问/user/index页面的时候会因为安全配置重定向到login页面
- UserService只配置了admin/test的用户,只有用admin用户才能登录成功
- 登录成功之后再访问/user/index页面才生效
8.测试授权功能
在userDetailsService中返回结果去掉ROLE_USER权限即可
调试关键点
| 方法 | 描述 |
|---|---|
| org.springframework.security.access.vote.AffirmativeBased#decide | 判断用户是否有权访问当前接口 |
| org.springframework.security.authentication.dao.DaoAuthenticationProvider#additionalAuthenticationChecks | 密码加密校验 |
/**
 * anyRequest          |   匹配所有请求路径
 * access              |   SpringEl表达式结果为true时可以访问
 * anonymous           |   匿名可以访问
 * denyAll             |   用户不能访问
 * fullyAuthenticated  |   用户完全认证可以访问(非remember-me下自动登录)
 * hasAnyAuthority     |   如果有参数,参数表示权限,则其中任何一个权限可以访问
 * hasAnyRole          |   如果有参数,参数表示角色,则其中任何一个角色可以访问
 * hasAuthority        |   如果有参数,参数表示权限,则其权限可以访问
 * hasIpAddress        |   如果有参数,参数表示IP地址,如果用户IP和参数匹配,则可以访问
 * hasRole             |   如果有参数,参数表示角色,则其角色可以访问
 * permitAll           |   用户可以任意访问
 * rememberMe          |   允许通过remember-me登录的用户访问
 * authenticated       |   用户登录后可访问
 */
@Override
protected void configure(HttpSecurity httpSecurity) throws Exception {
    // 开启HttpSecurity配置
    httpSecurity.authorizeRequests()
            // 不进行权限验证的请求或资源
            .antMatchers(AUTH_WHITE_LIST).permitAll()
            // 指定匿名用户允许URL
            .antMatchers(AUTH_ANONYMOUS).anonymous()
            // 其他的需要登陆后才能访问
            .anyRequest().authenticated()
            .and()
            // 配置未登录自定义处理类
            .httpBasic().authenticationEntryPoint(userAuthenticationEntryPointHandler)
            .and()
            // 配置登录地址
            .formLogin()
            .loginPage("/login")
            // 配置登录成功自定义处理类
            .successHandler(userLoginSuccessHandler)
            // 配置登录失败自定义处理类
            .failureHandler(userLoginFailureHandler)
            .and()
            // 配置登出地址
            .logout()
            .logoutUrl("/logout")
            // 设置注销成功后跳转页面,默认是跳转到登录页面
            .logoutSuccessUrl("/login")
            // 配置用户登出自定义处理类
            .logoutSuccessHandler(userLogoutSuccessHandler)
            .and()
            // 配置没有权限自定义处理类
            .exceptionHandling().accessDeniedHandler(userAuthAccessDeniedHandler)
            .and()
            // 开启跨域
            .cors()
            .and()
            // 关闭跨站请求伪造防护
            .csrf().disable();
    // 配置登出地址
    httpSecurity.logout().logoutUrl("/logout").logoutSuccessHandler(userLogoutSuccessHandler);
    // 基于Token不需要session
    httpSecurity.sessionManagement().sessionCreationPolicy(SessionCreationPolicy.STATELESS);
    // 禁用缓存
    httpSecurity.headers().cacheControl();
    // 添加JWT过滤器
    httpSecurity.addFilterBefore(jwtAuthenticationTokenFilter(), UsernamePasswordAuthenticationFilter.class);
    // 添加CORS filter
    httpSecurity.addFilterBefore(corsFilter, JwtAuthenticationTokenFilter.class);
    httpSecurity.addFilterBefore(corsFilter, LogoutFilter.class);
}
登录成功处理类(AuthenticationSuccessHandler)
@Component
public class UserLoginSuccessHandler implements AuthenticationSuccessHandler {
    /**
     * 登录成功返回结果
     */
    @Override
    public void onAuthenticationSuccess(HttpServletRequest request, HttpServletResponse response, Authentication authentication){
        // 组装JWT
        SelfUserEntity selfUserEntity =  (SelfUserEntity) authentication.getPrincipal();
        String token = JWTTokenUtil.createAccessToken(selfUserEntity);
        token = JWTConfig.tokenPrefix + token;

        // 封装返回参数
        Map<String,Object> resultData = new HashMap<>();
        resultData.put("code","200");
        resultData.put("msg", "登录成功");
        resultData.put("token",token);
        ResultUtil.responseJson(response,resultData);
    }
}
登录失败处理类(AuthenticationFailureHandler)
@Component
public class UserLoginFailureHandler implements AuthenticationFailureHandler {
    /**
     * 登录失败返回结果
     */
    @Override
    public void onAuthenticationFailure(HttpServletRequest request, HttpServletResponse response, AuthenticationException exception){
        // 这些对于操作的处理类可以根据不同异常进行不同处理
        if (exception instanceof UsernameNotFoundException){
            System.out.println("【登录失败】"+exception.getMessage());
            ResultUtil.responseJson(response,ResultUtil.resultCode(500,"用户名不存在"));
        }
        if (exception instanceof LockedException){
            System.out.println("【登录失败】"+exception.getMessage());
            ResultUtil.responseJson(response,ResultUtil.resultCode(500,"用户被冻结"));
        }
        if (exception instanceof BadCredentialsException){
            System.out.println("【登录失败】"+exception.getMessage());
            ResultUtil.responseJson(response,ResultUtil.resultCode(500,"密码错误"));
        }
        ResultUtil.responseJson(response,ResultUtil.resultCode(500,"登录失败"));
    }
}


