目标检测 pytorch复现SSD目标检测项目
- 0、简介
- 1、模型整体框架(以VGG16为特征提取网络)
- 3、默认框(default box)的生成--相当于Faster-RCNN中生成的anchor
- 4、预测层的实现原理:
- 5、正负样本的选取
- 6、损失的计算原理
- 6、以ResNet50作为特征提取backbone
- 7、ResNet50+SSD网络模型搭建
- 8、Default Box的生成原理
- **、训练自己的SSD目标检测模型
0、简介
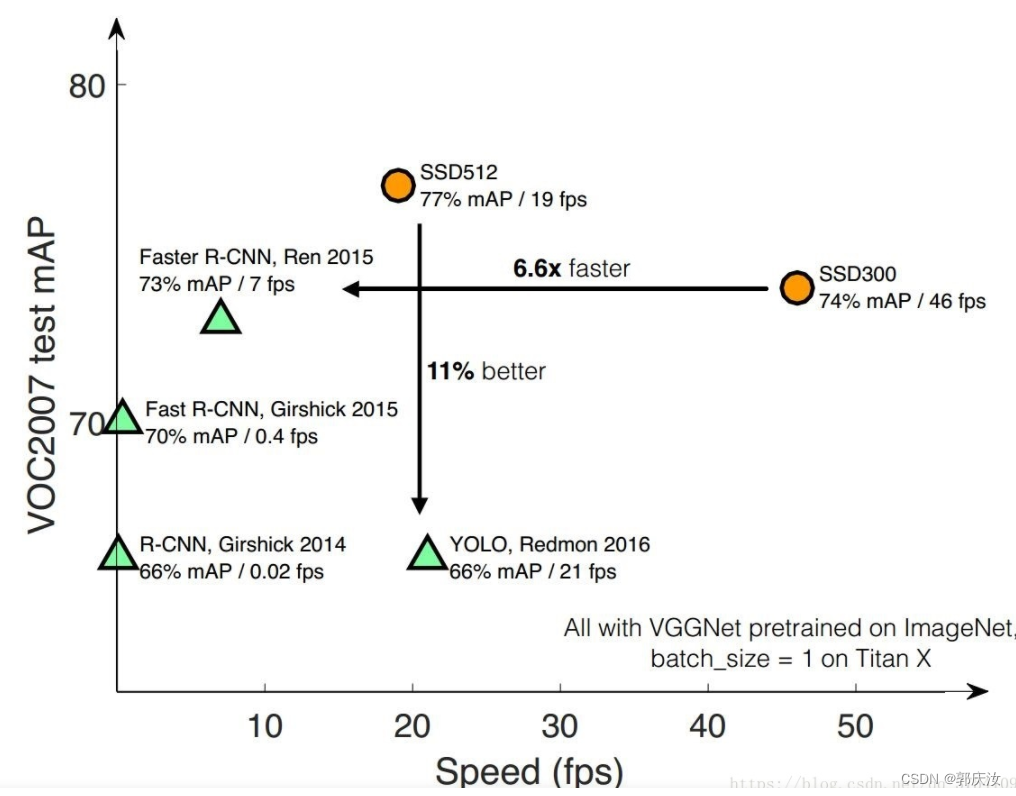
SSD(Single Shot MultiBox Detector)是大神Wei Liu在 ECCV 2016上发表的一种的目标检测算法。对于输入图像大小300x300的版本在VOC2007数据集上达到了72.1%mAP的准确率并且检测速度达到了惊人的58FPS( Faster RCNN:73.2%mAP,7FPS; YOLOv1: 63.4%mAP,45FPS ),500x500的版本达到了75.1%mAP的准确率。当然算法YOLOv2已经赶上了SSD,YOLOv3已经超越SSD,但SSD算法依旧值得研究。
1、模型整体框架(以VGG16为特征提取网络)

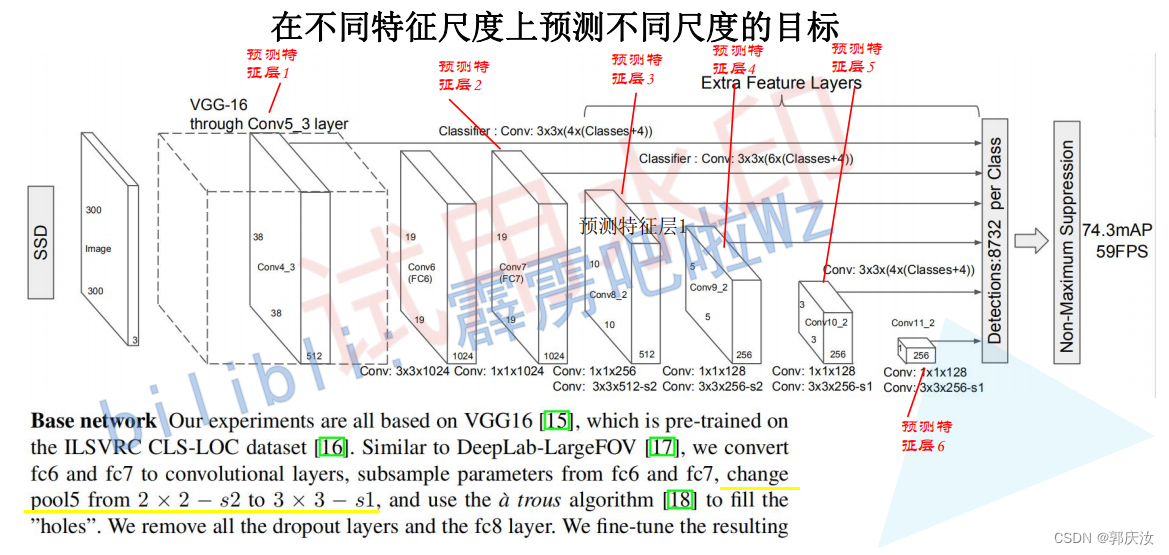
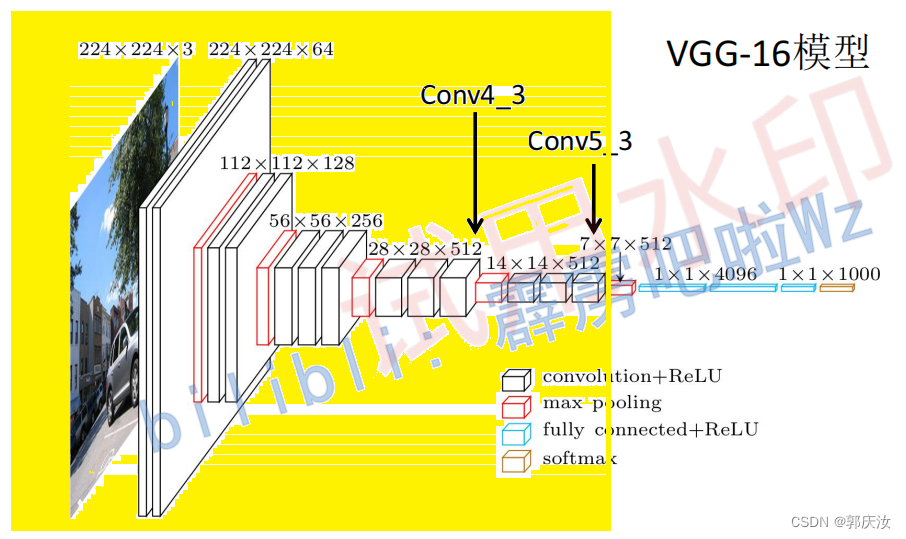
即根据论文,体征提取backbonk对应着上图中VGG16黄色框选的区域,也就是Conv5_3输出数据为提取的数据特征
在不同特征层上,匹配不同尺度大小的目标:
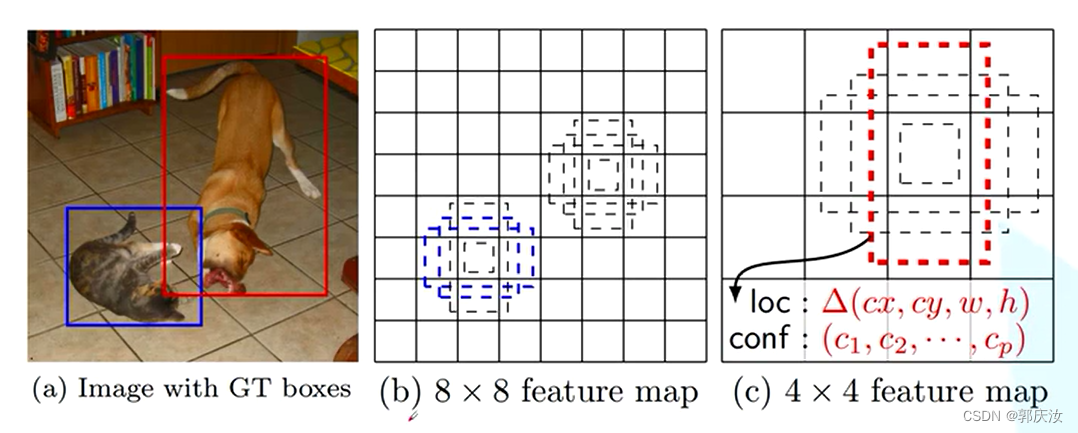
上图中8x8的特征矩阵相对于4x4的特征矩阵,保留的特征信息会更多些,所以,在相对底层的特征矩阵上去预测小目标,在相对高层的特征矩阵上去预测大些的目标。
3、默认框(default box)的生成–相当于Faster-RCNN中生成的anchor
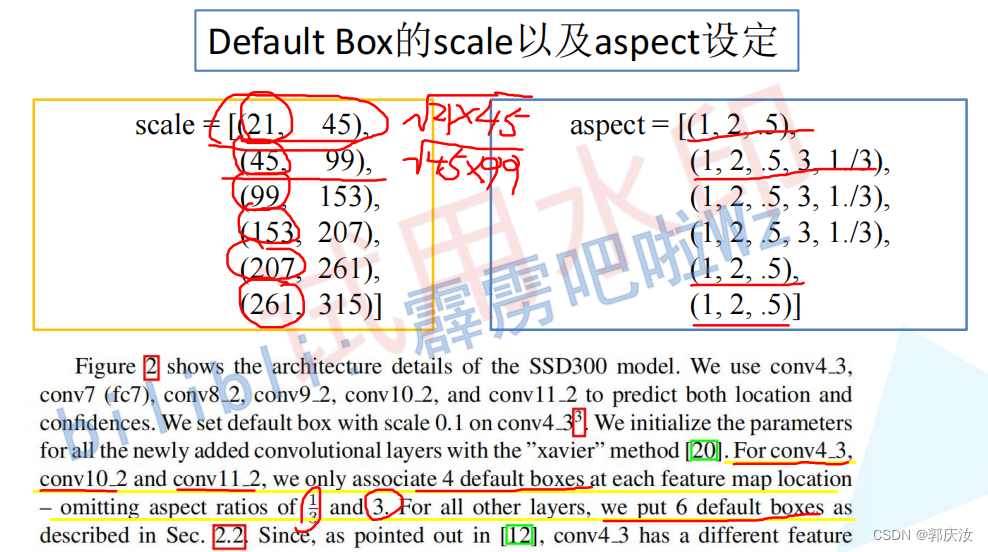
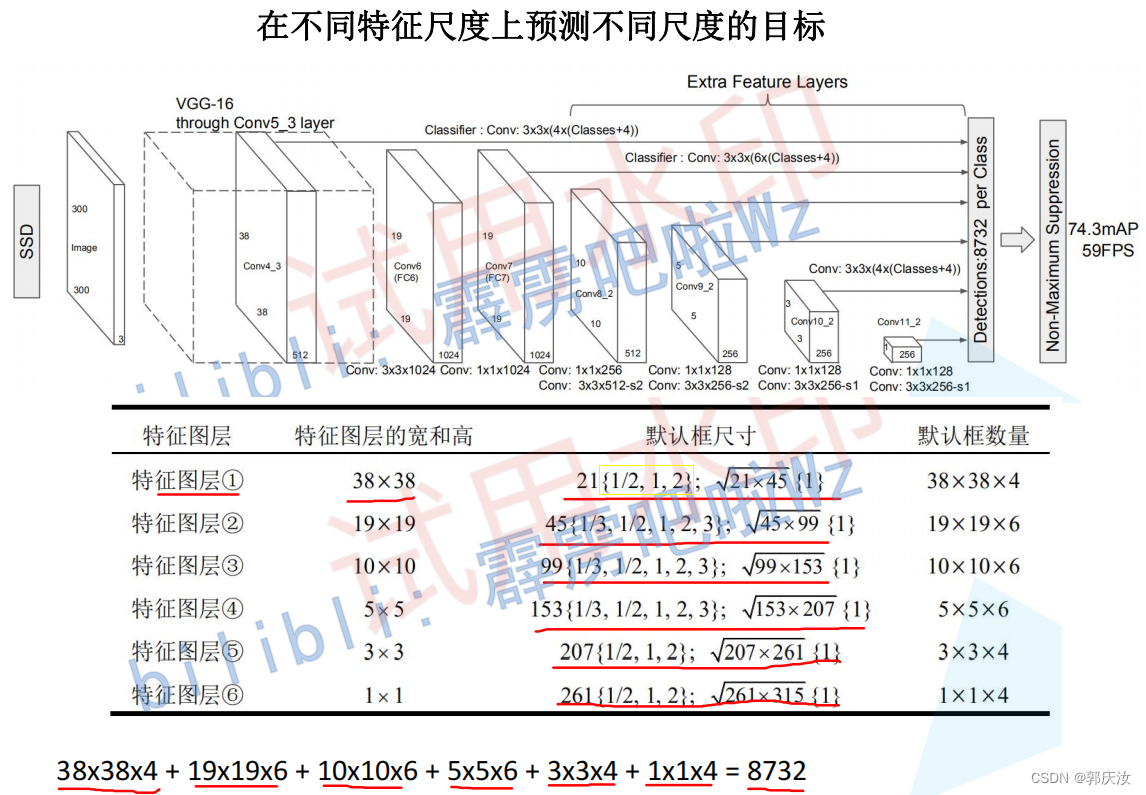
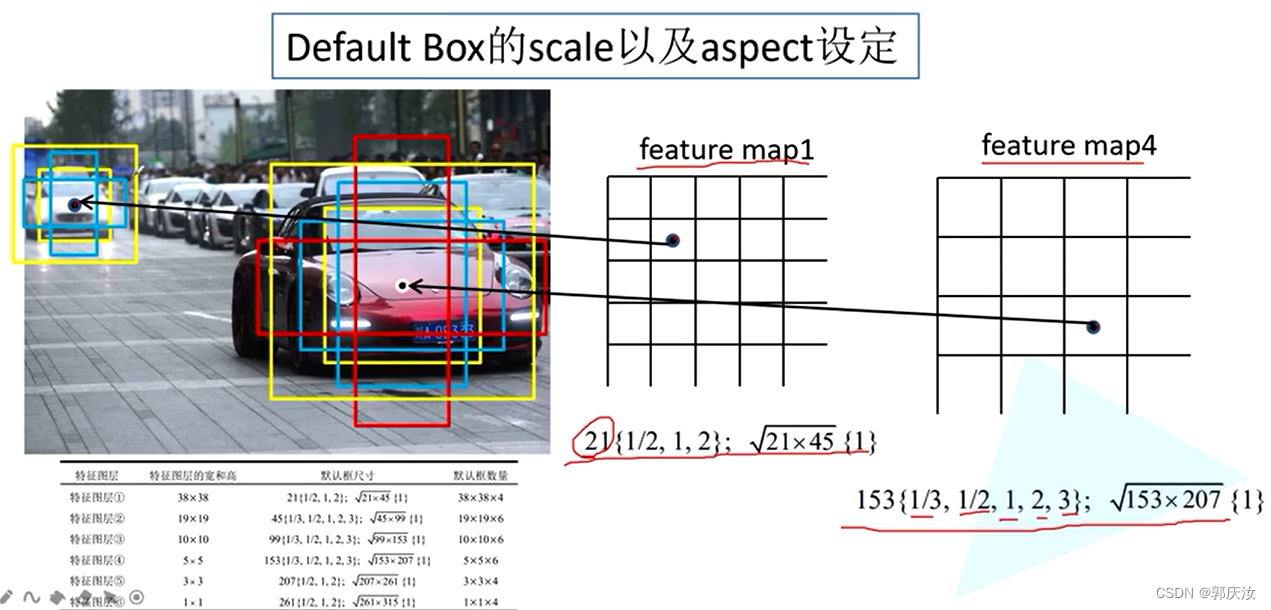
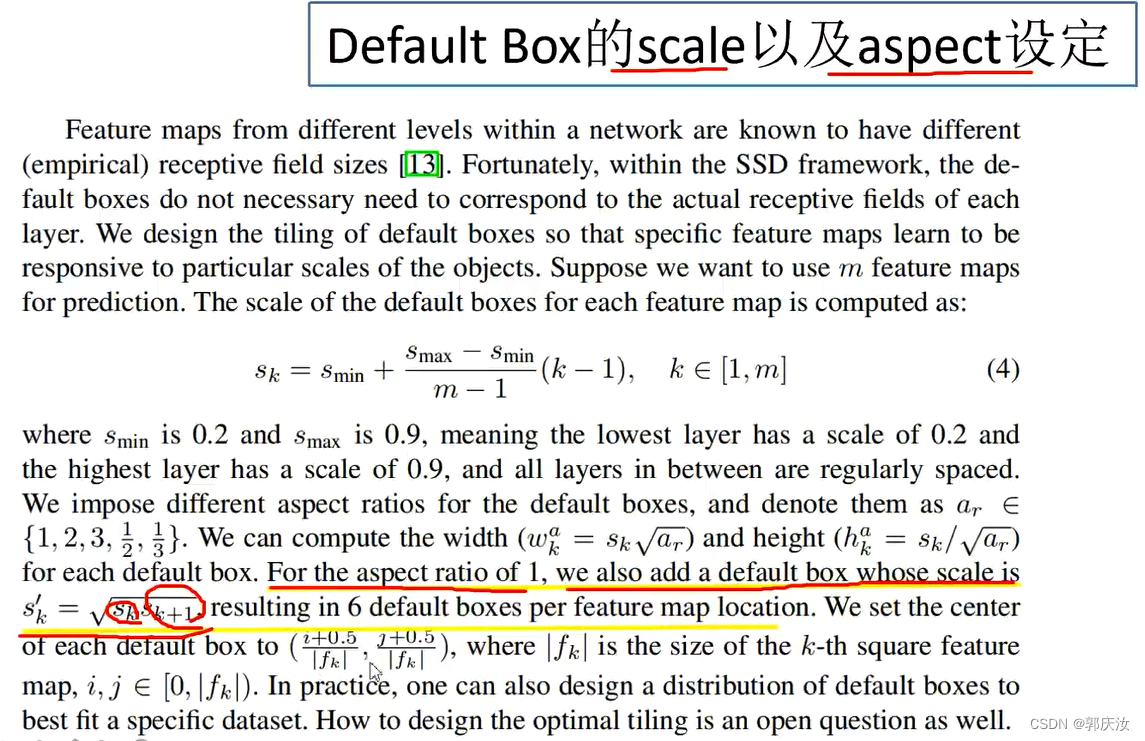
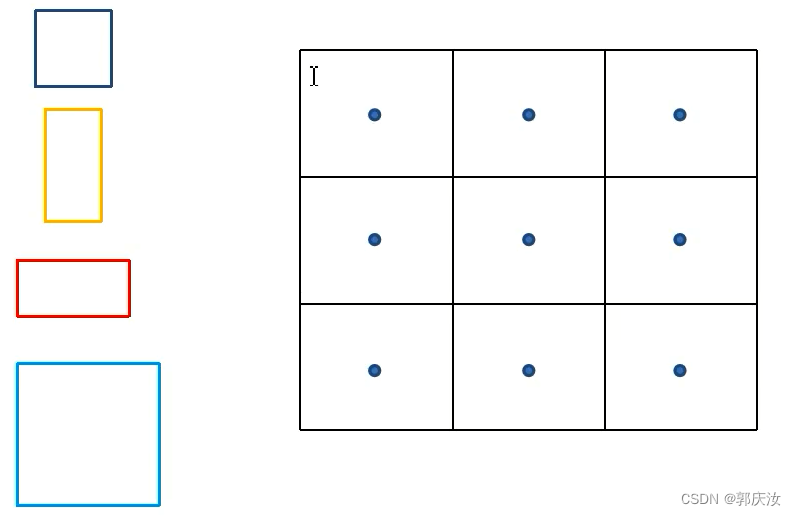
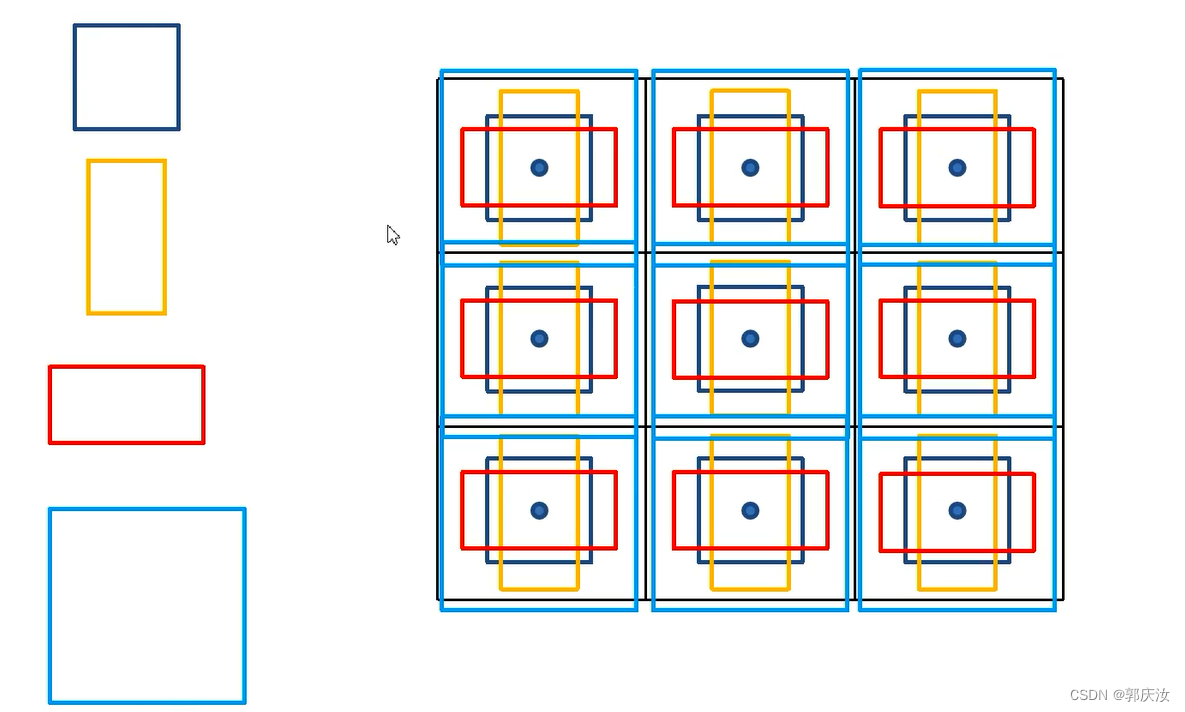
class DefaultBoxes(object):
    def __init__(self, fig_size, feat_size, steps, scales, aspect_ratios, scale_xy=0.1, scale_wh=0.2):
        self.fig_size = fig_size   # 输入网络的图像大小 300
        # [38, 19, 10, 5, 3, 1]
        self.feat_size = feat_size  # 每个预测层的feature map尺寸

        self.scale_xy_ = scale_xy
        self.scale_wh_ = scale_wh

        # According to https://github.com/weiliu89/caffe
        # Calculation method slightly different from paper
        # [8, 16, 32, 64, 100, 300]
        self.steps = steps    # 每个特征层上的一个cell在原图上的跨度

        # [21, 45, 99, 153, 207, 261, 315]
        self.scales = scales  # 每个特征层上预测的default box的scale  [21, 45, 99, 153, 207, 261, 315]

        fk = fig_size / np.array(steps)     # 计算每层特征层的fk
        # [[2], [2, 3], [2, 3], [2, 3], [2], [2]]
        self.aspect_ratios = aspect_ratios  # 每个预测特征层上预测的default box的ratios

        self.default_boxes = []
        # size of feature and number of feature
        # 遍历每层特征层,计算default box
        for idx, sfeat in enumerate(self.feat_size):
            sk1 = scales[idx] / fig_size  # scale转为相对值[0-1]
            sk2 = scales[idx + 1] / fig_size  # scale转为相对值[0-1]
            sk3 = sqrt(sk1 * sk2)
            # 先添加两个1:1比例的default box宽和高
            all_sizes = [(sk1, sk1), (sk3, sk3)]

            # 再将剩下不同比例的default box宽和高添加到all_sizes中
            for alpha in aspect_ratios[idx]:
                w, h = sk1 * sqrt(alpha), sk1 / sqrt(alpha)
                all_sizes.append((w, h))
                all_sizes.append((h, w))

            # 计算当前特征层对应原图上的所有default box
            for w, h in all_sizes:
                for i, j in itertools.product(range(sfeat), repeat=2):  # i -> 行(y), j -> 列(x)
                    # 计算每个default box的中心坐标(范围是在0-1之间)
                    cx, cy = (j + 0.5) / fk[idx], (i + 0.5) / fk[idx]
                    self.default_boxes.append((cx, cy, w, h))

        # 将default_boxes转为tensor格式
        self.dboxes = torch.as_tensor(self.default_boxes, dtype=torch.float32)  # 这里不转类型会报错
        self.dboxes.clamp_(min=0, max=1)  # 将坐标(x, y, w, h)都限制在0-1之间

        # For IoU calculation
        # ltrb is left top coordinate and right bottom coordinate
        # 将(x, y, w, h)转换成(xmin, ymin, xmax, ymax),方便后续计算IoU(匹配正负样本时)
        self.dboxes_ltrb = self.dboxes.clone()
        self.dboxes_ltrb[:, 0] = self.dboxes[:, 0] - 0.5 * self.dboxes[:, 2]   # xmin
        self.dboxes_ltrb[:, 1] = self.dboxes[:, 1] - 0.5 * self.dboxes[:, 3]   # ymin
        self.dboxes_ltrb[:, 2] = self.dboxes[:, 0] + 0.5 * self.dboxes[:, 2]   # xmax
        self.dboxes_ltrb[:, 3] = self.dboxes[:, 1] + 0.5 * self.dboxes[:, 3]   # ymax

    @property
    def scale_xy(self):
        return self.scale_xy_

    @property
    def scale_wh(self):
        return self.scale_wh_

    def __call__(self, order='ltrb'):
        # 根据需求返回对应格式的default box
        if order == 'ltrb':
            return self.dboxes_ltrb

        if order == 'xywh':
            return self.dboxes
4、预测层的实现原理:
假设生成k个Default box,则:
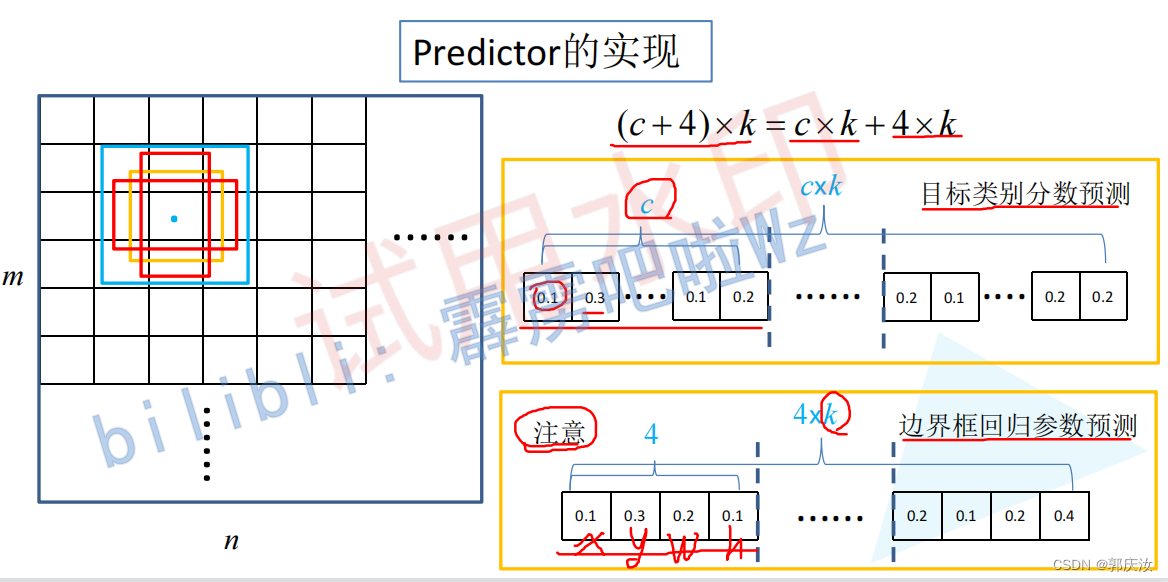
在Feature Map上的每个像素上,都会生成k个default box
即对每个Default box,都会预测C个类别分数(C包括了背景类别)
5、正负样本的选取
正样本的选取:
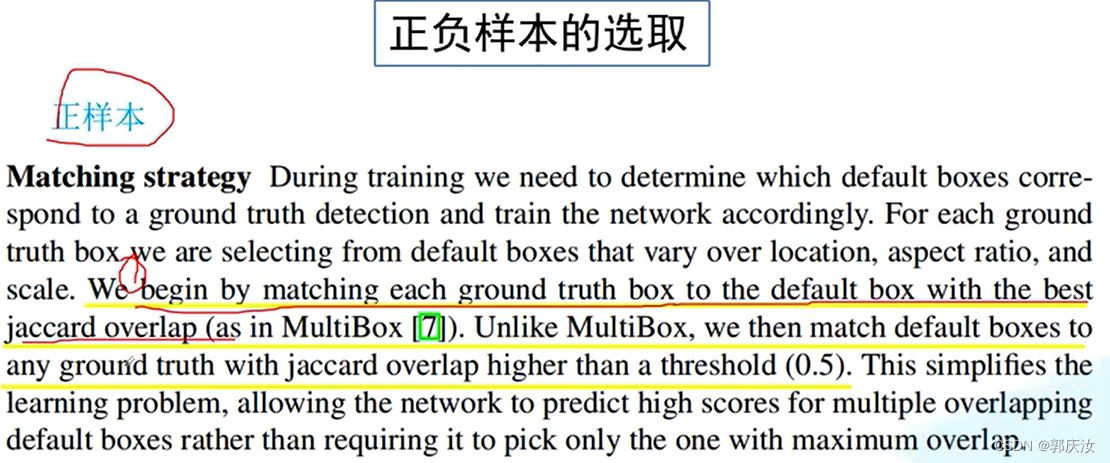
匹配准则1:
对于每一个GT box ,去匹配与其IOU值最大的Default Box
匹配准则2:
对于任意的Default Box,只要与任何一个GT Box的IOU值大于0.5,也认为其为正样本
负样本的选取:
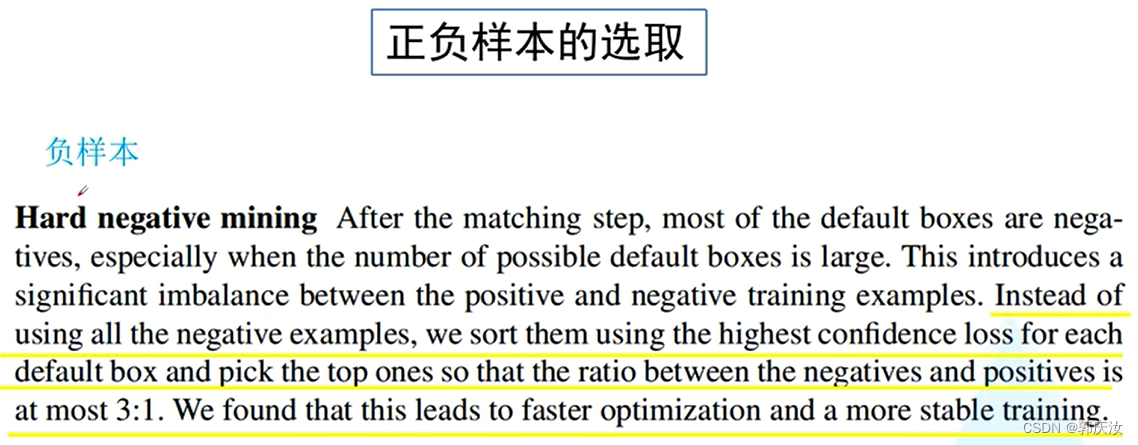
对于剩下的负样本,选取Confidence Loss(即该值越大,表示网络将对应的box预测为目标的概率越大)靠前的样本作为负样本
负样本与正样本的比例为3:1
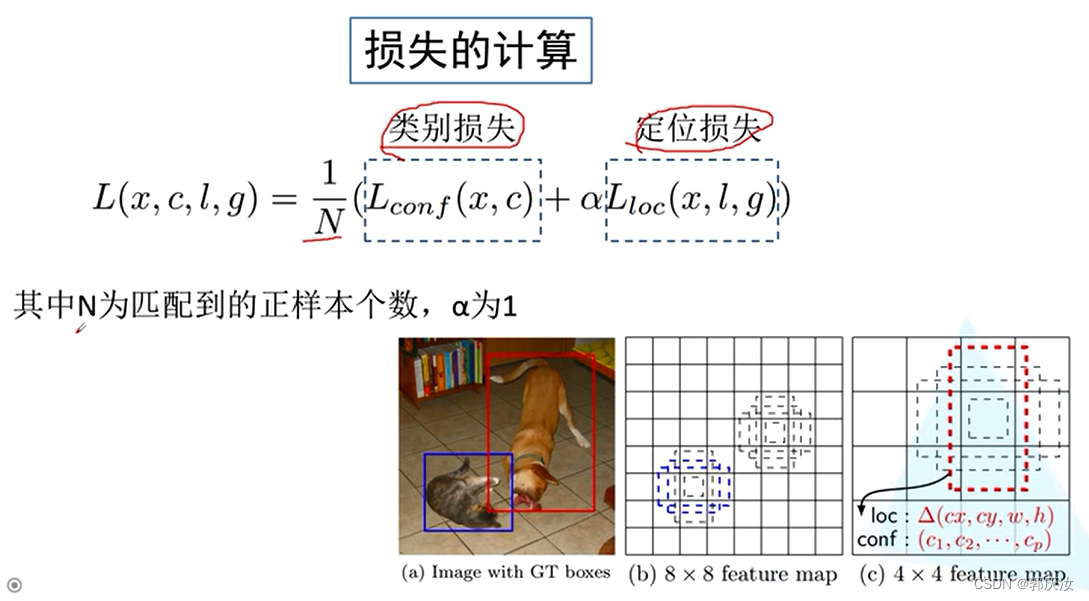
6、损失的计算原理
类别损失:

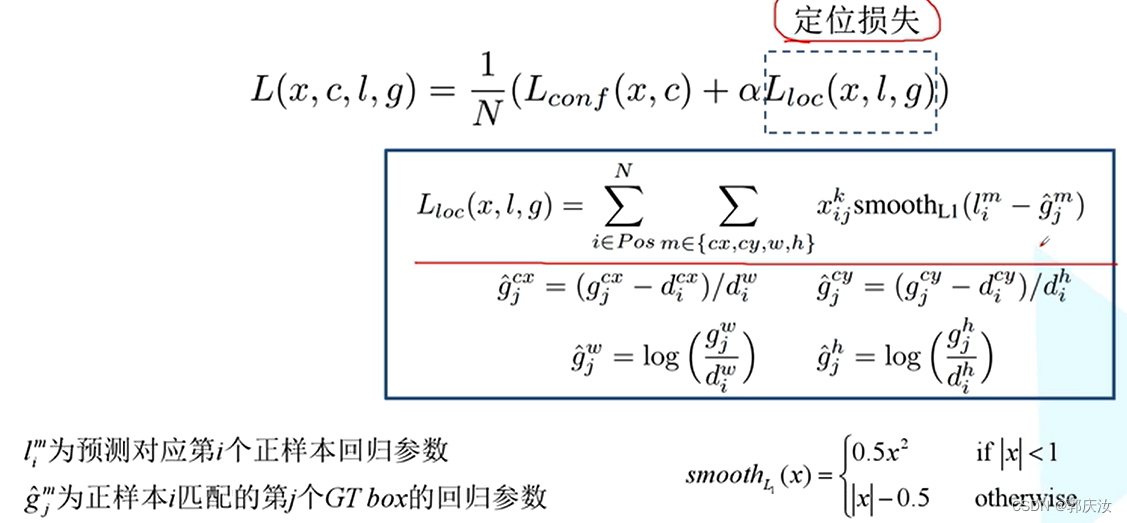
定位损失:
定位损失值针对于正样本而言
class Loss(nn.Module):
    """
        Implements the loss as the sum of the followings:
        1. Confidence Loss: All labels, with hard negative mining
        2. Localization Loss: Only on positive labels
        Suppose input dboxes has the shape 8732x4
    """
    def __init__(self, dboxes):
        super(Loss, self).__init__()
        # Two factor are from following links
        # http://jany.st/post/2017-11-05-single-shot-detector-ssd-from-scratch-in-tensorflow.html
        self.scale_xy = 1.0 / dboxes.scale_xy  # 10
        self.scale_wh = 1.0 / dboxes.scale_wh  # 5

        self.location_loss = nn.SmoothL1Loss(reduction='none')
        # [num_anchors, 4] -> [4, num_anchors] -> [1, 4, num_anchors]
        self.dboxes = nn.Parameter(dboxes(order="xywh").transpose(0, 1).unsqueeze(dim=0),
                                   requires_grad=False)

        self.confidence_loss = nn.CrossEntropyLoss(reduction='none')

    def _location_vec(self, loc):
        # type: (Tensor) -> Tensor
        """
        Generate Location Vectors
        计算ground truth相对anchors的回归参数
        :param loc: anchor匹配到的对应GTBOX Nx4x8732
        :return:
        """
        gxy = self.scale_xy * (loc[:, :2, :] - self.dboxes[:, :2, :]) / self.dboxes[:, 2:, :]  # Nx2x8732
        gwh = self.scale_wh * (loc[:, 2:, :] / self.dboxes[:, 2:, :]).log()  # Nx2x8732
        return torch.cat((gxy, gwh), dim=1).contiguous()

    def forward(self, ploc, plabel, gloc, glabel):
        # type: (Tensor, Tensor, Tensor, Tensor) -> Tensor
        """
            ploc, plabel: Nx4x8732, Nxlabel_numx8732
                predicted location and labels

            gloc, glabel: Nx4x8732, Nx8732
                ground truth location and labels
        """
        # 获取正样本的mask  Tensor: [N, 8732]
        mask = torch.gt(glabel, 0)  # (gt: >)
        # mask1 = torch.nonzero(glabel)
        # 计算一个batch中的每张图片的正样本个数 Tensor: [N]
        pos_num = mask.sum(dim=1)

        # 计算gt的location回归参数 Tensor: [N, 4, 8732]
        vec_gd = self._location_vec(gloc)

        # sum on four coordinates, and mask
        # 计算定位损失(只有正样本)
        loc_loss = self.location_loss(ploc, vec_gd).sum(dim=1)  # Tensor: [N, 8732]
        loc_loss = (mask.float() * loc_loss).sum(dim=1)  # Tenosr: [N]

        # hard negative mining Tenosr: [N, 8732]
        con = self.confidence_loss(plabel, glabel)

        # positive mask will never selected
        # 获取负样本
        con_neg = con.clone()
        con_neg[mask] = 0.0
        # 按照confidence_loss降序排列 con_idx(Tensor: [N, 8732])
        _, con_idx = con_neg.sort(dim=1, descending=True)
        _, con_rank = con_idx.sort(dim=1)  # 这个步骤比较巧妙

        # number of negative three times positive
        # 用于损失计算的负样本数是正样本的3倍(在原论文Hard negative mining部分),
        # 但不能超过总样本数8732
        neg_num = torch.clamp(3 * pos_num, max=mask.size(1)).unsqueeze(-1)
        neg_mask = torch.lt(con_rank, neg_num)  # (lt: <) Tensor [N, 8732]

        # confidence最终loss使用选取的正样本loss+选取的负样本loss
        con_loss = (con * (mask.float() + neg_mask.float())).sum(dim=1)  # Tensor [N]

        # avoid no object detected
        # 避免出现图像中没有GTBOX的情况
        total_loss = loc_loss + con_loss
        # eg. [15, 3, 5, 0] -> [1.0, 1.0, 1.0, 0.0]
        num_mask = torch.gt(pos_num, 0).float()  # 统计一个batch中的每张图像中是否存在正样本
        pos_num = pos_num.float().clamp(min=1e-6)  # 防止出现分母为零的情况
        ret = (total_loss * num_mask / pos_num).mean(dim=0)  # 只计算存在正样本的图像损失
        return ret
6、以ResNet50作为特征提取backbone
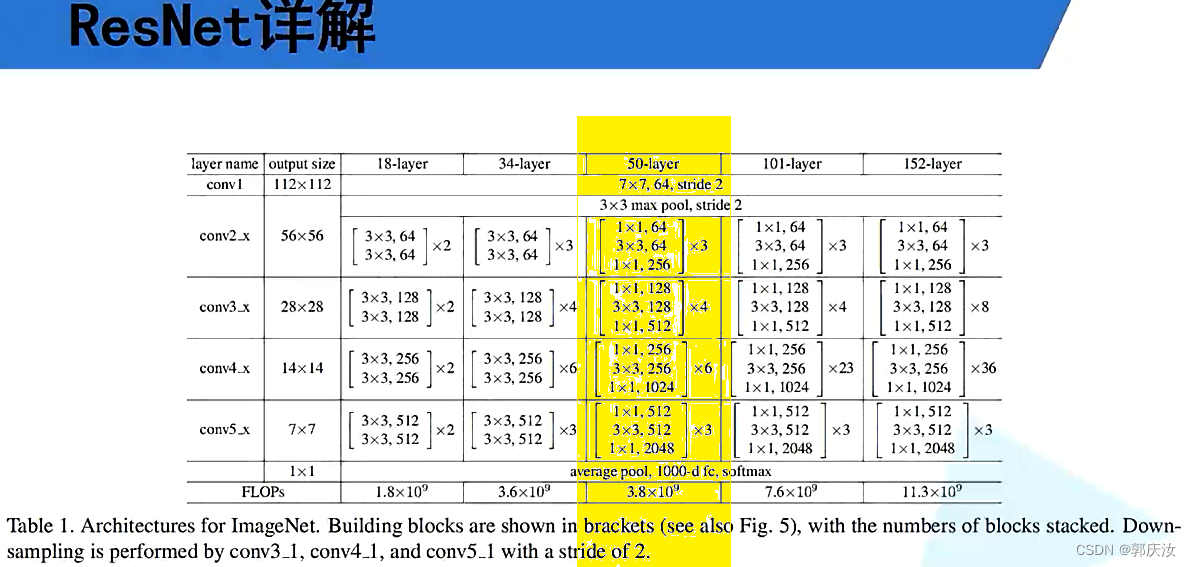
ResNet50+SSD整体架构:↓↓↓
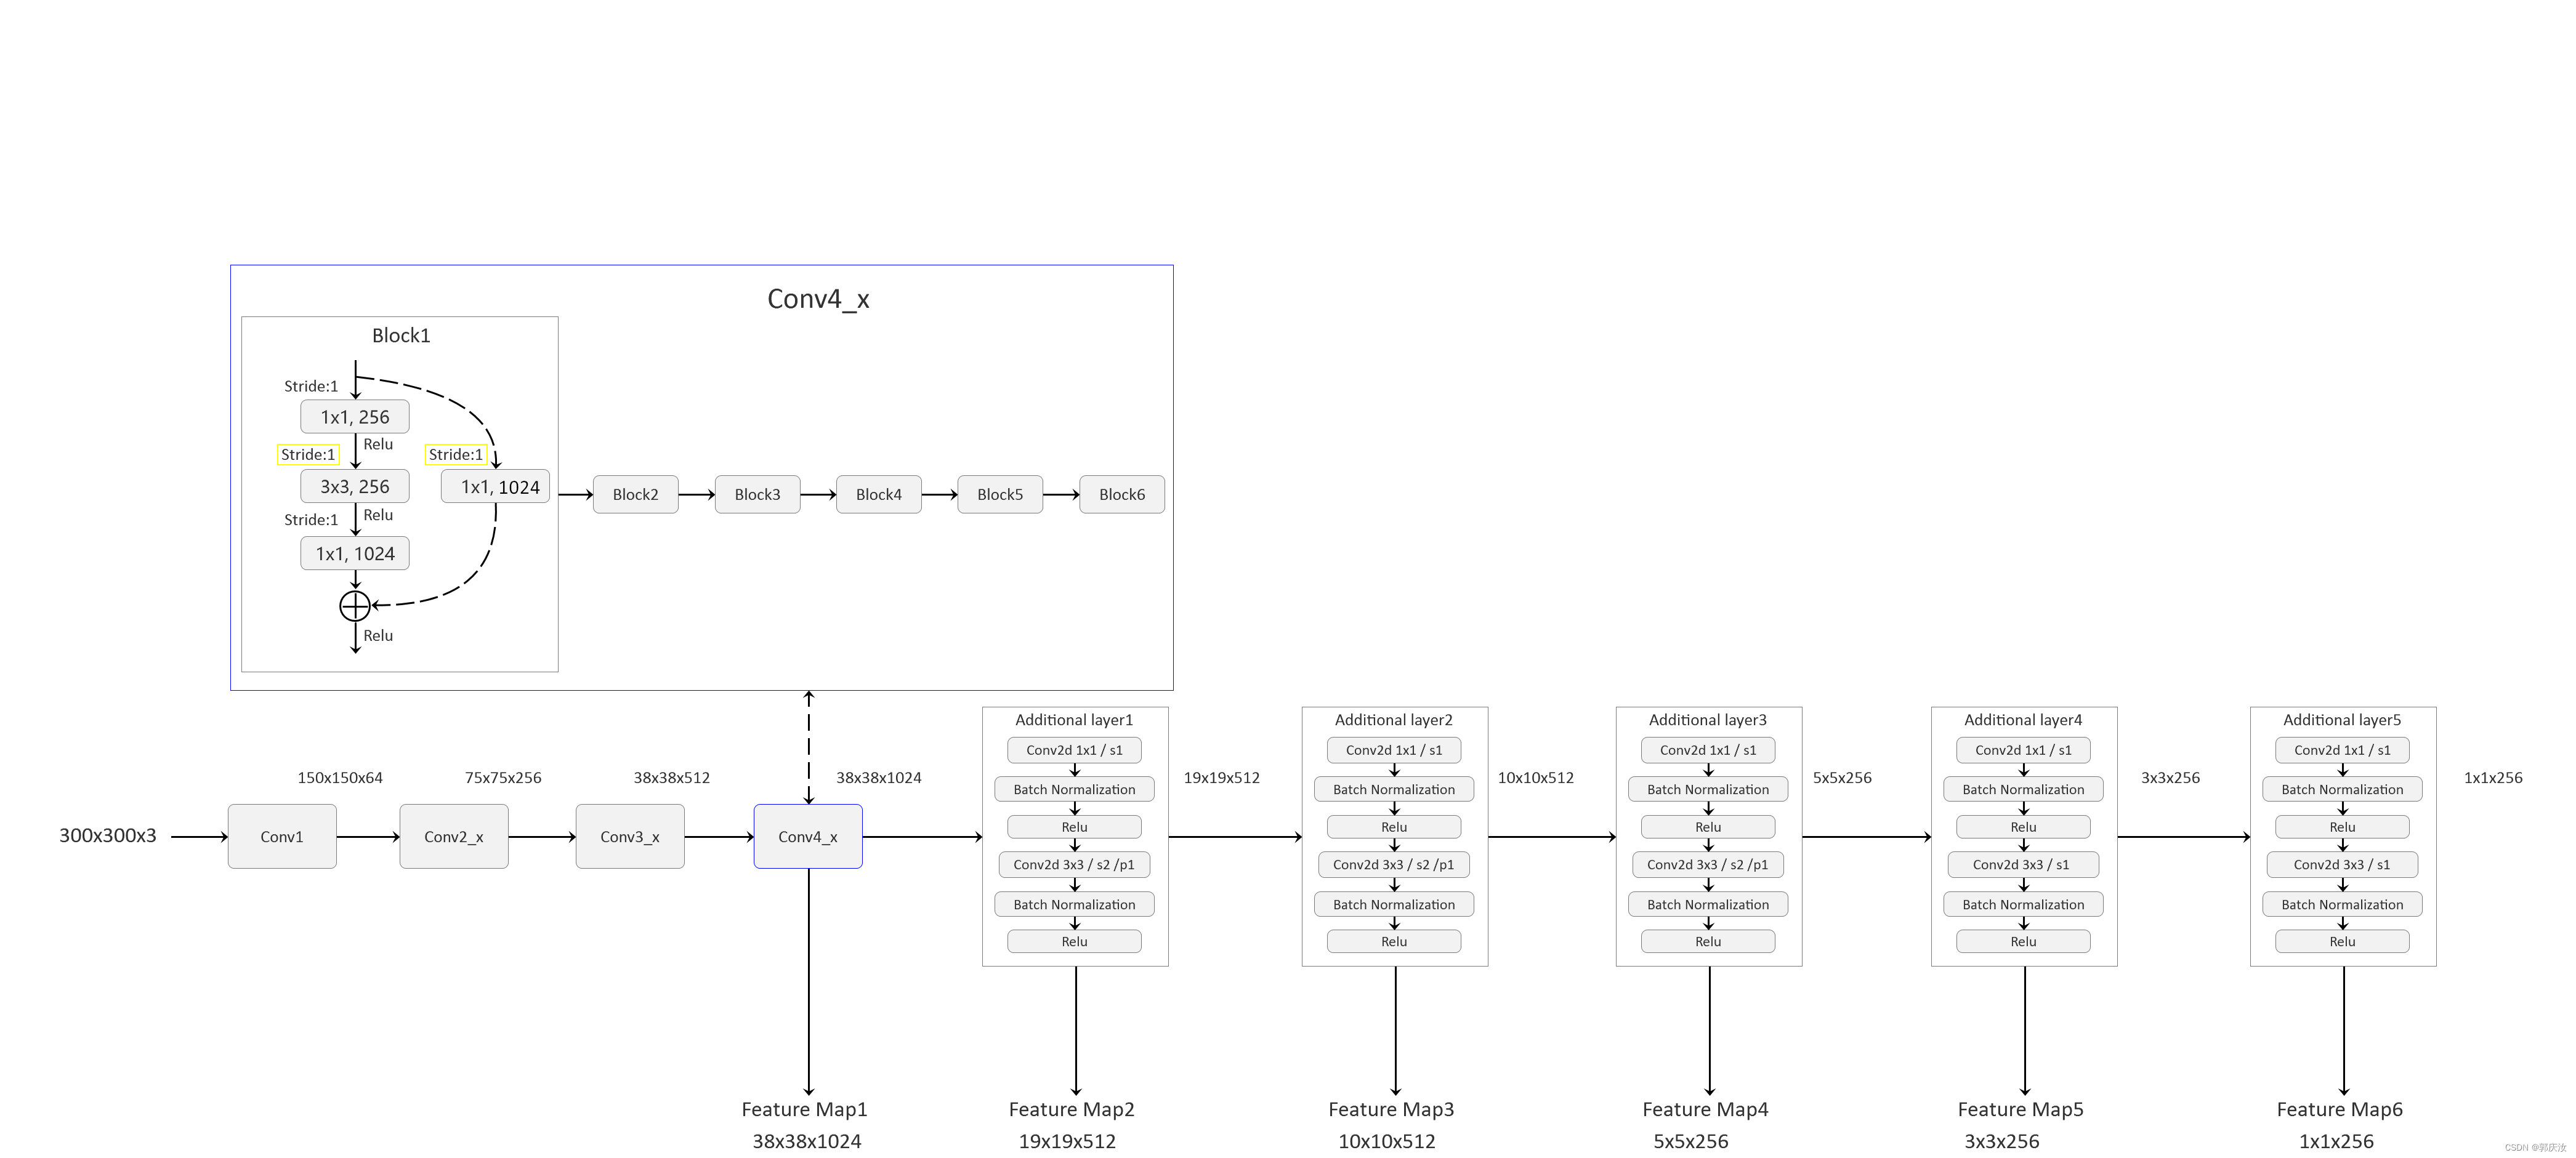
7、ResNet50+SSD网络模型搭建
res50_backbone.py ResNet50特征提取网络搭建
import torch.nn as nn
import torch


class Bottleneck(nn.Module):
    expansion = 4

    def __init__(self, in_channel, out_channel, stride=1, downsample=None):
        super(Bottleneck, self).__init__()
        self.conv1 = nn.Conv2d(in_channels=in_channel, out_channels=out_channel,
                               kernel_size=1, stride=1, bias=False)  # squeeze channels
        self.bn1 = nn.BatchNorm2d(out_channel)
        # -----------------------------------------
        self.conv2 = nn.Conv2d(in_channels=out_channel, out_channels=out_channel,
                               kernel_size=3, stride=stride, bias=False, padding=1)
        self.bn2 = nn.BatchNorm2d(out_channel)
        # -----------------------------------------
        self.conv3 = nn.Conv2d(in_channels=out_channel, out_channels=out_channel*self.expansion,
                               kernel_size=1, stride=1, bias=False)  # unsqueeze channels
        self.bn3 = nn.BatchNorm2d(out_channel*self.expansion)
        self.relu = nn.ReLU(inplace=True)
        self.downsample = downsample

    def forward(self, x):
        identity = x
        if self.downsample is not None:
            identity = self.downsample(x)

        out = self.conv1(x)
        out = self.bn1(out)
        out = self.relu(out)

        out = self.conv2(out)
        out = self.bn2(out)
        out = self.relu(out)

        out = self.conv3(out)
        out = self.bn3(out)

        out += identity
        out = self.relu(out)

        return out


class ResNet(nn.Module):

    def __init__(self, block, blocks_num, num_classes=1000, include_top=True):
        super(ResNet, self).__init__()
        self.include_top = include_top
        self.in_channel = 64

        self.conv1 = nn.Conv2d(3, self.in_channel, kernel_size=7, stride=2,
                               padding=3, bias=False)
        self.bn1 = nn.BatchNorm2d(self.in_channel)
        self.relu = nn.ReLU(inplace=True)
        self.maxpool = nn.MaxPool2d(kernel_size=3, stride=2, padding=1)
        self.layer1 = self._make_layer(block, 64, blocks_num[0])
        self.layer2 = self._make_layer(block, 128, blocks_num[1], stride=2)
        self.layer3 = self._make_layer(block, 256, blocks_num[2], stride=2)
        self.layer4 = self._make_layer(block, 512, blocks_num[3], stride=2)
        if self.include_top:
            self.avgpool = nn.AdaptiveAvgPool2d((1, 1))  # output size = (1, 1)
            self.fc = nn.Linear(512 * block.expansion, num_classes)

        for m in self.modules():
            if isinstance(m, nn.Conv2d):
                nn.init.kaiming_normal_(m.weight, mode='fan_out', nonlinearity='relu')

    def _make_layer(self, block, channel, block_num, stride=1):
        downsample = None
        if stride != 1 or self.in_channel != channel * block.expansion:
            downsample = nn.Sequential(
                nn.Conv2d(self.in_channel, channel * block.expansion, kernel_size=1, stride=stride, bias=False),
                nn.BatchNorm2d(channel * block.expansion))

        layers = []
        layers.append(block(self.in_channel, channel, downsample=downsample, stride=stride))
        self.in_channel = channel * block.expansion

        for _ in range(1, block_num):
            layers.append(block(self.in_channel, channel))

        return nn.Sequential(*layers)

    def forward(self, x):
        x = self.conv1(x)
        x = self.bn1(x)
        x = self.relu(x)
        x = self.maxpool(x)

        x = self.layer1(x)
        x = self.layer2(x)
        x = self.layer3(x)
        x = self.layer4(x)

        if self.include_top:
            x = self.avgpool(x)
            x = torch.flatten(x, 1)
            x = self.fc(x)

        return x


def resnet50(num_classes=1000, include_top=True):
    return ResNet(Bottleneck, [3, 4, 6, 3], num_classes=num_classes, include_top=include_top)
ssd_model.py ResNet50+SSD结构搭建
import torch
from torch import nn, Tensor
from torch.jit.annotations import List

from .res50_backbone import resnet50
from .utils import dboxes300_coco, Encoder, PostProcess


class Backbone(nn.Module):
    def __init__(self, pretrain_path=None):
        super(Backbone, self).__init__()
        net = resnet50()
        self.out_channels = [1024, 512, 512, 256, 256, 256]   # 对应着每一个预测特征层的channels

        if pretrain_path is not None:
            net.load_state_dict(torch.load(pretrain_path))

        self.feature_extractor = nn.Sequential(*list(net.children())[:7])   # 构建特征提取部分

        conv4_block1 = self.feature_extractor[-1][0]

        # 修改conv4_block1的步距,从2->1
        conv4_block1.conv1.stride = (1, 1)
        conv4_block1.conv2.stride = (1, 1)
        conv4_block1.downsample[0].stride = (1, 1)

    def forward(self, x):
        x = self.feature_extractor(x)
        return x


class SSD300(nn.Module):
    def __init__(self, backbone=None, num_classes=21):
        super(SSD300, self).__init__()
        if backbone is None:
            raise Exception("backbone is None")
        if not hasattr(backbone, "out_channels"):
            raise Exception("the backbone not has attribute: out_channel")
        self.feature_extractor = backbone

        self.num_classes = num_classes
        # out_channels = [1024, 512, 512, 256, 256, 256] for resnet50
        self._build_additional_features(self.feature_extractor.out_channels)
        self.num_defaults = [4, 6, 6, 6, 4, 4]
        location_extractors = []
        confidence_extractors = []

        # out_channels = [1024, 512, 512, 256, 256, 256] for resnet50
        for nd, oc in zip(self.num_defaults, self.feature_extractor.out_channels):
            # nd is number_default_boxes, oc is output_channel
            location_extractors.append(nn.Conv2d(oc, nd * 4, kernel_size=3, padding=1))
            confidence_extractors.append(nn.Conv2d(oc, nd * self.num_classes, kernel_size=3, padding=1))

        self.loc = nn.ModuleList(location_extractors)
        self.conf = nn.ModuleList(confidence_extractors)
        self._init_weights()

        default_box = dboxes300_coco()
        self.compute_loss = Loss(default_box)
        self.encoder = Encoder(default_box)
        self.postprocess = PostProcess(default_box)

    def _build_additional_features(self, input_size):
        """
        为backbone(resnet50)添加额外的一系列卷积层,得到相应的一系列特征提取器
        :param input_size:
        :return:
        """
        additional_blocks = []
        # input_size = [1024, 512, 512, 256, 256, 256] for resnet50
        middle_channels = [256, 256, 128, 128, 128]
        for i, (input_ch, output_ch, middle_ch) in enumerate(zip(input_size[:-1], input_size[1:], middle_channels)):
            padding, stride = (1, 2) if i < 3 else (0, 1)
            layer = nn.Sequential(
                nn.Conv2d(input_ch, middle_ch, kernel_size=1, bias=False),
                nn.BatchNorm2d(middle_ch),
                nn.ReLU(inplace=True),
                nn.Conv2d(middle_ch, output_ch, kernel_size=3, padding=padding, stride=stride, bias=False),
                nn.BatchNorm2d(output_ch),
                nn.ReLU(inplace=True),
            )
            additional_blocks.append(layer)
        self.additional_blocks = nn.ModuleList(additional_blocks)

    def _init_weights(self):
        layers = [*self.additional_blocks, *self.loc, *self.conf]
        for layer in layers:
            for param in layer.parameters():
                if param.dim() > 1:
                    nn.init.xavier_uniform_(param)

    # Shape the classifier to the view of bboxes
    def bbox_view(self, features, loc_extractor, conf_extractor):
        locs = []
        confs = []
        for f, l, c in zip(features, loc_extractor, conf_extractor):
            # [batch, n*4, feat_size, feat_size] -> [batch, 4, -1]
            locs.append(l(f).view(f.size(0), 4, -1))
            # [batch, n*classes, feat_size, feat_size] -> [batch, classes, -1]
            confs.append(c(f).view(f.size(0), self.num_classes, -1))

        locs, confs = torch.cat(locs, 2).contiguous(), torch.cat(confs, 2).contiguous()
        return locs, confs

    def forward(self, image, targets=None):
        x = self.feature_extractor(image)

        # Feature Map 38x38x1024, 19x19x512, 10x10x512, 5x5x256, 3x3x256, 1x1x256
        detection_features = torch.jit.annotate(List[Tensor], [])  # [x]
        detection_features.append(x)
        for layer in self.additional_blocks:
            x = layer(x)
            detection_features.append(x)

        # Feature Map 38x38x4, 19x19x6, 10x10x6, 5x5x6, 3x3x4, 1x1x4
        locs, confs = self.bbox_view(detection_features, self.loc, self.conf)

        # For SSD 300, shall return nbatch x 8732 x {nlabels, nlocs} results
        # 38x38x4 + 19x19x6 + 10x10x6 + 5x5x6 + 3x3x4 + 1x1x4 = 8732

        if self.training:
            if targets is None:
                raise ValueError("In training mode, targets should be passed")
            # bboxes_out (Tensor 8732 x 4), labels_out (Tensor 8732)
            bboxes_out = targets['boxes']
            bboxes_out = bboxes_out.transpose(1, 2).contiguous()
            # print(bboxes_out.is_contiguous())
            labels_out = targets['labels']
            # print(labels_out.is_contiguous())

            # ploc, plabel, gloc, glabel
            loss = self.compute_loss(locs, confs, bboxes_out, labels_out)
            return {"total_losses": loss}

        # 将预测回归参数叠加到default box上得到最终预测box,并执行非极大值抑制虑除重叠框
        # results = self.encoder.decode_batch(locs, confs)
        results = self.postprocess(locs, confs)
        return results


class Loss(nn.Module):
    """
        Implements the loss as the sum of the followings:
        1. Confidence Loss: All labels, with hard negative mining
        2. Localization Loss: Only on positive labels
        Suppose input dboxes has the shape 8732x4
    """
    def __init__(self, dboxes):
        super(Loss, self).__init__()
        # Two factor are from following links
        # http://jany.st/post/2017-11-05-single-shot-detector-ssd-from-scratch-in-tensorflow.html
        self.scale_xy = 1.0 / dboxes.scale_xy  # 10
        self.scale_wh = 1.0 / dboxes.scale_wh  # 5

        self.location_loss = nn.SmoothL1Loss(reduction='none')
        # [num_anchors, 4] -> [4, num_anchors] -> [1, 4, num_anchors]
        self.dboxes = nn.Parameter(dboxes(order="xywh").transpose(0, 1).unsqueeze(dim=0),
                                   requires_grad=False)

        self.confidence_loss = nn.CrossEntropyLoss(reduction='none')

    def _location_vec(self, loc):
        # type: (Tensor) -> Tensor
        """
        Generate Location Vectors
        计算ground truth相对anchors的回归参数
        :param loc: anchor匹配到的对应GTBOX Nx4x8732
        :return:
        """
        gxy = self.scale_xy * (loc[:, :2, :] - self.dboxes[:, :2, :]) / self.dboxes[:, 2:, :]  # Nx2x8732
        gwh = self.scale_wh * (loc[:, 2:, :] / self.dboxes[:, 2:, :]).log()  # Nx2x8732
        return torch.cat((gxy, gwh), dim=1).contiguous()

    def forward(self, ploc, plabel, gloc, glabel):
        # type: (Tensor, Tensor, Tensor, Tensor) -> Tensor
        """
            ploc, plabel: Nx4x8732, Nxlabel_numx8732
                predicted location and labels

            gloc, glabel: Nx4x8732, Nx8732
                ground truth location and labels
        """
        # 获取正样本的mask  Tensor: [N, 8732]
        mask = torch.gt(glabel, 0)  # (gt: >)
        # mask1 = torch.nonzero(glabel)
        # 计算一个batch中的每张图片的正样本个数 Tensor: [N]
        pos_num = mask.sum(dim=1)

        # 计算gt的location回归参数 Tensor: [N, 4, 8732]
        vec_gd = self._location_vec(gloc)

        # sum on four coordinates, and mask
        # 计算定位损失(只有正样本)
        loc_loss = self.location_loss(ploc, vec_gd).sum(dim=1)  # Tensor: [N, 8732]
        loc_loss = (mask.float() * loc_loss).sum(dim=1)  # Tenosr: [N]

        # hard negative mining Tenosr: [N, 8732]
        con = self.confidence_loss(plabel, glabel)

        # positive mask will never selected
        # 获取负样本
        con_neg = con.clone()
        con_neg[mask] = 0.0
        # 按照confidence_loss降序排列 con_idx(Tensor: [N, 8732])
        _, con_idx = con_neg.sort(dim=1, descending=True)
        _, con_rank = con_idx.sort(dim=1)  # 这个步骤比较巧妙

        # number of negative three times positive
        # 用于损失计算的负样本数是正样本的3倍(在原论文Hard negative mining部分),
        # 但不能超过总样本数8732
        neg_num = torch.clamp(3 * pos_num, max=mask.size(1)).unsqueeze(-1)
        neg_mask = torch.lt(con_rank, neg_num)  # (lt: <) Tensor [N, 8732]

        # confidence最终loss使用选取的正样本loss+选取的负样本loss
        con_loss = (con * (mask.float() + neg_mask.float())).sum(dim=1)  # Tensor [N]

        # avoid no object detected
        # 避免出现图像中没有GTBOX的情况
        total_loss = loc_loss + con_loss
        # eg. [15, 3, 5, 0] -> [1.0, 1.0, 1.0, 0.0]
        num_mask = torch.gt(pos_num, 0).float()  # 统计一个batch中的每张图像中是否存在正样本
        pos_num = pos_num.float().clamp(min=1e-6)  # 防止出现分母为零的情况
        ret = (total_loss * num_mask / pos_num).mean(dim=0)  # 只计算存在正样本的图像损失
        return ret
8、Default Box的生成原理
**、训练自己的SSD目标检测模型
ResNet50官方预训练权重
预训练权重下载地址(下载后放入src文件夹中):
ResNet50+SSD: https://ngc.nvidia.com/catalog/models
搜索ssd -> 找到SSD for PyTorch(FP32) -> download FP32 -> 解压文件
