目录
一,SpringBoot配置文件
1,配置文件的作用
2,配置文件的格式
二,properties 配置文件说明
1,properties 基本语法
2,读取配置文件
3,properties 的缺点
三,yml配置文件说明
1,yml 基本语法
2,yml配置不同的数据类型
3,yml读取配置文件
读取普通变量:
读取对象(需要使用注解@ConfigurationProperties):
读取字符串:
4,yml的优点分析
四,properties VS yml
一,SpringBoot配置文件
1,配置文件的作用
- 数据库的连接信息(包含用户名和密码的设置);
- 项目的启动端口;
- 第三方系统的调用秘钥等信息;
- 用于发现和定位问题的普通日志和异常日志等.
2,配置文件的格式
SpringBoot配置文件主要分为两种:
- .properties
- .yml
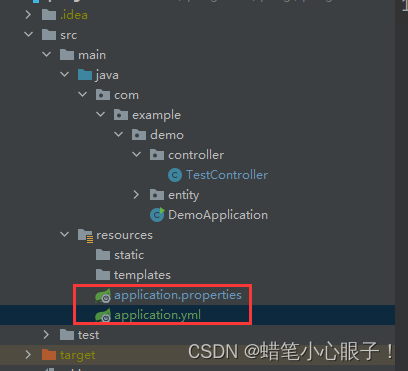
- 理论上讲 properties 可以和 yml ⼀起存在于⼀个项目当中,当 properties 和 yml ⼀起存在⼀个项目中时,如果配置文件中出现了同样的配置,比如 properties 和 yml 中都配置了“server.port”,那么这个时候会以 properties 中的配置为主,也就是 .properties 配置文件的优先级最高,但加载完 .properties 文件之后,也会加载 .yml 文件的配置信息;
- 虽然理论上来讲 .properties 可以和 .yml 共存,但实际的业务当中,我们通常会采取⼀种统⼀的配置文件格式,这样可以更好的维护(降低故障率)。
二,properties 配置文件说明
properties配置文件是最早期的配置文件,也是创建SpringBoot项目的默认文件
1,properties 基本语法
properties 是以键值对的形式进行书写的,key与value之间是以“=”连接的;

2,读取配置文件
在properties 配置文件中所配置的内容(不管是系统配置项还是自定义配置项)都可以被读取到,需要使用@Value注解,假设需要获取配置文件中的端口号:
//配置文件
server.port=8080
spring.datasource.url=jdbc:mysql://127.0.0.1/student?characterEncoding=utf8
spring.datasource.username=root
spring.datasource.password=root

//读取配置文件类
package com.example.demo.controller;

import org.springframework.beans.factory.annotation.Value;
import org.springframework.stereotype.Controller;
import org.springframework.web.bind.annotation.RequestMapping;
import org.springframework.web.bind.annotation.ResponseBody;


@Controller
@ResponseBody //当前类中所有的方法返回的是非静态页面的数据
public class TestController {
    @Value("${server.port}")
    private int port;//需要定义一个变量 目的就是把从配置文件中读取到的内容赋值给这个变量

    @RequestMapping("/sayHi")
    public String sayHi() {
        return "hello world -> " + port;
    }
}
在浏览器中输入URL获取页面:

3,properties 的缺点
以刚刚上述的properties 配置文件来说,我们可以发现properties 类型的配置文件key值存在较多的冗余信息,于是便有了yml配置文件来简化代码.

三,yml配置文件说明
1,yml 基本语法
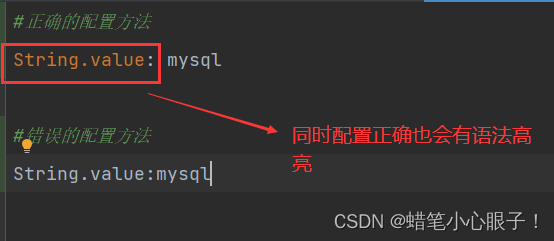
以数据库连接为例书写yml配置文件:

2,yml配置不同的数据类型
# 字符串
string.value: Hello
# 布尔值,true或false
boolean.value: true
boolean.value1: false
# 整数
int.value: 10
int.value1: 0b1010_0111_0100_1010_1110 # ⼆进制
# 浮点数
float.value: 3.14159
float.value1: 314159e-5 # 科学计数法
# Null,~代表null
null.value: ~
3,yml读取配置文件
yml读取配置文件的方式和properties 相同,使用@Value注解即可;
读取普通变量:
//配置文件
server:
  port: 8080

//读取类
package com.example.demo.controller;

import org.springframework.beans.factory.annotation.Value;
import org.springframework.stereotype.Controller;
import org.springframework.web.bind.annotation.RequestMapping;
import org.springframework.web.bind.annotation.ResponseBody;


@Controller
@ResponseBody //当前类中所有的方法返回的是非静态页面的数据
public class TestController {
    @Value("${server.port}")
    private int port;//需要定义一个变量 目的就是把从配置文件中读取到的内容赋值给这个变量

    @RequestMapping("/sayHi")
    public String sayHi() {
        return "hello world -> " + port;
    }
}
读取对象(需要使用注解@ConfigurationProperties):
//配置文件
student:
  id: 1
  name: 张三
  age: 18

//Student类
package com.example.demo.entity;

import lombok.Getter;
import lombok.Setter;
import lombok.ToString;
import org.springframework.boot.context.properties.ConfigurationProperties;
import org.springframework.stereotype.Component;


@ConfigurationProperties("student")
@Component
@Setter     //setter方法一定不能少 因为你从配置文件中拿到的数据必须通过setter方法才能赋值给对象
@Getter
@ToString
public class Student {
    private int id;
    private String name;
    private int age;

}

//读取类
package com.example.demo.controller;

import com.example.demo.entity.Student;
import org.springframework.beans.factory.annotation.Autowired;
import org.springframework.stereotype.Controller;
import org.springframework.web.bind.annotation.ResponseBody;

import javax.annotation.PostConstruct;


@Controller
@ResponseBody //当前类中所有的方法返回的是非静态页面的数据
public class TestController {
    @Autowired
    private Student student;

    @PostConstruct
    public void doPostConstruct() {
        System.out.println("========");
        System.out.println(student);
        System.out.println("========");
    }
}
注意:这里的Student类必须提供所有属性的getter和setter方法(或者注入lombok依赖的话加上@Setter和@Getter注解),因为从配置文件中拿到的数据必须通过setter方法才能赋值给对象!
读取字符串:
//配置文件
String:
  str1:  Hello \n Spring Boot
  str2:  'Hello \n Spring Boot'
  str3:  "Hello \n Spring Boot"

//读取类
package com.example.demo.controller;

import org.springframework.beans.factory.annotation.Value;
import org.springframework.stereotype.Controller;
import org.springframework.web.bind.annotation.ResponseBody;

import javax.annotation.PostConstruct;

@Controller
@ResponseBody //当前类中所有的方法返回的是非静态页面的数据
public class TestController {
    @Value("${String.str1}")
    private String str1;
    @Value("${String.str2}")
    private String str2;
    @Value("${String.str3}")
    private String str3;

    @PostConstruct
    public void doPostConstruct() {
        System.out.println("========");
        System.out.println(str1);
        System.out.println(str2);
        System.out.println(str3);
        System.out.println("========");
    }
}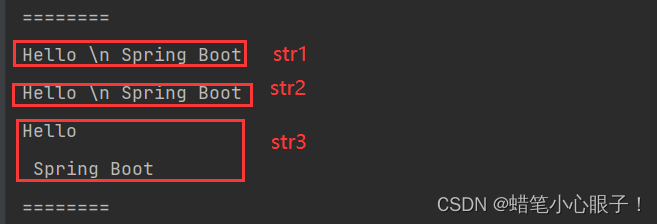
注意:
- 字符串默认不用加上单引号或者双引号;
- 单引号会转义特殊字符,特殊字符最终只是一个普通的字符串数据;
- 双引号不会转义字符串里面的特殊字符,特殊字符会作为本身想表示的意思.
4,yml的优点分析
- yml 是⼀个可读性高,写法简单、易于理解,它的语法和 JSON 语言类似;
- yml 支持更多的数据类型,它可以简单表达清单(数组)、散列表,标量等数据形态。它使用空白符号缩进和大量依赖外观的特色,特别适合用来表达或编辑数据结构、各种配置文件等;
- yml 支持更多的编程语言,它不止是 Java 中可以使用在 Golang、PHP、Python、Ruby、 JavaScript、Perl 中.
四,properties VS yml
- properties 是以 key=value 的形式配置的键值类型的配置文件,而 yml 使用的是类似 json 格式的树形配置⽅式进⾏配置的,yml 层级之间使用换行缩进的方式配置,key 和 value 之间使用“: ”英文冒号加空格的方式设置,并且空格不可省略;
- properties 为早期并且默认的配置文件格式,但其配置存在⼀定的冗余数据,使用 yml 可以很好的解决数据冗余的问题;
- yml 通用性更好,支持更多语言,如 Java、Go、Python 等,如果是云服务器开发,可以使用⼀份配置文件作为 Java 和 Go 的共同配置文件;yml 支持更多的数据类型.
