夜莺监控搭建V6版本
- v6版本系统架构
- 安装部署
- 安装时序数据库
- 安装mysql、redis和n9e(夜莺主程序)
- 安装categraf
- 登录平台
- 如何修改密码
- 添加数据源
官网: https://flashcat.cloud/
GitHub项目地址: https://github.com/ccfos/nightingale
帮助文档: https://flashcat.cloud/docs/
Releases: https://github.com/ccfos/nightingale/releases
VictoriaMetrics: https://github.com/VictoriaMetrics/VictoriaMetrics
v6版本系统架构
中心汇聚式部署方案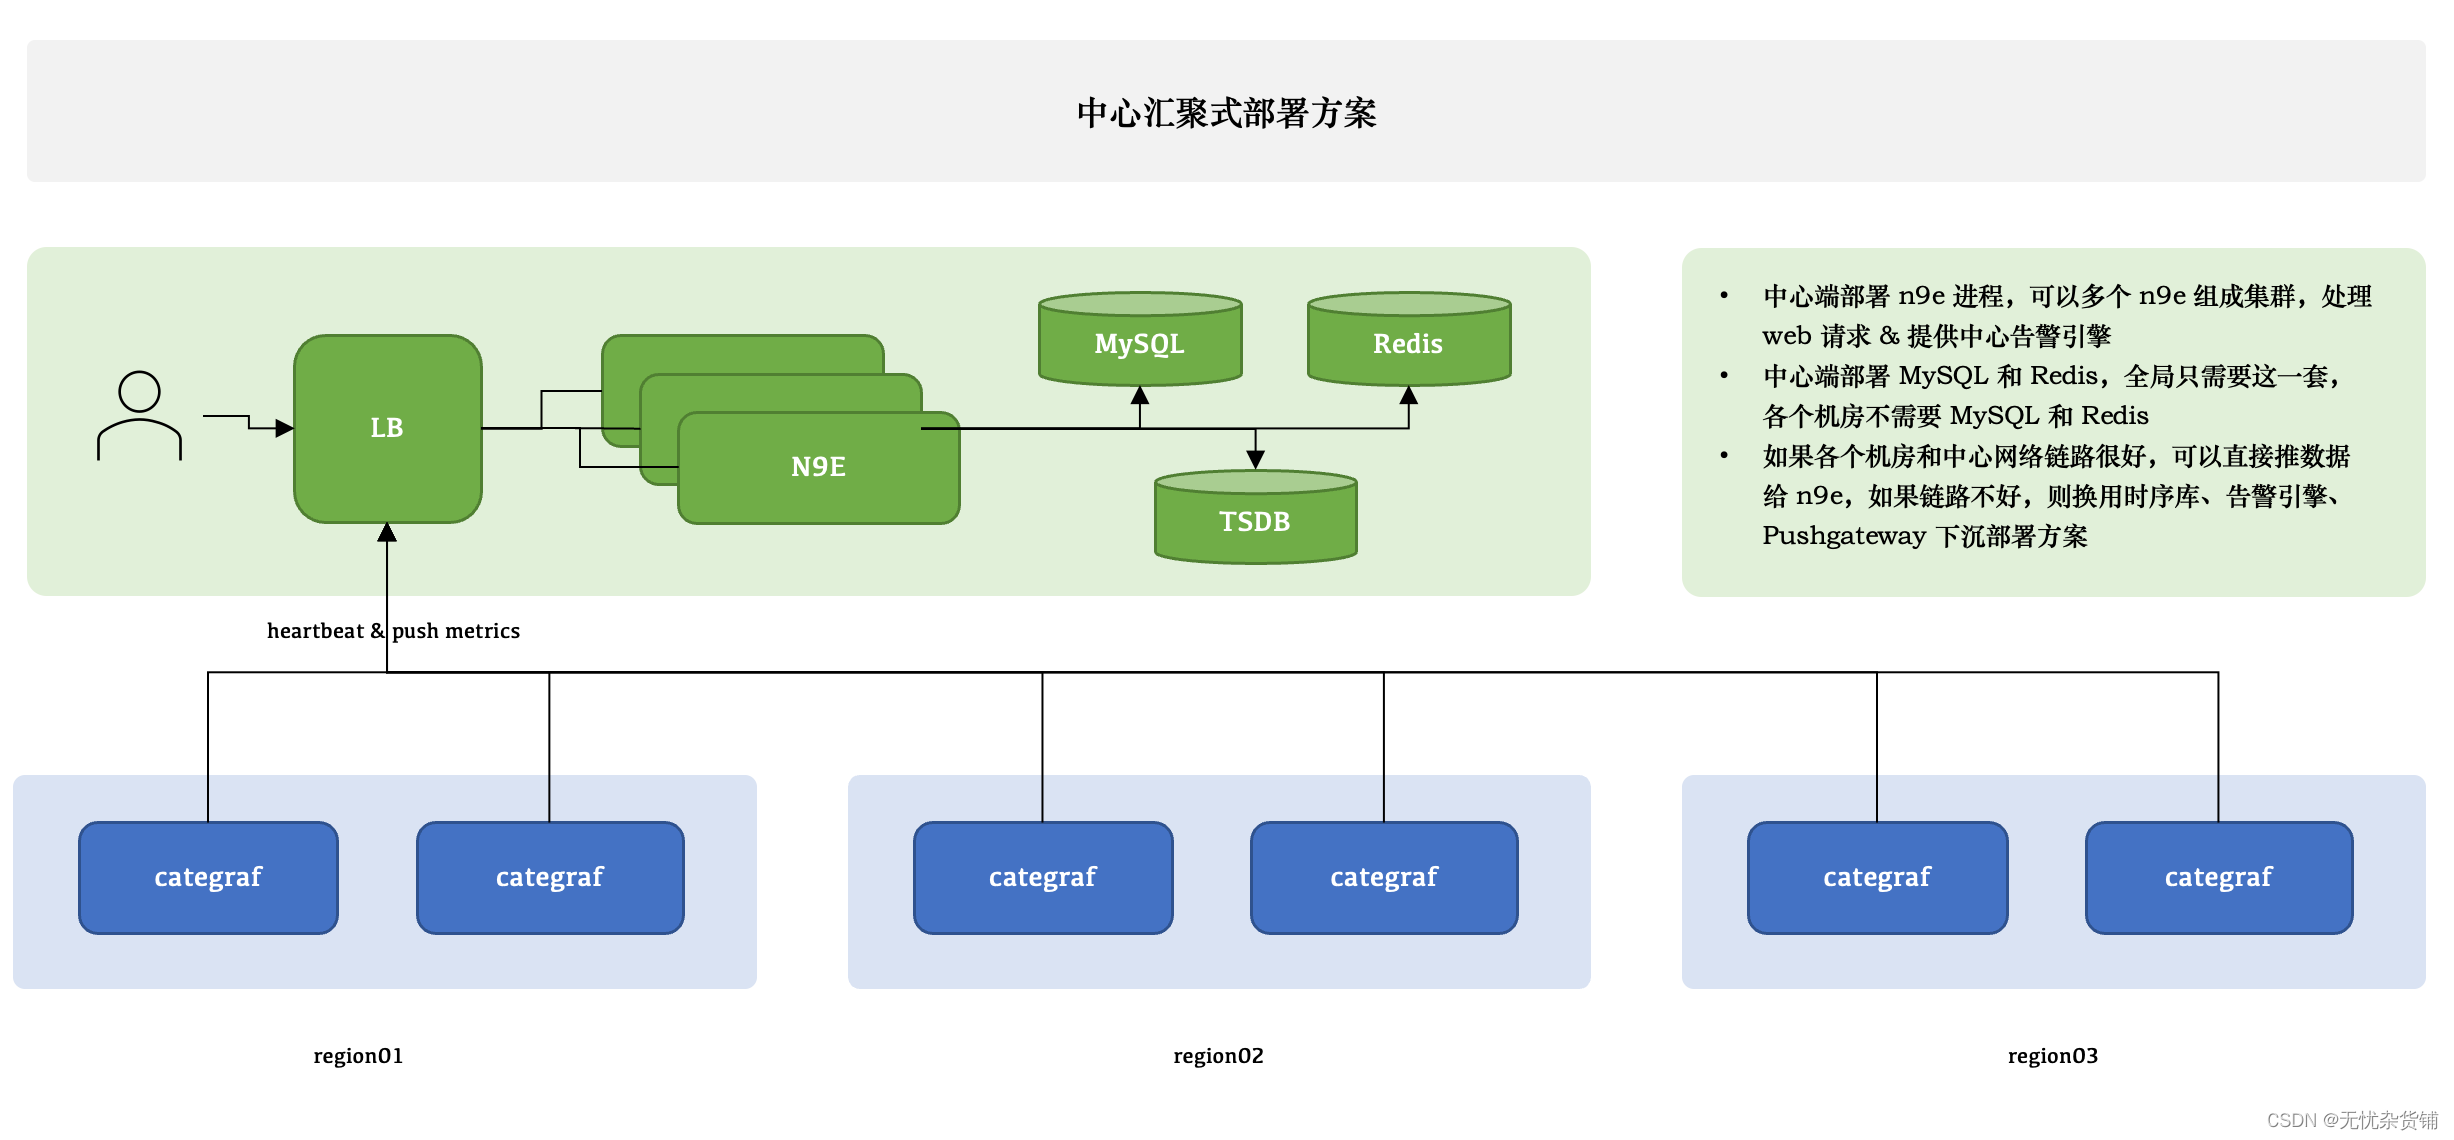
夜莺只有一个模块了,就是 n9e,可以部署多个 n9e 实例组成集群,n9e 依赖 2 个存储,数据库、Redis,数据库可以使用 MySQL 或 Postgres,自己按需选用。
n9e 提供的是 HTTP 接口,前面负载均衡可以是 4 层的,也可以是 7 层的。一般就选用 Nginx 就可以了。
n9e 这个模块接收到数据之后,需要转发给后端的时序库,相关配置是:
[Pushgw]
LabelRewrite = true
[[Pushgw.Writers]]
Url = "http://127.0.0.1:9090/api/v1/write"
相当于是,虽然数据源可以在页面配置了,但是上报转发链路,还是需要在配置文件指定。
所有机房的 agent( 比如 Categraf、Telegraf、 Grafana-agent、Datadog-agent ),都直接推数据给 n9e,这个架构最为简单,维护成本最低。当然,前提是要求机房之间网络链路比较好,一般有专线。如果网络链路不好,则要使用下面的部署方式了。
边缘下沉式混杂部署方案

这个图尝试解释 3 种不同的情形,比如 A 机房和中心网络链路很好,Categraf 可以直接汇报数据给中心 n9e 模块,另一个机房网络链路不好,就需要把时序库下沉部署,时序库下沉了,对应的告警引擎和转发网关也都要跟随下沉,这样数据不会跨机房传输,比较稳定。但是心跳还是需要往中心心跳,要不然在对象列表里看不到机器的 CPU、内存使用率。还有的时候,可能是接入的一个已有的 Prometheus,数据采集没有走 Categraf,那此时只需要把 Prometheus 作为数据源接入夜莺即可,可以在夜莺里看图、配告警规则,但是就是在对象列表里看不到,也不能使用告警自愈的功能,问题也不大,核心功能都不受影响。
边缘机房,下沉部署时序库、告警引擎、转发网关的时候,要注意,告警引擎需要依赖数据库,因为要同步告警规则,转发网关也要依赖数据库,因为要注册对象到数据库里去,需要打通相关网络,告警引擎和转发网关都不用Redis,所以无需为Redis打通网络。
安装部署
安装时序数据库
时序数据库可以安装prometheus或VictoriaMetrics,选择其中一个即可
安装 prometheus
# install prometheus
mkdir -p /opt/prometheus
wget https://s3-gz01.didistatic.com/n9e-pub/prome/prometheus-2.28.0.linux-amd64.tar.gz -O prometheus-2.28.0.linux-amd64.tar.gz
tar xf prometheus-2.28.0.linux-amd64.tar.gz
cp -far prometheus-2.28.0.linux-amd64/*  /opt/prometheus/

# service
cat <<EOF >/etc/systemd/system/prometheus.service
[Unit]
Description="prometheus"
Documentation=https://prometheus.io/
After=network.target

[Service]
Type=simple

ExecStart=/opt/prometheus/prometheus  --config.file=/opt/prometheus/prometheus.yml --storage.tsdb.path=/opt/prometheus/data --web.enable-lifecycle --enable-feature=remote-write-receiver --query.lookback-delta=2m

Restart=on-failure
SuccessExitStatus=0
LimitNOFILE=65536
StandardOutput=syslog
StandardError=syslog
SyslogIdentifier=prometheus

[Install]
WantedBy=multi-user.target
EOF

systemctl daemon-reload
systemctl enable prometheus
systemctl restart prometheus
systemctl status prometheus
安装VictoriaMetrics
mkdir /opt/vm && cd /opt/vm
wget https://github.com/VictoriaMetrics/VictoriaMetrics/releases/download/v1.90.0/victoria-metrics-linux-amd64-v1.90.0.tar.gz
./victoria-metrics-prod —help
nohup ./victoria-metrics-prod &>stdout.log
安装mysql、redis和n9e(夜莺主程序)
# install mysql
yum -y install mariadb*
systemctl enable mariadb
systemctl restart mariadb
# 设置密码
mysql -e "SET PASSWORD FOR 'root'@'localhost' = PASSWORD('1234');"


# install redis
yum -y install epel-release
yum -y install redis
systemctl enable redis
systemctl restart redis

mkdir /opt/n9e
cd /opt/n9e
# 下载n9e
wget https://download.flashcat.cloud/n9e-v6.0.0-ga.4.1-linux-amd64.tar.gz
# 确认目录结构
#tar ztvf n9e-v6.0.0-ga.4.1-linux-amd64.tar.gz
# 解压到n9e目录
tar zxvf n9e-v6.0.0-ga.4.1-linux-amd64.tar.gz
mysql -uroot -p1234 < n9e.sql
nohup ./n9e &> n9e.log &
ps aux | grep n9e
# 查询启动的进程端口
ss -ltnp
# 查看日志是否正常
tail -f n9e.log
安装categraf
cd /opt
wget https://download.flashcat.cloud/categraf-v0.2.39-linux-amd64.tar.gz
tar xzvf categraf-v0.2.39-linux-amd64.tar.gz
mv categraf-v0.2.39-linux-amd64 categraf
cd categraf/conf # 可以看到很多插件,每一个input都是一个插件
vi config.toml
[[writers]] # 配置n9e的地址
[heartbeat] # 配置n9e的地址
cd ..
# 测试
./categraf --test —debug
# 启动并放入后台
nohup ./categraf &>stdout.log &
# 确认进程是否正常启动
ps aux | grep categraf
# 查看日志是否正常
tail -f stdout.log
登录平台
夜莺服务端部署好之后,浏览器访问 你的搭建ip加17000端口 就可以体验相关功能了,默认用户是 root,密码是 root.2020

如何修改密码
点击超管——点击个人信息——修改密码——确认修改


添加数据源
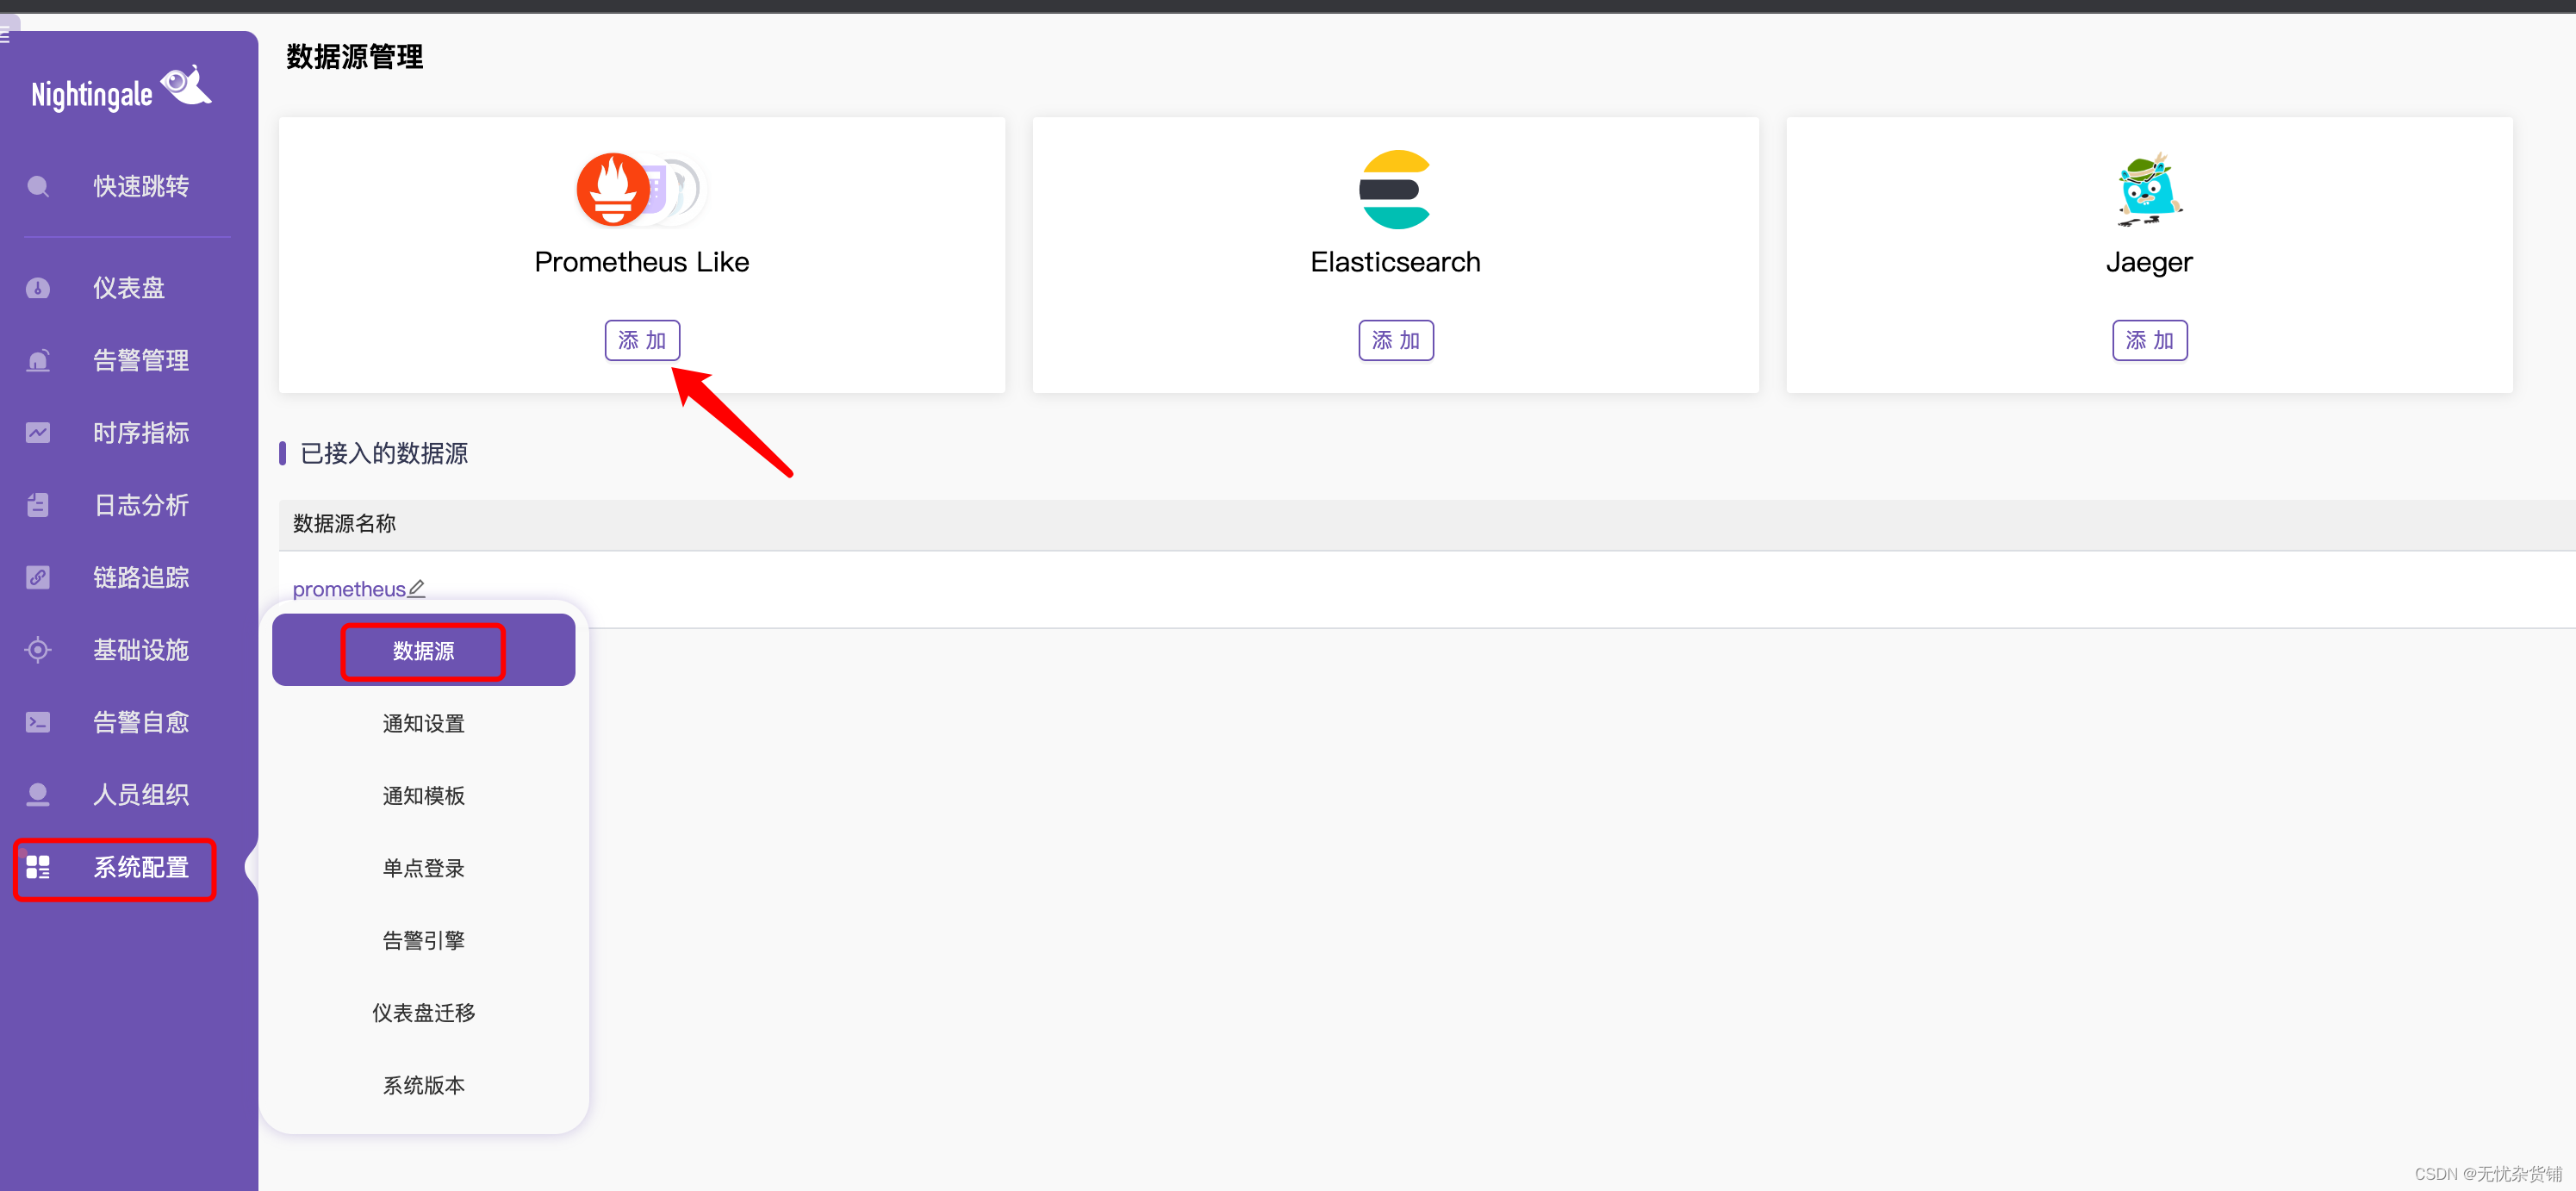
1、点击系统配置——点击数据源——点击Prometheus Like下的添加
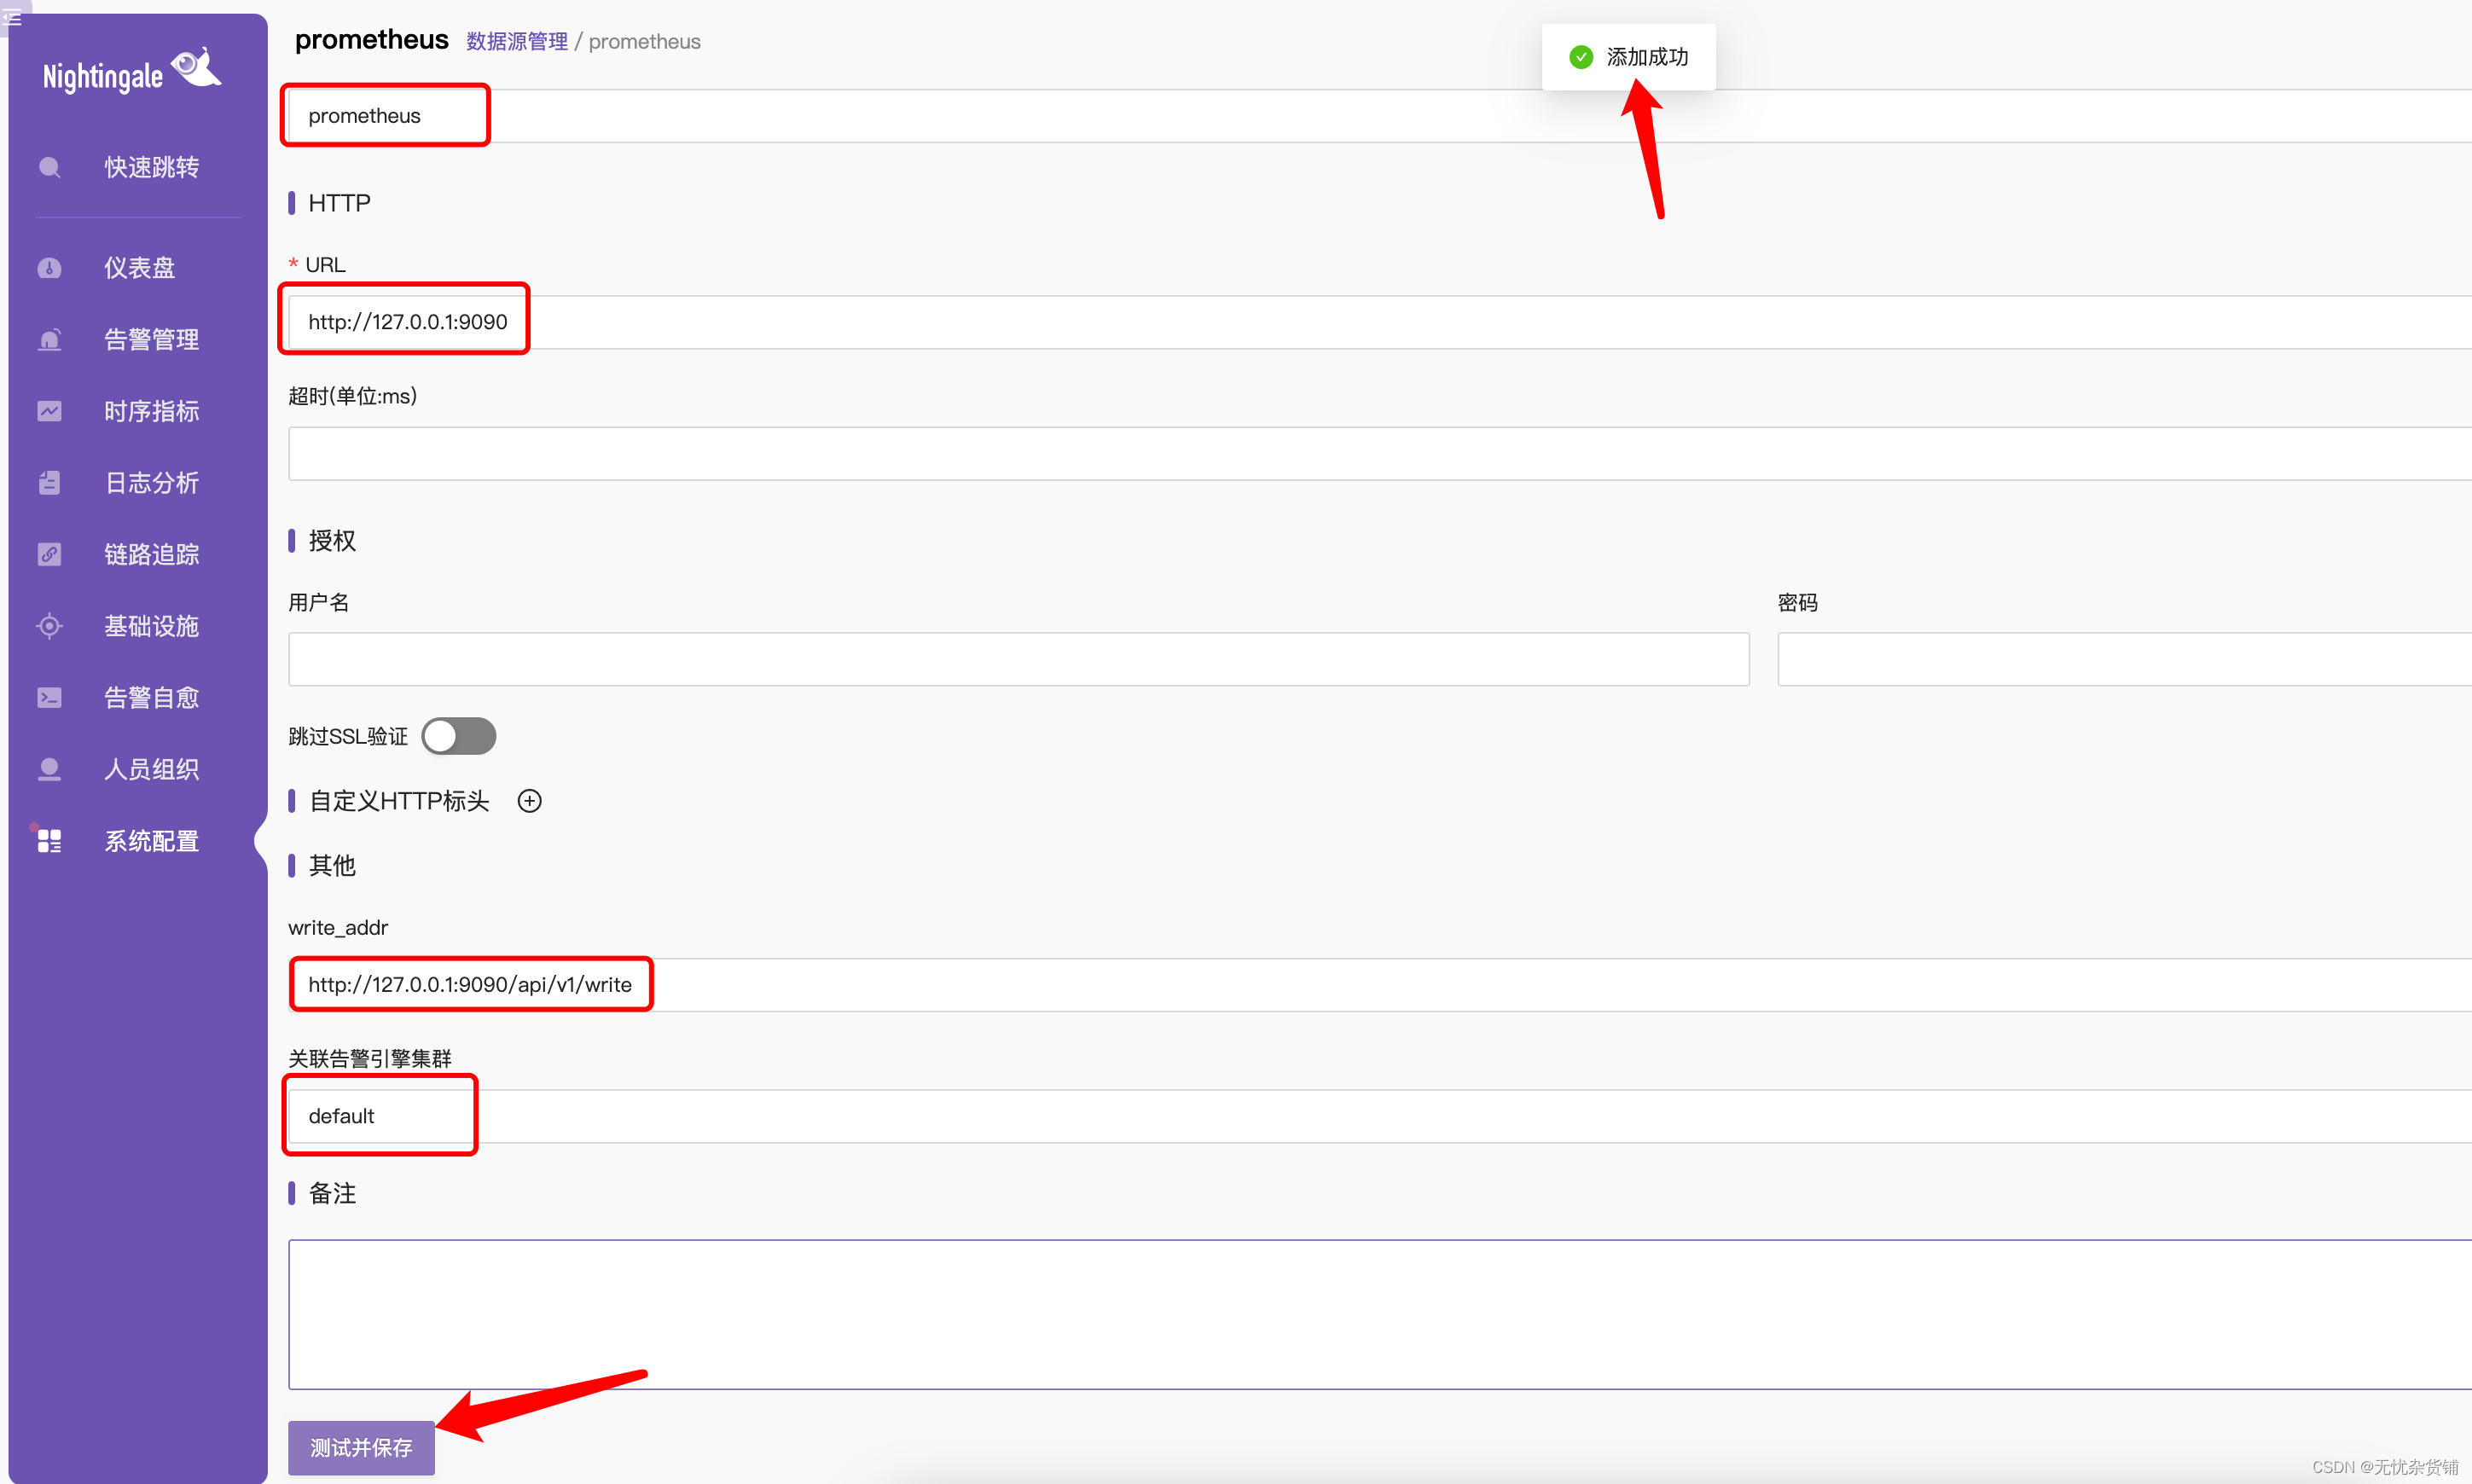
2、输入数据源名称,填写数据源URL,填写write,点击关联告警引擎集群下面的窗口,选择default,点击保存并测试,页面显示添加成功,如果添加不成功会有报错信息。
如何查询配置的write:grep -r write /opt/n9e/etc/config.toml
3、确认是否成功
点击时序指标——关联数据源选择刚添加的数据源——例如输入cpu,查询是否有数据,显示以下内容说明链路是通的


