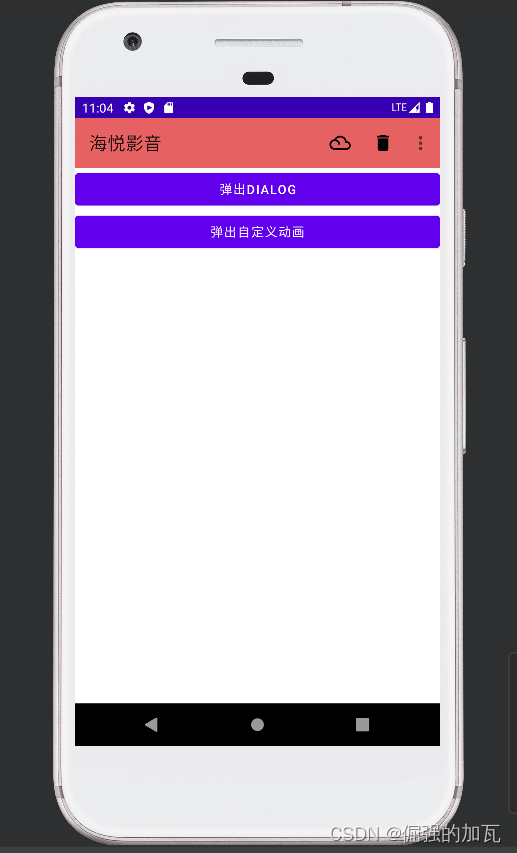
需求是自定义一个Toolbar和全屏展示一个第一次激活App的开机动画
1自定义Toolbar的使用
1仍然是先将工程的theme.xml中设置成NoActionBar
<resources xmlns:tools="http://schemas.android.com/tools">
    <!-- Base application theme. -->
    <style name="Theme.Animination" parent="Theme.MaterialComponents.DayNight.NoActionBar">
        <!-- Primary brand color. -->
        <item name="colorPrimary">@color/purple_500</item>
        <item name="colorPrimaryVariant">@color/purple_700</item>
        <item name="colorOnPrimary">@color/white</item>
        <!-- Secondary brand color. -->
        <item name="colorSecondary">@color/teal_200</item>
        <item name="colorSecondaryVariant">@color/teal_700</item>
        <item name="colorOnSecondary">@color/black</item>
        <!-- Status bar color. -->
        <item name="android:statusBarColor">?attr/colorPrimaryVariant</item>
        <!-- Customize your theme here. -->
    </style>


</resources>
2在layout目录下自定义Toolbar布局,便于其他布局直接引用
toolbar_layout.xml
<?xml version="1.0" encoding="utf-8"?>
<androidx.appcompat.widget.Toolbar xmlns:android="http://schemas.android.com/apk/res/android"
    android:id="@+id/toolbar"
    android:orientation="vertical"
    android:layout_width="match_parent"
    android:layout_height="?attr/actionBarSize"
    android:background="#E66161">

</androidx.appcompat.widget.Toolbar>
3在主布局中加入自定义的toolbar
<?xml version="1.0" encoding="utf-8"?>
<LinearLayout xmlns:android="http://schemas.android.com/apk/res/android"
    xmlns:app="http://schemas.android.com/apk/res-auto"
    xmlns:tools="http://schemas.android.com/tools"
    android:layout_width="match_parent"
    android:layout_height="match_parent"
    tools:context=".MainActivity"
    android:orientation="vertical">

    <include layout="@layout/toolbar_layout"/>

    <Button
        android:id="@+id/btn1"
        android:layout_width="match_parent"
        android:layout_height="wrap_content"
        android:text="弹出dialog"/>
    <Button
        android:id="@+id/btn2"
        android:layout_width="match_parent"
        android:layout_height="wrap_content"
        android:text="弹出自定义动画"/>

</LinearLayout>
4在menu目录下设置toolbar上面的小控件
main,xml
<?xml version="1.0" encoding="utf-8"?>
<menu xmlns:android="http://schemas.android.com/apk/res/android"
    xmlns:app="http://schemas.android.com/apk/res-auto">

    <item
        android:id="@+id/backup"
        android:icon="@drawable/baseline_filter_drama_24"
        android:title="Backup"
        app:showAsAction="always"/>
    <item
        android:id="@+id/delete"
        android:icon="@drawable/baseline_delete_24"
        android:title="Delete"
        app:showAsAction="ifRoom"/>
    <item
        android:id="@+id/setting"
        android:icon="@drawable/baseline_settings_24"
        android:title="Settings"
        app:showAsAction="never"/>

</menu>
5通过实现接口的方式自定义ToolBarManager接口,并引入当前控件的menu
package com.njupt.animination.util

import android.view.MenuItem
import android.widget.Toast
import androidx.appcompat.widget.Toolbar
import com.njupt.animination.R

interface MyToolbarManager {
    val toolbar:Toolbar
    fun initMainToolBar(){
        toolbar.title="影音App"

        toolbar.inflateMenu(R.menu.main)

        //对里面的按钮进行点击事件的绑定
        toolbar.setOnMenuItemClickListener(object :Toolbar.OnMenuItemClickListener{
            override fun onMenuItemClick(item: MenuItem?): Boolean {
                when(item?.itemId){
                    R.id.backup->{
                        Toast.makeText(toolbar.context,"点击备份按钮",Toast.LENGTH_SHORT).show()
                    }
                    R.id.delete->{
                        Toast.makeText(toolbar.context,"点击删除按钮",Toast.LENGTH_SHORT).show()
                    }
                    R.id.setting->{
                        Toast.makeText(toolbar.context,"点击设置按钮",Toast.LENGTH_SHORT).show()
                    }
                }
                return true
            }

        }
        )

    }
}
6在需要使用到ToolBar的布局主类中实现接口
package com.njupt.animination

import android.content.Intent
import androidx.appcompat.app.AppCompatActivity
import android.os.Bundle
import android.widget.Button
import androidx.appcompat.widget.Toolbar
import com.njupt.animination.util.MyToolbarManager

class MainActivity : AppCompatActivity() ,MyToolbarManager{
    override val toolbar: Toolbar by lazy {
        findViewById(R.id.toolbar)
    }
    private val mdialog:MyDiaglog by lazy {
        MyDiaglog(this,R.style.dialog)
    }
    override fun onCreate(savedInstanceState: Bundle?) {
        super.onCreate(savedInstanceState)
        setContentView(R.layout.activity_main)
        //调用MyToolbarManager接口里的方法来初始化toolbar
        initMainToolBar()

        val btn=findViewById<Button>(R.id.btn1)
        btn.setOnClickListener(){
            mdialog.show()
        }
        val btn2=findViewById<Button>(R.id.btn2)
        btn2.setOnClickListener(){
            startActivity(Intent(this,SplashActivity::class.java))
        }

    }
}
2App初始动画
一般是一张图片进行动态的展示后显示出主布局,所以真正使用时将进入界面设置成当前界面,全屏显示的效果,没有ActionBar,也没有系统标题。
1界面布局
<?xml version="1.0" encoding="utf-8"?>
<LinearLayout xmlns:android="http://schemas.android.com/apk/res/android"
    android:orientation="vertical"
    android:layout_width="match_parent"
    android:layout_height="match_parent">
    <ImageView
        android:id="@+id/image_splash"
        android:layout_width="match_parent"
        android:layout_height="match_parent"
        android:src="@drawable/splash"
        android:scaleType="centerCrop"
        android:scaleX="1.5"
        android:scaleY="1.5"/>

</LinearLayout>
2主程序实现
package com.njupt.animination

import android.content.Intent
import android.os.Bundle
import android.view.View
import android.view.Window
import android.view.WindowManager
import android.widget.ImageView
import androidx.appcompat.app.AppCompatActivity
import androidx.core.view.ViewCompat
import androidx.core.view.ViewPropertyAnimatorListener

class SplashActivity:AppCompatActivity(), ViewPropertyAnimatorListener {
    override fun onCreate(savedInstanceState: Bundle?) {
        super.onCreate(savedInstanceState)
        //实现全屏显示
        requestWindowFeature(Window.FEATURE_NO_TITLE);
        window.setFlags(
            WindowManager.LayoutParams.FLAG_FULLSCREEN,
            WindowManager.LayoutParams.FLAG_FULLSCREEN);

        setContentView(R.layout.splash_activity)
        var splashImage=findViewById<ImageView>(R.id.image_splash)
        //结束动画之后添加一个结束动画监听事件,结束后自动调转到App首页
        ViewCompat.animate(splashImage).scaleX(1.0f).scaleY(1.0f).setListener(this).setDuration(1000)
    }

    override fun onAnimationStart(view: View?) {

    }

    override fun onAnimationEnd(view: View?) {
        startActivity(Intent(this,SplashOverActivty::class.java))
    }

    override fun onAnimationCancel(view: View?) {

    }
}
3自定义的toolbar中点击设置按钮跳转到设置界面

1PreferenceFragment废弃问题需要使用到PreferenceFragmentCompat
加入依赖
implementation 'androidx.preference:preference:1.0.0'
2点击自定义的设置按钮后进行界面的跳转
package com.njupt.animination.util

import android.content.Intent
import android.view.MenuItem
import android.widget.Toast
import androidx.appcompat.widget.Toolbar
import com.njupt.animination.R
import com.njupt.animination.ui.activity.SettingActivity

interface MyToolbarManager {
    val toolbar:Toolbar
    fun initMainToolBar(){
        toolbar.title="影音App"

        toolbar.inflateMenu(R.menu.main)

        //对里面的按钮进行点击事件的绑定
        toolbar.setOnMenuItemClickListener(object :Toolbar.OnMenuItemClickListener{
            override fun onMenuItemClick(item: MenuItem?): Boolean {
                when(item?.itemId){
                    R.id.backup->{
                        Toast.makeText(toolbar.context,"点击备份按钮",Toast.LENGTH_SHORT).show()
                    }
                    R.id.delete->{
                        Toast.makeText(toolbar.context,"点击删除按钮",Toast.LENGTH_SHORT).show()
                    }
                    R.id.setting->{
                        //Toast.makeText(toolbar.context,"点击设置按钮",Toast.LENGTH_SHORT).show()
                        //点击设置按钮之后跳转到设置的界面
                        toolbar.context.startActivity(Intent(toolbar.context,SettingActivity::class.java))
                    }
                }
                return true
            }

        }
        )

    }

//设置界面需要的自定义toolbar
    fun initSettingToolbar(){
        toolbar.title="设置"
    }
}
3设置界面实现toolBar的接口,设置当前toolbar
package com.njupt.animination.ui.activity

import android.os.Bundle
import androidx.appcompat.app.AppCompatActivity
import androidx.appcompat.widget.Toolbar
import androidx.preference.PreferenceManager
import com.njupt.animination.R
import com.njupt.animination.util.MyToolbarManager

class SettingActivity:AppCompatActivity() ,MyToolbarManager{
    override val toolbar: Toolbar by lazy {
        findViewById(R.id.toolbar)
    }
    override fun onCreate(savedInstanceState: Bundle?) {
        super.onCreate(savedInstanceState)

        setContentView(R.layout.setting_activity)
        initSettingToolbar()

        val sp=PreferenceManager.getDefaultSharedPreferences(this)
        val push=sp.getBoolean("push",false)
        println(push)


    }
}
4自定义fragment,在fragment中继承PreferenceFragmentCompat
package com.njupt.animination.ui.fragment

import android.os.Bundle
import android.preference.PreferenceFragment
import android.view.LayoutInflater
import android.view.View
import android.view.ViewGroup
import android.widget.Toast
import androidx.preference.Preference
import androidx.preference.PreferenceFragmentCompat
import com.njupt.animination.R

class SettingFragment: PreferenceFragmentCompat() {
    override fun onCreateView(
        inflater: LayoutInflater,
        container: ViewGroup?,
        savedInstanceState: Bundle?
    ): View? {
        addPreferencesFromResource(R.xml.setting)
        return super.onCreateView(inflater, container, savedInstanceState)
    }

    override fun onCreatePreferences(savedInstanceState: Bundle?, rootKey: String?) {

    }

    override fun onPreferenceTreeClick(preference: Preference?): Boolean {
        when(preference?.key){
            "clear"->{Toast.makeText(this.context,"点击了按钮",Toast.LENGTH_SHORT).show()}
        }
        return super.onPreferenceTreeClick(preference)
    }
}
5R.xml.setting设置当前设置的选项和按钮等
<?xml version="1.0" encoding="utf-8"?>
<PreferenceScreen xmlns:android="http://schemas.android.com/apk/res/android"
    >
    <Preference
        android:key="clear"
        android:title="清除缓存"/>

    <SwitchPreference
        android:key="push"
        android:title="推送通知"
        />
    <SwitchPreference
        android:key="no_wifi"
        android:title="非wifi下加载图片"
        />
    <PreferenceCategory
        android:title="第一类">
        <Preference
            android:key="clear1"
            android:title="清除缓存1"/>
        <Preference
            android:key="clear2"
            android:title="清除缓存2"/>

    </PreferenceCategory>


    <DropDownPreference
        android:title="加载视频"/>
    <Preference
        android:key="about"
        android:title="关于"/>

    <PreferenceCategory android:title="显示一排偏好">
        <CheckBoxPreference android:key="checkbox_preference" android:title="开关偏好" android:summary="这是一个开关按钮" />
    </PreferenceCategory>
    <PreferenceCategory android:title="基于对话框的偏好">
        <EditTextPreference android:key="edittext_preference" android:title="文本输入偏好" android:summary="使用一个文本框对话框" android:dialogTitle="输入你的宠物" />
    </PreferenceCategory>
    <PreferenceCategory android:title="启动偏好">
        <PreferenceScreen android:key="screen_preference" android:title="屏幕" android:summary="显示另一个偏好屏幕">
            <!-- You can place more preferences here that will be shown on the next screen. -->
            <CheckBoxPreference android:key="next_screen_checkbox_preference" android:title="开关偏好" android:summary="另一个屏幕上的偏好" />
        </PreferenceScreen>
        <PreferenceScreen android:title="意图偏好" android:summary="通过意图启动一个Activity">
            <intent android:action="android.intent.action.VIEW" android:data="http://www.android.com"/>
        </PreferenceScreen>
    </PreferenceCategory>
    <PreferenceCategory android:title="偏好属性">
        <CheckBoxPreference android:key="parent_checkbox_preference" android:title="父开关" android:summary="这是一个父开关" />
        <CheckBoxPreference android:key="child_checkbox_preference" android:dependency="parent_checkbox_preference" android:layout="?android:attr/preferenceLayoutChild" android:title="子开关" android:summary="这是一个子开关" />
    </PreferenceCategory>

</PreferenceScreen>
6设置的主布局中加入fragment
setting_activity.xml
<?xml version="1.0" encoding="utf-8"?>
<LinearLayout xmlns:android="http://schemas.android.com/apk/res/android"
    android:orientation="vertical"
    android:layout_width="match_parent"
    android:layout_height="match_parent">
    <include layout="@layout/toolbar_layout"/>

    <!--需要在加一个Fragment-->
    <fragment
        android:id="@+id/setting_fragment"
        android:layout_width="match_parent"
        android:layout_height="match_parent"
        android:name="com.njupt.animination.ui.fragment.SettingFragment"/>

</LinearLayout>


![【C++】对数组指针的理解,例如 int (*p)[3]](https://img-blog.csdnimg.cn/0b69ad41f6394c93839bb6cd02012ee5.png?x-oss-process=image/watermark,type_ZHJvaWRzYW5zZmFsbGJhY2s,shadow_50,text_Q1NETiBA5rW36L2wUHJv,size_20,color_FFFFFF,t_70,g_se,x_16#pic_center)