YOLOv5白皮书-第Y4周:common.py文件解读
- 🍨 本文为🔗365天深度学习训练营 中的学习记录博客
- 🍖 原作者:K同学啊|接辅导、项目定制
文件位置:./models/common.py
该文件是实现YOLO算法中各个模块的地方,如果我们需要修改某一模块(例如C3),那么就需要修改这个文件中对应模块的的定义。这里我先围绕代码,带大家过一遍各个模块的 定义,详细介绍我将在后续的教案中逐步展开。由于YOLOV5版本问题,同一个模块你可能会看到不同的版本,这都是正常的,以官网为主即可。
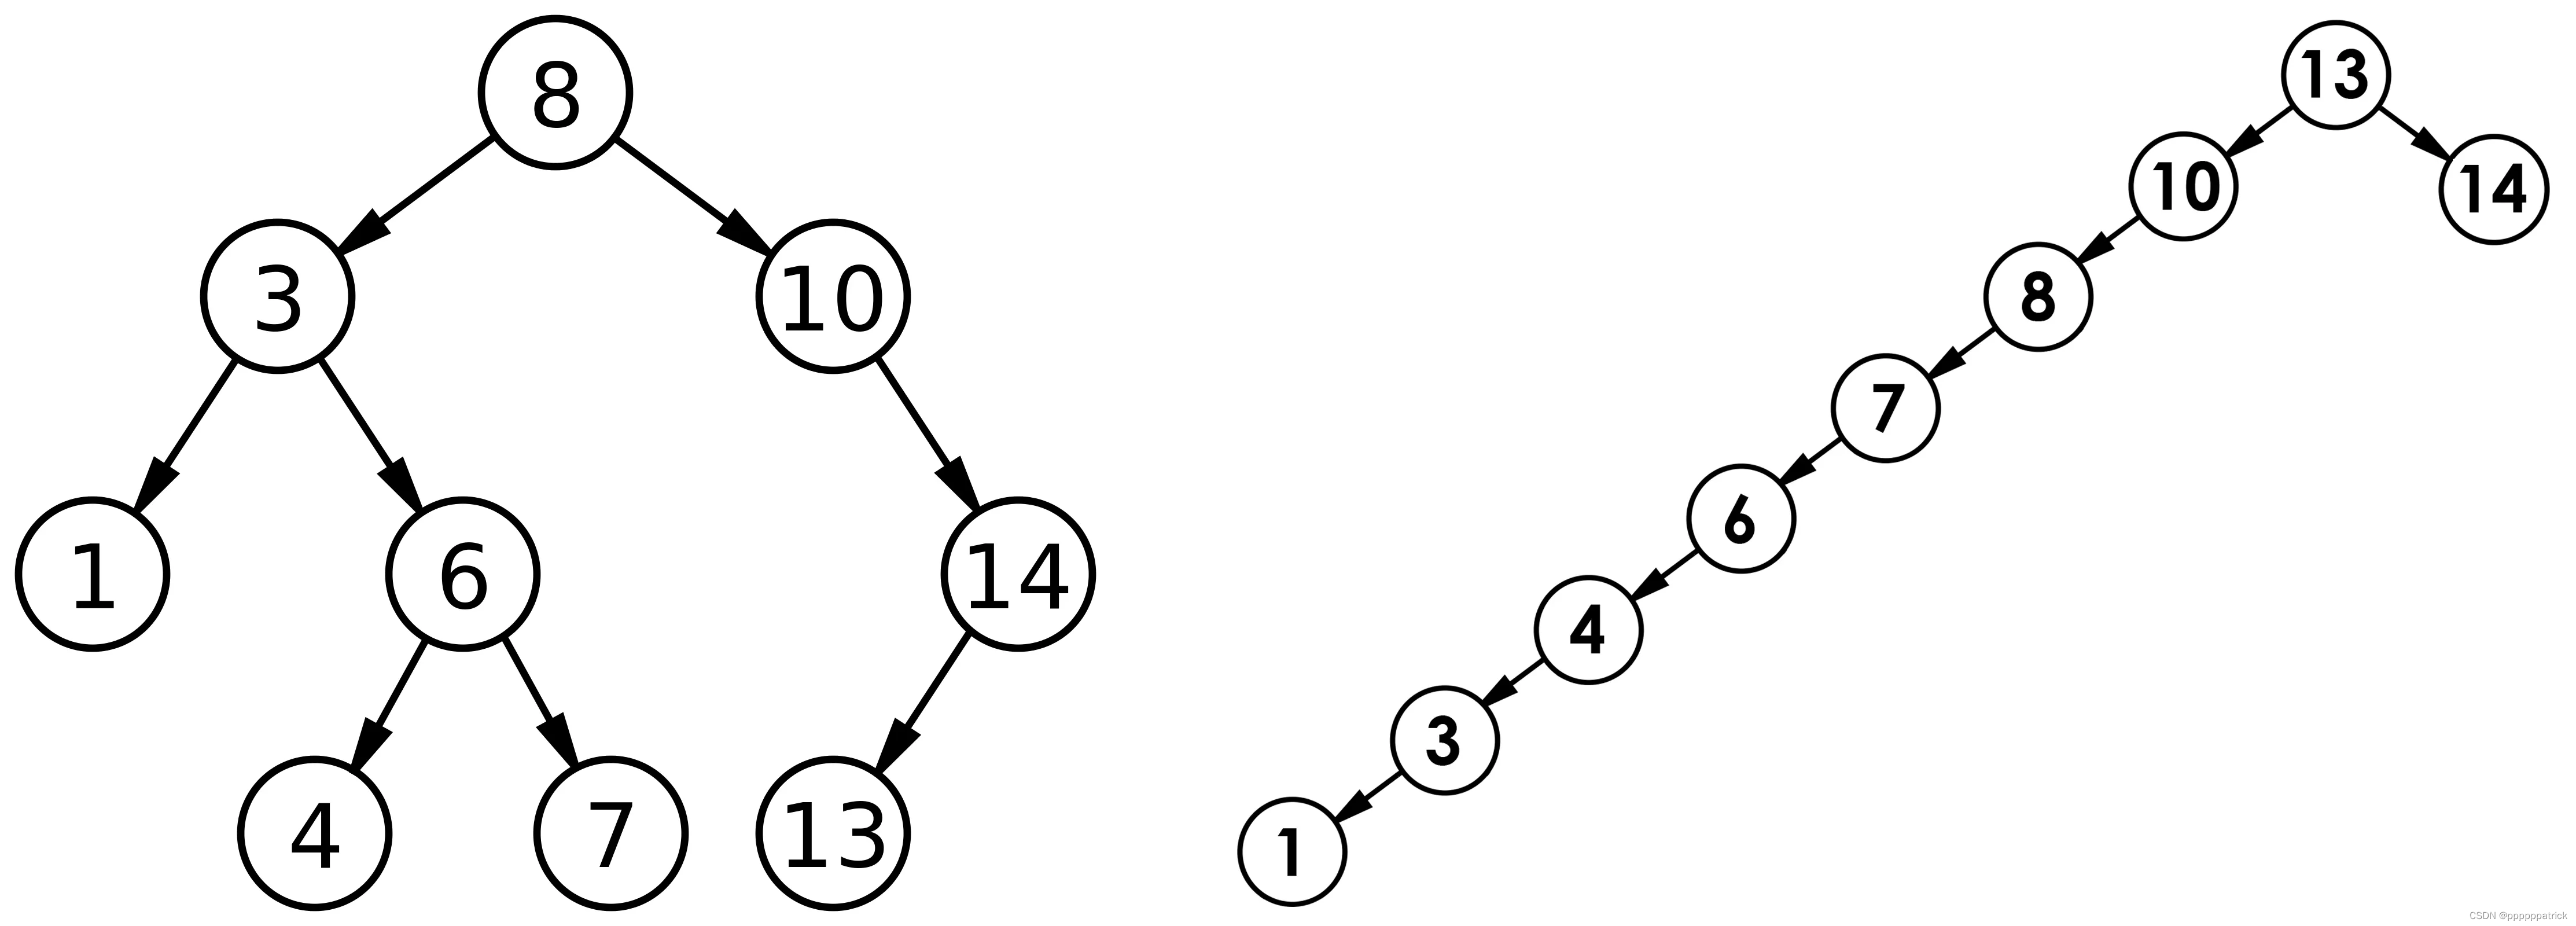
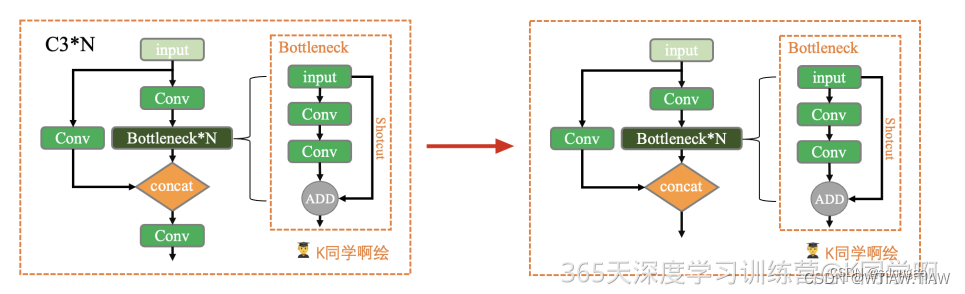
本周任务:将yolov5s网络模型中的C3模块按照下图方式修改,并跑通yolov5。
任务提示:仅需修改・/models/common.yaml文件。

完成任务:
import torch
import torch.nn as nn
class Bottleneck(nn.Module):
# Standard bottleneck Conv + Conv + shortcut
def __init__(self, c1, c2, shortcut=True, g=1, e=0.5): # ch_in, ch_out, shortcut, groups, expansion
''' 在BottleneckCSP和yolo.py的parse_model函数中被调用
:params c1: 第一个卷积的输入channel
:params c2: 第二个卷积的输入channel
:params shortcut: bool值,是否有shortcut连接,默认True
:params g: 卷积分组的个数,=1普通卷积,>1深度可分离卷积
:params e: expansion ratio,e*c2就是第一个卷积的输出channel=第二个卷积的输入channel
'''
super().__init__()
c_ = int(c2 * e) # hidden channels
self.cv1 = Conv(c1, c_, 1, 1) # 1x1
self.cv2 = Conv(c_, c2, 3, 1, g=g) # 3x3
self.add = shortcut and c1 == c2 # shortcut=Ture & c1==c2 才能做shortcut
def forward(self, x):
return x + self.cv2(self.cv1(x)) if self.add else self.cv2(self.cv1(x))
def autopad(k, p=None, d=1): # kernel, padding, dilation
# Pad to 'same' shape outputs
if d > 1:
k = d * (k - 1) + 1 if isinstance(k, int) else [d * (x - 1) + 1 for x in k] # actual kernel-size
if p is None:
p = k // 2 if isinstance(k, int) else [x // 2 for x in k] # auto-pad
return p
class Conv(nn.Module):
# Standard convolution with args(ch_in, ch_out, kernel, stride, padding, groups, dilation, activation)
default_act = nn.SiLU() # default activation
def __init__(self, c1, c2, k=1, s=1, p=None, g=1, d=1, act=True):
''' 在Focus、Bottleneck、BottleneckCSP、C3、SPP、DWConv、TransformerBlock等模块中调用
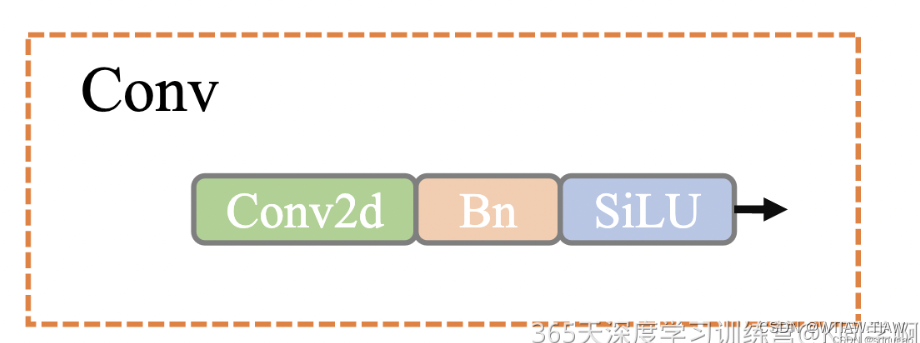
Standard convolution : conv + BN + act
:params c1: 输入的channel值
:params c2: 输出的channel值
:params k: 卷积的kernel_size
:params s: 卷积的stride
:params p: 卷积的padding,默认是None,可以通过autopad自行计算需要的padding值
:params g: 卷积的groups数,1就是普通的卷积,>1就是深度可分离卷积
:params act: 激活函数类型,True就是SiLU()/Swish,False就是不使用激活函数,类型是nn.Module就使用传进来的激活函数类型
'''
super().__init__()
self.conv = nn.Conv2d(c1, c2, k, s, autopad(k, p, d), groups=g, dilation=d, bias=False)
self.bn = nn.BatchNorm2d(c2)
self.act = self.default_act if act is True else act if isinstance(act, nn.Module) else nn.Identity()
def forward(self, x):
return self.act(self.bn(self.conv(x)))
def forward_fuse(self, x):
''' 用于Model类的fuse函数
融合 Conv + BN 加速推理,一般用于测试/验证阶段
'''
return self.act(self.conv(x))
''''''
class C3(nn.Module):
# CSP Bottleneck with 3 convolutions
def __init__(self, c1, c2, n=1, shortcut=True, g=1, e=0.5): # ch_in, ch_out, number, shortcut, groups, expansion
''' 在C3RT模块和yolo.py的parse_model函数中被调用
:params c1: 整个C3的输入channel
:params c2: 整个C3的输出channel
:params n: 有n个子模块[Bottleneck/CrossConv]
:params shortcut: bool值,子模块[Bottlenec/CrossConv]中是否有shortcut,默认True
:params g: 子模块[Bottlenec/CrossConv]中的3x3卷积类型,=1普通卷积,>1深度可分离卷积
:params e: expansion ratio,e*c2=中间其它所有层的卷积核个数=中间所有层的的输入输出channel
'''
super().__init__()
c_ = int(c2 * e) # hidden channels
self.cv1 = Conv(c1, c_, 1, 1)
self.cv2 = Conv(c1, c_, 1, 1)
self.cv3 = Conv(2 * c_, c2, 1) # optional act=FReLU(c2)
self.m = nn.Sequential(*(Bottleneck(c_, c_, shortcut, g, e=1.0) for _ in range(n)))
# 实验性 CrossConv
#self.m = nn.Sequential(*[CrossConv(c_, c_, 3, 1, g, 1.0, shortcut) for _ in range(n)])
def forward(self, x):
return self.torch.cat((self.m(self.cv1(x)), self.cv2(x)), 1)
''''''
class C3(nn.Module):
# CSP Bottleneck with 3 convolutions
def __init__(self, c1, c2, n=1, shortcut=True, g=1, e=0.5): # ch_in, ch_out, number, shortcut, groups, expansion
super().__init__()
c_ = int(c2 * e) # hidden channels
self.cv1 = Conv(c1, c_, 1, 1)
self.cv2 = Conv(c1, c_, 1, 1)
self.cv3 = Conv(2 * c_, c2, 1) # optional act=FReLU(c2)
self.m = nn.Sequential(*(Bottleneck(c_, c_, shortcut, g, e=1.0) for _ in range(n)))
def forward(self, x):
return torch.cat((self.m(self.cv1(x)), self.cv2(x)), 1)
x = torch.randn(1,32,120,120)
c3 = C3(32,64)
output = c3(x)
print(output.shape)
经测试:

def autopad(k, p=None):   # kernel, padding
	"""
	用于Conv函数和Classify函数中
    根据卷积核大小k自动计算卷积核padding数(0填充)
    v5中只有两种卷积:
       1、下采样卷积:conv3x3 s=2 p=k//2=1
       2、feature size不变的卷积:conv1x1 s=1 p=k//2=1
    :params k: 卷积核的kernel_size
    :return p: 自动计算的需要pad值(0填充)
    """
	if p is None:
        p = k // 2 if isinstance(k,int) else [x // 2 for x in k]  # auto-pad
    return p
另外这个类中还有一个特殊函数 forward_fuse ,这是一个前向加速推理模块,在前向传播过程中,通过融合 Conv + BN 层,达到加速推理的作用,一般用于测试或验证阶段。
class Conv(nn.Module):
    def __init__(self, c1, c2, k=1, s=1, p=None, g=1, act=True):
        """
        在Focus、Bottleneck、BottleneckCSP、C3、SPP、DWConv、TransformerBloc等模块中调用
        Standard convolution  conv+BN+act
        :params c1: 输入的channel值
        :params c2: 输出的channel值
        :params k: 卷积的kernel_size
        :params s: 卷积的stride
        :params p: 卷积的padding  一般是None  可以通过autopad自行计算需要pad的padding数
        :params g: 卷积的groups数  =1就是普通的卷积  >1就是深度可分离卷积
        :params act: 激活函数类型   True就是SiLU()/Swish   False就是不使用激活函数
                     类型是nn.Module就使用传进来的激活函数类型
        """
        super(Conv, self).__init__()
        self.conv = nn.Conv2d(c1, c2, k, s, autopad(k, p), groups=g, bias=False)  # conv
        self.bn = nn.BatchNorm2d(c2)  # bn
        self.act = nn.SiLU() if act is True else (act if isinstance(act, nn.Module) else nn.Identity())  # activation

    def forward(self, x):
        return self.act(self.bn(self.conv(x)))

    def fuseforward(self, x):
        """
        用于Model类的fuse函数
        融合conv+bn 加速推理 一般用于测试/验证阶段
        """
        return self.act(self.conv(x))
Focus模块是作者自己设计出来,为了减少浮点数和提高速度,本质是将图像进行切片,将原图像的宽高信息切分,聚合到channel通道中。
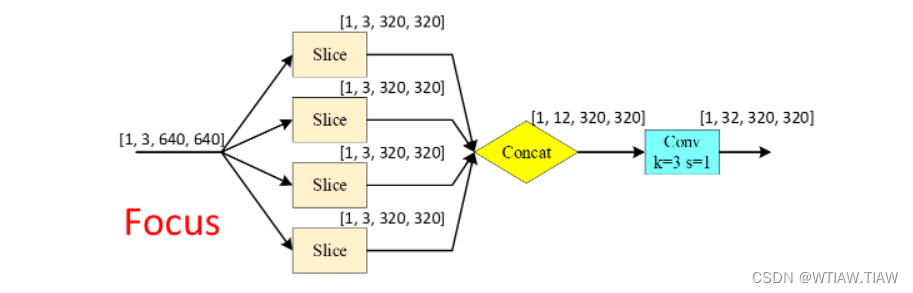
class Focus(nn.Module):
    def __init__(self, c1, c2, k=1, s=1, p=None, g=1, act=True):
        super(Focus, self).__init__()
        self.conv = Conv(c1 * 4, c2, k, s, p, g, act)  # concat后的卷积(最后的卷积)
    def forward(self, x):
        # x(b,c,w,h) -> y(b,4c,w/2,h/2)
        return self.conv(torch.cat([x[..., ::2, ::2], x[..., 1::2, ::2], x[..., ::2, 1::2], x[..., 1::2, 1::2]], 1))
class Bottleneck(nn.Module):
    def __init__(self, c1, c2, shortcut=True, g=1, e=0.5):
        """在BottleneckCSP和yolo.py的parse_model中调用
        Standard bottleneck  Conv+Conv+shortcut
        :params c1: 第一个卷积的输入channel
        :params c2: 第二个卷积的输出channel
        :params shortcut: bool 是否有shortcut连接 默认是True
        :params g: 卷积分组的个数  =1就是普通卷积  >1就是深度可分离卷积
        :params e: expansion ratio  e*c2就是第一个卷积的输出channel=第二个卷积的输入channel
        """
        super(Bottleneck, self).__init__()
        c_ = int(c2 * e)                    # hidden channels
        self.cv1 = Conv(c1, c_, 1, 1)       # 1x1
        self.cv2 = Conv(c_, c2, 3, 1, g=g)  # 3x3
        self.add = shortcut and c1 == c2    # shortcut=True and c1 == c2 才能做shortcut

    def forward(self, x):
        return x + self.cv2(self.cv1(x)) if self.add else self.cv2(self.cv1(x))
BottleNeckCSP
这个模块是由Bottleneck模块和CSP结构组成。CSP结构来源于2019年发表的一篇论文:
CSPNet: A New Backbone that can Enhance Learning Capability of CNN
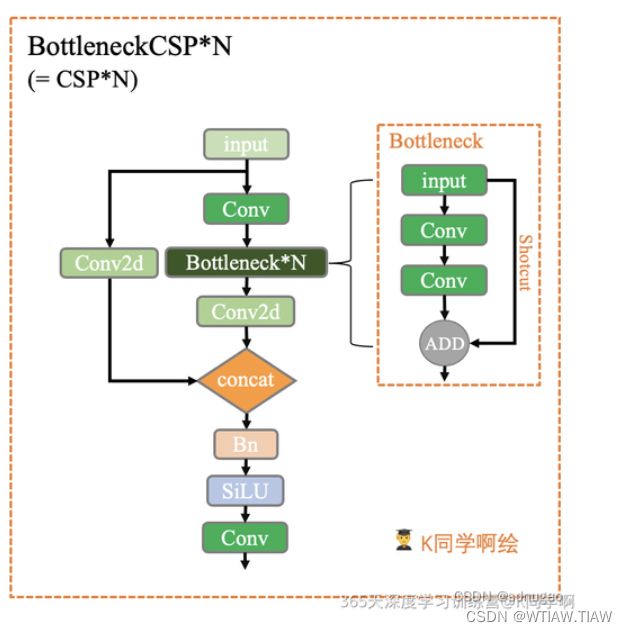
class BottleneckCSP(nn.Module):
    def __init__(self, c1, c2, n=1, shortcut=True, g=1, e=0.5):
        """在C3模块和yolo.py的parse_model模块调用
        CSP Bottleneck https://github.com/WongKinYiu/CrossStagePartialNetworks
        :params c1: 整个BottleneckCSP的输入channel
        :params c2: 整个BottleneckCSP的输出channel
        :params n: 有n个Bottleneck
        :params shortcut: bool Bottleneck中是否有shortcut,默认True
        :params g: Bottleneck中的3x3卷积类型  =1普通卷积  >1深度可分离卷积
        :params e: expansion ratio c2xe=中间其他所有层的卷积核个数/中间所有层的输入输出channel数
        """
        # ch_in, ch_out, number, shortcut, groups, expansion
        super(BottleneckCSP, self).__init__()
        c_ = int(c2 * e)  # hidden channels
        self.cv1 = Conv(c1, c_, 1, 1)
        self.cv2 = nn.Conv2d(c1, c_, 1, 1, bias=False)
        self.cv3 = nn.Conv2d(c_, c_, 1, 1, bias=False)
        self.cv4 = Conv(2 * c_, c2, 1, 1)
        self.bn = nn.BatchNorm2d(2 * c_)  # applied to cat(cv2, cv3)  2*c_
        self.act = nn.LeakyReLU(0.1, inplace=True)
        # 叠加n次Bottleneck
        self.m = nn.Sequential(*[Bottleneck(c_, c_, shortcut, g, e=1.0) for _ in range(n)])

    def forward(self, x):
        y1 = self.cv3(self.m(self.cv1(x)))
        y2 = self.cv2(x)
        return self.cv4(self.act(self.bn(torch.cat((y1, y2), dim=1))))
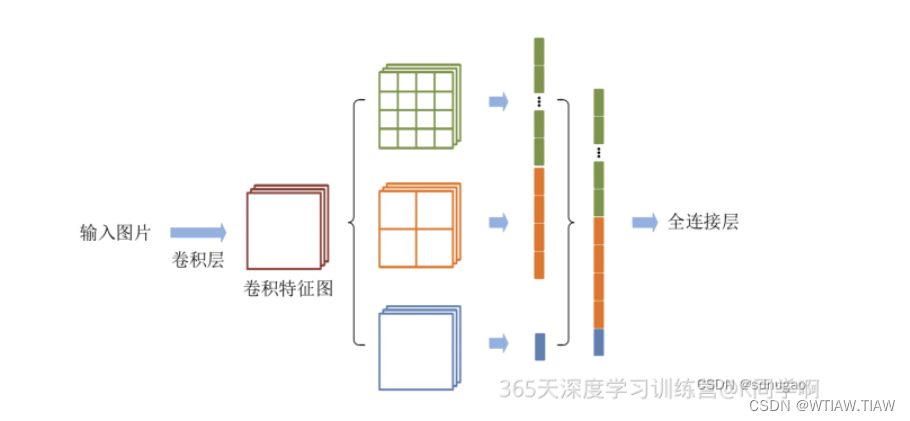
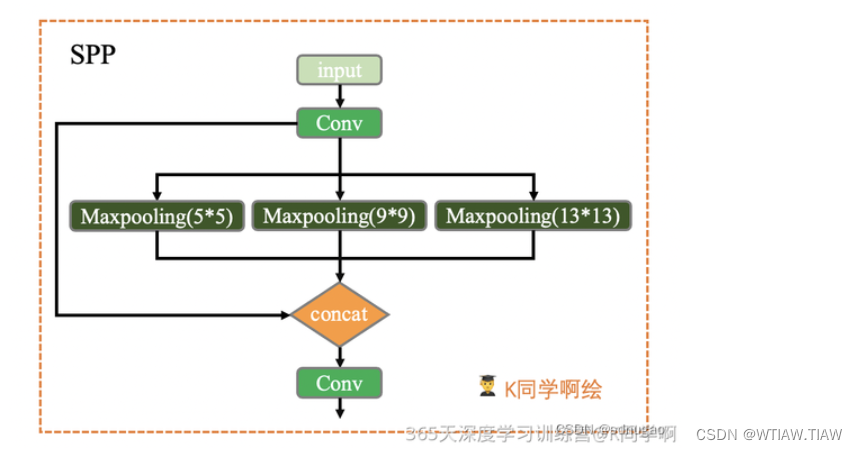
SPP模块
高层网络层的感受野的语义信息表征能力强,低层网络层的感受野空间细节信息表征能力强。空间金字塔池化(Spatial Pyramid Pooling, SPP)是目标检测算法中对高层特征进行多尺度池化以增加感受野的重要措施之一。经典的空间金字塔池化模块首先将输入的卷积特征分成不同的尺寸,然后每个尺寸提取固定维度的特征,最后将这些特征拼接成一个固定的维度,如图1所示。输入的卷积特征图的大小为(w,h),第一层空间金字塔采用4x4的刻度对特征图进行划分,其将输入的特征图分成了16个块,每块的大小为(w/4, h/4);第二层空间金字塔采用2x2刻度对特征图进行划分,其将特征图分为4个快,每块大小为(w/2,h/2);第三层空间金字塔将整张特征图作为一块,进行特征提取操作,最终的特 征向量为21=16+4+1维。
class SPP(nn.Module):
    def __init__(self, c1, c2, k=(5, 9, 13)):
        """在yolo.py的parse_model模块调用
        空间金字塔池化 Spatial pyramid pooling layer used in YOLOv3-SPP
        :params c1: SPP模块的输入channel
        :params c2: SPP模块的输出channel
        :params k: 保存着三个maxpool的卷积核大小 默认是(5, 9, 13)
        """
        super(SPP, self).__init__()
        c_ = c1 // 2  # hidden channels
        self.cv1 = Conv(c1, c_, 1, 1)  # 第一层卷积
        self.cv2 = Conv(c_ * (len(k) + 1), c2, 1, 1)  # 最后一层卷积  +1是因为有len(k)+1个输入
        self.m = nn.ModuleList([nn.MaxPool2d(kernel_size=x, stride=1, padding=x // 2) for x in k])

    def forward(self, x):
        x = self.cv1(x)
        return self.cv2(torch.cat([x] + [m(x) for m in self.m], 1))
NMS: 移除一些网络模型预测时生成的多余检测框,该算法的核心思想是指搜索局部得分最大值预测并移除与局部最大值预测框重叠度超过一定阈值的检测框
非极大值抑制(Non-maximum Suppression (NMS))的作用简单说就是模型检测出了很多框,我应该留哪些。

YOLOV5中使用NMS算法用来移除一些网络模型预测时生成的多余检测框,该算法的核心 思想是指搜索局部得分最大值预测并移除与局部最大值预测框重叠度超过一定阈值的检测 框,需要注意的是,NMS算法对所有待检测目标类别分别执行。
这个模块是给模型搭载NMS功能,直接调用的./utils/general.py文件的non_max_suppression()函数。
class NMS(nn.Module):
    """在yolo.py中Model类的nms函数中使用
    NMS非极大值抑制 Non-Maximum Suppression (NMS) module
    给模型model封装nms  增加模型的扩展功能  但是我们一般不用 一般是在前向推理结束后再调用non_max_suppression函数
    """
    conf = 0.25     # 置信度阈值              confidence threshold
    iou = 0.45      # iou阈值                IoU threshold
    classes = None  # 是否nms后只保留特定的类别 (optional list) filter by class
    max_det = 1000  # 每张图片的最大目标个数    maximum number of detections per image
    def __init__(self):
        super(NMS, self).__init__()
    def forward(self, x):
        """
        :params x[0]: [batch, num_anchors(3个yolo预测层), (x+y+w+h+1+num_classes)]
        直接调用的是general.py中的non_max_suppression函数给model扩展nms功能
        """
        return non_max_suppression(x[0], self.conf, iou_thres=self.iou, classes=self.classes, max_det=self.max_det)
AutoShape
这个模块是一个模型扩展模块,给模型封装成包含前处理、推理、后处理的模块(预处理+ 推理+ nms),用的不多。
class AutoShape(nn.Module):
    # YOLOv5 input-robust model wrapper for passing cv2/np/PIL/torch inputs. Includes preprocessing, inference and NMS
    # YOLOv5模型包装器,用于传递 cv2/np/PIL/torch 输入,
    # 包括预处理(preprocessing), 推理(inference) and NMS
    conf = 0.25  # NMS confidence threshold
    iou = 0.45   # NMS IoU threshold
    agnostic = False  # NMS class-agnostic
    multi_label = False  # NMS multiple labels per box
    classes = None  # (optional list) filter by class, i.e. = [0, 15, 16] for COCO persons, cats and dogs
    max_det = 1000  # maximum number of detections per image
    amp = False     # Automatic Mixed Precision (AMP) inference

    def __init__(self, model, verbose=True):
        super().__init__()
        if verbose:
            LOGGER.info('Adding AutoShape... ')
        copy_attr(self, model, include=('yaml', 'nc', 'hyp', 'names', 'stride', 'abc'), exclude=())  # copy attributes
        self.dmb = isinstance(model, DetectMultiBackend)  # DetectMultiBackend() instance
        self.pt = not self.dmb or model.pt  # PyTorch model
        # 开启验证模式
        self.model = model.eval()
        if self.pt:
            m = self.model.model.model[-1] if self.dmb else self.model.model[-1]  # Detect()
            m.inplace = False  # Detect.inplace=False for safe multithread inference
            m.export = True  # do not output loss values

    def _apply(self, fn):
        # Apply to(), cpu(), cuda(), half() to model tensors that are not parameters or registered buffers
        self = super()._apply(fn)
        if self.pt:
            m = self.model.model.model[-1] if self.dmb else self.model.model[-1]  # Detect()
            m.stride = fn(m.stride)
            m.grid = list(map(fn, m.grid))
            if isinstance(m.anchor_grid, list):
                m.anchor_grid = list(map(fn, m.anchor_grid))
        return self

    @smart_inference_mode()
    def forward(self, ims, size=640, augment=False, profile=False):
        # Inference from various sources. For size(height=640, width=1280), RGB images example inputs are:
        #   file:        ims = 'data/images/zidane.jpg'  # str or PosixPath
        #   URI:             = 'https://ultralytics.com/images/zidane.jpg'
        #   OpenCV:          = cv2.imread('image.jpg')[:,:,::-1]  # HWC BGR to RGB x(640,1280,3)
        #   PIL:             = Image.open('image.jpg') or ImageGrab.grab()  # HWC x(640,1280,3)
        #   numpy:           = np.zeros((640,1280,3))  # HWC
        #   torch:           = torch.zeros(16,3,320,640)  # BCHW (scaled to size=640, 0-1 values)
        #   multiple:        = [Image.open('image1.jpg'), Image.open('image2.jpg'), ...]  # list of images

        dt = (Profile(), Profile(), Profile())
        with dt[0]:
            if isinstance(size, int):  # expand
                size = (size, size)
            p = next(self.model.parameters()) if self.pt else torch.empty(1, device=self.model.device)  # param
            autocast = self.amp and (p.device.type != 'cpu')  # Automatic Mixed Precision (AMP) inference
            # 图片如果是tensor格式 说明是预处理过的,
            # 直接正常进行前向推理即可 nms在推理结束进行(函数外写)
            if isinstance(ims, torch.Tensor):  # torch
                with amp.autocast(autocast):
                    return self.model(ims.to(p.device).type_as(p), augment=augment)  # inference

            # Pre-process
            n, ims = (len(ims), list(ims)) if isinstance(ims, (list, tuple)) else (1, [ims])  # number, list of images
            shape0, shape1, files = [], [], []  # image and inference shapes, filenames
            for i, im in enumerate(ims):
                f = f'image{i}'  # filename
                if isinstance(im, (str, Path)):  # filename or uri
                    im, f = Image.open(requests.get(im, stream=True).raw if str(im).startswith('http') else im), im
                    im = np.asarray(exif_transpose(im))
                elif isinstance(im, Image.Image):  # PIL Image
                    im, f = np.asarray(exif_transpose(im)), getattr(im, 'filename', f) or f
                files.append(Path(f).with_suffix('.jpg').name)
                if im.shape[0] < 5:  # image in CHW
                    im = im.transpose((1, 2, 0))  # reverse dataloader .transpose(2, 0, 1)
                im = im[..., :3] if im.ndim == 3 else cv2.cvtColor(im, cv2.COLOR_GRAY2BGR)  # enforce 3ch input
                s = im.shape[:2]  # HWC
                shape0.append(s)  # image shape
                g = max(size) / max(s)  # gain
                shape1.append([int(y * g) for y in s])
                ims[i] = im if im.data.contiguous else np.ascontiguousarray(im)  # update
            shape1 = [make_divisible(x, self.stride) for x in np.array(shape1).max(0)]  # inf shape
            x = [letterbox(im, shape1, auto=False)[0] for im in ims]  # pad
            x = np.ascontiguousarray(np.array(x).transpose((0, 3, 1, 2)))  # stack and BHWC to BCHW
            x = torch.from_numpy(x).to(p.device).type_as(p) / 255  # uint8 to fp16/32

        with amp.autocast(autocast):
            # Inference
            with dt[1]:
                y = self.model(x, augment=augment)  # forward
            # Post-process
            with dt[2]:
                y = non_max_suppression(y if self.dmb else y[0],
                                        self.conf,
                                        self.iou,
                                        self.classes,
                                        self.agnostic,
                                        self.multi_label,
                                        max_det=self.max_det)  # NMS
                for i in range(n):
                    scale_boxes(shape1, y[i][:, :4], shape0[i])
            return Detections(ims, y, files, dt, self.names, x.shape)
class Detections:
    # YOLOv5 detections class for inference results
    # YOLOv5推理结果检测类
    def __init__(self, ims, pred, files, times=(0, 0, 0), names=None, shape=None):
        super().__init__()
        d = pred[0].device  # device
        gn = [torch.tensor([*(im.shape[i] for i in [1, 0, 1, 0]), 1, 1], device=d) for im in ims]  # normalizations
        self.ims = ims  # list of images as numpy arrays
        self.pred = pred  # list of tensors pred[0] = (xyxy, conf, cls)
        self.names = names  # class names
        self.files = files  # image filenames
        self.times = times  # profiling times
        self.xyxy = pred  # xyxy pixels
        self.xywh = [xyxy2xywh(x) for x in pred]  # xywh pixels
        self.xyxyn = [x / g for x, g in zip(self.xyxy, gn)]  # xyxy normalized
        self.xywhn = [x / g for x, g in zip(self.xywh, gn)]  # xywh normalized
        self.n = len(self.pred)  # number of images (batch size)
        self.t = tuple(x.t / self.n * 1E3 for x in times)  # timestamps (ms)
        self.s = tuple(shape)  # inference BCHW shape

    def _run(self, pprint=False, show=False, save=False, crop=False, render=False, labels=True, save_dir=Path('')):
        s, crops = '', []
        for i, (im, pred) in enumerate(zip(self.ims, self.pred)):
            s += f'\nimage {i + 1}/{len(self.pred)}: {im.shape[0]}x{im.shape[1]} '  # string
            if pred.shape[0]:
                for c in pred[:, -1].unique():
                    n = (pred[:, -1] == c).sum()  # detections per class
                    s += f"{n} {self.names[int(c)]}{'s' * (n > 1)}, "  # add to string
                s = s.rstrip(', ')
                if show or save or render or crop:
                    annotator = Annotator(im, example=str(self.names))
                    for *box, conf, cls in reversed(pred):  # xyxy, confidence, class
                        label = f'{self.names[int(cls)]} {conf:.2f}'
                        if crop:
                            file = save_dir / 'crops' / self.names[int(cls)] / self.files[i] if save else None
                            crops.append({
                                'box': box,
                                'conf': conf,
                                'cls': cls,
                                'label': label,
                                'im': save_one_box(box, im, file=file, save=save)})
                        else:  # all others
                            annotator.box_label(box, label if labels else '', color=colors(cls))
                    im = annotator.im
            else:
                s += '(no detections)'

            im = Image.fromarray(im.astype(np.uint8)) if isinstance(im, np.ndarray) else im  # from np
            if show:
                display(im) if is_notebook() else im.show(self.files[i])
            if save:
                f = self.files[i]
                im.save(save_dir / f)  # save
                if i == self.n - 1:
                    LOGGER.info(f"Saved {self.n} image{'s' * (self.n > 1)} to {colorstr('bold', save_dir)}")
            if render:
                self.ims[i] = np.asarray(im)
        if pprint:
            s = s.lstrip('\n')
            return f'{s}\nSpeed: %.1fms pre-process, %.1fms inference, %.1fms NMS per image at shape {self.s}' % self.t
        if crop:
            if save:
                LOGGER.info(f'Saved results to {save_dir}\n')
            return crops

    @TryExcept('Showing images is not supported in this environment')
    def show(self, labels=True):
        self._run(show=True, labels=labels)  # show results

    def save(self, labels=True, save_dir='runs/detect/exp', exist_ok=False):
        save_dir = increment_path(save_dir, exist_ok, mkdir=True)  # increment save_dir
        self._run(save=True, labels=labels, save_dir=save_dir)  # save results

    def crop(self, save=True, save_dir='runs/detect/exp', exist_ok=False):
        save_dir = increment_path(save_dir, exist_ok, mkdir=True) if save else None
        return self._run(crop=True, save=save, save_dir=save_dir)  # crop results

    def render(self, labels=True):
        self._run(render=True, labels=labels)  # render results
        return self.ims

    def pandas(self):
        # return detections as pandas DataFrames, i.e. print(results.pandas().xyxy[0])
        new = copy(self)  # return copy
        ca = 'xmin', 'ymin', 'xmax', 'ymax', 'confidence', 'class', 'name'  # xyxy columns
        cb = 'xcenter', 'ycenter', 'width', 'height', 'confidence', 'class', 'name'  # xywh columns
        for k, c in zip(['xyxy', 'xyxyn', 'xywh', 'xywhn'], [ca, ca, cb, cb]):
            a = [[x[:5] + [int(x[5]), self.names[int(x[5])]] for x in x.tolist()] for x in getattr(self, k)]  # update
            setattr(new, k, [pd.DataFrame(x, columns=c) for x in a])
        return new

    def tolist(self):
        # return a list of Detections objects, i.e. 'for result in results.tolist():'
        r = range(self.n)  # iterable
        x = [Detections([self.ims[i]], [self.pred[i]], [self.files[i]], self.times, self.names, self.s) for i in r]
        # for d in x:
        #    for k in ['ims', 'pred', 'xyxy', 'xyxyn', 'xywh', 'xywhn']:
        #        setattr(d, k, getattr(d, k)[0])  # pop out of list
        return x

    def print(self):
        LOGGER.info(self.__str__())

    def __len__(self):  # override len(results)
        return self.n

    def __str__(self):  # override print(results)
        return self._run(pprint=True)  # print results

    def __repr__(self):
        return f'YOLOv5 {self.__class__} instance\n' + self.__str__()