目录
MobilneNetV2原理
MobileNetV2的创新点:
MobileNetV2对比MobileNetV1
MobilneNetV2源码(torch版)
训练10个epoch的效果
MobilneNetV2原理
MobileNetV2是由谷歌开发的一种用于移动设备的轻量级卷积神经网络。与传统卷积神经网络相比,它具有更高的计算效率和更小的模型尺寸,可以在移动设备上实现高精度的图像识别任务。
MobileNetV2的主要原理是使用深度可分离卷积来减少模型的参数数量和计算量。深度可分离卷积将传统的卷积操作分解为两个独立的操作:深度卷积和逐点卷积。深度卷积仅在通道维度上进行卷积操作,而逐点卷积仅在空间维度上进行卷积操作。这种分解能大大降低计算复杂度,同时保持较高的分类精度。
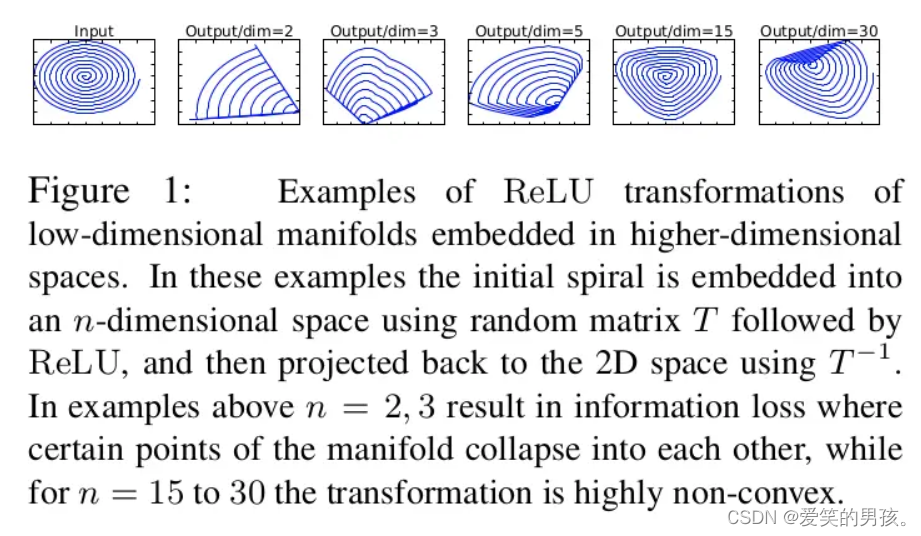
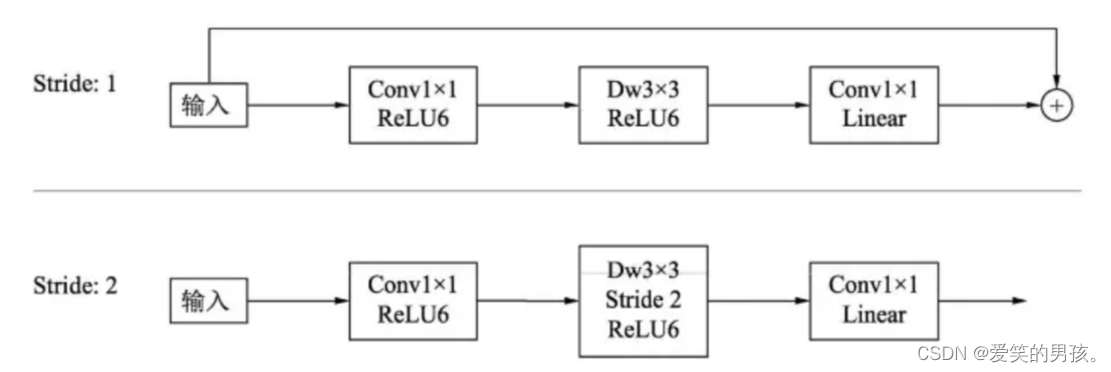
另外,MobileNetV2还使用了线性瓶颈函数来加速网络训练,以及Inverted Residuals结构来充分使用低维特征信息。
线性瓶颈结构:
MobileNetV2两种残差块:
它还采用了轻量级的特征网络Design Spaces提升性能的策略,优化卷积核大小和数量,调整网络宽度和深度,最终得到一个更加高效的网络。网络结构图如下:
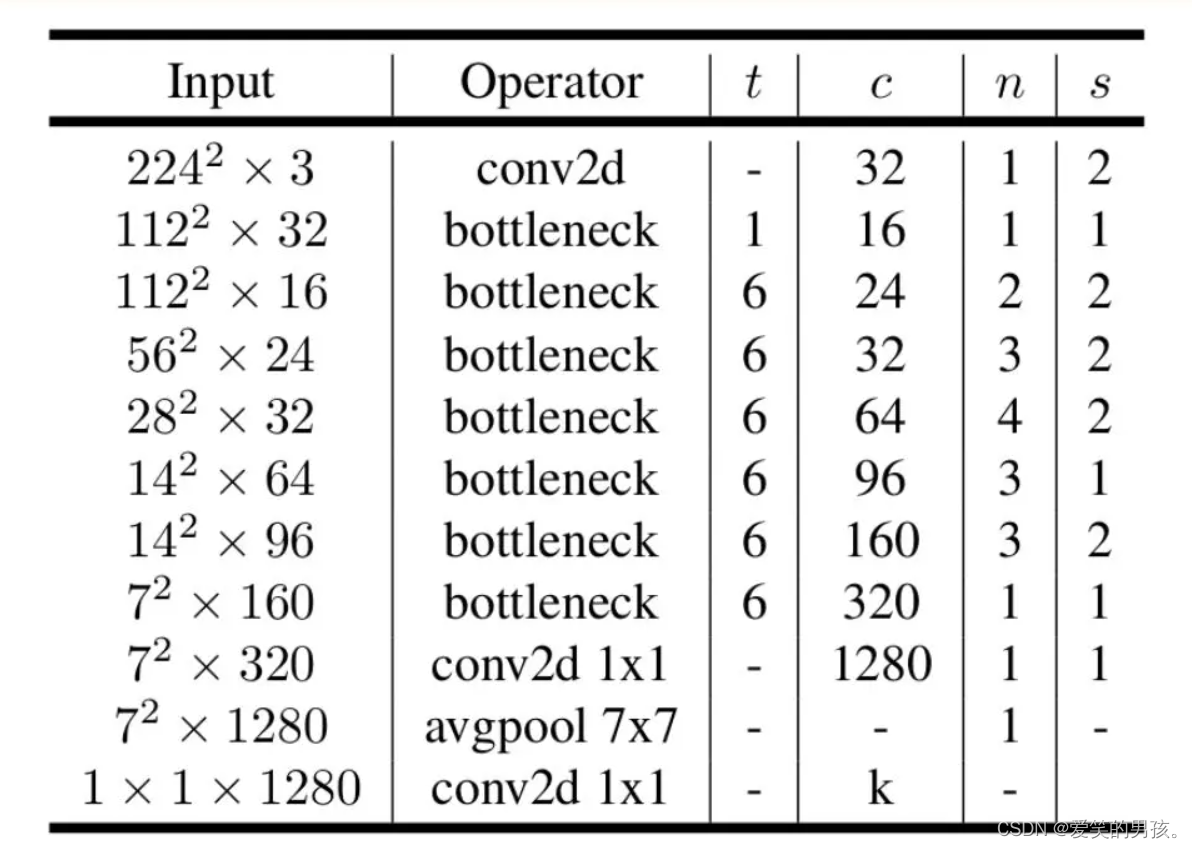
MobileNetV2的创新点:
MobileNetV2相较于MobileNetV1在以下方面进行了创新:
-
Inverted Residuals:MobileNetV2使用了Inverted Residuals结构,将输入先进行低维变换,再使用残差模块加上上采样,最后使用1x1卷积进行通道变换,从而减少计算量。
-
Linear Bottlenecks: MobileNetV2使用1x1卷积核将输入通道数缩小到一个较小的值,然后进行卷积操作,最后再使用1x1卷积通道扩展回原来的通道数。这样可以减少计算量和参数量,同时提高模型准确度。
-
使用深度可分离卷积:MobileNetV2中使用了深度可分离卷积,在计算相同的特征图时用的参数远少于传统卷积。而且,深度可分离卷积允许使用不同的卷积核、池化层和标准化层,从而提高了模型的灵活性。
-
设计高效的shortcut连接:在MobileNetV2中,shortcut连接采用的是identity mapping方法,使用1x1卷积将跳过的特征图的通道数与当前特征图的通道数对应起来,同时这种结构可以避免梯度消失和梯度爆炸的问题,提高了模型的稳定性。
-
激活函数采用Scaled Exponential Linear Unit (SELU):MobileNetV2将激活函数采用了Scaled Exponential Linear Unit (SELU),可以在不增加计算量的情况下提高模型的准确性。
总之,MobileNetV2通过使用深度可分离卷积和其他技术来减少计算量和模型尺寸,同时保持高精度的分类任务,是一种非常有前途的轻量级卷积神经网络。
MobileNetV2对比MobileNetV1
MobileNetV2相比于MobileNetV1,主要改进有以下几个方面:
-
更优的性能:MobileNetV2在ImageNet上的Top-1准确率为72.0%,相比MobileNetV1(70.6%)有显著提升。
-
更高的效率:MobileNetV2在相同的计算资源下,参数量比MobileNetV1少了40%,计算量比它少了30%。
-
更好的适应性:MobileNetV2引入了一些新的技术,例如倒置余弦线性单元(Inverted Residuals with Linear Bottlenecks)和线性瓶颈模块(Linear Bottlenecks),使得它更适应于移动设备上的实时推理场景。
-
更好的鲁棒性:MobileNetV2在对小型变形的物体分类和检测任务上,能够显著提高模型的准确率。
MobilneNetV2源码(torch版)
数据集运行代码时自动下载,如果网络比较慢,可以自行点击我分享的链接下载cifar数据集。
链接:百度网盘
提取码:kd9a
此代码是使用的GPU运行的,如果没有GPU导致运行失败,就把代码中的device、.to(device)删除,使用默认CPU运行。
如果使用GPU,GPU显存小导致运行报错,就将主函数main()里面的batch_size调小即可。
from torch.utils.data import DataLoader
from torchvision.datasets import CIFAR10
from torchvision.transforms import transforms
from torch.autograd import Variable


import torch.nn as nn
import torch.nn.functional as F
import torch

class Block(nn.Module):
    def __init__(self, in_planes, out_planes, expansion, stride):
        super(Block, self).__init__()
        self.stride = stride

        planes = expansion * in_planes
        self.conv1 = nn.Conv2d(in_planes, planes, kernel_size=1, bias=False)
        self.bn1 = nn.BatchNorm2d(planes)
        self.conv2 = nn.Conv2d(planes, planes, kernel_size=3, stride=stride, padding=1, groups=planes, bias=False)
        self.bn2 = nn.BatchNorm2d(planes)
        self.conv3 = nn.Conv2d(planes, out_planes, kernel_size=1, bias=False)
        self.bn3 = nn.BatchNorm2d(out_planes)

        self.shortcut = nn.Sequential()
        if stride == 1 and in_planes != out_planes:
            self.shortcut = nn.Sequential(
                nn.Conv2d(in_planes, out_planes, kernel_size=1, stride=stride, bias=False),
                nn.BatchNorm2d(out_planes)
            )

    def forward(self, x):
        out = F.relu(self.bn1(self.conv1(x)))
        out = F.relu(self.bn2(self.conv2(out)))
        out = self.bn3(self.conv3(out))
        out += self.shortcut(x) if self.stride == 1 else out
        return out


class MobileNetV2(nn.Module):
    def __init__(self, num_classes=10):
        super(MobileNetV2, self).__init__()

        self.cfgs = [
            # t, c, n, s
            [1, 16, 1, 1],
            [6, 24, 2, 1],
            [6, 32, 3, 2],
            [6, 64, 4, 2],
            [6, 96, 3, 1],
            [6, 160, 3, 2],
            [6, 320, 1, 1],
        ]

        self.conv1 = nn.Conv2d(3, 32, kernel_size=3, stride=1, padding=1, bias=False)
        self.bn1 = nn.BatchNorm2d(32)
        self.layers = self._make_layers(in_planes=32)
        self.conv2 = nn.Conv2d(320, 1280, kernel_size=1, bias=False)
        self.bn2 = nn.BatchNorm2d(1280)
        self.linear = nn.Linear(1280, num_classes)

    def _make_layers(self, in_planes):
        layers = []
        for t, c, n, s in self.cfgs:
            for i in range(n):
                stride = s if i == 0 else 1
                layers.append(Block(in_planes, c, t, stride))
                in_planes = c
        return nn.Sequential(*layers)

    def forward(self, x):
        out = F.relu(self.bn1(self.conv1(x)))
        out = self.layers(out)
        out = F.relu(self.bn2(self.conv2(out)))
        out = F.avg_pool2d(out, 4)
        out = out.view(out.size(0), -1)
        out = self.linear(out)
        return out


if __name__ == '__main__':
    train_data = CIFAR10('cifar', train=True, transform=transforms.ToTensor())
    data = DataLoader(train_data, batch_size=148, shuffle=True)

    device = torch.device("cuda")
    net = MobileNetV2().to(device)
    print(net)
    cross = nn.CrossEntropyLoss().to(device)
    optimizer = torch.optim.Adam(net.parameters(), 0.0001)
    for epoch in range(10):
        for img, label in data:
            img = Variable(img).to(device)
            label = Variable(label).to(device)
            output = net.forward(img)
            loss = cross(output, label)
            loss.backward()
            optimizer.zero_grad()
            optimizer.step()
            pre = torch.argmax(output, 1)
            num = (pre == label).sum().item()
            acc = num / img.shape[0]
        print("epoch:", epoch + 1)
        print("loss:", loss.item())
print("Accuracy:", acc) 以上代码采用的是跟PyTorch官方模型一样的模型结构,在_make_layers函数中构建了7个Block块,每个Block块都是跟MobileNetV2一样的结构,通过自定义一个Block类来实现。在forward函数中,通过调用这7个Block块的方式构建整个网络的结构。在最后的分类层中,采用了一个线性层。
使用cifar10训练做测试。
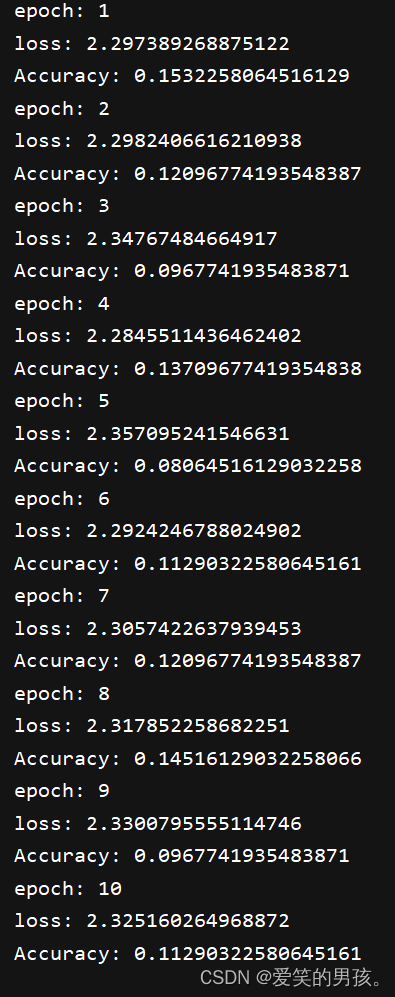
训练10个epoch的效果
