1 介绍
Duration: 5:00
总览
旅行者能够使用该应用在华为地图上搜索附近名胜景点、游玩去处或是附近ATM、餐馆和医院等。
服务场景描述
Tourism应用通过集成机器学习服务的地标识别能力,能够提供旅行过程所有必要的信息,还可以识别图片中的地标建筑。当传入图片时,用户可以获取识别出的地标信息以及搜索服务提供的相关图片。相关图片可以通过使用全景服务以全景图片或柱状全景图片形式快速展示。应用使用位置服务向用户展示名胜景点或是打算前去的地点位置。
| 特性 | 服务 |
| 华为账号/手机号登录 | 认证服务,账号服务 |
| 获取定位并展示在地图上 | 定位服务,地图服务 |
| 位置搜索 | 位置服务 |
| 加载地标相关图片 | 搜索服务 |
| 360°全景图片与交互 | 全景服务 |
2 您需要什么
Duration: 1:00
硬件需求
-
一部搭载安卓6或更高版本系统的手机,用于调试应用。
请提前准备上述硬件设备。
软件需求
-
Android Studio (下载),本次Codelab使用Windows环境。
-
JDK 1.8或以上版本(下载)。
请提前准备上述软件环境。
3 能力接入准备
Duration: 2:00
首先,您需要在AppGallery Connect上启用HMS Core的相关服务。
启用前,请完成以下准备工作:
-
在AppGallery Connect上创建一个应用。
-
在Android Studio中新建一个项目。
-
生成签名证书。
-
生成签名证书指纹。
-
配置签名证书指纹。
-
添加应用包名并保存配置文件。
-
在项目级build.gradle文件中添加AppGallery Connect插件和Maven仓。
-
在Android Studio中配置签名证书。
详情请参见HUAWEI HMS Core集成准备。
4 开通服务
Duration: 5:00
-
登录AppGallery Connect,点击“项目设置”中“API管理”页签,开通如下服务的API权限。
-
认证服务
-
地图服务
-
定位服务
-
位置服务
-
搜索服务
-
机器学习服务
-
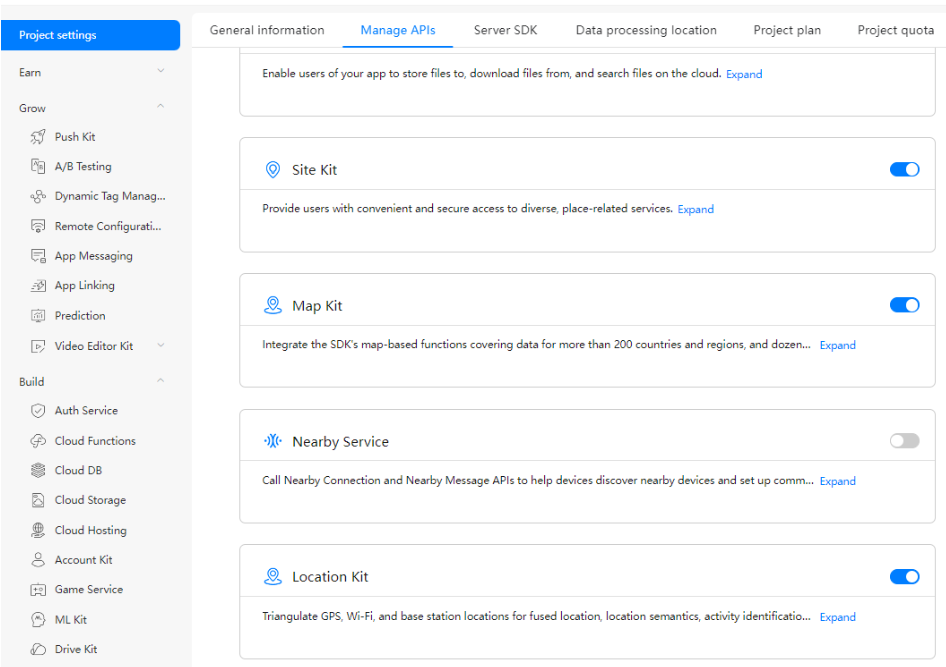
说明:以上API权限默认已开通。如未开通,请手动开通。
2.开启地图服务的额外权限,请参考地图服务(Android)。
服务权限开启完毕后,您可进入下一个开发步骤。
5 配置开发环境
Duration: 3:00
-
点击“agconnect-services.json”下载配置文件。
-
复制agconnect-services.json文件至项目应用级根目录中。
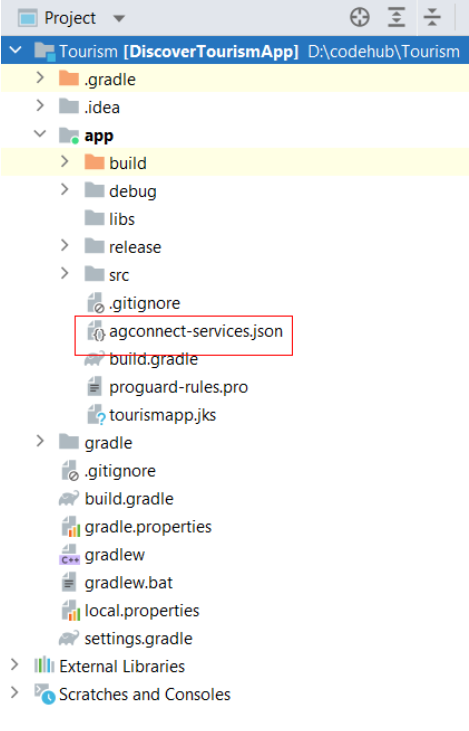
3.打开Android Studio项目中根目录下的“build.gradle”文件。
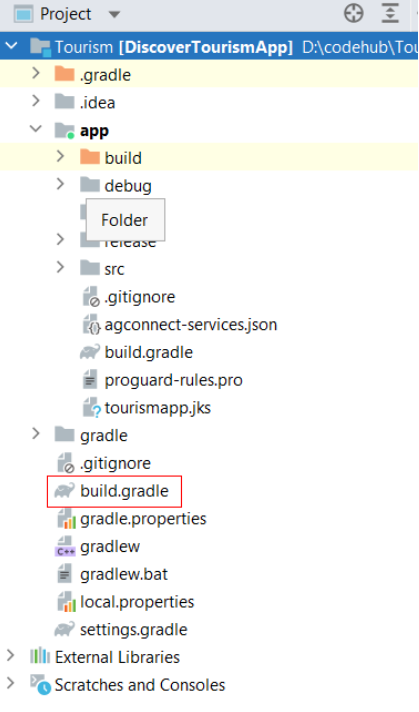
4.配置如下信息。
buildscript {
    repositories {
        mavenLocal()
        google()
        mavenCentral()
        maven { url 'https://developer.huawei.com/repo/' }
    }
    dependencies {
        classpath 'com.android.tools.build:gradle:7.2.0'
        classpath 'com.huawei.agconnect:agcp:1.6.0.300'
    }
}
plugins {
    id 'com.android.application' version '7.2.1' apply false
    id 'com.android.library' version '7.2.1' apply false
}

task clean(type: Delete) {
    delete rootProject.buildDir
}
5. 在settings.gradle文件中配置如下信息。
pluginManagement {
    repositories {
        gradlePluginPortal()
        google()
        mavenCentral()
        maven { url 'https://developer.huawei.com/repo/' }
    }
}
dependencyResolutionManagement {
    repositoriesMode.set(RepositoriesMode.FAIL_ON_PROJECT_REPOS)
    repositories {
        google()
        mavenCentral()
        maven { url 'https://developer.huawei.com/repo/' }
    }
}
rootProject.name = "DiscoverTourismApp"
include ':app'
6.打开应用级目录下的build.gradle文件。
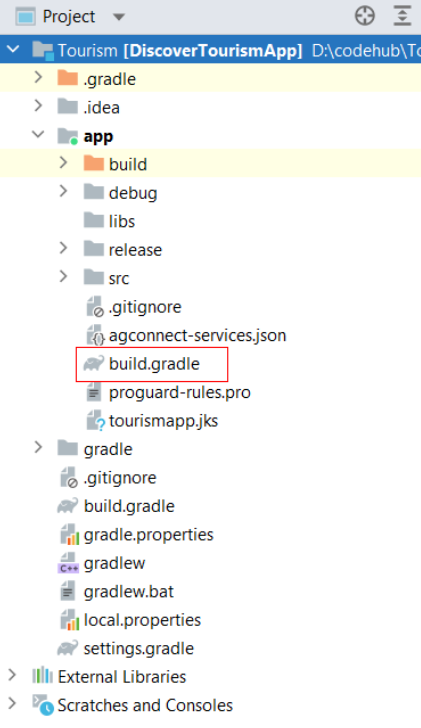
7.在应用级build.gradle文件里添加signing configs和所需的依赖。
apply plugin: 'com.huawei.agconnect'
android {
    ...
    signingConfigs {
        release {
            storeFile file("xxx.jks")
            keyAlias 'xxx'
            keyPassword 'xxx'
            storePassword 'xxx'
            v1SigningEnabled true
            v2SigningEnabled true
        }
    }
    defaultConfig {...}
    buildTypes {
        debug{...}
        release{...}
    }
}
implementation 'com.huawei.agconnect:agconnect-core:1.6.5.300'
implementation 'com.huawei.agconnect:agconnect-auth:1.6.5.300'
implementation 'com.huawei.hms:hwid:6.4.0.301'
implementation 'com.huawei.hms:site:4.0.3.300'
implementation 'com.huawei.hms:maps:5.0.3.302'
implementation 'com.huawei.hms:location:5.0.4.300'
implementation 'com.huawei.hms:ml-computer-vision-segmentation:2.2.0.300'
implementation 'com.huawei.hms:searchkit:5.0.4.303'
implementation 'com.huawei.hms:panorama:5.0.2.306'
implementation 'com.huawei.hms:panorama-local:5.0.2.306'8.在AndroidManifest.xml文件里添加所需权限。
<uses-permission android:name="android.permission.INTERNET" />
 <uses-permission android:name="android.permission.READ_EXTERNAL_STORAGE" />
 <uses-permission android:name="android.permission.WRITE_EXTERNAL_STORAGE" />
 <uses-permission android:name="android.permission.CAMERA" />
 <uses-permission android:name="com.huawei.permission.SECURITY_DIAGNOSE" />
 <uses-permission android:name="android.permission.WAKE_LOCK" />
 <uses-permission android:name="android.permission.ACCESS_WIFI_STATE" />
 <uses-permission android:name="android.permission.READ_PHONE_STATE" />
 <uses-permission android:name="android.permission.INTERNET" />
 <uses-permission android:name="android.permission.ACCESS_NETWORK_STATE" />
 <uses-permission android:name="com.huawei.hms.permission.ACTIVITY_RECOGNITION" />
 <uses-permission android:name="android.permission.ACTIVITY_RECOGNITION" />
 <uses-permission android:name="android.permission.ACCESS_COARSE_LOCATION" />
 <uses-permission android:name="android.permission.ACCESS_FINE_LOCATION" />
6 开发步骤
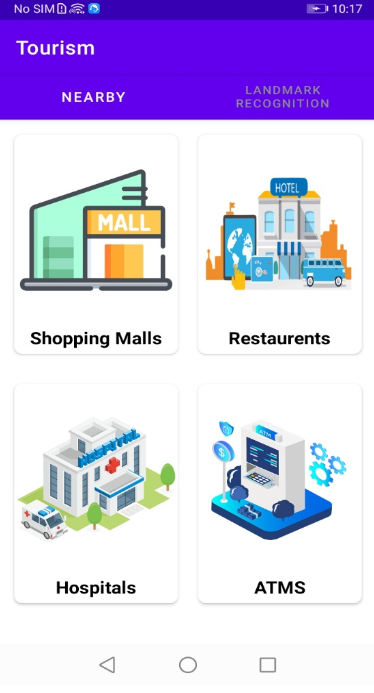
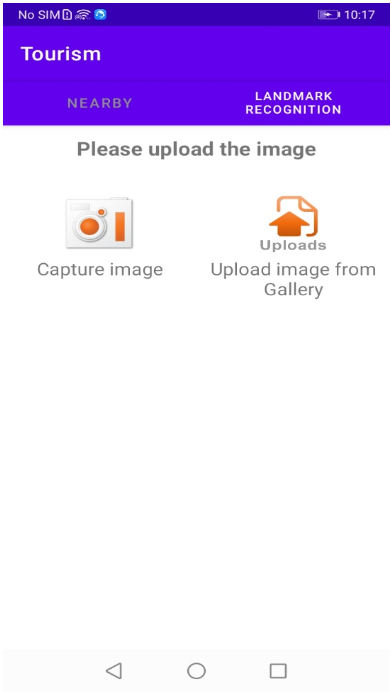
登录成功后,用户进入应用面板页面,页面包括如下图所示的NEARBY和LANDMARK RECOGNITION模块。
7 集成认证服务
Duration: 1:00
认证服务提供多种认证方式,包括手机号、Facebook和谷歌账号等。本次codelab使用华为账号认证。首先开通华为账号认证模式来获取用户的华为账号信息。

-
集成认证服务SDK。
添加下述依赖。
implementation "com.huawei.agconnect:agconnect-auth:<auth_service_version>"说明:本示例中使用的认证服务版本为1.6.0.300。
您在开发时,请使用最新版本。
-
开发华为账号登录功能。
认证服务在用户使用华为账号登录时认证用户。
导入认证服务所需的类。
import com.huawei.hms.support.account.AccountAuthManager;
import com.huawei.hms.support.account.request.AccountAuthParams;
import com.huawei.hms.support.account.request.AccountAuthParamsHelper;
import com.huawei.hms.support.account.result.AuthAccount;
import com.huawei.hms.support.account.service.AccountAuthService;
import com.huawei.hms.support.hwid.ui.HuaweiIdAuthButton;
Java
LoginActivity.java
设计华为账号登录按钮样式。
<com.huawei.hms.support.hwid.ui.HuaweiIdAuthButton
     android:id="@+id/btn_login_account"
     android:layout_width="wrap_content"
     android:layout_height="wrap_content"
     android:layout_gravity="center"
     android:gravity="center"
     app:hwid_color_policy="hwid_color_policy_blue"/>
HuaweiIdAuthButton huaweiIdAuthButton = findViewById(R.id.btn_login_account);
LoginActivity.java
当点击按钮时执行回调。
mAuthParam = new AccountAuthParamsHelper(AccountAuthParams.DEFAULT_AUTH_REQUEST_PARAM) .setEmail() .createParams(); mAuthService = AccountAuthManager.getService(this, mAuthParam); Task<AuthAccount> task = mAuthService.silentSignIn(); task.addOnSuccessListener(authAccount -> signinResult(authAccount)); -
调用getSignInIntent接口获取登录信息。
登录成功后,在onActivityResult中调用getSignInIntent接口获取登录接口。
Java
LoginActivity.java
@Override
protected void onActivityResult(int requestCode, int resultCode, Intent data) {
     super.onActivityResult(requestCode, resultCode, data);
     if (requestCode == REQUEST_CODE_SIGN_IN) {

Task<AuthAccount> authAccountTask = AccountAuthManager.parseAuthResultFromIntent(data);
if (authAccountTask.isSuccessful()) {
     AuthAccount authAccount = authAccountTask.getResult();
 signinResult(authAccount);
} else {
     AppLog.logE(TAG, "sign in failed : " + ((ApiException)
authAccountTask.getException()).getStatusCode());
 }


             }
 }
处理用户信息。
Java
处理登录结果。
private void signinResult(AuthAccount authAccount) {
     TourismSharedPref.initializeInstance(this);

TourismSharedPref.getInstance().putString(Constants.USER_NAME, authAccount.getDisplayName());
     TourismSharedPref.getInstance().putString(Constants.EMAIL, authAccount.getEmail());
TourismSharedPref.getInstance().putString(Constants.ALREADY_LOGIN, "1");
     Intent i = new Intent(LoginActivity.this, MainActivity.class);
     i.putExtra("name", authAccount.getDisplayName());
     i.putExtra("email", authAccount.getEmail());
     startActivity(i);
     finish();
 }
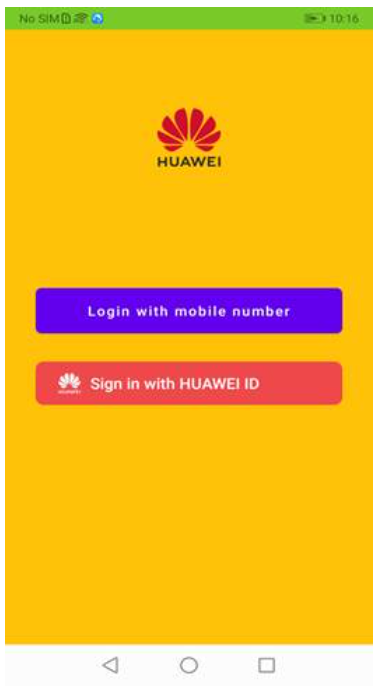
效果:
用户手机上打开Main Activity页面。
8 集成定位服务
Duration: 1:00
定位服务(Location Kit)为您提供快速、精准地获取用户位置信息的能力,构建全球定位服务能力,助力您发展全球业务。
-
添加依赖。
添加定位服务依赖。
dependencies {
     implementation "com.huawei.hms:location:<latest_version_code>"
 }
说明:本示例中使用的定位服务SDK版本为6.0.0.302。
您在开发时,请使用最新版本。
-
在Manifest文件中添加如下权限。
<uses-permission android:name="android.permission.ACCESS_FINE_LOCATION" />
 <uses-permission android:name="android.permission.ACCESS_COARSE_LOCATION" />
Java
a.添加运行时权限。
if (checkPermission()) {
     getLastKnownLocation();
     checkLocationSettings();
     hMap.setMyLocationEnabled(true);
     //启用my-location图标。
     hMap.getUiSettings().setMyLocationButtonEnabled(true);
 } else {
     Toast.makeText(getApplicationContext(),"Permission needed",Toast.LENGTH_LONG).show();
     //申请权限。
     requestPermission();
 }
b.选择以下的一种方式动态申请权限。
checkLocationPermission()
public boolean checkPermission() {
     int fineloc = ContextCompat.checkSelfPermission(mContext, Manifest.permission.ACCESS_FINE_LOCATION);
     int coarseloc = ContextCompat.checkSelfPermission(mContext, Manifest.permission.ACCESS_COARSE_LOCATION);

     if (Build.VERSION.SDK_INT <= Build.VERSION_CODES.P) {
         return fineloc == PackageManager.PERMISSION_GRANTED && coarseloc == PackageManager.PERMISSION_GRANTED;
     } else {
         int backloc = ContextCompat.checkSelfPermission(mContext, Manifest.permission.ACCESS_BACKGROUND_LOCATION);
         return fineloc == PackageManager.PERMISSION_GRANTED && coarseloc == PackageManager.PERMISSION_GRANTED && backloc == PackageManager.PERMISSION_GRANTED;
     }
 }
requestPermissionForLocation()
@TargetApi(Build.VERSION_CODES.M)
private void requestPermission() {
     if (Build.VERSION.SDK_INT <= Build.VERSION_CODES.P) {
         requestPermissions(new String[]{Manifest.permission.ACCESS_FINE_LOCATION, Manifest.permission.ACCESS_COARSE_LOCATION}, REQUEST_ACCESS_PERMISSION_CODE);
     } else {
         requestPermissions(new String[]{Manifest.permission.ACCESS_FINE_LOCATION, Manifest.permission.ACCESS_COARSE_LOCATION, Manifest.permission.ACCESS_BACKGROUND_LOCATION
         }, REQUEST_ACCESS_PERMISSION_CODE);
     }
 }
c.处理权限。
@TargetApi(Build.VERSION_CODES.M)
@Override
public void onRequestPermissionsResult(int requestCode, @NonNull String[] permissions, @NonNull int[] grantResults) {
     super.onRequestPermissionsResult(requestCode, permissions, grantResults);
     if (requestCode == REQUEST_ACCESS_PERMISSION_CODE) {
     if (grantResults[0] == PackageManager.PERMISSION_GRANTED) {

    } else {
        }

     }
 }
添加下述代码获取定位。
private void getLastLocation() {
     try {
         Task<Location> lastLocation = mFusedLocationProviderClient.getLastLocation();
         lastLocation.addOnSuccessListener(location -> {
             if (location == null) {
                 Log.i(TAG, "getLastLocation onSuccess location is null");
                 return;
             }
String latlong = "" + location.getLatitude() + " -- " + location.getLongitude();
             Log.i(TAG, "getLastLocation onSuccess location[Longitude,Latitude]:"
                     + location.getLongitude() + "," + location.getLatitude());
             mCurrentLocation.setLatitude(location.getLatitude());
             mCurrentLocation.setLongitude(location.getLongitude());

return;
         }).addOnFailureListener(e -> Log.e(TAG, "getLastLocation onFailure:" + e.getMessage()));
     } catch (Exception e) {
         Log.e(TAG, "getLastLocation exception:" + e.getMessage());
     }
 }
效果:
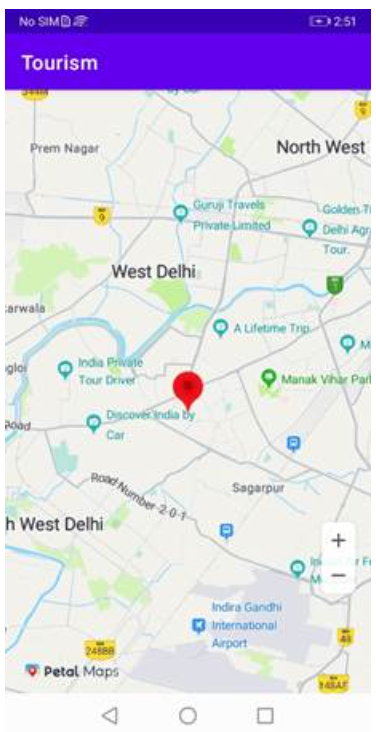
红色标记为当前定位。
9 集成地图服务
Duration: 1:00
地图Android SDK是一套地图开发调用接口。地图数据覆盖大部分国家和地区,支持多语言。地图采用WGS84 GPS坐标系,满足绝大多数海外地图开发的需求。
-
添加依赖。
dependencies { implementation "com.huawei.hms:maps:<map_service>" } -
开发地图功能。
a.在Manifest文件中添加如下依赖。
<uses-permission android:name="android.permission.ACCESS_COARSE_LOCATION"/>
 <uses-permission android:name="android.permission.ACCESS_FINE_LOCATION"/>
 <uses-permission android:name="android.permission.INTERNET"/>
 <uses-permission android:name="android.permission.ACCESS_NETWORK_STATE"/>
b.在布局文件中添加SupportMapFragment类。
Java
<fragment
     android:id="@+id/mapfragment_mapfragmentdemo"
     class="com.huawei.hms.maps.SupportMapFragment"
     android:layout_width="match_parent"
     android:layout_height="match_parent"
     app:cameraTargetLat="48.893478"
     app:cameraTargetLng="2.334595"
     app:cameraZoom="10"
     app:layout_constraintBottom_toBottomOf="parent"
     app:layout_constraintEnd_toEndOf="parent"
     app:layout_constraintStart_toStartOf="parent"
     app:layout_constraintTop_toTopOf="parent" />
c.创建Map实例。
mSupportMapFragment = (SupportMapFragment) getSupportFragmentManager().findFragmentById(R.id.mapfragment_mapfragmentdemo);
 mSupportMapFragment.getMapAsync(this);


@Override
public void onMapReady(HuaweiMap huaweiMap) {
     HuaweiMap hMap = huaweiMap;
     LatLng hospitalLatLng = new LatLng(lat, lng);
     CameraUpdate cameraUpdate = CameraUpdateFactory.newLatLngZoom(hospitalLatLng, 12);
     huaweiMap.moveCamera(cameraUpdate);
     hMap.addMarker(new MarkerOptions().position(hospitalLatLng));
 }
效果:
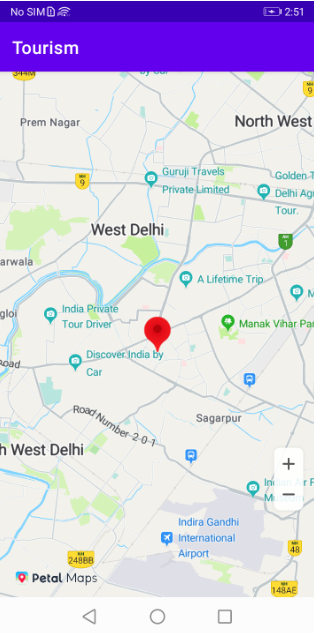
说明:本示例中使用的地图服务SDK版本为6.0.0.31。
您在开发时,请使用最新版本。
10 集成位置服务
Duration: 1:00
位置服务(Site Kit)提供海量POI数据,位置查询、时区查询、地理编码、行政区域等多类搜索服务能力,帮助您的应用吸引更多用户。
-
添加依赖。
添加位置服务的依赖。
dependencies { implementation "com.huawei.hms:site:<latest_version_code>" }说明:本示例中使用的位置服务SDK版本为6.0.0.302。
您在开发时,请使用最新版本。
添加下述代码获取地点列表。
private void nearbySearch(int type, Double lat, Double lng) {

     util.showProgressBar(this);
     NearbySearchRequest request = new NearbySearchRequest();
     request.setLocation(new Coordinate(lat, lng));
     if(type==1){
         request.setPoiType(LocationType.SHOPPING_MALL);
     }else if(type==2){
         request.setPoiType(LocationType.RESTAURANT);
     }else if(type==3){
         request.setPoiType(LocationType.HOSPITAL);
     }else if(type==4){
         request.setPoiType(LocationType.ATM);
     }
     request.setRadius(10000);
     searchService.nearbySearch(request, searchResultListener);

 }
SearchResultListener searchResultListener = new SearchResultListener<NearbySearchResponse>() {
@Override
public void onSearchResult(NearbySearchResponse results) {
StringBuilder stringBuilder = new StringBuilder();
if (results != null) {
List<Site> sites = results.getSites();
NearByAdapter nearByAdapter = new NearByAdapter(NearbySearchActivity.this, sites);
recyclerView.setAdapter(nearByAdapter);
util.stopProgressBar();
}
showSuccessResult(stringBuilder.toString());
}
@Override
public void onSearchError(SearchStatus status) {
showFailResult("", status.getErrorCode(), status.getErrorMessage());
}
};效果:
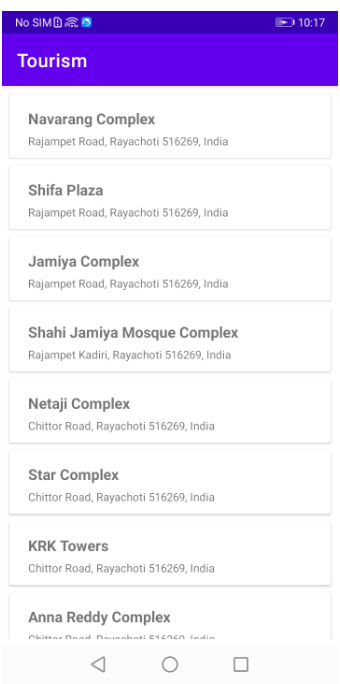
上图展示的是购物中心列表。
11 集成机器学习服务
Duration: 1:00
得益于华为长期技术积累,ML Kit为开发者提供简单易用、服务多样、技术领先的机器学习能力,助力开发者更快更好地开发各类AI应用。
-
添加依赖。
添加机器学习服务的依赖。
dependencies {
     implementation "com.huawei.hms:ml-computer-vision-segmentation:<latest_version_code>"
 }
说明:本示例中使用的机器学习服务SDK版本为6.0.0.302。
您在开发时,请使用最新版本。
添加下述代码获取地标名称和地址。
private void analyzer(Bitmap bitmap) {
     util.showProgressBar(getActivity());

     analyzer = MLAnalyzerFactory.getInstance().getRemoteLandmarkAnalyzer();
     MLRemoteLandmarkAnalyzerSetting settings = new MLRemoteLandmarkAnalyzerSetting.Factory()
             .setLargestNumOfReturns(1)
             .setPatternType(MLRemoteLandmarkAnalyzerSetting.STEADY_PATTERN)
             .create();
     this.analyzer = MLAnalyzerFactory.getInstance()
             .getRemoteLandmarkAnalyzer(settings);
     //通过android.graphics.Bitmap构造MLFrame,建议图片尺寸大于640 x 640像素。
    // Bitmap bitmap = BitmapFactory.decodeResource(this.getResources(), R.drawable.landmark_image);
     MLFrame mlFrame = new MLFrame.Creator().setBitmap(bitmap).create();
     //设置ApiKey。
     MLApplication.getInstance().setApiKey(getResources().getString(R.string.api_key));
     //设置access token。
     // MLApplication.getInstance().setAccessToken(MainActivity.accessToken);
     Task<List<MLRemoteLandmark>> task = this.analyzer.asyncAnalyseFrame(mlFrame);
     task.addOnSuccessListener(new OnSuccessListener<List<MLRemoteLandmark>>() {
         @Override
         public void onSuccess(List<MLRemoteLandmark> landmarkResults) {
             //识别成功的处理逻辑。
             displaySuccess(landmarkResults.get(0));
         }
     }).addOnFailureListener(new OnFailureListener() {
         @Override
         public void onFailure(Exception e) {
             //识别失败的处理逻辑。
            displayFailure(e);
         }
     });
 }

private void displayFailure(Exception exception) {
     String error = "Failure. ";
     try {
         MLException mlException = (MLException) exception;
         error += "error code: " + mlException.getErrCode() + "\n" + "error message: " + mlException.getMessage();
     } catch (Exception e) {
         error += e.getMessage();
     }
 }
private void displaySuccess(MLRemoteLandmark landmark) {
     String result = "";
     if (landmark.getLandmark() != null) {
         result = "Landmark: " + landmark.getLandmark();
     }
     location_name=landmark.getLandmark();
     result += "\nPositions: ";
     if (landmark.getPositionInfos() != null) {
         for (MLCoordinate coordinate : landmark.getPositionInfos()) {
             result += "\nLatitude:" + coordinate.getLat();
             result += "\nLongitude:" + coordinate.getLng();
             lat=coordinate.getLat();
             lng=coordinate.getLng();
         }
     }
     this.landMark_text.setText(landmark.getLandmark()+"\n\n"+landmark.getLandmarkIdentity());
     util.stopProgressBar();
 }
效果:
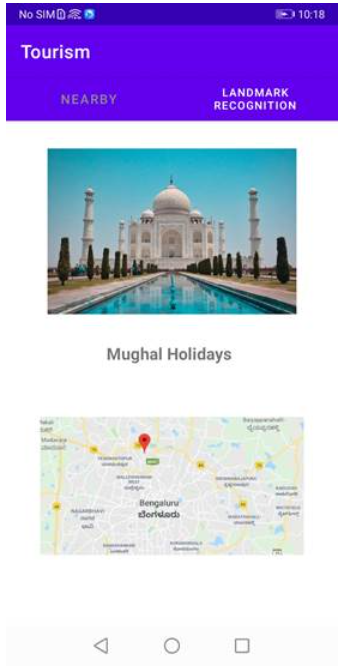
应用识别出图片上的地标名称为Mughal Holidays。
12 集成搜索服务
Duration: 1:00
Search Kit通过端侧SDK和云侧API方式,全面开放Petal Search搜索能力,使能生态合作伙伴快速构建更好的移动应用搜索体验。
-
添加依赖。
添加搜索服务的依赖。
dependencies {
     implementation "com.huawei.hms:searchkit:<latest_version_code>"
 }
说明:本示例中使用的搜索服务SDK版本为6.0.0.302。
您在开发时,请使用最新版本。
添加下述代码获取附近地点。
public void initRetrofit() {
     util.showProgressBar(this);
     ApplicationInfo appInfo = null;
     String baseUrl = "";
     try {
         appInfo = getPackageManager().getApplicationInfo(getPackageName(), PackageManager.GET_META_DATA);
         baseUrl = appInfo.metaData.getString("baseUrl");
     } catch (PackageManager.NameNotFoundException e) {

}
     QueryService service = NetworkManager.getInstance().createService(this, baseUrl);
     service.getRequestToken(
                     "client_credentials",
                     getResources().getString(R.string.app_id),
                     getResources().getString(R.string.client_secret_site))
             .subscribeOn(Schedulers.io())
             .observeOn(AndroidSchedulers.mainThread())
             .subscribe(new Observer<TokenResponse>() {
                 @Override
                 public void onSubscribe(Disposable d) {
                 }

                 @Override
                 public void onNext(TokenResponse tokenResponse) {
                     if (tokenResponse != null) {
                         if (tokenResponse.getAccess_token() != null) {
                             // Log.e(TAG,       tokenResponse.getBody().getAccess_token());
                             Log.e(TAG, "token response" +    tokenResponse.getAccess_token());

SearchKitInstance.getInstance().setInstanceCredential(tokenResponse.getAccess_token());
                         } else {
                             Log.e(TAG, "get responseBody token is null");
                         }
                     } else {
                         Log.e(TAG, "get responseBody is null");
                     }
                 }

                 @Override
                 public void onError(Throwable e) {
                     Log.e(TAG, "get token error: " + e.getMessage());
                 }

                 @Override
                 public void onComplete() {
                     getSuggest(landamark_str);
                     getSpellCheck(landamark_str);
                 }
             });
 }


private void getSuggest(final String query) {
     Observable.create                  (ObservableOnSubscribe<List<String>>) emitter -> {
                         AutoSuggestResponse response =
                                 SearchKitInstance.getInstance()
                                         .getSearchHelper()
                                         .suggest(query, Language.ENGLISH);
                         List<String> list = new ArrayList<String>();
                         if (response != null) {
                             if (response.getSuggestions() != null && !response.getSuggestions().isEmpty()) {
                                 for (int i = 0; i < response.getSuggestions().size(); i++) {
                                     list.add(response.getSuggestions().get(i).getName());
                                 }
                                 emitter.onNext(list);
                             }
                         }
                         emitter.onComplete();
                     })
             .subscribeOn(Schedulers.newThread())
             .observeOn(AndroidSchedulers.mainThread())
             .subscribe(
                     list -> doSearch(landamark_str),
                     StaticUtils.consumer);
 }


private void doSearch(String query) {
     webRequest.setQ(query);
     webRequest.setLang(Language.ENGLISH);
     webRequest.setSregion(Region.UNITEDKINGDOM);
     webRequest.setPn(1);
     webRequest.setPs(10);
     webRequest.setWithin("www.amazon.com");

     commonRequest.setQ(query);
     commonRequest.setLang(Language.ENGLISH);
     commonRequest.setSregion(Region.UNITEDKINGDOM);
     commonRequest.setPn(1);
     commonRequest.setPs(10);

     Observable.create(StaticUtils.observable)
             .subscribeOn(Schedulers.newThread())
             .observeOn(AndroidSchedulers.mainThread())
             .subscribe(
                     baseSearchResponse -> {
                         if (baseSearchResponse != null && baseSearchResponse.getData() != null) {
                             setValue((List<ImageItem>) baseSearchResponse.getData());
                         }
                     },
                     StaticUtils.consumer);
 }
效果:
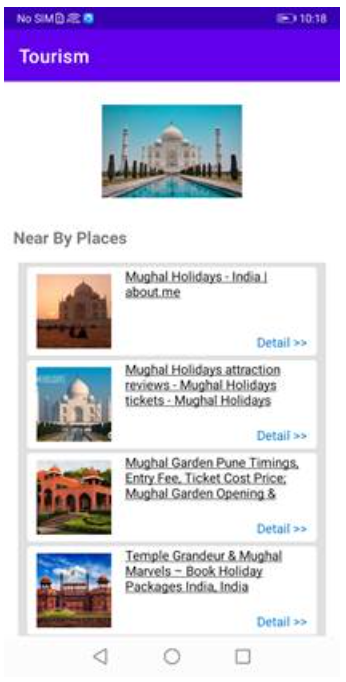
上图展示了Mughal Holidays附近的地点。
13 集成全景服务
Duration: 1:00
通过集成全景服务SDK,您可以在Android手机上快速将球形展开的全景图片或柱状全景图片在模拟的三维空间中以可交互的方式展示,给用户带来沉浸感与真实感。
-
添加依赖。
添加全景服务的依赖。
dependencies {
    implementation "com.huawei.hms:panorama:<latest_version_code>"
 }
说明:本示例中使用的全景服务SDK版本为6.0.0.302。
您在开发时,请使用最新版本。点击此处获取最新版本。
添加下述代码获取3D和全方位视角。
Bitmap bmp = BitmapFactory.decodeByteArray(byteArray, 0, byteArray.length);
Panorama.getInstance().loadImageInfoWithPermission(
                 this, getImageUri(this, bmp), PanoramaInterface.IMAGE_TYPE_SPHERICAL)
         .setResultCallback(new ResultCallbackImpl());


private class ResultCallbackImpl implements ResultCallback<PanoramaInterface.ImageInfoResult> {
     @Override
     public void onResult(PanoramaInterface.ImageInfoResult panoramaResult) {
         if (panoramaResult == null) {
             logAndToast("panoramaResult is null");
             return;
         }

         if (panoramaResult.getStatus().isSuccess()) {
             Intent intent = panoramaResult.getImageDisplayIntent();
             if (intent != null) {
                 startActivity(intent);
             } else {
                 logAndToast("unknown error, view intent is null");
             }
         } else {
             logAndToast("error status : " + panoramaResult.getStatus());
         }
     }
 }
效果:

如图所示,应用展示了全景视角。
14 恭喜您
祝贺您,您已成功构建本示例应用并学会了:
-
如何在AppGallery Connect上配置应用信息。
在Android Studio中为您的应用集成多个HMS Core服务。
16 参考
参考如下文档获取更多信息:
-
认证服务
-
账号服务
-
地图服务
-
定位服务
-
位置服务
-
搜索服务
-
机器学习服务
-
全景服务
点击此处下载源码。
声明:本codelab实现多个HMS Core服务在单个项目中的集成,供您参考。您需要验证确保相关开源代码的安全合法合规。
欲了解更多更全技术文章,欢迎访问https://developer.huawei.com/consumer/cn/forum/?ha_source=zzh
![[Python]字符串常用操作与方法](https://img-blog.csdnimg.cn/b866807aef9941c9a2255576c7151368.png)
